D-Link交换机管理设置快速配置手册(运营商行业)
D-Link用户手册
3.10.1 VPN 基本设置 .............................................- 64 3.10.2 VPN 服务端的建立 .........................................- 64 3.10.3 路由器客户端的设置 .......................................- 66 3.10.4 PC 客户端的设置 ..........................................- 67 3.10.5 VPN 状态 .................................................- 70 3.10.6 VPN 证书 .................................................- 70 3.10.7 VPN 日志 .................................................- 71 第四章 快捷菜单设置 .....................................................- 73 4.1 配置管理 ........................................................- 73 4.2 用户管理 ........................................................- 73 4.3 系统维护 ........................................................- 74 -
Dlink配置信息
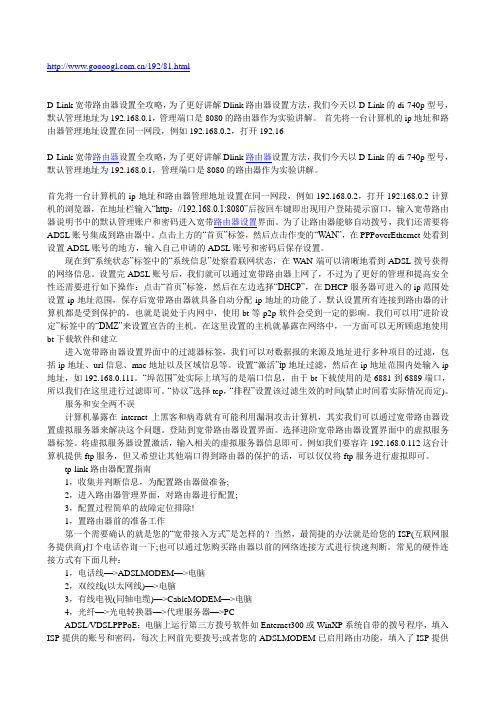
/192/81.htmlD-Link宽带路由器设置全攻略,为了更好讲解Dlink路由器设置方法,我们今天以D-Link的di-740p型号,默认管理地址为192.168.0.1,管理端口是8080的路由器作为实验讲解。
首先将一台计算机的ip地址和路由器管理地址设置在同一网段,例如192.168.0.2,打开192.16-D-Link宽带路由器设置全攻略,为了更好讲解Dlink路由器设置方法,我们今天以D-Link的di-740p型号,默认管理地址为192.168.0.1,管理端口是8080的路由器作为实验讲解。
首先将一台计算机的ip地址和路由器管理地址设置在同一网段,例如192.168.0.2,打开192.168.0.2计算机的浏览器,在地址栏输入“http://192.168.0.1:8080”后按回车键即出现用户登陆提示窗口,输入宽带路由器说明书中的默认管理账户和密码进入宽带路由器设置界面。
为了让路由器能够自动拨号,我们还需要将ADSL账号集成到路由器中。
点击上方的“首页”标签,然后点击作变的“W AN”,在PPPoverEthernet处看到设置ADSL账号的地方,输入自己申请的ADSL账号和密码后保存设置。
现在到“系统状态”标签中的“系统信息”处察看联网状态,在W AN端可以清晰地看到ADSL拨号获得的网络信息。
设置完ADSL账号后,我们就可以通过宽带路由器上网了,不过为了更好的管理和提高安全性还需要进行如下操作:点击“首页”标签,然后在左边选择“DHCP”,在DHCP服务器可进入的ip范围处设置ip地址范围,保存后宽带路由器就具备自动分配ip地址的功能了。
默认设置所有连接到路由器的计算机都是受到保护的,也就是说处于内网中,使用bt等p2p软件会受到一定的影响。
我们可以用“进阶设定”标签中的“DMZ”来设置宣告的主机。
在这里设置的主机就暴露在网络中,一方面可以无所顾虑地使用bt下载软件和建立进入宽带路由器设置界面中的过滤器标签,我们可以对数据报的来源及地址进行多种项目的过滤,包括ip地址、url信息、mac地址以及区域信息等。
D-Link路由器配置指南说明书
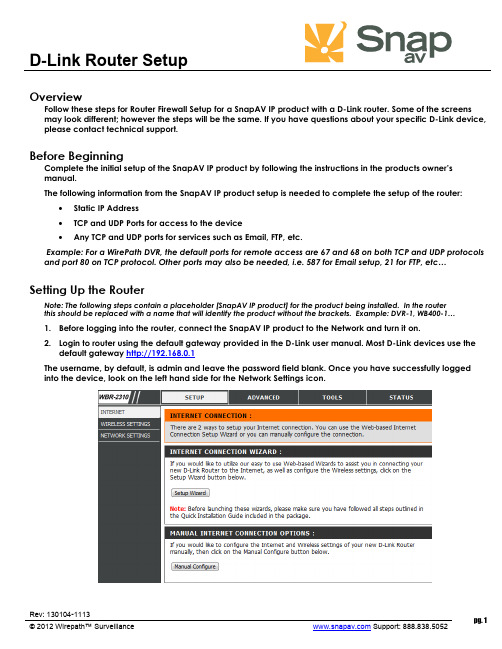
D-Link Router SetupRev: 130104-1113pg. 1© 2012 Wirepath™ Surveillance Support: 888.838.5052 OverviewFollow these steps for Router Firewall Setup for a SnapAV IP product with a D-Link router. Some of the screens may look different; however the steps will be the same. If you have questions about your specific D-Link device, please contact technical support.Before BeginningComplete the initial setup of the SnapAV IP product by following the instructions in the products owner’s manual.The following information from the SnapAV IP product setup is needed to complete the setup of the router:∙Static IP Address ∙TCP and UDP Ports for access to the device ∙ Any TCP and UDP ports for services such as Email, FTP, etc.Example: For a WirePath DVR, the default ports for remote access are 67 and 68 on both TCP and UDP protocols and port 80 on TCP protocol. Other ports may also be needed, i.e. 587 for Email setup, 21 for FTP, etc… Setting Up the RouterNote: The following steps contain a placeholder [SnapAV IP product] for the product being installed. In the router this should be replaced with a name that will identify the product without the brackets. Example: DVR-1, WB400-1…1. Before logging into the router, connect the SnapAV IP product to the Network and turn it on.2. Login to router using the default gateway provided in the D-Link user manual. Most D-Link devices use thedefault gateway http://192.168.0.1The username, by default, is admin and leave the password field blank. Once you have successfully logged into the device, look on the left hand side for the Network Settings icon.D-Link Router Setup3.In the DHCP Server Settings sections at the bottom of the screen check the Enable DHCP server radio button.Below that, in the Add DHCP Reservation section select your SnapAV IP product from the drop down menu next to computer name. Make sure to write down the IP address of the SnapAV IP product for step5.4.Once the SnapAV IP product has been set for DHCP Reservation, look for the Advanced icon at the top ofthe screen. Click the Port Forwarding icon one the left hand side.5.Once you click the Port Forwarding icon you should be in the Port Forwarding rules section. For Name enter[SnapAV IP product] and a descriptor for the port’s function(example: D VR control port) Traffic Type should be TCP,UDP, or TCP/UDP. The starting and ending port will be the same number if a single number range is being configured, or the start and end of the range of numbers if a range is being configured. The IP address is the IP address for the SnapAV IP product that you noted from step 2.6.Repeat step 5 for additional ports. Be sure to click “Apply” or “Save” at the bottom of the Port Forwardingpage before leaving that section of the router setup.7.Save all settings and be sure to reboot both the router and the SnapAV device after you finish to be sure allchanges take effect.Contacting Technical SupportPhone: (866) 838-5052Email: **********************pg. 2D-Link Router Setuppg. 3 © © 2012 Wirepath™ Surveillance Support: 888.838.5052。
D-Link 智能型交换机 说明书

關於本指南本指南提供設定D-Link 智慧型交換器的的說明,請注意您購買的產品可能與下列說明有些許差異。
更多關於您的交換器細節資訊、配件、設定網連接路與技術規格,請參閱產品包裝中的使用手冊。
步驟 1 – 打開包裝小心打開包裝後,請參閱包裝內容物資料,確認所有品項數量正確以及均正常沒有損壞,假如有任何品項遺失或損壞,請聯絡當地的零售商更換。
- D-Link Web 智慧型交換器。
- 機架固定架。
- 電源線。
- 使用手冊光碟片(包含SmartConsole Utility program)。
- 多國語言版設定指南。
步驟2 – 交換器安裝為了讓交換器安裝與運作安全,建議您以下幾件事情:♦檢查電源線的外表,並確認AC電源連接插頭是安全的。
♦請確認交換器周圍為適當的通風散熱環境。
♦不要放重物在交換器上。
桌上型或架上行安裝當安裝交換器在桌上或架子上,產品包裝內的橡膠腳墊請安裝至交換器底部的四個角落,讓交換器與桌面有適當的通風空間。
圖 1. 安裝橡膠腳墊機架安裝交換器可以安裝在EIA標準尺寸的19吋機架,安裝時,請將利用螺絲將機架固定架固定鎖緊在交換器的側面(兩邊均要安裝)。
圖 2. 固定機架固定架然後,使用包裝內所提供的螺絲,將交換器鎖到機架上面。
圖 3. 安裝交換器到標準尺寸的機架步驟3 – 將AC電源線連接至交換器您可以連接AC電源線至交換器後方的的電源插孔(電源插孔最好具備接地或高壓保護機制)圖 4. 將交換器電源插上牆壁插座電源中斷為了預防危險,如果發生電源中斷,請立即拔掉插座,當電源回覆,請將電源插上。
管理設定D-Link Web 智慧型交換器使用Web-based Management Utility,可以經由設備上的任何網路連接埠管理,或可以透過任何電腦使用SmartConsole Utility進行管理。
假如您僅想要管理一部D-Link Web 智慧型交換器,Web-Based Management Utility將會是比較好的選擇,每部交換器會取得自己的IP 位址,可以讓Web-Based Management Utility或SNMP網路管理者或電腦在相同的IP網段進行通訊溝通之用。
D-Link交换机安全性功能配置手册
D-Link交换机设备安全性功能配置手册友讯网络D-Link2012年4月目录1、风暴抑制 (2)1)广播抑制 (2)2)组播抑制 (4)3)未知单播抑制 (5)2、Safe Guide配置 (8)1)配置需求 (8)2)配置过程 (8)3)测试验证 (9)3、MAC地址绑定配置 (10)1)配置需求 (10)2)配置思路 (10)3)验证测试 (11)4、IP+MAC+PORT绑定 (12)1)组网需求 (12)2)组网图 (12)3)配置步骤 (12)5、DHCP_Snooping (17)1)功能介绍 (17)2)功能作用 (17)3)配置范例 (18)6、端口隔离配置 (21)1)配置要求 (21)2)配置实例 (21)1、风暴抑制风暴抑制是防止交换机的端口被局域网中的广播、组播或者一个物理端口上的单播风暴所破坏。
当流量在局域网中泛洪,建立的过多的流量将占用过多的带宽,并导致网络拥塞。
风暴抑制用于对进入的流量进行控制,从上面我们可以看出控制的对象可以是单播、广播和组播流量。
我们通过事先定义一个门限值(threshold),当某种流量超出了门限值,将对该流量进行控制,使其降到门限值一下,一旦流量超出门限值,所有的进入交换机的流量(无论是单播、组播还是广播)都会被丢弃!风暴抑制在交换机上默认是关闭。
D-link的交换机具有抑制广播、组播、单播三种风暴的能力,下面以DGS-3120-24TC为例,介绍如何对风暴抑制进行设置。
1)广播抑制1、进入交换机的配置界面。
2、输入以下命令:config traffic control 1:1-1:10 broadcast enable:在交换机第一个端口至第十个端口开启广播抑制。
threshold 128000 action shutdown :当交换机作用端口接收到超过每秒128000个数据包时,关闭该端口。
每秒通过的数据包数值可以自行设置,范围在0—255000之间。
D-Link交换机通用配置手册
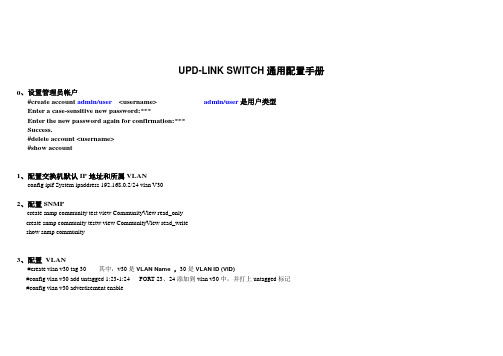
UPD-LINK SWITCH通用配置手册0、设置管理员帐户#create account admin/user<username> admin/user是用户类型Enter a case-sensitive new password:***Enter the new password again for confirmation:***Success.#delete account <username>#show account1、配置交换机默认IP地址和所属VLANconfig ipif System ipaddress 192.168.0.2/24 vlan V302、配置SNMPcreate snmp community test view CommunityView read_onlycreate snmp community testw view CommunityView read_writeshow snmp community3、配置VLAN#create vlan v30 tag 30 其中,v30是VLAN Name ,30是VLAN ID (VID)#config vlan v30 add untagged 1:23-1:24 PORT 23、24添加到vlan v30中,并打上untagged标记#config vlan v30 advertisement enable4、端口配置语法:config ports [<portlist | all> [speed [auto | 10_half | 10_full | 100_half | 100_full | 1000_full {[master | slave]} ] | flow_control [enable | disable] | learning [enable | disable] state [enable | disable] description <desc 32> | clear]例:#config ports 23-24 speed 100_half learning enable state enable flow_control enable5、配置链路聚合组语法:#create link_aggregation group_id <value 1-32> {type [lacp | static]}#config link_aggregation group_id <value 1-32> {master_port <port> | ports <portlist> | state [enable |disable]例:#config link_aggregation group_id 1 master_port 1:5 ports 1:5-1:7, 1:96、端口镜像enable mirrorconfig mirror port <port> [add/delete] source ports <portlist> [rx/tx/both]<port>监控端口;source ports 被监控端口7、软件升级download firmware 10.90.90.92 升级firmwareupload configuration 172.18.192.90 <filename> 上传配置到TFTP服务器download configuration 172.18.192.90 <filename> 从TFTP服务器下载配置8、Ip Interface的配置语法:creat ipif <ipif name > <network address > <vlan name > state enable例:creat ipif test 192.168.1.1/24 vlan100 state enableconfig ipif System ipaddress 10.48.74.122/8 vlan v309、MAC绑定到交换机端口(手动添加MAC,这些MAC的终端可以使用此端口)Used to create a static entry to the unicast MAC address forwarding table (database)1、语法:create fdb <vlan_name 32> <macaddr> [port <port>] 建立静态fdb条目例:create fdb default 00-00-00-00-01-02 port 2:52、语法:config ports learning disable 关掉端口学习功能10、MAC锁定到交换机端口(设定使用端口的终端-MAC的数量,并锁定当前连接的终端-MAC为许可用户)语法:config port_security ports [<portlist>| all ] {admin_state [enable | disable] | max_learning_addr <max_lock_no 0-64> | lock_address_mode [Permanent | DeleteOnTimeout | DeleteOnReset]}例:config port_security ports 1:16 admin_state enable max_learning_addr 10 lock_address_mode DeleteOnReset11、traffic_segmentation(同一VLAN内端口隔离功能)语法:config traffic_segmentation [<portlist>| all] forward_list [null | all | <portlist>]例:config traffic_segmentation 1:1 forward_list 1:1-1:10 (Port1可以和Port1-10通讯,和Port 11-24隔离)12、带宽控制语法:config bandwidth_control [<portlist> | all] {rx_rate [no_limit | <value 1-999>] | tx_rate [no_limit | <value 1-999>]} 单位为Mbps13、创建IP interface语法:create ipif <ipif_name 12> ipaddress <network_address> vlan <vlan_name 32> state [enable | disable]例:create ipif p1 ipaddress 10.1.1.1 Trinity state enable14、设置静态路由语法:create iproute <network_address> <ipaddr> {<metric 1-65535>} {[primary | backup]}<network_address> . IP address and netmask of the IP interface that is the destination of the route.<ipaddr> . The gateway IP address for the next hop router.语法:create iproute default <ipaddr> {<metric 1-65535>}15、ACL访问控制列表1、创建access_profileDXS-3350SR:4#create access_profile ip destination_ip_mask 255.255.255.255 profile_id 12、建立access条目DXS-3350SR:4#config access_profile profile_id 1 add access_id 1 ip destination_ip 172.18.192.246 port 1:16 deny16、IP-MAC BindingThe IP-MAC Binding commands in the Command Line Interface (CLI) are listed (along with the appropriate parameters) in the following table.Commandcreate address_binding ip_mac ipaddress <ipaddr> mac_address <macaddr>config address_binding ip_mac ipaddress <ipaddr> mac_address <macaddr>config address_binding ip_mac ports [<portlist> | all] state [enable | disable]showeg:enable address_binding acl_mode Enable IP-MAC Port Binding ACL Modecreate address_binding ip_mac ipaddress 192.168.0.10 mac_address 00-15-F2-A9-0B-C2 ports 1 mode acl ⎝ To set up a IP-MAC Port Binding Rule config address_binding ip_mac ports 1-10 state enable ⎝ Enable active portshow address_binding ip_macshow address_binding ports17、策略路由create access_profile profile_id 1 ip source_ip_mask 255.255.255.0config access_profile profile_id 1 add access_id 1 ip source_ip 4.4.4.4 port 1create policy_route name 1config policy_route name 1 acl profile_id 1 access_id 1 nexthop 2.2.2.2 state enable18、DHCP Servercreate dhcp pool testconfig dhcp pool network_addr test 192.168.0.0/24config dhcp pool dns_server_address test 61.139.2.69 0.0.0.0 0.0.0.0config dhcp pool netbios_node_type test broadcastconfig dhcp pool default_router test 192.168.0.1 0.0.0.0 0.0.0.0config dhcp pool lease test 1 1 1config dhcp ping_packets 5config dhcp ping_timeout 500enable dhcp_server19、修改交换机名称config command_prompt <name>20、线缆检测diag_cable ports <portlist>21、三层组播协议enable igmp_snoopingconfig igmp_snooping all state enableconfig igmp all state enableenable DVMRPconfig DVMRP all state enable22、开启DHCP Server Screening功能config filter dhcp_server add permit server_ip 10.10.10.1 client_mac 00-90-27-e0-67-27 port 1:1-1:24 config filter dhcp_server ports <端口> state enable23、开启DHCP中继功能enable dhcp_relayconfig dhcp_relay add ipif <三层接口名称> <DHCP服务器的IP>24、保存配置文件upload cfg_toTFTP <TFTP IP地址> dest_file c:\cfg\DGS-3420.cf。
D-link des-3828三层交换机入门设置
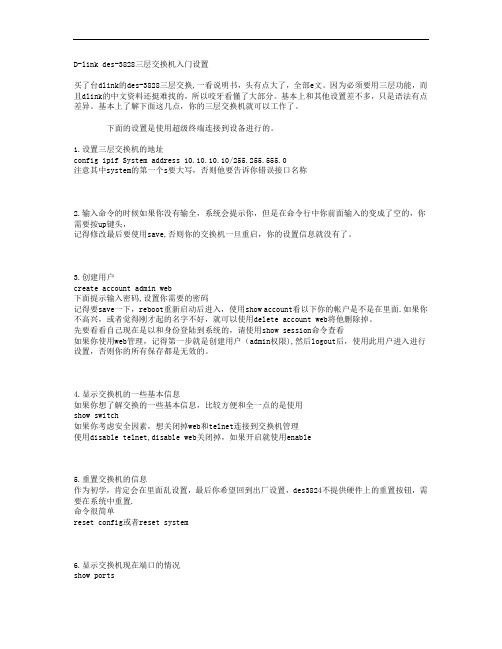
D-link des-3828三层交换机入门设置买了台dlink的des-3828三层交换,一看说明书,头有点大了,全部e文。
因为必须要用三层功能,而且dlink的中文资料还挺难找的,所以咬牙看懂了大部分。
基本上和其他设置差不多,只是语法有点差异。
基本上了解下面这几点,你的三层交换机就可以工作了。
下面的设置是使用超级终端连接到设备进行的。
1.设置三层交换机的地址config ipif System address 10.10.10.10/255.255.555.0注意其中system的第一个s要大写,否则他要告诉你错误接口名称2.输入命令的时候如果你没有输全,系统会提示你,但是在命令行中你前面输入的变成了空的,你需要按up键头,记得修改最后要使用save,否则你的交换机一旦重启,你的设置信息就没有了。
3.创建用户create account admin web下面提示输入密码,设置你需要的密码记得要save一下,reboot重新启动后进入,使用show account看以下你的帐户是不是在里面.如果你不高兴,或者觉得刚才起的名字不好,就可以使用delete account web将他删除掉。
先要看看自己现在是以和身份登陆到系统的,请使用show session命令查看如果你使用web管理,记得第一步就是创建用户(admin权限),然后logout后,使用此用户进入进行设置,否则你的所有保存都是无效的。
4.显示交换机的一些基本信息如果你想了解交换的一些基本信息,比较方便和全一点的是使用show switch如果你考虑安全因素,想关闭掉web和telnet连接到交换机管理使用disable telnet,disable web关闭掉,如果开启就使用enable5.重置交换机的信息作为初学,肯定会在里面乱设置,最后你希望回到出厂设置,des3824不提供硬件上的重置按钮,需要在系统中重置.命令很简单reset config或者reset system6.显示交换机现在端口的情况show ports下面进行到交换机二层及三层属性设置7.创建vlan在这前,你需要对你的网络结构有清晰的思路,比如我的两个网段,192.168.0.*,192.168.2.*,mask 都是255.255.255.0所以先使用以下命令创建vlancreate vlan vlan1 tag 11create vlan vlan2 tag 12注意tag 1已经被系统默认的default vlan用掉了,所以你不能再使用它了。
D-Link交换机管理设置快速配置手册(运营商行业)
D-Link 交换机设备管理设置快速配置手册友讯网络D-Link2012年10月目录1、Console管理模式 (2)2、Telnet模式 (5)3、WEB界面管理 (8)D-Link交换机支持3种管理配置方法,分别是Console管理(命令行CLI方式)、Telnet配置(命令行CLI方式)和WEB界面(菜单图形方式)配置。
1、Console管理模式使用交换机配置线连接交换机Console口和调试PC串口,使用Windows操作系统自带的【超级终端】仿真软件对交换机进行配置管理。
首先在“开始”——“程序”——“附件”——“通讯”中打开“超级终端”。
新建连接,输入名称,选择正确的连接端口。
设置端口属性,首先点击“还原默认值”,然后选择“每秒位数(B)”为“9600”:点击“确定”后即可打开交换机Console口配置模式,初始用户名/密码为空,按回车即可。
2、Telnet模式在远程调试交换机设备时,无法使用Console口进行连接,此时可以使用Telnet方式,通过网络远程管理设备。
首先确定交换机的IP 地址,初始默认值为空,无IP,可以通过Console来配置,包括交换机设备当前IP地址、Telnet是否开启等信息。
配置交换机IP打开“命令提示符”界面首先通过ping命令测试管理PC与交换机网络是否连通。
确定网络连通后,使用Telnet命令进行远程调试。
例如!配置只允许192.168.0.0/255.255.0.0这个网段的地址通过telnet访问交换机Dlink(config)#login-access-list telnet 192.168.0.1 0.0.255.2553、WEB界面管理部分用户对命令行CLI方式配置交换机方式比较陌生,可以使用WEB界面来配置交换机。
首先确认交换机IP地址和网络连通性,并确定WEB管理是否开启(具体参照Telnet管理部分)。
如果WEB管理未开启,可通过Console或者Telnet方式下执行enable web命令开启。
- 1、下载文档前请自行甄别文档内容的完整性,平台不提供额外的编辑、内容补充、找答案等附加服务。
- 2、"仅部分预览"的文档,不可在线预览部分如存在完整性等问题,可反馈申请退款(可完整预览的文档不适用该条件!)。
- 3、如文档侵犯您的权益,请联系客服反馈,我们会尽快为您处理(人工客服工作时间:9:00-18:30)。
D-Link 交换机设备管理设置快速配置手册
友讯网络
D-Link
2012年10月
目录
1、Console管理模式 (2)
2、Telnet模式 (5)
3、WEB界面管理 (8)
D-Link交换机支持3种管理配置方法,分别是Console管理(命令行CLI方式)、Telnet配置(命令行CLI方式)和WEB界面(菜单图形方式)配置。
1、Console管理模式
使用交换机配置线连接交换机Console口和调试PC串口,使用Windows操作系统自带的【超级终端】仿真软件对交换机进行配置管理。
首先在“开始”——“程序”——“附件”——“通讯”中打开“超级终端”。
新建连接,输入名称,选择正确的连接端口。
设置端口属性,首先点击“还原默认值”,然后选择“每秒位数(B)”为“9600”:
点击“确定”后即可打开交换机Console口配置模式,初始用户名/密码为空,按回车即可。
2、Telnet模式
在远程调试交换机设备时,无法使用Console口进行连接,此时可以使用Telnet方式,通过网络远程管理设备。
首先确定交换机的IP地址,初始默认值为空,无IP,可以通过Console来配置,包括交换机设备当前IP地址、Telnet是否开启等信息。
配置交换机IP
打开“命令提示符”界面
首先通过ping命令测试管理PC与交换机网络是否连通。
确定网络连通后,使用Telnet命令进行远程调试。
例如
!配置只允许192.168.0.0/255.255.0.0这个网段的地址通过telnet访问交换机Dlink(config)#login-access-list telnet 192.168.0.1 0.0.255.255
3、WEB界面管理
部分用户对命令行CLI方式配置交换机方式比较陌生,可以使用WEB界面来配置交换机。
首先确认交换机IP地址和网络连通性,并确定WEB管理是否开启(具体参照Telnet管理部分)。
如果WEB管理未开启,可通过Console或者Telnet方式下执行enable web命令开启。
开启WEB管理命令截图
然后在浏览器中,输入交换机地址,以下截图交换机IP默认为:http://10.90.90.90。
输入用户名和密码,初始默认为admin,点击“确定”按钮。
即可打开交换机web管理界面。