Aspen7.2安装
Aspen7.2安装指南
Aspen7.2是一款优秀的化工模拟软件,可优秀归优秀,装不起那可急死人。
大家在安装时也难免会遇到一些问题。
所以在这里就分享一下我的安装经验,希望能给大家对Aspen的学习提供帮助。
Aspen7.2的种子在网盘里,与群共享中都有,注意下载。
首先呢,大家可以看到这就是安装所需的所有装备然后我们就要一步步进行安装,才能保证Aspen7.2能够正常运行1.安装SQL 2005 express(SQL2005 SP3的安装向导),安装方法很简单,基本上是一直按“下一步”。
2.安装SQL2005 SP3(结构化查询语言…干什么的我也不是很清楚,),请记住不管是32位与64位的系统都装X86的SQL2005,别问我为什么,这都是一遍遍的重装试出来的。
3.安装dotnetfx35(.net framework 3.5,软件的运行框架),基本上只有XP的机子才需要装,Win7集成了.net framework 2.0所以就不用装了。
安装也基本上是点“下一步”就好了,很简单的。
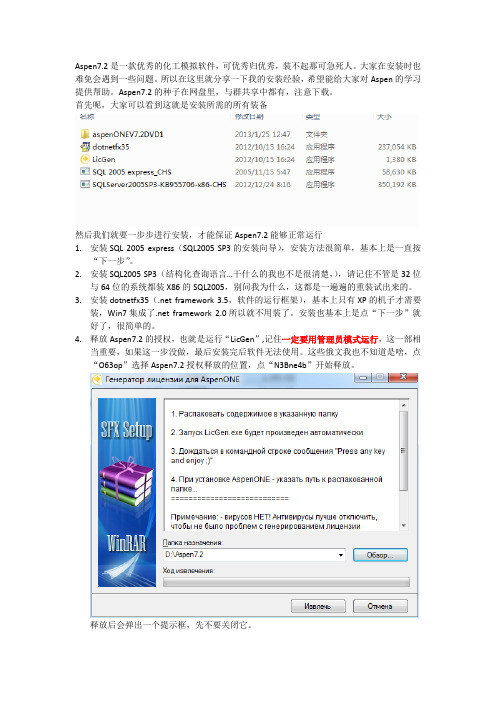
4.释放Aspen7.2的授权,也就是运行“LicGen”,记住一定要用管理员模式运行,这一部相当重要,如果这一步没做,最后安装完后软件无法使用。
这些俄文我也不知道是啥,点“O63op”选择Aspen7.2授权释放的位置,点“N3Bne4b”开始释放。
释放后会弹出一个提示框,先不要关闭它。
等提示框中呈如下显示后,便可关闭。
释放的就是这几个文件,将“LSERVRC_004_28CF2.lic”复制后放在C:/的根目录下。
5.打开AspenONEV7.2DVD1文件夹,启动虚拟光碟“dvdBrowser”,选择“product”6.载入产品授权,记得是复制在C盘中的那个文件哦。
一直选择下一步,插件授权载入数量是710个。
7.正式开始安装Aspen Plus,在接下来弹出的界面下选择“Aspen Engineering”,然后点击“install”8.选择Standard Install9.选择Aspen plus的安装位置10.选择需要安装的三个插件11.选择登陆用户12.开始安装安装时间可能有二十分钟左右,这个时候大家可以关注一下化工设计沙龙的人人小站,小站地址是“/huagongsheji”,别忘了加关注哦。
HYSYS7.3安装方法

ASPEN 的安装方法简介第一步先安装AspenONE v7.3\a73\3rd Party Redistributables\Microsoft NET Framework 4.0的NET4文件,这个没得特别要求,一点到底。
第二步AspenONE v7.3\a73\3rd Party Redistributables\Microsoft SQL Express 2005 SP3下的SQL2005文件。
有以下注意事项:确保以下几个重要页面正确;其他的也没要选择,也没有特别要求的地方,这儿就不一一展示了。
以下页面就利用“三角形”的下拉按钮选第二个。
下两页的模式一定要选对!需要的密码是自己随意输入的,没得要求。
下一页的两个选项就全选就行了。
这样,恭喜你,SQL就安装成功了!这儿可以用360先体检一下(应该会发现许多系统缺陷),然后修复一下,再进行下一步安装。
第三步,对AspenONE v7.3\crack-doc的1-LicGen.exe文件安装。
(也没有难度,就选择默认路径,一点到底会出现下面所示的页面;等待一段时间后,出现press any key时,敲击任何键就可以了。
)会在C盘一个叫ASPEN 文件中生成一个后缀为.lic的文件,这个文件以后有用。
第四步,对AspenONE v7.3\a73下的setup.exe文件进行安装,注意以下几个页面的选择与安装。
这儿要把刚刚在第三步生成的后缀为.lic的文件路径(在C盘的ASPEN文件里面),利用add license控件(可能会先remove掉)进行添加。
选择以下页面的黑色部分的控件。
这儿点击以下页面的第一个,就可以进入下一步同样利用三角形控件选择你需要安装的程序(出现下拉后,一定要选择出现的第二个),HYSYS与MUSE这两个控件一定要安装(做作业有用),结果如下图所示。
最后特别注意下面这个页面,直接选择下面的skip就行了,不要输密码。
这样,第四步就完了。
[化工流程模拟系统].Installing_ASPEN_v7.2
![[化工流程模拟系统].Installing_ASPEN_v7.2](https://img.taocdn.com/s3/m/49330d0e4a7302768e9939c2.png)
Document Written by filespotFollow these steps:Step 1: Un-Installing Old ASPEN Versions1. Uninstall the previously installed Aspen.2. Delete folders Aspentech, Common files>shared files>Aspentech folders, Hyprotech folders.3. Restart, the PCStep 2: Set User Account Control Settings (not required for installing ASPENv7.2 on windowsXP)1. Go To Control Panel>User Accounts>Change User Account Control Settings2. Pull down the Slider to Never Notify3. If it prompts to Restart PC, then RestartStep 3: Installing Dotnet Framework 1.1 (not required for installing ASPENv7.2 on windowsXP)1. Refer the document given in the following link/dl/102937207/6c98a7b/Installing_Dotnet_Framework_1.1.pdf.htmlStep 4: Activating Administrator Account2. Click start button in start menu, then write cmd in start search.3. Now type this command (in red ) as such net user administrator /active:yes4. You will get a message that the command completed successfully.5. Go To Control Panel>User Accounts>. Set a password for Administrator account. Step 5: Installing SQL-SERVER-20051. Download from the following link (32bit)/dl/102937200/5a2fbd6/SQLEXPR_ADV.EXE.html 2. Click SQLEXPR_ADV.EXE and then click INSTALLDocument Written by filespot3. Click NEXT4. Click NEXT5. Click NEXT6.Give any Arbitrary details & then click NEXT7.Select all Features and Sub-Features & then click NEXT8.Default option is Windows Authentication ModeDocument Written by filespotDocument Written by filespot9. Select Mixed Mode10. Select both the Check Boxes11. Click NEXT12.Click INSTALL13.Click NEXT14.Click FINISHDocument Written by filespotStep 6:Generating a License File1.Download License Generator.zip from following link/dl/101255761/ae60a9a/License20Generator.zip.html2.Extract this folder somewhere on to your PC3.Open the folder and run the following file "ASPEN_LicGen.exe"4.Sit back and wait for the License Generator to generate License file (.lic).Step 7:Installing Virtual Drive Software1.Install any Virtual Drive Software (Alcohol 120%/Daemon Tools/Virtual Clone Drive)2.Virtual Clone Drive(link): /en/download.htmlStep 8:Installing AspenV7.21.Mount aspenONEV7.2DVD1.ISO file on any one Virtual Drive installed in above step.2.Wait for the AutoPlay and then Click "Run Setup.exe"3.Click on ProductsTab4.Click OKDocument Written by filespot5.Click NEXT6.Select Standalone License File7.Click Add LicenseDocument Written by filespot8.Point to License file created in STEP 69.Select License file and click OPEN10.Click NEXTDocument Written by filespotto Determine Available Licenses11.Wait for ASPEN13.Now click on Aspen Engineering option under DVD 1 – Aspen Enginnering and then clickINSTALLDocument Written by filespot14.Click NEXT15.Select YES & Click NEXT16.Select STANDARD INSTALDocument Written by filespotL17.Click NEXT18.Select Aspen Plus19.Select Sub-features of Aspen PlusDocument Written by filespot20.Select Sub-features of Hysys and click NEXT21.Click NEXT22.Click NEXTDocument Written by filespotername: AdministratorPassword: which u have created in Step4, No.5Domain: Your Computer (for this Right click on my computer, go to properties, Ur PC name will be displayed)Fill this data & Click NEXT24.Click INSTALLDocument Written by filespotDocument Written by filespot25.Sit-Back and see couple of windows disappear26. Click FINISHDocument Written by filespot27. Finally click YES to RESTARTStep 9: Checking status of Installation1. Select Aspen Plus User Interface from Start Menu2. Click Academic User/Register Later3. Sit-Back and see ASPEN Plus v 7.2 Connection Local PC(Server)Document Written by filespot4. Select Blank Simulationoption5.See Aspen ASPEN Plus v 7.2 Working6. Select Aspen HYSYS User Interface from Start Menu7.Click Academic User/Register LaterSit-Back and see ASPEN HYSYS v 7.2 Connection Local PC(Server)8.Document Written by filespotReady to work……..ASPEN v7.2 is successfully installed. :-)Document Written by filespot。
aspen7.1安装教程
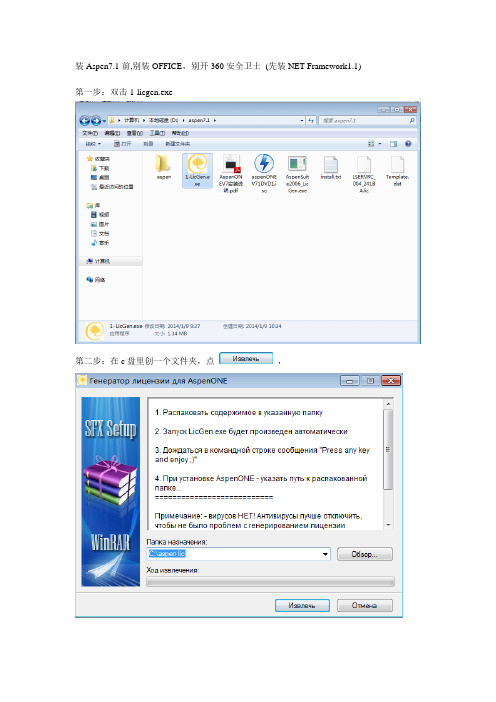
装Aspen7.1前,别装OFFICE,别开360安全卫士(先装NET Framework1.1) 第一步:双击1-licgen.exe
第二步:在c盘里创一个文件夹,点,
第三步:等待几分钟第四步:双击
第五步:双击
第六步:点products
第七步:点确定
第八步:点下一步
第九步:选Both,点下一步
第十步:点Add License,选则刚刚在c盘里的创建的文件,点下一步
十一步:直接点下一步
十二步:出现下面界面,等待一会
十三步:点Next
十四步:选Aspen Engineering,点Install
十五步:点Next
十六步:选Yes,点Next
十七步:选Standard Install
十八步:可以更改目录,点Next
十九步:选Process Modeling(Aspen Plus)里面的第一个的This feature will be install on local hard drive,然后点Next
二十步:也可以更改目录(不要和上面的安装目录一样),点Next
二十一步:点Next
二十二步:选这个,点Next
二十三步:点Install,等几分钟
二十四步:点Finish,然后点Yes
二十五步:出现“SQL2005 incompatible”的提示时,点确定,会退回到二十三步,不用管,继续点install安装,
不用选,直接点下一步
二十七步:直接点下一步
二十九步:继续点下一步
三十步:点下一步
三十一步:点完成
三十二步:打开aspen选Tempate
要是出现错误
点确定之后再文件名那随便输个名称,点保存就好了。
ASPEN V7安装教程
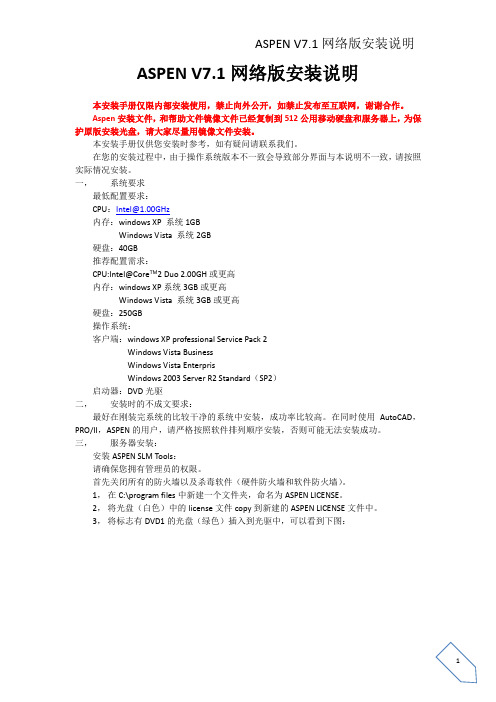
ASPEN V7.1网络版安装说明本安装手册仅限内部安装使用,禁止向外公开,如禁止发布至互联网,谢谢合作。
Aspen安装文件,和帮助文件镜像文件已经复制到512公用移动硬盘和服务器上,为保护原版安装光盘,请大家尽量用镜像文件安装。
本安装手册仅供您安装时参考,如有疑问请联系我们。
在您的安装过程中,由于操作系统版本不一致会导致部分界面与本说明不一致,请按照实际情况安装。
一,系统要求最低配置要求:CPU:Intel@1.00GHz内存:windows XP 系统1GBWindows Vista 系统2GB硬盘:40GB推荐配置需求:CPU:Intel@Core TM2 Duo 2.00GH或更高内存:windows XP系统3GB或更高Windows Vista 系统3GB或更高硬盘:250GB操作系统:客户端:windows XP professional Service Pack 2Windows Vista BusinessWindows Vista EnterprisWindows 2003 Server R2 Standard(SP2)启动器:DVD光驱二,安装时的不成文要求:最好在刚装完系统的比较干净的系统中安装,成功率比较高。
在同时使用AutoCAD,PRO/II,ASPEN的用户,请严格按照软件排列顺序安装,否则可能无法安装成功。
三,服务器安装:安装ASPEN SLM Tools:请确保您拥有管理员的权限。
首先关闭所有的防火墙以及杀毒软件(硬件防火墙和软件防火墙)。
1,在C:\program files中新建一个文件夹,命名为ASPEN LICENSE。
2,将光盘(白色)中的license文件copy到新建的ASPEN LICENSE文件中。
3,将标志有DVD1的光盘(绿色)插入到光驱中,可以看到下图:Aspen SLM Tools 软件的安装:在Aspen one 2006.5版本的软件中,包含有两个版本的SLM Tools程序,如果使用的操作系统为Windows Vista,则需要安装Aspen SLM Tools 8.2;如果使用的操作体统为WindowsVista以外的其他Windows操作系统,则需要选择Aspen SLM Tools7.3单击install,出现如下图所示界面:单击Next,如下图:选择Yes,……;单击Next,如下图:单击Standard Install,如下图:选择Browser,单击Next,如下图:选择安装Aspen SLM,单击Next,如下图:单击Install,如下图:Just Waiting for it,几分钟之后如下图:接着等,如下图:单击Finsh。
Management Station 软件版本 7.2 安装指南说明书
Management Station Software Version 7.2 Installation GuideNotes, Cautions, and WarningsNOTE: A NOTE indicates important information that helps you make better use of your computer.CAUTION: A CAUTION indicates either potential damage to hardware or loss of data and tells you how to avoid the problem.WARNING: A WARNING indicates a potential for property damage, personal injury, or death.Copyright© 2012 Dell Inc. All Rights Reserved.Trademarks used in this text: Dell™, the Dell logo, Dell Boomi™, Dell Precision™ , OptiPlex™ Latitude™, PowerEdge™, PowerVault™, PowerConnect™, OpenManage™, EqualLogic™, Compellent™, KACE™, FlexAddress™, Force10™ and Vostro™ are trademarks of Dell Inc. Intel®, Pentium®, Xeon®, Core® and Celeron® are registered trademarks of Intel Corporation in the U.S. and other countries. AMD®is a registered trademark and AMD Opteron™, AMD Phenom™ and AMD Sempron™ are trademarks of Advanced Micro Devices, Inc. Microsoft®, Windows®, Windows Server®, MS-DOS®, Windows Vista®, and Active Directory® are either trademarks or registered trademarks of Microsoft Corporation in the United States and/or other countries. Red Hat Enterprise Linux® and Enterprise Linux® are registered trademarks of Red Hat, Inc. in the United States and/or other countries. Novell® is a registered trademark and SUSE™ is a trademark of Novell Inc. in the United States and other countries. Oracle® is a registered trademark of Oracle Corporation and/or its affiliates. Citrix®, Xen®, XenServer® and XenMotion® are either registered trademarks or trademarks of Citrix Systems, Inc. in the United States and/or other countries. VMware®, Virtual SMP®, vMotion®, vCenter® and vSphere® are registered trademarks or trademarks of VMware, Inc. in the United States or other countries. IBM® is a registered trademark of International Business Machines Corporation.2012 - 12Rev. A00ContentsNotes, Cautions, and Warnings (2)1 About (5)Systems Management Software DVDs (5)Managed System And Management Station (5)Systems Management Tools And Documentation DVD (5)Managed System Software (5)Management Station Software (6)2 Installing Management Station Software On Windows (9)Installing Management Station Software On Microsoft Windows Server 2008 Core And Hyper-V Server (9)Installing Management Station Software In CLI Mode (9)Uninstalling Management Station Software In CLI Mode (10)3 Installing Management Station Software On Supported Red Hat Enterprise Linux, SUSE Linux Enterprise Server, And VMware ESX Server (11)41 AboutThe Management Station Software Installation Guide provides an overview of the management station software and installation instructions for the same. For information on installing Server Administrator, see the Server Administrator Installation Guide on the Systems Management Tools and Documentation DVD.Systems Management Software DVDsThe systems management software comprises three DVDs, and they are:•Systems Management Tools and Documentation DVD•Server Updates DVD•Management Console DVDFor information on the systems that support systems management software, the operating systems supported by these systems, and the components that you can install on these systems, see the Systems Software Support Matrix. Managed System And Management StationDepending on the way you use the systems management tools, you can classify the systems as:•Managed SystemA managed system is any system that is monitored and managed using Server Administrator (one of the systemsmanagement tools on the Systems Management Tools and Documentation DVD) or Management Console. You can manage systems running Server Administrator locally or remotely through a supported web browser. For more information on Server Administrator, see the Server Administrator User's Guide on the SystemsManagement Tools and Documentation DVD.•Management StationA management station is a laptop, desktop, or server that you use to remotely manage one or more managedsystems from a central location using tools such as Intelligent Platform Management Interface (IPMI) Utilities, Remote Access Controller (RAC) tools, Dell OpenManage Essentials or Server Administrator Web Server. Systems Management Tools And Documentation DVDThe Systems Management Tools and Documentation DVD contains the systems management software. The systems management software helps you to manage the systems by monitoring the system components, diagnosing issues, notifying through alerts, and troubleshooting remotely. Systems management software is classified into managed system software and management station software.Managed System SoftwareThe following applications comprise the managed system software:•Server Administrator5Server Administrator provides easy-to-use management and administration of local and remote systems througha comprehensive set of integrated management services. Server Administrator is the sole installation on themanaged system and is accessible both locally and remotely.•Local Remote Access ControllerLocal Remote Access Controller enables the system to receive e-mail alerts for warnings or errors related tovoltage, temperature, and fan speed. Remote Access Controller also logs event data and the most recent crash screen (available only on systems running Microsoft Windows operating system) to help you diagnose theprobable cause of a system crash.Management Station SoftwareThe following applications comprise the management station software that you can install using the Systems Management Tools and Documentation DVD:•Active Directory Snap-InThe Active Directory (AD) Snap-In utility provides an extension snap-in to the Microsoft Active Directory tomanage AD objects specific to products on this DVD.NOTE: Both 32–bit and 64–bit installers are available. When Active Directory Snap-In is invoked fromautorun, it launches the installer corresponding to the operating system architecture.•BMC/IPMI UtilitiesBMC Management Utility (BMU) is a utility that provides remote management and configuration of systemsequipped with a Baseboard Management Controller (BMC) or iDRAC using the IPMI protocol. For moreinformation on BMU, see the Baseboard Management Controller Utilities User's GuideNOTE: Only 32–bit installer is available.•RAC ToolsThe RAC console is a management station software designed to provide remote management capabilities for the systems. You can remotely connect to the RAC hardware and access the RAC features either by using a web browser or the RACADM Command Line Interface (CLI). RACADM CLI is the command line user interface to the RAC.You can install RAC either on the managed system or on the management station.For information on installing RAC on the managed system, see the Server Administrator Installation Guide. For information on installing on the management station, see Installing Management Station Software on Windows.For more information on RAC, see the Remote Access Controller User's Guide.NOTE: Both 32–bit and 64–bit installers are available. When RAC tools is invoked from autorun, it launchesthe installer corresponding to the operating system architecture.•Systems Build and Update Utility (SBUU)You can use the SBUU to:–Update the system firmware.–Install an operating system.–Update the firmware and BIOS on multiple systems in a pre-operating system environment.–Configure the system hardware.–Customize the Server Update Utility (SUU) and use it to update the system.For information on performing these tasks and details on the SBUU, see the Systems Build and Update UtilityUser's Guide.•IT Assistant6This release of Systems Management is the last version supporting IT Assistant. Starting Systems Management 7.2, the availability of IT Assistant on the SMTD DVD is removed. Contact service provider to download the web version of IT Assistant associated to Systems Management 7.2 release. IT Assistant will not be available in releases following 7.2.We recommend to use Dell OpenManage Essentials as replacement for ITA. Dell OpenManage Essentials provides improved capabilities such as:–Discovering and inventoring the systems.–Monitoring systems’ health.–Viewing and managing system alerts.–Performing system updates.–Viewing hardware inventory and compliance reports.For more information regarding Dell OpenManage Essentials, contact service provider.782 Installing Management Station Software On Windows1.Log on with administrator privileges to the system on which you want to install the management stationapplications.2.Insert the Systems Management Tools and Documentation DVD into the DVD drive or contact your service providerfor information to download the web installer.3.Run autorun.exe.NOTE: If you are using the DVD to install, select the management station application that you want to install,and then click Install.4.Follow the instructions in the Install Wizard.NOTE: You cannot install remote RAC (RAC installed on the management station) and local RAC (RAC installed on the managed system) on the same system.Installing Management Station Software On Microsoft Windows Server 2008 Core And Hyper-V ServerWindows Server 2008 Core or Hyper-V Server operating system does not support a graphical user interface (GUI) based installation of the software components. Install the software in CLI mode on Server Core. For more information on Server Core, see the Microsoft website.NOTE: Log in as a built-in Administrator to install systems management software on Windows Server 2008 and Windows Vista. For more information on built-in Administrator account, see the Windows Server 2008 Help.Installing Management Station Software In CLI ModeTo install the RAC Tools, launch the MSI file using the command:•For 32–bit: msiexec /i RACTools.msi•For 64–bit: msiexec /i RACTools64Bit.msiNOTE: The RACTools.msi and RACTools64Bit.msi files are located at SYSMGMT\ManagementStation\windows \RACTools on the Systems Management Tools and Documentation DVD.To install BMU, launch the MSI file using the command:msiexec /i BMC.msiNOTE: Only 32–bit installer is available.NOTE: The BMC.msi file is located at SYSMGMT\ManagementStation\windows\BMC on the Systems Management Tools and Documentation DVD.To install Active Directory Snap-In, launch the MSI file using the command:•For 32–bit: msiexec /i ADSnapIn.msi9•For 64–bit: msiexec /i ADSnapIn64Bit.msiNOTE: The ADSnapIn.msi and ADSnapIn64Bit.msi files are located at SYSMGMT\ManagementStation\windows \ADSnapIn on the Systems Management Tools and Documentation DVD.To install the localized version of the management station software, at the command prompt type the following: msiexec / I <management_station_software>.msi TRANSFORMS=<languauge_transform>.mstNOTE: Replace <language_transform>.mst with the appropriate language file:•1031.mst (German)•1034.mst (Spanish)•1036.mst (French)•1041.mst (Japanese)•2052.mst (Simplified Chinese)Uninstalling Management Station Software In CLI ModeTo uninstall management station software, run the commands as listed in the table below.Table 1. Commands to Uninstall Management Station Software103 Installing Management Station Software On Supported Red Hat Enterprise Linux, SUSE Linux Enterprise Server, And VMware ESX ServerOnly RAC tools and BMU are supported on the Red Hat Enterprise Linux, SUSE Linux Enterprise Server, and VMware ESX Server operating systems.On systems running Red Hat Enterprise Linux 5 operating system, DVDs are auto-mounted with the -noexec mount option. This option does not allow you to run any executable from the DVD. You must mount the DVD-ROM manually and then run the executables.To install BMU, navigate to the SYSMGMT/ManagementStation/linux/bmc directory and install the BMU RPM specific to the operating system as follows:•For systems running Red Hat Enterprise Linux, type rpm -ivh osabmcutil*-RHEL-*.rpm•For systems running SUSE Linux Enterprise Server, type rpm -ivh osabmcutil*-SUSE-*.rpmTo install the latest version of RAC Tools:1.Uninstall the existing IPMI tool:a.Query the existing IPMI tool: rpm -qa | grep ipmitoolIf the IPMI tool is already installed, the query returns ipmitool-x.x.xx-x.x.xx.b.To uninstall the IPMI tool:*On systems running SUSE Linux Enterprise Server and VMware ESX Server, type rpm -e ipmitool-x.x.xx-x.x.xx*On systems running Red Hat Enterprise Linux 5.x, type rpm –e OpenIPMI-tools*On systems running Red Hat Enterprise Linux 6.x, type rpm –e ipmitoolNOTE: The settings made by the existing IPMITOOL is retained.2.Navigate to the SYSMGMT/ManagementStation/linux/rac/<OS> directory and then type rpm -ivh *.rpm11。
教你成功安装Aspen-HYSYS-V7.2的步骤

Aspen HYSYS V7.2安装、汉化步骤最近机子不小心感染了病毒,只好重装了系统。
原来电脑上的HYSYS也被删掉了。
无奈,就试着重新安装Aspen V7.2,反复安装了好几次都没有成功。
后来参照马后炮论坛上《一步一步教你安装Aspen V7.2》这篇文章,再结合自己多次安装失败的经验教训,最后终于完成安装,并成功启用中文包。
鉴于现在仍然有很多朋友,多次安装仍不成功的情况,我愿把自己成功的经验与广大网友分享,以期对更多的人有所帮助。
首先确认你下载的安装包里文件是不是齐全了。
如下图所示你的安装包里应该有这些文件。
安装前得和你交代一下,安装过程中不要着急,得一步一步慢慢来。
速度看电脑配置而定,千万不要着急,耐心等待,要有1‐2 小时安装时间的心理准备。
我办公室的机子是windows XP系统,笔记本电脑是vista系统。
需要说明的是安装Aspen 并不和office2010 冲突(网上有人说安装aspen 之前先卸载office,实践证明并没有影响)。
dotnetfx35和SQLEXP R_RUS.EXE是Aspen V7.2、V7.3数据库文件所必需的软件,在安装Aspen V7.2之前,需要先安装着两个软件。
dotnetfx35一般在你电脑上的windows软件升级的时候,都会自行安装升级;而SQLEXP R_RUS.EXE则需自己单独安装。
我的Aspen v7.2安装软件里,本身就带有这两个软件,所以点开安装就行了。
如果你的电脑里没有这两个软件,那也没关系,从百度上搜一下,下载后再安装就可以了。
安装完dotnetfx35和SQLEXP R_RUS.EXE这两个软件后,就可以正式开始安装Aspen V7.2 了。
1、选择许可文件生成器LicGen.exe,双击后出现以下画面;2、等大约7、8分钟左右(根据计算机的配置不同而略有区别),会弹出如下界面,单击任意键退出,这时你会发现生成一个名为LSERVRC_XXX_XXXXX.lic 的文件,文件路径一般为C:\AspenONE\Aspen Suite2006_LicGen.exe ;3、将刚才C:\AspenONE 下生成的该lic 许可文件拷贝到C盘的根目录下。
Win7下成功安装aspen的方法

Win7下成功安装aspen的方法Win7系统已经流行很长一段时间了,应该来说win7下安装软件不应该存在兼容性问题,但是论坛上海友都在提类似“win7下如何安装aspen?”的问题。
今天恰好有个朋友要我帮忙她安装一下,看见她折腾很多次还是没有安装成功的苦恼样子,今天就花点时间给需要帮助的海友介绍下我是怎么解决这个问题的。
为照顾该方法普适和简洁两个方面,我上传了很多图片流程图,鉴于文档太大占用大家的财富,我保存为PDF文档,希望对大家有所帮助。
废话不多说,开始介绍我是怎么安装的,我是这样安装的,大家要是按这个方法应该也不会错。
一介绍我安装的电脑配置华硕N43JF笔记本电脑,I5处理器,2.53HZ,混合硬盘7200r,操作系统:32bitwin7旗舰版。
大家用的电脑配置跟这个也许有点不同,但是按照这个方法应该可以完全将aspen2006安装成功。
二普适性Win7上安装aspenV7.1是完全没有问题的,要是各位海友也遇到一定的苦难,安装这个教程应该也可以解决。
当然,不管你是64bit 的系统上装aspen2006,只要按照这个步骤一步一步来,也应该没有问题。
安装时候确保aspensuite 2006 license generator在电脑的任何一个盘上,这才后面有介绍。
三安装步骤1 生成注册码鼠标右键点击aspensuite 2006 license generator,选择“以管理员身份运行”,出现下面界面,等待2分钟左右生成注册码。
a)这里要注意一定要选择“以管理员身份运行”,当然如果登录电脑时用的是Administrtor账户那就不存在这个问题,这一步就直接双击运行注册机。
b)安装过程中最好不要运行其他的程序,因为安装过程很吃电脑资源。
c)安装过程中最好把杀毒软件关了。
d)如果出现兼容问题,右键点击aspensuite 2006 licensegenerator,选择“兼容性疑难解答”—>“启用程序”—>“尝试建议的设置”—>“启用程序”。
- 1、下载文档前请自行甄别文档内容的完整性,平台不提供额外的编辑、内容补充、找答案等附加服务。
- 2、"仅部分预览"的文档,不可在线预览部分如存在完整性等问题,可反馈申请退款(可完整预览的文档不适用该条件!)。
- 3、如文档侵犯您的权益,请联系客服反馈,我们会尽快为您处理(人工客服工作时间:9:00-18:30)。
Aspen7.2安装在XP系统
安装前先关闭杀毒软件,360等;断开网络。
1、运行Aspen7.2\aspen\AspenONE7.2_licGen.exe,点确定后先放一边不管。
2、运行Aspen7.2\aspen\ netFramework-v3.5\ dotNetFX35setup.exe, 除了在下一界面处选择“我已阅读并接受许可协议……”外全部点“下一步”(或“安装”),不用管它下载不下载,只要此时不联网就行。
3、运行Aspen7.2\aspen\ dotnetfx35-sp1补丁.exe,安装过程同上步。
4、运行Aspen7.2\aspen\ SQLEXPR_CHS.EXE, 同上。
(这一步安装时间稍长,全部点“下
一步”,其他的可以不用考虑)
5、运行Aspen7.2\aspen\ SQLServer2005SP3-KB955706-x86-CHS.exe,同上。
6、此时破解应已完成,选择下面这一界面,按任意键结束。
7、运行Aspen7.2\aspen\ DTLite4451-0236.exe,除了在下一界面处选择“免费许可”外全部点下一步
8、第七步安装完成后,双击打开桌面上的DAEMON Tools Lite快捷方式
等待数秒后,运行界面如下,按图中所示加载Aspen7.2\ aspenONEV7.2DVD1.iso镜像文件
加载后出现如下界面,如图操作
双击后一般会出现自动播放窗口,单击第一项“运行……exe ”即可;如未出现自动播放,则打开“我的电脑”
打开那个aspenONE7.2DVD1的光驱,如上图。
双击其中的setup.exe 出现如下界面,点击pruduct项
选择standalone license file项,点“下一步”
可能会出现下一界面,先点击选中图中1部分,单击2部分,Remove license
单击Add license,添加C:\AspenONE\ LSERVRC_004_27477.lic文件,单击打开
等待数秒后完成后,单击Next
出现下面界面,点选图中1,单击Install
出现如下界面,单击Next
下面直接截了另一个安装教程的图
出现的下一界面中单击图中红圈处,出现一下拉列表,选择第二项(安装该项全部内容)即可;若要安装其他组件(如HYSYS),同样做法即可。
接着变成这样,安装目录自选
下面就一直Next就行了,除了下面这里选择Skip……
其他步全部Next就行,从下图中23开始软件自动安装过程不用任何操作
软件安装完成后出现如下界面,单击finish即可,有时会跟着出现一个窗口说要重新启动,可以不理他,单击NO即可。
到开始里面运行软件,桌面不会有快捷方式
可以将aspen plus user interface拖到桌面建立快捷方式,如有重名,先把桌面的那个名字改了。
至此安装完成。