EL-O-MATIC F20定位器使用说明
定位仪使用操作

定位时,车的水平非常重要。 在检测和调整时,应将载车 平台锁在锁孔中,以保证定 位的准确性。 四柱举升机的水平不够准确 将对测量带来误差,仅2mm 的左右偏差就能产生6.18′ 的外倾角误差和0.96′的前 束误差。
配合定位的举升机要调整水平
应使用专用水准仪 仪器检查举升机的 水平,而不是水平 尺或水管
4. 如果使用电子转角盘,分 别向右,向左打20°转角。 以屏幕上箭头对中为准。 如果不使用电子转角盘, 分别向右,向左打10°转 角。以屏幕上箭头对中 为准。按右侧图示将方 向对中。 在测量过程中,请勿压靠车身和举升机 在转向时测出主销内倾角、主销后倾角和转向前展差。 转向时,车轮的转动将影响以上测量结果。必须锁好刹车锁。
车辆的定位准备 Vehicle Preparation
填表格 输入客户信息 输入和调整车辆 基本 状态,包括轮胎气压 和胎纹深度等
车辆的定位准备 Vehicle Preparation
•选择与定位匹配的车型数据
车辆的定位准备 Vehicle Preparation
目视检查(Inspection list ) 与定位无直接关系,可跳过 准备工作提示 ( Measurement Preparation ) 操作熟练之后可不看 偏位补偿 ( Run-out Compensation ) 按前进方向旋转车轮 每次旋转90度 最后回到初始位置
定位调整 Vehicle adjustment
按照屏幕上的箭头打正 方向盘 将方向盘锁住 目的: 保证后轴调整时的中心 对称面的准确测量,并 防止前轮调整时方向偏 转,影响测量结果
后轴角度调整 Adjustment of rear axle
调整后轴外倾和前束到绿 色区域 目的: 调整后轮角度 减少推力线偏移 重新检查方向盘是否在中 间位置 目的: 后轴的调整使推力线有可 能发生变化
西门子智能阀门定位器操作(精.选)
智能阀门定位器(SIPART PS2)一、气源:气源要求:1.4~4bar二、直行程执行器调试准备:1、用相应的安装配件安装定位器。
2、用气动管缆连接定位器与执行机构,给定位器提供气源。
3、连接相应的电流或电压源。
4、现在定位器处于“P manual”方式,在显示屏上一行显示当前电位计的百分比电压值(P),显示屏下行“NOINI”在闪烁。
5、通过“增加键”和“减少键”移动执行机构达到每一个最终位置,来检查机械装置是否可在全部调整范围内自由移动,即显示P5.0~P95.0的允许范围之间。
如果不是,利用调节轮和反馈杆长度调节PS2的零点和量程。
(调节轮调整相当零点调整,反馈杆长度调整相当量程调整)6、现在移动执行器,使杆达到水平位置,显示一个介于P48.0到P52.0之间的值,如果不是这种情况,调整摩擦夹紧单元,直到杆水平显示“P50.0”。
三、直行程执行机构的自动初始化正确移动执行机构。
离开中心位置,开始初始化。
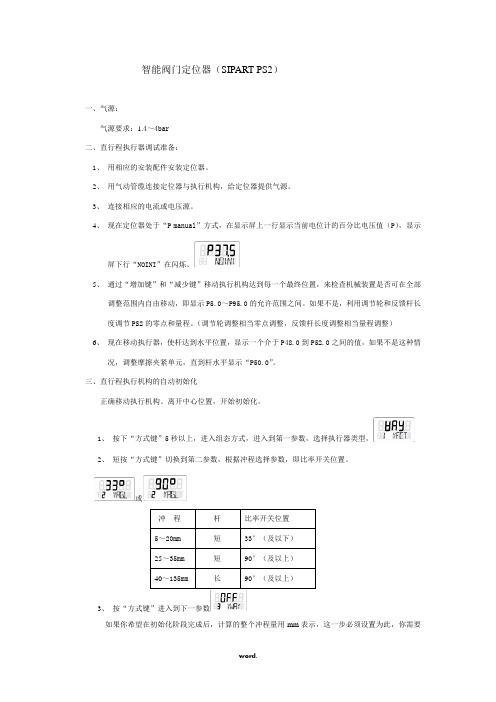
1、按下“方式键”5秒以上,进入组态方式,进入到第一参数,选择执行器类型,2、短按“方式键”切换到第二参数,根据冲程选择参数,即比率开关位置。
或3、按“方式键”进入到下一参数如果你希望在初始化阶段完成后,计算的整个冲程量用mm表示,这一步必须设置为此,你需要屏上选择与刻度杆上驱动钉设定值相同的值。
4、按“方式键”进入下一参数,然后按”增加键”超过5秒,初始化开始,初始化进行时,“RUN1”至“RUN5”一个接一个出现于显示屏下行,初始化过程依据执行机构,可持续15分钟,当显示时初始化完成。
5、短按“方式键”,出现“INITA”,再按“方式键”超过5秒退出组态方式。
松开“方式键”时,处于手动方式,再短按“方式键”进入自动方式。
注:如使用手动初始化,则RUN2由手动完成,其余各步骤均相同。
四、角行程执行机构调试准备1、用相应的安装配件安装定位器。
2、用气动管缆连接定位器与执行机构,给定位器提供气源。
小博士GPS说明书讲解

小博士说明书介绍感谢您购买etrex(小博士)GPS接收机(以下简称“小博士”)--我们不停努力的结果,为了可以使您的新型GPS接收机发挥最大的用途,并且了解所有的操作细节,您可以花些时间阅读一下本手册。
手册由五部分组成:一、序言部分介绍了关于GPS系统和GPS接收机的基本知识。
二、基本操作部分介绍了“小博士”的结构、按键和基本操作。
三、主页面部分介绍了“小博士”四个主页面的概况。
四、具体功能详述部分详细说明了“小博士”各种功能的使用细节。
五、附录部分技术指标,相关附件等其他方面的信息。
标准配置包括主机:1台牵引绳索:1根中文说明书:1本本手册中,所有的按键名称将使用黑体字,所有的菜单选项将用“”括起来.GPS介绍全球定位系统(global positioning system - GPS)是美国从本世纪70年代开始研制,历时20年,耗资200亿美元,于1994年全面建成,具有在海、陆、空进行全方位实时三维导航与定位能力的新一代卫星导航与定位系统。
经过近10年我国测绘等部门的使用表明,GPS以全天候、高精度、自动化、高效益等显著的特点,赢得了广大测绘工作者的信赖,并成功地应用于大地测量、工程测量、航空摄影测量、运载工具导航和管制、地壳运动监测、工程变形监测、资源勘察、地球动力学等多种学科,从而给测绘领域带来一场深刻的技术革命。
随着全球定位系统的不断改进,硬、软件的不断完善,应用领域正在不断地开拓,目前已遍及国民经济各种部门,并开始逐步深入人们的日常生活。
GPS系统的特点:1)全球,全天候工作:能为用户提供连续,实时的三维位置,三维速度和精密时间。
不受天气的影响。
2)定位精度高:单机定位精度优于10米,采用差分定位,精度可达厘米级和毫米级。
3)功能多,应用广:随着人们对GPS认识的加深,GPS不仅在测量、导航、测速、测时等方面得到更广泛的应用,而且其应用领域不断扩大。
GPS发展历程GPS实施计划共分三个阶段:第一阶段为方案论证和初步设计阶段。
西门子定位器操作指南

受过培训或根据公认的安全惯例有权通电、断电、接地、连接电路和设备。 根据公认的安全惯例,在注意保护设备方面受过培训。 在紧急救护方面受过培训。
1
安全信息
•
在定位器有防爆保护情况下,受过培训或有权在有潜在爆炸设备方面进行工作。 WARNING
定位器必须要由合格的人员来安装和操作。 定位器为连接到功能或安全超低压而设计, 由供电单元 决定电气安全。 气动执行器会产生高的推力,为了避免伤害,必须要在遵守严格的安全规程下进行安装和操作。 对于有潜在爆炸设备的情况下,尤其要遵守使用安全规程。 定位器正确和安全运行与运输、贮存、安装、以及细心的操作和维护有关。 相关的 CE.FM 认证请参见英文手册。
SIPART!"#$%& PS2
!Leabharlann 1-1目录安全信息 ..................................................................................................................................................... 1 1.1 术语含义 ............................................................................................................................................. 1 1.2 前言 ....................................................................................................................
上海奥马定位器说明书

上海奥马定位器说明书
1、首先你需要有一台GPS定位器硬件设备;
2、其次你需要一张物联卡或者手机卡,因为定位器是通过物联卡或者手机卡中的GPRS获取位置信息的,所以这个卡是必不可少的;
3、你需要登录平台或者安装手机APP查车软件,因为定位器获取位置之后,是需要通过软件在后台进行数据换算之后再通过地图的形式再软件中展现出来,能够让你对定位器当前位置一目了然;
4、定位器充电使用说明,定位器作为日常常用的定位装置,它的结构非常简单。
电池提供重力流量卡作为无线传输进行定位。
他的电池非常简单。
由干电池作为电池动力的提供。
充电时只需要将充电器的插头插入定位器的充电器。
经过四个小时左右的充电就可以充电完成。
5、如果按正面大绿色键,灯不亮,表示没有电自动关机了,请插上充电电源,并开机。
一般充电2-4个小时,就会充满。
可正常使用3天以上。
如果孩子语音较多,建议开通亲情号。
迈欧mio阿尔法2第二代产品操作知道

包装清单1.Mio ALPHAB 充电器3.快速操作指南4.保修和售后5.佩戴和充电注意事项Mio ALPHAA 左键 B. 右键 C. 心率指示灯安全须知在开始新的训练计划前,请咨询医生。
Mio ALPHA可以精准测量心率,但是不能用于医疗用途。
Mio ALPHA及USB充电器有很强磁性,佩戴起搏器、除颤器或其他植入电子设备的用户使用前请咨询医生。
激活 Mio ALPHA长按 (A) 或 (B)激活Mio ALPHA激活后,进入信息设置。
短按(B)调整数值. 短按 (A) 确认并进入下一项设置。
用户配置设置设置以下个人信息有利于 Mio ALPHA测得的数据更加精准有效∙日期(date)和时间(time)∙英制(imperial)或公制(metric),一般选公制。
∙体重(weight)和身高(height)∙性别(gender)∙出生年( year of birth)∙最大心率(Maximum heart rate),会根据你输入的个人信息自动生成,也可以手动输入(220-年龄)在手表上直接设置在时间模式下,长按 (A) 进入个人信息设置。
短按 (B) 调整数值和设置内容. 短按 (A) 确认并进入下一项设置。
长按(A),退出个人信息设置。
充电1.警告:充电时,请确保充电器的针脚是干燥的。
2.将USB 接口一端连到电脑。
3.将Mio ALPHA后盖的充电触点和充电器针脚如下图排成一行。
充电针脚的磁性有利于充电器和Mio ALPHA吸附到一起。
充电时,屏幕显示动态的电池充电标志充满后,屏幕显示FULL,然后满格标志背光灯连续敲击屏幕2次,开启背光灯。
运动模式Mio ALPHA 运动模式下的功能:∙连续心率测量∙心率报警∙秒表、倒计时和计圈∙配速、计步和卡路里等Mio ALPHA 的佩戴为了保证数据精准度,请按照一下方式佩戴:∙将Mio ALPHA 紧贴你的小臂, 离腕骨 1-3 英寸 (3-8 cm) 处. 表后盖的光电传感器需要紧贴你的皮肤∙如果你手腕比较细,请将ALPHA 带高点∙注意:为了保证ALPHA测量的精准度,建议在测心率前,做几分钟热身运动,特别是经常手脚冰凉或血液循环不佳的用户。
定位仪的操作流程

定位仪的操作流程英文操作流程:Power On and Initial Setup: Start by pressing the power button to turn on the locator. Then, navigate to the system settings to perform the basic configurations. This includes selecting the language, setting the date and time, and connecting to Wi-Fi. Some devices may also offer additional settings such as adjusting screen brightness or power management mode.SIM and SD Card Insertion: The GPS locator typically requires an active SIM card for network connectivity. Open the SIM card slot and insert the SIM card. If your device supports expandable storage, you can also insert an SD card.Map Download and Installation: Before using the GPS locator, you need to download and install the appropriate maps. These maps may be available from the device's preinstalled app store or from third-party map providers. After downloading and installing the maps, you may need to perform some initial setup, such as selecting the map display mode and downloading offline map data.Positioning and Navigation: Once the above steps are completed, you can start using the positioning and navigation features of the GPS locator. Select your destination on the map, and the device will plan the optimal route and start navigation.中文操作流程:开机与基础设置:首先,按下定位仪的开机按钮,启动设备。
定位器的操作方法 -回复
定位器的操作方法-回复人们对于定位器的需求越来越大,尤其是在找寻遗失物品或者追踪物品位置的时候。
定位器可以快速准确地告诉我们物品的具体位置,帮助我们迅速找到丢失的物品。
那么,定位器的操作方法是怎样的呢?首先,首先我们要确保定位器的电量充足。
毕竟,没有电量的设备是无法工作的。
我们应该根据定位器的说明书,找到充电方式,并按照说明书的提示进行充电。
在充电过程中,我们可以先阅读一下定位器的使用说明书,了解操作方法和注意事项。
接下来,我们需要将定位器与我们要追踪的物品相连。
定位器通常有不同的附件或者功能,如钥匙链、贴纸等等。
我们可以选择适合我们物品的附件或者功能,将定位器固定在物品上,比如钥匙、行李箱、手机等。
完成这些准备工作后,我们正式开始使用定位器。
定位器通常会伴随着一个APP或者电脑软件,在使用之前我们需要先下载并安装这个软件。
根据说明书的指示,打开软件并登录账号。
如果还没有账号,我们需要进行注册。
注册完成后,我们需要将定位器与软件绑定。
通常,通过扫描定位器上的二维码或者输入定位器的序列号,我们就可以将定位器与软件绑定。
绑定完成后,我们可以开始使用定位器的功能了。
打开软件,可以看到定位器的相关信息,如电量、信号强度等等。
如果我们要寻找丢失的物品,我们可以点击寻找按钮,定位器将会发出蜂鸣声或者闪烁指示灯,帮助我们找到物品。
有些定位器甚至配备有地图导航功能,我们可以通过手机或者电脑软件上的地图,实时查看物品的具体位置。
除了寻找功能,定位器还具备远程报警功能。
如果我们离开某个物品一定距离,定位器将会自动报警。
具体的报警方式会因不同的定位器而有所不同,有些会通过手机APP发送警报信息,有些会通过设备本身发出声音或者震动。
这对于我们防止物品被盗或者丢失是非常有帮助的。
此外,定位器还可以进行历史轨迹回放。
我们可以通过软件查看物品的历史移动路径,了解物品曾经所处的位置。
这对于做一些统计或者分析是非常有用的。
最后,当我们找到了丢失的物品或者完成了定位器的使用目的后,我们应该记得关闭定位器或者停止追踪功能,以免浪费电量或者造成不必要的干扰。
- 1、下载文档前请自行甄别文档内容的完整性,平台不提供额外的编辑、内容补充、找答案等附加服务。
- 2、"仅部分预览"的文档,不可在线预览部分如存在完整性等问题,可反馈申请退款(可完整预览的文档不适用该条件!)。
- 3、如文档侵犯您的权益,请联系客服反馈,我们会尽快为您处理(人工客服工作时间:9:00-18:30)。
All Rights Reserved. We reserve the right to modify or improve the designs or specifications ofthe products mentioned in this manual at any time without notice. Emerson Process Manage-ment does not assume responsibility for the selection, use or maintenance of any product.Responsibility for proper selection, use and maintenance of any Emerson Process Management product remains solely with the purchaser. ©2010 Emerson Electric Co.Alle Rechte vorbehalten. Wir behalten uns das Recht vor, die Entwürfe oder die technischen Daten unserer Produkte jederzeit und ohne Vorankündigung zu ändern oder zu verbessern. Emerson Process Management übernimmt keine Haftung für die Auswahl, Anwendung oder Wartung irgendeines Produkts. Die Verantwortung für eine ordnungsgemäße Auswahl, Anwend-ung und Wartung jedes Produkts von Emerson Process Management liegt ausschließlich beim Käufer. ©2010 Emerson Electric Co.Tous droits réservés. Nous nous réservons le droit de modifier ou d’améliorer la conception ou les spécifications des produits mentionnés dans ce manuel à tout moment sans préavis.Emerson Process Management n’assume aucune responsabilité pour la sélection, l’utilisation ou l’entretien de tout produit. Responsabilité de la sélection, l’utilisation et l’entretien de tout produit Emerson Process Management incombe uniquement à l’acheteur. ©2010 Emerson Electric Co.Todos los derechos reservados. Nos reservamos el derecho de modificar, o mejorar los diseñoso especificaciones de los productos mencionados en el presente manual en cualquier momento sin previo aviso. Emerson Process Management no se hace responsable de la selección, uso o mantenimiento de cualquier producto. La responsabilidad de la selección, uso y mantenimiento de cualquier producto de Emerson Process Management sigue siendo el único con el compra-dor. ©2010 Emerson Electric Co.Europe Middle East & AfricaP .O. Box 2237550 AE Hengelo (O)Asveldweg 117556 BT Hengelo (O)The Netherlands T +31 74 256 10 10F +31 74 291 09 38North & South America9009 King Palm Drive Tampa, Florida 33619United States of AmericaT +1 936 372 5575F + 1 281 463 5106Singapore19 Kian Teck Crescent Singapore 628885T +65 626 24 515F +65 626 80 028United kingdom 6 Bracken HillSouth West Industrial EstatePeterlee, Co Durham SR8 2LSUnited KingdomT +44 (0) 191 5180020F +44 (0) 191 5180032GermanyPostfach 500155, D-47870 Willich Siemensring 112, D-47877 Willich GermanyT +49 2154 499660F +49 2154 499 66 13France30/36 Allee du Plateau 93250 Villemomble FranceT +33 1-48-12-26-10F +33 1-48-12-26-18South Africa P .O. Box 979Isando 16002 Monteer Road IsandoSouth AfricaT +27 11 974 3336F +27 11 974 7005Please visit our website for up to date product data.ATEX Installation GuideDOC.F20ATX.EDFS Rev. A January, 2011- -English Deutsch Français Español1.0 ATEX Einbauanweisungen 1.1 ATEX Vorgesehener Verwen-dungszweck F20 Ex i ist ein Gerät der Gruppe II, Kategorie 2 und konzipiert für den Einsatz in Gebieten, in denen explosi-onsgefährliche Atmosphären durch Mi-schungen von Luft und Gasen, Dämp-fen oder Nebeln wahrscheinlich sind.Er kann daher in den (ATEX) klassifi -zierten Zonen 1 & 2 (Gase) verwendet werden.1.2Produkt Markierung F20 Ex iATEX gefährliche oder KlassifizierterBereicheZertifikat: TÜV 10ATEX 379858T4 @ Ta = -50°C to +60°C T6 @ Ta = -50°C to +40°C1.3 Mechanischer Einbau Zur Mechanischer Einbau, siehe:* F20 Stellungregler: Dokument362.95.001, Kapitel 1 und 2 * Verwenden Sie eine elektrischleitfähige, korrosionsbeständige Halterung zur Erdung, um elek-trostatische Aufladung des F20 Gehäuses zu vermeiden,* Wir empfehlen dringend, den Edel-stahl VDE / VDI 3845 (NAMUR) Montagesatz nach DOC.F20.EDFS, Kapitel 1.* Geräte oder Teile von Geräten, die thermisch leitend mit dem Stel-lungsregler F20 verbunden sinddürfen nicht zu einer unzulässigen Erwärmung oder einer unzuläs-sigen Abkühlung des Gerätes führen. Der Umgebungstempera-turbereich des Gerätes ist wie folgt festgelegt:Tamb = -50 °C ... +60 °C für T4 und -50 °C ... +40 °C für T6” * Das Gehäuses des Gerätes istmit dem Potentialausgleich des Ex-bereiches elektrisch leitend zu verbinden.* PTF20 Stellungsgeber: Dokument 363.95.006, Einbau 1.4 F20 Ex i Verdrahtungsanweisun-gen1.4.1 Verfahren 1 Entfernen Sie den Deckel2 Führen Sie die Kabel durch die elekt-rische Eingänge.- Benutzen Sie und bringen Sie Ka-bel muffen an, wie von nationaleroder lokaler Gesetzgebung gefor-dert. - Wenn IP65/NEMA4 Schutz an-gefordert wird, müssen die elek-trischen Eingänge ausgerüstet werden mit Kabelmuffen jedenfalls IP65/NEMA4 oder höher.3 Schließen Sie nach Abbildung. 1.2 und Tabelle 1.1 und 1.2 an.4 Montieren Sie den Deckel am Ge-häuse. Die Deckeldichtung mußrichtig im Platz liegen, um Dichtheitgemäß IP65/NEMA4 zu gewährlei-sten.1.5 Dielektrische Durchschlagsfes-tigkeitDer F20 Stellungsregler und PTF20 Stellungsgeber erfüllen die Anforderun-gen für dielektrische Durchschlagsfes-tigkeit gemäß EN-60079-11Les instructions d’installation ATEX1.2Usage ATEX prévuLe F20 Ex i est un équipement de catégo-rie 2, groupe II, destiné à un usage dansdes zones à atmosphère explosible due àla présence d’air et de gaz, de vapeurs, de brouillards.Elles peuvent donc être utilisées dans les zones 1 et 2 (pour les gaz) conformémentà la classification ATEX.1.2 Marquage produit F20 Ex iZertifikat: TÜV 10ATEX 379858T4 @ Ta = -50°C to +60°C T6 @ Ta = -50°C to +40°C 1.3Installation mécaniquePour l’installation mécanique, voir:* F20 positioneur: Document 362.95.001, chapitre 1 et 2* Utiliser un support de fixation élec -triquement conductive et résistant à la corrosion pour raccordement à la terre. Ce, afin d’éviter les charge électrostatiques du boîtier F20. * Nous recommandons fortementd’utiliser le kit de montage en acier inoxydable VDE / VDI 3845 (NAMUR) comme DOC.F20.EDFS, chapitre 1.* Les équipements ou pièces d’équi-pement, qui sont thermiquement conducteur relié à la positionneur F20, ne devrait pas conduire à uneadmissibles pas de chauffage ou de refroidissement de l’appareil. La plage de température ambiante de l’appareil se présente comme suit: Tamb = -50 ° C ... +60 ° C pour T4 et -50 ° C ... +40 ° C pour T6* Le boîtier de l’appareil doit êtreélectriquement conductrice reliée à la prise de terre de protection de lazone dangereuse.* PTF20 d’émetteur du position: Docu -ment 363.95.006, Instalation1.4 Instructions de câblage F20 Exi1.4.1 Procedure 1 Retirez le couvercle.2 Insérez les câbles dans le presse-étoupe. - Posez et raccordez les câbles confor-mément à la législation nationale et locale en vigueur. - Lorsqu’une protection en entréeIP65/NEMA4 est requise, les entrées électriques doivent être équipées de raccords IP65/NEMA4 ou supé-rieurs.3 Procédez aux raccordements électriques comme indiqué sur la figure 1.2 et table 1.1 et 1.2.4 Montez le couvercle sur le boîtier. Assurez-vous que le couvercle esthermétiquement fermé pour éviter toute infiltration d’eau et de poussière dans le module, conformément aux normes IP65 / NEMA4X.1.5Force diélectriqueLe F20 Ex i est conforme aux conditions requises en termes de force diélectrique par la norme EN- 60079-11Las instrucciones de instalación ATEX1.1Uso apropiado de ATEXEl F20 Ex i es equipo de Grupo II catego-ría 2, destinado a usarse en áreas en las que son probables atmósferas explosivas causadas por la mezcla de aire y gases, vapores, brumas o aire.Por tanto puede usarse en zonas (ATEX) clasifi cadas 1, 2 (Gases).1.2Marca del producto F20 Ex i ATEX Ubicación peligrosa o clasificadaCertificado: TÜV 10ATEX 379858T4 @ Ta = -50°C to +60°C T6 @ Ta = -50°C to +40°C 1.3Instalación mecánicaPara la instalación mecánica véase:* F20 posicionador: Documento 362.95.001, capítulo 1 y 2 * Utilice el soporte de montaje que eseléctricamente conductivo y resistente a la corrosión. Para conexión a tierra y para evitar la carga electrostática de la caja del F20.* Recomendamos encarecidamente que utilice el acero inoxidable VDE / VDI 3845 (NAMUR) kit de montaje como por DOC.F20.EDFS, capítulo 1. * Los equipos o partes de aparatos, que son térmicamente conductores conec-tados a la posicionador F20, no debe conducir a una permitido la calefac-ción o la refrigeración del aparato.El rango de temperatura ambiente del dispositivo es el siguiente:Tamb = -50 ° C ... 60 ° C para el T4 y -50 ° C ... 40 ° C para T6* La carcasa del dispositivo debe sereléctricamente conductores conecta-dos a la toma de tierra de protección de la zona peligrosa.* PTF20 transmisor de posición: Docu -mento 363.95.006, Instalación 1.4 Instrucciones de cableado F20 Ex i1.4.1Procedimiento1 Retire la tapa del Módulo de control (véase la figura 4.1).2 Coloque los cables a través de las entra-das eléctricas. - Use y monte los prensaestopas de cablescomo requiera la legislación nacional o local.- Si se necesita protección de ingreso IP65/ NEMA4X, las entradas eléctricas deben equiparse con prensaestopas de clasificación IP65 / NEMA4X o superior.3 Establezca las conexiones eléctricas tal como se muestra en la figura 1.2 y cuadro 1.1 y 1.24 Monte la cubierta del Módulo de controlen la caja (vea la figura 4.1) o continúecon el capítulo 5. Asegúrese de que la junta de la cubierta esté colocada para cumplir con las condiciones de estan-queidad al polvo y al agua de la norma IP65 / NEMA4.1.5 Rigidez dieléctrica El F20 Ex i cumple el requisito de rigidez dieléctrica de la normaEN 60079_111.0 ATEX Installation instructions 1.1 ATEX Intended useThe F20 Ex i is a Group II category 2 equipment and intended for use in ar-eas in which explosive atmospherescaused by mixtures of air and gases, vapours and mists are likely to occur.Therefore it may be used in (ATEX) classified Zones 1 and 2 (Gasses).1.2 Product marking F20 Ex i ATEX Hazardous or Classified Certificate: TÜV 10ATEX 379858T4 @ Ta = -50°C to +60°C T6 @ Ta = -50°C to +40°C 1.3 Mechanical installation For mechanical installation see:* F20 positioner: Document 362.95.001, chapter 1 and 2* Use an electrically conductiveand corrosion resistant mountingbracket for earth connection, toavoid electrostatic charge of theF20 housing.* We strongly recommend usingthe stainless steel VDE/VDI3845 (NAMUR) mounting kit asper DOC.F20.EDFS, chapter 1.* Equipment or parts of equip-ment, that are thermally con-ductive connected to the F20positioner, should not lead to a not allowable heating or cool-ing of the device. The ambient temperature range of the device is as follows:Tamb = -50 °C ... +60 °C for T4 and -50 °C ... +40 °C for T6.* The housing of the device mustbe electrically conductive con-nected to the protective earthconnection of the hazardous area.* PTF20 position transmitter: Docu -ment 363.95.006, Installation 1.4 Wiring instructions F20 Ex i 1.4.1 Procedure 1 Remove cover2 Guide the cable(s) through the electrical entry(ies). - Use and mount cable glandsas required by national or local legislation.- When IP65/NEMA4 ingress pro-tection is required, the electricalentries must be fitted with glands rated IP65/NEMA4 or higher.3 Make the electrical connections asshown in fig 1.2 and table 1.1 and1.24 Mount the cover to the housing.Take care that the cover seal is inplace to comply to dust and watertightness according IP65 / NEMA4.1.5 Dielectric strengthThe F20 positioner and PTF20 posi-tion transmitter comply to the dielec-tric strength requirement accordingEN-60079-11. 1.2 Intrinsically safe connectionsTable 1.2 ATEX Notes de câblage Tabla 1.2Cableado notas ATEX。