c2500d5a说明书
日本大仓 EC5500R温度控制器 中文简易操作说明书

上段顯示 PV
PV(n) (b) (E)
PV(1) PV(2) n.HET(A) n.HET(R) HEAT(H) KEY
Cont(t)
Cont(P) Cont(I) Cont(D) Cont(M) Cont(P.) Cont(I.) Cont(D.) Cont(M.) Cont(b)
描述/設定範圍
使用脈衝警報 An.PS oFF--不使用,on--使用
(八) 參數ቤተ መጻሕፍቲ ባይዱ面
物件 PA1 警報
警報值設定
上段顯示
描述/設定範圍
n:警報號碼(n=1~4)
n.DO 功能選擇
資料
PV 警報--刻度對比(Scaling)範圍 SP 警報--刻度對比(Scaling)範圍 高警報誤差--0~+刻度對比(Scaling)寬度 低警報誤差:--刻度對比(Scaling)寬度~0 警報絕對值誤差--0~+刻度對比(Scaling)寬度
n.tUn:正常 Aton 或 1.At:1st 自動調定(Auto tuning) Ston:手動調定(Self tuning) 2.At:2nd 自動調定(Auto tuning)
計算比例帶------0.1~999.9% (第 1 通道出力) 計算積分時間---0.01~99.99 分鐘 (第 1 通道出力) 計算微分時間---0.00~20.00 分鐘 (第 1 通道出力) 計算手動重設(Manual reset)---0~100% (第 1 通道出力) 計算比例帶------0.1~999.9% (第 2 通道出力) 計算積分時間---0.01~99.99 分鐘 (第 2 通道出力) 計算微分時間---0.00~20.00 分鐘 (第 2 通道出力) 計算手動重設(Manual reset)---0~100% (第 2 通道出力) -0.500~0.500 Dead band 百分比=dead band 係數 x100
Manual_MultiCharger 1500

产品说明书和操作指南MultiCharger 150012V/100A 24V/50A使用前请仔细阅读说明书!保留所有版权及抵制不正当竞争的合法权利。
未经书面同意,本产品说明书及操作指南不得复印,也不得向第三人透露。
版本说明MultiCharger 1500EVD-No.: 811-0206-0Doc-No.: 2075354.01© December 2009 by Eltek Valere Deutschland GmbH 编号: 0109ELTEK VALERE DEUTSCHLAND GMBHFerdinand-Porsche-Straße 45 Postfach (PO Box) 61 06 51 D-60386 Frankfurt am Main D-60348 Frankfurt am MainTelefon-Nr. : +49 69 42002-0Fax-Nr. : +49 69 42002-389E-mail : info@eltekvalere.deweb : http://www.eltekvalere.de一般安全说明仅只能连接额定电压为12V和24V的电池。
注意——仅只能连接可充电电池。
注意——有形成爆鸣气体的危险:1. 连接及断开电池馈电线时,要断开电源。
2. 如电池是安装在车内的,则首先按照极性标识,将充电器的充电线与电池的正极(+)连接(不要与汽车底盘连接)。
然后,将负线与电池的负极(-)连接。
不要连接到汽化器或燃油管上。
充电完毕后,首先取下负线(底盘侧的线)。
(如电池是安装在车内的,则首先按照极性标识,将充电器的充电线与电池极进行连接,并使充电器进入待用状态。
在充电过程中,不要取下电池夹。
只是在充电器失活后以及断开电源后,方才取下电池夹。
)3. 不要使电池过度充电——参阅使用说明。
4. 电池附近禁止吸烟。
避免明火及火花。
5. 仅只在通风良好处使用。
恒基汽车Dirt Rocket MX500和MX650电动摩托车用户手册说明书
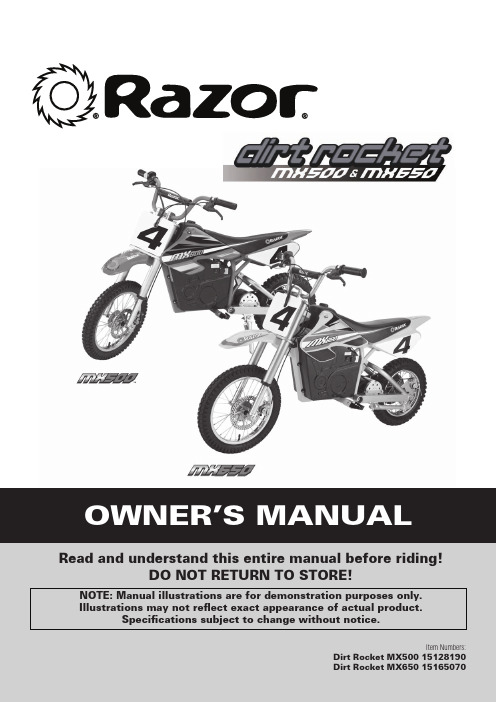
WARNING: Riding an electric motorbike can be a hazardous activity. Certain conditions may cause the equipment to fail without fault of the manufacturer. Like other electric products, the Dirt Rocket can and is intended to move, and it is therefore possible to lose control, fall off and/or get into dangerous situations that no amount of care, instruction or expertise can eliminate. If such things occur you can be seriously injured or die, even when using safety equipment and other precautions. RIDE AT YOUR OWN RISK AND USE COMMON SENSE.This manual contains many warnings and cautions concerning the consequences of failing to maintain, inspect or properly use your electric motorbike. Because any incident can result in serious injury or even death, we do not repeat the warning of possible serious injury or death each time such a possibility is mentioned.APPROPRIATE RIDER USE AND PARENTAL SUPERVISIONThis manual contains important safety information. It is your responsibility to review this information and make sure that all riders understand all warnings, cautions, instructions and safety topics and assure that young riders are able to safely and responsibly use this product. Razor USA recommends that you periodically review and reinforce the information in this manual with younger riders, and that you inspect and maintain your child’s product to insure their safety.The recommended rider age (14 for the MX500 and 16 for the MX650) is only an estimate, and can be affected by the rider’s size, weight or skills. Any rider unable to fit comfortably on the Dirt Rocket should not attempt to ride it.A parent’s decision to allow his or her child to ride this product should be based on the child’s maturity, skill and ability to follow rules.Keep this product away from small children and remember that this product is intended for use only by persons who are, at a minimum, completely comfortable and competent while operating the product.DO NOT EXCEED THE WEIGHT LIMIT OF 175 pounds for the MX500 and 220 pounds for the MX650. Rider weight does not necessarily mean a person’s size is appropriate to fit or maintain control of the Dirt Rocket.Do not touch the brakes or electric motor on your electric motorbike when in use as they can become very hot.Refer to the section on safety for additional warnings.ACCEPTABLE RIDING PRACTICES AND CONDITIONSAlways check and obey any local laws or regulations which may affect the locations where the Dirt Rocket may be used.Ride defensively. Watch out for potential obstacles that could catch your wheel or force you to swerve suddenly or lose control. Be careful to avoid pedestrians, skaters, skateboards, scooters, bikes, children or animals who may enter your path, and respect the rights and property of others.The Dirt Rocket is meant to be used only in controlled environments free of potential traffic hazards and not on public streets or sidewalks. Do not ride your electric motorbike in any areas where pedestrian or product traffic is present.Do not activate the speed control on the hand grip unless you are on the electric motorbike and in a safe, outdoor environment suitable for riding. These bikes were manufactured for performance and durability but are not impervious to damage. Jumping or other aggressive riding can over-stress and damage any product, including the electric motorbike, and the rider assumes all risks associated with high-stress activity.Be careful and know your limitations. Risk of injury increases as the degree of riding difficulty increases. The rider assumes all risk associated with aggressive riding activities.Maintain a hold on the handlebars at all times.Never carry passengers or allow more than one person at a time to ride the electric motor bike.Never use near steps or swimming pools.Keep your fingers and other body parts away from the drive chain, steering system, wheels and all other moving components.Never use headphones or a mobile phone when riding.Never hitch a ride with another product.Do not ride the Dirt Rocket in wet or icy weather and never immerse the electric motorbike in water, as the electrical and drive components could be damaged by water or create other possibly unsafe conditions.The Dirt Rocket is intended for use on flat, level ground without loose debris such as rocks or gravel. Wet, slick, bumpy, uneven or rough surfaces may impair traction and contribute to possible accidents. Do not ride the electric motorbike in mud, ice, puddles or water. Avoid excessive speeds that can be associated with downhill rides. Never risk damaging surfaces such as carpet or flooring by use of an electric motorbike indoors.Do not ride at night or when visibility is limited.PROPER RIDING ATTIREAlways wear proper protective equipment such as an approved safety helmet (with chin strap securely buckled), elbow pads and kneepads. A helmet may be legally required by local law or regulation in your area. A long-sleeved shirt, long pants and gloves are recommended. Always wear athletic shoes (lace-up shoes with rubber soles), never ride barefooted or in sandals, and keep shoelaces tied and out of the way of the wheels, motor and drive system.USING THE CHARGERThe charger supplied with the electric motorbike should be regularly examined for damage to the cord, plug, enclosure and other parts, and in the event of such damage, the bike must not be charged until the charger has been repaired or replaced.Use only with the recommended charger.Use caution when charging.The charger is not a toy. Charger should be operated by an adult.Do not operate near flammable materials.Unplug charger and disconnect from bike when not in use.Always disconnect from the charger prior to wiping down and cleaning your electric motorbike with liquid.FAILURE TO USE COMMON SENSE AND HEED THE ABOVE WARNINGS INCREASES RISK OF SERIOUS INJURY. USE WITH APPROPRIATE CAUTION AND SERIOUS ATTENTION TO SAFE OPERATION.warnIng: DO NOT USE NON-RAZOR PRODUCTS WITH YOUR RAZOR DIRT ROCKET. The Dirt Rocket has been built to certain Razor design specifications. The original equipment supplied at the time of sale was selected on the basis of its compatibility with the frame, fork and all other parts. Certain aftermarket products may or may not be compatible and will void your warranty.required Tools5mm and 6mm Allen wrenches (Included)2.5mm Allen wrench (Not Included)Spoke tightener(Included)Charger Phillips screwdriver (Included)Bicycle tire pump for Schrader valve tires, with pressure gauge (Not Included)Remove contents from box. Remove the foam separators that protect the components from damage during shipping. Inspect the contents of the box for scratches in the paint, dents or kinked cables that may have occurred during shipping. Because the Dirt Rocket is 95 percent assembled and packed at the factory, there should not be any problems, even if the box has a few scars or dents.MAKE SURE POWER SWITCH IS TURNED “OFF” BEFORE CONDUCTING ANY MAINTENANCE PROCEDURES.estimated assembly and set-up TimeRazor recommends assembly by an adult. Allow up to 30 minutes for assembly.Allow up to 12 hours for initial charge (see page 5 for charging information).10mm, 14mm and 17mmopen wrenches (Included)19mm open wrench (Not Included)1Place the handlebars in the handlebar clamps. Note: Handlebar clamps are located in the plastic bag.2Align parallel to the fork andtighten the bolts using a 6mmAllen wrench. When properlytightened, the handlebars shouldnot move forward or back.Adjust the brake leveradjuster to the proper placeand tighten it with the 5mmAllen wrench.attaching the Handlebars1 Align fender with the holein the fork and insert thebolt. Tighten securely using a10mm open wrench and 5mmq attaching the front fenderInflating the TiresTires are inflated when shipped, but they invariably lose some pressure between the point of manufacturing and your purchase.Note: The pressurized airsupplies found at gasoline stations are designed to inflate high-volume automobile tires. If you decide to use such an air supply to inflate your tires, first make sure the pressure gauge is working, then use very short bursts to inflate to the correct PSI. If you inadvertently over-inflate the tire, release the excess pressure immediately.Using a bicycle tire pump equipped for Schrader valves, inflate the tires to the PSI indicated on the sidewall of the tire.warnIng:Failing to properly adjust and tighten the nuts and bolts that affix the fork can cause you to lose control and fall.through the other side of the wheel hub, add the other spacer and slide though the fork. Secure with washer and nut.Note: Front axle is installed with the spacer between the fork and wheel for all Dirt Rockets.Note: If your model has one short spacer, it goes on the side of the hub with the disc brake.Note:where front axle is located in box.1 Position wheel in front fork and slide disk brake into caliper.3 With a 14mm and 17mmopen wrench tighten the front wheel screws.The brake is capable ofcausing the electric motorbike repaIr anD MaInTenancewarnIng:Always disconnect your electric motorbike from the charger beforewarnIng:To prevent shock, please follow the instructions accordingly and do not skip any steps.Note: the arrangement of the hardware sequence:Right Side (Throttle)16-1 Nut 16-2 Washer 16-3 Spacer Left Side (Brake)16-1 Nut 16-2 Washer 16-3 Spacer16-116-316-216-216-316-1qwarnIng:To avoid a pinch or injury, keep fingers away from moving q warnIng: Regularly check the spoke tension and retighten the 1q Battery care and DisposalDisposal: Your Razor product uses sealed lead-acid batteries which must be recycled or disposed of in an environmentally sound manner. Do not dispose of a lead-acid battery in a fire. The battery may explode or leak. Do not dispose of a lead-acid battery in your regular household trash. The incineration, land filling or mixing of sealed lead-acid batteries with household trash is prohibited by law in most areas. Return exhausted batteries to a federal or state approved lead-acid battery recycler or a local seller of automotive batteries. If you live in Florida or Minnesota, it is prohibited by law to throw away lead-acid batteries in the municipal waste stream.q chargerThe charger supplied with the bike should be regularly examined for damage to the cord, plug,enclosure and other parts and in the event of such damage, the Dirt Rocket must not be charged until it has been repaired or replaced.Use ONLY with the recommended charger.warnIng:If a battery leak develops, avoid contact with the leaking acid and place the damaged battery in a plastic bag. Refer to the disposal instructions at left. If acid comes into contact with skin or eyes, flush with cool water for at least 15 minutes and contact a physician.warnIng: Batteryposts, terminals and related accessories contain lead and lead compounds. Wash your hands after handling.Motor bike does not runMotor bike was running but suddenly stoppedShort run time (less than 15 minutes per charge)Motor bike runs sluggishlySometimes the motor doesn’t run, but other times it doesMotor bike does not stop when applying the brake Motor bike makes loud noises or grinding soundsproblem possible cause solutionUndercharged batteryLoose wires or connectorsBurned-out fuseMotor or electrical switch damageUndercharged batteryBattery is old and will not accept full chargeBrakes are not adjusted properlyRiding conditions are too stressful Tires are not properly inflatedMotor bike is overloadedLoose wires or connectors Motor or electrical switch damageBrakes are not adjusted properly Chain is too dryCharge the battery. A new battery should have been charged for at least 12 hours before using the motor bike for the first time and up to 12 hours after each subsequent use.Check all connectors. Make sure the charger connector is tightly plugged into the charging port, and that the charger is plugged into the wall.Make sure power flow to the wall outlet is on.Check all wires and connectors to make sure they are tight.The fuse will burn out and automatically shut off the power if the motor is overloaded.An excessive overload, such as too heavy a rider or too steep a hill, could cause the motor to overheat. Replace the fuse(s) with a new one of equal amperage. Correct the conditions that caused the fuse to burn out and avoid repeatedly burning out fuse.Contact your local Razor authorized service center for diagnosis and repair.Charge the battery. A new battery should have been charged for at least 12 hours before using the motor bike for the first time and up to 12 hours after each subsequent use.Check all wires and connectors. Make sure the battery connector is tightly plugged into the charger connector, and that the charger is plugged into the wall.Even with proper care, a rechargeable battery does not last forever. Average battery life is 1 to 2 years depending on use of product and conditions. Replace only with a Razor replacement battery.Refer to brake adjustment instructions on page 5 of this e only on solid, flat clean and dry surfaces such as pavement or level ground.The tires are inflated when shipped, but they invariably will lose some pressure between the point of manufacturing and your purchase. Refer to instructions on page 4 of this manual to properly inflate tires.Make sure you do not overload the motor bike by allowing more than one rider at one time, exceeding the maximum weight limit, going up too steep a hill or towing objects behind the vehicle.Check all wires around the motors and all connectors to make sure they are tight.Contact your local Razor authorized service center for diagnosis and repair.Refer to instructions on page 5 of this manual to properly adjust brakes.Apply a lubricant such as 3 in 1TMor Tri-Flow TMto the chain.01 Handlebar grip (right/left)02Twist grip throttle02-1 Sleeve 03 Front brake lever assembly (right)04 Handlebar05 Rear brake lever assembly (left)06 Front fork 07Front fender08 Handlebar clamp (upper/lower)09 Front wheel complete 10 Caliper brake 11 Shock 12 Control module13 Battery (3- 12V/ 12Ah) with Fuse 14 MX500 motor (36V/500W)MX650 motor (36V/650W)15 Kickstand16 Rear wheel complete 17 Chain 18 Chain guard19 Battery cover (left/right)20 On/ Off switch 21 Charger port 22Seat fairingSB 1918 (CALIFORNIA) DECLARATIONYOUR INSURANCE POLICIES MAY NOT PROVIDE COVERAGE FOR ACCIDENTS INVOLVING THE USE OF THIS SCOOTER/ELECTRIC RIDE-ON PRODUCT. TO DETERMINE IF COVERAGE IS PROVIDED, YOU SHOULD CONTACT YOUR INSURANCE COMPANY OR AGENT.Tire InflationPeriodically inspect the tires for excess wear and replace as required, and regularly check the tire pressure and re-inflate as necessary. If you get a flat tire, the inner tube can be patched or a new tube can be purchased from Razor or an authorized repair center.safety gearAlways wear proper protective equipment, such as an approved safety helmet, elbow pads and kneepads. Always wear shoes, never ride barefooted or in sandals, and keep shoelaces tied and out of the way of the wheels, motor anddrive system.razor limited warrantyThe manufacturer warranties this product to be free of manufacturing defects for a period of 90 days from date of purchase. This Limited Warranty does not cover normal wear and tear, tires, tubes orcables, or any damage, failure or loss caused by improper assembly, maintenance, or storage or use of the Razor Dirt Rocket.This Limited Warranty will be void if the product is ever: •used in a manner other than for recreation;•modified in any way;•rented.The manufacturer is not liable for incidental or consequential loss or damage due directly or indirectly to the use of this product.Razor does not offer an extended warranty. If you have purchased an extended warranty, it must be honored by the store at which it was purchased.For your records, save your original sales receipt with this manual and write the serial number below.__________________________________________Item Numbers:MX500 15128190MX650 15165070loose partsThere should not be any unusual rattles or sounds from loose parts or broken components. If you are not sure, ask an experienced mechanic to check.BrakesCheck the brakes for proper function. When you squeeze the lever, the brake should provide positive braking action.frame, fork and HandlebarsCheck for cracks or broken connections. Although broken frames are rare, it is possible for an aggressive rider to run into a curb or wall and wreck and bend or break a frame. Get in the habit of inspecting yours regularly.q pre-rIDe cHecKlIsTq qq qDo not use this product for the first time until you have inflated the tires to the correct psI and charged the battery for at least 12 hours.failure to follow these instructions may damageyour product and void your warranty.Discover skating and wheel toys in our online store.。
信立成变频器说明书

感谢您选择公司D5M 系列多功能、高性能变频器。
变频器在安装,配线,运行中的错误操作可能引起意外事故,使用之前请务必仔细阅读此说明书,掌握正确的使用方法,避免由于使用不当而造成的人身及财产损失。
阅读后请妥善保管说明书,以便于日后的维护,保护及其他场合使用。
为了您的安全,请务必由专业的电机工程人员安装、调试变频器及调整参数。
本说明书中有、 标记的为提醒您在搬运、安装、运转、检查变频器等过程时的安全防范事项,请务必遵守,让变频器使用更加安全。
使用过程中如有不明之处请查阅本说明书,若存在解决不了的问题,请随时与本公司各地经销商联络,或直接与本公司联系,我们的专业人员将热诚为您服务。
版本号:1.3 日期:2012-1-6致力于产品的不断完善,公司保留对本说明书修改而不另行通知的权利。
本说明书将安全等级分为“危险”和“注意”,分别使用下列标记::未按照要求使用时,可能造成人员伤亡。
:未按照要求使用时,可能造成人员伤害及变频器或机械系统损坏。
附有安全标记的内容,请务必遵守。
由于情况的不同,“注意”事项也可能造成严重后果,请遵循说明书中的注意事项。
—信立成变频器—●实施配线,务必关闭电源。
●切断交流电源后,充电指示灯未熄灭前,表示变频器内部仍有高压,十分危险,请勿触摸内部电路及零部件。
●运转时,请勿检查电路板上零部件及信号。
●请勿自行拆装更改变频器内部连接线或线路,零部件。
●请勿用湿手操作开关按钮,防止触电。
●变频器接地端请务必正确接地。
●严禁私自改装、更换控制板及零部件,否则有触电、发生爆炸等危险。
●请勿对变频器内部的零部件进行耐压测试,这些半导体零件易受高压损毁。
●绝不可将变频器输出端子U.V.W连接至交流电源。
●正在通电或断开电源不久,变频器和制动电阻处于高温状态,请不要接触它们,以免引起烫伤。
●各个端子上所加的电压只能是使用手册上所加的电压,以防止爆裂,损坏等等。
●变频器主电路板CMOS、IC易受静电影响及破坏,请勿触摸主电路板。
RXD250 Racer商品说明书

Please fully read and understand this manual and the operation and all safety aspects required of you for the safe operation of this product. Before use, if you feel this product is not for you please return it to your place of purchase.RISE products are to be used by ages 14 and over.Manual Specifications and Description ChangesThe instruction manual, warranties and other associated documentation are subject to change without notice. Hobbico assumes no responsibility for inadvertent errors to this manual.WARNING INSTRUCTION MANUALREQUIRED FOR COMPLETION:6-channel Transmitter with Receiver 3S 1300m~2200mAh LiPo Battery LiPo Battery Charger 5.8G Transmitter for FPV (optional)FPV Camera (optional )5.8G Receiver with Video Monitor or Goggles (optional )INTRODUCTIONThank you for purchasing the RXD250 Racer. We want the time you spend with your new R/C quadcopter to be fun and successful so please read the entire manual before beginning setup. If for any reason you think this R/C model is not for you, return it to the dealer immediately. Your dealer cannot accept returns on any model after final assembly.For the latest technical updates or manual corrections for the RXD250 please visit the Rise web site at . If there is any new technical information, changes or important updates to this model, a “tech notice” box will appear on the page. Click the “tech notice” box to learn more. SAFETY PRECAUTIONS●K eep your face and body as well as all spectators away from the rotatingplane of the blades whenever the battery is connected. Keep loose clothing, shirt sleeves, ties, scarfs, long hair or loose objects such as pencils or screwdrivers that may fall out of shirt or jacket pockets away from the rotors. The spinning blades of a model quadcopter can cause serious injury. When choosing a flying site for your RXD250, stay clear of buildings, trees and power lines. AVOID flying in or near crowded areas. DO NOT fly close to people or pets. Maintain a safe distance from the quadcopter.●Y our RXD250 should not be considered a toy. Because of its performancecapabilities, the RXD250, if not operated correctly, could cause injury to you or spectators and damage to property.●D O NOT alter or modify the model. Doing so may result in an unsafe orunflyable model.●W hen and if repairs are necessary you must correctly install all componentsso that the model operates properly on the ground and in the air. Please check the operation of the model before every flight to insure that all equipment is operating and that the model has remained structurally sound. Be sure to check connectors and the propellers before each flight.Replace them if they show any signs of wear or fatigue.KNOW BEFORE YOU FLYAs a new owner of an unmanned aircraft system (UAS), you are responsible for the operation of this vehicle and the safety of those around you. Please contact your local authorities to find out the latest rules and regulations.In the United States, please visit:/uasAMAWe urge you to join the AMA (Academy of Model Aeronautics) and a local R/C club. The AMA is the governing body of model aviation and membership is required to fly at AMA clubs. Though joining the AMA provides many benefits, one of the primary reasons to join is liability protection. Coverage is not limited to flying at contests or on the club field. It even applies to flying at public demonstrations and air shows. Failure to comply with the Safety Code may endanger insurance coverage. Additionally, training programs and instructors are available at AMA club sites to help you get started the right way. There are over 2,500 AMA chartered clubs across the country. Contact the AMA at the address or toll-free phone number that follows. Academy of Model Aeronautics5151 East Memorial DriveMuncie, IN 47302-9252Tele. (800) 435-9262Fax (765) 741-0057Or via the Internet at: IMPORTANT: Two of the most important things you can do to preserve the radio controlled aircraft hobby are to avoid flying near full-scale aircraft and avoid flying near or over groups of people.BATTERY WARNINGS●A LWAYS unplug your battery from either the charger or quadcopter afteruse. NEVER store your quadcopter with the battery plugged into the quadcopter.●D O NOT attempt to charge your battery if it becomes swollen or hot.●T he RXD250 does not have a voltage cutoff failsafe. When the LEDs beginto fl ash, land the quad and disconnect the battery.●I t is best to store your batteries in a cool, dry location at 1/2 charge (11.4V).Storing a fully discharged battery may cause irreversible damage to the battery.●N EVER disassemble, puncture or modify the battery pack in any way.●N EVER allow the battery temperature to exceed 150° F [65° C].●I f your battery begins to swell or “puff” during charge or discharge orbecomes damaged in any way, stop using it.WARRANTYRise™guarantees this kit to be free from defects in both material and workmanship at the date of purchase. This warranty does not cover any component parts damaged by use or modifi cation. In no case shall Rise’s liability exceed the original cost of the purchased kit. Further, Rise reserves the right to change or modify this warranty without notice. In that Rise has no control over the fi nal assembly or material used for fi nal assembly, no liability shall be assumed nor accepted for any damage resulting from the use by the user of the fi nal user-assembled product. By the act of using the user assembled product, the user accepts all resulting liability. If the buyer is not prepared to accept the liability associated with the use of this product, the buyer is advised to return this kit immediately in new and unused condition to the place of purchase.To make a warranty claim, send the defective part or item to Hobby Services at this address.Hobby Services 217-398-8970 ext#63002 N. Apollo Dr., Suite 1Champaign, IL 61822 USA********************************Include a letter stating your name, return shipping address, as much contact information as possible (daytime telephone number, fax number, e-mail address), a detailed description of the problem and a photocopy of the purchase receipt. Upon receipt of the package the problem will be evaluated as quickly as possible.FEATURES●250 class racing quad●E xtremely durable foam, carbon fi ber, and fi berglass frame●10A brushless speed controls●2280kV brushless motors●R eceiver Ready, no building required●F light Controller is pre-programmed, no setup needed DIMENSIONSSize: 250 mm (9.8 in) diagonally motor to motorWidth: 220 mm (8.7 in)Length: 270 mm (10.6 in)Blade Length: 125 mm (4.9 in)Empty Weight: 300 g (10.6 oz) without battery and FPV systemWeight: 437 g (15.4 oz) with 1300mA LiPo and FPV systemRTFCONTENTS● R XR Rise RXD250● S pare Props ● H ook & Loop pads for the battery FLIGHT MODESThe RXD250 has three flight modes.Stability Mode has limits on thetilt angle and the quadcopter willlevel itself when the right stick iscentered. The Rattitude Mode will centerthe quad and limit the tilt angle when the right stick is near center. When the stick is moved away from center, the limits are removed making the quad much more maneuverable. Flips are rolls are easily done in this mode.Rate Mode is available for experienced pilots that want maximum maneuverability. In this mode, the quad will maintain its current pitch or heading when the right stick is released. The quadcopter’s flight will be smoother and more responsive in this mode.SETUPThe RXD250 needs only minimal assembly. All the bolts have been set to the proper torque and have thread locking compound applied to keep them secure.PROPELLERS The propellers are counter rotating and must be installed correctly orthe quad will not fly. Wheninstalling or replacing propellers,make sure you install the correctprop on the correct corner. Notethat two of the motor shafts andnuts are “reverse” threaded.CW= clockwise rotation whenobserved from the top.CCW=counter clockwise rotationwhen observed from the top.Receiver Mount FPV Transmitter MountAntenna MountAntenna Mount HD Camera Mount CW PROP “Reverse” Nut CW PROP “Reverse” NutFRONT CCW PROP “Normal” Nut CCW PROP “Normal” NutRADIO SYSTEMYour transmitter needs to have a switch for channel 5. The setup below is typical for most transmitters. The receiver must have one port for each channel. S-bus, X-bus, and satellite receivers cannot be used with the 8 pin receiver cable.Mount the receiver just in front of the flight controller. Install the antenna mounts as illustrated or run the antenna down through the frame.Receiver locationwith double-sided tape.Antenna AntennaConnect the receiver tothe CC3D flight controller.FLIGHT CONTROLLER SETUPDownload the Librepilot Ground Station app (GCS) from from the software downloads section.To set up your transmitter using the GCS app, you will need:A.A mini-USB cable to connect the cc3d controller to the GCS app.B.A charged flight battery.C.T he transmitter set up with the new model and linked to the receiver.Open the GCS app and connect the RXD250 with your mini-USB cable. When the communication window shows that the flight controller is connected to the GCS app, click on the configuration button.Click on the input button.Click on the Transmitter setup wizard button and follow the steps to set up the transmitter.ARMING SETTINGAt the end of the wizard is the screen to set the motor arming procedure. The recommended setting is Yaw Right which requires the yaw control to be held to the right while the throttle is at 0 for 3 seconds to arm the motors. Holding the Yaw control to the left will disarm the motors. There are several other options available for arming/stopping the motors including using a switch assigned to Channel 6.After the Arming Setting is completed, the settings need to be saved to the flight controller.GENERAL SETTINGSAny time the controller is connected to the app, the following settings should be checked.A. V ehicle Configuration Screen –Motor Output Channel 1 – Channel3Motor Output Channel 3 – Channel1B. A ttitude Configuration Screen – Yaw is set to -90FAILSAFEIf your transmitter can set values for all the channels for failsafe, set the roll & pitch channels to midstick and the throttle to its lowest setting to stop the motors.For transmitters that only set failsafe on the throttle channel, set the throttle to its lowest settingBe sure to remove the props before testing the failsafe operation.BATTERIESThe RXD250 has been tested with 3 cell lipos between 1300(30C or larger) and 2200mAh (20C or larger). Typical flight time is between 4 and 6 minutes.IMPORTANT! The flight controller does not have a low voltage cutoff to protect the lipo from damage. The LEDs on the bottom of the RXD250 will start flashing when the battery is at 10.2V for a 3S battery. You MUST land the quadcopter as soon as the LEDs start to flash.For your first flight, set a timer for 4 minutes. If the LEDs are not flashing at the end of the flight, the timer setting could be increased to find the optimal flight time. If the LEDs are flashing at the end of the flight, the timer setting should be reduced to protect the battery from damage.We recommend using a voltage monitor/alarm that plugs into the battery’s balance connector and will sound an alarm when the battery voltage gets low.WARNING: Your battery life will be reduced and the battery can be damaged any time the battery voltage is low enough for the LEDs to flash. Charging a Lipo battery that is damaged in any way can pose a fire hazard.VIDEO SYSTEM SETUPThe optional camera (RISE2508) is designed to fit the cameramounting plate without anymodifications.The camera is designed to operateon just 5 volts. The red and blackwires should be connected to areceiver port to power the camera.Warning- check the polarity of thecamera connection before connectingthe flight battery to the RXD250. Thecamera will be damaged if thepolarity is backwards. The Tactic 200mW FPV transmitter(TACZ5005) is recommended. It can be easily connected to the 12 volt connector at the back of the RXD250 and has additional cables that make connecting the optional camera a simple task.MOTOR ARMING & TAKEOFFTurn on the transmitter and connect the flight battery to the RXD250. Place the quadcopter on a level surface and let it sit for 10 seconds to let the flight controller set up the gyros.Arm the motors by holding the yaw control to the right for at least 3 seconds, and center the left stick. Advance the throttle to start the motors and take off.To disarm the motors, bring the throttle down to 0% and hold the yaw control to the left.FLYINGThe RXD250 is a racing quad. As such it is capable of flying at high rates of speed and can get out of sight very quickly. We recommend flying the quad in stability mode without FPV for several flights until you are fully familiar with how this quad handles.As your skills grow, try Rattitude mode. When flying in this mode, let go of the right stick if you find yourself in trouble. The quad will level itself and become stable.FPV RACING WEBSITESMore information about FPV racing can be found at sites like and FPV TransmitterSPARE PARTS1 RISE2501 CC3D Flight Ccontroller2 RISE2502 Brushless Motor (2)3 RISE2503 10 AMP ESC4 RISE2504 5x3 Propeller SetGear5 RISE2505 Landing6 RISE2506 Prop Nut SetSet7 RISE2507 Frame(Optional)8 RISE2508 Camera。
安川G5变频器使用说明-自整理

安川G5变频器使用说明-自整理Frequency Ref 频率给定Main Menu Operation 主菜单操作Modified Consts 修改参数Reference d1-01 参数d1-01 OL2 Chara & L-Spd Enable OL2使能Prtct & L-Spd Fixed fc 固定的参考值Base Frequency 基础频率Max Frequency 最大频率Input Voltage 输入电压Auto Tuning 自动调谐Data Invalid 数据无效Rated Voltage 额定电压Rated Current 额定电流Rated Frequency 额定频率Rated Speed 额定转速Nunmbr of Poles 电机极数Select Motor 选择电机Programming 编程Reference Source 基准源B1-01Terminals 终端接线端Operator 手动操作Reference SourceOption PCB 基准源选择PCB Serial Com 窜行通讯NO-Load Current 空载电流E2-03=22.0AMotor Rated Slip 电机额定滑差E2-02=1.6HZMotor Rated FLA 电机额定的FLA(工作电流)E2-01=79.7a Base Voltage 基准电压E1-13=0.0VACMin Frequency 最小频率E1-09=0.5hzBase Frequency 基准频率E1-06=50.0hzMax Voltage 最大电压E1-05=400.0VACMax Frequency 最大频率V/F Selection V/F选择(电压频率选择)Custom V/F 设定定义V/FE1-03=FF Custom w/o limit 自定义W/O限制Motor Selection Std Fan Cooled 电机选择标准风扇冷却E1-02=0***Std Fan Cooled 标准风扇冷却E1-02=2 Vector Motor 矢量控制E1-02=1 Std Blower Cooled 标准风机冷却Input Voltage 输入电压E1-01=380VacJog Reference 软启动参数Reference 4 频率4d1-04=0.00hzReference 3 频率3d1-03=0.00hzReference 2 频率2d1-02=0.00hzReference 1 频率1d1-03=100.00hzDecel Time 减速时间C1-02=10.0 SecAccel Time 加速时间C1-01=10.0 secStopping Method Ramp to Stop 减速停车方法b1-03=0*** Ramp to stop 减速停车b1-03=3 Coast w/Timer 计时停车b1-03=2 DCInj to Stop 直流能耗制动停车b1-03=1 Coast to Stop 自由停车Run Source Terminals 运行终端b1-02=1*** Terminals 终端b1-02=0 Operator 手动操作b1-02=4 EWS 远程控制Initialize 初始化Select Language 选择语言Enter PasswordA1-04=0 输入密码A1-04=0Init Parameters No Initialize 参数没有初始化A1-03=0*** No Initialize 没有初始化A1-03=3330 3-Wire Initial 3相初始化A1-03=2220 2-Wire Initial 2相初始化Control Method Open Loop Vector 控制方式开环矢量A1-02=2*** Open Loop Vector 开环矢量A1-02=1 V/F w/PG Fdbk 电压频率闭环反馈A1-02=0 V/F Control 电压频率控制A1-02=3 Flux Vector 磁通矢量Access Level Quick Start 访问级别的快速启动A1-01=2*** Quick Start 快速启动A1-01=0 Operation Only 只能手动操作A1-01=4 Advanced Level 平稳启动A1-01=3 Basic Level 基本平稳启动Operation 操作Frequency Ref U1-01=0.00hz 频率给定Function U1 Monitor 功能监测U1Function U3 Fault History U3的功能故障历史记录Function U2 Fault Trace U2的故障跟踪记录Output Voliage U1-06=0.0vac 输出电压Output Current 输出电流Output Freq U1-02=0.00HZ 输出换向OPE05 Sequence Select 序列选择Modified Consts 修改参数Initialize 初始化mid voltage 中间电压DC Bus Undervolt 直流总线欠压Local REMOTE 本地或者远程jog 换向Function key o2 Selections 功能键O2选择Local remote key enabled 启用本地遥控钥匙Inverter model 4045 逆变器模型4045 User Defaults 用户默认o2-03=0 No Change 无变化o2-03=1 Set Defaults 设置默认值o2-03=2 Clear A11 清除A11Open STOP Key enable 开关使能Function U3 Fault History U3的功能故障历史记录Function U2 Fault Trace U2的故障跟踪功能Function U1 Monitor 功能U1的监视器Terminal 8 Sel Jog Freg Ref 终端换向频率8H1-06=0 3-Wire Control 3线控制H1-06=1 Local/Remote Sel 本地/远程信号H1-06=2 Option/Inv Sel 选择/反相器信号H1-06=3 Multi-Step Ref 1 多步骤参考1H1-06=4 Multi-Step Ref 2 多步骤参考2H1-06=5 Multi-Step Ref 3 多步骤参考3H1-06=6 Jog Freq Ref 点动频率参考H1-06=7 Multi - Acc/Dec 1 多段控制加速/减速H1-06= 8 Ext Base Blk N.O. 分机模式开H1-06=9 Ext Base Blk N.O. 分机模式空H1-06=A Acc/Dec Ramp Hold 加速减速曲线保持H1-06=B OH2 Alarm Signal OH2报警信号H1-06=C Term 16 enable 条件16 使能H1-06=F Term Not Used 未使用H1-06=10 Mop Increase MOP 增加H1-06= 11 Mop Deccrease MOP 减速H1-06=12 Forward Jog 正向点动H1-06=13 Reverse Jog 反向点动H1-06=14 Fault Rest 错误复位H1-06=15 Fast-Stop N.O. 快速-停止开H1-06=16 Motor 2 Select 电机2 选择H1-06= 17 Fast-Stop N.C. 快速-停止关H1-06=18 Timer Function 定时功能H1-06=19 Pid Disable PID控制使不能H1-06=1A Multi-Acc/Dec 2 多段加速/减速2H1-06=1B Program Lockout 程序锁定(关闭)H1-06=1C Trim Ctl Increase 增加修正H1-06=1d Trim Ctl Decrease 减小修正H1-06=1E Ref Sample Hold 频率采样保持H1-06=1F Term 13/14 Swtch 条件13/14 交换H1-06=24 External Fault 外部故障H1-06=30 Pid Intgrl ResetH1-06=31 PID Intgrl HoldH1-06=60 DCInj ActivateH1-06=61 Sped Search 1H1-06=62 Sped Search 2H1-06=63 Energy Save Mode H1-06=64 Speed Search 3H1-06=65 KEB Ridethru NC H1-06=66 KEB Ridethru NO。
飞利浦 AJ5300D 用户手册说明书

注意 • 存在损坏产品的风险! 请确保实际电源电压与印
在装置背面或底部的电压相符。
• 存在触电危险! 拔下电源适配器时,务必先将插
头从电源插座中拔出。切勿拉扯电源线。
• 连接电源适配器之前,请确保您已完成所有其它
连接。
• 仅使用随附的电源适配器。
开机
按。 »» 本时钟收音机将切换到上一个选定 的来源。
设置定时关机
本时钟收音机在预设时段后可切换至待机 模式。 反复按 SLEEP 选择定时关机(分钟)。
»» 当定时关机激活时,将出现 。 要禁用定时关机,请反复按 SLEEP,直到出 现 OFF。
调节显示屏亮度
反复按 BRIGHTNESS 可选择不同的亮度级 别。
ZH-CN 9
6 产品信息
注 • 产品信息如有更改,恕不另行通知。
提示 • 如果将 iPod/iPhone 选为闹钟来源,而没有连接
iPod/iPhone 时,时钟收音机将切换至蜂鸣器来源。
• 对于通过时钟收音机设置的闹钟,您还可以选择
将存储在 HomeStudio 应用程序中的自然声音作为 闹钟声音。
激活/禁用闹钟定时
1 按 AL1/AL2。 »» 将显示闹钟设置。
注 • 确保您已正确设置时钟。
1 按住 AL1/AL2 2 秒以上以激活闹钟设 置模式。 »» 小时位和闹钟图标将开始闪烁。
2 反复按 / 设置小时。 3 按 AL1/AL2 确认。
»» 分钟数位将开始闪烁。
4 请重复步骤 2-3 以设置分钟,选择闹钟 来源(蜂鸣器、FM 收音机或底座), 并调节音量。
g TIME SET(时间设置) • 设置时间。
h TUNING(调谐) • 调谐或扫描至 FM 电台。
S500系列大屏幕温湿度计用户手册说明书

S500 系列大屏幕温湿度计用户手册S500 系列温湿度记录仪用户手册S500-EX/TH/ET/DT-USB S500-EX/TH/ET/DT-RS4854.1 注意事项----------------------------------------------------------------------------------------------------4.2 常见故障----------------------------------------------------------------------------------------------------目 录第一章 产品介绍-------------------------------------------------------------------------11.1 产品特点----------------------------------------------------------------------------------------------------1.2 使用范围----------------------------------------------------------------------------------------------------1.3 性能参数----------------------------------------------------------------------------------------------------1.4 S500-EX/TH/ET/DT-USB记录仪外型说明------------------------------------------------------------1.5 S500-EX/TH/ET/DT-RS485记录仪外型说明--------------------------------------------------------- 1.6 LCD 显示屏符号说明-------------------------------------------------------------------------------------1.7 按键功能说明----------------------------------------------------------------------------------------------第二章 S500-EX/TH/ET/DT-USB软件使用指南-------------------------------------2.1 USB 驱动安装----------------------------------------------------------------------------------------------2.2 Logpro 软件的使用---------------------------------------------------------------------------------------第三章 S500-EX/TH/ET/DT-RS485软件使用指南----------------------------------3.1 ToMonitor 实时监测软件的使用方法-----------------------------------------------------------------3.2 查看上传的数据-------------------------------------------------------------------------------------------第四章 使用注意事项-------------------------------------------------------------------------------111234557510131616516第一章 产品介绍1.1 产品特点1.2 使用范围采用进口原厂封装校准一体式温湿度传感器内置容量存储器,可存储4.3万组温湿度数据测量温湿度精准度高温湿度数据和时间同时显示,按键操作简单方便内置声光报警,超限报警功能。
- 1、下载文档前请自行甄别文档内容的完整性,平台不提供额外的编辑、内容补充、找答案等附加服务。
- 2、"仅部分预览"的文档,不可在线预览部分如存在完整性等问题,可反馈申请退款(可完整预览的文档不适用该条件!)。
- 3、如文档侵犯您的权益,请联系客服反馈,我们会尽快为您处理(人工客服工作时间:9:00-18:30)。
苛刻条件。
安装参数
最小通风量(m3/s)30.5最小机房面积(mm)9000×6000×3500(L-W-H)
燃烧空气量(m3/s) 2.61导风管长度(mm)600
最小进风面积(m2)8.8离地高度(mm)≈700
最小排放面积(m2) 6.8排烟管高度(mm)3000
水箱排风口尺寸(mm)2340×2415水泥地基厚度(mm)>150
日用油箱容量(L)1000最大背压(k Pa) 6.7注:安装应根据现场情况因地制宜,表中的安装数据除设备固定参数,其他为康明斯公司建议的常规数据,请用户知悉。
----------------------
柴油机技术说明
对于技工岗位的工程师,请向当地服务中心获取专业维修资料和参考内容。
-康明斯是全球大马力柴油机家族中维护和维修成本最低、最耐用的产品之一。
-基于极其成功的康明斯系列结构设计,增加柴油机排量,提升其功率。
-成熟可靠的技术使康明斯被大量运用于全球矿用、港口、建筑、发电机组等移动式和固定式设备。
-康明斯对其专利的PT燃油系统进行了优化,设计了新型的喷油器和凸轮轴,提升了喷油雾化质量,提高了燃油效率和其经济性。
-拥有康明斯全球统一标准的通用货源,同时延续了模块化结构,使维护和维修成本更低。
-柴油机启动性能优异,瞬态响应快,性能卓越,让用户用电高枕无忧。