键盘鼠标同步器说明书
HSL KM 共享键盘鼠标设备安装指南说明书
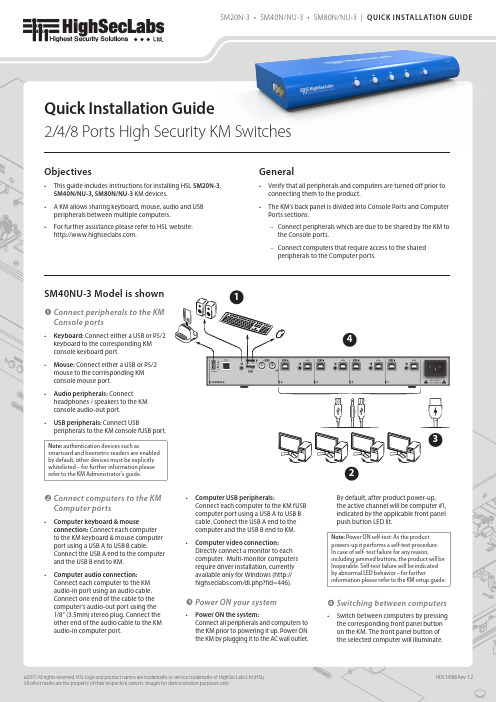
Objectives• This guide includes instructions for installing HSL SM20N-3, SM40N/NU-3, SM80N/NU-3 KM devices.• A KM allows sharing keyboard, mouse, audio and USB peripherals between multiple computers.• For further assistance please refer to HSL website: .General• Verify that all peripherals and computers are turned off prior to connecting them to the product.• The KM’s back panel is divided into Console Ports and Computer Ports sections.–Connect peripherals which are due to be shared by the KM to the Console ports.–Connect computers that require access to the sharedperipherals to the Computer ports.SM40NU-3 Model is shown ❶ Connect peripherals to the KM Console ports• Keyboard: Connect either a USB or PS/2 keyboard to the corresponding KMconsole keyboard port.• Mouse: Connect either a USB or PS/2 mouse to the corresponding KMconsole mouse port.• Audio peripherals: Connectheadphones / speakers to the KMconsole audio-out port.• USB peripherals: Connect USBperipherals to the KM console fUSB port. Note: authentication devices such as smartcard and biometric readers are enabled by default, other devices must be explicitly whitelisted – for further information please refer to the KM Administrator’s guide.❷ Connect computers to the KM Computer ports• Computer keyboard & mouseconnection: Connect each computerto the KM keyboard & mouse computer port using a USB A to USB B cable.Connect the USB A end to the computer and the USB B end to KM.• Computer audio connection:Connect each computer to the KMaudio-in port using an audio cable.Connect one end of the cable to thecomputer’s audio-out port using the1/8” (3.5mm) stereo plug. Connect theother end of the audio cable to the KMaudio-in computer port.• Computer USB peripherals:Connect each computer to the KM fUSBcomputer port using a USB A to USB Bcable. Connect the USB A end to thecomputer and the USB B end to KM.• Computer video connection:Directly connect a monitor to eachcomp uter. Multi-monitor computersrequire driver installation, currentlyavailable only for Windows (http:///dl.php?fid=446).❸ Power ON your system• Power ON the system:Connect all peripherals and computers tothe KM prior to powering it up. Power ONthe KM by plugging it to the AC wall outlet.By default, after product power-up,the active channel will be computer #1,indicated by the applicable front panelpush button LED lit.Note: Power ON self-test: As the productpowers-up it performs a self-test procedure.In case of self- test failure for any reason,including jammed buttons, the product will beInoperable. Self-test failure will be indicatedby abnormal LED behavior – for furtherinformation please refer to the KM setup guide.❹ Switching between computers• Switch between computers by pressingthe corresponding front panel buttonon the KM. The front panel button ofthe selected computer will illuminate.Quick Installation Guide2/4/8 Ports High Security KM Switches1234Supported HardwareThe KM switches support most standard speakers, headsets and USB or PS/2 keyboards and mice.Environmental• Operating temperature is 32° to 104° F (0° to 40° C).• Storage temperature is -4° to 140° F (-20° to 60° C).• Humidity requirements are 0-80% relative humidity, non-condensing.SM20N-3 Dimensions177 (W) x 82 (D) x 35 (H) mm, Weight: 0.52 kg SM40N/NU-3 Dimensions342 (W) x 148 (D) x 42 (H) mm, Weight: 1.3 kg SM80N/NU-3 Dimensions440 (W) x 192 (D) x 48 (H) mm, Weight: 2.4 kgSafety and Regulatory StatementsSafety SymbolsOne or more of the following symbols may be included in your product documentation and/or on the product.Instructions: This symbol is intended to alert the user tothe presence of important operating and maintenance(servicing) instructions in the product user manual.Dangerous Voltage: This symbol is intended to alert theuser to the presence of uninsulated dangerous voltagewithin the product’s enclosure that may be of sufficientmagnitude to constitute a risk of electric shock to persons.Power On: This symbol indicates the principal on/offswitch is in the on position.Power Off: This symbol indicates the principal on/offswitch is in the off position.Protective Grounding Terminal: This symbol indicates aterminal which must be connected to earth ground priorto making any other connections to the equipment. Safety PrecautionsWARNING: To avoid a potentially fatal shock hazard and possible damage to equipment, please observe the following precautions.• Do not disable the power grounding plug. The grounding plug is an important safety feature.• Plug the power cord into a grounded (earthed) outlet that is easily accessible at all times.• Disconnect the power from the product by unplugging the power cord from either the electrical outlet or the product. The AC inlet is the main disconnect for removing power to this product. For products that have more than one AC inlet, to remove powercompletely, all AC line cords must be disconnected.• This product has no serviceable parts inside the product enclosure. Do not open or remove product cover. CAUTION: Some HSL products contain a lithium battery. This battery is not a field replaceable item, and replacement should not be attempted by a user. If errors occur when using the product and the battery is suspected, contact HSL Technical Support. WARNING: For Service Personnel Only - There is a risk of explosion if the battery is replaced with an incorrect type. Dispose of used batteries according to the manufacturer’s instructions.This product is for use with other products that are Listed or Certified by a Nationally Recognized Testing Laboratory (NRTL).NIAP Protection ProfileThis product is certified to the NIAP Protection Profile PSS version 3.0 certification for peripheral sharing switch devices.Installation PrecautionsNOTE: In order to comply with the product’s Common Criteria evaluation and to prevent unauthorized administrative access to the product, the default administrator username and password must be changed prior to first product use.Do not connect this product to computing devices that:• are TEMPEST computers• include telecommunication equipment• include frame grabber video cards• include special audio processing cardsWARNING: Peripheral Warning - For security reasons, this product does not support wireless keyboards. Do not connect a microphone or headset to the audio output port.Security VulnerabilityIf you are aware of a potential security vulnerability while installing this product, contact Technical Support immediately by:• Web form: /support/case/• Email: ************************• Tel: +972-4-9591191/2CAUTION: Anti-tamper Caution - This product is equippedwith an always-on, active anti-tampering system. Any attemptto open the product enclosure will activate the anti-tamper triggers, rendering the unit inoperable and voiding its warranty. WARNING: Unit Enclosure Warning - If the unit’s enclosure appears disrupted or if all LEDs flash continuously, remove the product from service immediately and contact Technical Support.Change ManagementFor change management tracking, perform a quarterly log check to verify that the RFD was not improperly used to override the current device policy by an unauthorized person.。
鼠标键盘共享工具Synergy的使用方法图文教程

鼠标键盘共享工具Synergy的使用方法图文教程Synergy允许你轻松地在你办公桌上多台计算机之间共享你的鼠标和键盘,它免费并且开放源代码。
你只要将鼠标(指针)从一台计算机的屏幕边缘移出到另一个屏幕就行了。
甚至可以共享你的剪贴板。
你所需要的仅仅是一个网络连接。
Synergy是跨平台的(可以运行于Windows,Mac OS X和Linux)。
先介绍本人机器环境,机器两台,Windows 7 x64, Ubuntu 12.10 x64.由于工作中需要使用Windows查看邮件,故使用Windows 7作为主机。
Server端配置在 Windows 上安装 Synergy ,不多说了,电脑,主界面如下。
主界面上点击Configure Server。
从右上角拖拽到网格上,双击配置,最多可以配置15个。
然后点击Start运行serverClient配置Ubuntu源里有,电脑技术,直接安装:1sudo apt-get install synergy同时建议安装quicksynergy,synergy的GUI工具1sudo apt-get install quicksynergy运行quicksynergy,在Server hostname/IP address 中填入server 的 IP 或 hostname ,建议使用 hostname.点击 Execute 执行。
注意两个名字都需要在 Server 端配置。
Ubuntu开机自启动在Startup Application Perferences中加入如下配置。
具体参数可以man之。
如果成功连上的话,server端的log中会有类似信息:1NOTE: accepted client connection2NOTE: client "TELENAV-90171" has connected效果如图:(责任编辑:admin)。
同步控制器使用手册

安全须知无论在任何情况下,如操作、清洁或保养,请务必遵守以下所规定的安全守则,若有因违反,而造成超出原设计、制造的安全顾虑,本公司将不予以负责。
当地若另有其它的安全规范,则请一起遵守。
警告:请在本设备允许的操作和储存环境条件下使用。
·任何情况下,无专业人员指导,切勿拆卸或碰触内部零部件;·维修设备时,严禁带电操作;·切勿使金属、液体等异物掉入设备内,以免设备损坏;·设备安装尽量远离干扰源(例如:接触器、变频器等)或采取相应的屏蔽措施;·信号线、电源线最好分开走线,以免产生干扰;·本设备与接触器不可共享一个电源,否则会有干扰产生;·本设备专门为本公司生产的VFD系列变频器配套使用而设计,使之能够发挥最佳性能,但不能保证与其它品牌变频器的匹配。
储存本品在安装之前必须置于其包装箱内,若该机暂不使用,为了使该品能够在本公司的保修范围内以及日后的维护,储存时务必注意下列事项:☞必须置于无尘垢、干燥之位置。
☞储存位置的环境温度必须在0℃到+65℃范围内。
☞储存位置的相对湿度必须在5%到90%范围内,且无结露。
☞避免储存于含有腐蚀性气、液体之环境中。
☞最好适当包装并存放在架子或台面上。
操作环境☞环境温度0℃-+50℃,若环境温度超过40℃以上时,请置于通风良好之场所。
☞相对湿度15%-+95%RH,避免安装与任何发生结露、冰冻或要接触任何液体之场所。
☞不要安装一任何有以下情况的场所:阳光直晒、浓灰尘、腐蚀性气体或油雾、易燃性气体、液体。
☞震动小于5.9米/妙(0.6g)。
SLC系列同步控制器拥有完善的功能,在技术上处于国内领先水平,在性能上可与国外同类产品相媲美。
广泛适用于由多台调速系统组成的各种机械设备上,如电力、钢铁、造纸、纺织、印染、电缆光纤、塑料等行业。
可对线速度、位移、张力、距离等进行控制,是机器设备的最佳选择。
一、型号说明SLC 04C22 (A)B 为反馈电压为0-10VA 为反馈电压为±5V控制器输出路数4路控制器系列号1、主要特点A、数字化SLC04C22A(B)控制器采用单片计算机控制,可对控制器进行多种参数设置,设置参数时通过数码显示。
32口同步器使用说明

32口同步器使用说明
键盘鼠标同步器,可以实现将一套键鼠的信息同时发给多台电脑,适用于游戏,教学,测试等领域。
由于采用了迈拓维矩绝对同步技术,鼠标在多台电脑画面完全一致,这一特点,在游戏领域非常重要。
鼠标正常工作模式。
1、同步工作模式(同步器加电后的默认模式)依次按下鼠标左键、中键、右键,再依次松开鼠标中键、左键、右键进入此次模式。
2、DN模式
按下鼠标中键、右键、再依次松开鼠标右键、中键进入此模式。
(游戏中人物转动非常快,可以通过进入DN模式解决)键盘切换功能。
(一)实现一台或全部电脑有效通过小键盘的“*”键+小键盘的“数字”键来实现。
1、依次按下“*”和“1”,再依次松开“1”和“*”,第一台电脑有效。
2、依次按下“*”和“2”,再依次松开“2”和“*”,第二台电脑有效。
3、依次按下“*”和“3”,再依次松开“3”和“*”,第三台电脑有效。
4、依次按下“*”和“0”,再依次松开“0”和“*”,全部电脑有效。
键盘自动连发功能,在同步器上,支持自动连发功能。
例如你已经
设置A键为射击连发,那您需要一直按住A键,键盘鼠标同步器将自动为你连续开火。
当你想停止射击时,松开A键即可解除连发。
你可以设置多个自动连发的按键,自动连发按键没有上限规定,如果你忘了哪些键设置了连发,你仅需要按scroll lock+ESC即可清除所有连发按键。
戴尔KM7120W多设备无线键盘和鼠标组合说明书

组合装置型号:KM7120W监管型号 KB7120Wc/MS5320Wc/RG-1216Dell多设备无线键盘和鼠标组合KM7120W用户指南版权© 2020 Dell Inc. 保留所有权利。
Dell 、EMC 和其他商标是Dell Inc.或其子公司的商标。
其他商标可能是其各自所有者的商标。
2020 – 04 Rev. A01备注、小心和警告备注:备注表示有助于您更好使用计算机的重要信息。
小心: 小心表示如果未遵守说明可能会造成硬件损坏或数据丢失。
警告: 警告表示可能造成财产损失、人身伤害或死亡。
目录包装清单 (4)功能特点 (5)鼠标 (5)顶视图 (5)底视图 (6)键盘 (7)顶视图 (7)底视图 (7)Dell Peripheral Manager (8)设置无线鼠标 (9)安装电池 (9)配对无线鼠标 (11)与USB加密狗配对 (11)使用蓝牙配对鼠标 (12)使用蓝牙配对设备 (14)设置无线键盘 (16)配对无线键盘 (18)与USB加密狗配对 (18)使用蓝牙配对无线键盘 (19)使用蓝牙配对设备 (21)规格 (23)故障排除 (25)法定信息 (29)包装清单│ 34 │ 包装清单包装清单1 无线键盘2 无线鼠标3 文档4 加密狗5 AA 型电池(3)功能特点鼠标顶视图1 左按钮2 右按钮3 滚动轮4 向前按钮5 向后按钮6 连接模式灯• 白色LED闪烁:设备未连接到计算机• LED灯亮起白色:设备已连接到计算机• 琥珀色LED闪烁:设备电池电量不足7 连接模式按钮8 PPID标签功能特点│ 56 │ 功能特点鼠标 底视图1 光学传感器2 电源开关功能特点 │ 7键盘 顶视图底视图1 电源开关4 电池盖 2 连接模式灯5 PPID 标签• 白色LED 闪烁:设备未连接到计算机 • LED 灯亮起白色:设备已连接到计算机 • 琥珀色LED 闪烁:设备电池电量不足3 连接模式开关按钮Dell Peripheral ManagerDell Peripheral Manager软件可以让您执行以下操作:•通过Action(操作)选项卡将程序快捷方式分配给设备可编程按钮或按键。
键鼠同步器工作原理

键鼠同步器工作原理
键鼠同步器是一种硬件设备,主要用于将键盘和鼠标的信号同时传输到计算机,实现同步操作。
其工作原理可分为以下几个步骤:
1. 信号接收:键鼠同步器首先接收键盘和鼠标的信号。
在键盘方面,它会接收按键的信息,例如按下、释放和组合键等。
在鼠标方面,它会接收鼠标移动和点击的信号。
2. 信号处理:接收到键盘和鼠标信号后,键鼠同步器会对信号进行处理。
首先,它会将键盘和鼠标的信号分别进行解码,以获取各自的数据。
然后,它会将这些数据进行合并,生成一组综合的输入数据。
3. 信号传输:处理后的综合输入数据会通过键鼠同步器的输出接口传输给计算机。
这个输出接口可以是USB接口或者无线接口。
无论采用哪种接口,键鼠同步器都会将综合输入数据转换成计算机可以识别的格式,并通过接口传输给计算机。
4. 信号识别:计算机接收到键鼠同步器传输的输入数据后,会对其进行识别。
计算机根据输入数据的特征和格式,确定哪些是键盘输入,哪些是鼠标输入。
5. 指令执行:最后,根据计算机识别出的键盘和鼠标输入,系统将执行相应的操作。
例如,如果识别到键盘输入为按下Ctrl 键和鼠标输入为点击某个图标,那么系统会执行以Ctrl + 鼠标点击为触发条件的操作。
通过以上步骤,键鼠同步器实现了将键盘和鼠标的信号同步传输到计算机,使用户可以同时使用键盘和鼠标进行操作。
这样可以提高用户的工作效率和使用体验。
[讲解]轩氏同步器使用说明
轩氏同步器使用说明键盘鼠标同步器说明书1.串屏功能:关于同步器串屏功能设置方法:小键盘“*”+S 打开串屏并默认第一台电脑控制有效小键盘“*”+E 或小键盘“*”+0关闭串屏并默认全部电脑控制有效说明:1).单个同步器有串屏功能,多个同步器级联没有串屏功能, 多个设备级联串屏没有意义。
2).在串屏模式下,支持键盘切换功能。
3). 串屏模式下不支持退出同步的切换。
3). 鼠标串屏到某一台电脑后,键盘也在对应的电脑有效。
功能实现:以6台电脑串屏为例:要求可以从左向右串屏1->2->3->4->5->6->1,也可以从右向左串屏6->5->4->3->2->1->6,串屏时,比如由PC1串到PC2,光标从PC1的最右边开始串到PC2的最左边,依次类推。
2.退出功能:同步器在同步控制过程中,可以把指定的电脑退出同步控制退出方法:空格右边的win键(也就是空格右边的窗口键)+小键盘的 1~8键切换方法:按住小键盘 * 组合 1~8键,在8台电脑之间切换按住小键盘 * 组合 0键,8台电脑同步(开机默认同步)鼠标工作模式:1.正常工作模式:(同步器加电默认工作方式)切换方法:按住鼠标左键,中键,右键,松开中键,松开左键和右键进入正常工作模式2.3D模式:切换方法:按住鼠标中键,再按一下鼠标左键,进入3D模式,3D 模式用鼠标移动人物视角时能保持完全同步(此模式有很多技巧,有经验的用户可以尝试)。
3.DN(龙之谷)模式:切换方法:按住鼠标中键,再按一下鼠标右键,进入DN模式。
一、功能介绍1、同步功能:来自同一套键盘鼠标的动作指令通过同步器分出多路完全相同的信号,同步传送给多台电脑,以实现多台电脑的动作完全一致!例如,按“A”则几台显示器上同出现“A”,按“1”则同时出现“1”;鼠标也一样,几台电脑的鼠标箭头以相同的轨迹移动。
2、切换功能(单手切换):通过切换功能可以选择任意一台电脑单独控制。
Dell 无线鼠标和键盘 KM717 用户手册说明书
Dell Universal Receiver feature for Windows ................................................ 23 Troubleshooting................................................................................................. 24
Dell Wireless Mouse and Keyboard
KM717
User’s Guide
Regulatory model: KM717
Notes, cautions, and warnings
NOTE: A NOTE indicates important information that helps you make better use of your computer. CAUTION: A CAUTION indicates either potential damage to hardware or loss of data and tells you how to avoid the problem WARNING: A WARNING indicates a potential for property damage, personal injury, or death.
键鼠同步器使用说明
本次更新,使用了大漠插件。
使用在第一次使用时需要注册一下大漠插件。
双击该文件,就可以完成注册。
使用大漠插件后,新增了多种模式的键盘鼠标绑定模式。
可以根据不同的需要,进行搭配使用。
以上的模式均为后台模式。
不存在抢鼠标的问题。
由于其中有些模式是付费大漠用户才可以使用,所有可能出现一些模式绑定失败的现象。
下面我们来说明一下如何使用本软件。
第一步,将软件中的绿色瞄准器拖动至目标窗口(你需要进行同步操作的窗口)。
第一次绑定的为主窗口,即你手动操作的窗口。
如果抓取失败,则会现实空白。
成功的抓取到窗口,则窗口句柄会有数字显示。
成功抓取窗口后
点击“全体同步”按钮
如果失败,则显示“绑定失败”
如果成功则,绑定状态栏显示“已绑定”
成功后,就可以进行同步操作了。
如果是客户端游戏,则可能需要调整偏移。
一般客户端游戏,X偏移填写-5 Y偏移-25
使用完毕后,点击“全体解除”就可以了。
键盘鼠标连点器说明书
键盘鼠标快打数据线(UU/PU快打线)唐山轩氏科技有限公司TANGSHANXUANSHIKEJICO、,LTD、功能说明本产品可以实现键盘鼠标高速击打,最高速度可达300-500字符/秒;可以实现不同按键具有不同的击打速度,其性能远胜过机械键盘鼠标。
有了它您可以驰骋在游戏世界,成为永远的王者! 同时键盘鼠标还可以实现自动击打功能,是升级练号的利器。
2、支持USB无线键盘鼠标输入(UU快打线)3、支持PS2键盘鼠标输入(PU快打线)4、支持不同的按键有不同的速度5、速度可以分为加速和减速两种方式6、两种控制方式适应不同的用户7、断电保存所有的设置信息8、支持二代UU同步器9、输出支持台式机﹑平板电脑(需要转换头)和有OTG功能的手机(需要转换头)UU快打线(UUDAV01)PU快打线(PUDAV01)产品图片1、将键盘鼠标分别接入快打线的输入端2、快打线的输出端连接主机或者平板电脑(或者手机)注:第一次使用设备时,当电脑进入桌面后,在电脑桌面右下角显示”发现新硬件”,这时需要等待大约10-30秒,等待操作系统自动识别键盘鼠标;识别成功后会提示“新硬件已安装并可以使用了”或者“成功安装了设备驱动程序”,此时表示设备可以正常使用了。
热键设置方法1、设置键盘加速方法:【scroll lock】+【scroll lock】+【page up】+【需要加速的按键】+【三位小键盘数字键】例如设置键盘a为加速键,实现每秒击打60个a的加速:1、连接数据快打线,等到连接数据快打线的键盘和鼠标可以使用为正常工作状态。
2、依次按下【scroll lock】【scroll lock】【page up】【a】【0】【6】【0】3、输入完成键盘三个指示灯闪烁1次,表示设置成功。
4、设置成功之后,打开记事本,并调整到可以输入字符的状态。
长按a,此时键盘以每秒60次的速度敲击按键 a ,松开a即停止加速。
2、设置键盘减速方法:【scroll lock】+【scroll lock】+【page down】+【需要减速的按键】+【三位小键盘数字键】例如设置键盘a为减速键,实现每3秒击打一个a :1、连接数据快打线,等到连接数据快打线的键盘和鼠标可以使用为正常工作状态。
- 1、下载文档前请自行甄别文档内容的完整性,平台不提供额外的编辑、内容补充、找答案等附加服务。
- 2、"仅部分预览"的文档,不可在线预览部分如存在完整性等问题,可反馈申请退款(可完整预览的文档不适用该条件!)。
- 3、如文档侵犯您的权益,请联系客服反馈,我们会尽快为您处理(人工客服工作时间:9:00-18:30)。
键盘鼠标同步器说明书
一.简介
键盘鼠标同步器主要实现将键盘鼠标信号同步的传输到各个受控的计算机,为了保证数据同步性,以纯硬件的方式将键盘鼠标并行发送到受控的计算机,达到精确的同步效果。
同步器支持PS2键盘鼠标输入,USB信号输出,USB输出接到各个受控计算机,受控计算机可以独立的关机,冷启,热启。
同步器电源直接由计算机提供,同步器在使用时不需要安装任何额外的软件或驱动。
同步器键盘支持连发功能,可以同时设置小于7个连发键。
支持键盘的两种切换功能,通过切换,可以实现控制任意单台或几台计算机。
同步器鼠标支持三种工作模式。
***安装方法:
请务必按照这个顺序安装
开机状态--》必须先连接键鼠到同步器--》最后再连接同步器到电脑
二.键盘功能:
切换功能一
这种方式切换可以实现任一台可控电脑有效,或全部都有效。
切换方法:小键盘上的*按键盘+ 小键盘上的0-6 (以一控六为例)
按住小键盘上的* 键,再按一下小键盘上的1键,切换到第一台电脑,键盘鼠标只对第一台电脑有效。
按住小键盘上的* 键,再按一下小键盘上的2键,切换到第一台电脑,键盘鼠标只对第二台电脑有效。
按住小键盘上的* 键,再按一下小键盘上的3键,切换到第一台电脑,键盘鼠标只对第三台电脑有效。
按住小键盘上的* 键,再按一下小键盘上的4键,切换到第一台电脑,键盘鼠标只对第四台电脑有效。
按住小键盘上的* 键,再按一下小键盘上的5键,切换到第一台电脑,键盘鼠标只对第五台电脑有效。
按住小键盘上的* 键,再按一下小键盘上的6键,切换到第一台电脑,键盘鼠标只对第六台电脑有效。
按住小键盘上的* 键,再按一下小键盘上的0 键,键盘鼠标对所有电脑都有效。
注:切换时可以看对应的指示灯,对应路的指示灯点亮的电脑控制有效。
c.切换功能二(此功能专门用户才有!)
这种方式切换可以实现控制任意接入的多台电脑同步控制,可以配合切换功能一,灵活控制多台电脑同步。
切换方法:PageUp按键+ 功能键F1 -----F6(以一控六为例)
按住PageUp键,再按一下F1键,对应第一台电脑无效,不影响其它控制电脑状态。
按住PageUp键,再按一下F2键,对应第二台电脑无效,不影响其它控制电脑状态。
按住PageUp键,再按一下F3键,对应第三台电脑无效,不影响其它控制电脑状态。
按住PageUp键,再按一下F4键,对应第四台电脑无效,不影响其它控制电脑状态。
按住PageUp键,再按一下F5键,对应第五台电脑无效,不影响其它控制电脑状态。
按住PageUp键,再按一下F6键,对应第六台电脑无效,不影响其它控制电脑状态。
可以配合小键盘上的* 键,再按一下小键盘上的0 键,切换成全有效,然后通过切换功能二,去掉不想控制的电脑。
注:切换时可以看对应的指示灯,对应路的指示灯点亮的电脑控制有效。
三.鼠标功能:
1.正常工作模式:(同步器加电默认工作方式)
切换方法:按住鼠标左键,中键,右键,松开中键,松开左键和右键进入正常工作模式
(把控制电脑显示器的分辨率设置成一样)。
正常模式下各个控制的电脑的鼠标光标位置完全一致,当通过切换控制后,对应的电脑鼠标的位置可能和其它电脑鼠标位置不一样,切换成全部有效后,只要移动一下鼠标,所有的控制电脑鼠标位置完全一致。
正常模式适用于大多数据用户,教学,监控,游戏等任何同步控制的领域都可以使用。
本模式适用于2.5D游戏。
2.3D模式:
切换方法:按住鼠标中键,再按一下鼠标左键,进入3D模式,3D模式用鼠标移动人物视角时能保持完全同步(此模式有很多技巧,有经验的用户可以尝试) 。
主要适用于魔獸世界,永恒之塔真正的3D游戏。
3.DN(龙之谷)模式:
切换方法:按住鼠标中键,再按一下鼠标右键,进入DN模式。
备注:
1.使用同步器前请按下面方式设置计算机:
设置鼠标:
开始->控制面板->鼠标->指针选项中,去掉“提高指针精确度”,“选择指针移动速度”设置为中间,将同步鼠标设置到DN模式,从左下角移动到右上角,如果各个电脑有不一致,需要调整不一致电脑到一致。
设置键盘:
开始->控制面板->键盘->速度选项中,将键盘重复延时和重复率设置成一样,然后在测试筐中测试,按住总控键盘几秒钟,看看出现在测试筐中的字符是不是一样多,调整重复率直到一样多。
2.产品支持一控四和一控六,说明书以一控六为例作的说明。
3.版本T800 支持任意级联,版本T600不支持级联。