华为模拟器实验文档
eNSP使用和实验教程详解

一.ENSP软件说明1.ENSP使用简介2.ENSP整体介绍a)基本界面。
b)选择设备,为设备选择所需模块并且选用合适的线型互连设备。
c)配置不同设备。
d)测试设备的连通性。
二.终端设备的使用(PC,Client,server,MCS,STA,Mobile)1.Client使用方法2.server使用方法3.PC使用方法4.MCS使用方法5.STA和Mobile使用方法三.云设备,HUB,帧中继1.Hub只是实现一个透传作用,这边就不作说明了。
肯定会无师自通的2.帧中继使用方法3.设备云使用方法四.交换机五. AR(以一款AR为例)六. WLAN(AC,AP)1.AC使用2.AP使用方法一. eNSP软件说明使用简介全球领先的信息与通信解决方案供应商华为,近日面向全球ICT从业者,以及有兴趣掌握ICT相关知识的人士,免费推出其图形化网络仿真工具平台——eNSP。
该平台通过对真实网络设备的仿真模拟,帮助广大ICT从业者和客户快速熟悉华为数通系列产品,了解并掌握相关产品的操作和配置、故障定位方法,具备和提升对企业ICT网络的规划、建设、运维能力,从而帮助企业构建更高效,更优质的企业ICT网络。
近些年来,针对越来越多的ICT从业者的对真实网络设备模拟的需求,不同的ICT厂商开发出来了针对自家设备的仿真平台软件。
但目前行业中推出的仿真平台软件普遍存在着仿真程度不够高、仿真系统更新不够及时、软件操作不够方便等系列问题,这些问题也困扰着广大ICT从业者,同时也极大的影响了模拟真实设备的操作体验,降低了用户了解相关产品进行操作和配置的兴趣。
为了避免现行仿真软件存在的这些问题,华为近期研发出了一款界面友好,操作简单,并且具备极高仿真度的数通设备模拟器——eNSP(Enterprise Network Simulation Platform)。
这款仿真软件运行是物理设备的VRP操作系统,最大程度地模拟真实设备环境,您可以利用eNSP模拟工程开局与网络测试,协助您高效地构建企业优质的ICT网络。
2014-08-10 华为模拟器末梢区域实验
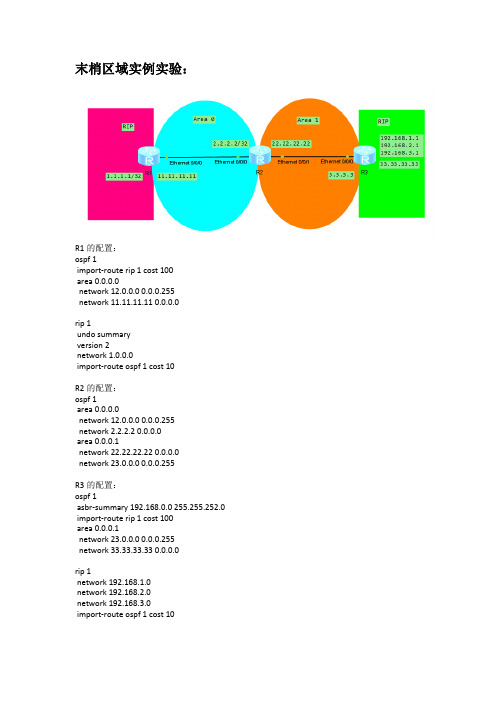
末梢区域实例实验:R1的配置:ospf 1import-route rip 1 cost 100area 0.0.0.0network 12.0.0.0 0.0.0.255network 11.11.11.11 0.0.0.0rip 1undo summaryversion 2network 1.0.0.0import-route ospf 1 cost 10R2的配置:ospf 1area 0.0.0.0network 12.0.0.0 0.0.0.255network 2.2.2.2 0.0.0.0area 0.0.0.1network 22.22.22.22 0.0.0.0network 23.0.0.0 0.0.0.255R3的配置:ospf 1asbr-summary 192.168.0.0 255.255.252.0 import-route rip 1 cost 100area 0.0.0.1network 23.0.0.0 0.0.0.255network 33.33.33.33 0.0.0.0rip 1network 192.168.1.0network 192.168.2.0network 192.168.3.0import-route ospf 1 cost 10将Area 1配置为Stub区域,查看现象:配置Stub区域前R3的路由条目:[R3]dis ip routing-tableRoute Flags: R - relay, D - download to fib------------------------------------------------------------------------------ Routing Tables: PublicDestinations : 14 Routes : 14Destination/Mask Proto Pre Cost Flags NextHop Interface1.1.1.1/32 O_ASE 150 100 D 23.0.0.2 Ethernet0/0/02.2.2.2/32 OSPF 10 1 D 23.0.0.2 Ethernet0/0/03.3.3.3/32 Direct 0 0 D 127.0.0.1 LoopBack011.11.11.11/32 OSPF 10 2 D 23.0.0.2 Ethernet0/0/012.0.0.0/24 OSPF 10 2 D 23.0.0.2 Ethernet0/0/022.22.22.22/32 OSPF 10 1 D 23.0.0.2 Ethernet0/0/023.0.0.0/24 Direct 0 0 D 23.0.0.3 Ethernet0/0/023.0.0.3/32 Direct 0 0 D 127.0.0.1 Ethernet0/0/0 33.33.33.33/32 Direct 0 0 D 127.0.0.1 LoopBack1127.0.0.0/8 Direct 0 0 D 127.0.0.1 InLoopBack0127.0.0.1/32 Direct 0 0 D 127.0.0.1 InLoopBack0192.168.1.1/32 Direct 0 0 D 127.0.0.1 LoopBack2192.168.2.1/32 Direct 0 0 D 127.0.0.1 LoopBack3192.168.3.1/32 Direct 0 0 D 127.0.0.1 LoopBack4配置Stub区域:[R2]ospf 1[R2-ospf-1]area 1[R2-ospf-1-area-0.0.0.1]stub[R3]ospf 1[R3-ospf-1]area 1[R3-ospf-1-area-0.0.0.1]stub再看R3的路由表:[R3]dis ip routing-tableRoute Flags: R - relay, D - download to fib------------------------------------------------------------------------------ Routing Tables: PublicDestinations : 14 Routes : 14Destination/Mask Proto Pre Cost Flags NextHop Interface 0.0.0.0/0 OSPF 10 2 D 23.0.0.2 Ethernet0/0/02.2.2.2/32 OSPF 10 1 D 23.0.0.2 Ethernet0/0/03.3.3.3/32 Direct 0 0 D 127.0.0.1 LoopBack011.11.11.11/32 OSPF 10 2 D 23.0.0.2 Ethernet0/0/012.0.0.0/24 OSPF 10 2 D 23.0.0.2 Ethernet0/0/022.22.22.22/32 OSPF 10 1 D 23.0.0.2 Ethernet0/0/023.0.0.0/24 Direct 0 0 D 23.0.0.3 Ethernet0/0/023.0.0.3/32 Direct 0 0 D 127.0.0.1 Ethernet0/0/0 33.33.33.33/32 Direct 0 0 D 127.0.0.1 LoopBack1127.0.0.0/8 Direct 0 0 D 127.0.0.1 InLoopBack0127.0.0.1/32 Direct 0 0 D 127.0.0.1 InLoopBack0192.168.1.1/32 Direct 0 0 D 127.0.0.1 LoopBack2192.168.2.1/32 Direct 0 0 D 127.0.0.1 LoopBack3192.168.3.1/32 Direct 0 0 D 127.0.0.1 LoopBack4不会学习R1的路由条目。
华为模拟实验
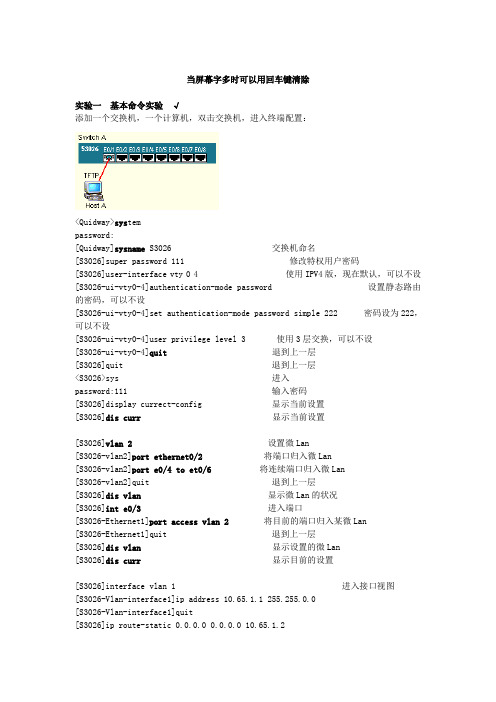
当屏幕字多时可以用回车键清除实验一基本命令实验√添加一个交换机,一个计算机,双击交换机,进入终端配置:<Quidway>sys tempassword:[Quidway]sysname S3026 交换机命名[S3026]super password 111 修改特权用户密码[S3026]user-interface vty 0 4 使用IPV4版,现在默认,可以不设[S3026-ui-vty0-4]authentication-mode password 设置静态路由的密码,可以不设[S3026-ui-vty0-4]set authentication-mode password simple 222 密码设为222,可以不设[S3026-ui-vty0-4]user privilege level 3 使用3层交换,可以不设[S3026-ui-vty0-4]quit退到上一层[S3026]quit 退到上一层<S3026>sys 进入password:111 输入密码[S3026]display currect-config 显示当前设置[S3026]dis curr显示当前设置[S3026]vlan 2设置微Lan[S3026-vlan2]port ethernet0/2将端口归入微Lan[S3026-vlan2]port e0/4 to et0/6 将连续端口归入微Lan[S3026-vlan2]quit 退到上一层[S3026]dis vlan显示微Lan的状况[S3026]int e0/3进入端口[S3026-Ethernet1]port access vlan 2将目前的端口归入某微Lan[S3026-Ethernet1]quit 退到上一层[S3026]dis vlan显示设置的微Lan[S3026]dis curr显示目前的设置[S3026]interface vlan 1 进入接口视图[S3026-Vlan-interface1]ip address 10.65.1.1 255.255.0.0[S3026-Vlan-interface1]quit[S3026]ip route-static 0.0.0.0 0.0.0.0 10.65.1.2[S3026]ip default-gateway 10.65.1.2[S3026]dis curr[S3026]save双击小电脑:login:root 登入password:linux 密码[root@PCA root]#ifconfig eth0 10.65.1.1 netmask 255.255.0.0 设置IP和掩码eth0以太网[root@PCA root]#ping 10.65.1.2 PING通[root@PCA root]#telnet 10.65.1.2 另外的命令实验二配置端口聚合增加主干线上的带宽要求聚合的端口工作在全双工,速度一致,在同一槽口且连续,ingress:源MAC, both:源和目的MAC对于SwitchA:[SwitchA]interface ethernet0/1 进入端口[SwitchA-Ethernet0/1]duplex full 设置双工[SwitchA-Ethernet0/1]speed 100 设置速度[SwitchA-Ethernet0/1]int e0/2[SwitchA-Ethernet0/2]duplex full[SwitchA-Ethernet0/2]speed 100对于SwitchB:[SwitchB]interface ethernet0/1[SwitchB-Ethernet0/1]duplex full[SwitchB-Ethernet0/1]speed 100[SwitchB-Ethernet0/1]int e0/2[SwitchB-Ethernet0/2]duplex full[SwitchB-Ethernet0/2]speed 100聚合操作:[SwitchA]link-aggregation ethernet0/1 to ethernet0/2 both 聚合[SwitchB]link-aggregation ethernet0/1 to ethernet0/2 both[SwitchA]display link-aggregation ethernet0/1[SwitchA]undo link-aggregation all实验三基本VLAN设置√[SwitchA]vlan 2[SwitchA-vlan2]port e0/3 to e0/4[SwitchA]vlan 3[SwitchA-vlan3]port e0/5 to e0/6[SwitchB]vlan 2[SwitchB-vlan2]port e0/3 to e0/4[SwitchB]vlan 3[SwitchB-vlan3]port e0/5 to e0/6设置计算机的IP为:PCA:10.65.1.1 PCB:10.65.1.2 PCC:10.65.1.3 PCD:10.65.1.4[root@PCA root]#ping 10.65.1.1 通[root@PCA root]#ping 10.65.1.2 不通[root@PCA root]#ping 10.65.1.3 不通[root@PCA root]#ping 10.65.1.4 不通将PCA改接到SwitchA E0/2, PCC改接到SwitchB E0/2[root@PCA root]#ping 10.65.1.3 通(这时都在vlan 1)再改回来:[S3026A]interface ethernet 0/8[S3026A-Ethernet0/8]port link-type trunk 设置端口模式[S3026A-Ethernet0/8]port trunk permit vlan all 允许全部vlan通过[S3026B]interface ethernet 0/1[S3026B-Ethernet0/1]port link-type trunk[S3026B-Ethernet0/1]port trunk permit vlan all[root@PCA root]#ping 10.65.1.3 通[root@PCA root]#ping 10.65.1.4 不通[root@PCB root]#ping 10.65.1.4 通即:PCA和PCC同在vlan 2 是通的。
华为配置实验报告
一、实验目的本次实验旨在通过华为网络设备,掌握网络配置的基本技能,熟悉华为设备的配置界面和命令,并能够独立完成以下任务:1. 配置IP地址2. 宣告OSPF3. 引入默认路由4. 路由汇总5. 配置完全Stub区域6. 修改接口Cost实现合理分流,确保来回路径一致7. 修改网络类型,加快收敛8. 配置出口NAT,实现外网连通性9. 增强安全性二、实验环境1. 华为交换机:S5700-28P2. 华为路由器:AR22003. 实验软件:华为eNSP(企业网络仿真器)三、实验步骤1. 配置IP地址- 在交换机上配置VLAN,并为其分配Access接口。
- 为路由器接口配置IP地址。
2. 宣告OSPF- 在路由器上启用OSPF协议。
- 配置OSPF进程ID。
- 宣告OSPF网络。
3. 引入默认路由- 在路由器上配置默认路由,指向下一跳路由器。
4. 路由汇总- 配置路由汇总,减少路由表项。
5. 配置完全Stub区域- 在OSPF区域中配置完全Stub区域,禁止区域内的路由器学习其他区域的路由信息。
6. 修改接口Cost实现合理分流- 根据网络流量需求,修改接口Cost值,实现合理分流。
7. 修改网络类型,加快收敛- 根据网络需求,修改OSPF网络类型,加快收敛速度。
8. 配置出口NAT,实现外网连通性- 配置NAT地址转换,实现内网设备访问外网。
9. 增强安全性- 配置访问控制列表(ACL),限制对网络设备的访问。
- 配置IPsec VPN,保障数据传输安全。
四、实验结果与分析1. 成功配置了IP地址、OSPF、默认路由、路由汇总、完全Stub区域等。
2. 修改接口Cost值,实现了合理分流。
3. 修改网络类型,加快了收敛速度。
4. 配置出口NAT,实现了外网连通性。
5. 增强了网络设备的安全性。
五、实验总结通过本次实验,我们掌握了以下技能:1. 华为设备的配置界面和命令。
2. 网络配置的基本技能。
3. OSPF多区域配置的规划和实施。
华为模拟器配置实例

华为模拟器配置实例实验一计算机和交换机基本设置添加一个交换机,一个计算机,双击交换机,进入终端配置:systempassword:[Quidway]sysname S3026 ;交换机命名 [S3026]super password 111 ;设置特权密码 [S3026]user-interface vty 0 4[S3026-ui-vty0-4]authentication-mode password[S3026-ui-vty0-4]set authentication-mode password simple 222 [S3026-ui-vty0-4]user privilege level 3 [S3026-ui-vty0-4]quit [S3026]quitsys password:111[S3026]display currect-config [S3026]dis curr[S3026]vlan 2[S3026-vlan2]port ethernet0/2 [S3026-vlan2]port e0/4 to et0/6 [S3026-vlan2]quit [S3026]dis vlan [S3026]int e0/3[S3026-Ethernet1]port access vlan 2 [S3026-Ethernet1]quit [S3026]dis vlan [S3026]dis curr[S3026]interface vlan 1[S3026-Vlan-interface1]ip address 10.65.1.8 255.255.0.0 [S3026-Vlan-interface1]quit[S3026]ip route-static 0.0.0.0 0.0.0.0 10.65.1.2 [S3026]ip default-gateway 10.65.1.2 [S3026]dis curr [S3026]save双击小电脑: login:rootpassword:linux[root@PCA root]#ifconfig eth0 10.65.1.1 netmask 255.255.0.0 [root@PCA root]#ifconfig[root@PCA root]#route add default gw 10.65.1.2 [root@PCA root]#route[root@PCA root]#ping 10.65.1.8 [root@PCA root]#telnet 10.65.1.8实验二配置端口聚合要求聚合的端口工作在全双工,速度一致,在同一槽口且连续。
模拟器实验

基本静态路由配置(2)
实验拓扑 结构图:
E0:192.168.1.1 E0:192.168.2.1
R1,R2:2501
S0:202.98.0.1 掩码:255.255.255.252 S0:202.98.0.2 掩码:255.255.255.252
PC1:192.168.1.2 Default Gateway: 192.168.1.1
拓扑图绘制完成后用 save保存
Next
Finish
实验步骤2:配置基本参数。 首先,启动Boson NetSim并装入拓扑结 构图。 1)、在PC1和PC2上分别用winipcfg或 ipconfig设置IP地址和缺省网关。
如,在PC1上:
•ipconfig /ip 192.168.1.2 255.255.255.0 •ipconfig /dg 192.168.1.1
2)、在路由器R1上用以下命令进行设置
en conf t int e0 ip address 192.168.1.1 255.255.255.0 ( 设置e0口的IP 地址) no shutdown (开启该接口) int s0 ip address 202.98.0.1 255.255.255.252 clock rate 64000 (设置路由器的时钟频率,若64000有 错,则改为64) no shutdown exit (退出到全局模式) ip route 192.168.2.0 255.255.255.0 202.98.0.2 ( 添加 静态路由) exit (退出到特权模式) sh int e0 (显示e0口的配置信息)
PC2:192.168.2.2 Default Gateway: 192.168.2.1
实验步骤1:在Boson Network Designer中绘 制拓扑结构图。
华为模拟器配置实例
华为模拟器配置实例实验⼀计算机和交换机基本设置添加⼀个交换机,⼀个计算机,双击交换机,进⼊终端配置:systempassword:[Quidway]sysname S3026;交换机命名[S3026]super password111;设置特权密码[S3026]user-interface vty04 [S3026-ui-vty0-4]authentication-mode password[S3026-ui-vty0-4]set authentication-mode password simple222[S3026-ui-vty0-4]user privilege level3[S3026-ui-vty0-4]quit[S3026]quitsyspassword:111[S3026]display currect-config[S3026]dis curr[S3026]vlan2[S3026-vlan2]port ethernet0/2[S3026-vlan2]port e0/4to et0/6[S3026-vlan2]quit[S3026]dis vlan[S3026]int e0/3[S3026-Ethernet1]port access vlan2[S3026-Ethernet1]quit[S3026]dis vlan[S3026]dis curr[S3026]interface vlan1[S3026-Vlan-interface1]ip address10.65.1.8255.255.0.0[S3026-Vlan-interface1]quit[S3026]ip route-static0.0.0.00.0.0.010.65.1.2[S3026]ip default-gateway10.65.1.2[S3026]dis curr[S3026]save双击⼩电脑:login:rootpassword:linux[root@PCA root]#ifconfig eth010.65.1.1netmask255.255.0.0 [root@PCA root]#ifconfig[root@PCA root]#route add default gw10.65.1.2[root@PCA root]#route[root@PCA root]#ping10.65.1.8[root@PCA root]#telnet10.65.1.8实验⼆配置端⼝聚合要求聚合的端⼝⼯作在全双⼯,速度⼀致,在同⼀槽⼝且连续。
华为模拟器使用文档
华为模拟器使用操作
之前由于朋友公司需要学习华为路由交换,就推荐朋友在51cto下载了一个模拟器,在他打开后,却不知道如何使用,就在这里把之前给他的文档送给大家,如果有需要的,可以下载使用!
不多说了,请看图:
1.华为模拟器初始状态
2.华为模拟器文件操作栏
3.添加需要的网络设备
同软件内的图标栏中的设置一样
4.显示状态栏
5.作业操作
6.实验案例
实验小试1.添加设备
2.连接设备
只需要双击需要配置额的设备
4.保存文件
大家可以用此来畅游你的华为世界了!。
华为eNSP模拟器—telnet实验
华为eNSP模拟器—telnet实验华为eNSP模拟器—telnet实验⼀、实验⼀1. 路由交换之间实现telnet登陆2. 实验拓扑3. 实验⽬的:路由器作为 telnet 服务器交换机作为客户端去连接路由器4. 实验步骤:路由器配置<Huawei>system-view[Huawei]sysname Route[Route]interface GigabitEthernet0/0/0[Route-GigabitEthernet0/0/0]ip address 192.168.1.1 24[Route-GigabitEthernet0/0/0]quit[Route]user-interface vty 0 4 (开放端⼝,最多允许个⽤户同时登陆)[Route-ui-vty0-4]authentication-mode password (设置登陆模式为密码认证)[Route-ui-vty0-4]set authentication password cipher 123456 (设置登陆密码,且为加密的类型)[Route-ui-vty0-4]user privilege level 3 (设置⽤户登陆后权限等级为3)[Route-ui-vty0-4]quit[Route]telnet server enable (开启 telent 服务)[Route]return交换机配置<Huawei>system-view[Huawei]sysname Switch[Switch]interface Vlanif 1[Switch-Vlanif1]ip address 192.168.1.10 24 (需要配上vlan1的地址,否则telnet不上)[Switch-Vlanif1]return<Switch>ping 192.168.1.1 (测试与路由器的连通性)PING 192.168.1.1: 56 data bytes, press CTRL_C to breakReply from 192.168.1.1: bytes=56 Sequence=1 ttl=255 time=70 msReply from 192.168.1.1: bytes=56 Sequence=2 ttl=255 time=30 msReply from 192.168.1.1: bytes=56 Sequence=3 ttl=255 time=50 msReply from 192.168.1.1: bytes=56 Sequence=4 ttl=255 time=50 msReply from 192.168.1.1: bytes=56 Sequence=5 ttl=255 time=30 ms--- 192.168.1.1 ping statistics ---5 packet(s) transmitted5 packet(s) received0.00% packet lossround-trip min/avg/max = 30/46/70 ms<Switch>telnet 192.168.1.1 (telent登陆需要在⽤户视图下连接)具体演⽰如下:5. 交换连接:在路由器上 telnet 连接交换机交换机配置<Switch>system-view[Switch]user-interface vty 0 4[Switch-ui-vty0-4]authentication-mode password[Switch-ui-vty0-4]set authentication password simple abc123 (设置登陆密码,密码为明⽂⽅式)[Switch-ui-vty0-4]user privilege level 3[Switch-ui-vty0-4]quit[Switch]telnet server enable在路由器上连接测试⼆、实验⼆1. 路由之间实现telnet登陆2. 实验拓扑3. 实验⽬的:R1作为telent服务器端R2作为客户端4. 实验步骤:R1配置//⾸先配置接⼝地址<Huawei>system-view[Huawei]interface GigabitEthernet0/0/0[Huawei-GigabitEthernet0/0/0]ip add 192.168.1.1 24[Huawei-GigabitEthernet0/0/0]undo shutdown[Huawei-GigabitEthernet0/0/0]quit//配置telnet登陆认证[Huawei]user-interface vty 0 4[Huawei-ui-vty0-4]authentication-mode password[Huawei-ui-vty0-4]set authentication password cipher 123456 [Huawei-ui-vty0-4]user privilege level 3//开启telnet服务[Huawei]telnet server enable//查看刚刚配置的信息[Huawei-ui-vty0-4]display this#user-interface con 0user-interface vty 0 4user privilege level 3set authentication password cipher }0zO(Z|rc6bL^B&WSBiQ^J~# user-interface vty 16 20#return[Huawei-ui-vty0-4][Huawei-ui-vty0-4]quit[Huawei]R2配置(配置与R1配置类似)//配置接⼝地址<Huawei>system-view[Huawei]interface GigabitEthernet0/0/0[Huawei-GigabitEthernet0/0/0]ip address 192.168.1.2 24 [Huawei-GigabitEthernet0/0/0]undo shutdown[Huawei-GigabitEthernet0/0/0]quit//配置telnet登陆⽤户认证[Huawei]user-interface vty 0 4[Huawei-ui-vty0-4]authentication-mode aaa[Huawei-ui-vty0-4]quit[Huawei]//配置AAA⽤户认证信息[Huawei]aaa[Huawei-aaa]local-user admin password cipher 123456 [Huawei-aaa]local-user admin privilege level 3[Huawei-aaa]local-user admin service-type telnet[Huawei-aaa]quit[Huawei]//开启telent服务[Huawei]telnet server enable//查看本地⽤户[Huawei]display local-user----------------------------------------------------------------------------User-name State AuthMask AdminLevel----------------------------------------------------------------------------admin A T 3----------------------------------------------------------------------------Total 1 user(s)5. 演⽰⽰例。
华为模拟器局域网组建实验
网络通讯与技术实验报告学院:地信院班级:测绘0904姓名:学号:2011年12月7日实验标题华为模拟器局域网组建实验实验目的通过实验熟悉利用交换机以及路由器组建局域网及连接局域网。
实验内容一、利用华为路由器模拟器熟悉如何通过交换机组建局域网•二、利用路由器连接两个局域网•三、自由构建几个网络,保证网络之间的互连通性。
实验地点地学楼101准备工作:认识设备表示一台计算机表示交换机表示路由器实验步骤第一步打开HW-RouteSim华为模拟器3.1,按照图示插入设备,交换机一台,主机两台第二步:设置主机的IP地址双击小电脑HostA:login:rootpassword:linux[root@PCA root]#ifconfig eth0 10.65.1.1 netmask 255.255.0.0双击小电脑HostB:login:rootpassword:linux[root@PCA root]#ifconfig eth0 10.65.1.2 netmask 255.255.0.0第三步:测试HostA和HostB是否连通[root@PCA root]#ping 10.65.1.2第四步尝试利用路由器连接两个局域网同如下采用第二部的相同方法进行设置主机IP如下图配置路由器[Quidway]sysname aabbcc ;更改主机名[Quidway]super passwrod 111 ;设置口令[Quidway]interfaceserial0 ;进入接口(简写为int e0)[RouterA-Ethernet0]ip addrress 10.65.1.10 255.0.0.0[RouterA-Ethernet0]undo shutdown[RouterA-Ethernet0]int e1[RouterA-Ethernet1]ip addrress 10.66.1.10 255.0.0.0 [RouterA-Ethernet1]undo shutdown测试连接成果•实验心得本次实验是利用华为路由器模拟器熟悉如何通过交换机组建局域网,利用路由器连接两个局域网,并能够自由构建几个网络,保证网络之间的互连通性。
- 1、下载文档前请自行甄别文档内容的完整性,平台不提供额外的编辑、内容补充、找答案等附加服务。
- 2、"仅部分预览"的文档,不可在线预览部分如存在完整性等问题,可反馈申请退款(可完整预览的文档不适用该条件!)。
- 3、如文档侵犯您的权益,请联系客服反馈,我们会尽快为您处理(人工客服工作时间:9:00-18:30)。
实验一口令和主机名设置1.交换机的初始化当交换机没有进行配置时,接入超级终端会提示是否以对话方式进行配置,初始化内容主要有IP地址、网关、主机名和口令等。
配置文件是flash:config.text。
2924交换机进入ROM方式是在上电时按住其mode键,本软件是按Ctrl+Break键,出现:switch> ;按Ctrl+Break键switch:reset ;或用boot命令如果有配置文件进入用户模式,否则提交对话:--- System Configuration Dialog ---At any point you may enter a question mark '?' for help.Use ctrl-c to abort configuration dialog at any prompt.Default settings are in square brackets '[]'.Continue with configuration dialog? [yes/no]:yEnter IP address:10.65.1.8Enter IP netmask:255.255.0.0Would you like to enter a default gateway address? [yes]:IP address of default gateway:Enter host name [Switch]:swaThe enable secret is a one-way cryptographic secret used instead of the enable password when it exists.Enter enable secret:aaaWould you like to configure a Telnet password? [yes]:Enter Telnet password:aWould you like to enable as a cluster command switch? [no]:The following configuration command script was created:......Press RETURN to get started.swa>enpassword:aaaswa#copy run start (保存配置信息)swa#dir flash: (查看闪存中的文件)再次进入对话方式:swa#setup2.路由器的初始化(路由器初始化与交换机类似)router> ;用户模式,按Ctrl+Break rommon>reset ;进入ROM监控状态,复位引导Continue with configuration dialog? [yes/no]:yesAt any point you may enter a question mark '?' for help.Use ctrl-c to abort configuration dialog at any prompt.Default settings are in square brackets '[ ]'.Would you like to enter basic management setup? [yes/no]:yesConfiguring global parameters:Enter host name [router]:ra回车The enable secret is a password used to protect access toprivileged EXEC and configuration modes. This password,after entered,becomes encrypted in the configuration.Enter enable secret:aaa回车The enable password is used when you do not specify anenable secret password,with some older software versions,and some boot images.Enter enable password:aa回车The virtual terminal password is used to protectaccess to the router over a network interface.Enter virtual terminal password :a回车Enter interface name used to connect to the managementnetwork from the above interface summary:FastEthernet0/0回车Configuring interface FastEthernet0/0:回车Use the 100 Base-TX (RJ-45) connector? [yes]:回车Operate in full-duplex mode? [no]:回车Configure IP on this interface? [yes]:回车IP address for this interface [ ]:10.1.1.1回车Subnet mask for this interface [ ]:255.0.0.0回车[0] Go to the IOS command prompt without saving this config.[1] Return back to the setup without saving this config.[2] Save this configuration to nvram and exit.Enter your selection [2]:回车ra>enpassword aaa (进入特权模式)ra#show run (显示配置信息)ra#w (保存配置信息)ra#dir flash: (显示配置文件)(配置文件在2621路由器不能删除,放弁配置文件要用寄存器设置0x2142);3. 用命令行设置交换机和路由器的口令和主机名先对交换机进行操作,双击SwitchA,出现:switch>en ;第一次密码为空switch#conf t ;进入全局配置模式switch(config)#hostname swa ;设置交换机名swa(config)#enable secret aaa ;设置特权加密口令为aaaswa(config)#enable password aax ;设置特权非密口令为aaxswa(config)#line console 0 ;进入控制台口(Rs232)swa(config-line)#password aa ;设置console登录口令为aaswa(config-line)#login ;登录要求口令验证swa(config-line)#line vty 0 4 ;进入虚拟终端virtual ttyswa(config-line)#password a ;设置vty的登录口令为aswa(config-line)#login ;登录要求口令验证swa(config-line)#exit ;返回上一层swa(config)#exit ;返回上一层swa#sh run ;看配置信息swa#exit ;返回命令swa>enpassword: ;请问输入哪个口(aaa)secret是设置加密口令,一般都使用这种口令设置方式,它优先级高,即没设置secret 口令时,非加密口令才有效。
4. 备份IOS和配置文件在实际工作中经常需要备份路由器的IOS和配置文件,以备系统有问题时的恢复。
可以这样操作:router#dir nvram:router#copy flash:c2621.bin tftp:router#copy startup-config tftp:router#实验二计算机与交换机IP地址设置1. 双击HostA,输入用户名和口令。
PCA login:rootPassword:linux[root#PCA root]# ifconfig eth0 10.65.1.1 netmask 255.255.0.0 设置IP[root#PCA root]# ifconfig 查看IP[root#PCA root]# ifconfig eth0 10.65.1.1 netmask 255.255.0.0 down关闭网卡[root#PCA root]# route add default gw 10.65.1.9 设置网关[root#PCA root]# route 查看网关[root#PCA root]# route del default gw 10.65.1.9 删除网关2. 双击HostB,输入用户名和入口令,键入"?"可以求得帮助。
PCB login:rootPassword:linux[root#PCB root]# ifconfig eth0 10.65.1.2 netmask 255.255.0.0 设置IP[root#PCB root]# ifconfig[root#PCB root]# route add default gw 10.65.1.9 设置网关[root#PCB root]# route这里只是说明设置网关的方法,关于它的意义在后面实现才能体现。
[root@PCA root]# ping 10.65.1.1 (通) [root@PCB root]# ping 10.65.1.1 (通)[root@PCA root]# ping 10.65.1.2 (通) [root@PCB root]# ping 10.65.1.2 (通) 可见交换机不用做任何设置,就可以让两个计算机连通。
交换机默认状态是所有端口全在vlan1,可以替代HUB使用,交换机的端口独享带宽。
3.双击SwitchAswitch>en 进入特权模式switch#conf t 进入全局配置模式:switch(config)#int vlan 1进入默认vlan状态:switch(config-if)#ip address 10.65.1.3 255.255.0.0 设置ip地址和掩码:switch(config)#ip default-gateway 10.65.1.9 设置switch的网关:switch#sh run查看当前配置:测试联通情况:switch#ping 10.65.1.1 (通) ;ping HostAswitch#ping 10.65.1.2 (通) ;ping HostBswitch#ping 10.65.1.3 (通) ;ping自己switch#ping 10.65.1.4 (不通) ;没有这个IP,所以不通。