KW-2000拔号器说明手册大全
操作手册 W2000.

操作手册 W2000序号:06.20.0902F003.0096出版日期:目录序列号:118406/0001[第二页]本操作手册只有同安全说明书一起使用才有效,序列号为:76779机器标示所有WIRTGEN的机器都用序列号来标示。
序列号位于机器底盘或标示牌上。
例如:06.20.0001=序列号06.20=序列号0001=机器号[0.00.01-1]1、概述1.00概述 1.00.01 介绍1.01 使用 1.01.01 使用范围1.02 规程 1.02.01 机器具体的安全规程1.02.02 噪音振动1.03 机器数据 1.03.01 标记牌1.03.02 安全设施1.04 技术数据 1.04.01 外型尺寸-重量介绍 1.04.02 吊装点 1.04.03 工作数据[0.00.01-2]2.操作2.00概述2.00.01控制-主控制面板 2.00.02 控制-辅助控制面板2.00.04 控制-找平机构-调整器 2.00.04 压力显示器2.01 机架2.01.01 发动机罩 2.01.02 安全盖2.02 机手座椅 2.02.01 机手站立位置 2.02.02 控制面板 2.02.03 机手座椅 2.02.04 安全护栏 2.02.05 防雨帐篷[0.00.01-3]2.03铣刨毂总成 2.03.01铣刨毂 2.03.02铣刨毂连接 2.03.03 铣刨毂前附件2.03.04 铣刨毂刮料板 2.03.05 侧板 2.03.06 切削工具分离器 2.03.07铣刨毂转动速度 2.03.08 材料阻尼器2.04发动机 2.04.01 起动前 2.04.02 起动 2.04.03 停机 2.04.04 燃料箱添加泵2.07 高度调整 2.07.01 升高-降低机器2.08 行走驱动 2.08.01行走驱动 2.08.02 控制负载 2.08.03 指针 2.08.04紧急拖动装置[0.00.01-4]2.08.05液压刹车释放2.09 转向系统 2.09.01 转向2.10 输送机2.10.01 卸料-主输送机 2.10.02 折叠卸料输送机2.11找平装置2.11.01 设置零位(手动) 2.11.02 调整铣刨深度 2.11.03 调整横坡 2.11.04 定位因素 2.11.05 机械式高度显示器2.11.04 调整铣刨深度 2.11.05 横坡调整 2.11.06 定位因素 2.11.07 安装调整器2.12 供水系统 2.12.01 喷水装置 2.12.02 添加水箱 2.12.03 高压力清洗器 2.12.04 水箱添加泵[0.00.01-5]2.30 可编程逻辑控制(CGC) 2.30.01 机手指南 2.30.02 设置语言 2.30.03 故障诊断 2.30.04 故障-出错信息 2.30.05 服务信息 2.30.06 符号2.31 可编程逻辑控制(找平装置)2.31.01 机手指南(V6.072) 2.31.02 传感器(V6.072) 2.30.03故障-出错信息2.50停机 2.50.01 关闭机器2.60运输 2.60.01 装车[0.00.01-6]3-维护保养3.0 概述3.00.01 维护保养图 3.00.02 提示 3.00.03 越冬保存 3.00.04 电器系统 3.00.05 焊接工作3.01 机架 3.01.01 灯光-报警装置3.02 机手座椅 3.02.01防滑表面3.03铣刨鼓 3.03.01 铣刨毂驱动 3.03.02 更换刀具 3.03.03 快速更换系统 3.03.04驱动皮带 3.03.05 铣刨毂冷却液 3.03.06 铣刨毂轴承[0.00.01-7]3.03.07 限位开关(刮料板)3.03.08 固定点3.04 发动机 3.04.01 燃油箱 3.04.02 发动机 3.04.03 利用搭线起动3.05 加注液压油 3.05.01 液压油箱 3.05.02 泵分离器齿轮箱3.05.03 滤清器 3.05.04 机油冷却器3.06 电力提供 3.06.01 电瓶3.08 行走驱动 3.08.01 行走驱动齿轮箱 3.08.02 履带板3.10 输送机 3.10.01 主/卸料输送机3.12 喷水系统 3.12.01 水箱 3.12.02 过滤器 3.12.03 喷嘴[0.00.01-8]3.12.04水箱添加泵(液压驱动)3.17 压缩空气系统 3.17.01 压缩空气箱 3.17.02 出霜装置3.70 润滑 3.70.01润滑点4 表格4.00燃油润滑油 4.00.01 系列容器加注量 4.00.02 润滑对照表4.01 拧紧扭矩 4.01.01 螺母和螺栓拧紧扭矩4.02 防冻保护 4.02.01 混合比[1.00.01-1]本操作手册是为了帮助用户能够安全正确地使用机器,并能够利用该机器所有的使用功能。
CWT-2000 系列 GSMGPRSCDMA MODEM手册

CWT-2000系列 GSM/GPRS/CDMA MODEM使用手册Version 2.Version 2.11.0.0© 深圳市盈科互动科技有限公司 版权所有深圳市盈科互动科技有限公司深圳市盈科互动科技有限公司2005年 3月所有权申明本手册所有权由深圳市盈科互动科技有限公司(以下称本公司)独家拥有。
未经本公司之书面许可,任何单位和个人无权以任何形式复制、传播和转载本手册之任何部分,否则一切后果由违者自负。
注意注意:本公司拥有对本手册的最终解释权,并保留其对所描述之产品改进的权力。
使用注意事项使用注意事项注意注意::更换SIM 卡之前请关闭电源卡之前请关闭电源 注意注意::请使用产品所带的原装配件请使用产品所带的原装配件注意注意::请尽量使用主机后置USB 接口并且避免带电拔插操作接口并且避免带电拔插操作 注意注意::请在使用过程中请在使用过程中防止静电和防止静电和防止静电和灰尘灰尘灰尘注意注意::请在使用过程中防水请在使用过程中防水,,不要将水不要将水、、汽油汽油、、酒精等液体倾倒在设备中酒精等液体倾倒在设备中 注意注意::请不要在雷雨天气使用本设备请不要在雷雨天气使用本设备 注意注意::部分产品具有GPRS 功能功能 注意注意::部分产品具有CDMA1X 功能功能目 录录一、产品简介 (4)二、技术指标 (5)三、主要功能 (6)四、产品外形 (7)五、产品安装 (8)5.1 CWT-2000S系列产品安装 (8)5.2 CWT-2000P系列产品安装 (9)5.2.1 安装步骤 (9)5.2.2 驱动安装 (9)5.3 CWT-2000U系列产品安装 (11)5.3.1 安装步骤 (11)5.3.2 驱动安装 (11)六、GPRS安装指南 (12)七、产品清单 (13)八、保修政策 (14)九、注意事项 (15)产品简介一、产品简介CWT-2000系列GSM/GPRS/CDMA MODEM是深圳市盈科互动科技有限公司最新开发的产品,它使用工业级无线模块设计,采用通用的COM/PCI/USB(视具体型号而定)型接口,是为数据、传真和短消息传输而专门设计的无线MODEM。
科姆龙2000 变频器 参数表 说明书

-51-第六章 功能参数说明功能参数说明6.1功能参数简表6-1科姆龙KV KV22000系列通用变频器参数表系列通用变频器参数表功能功能 代码代码 名 称称设定范围设定范围最小最小 单位单位 出厂出厂 设定设定 类型类型 F00F0000 主速度频率设定 0.00Hz~650.00Hz 0.00Hz 50.00Hz R/W F001F001 加速时间 0.1~6553.0秒 0.1秒 10.0秒 R/W F00F0022 减速时间0.1~6553.0秒 0.1秒 10.0秒 R/W F003F003 FWD(X5)输入端子功能选择 0~99 0 73 FR/W F00F0044 REV(X6)输入端子功能选择 0~990 74 FR/W F00F0055 停机直流制动起始频率 0.50~650.00Hz 0.50Hz 5.00Hz R/W F00F0066 停机直流制动电压 0~30 % 0 5% R/W F00F0077 停机直流制动动作时间 0.0~25.0秒 0.0 1.0秒 R/W F00F0088 停机直流制动延迟时间 0.0~1.0秒 0.0 0.5秒 R/W F00F0099 转矩提升设定 0~30%3%FR/W F0F0101010 电机额定频率 0.50~650.00 Hz 0.50 Hz 50.00 Hz FR/W F0F0111111 电机额定电压30~100%30 %100 %FR/W F0F0121212 最大载波频率/载波频率转折点 2.0~16.9 KHz 2.0 KHz 机型设定 FR/W F0F0131313 Modbus 字串间隔时间 3~250ms 3ms 3ms FR/W F0F0141414 温度检测形式设定 0.0~999.9 0.0440.8FR/W F0F0151515 上限频率0.50~650.00 Hz0.50 Hz 50.00 HzFR/WF0F0161616 下限频率 0.00~650.00 Hz 0.00 Hz 0.00 Hz FR/W F0F0171717 跳跃频率 0.00~650.00 Hz 0.00 Hz 0.00 Hz R/W F0F0181818 跳跃频率范围 0.00~5.00 Hz 0.00 Hz 0.00 Hz R/W F0F0191919 点动频率 0.00~650.00 Hz 0.00 Hz 10.00 Hz R/W F0F0202020 点动频率加减速时间 0.1~25.0秒 0.1秒 10.0秒 R/W F0F0212121 阶段1运行频率 0.00~650.00 Hz 0.00 Hz 0.00 Hz R/W F0F0222222 阶段1加速时间 0.1~6553.0秒 0.1秒 10.0秒 R/W F023 阶段1减速时间 0.1~6553.0秒 0.1秒 10.0秒 R/W F023F024 阶段2运行频率 0.00~650.00 Hz 0.00 Hz 0.00 Hz R/W F024F025 阶段2加速时间 0.1~6553.0秒 0.1秒 10.0秒 R/W F025F0F0262626 阶段2减速时间 0.1~6553.0秒 0.1秒 10.0秒 R/W F0F0272727 阶段3运行频率 0.00~650.00 Hz 0.00 Hz 0.00 Hz R/W F0F0282828 阶段3加速时间 0.1~6553.0秒 0.1秒 10.0秒 R/W F0F0292929 阶段3减速时间 0.1~6553.0秒 0.1秒 10.0秒 R/W F0F0303030 停机方式 0~1 0 0 R/W F0F0313131 禁止反转 0~1 0 0 R/W F0F0323232 功率因数/滤波常数 50.00~99.99 50.00 85.20 FR/W F0F0333333 启动放电刹车回路 0~2 0 0 R/W F0F0343434 低(过)电压故障后再启动 0~1 0 0 R/W-52-F0F03535失速过流点 10~200 10 200 % R/W F0F0363636 暂时停止输出时间 0.1~5.0秒 0.1秒 0.5秒 R/W F0F0373737 模拟输出AM 0~17 0 0 R/W F0F0383838 模拟输出AM增益 0~255 0 255 R/W F0F0393939 运行控制方式选择 0.0~9.9 0.0 0.0 R/W F0F0440频率设定选择 0.00~99.99 0.00 8.08 R/W F0F0414141 X1输入端子功能选择 0~99 0 0 R/W F042 X2输入端子功能选择 0~99 0 0 R/W F042F043 X3输入端子功能选择 0~99 0 0 R/W F043F044 X4输入端子功能选择 0~99 0 0 R/W F044F0F0454545 开路集电极输出Y1功能选择 0~99 0 0 R/W F0F0464646 开路集电极输出Y2功能选择 0~99 0 0 R/W F0F0474747 继电器输出端子功能选择 0~99 0 4 R/W F0F0484848 输出电流检出水平 0~150% 0 100 % R/W F0F0494949 频率检出水平 0.00~650.00 Hz 0.00 Hz 30.00 Hz R/W F0F0505050 频率检出允许范围 0.00~25.0 Hz 0.00 Hz 5.0 Hz R/W F0F0515151 电子热继电器动作时间 0~120秒 0 60秒 R/W F0F0525252 电机极数 2~12极 2极 4极 FR/W F0F0535353 齿轮比例 0~250% 0 100 % R/W-53-F0F05454监视模式选择 0~250 0 0 R/W F0F0555555 模拟转换器输入信号选择 0~250 0 0 R/W F0F0565656 模拟转换器输出资料 0~1023 0 M F0F0575757 输出频率(Hz) 0.00~650.00 Hz 0.00 Hz Hz M F0F0585858 输出转速(rpm) 0 rpm rpm/ Krpm M F0F0595959 直流母线电压 Vdc M F0F0606060 输出电压 Vrms M F061 电流及其他状态显示 M F061F062 散热器温度 0~100℃ ℃ M F062F063 数字输入端子状态 0.0.0.0~1.1.1.1 0.0.0.0 0.0.0.0 M F063F0F0646464 控制端子状态 0.0.~1.1 0.0. 0.0. M F0F0656565 数字输出端子状态 0.0.0~1.1.1 0.0.0 0.0.0 M F0F0666666 保留F0F0676767 运行模式选择 0~4 0 1 FR/W F0F0686868 无感矢量电压补偿 0~30 0 10 FR/W F0F0696969 滑差补偿系数F1/F2 0.0~99.99 0.0 50.50 % FR/W F0F0707070 模拟输入增益 0.0~100 0.0 50 % R/W F0F0717171 计时器(TIMER)动作时间 0.2~6553.0 0.2 5.0秒 R/W F0F0727272 简易PLC自动运行选择 0~6 0 0 R/W-54-F0F0737373 自动运行第一段时间设定 0.1~6553.0秒 0.1秒 15.0秒 R/W F0F0747474 自动运行第二段时间设定 0.1~6553.0秒 0.1秒 15.0秒 R/W F0F0757575 自动运行第三段时间设定 0.1~6553.0秒 0.1秒 15.0秒 R/W F0F0767676 自动运行第四段时间设定 0.1~6553.0秒 0.1秒 15.0秒 R/W F0F0777777 自动运行第五段时间设定 0.1~6553.0秒 0.1秒 15.0秒 R/W F0F0787878 电机额定容量 10~100 % 10 100 % FR/W F0F0797979 再启动方式选择 0~3 0 0 R/W F080 速度寻找动作水平 10~200 % 10 150 % R/W F080F081 速度寻找时减速时间 0.1~25.0秒 0.1秒 2.0秒 R/W F081F0F0828282 速度寻找时电压恢复时间 0.1~5.0秒 0.1 0.5秒 R/W F0F0838383 IGBT保护时间 2.0~25.0us 2.0us 3.0us FR/W F0F0848484 输入交流电压 40~1000 V 40 380V FR/W F0F0858585 变频器额定电流 0.5~3000.0 A 0.5 机型设定 FR/W F0F0868686 电流显示值的增益调整 70~140 70 100 FR/W F0F0878787 电压显示值的增益调整 70~140 70 100 FR/W F0F0888888 最大输出电压 30~100 30 100 % FR/W F0F0898989 V1端子输入最低值 0~1023 0 12 FR/W F0F0909090 V1端子输入最高值 0~1023 0 1012 FR/W F0F0919191 V2端子输入最低值 0~1023 0 12 FR/W-55--56-F0F09292 V2端子输入最高值 0~1023 0 780 FR/W F0F0939393 通讯格式/通讯地址 0.01~99.99 0.01 0.01 FR/W F0F0949494 数据初始化 0~250 0 0 R/W F0F0959595 参数写保护 0~2 0 0 R/W F0F0969696 开放特殊参数设定 0~1 0 0 R/W F0F0979797 软件版本机型设定 R F0F0989898 I 灯亮时欲监视的参数 0~99 0 61 R/W F099F099 Hz 灯亮时欲监视的参数0~9957R/W-57-6.2 参数功能详细说明F000 F000 主速度频率设定主速度频率设定主速度频率设定设定范围设定范围::0.00 0.00 ~~ 650.00Hz 650.00HzF000是存储器内的主要运行频率设定。
KW 系列用户手册说明书
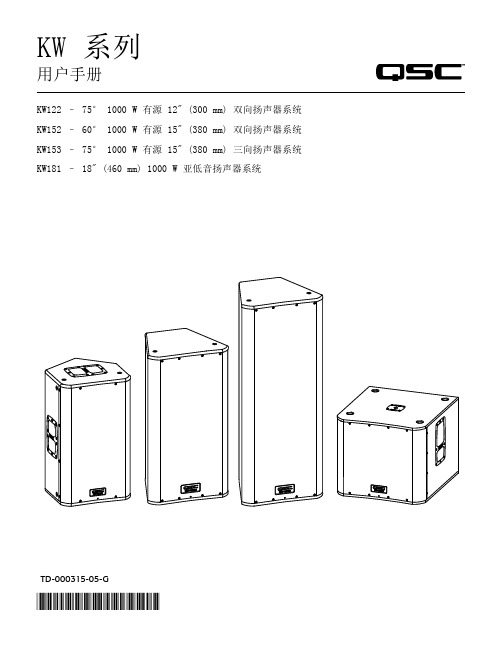
TD-000315-05-G*TD-000315-05*KW 系列用户手册KW122 – 75° 1000 W 有源 12" (300 mm) 双向扬声器系统KW152 – 60° 1000 W 有源 15" (380 mm) 双向扬声器系统KW153 – 75° 1000 W 有源 15" (380 mm) 三向扬声器系统KW181 – 18" (460 mm) 1000 W 亚低音扬声器系统重要的安全注意事项和符号说明警告!小心:为降低电击风险,请不要移除放大器盖板。
内部无用户可以维修的零件。
请联络合格的专业人员进行维修。
等边三角形内带箭头的闪电符号用于警告用户该产品机罩内有非绝缘“危险”电压,此电压足以导致对人体产生电击危险。
等边三角形内带惊叹号用于提醒用户本手册中重要的操作和维护(维修)规定。
请遵照 QSC 产品说明在经认证的专业安装工程师的监督下进行安装。
警告用于警示用户可能导致发生人身伤害的情况。
小心用于警示用户可能导致设备发生物理损坏的情况。
1. 请阅读这些说明。
2. 请保存好这些说明。
3. 请谨记所有警告与小心提示。
4. 请遵守所有说明。
5. 警告!为避免火灾或电击,请勿将设备暴露于雨中或潮湿环境中。
请勿在距离水很近的地方使用此扬声器。
6. 在清洁设备时只能用干布擦拭。
7. 小心:机罩背后至少要留出 6" (152 mm) 的空隙以便进行对流冷却。
机罩背后不要放置可能阻碍空气流动的物品(比如布料、织物等等)。
请勿堵塞通风口。
本产品内置有功率放大器,因此会产生热量,需要进行通风散热。
8. 小心:不要将本产品安装在会产生热量的热源,如散热器、热调节装置、炉子或其他扬声器(包括放大器)附近。
9. 警告!为了保证你的安全,务必保证此扬声器的正确接地。
接地插头有两个叶片和一个接地爪。
这个接地爪用来保证您的安全。
KW2000变频恒压供水控制器

变频恒压供水控制器使用手册产品概述变频恒压供水控制器是专为变频恒压供水系统和锅炉及换热系统补水而设计的电脑控制器,可与各种品牌的变频器配套使用。
性能指标1.采用32位高性能处理器,配置高可靠性的铁电存储器。
2.参数调整和设定具有密码锁定及保护功能。
3.采用PI控制算法,设定参数少,控制精度高。
4.模拟量输出可以通过参数调整。
5.具有压力传感器零点和满度补偿功能。
6.具有定时自动倒泵功能。
7.具有外部手动端子。
8.具有缺水自动检测保护功能和外部输入停机保护功能。
9.系统补水控制时,具有超压自动泄水控制功能。
10.具有可选的定时自动开、关机控制功能。
11.具有手操器功能,可手动调节输出电压来控制变频器的频率。
12.可代替电接点压力表进行上、下限压力控制。
13.具有分时分压供水控制功能,最多有六段时间控制。
14.具有上限保护压力控制功能,超压自动停泵。
产品规格1.额定工作电压: AC220V±15%;2.控制器额定功耗: <=AC 2W;3.开关输出信号: 继电器输出5A/ AC220V4.模拟输入信号: 1路,0-5V/1-5V电压信号6.模拟量输出信号: 1路,0-10V/0-5V电压信号7.控制器外形尺寸: 96mm×96mm×72mm8.控制柜面板开口尺寸:91mm×91mm,支座安装9.使用环境: 无水滴、蒸汽、腐蚀、易燃、灰尘及金属微粒的场所;温度:-20℃~50℃;.相对湿度:< 95%控制器面板示意图接线端子说明控制器端子接线图(图和实物一一对应,接线时需参照)接线端子说明:详细操作说明1、面板及按键说明:PV窗口为测量值显示窗口,SV窗口为设定值显示窗口。
"S"键为参数设定键,"▲"和"▼"为两个数字加减键,在参数设定状态,"M"键和""键为参数翻页键;在正常工作状态,""键为显示方式转换键,用来转换显示压力值和输出频率值;"●"键为功能键,在DA值检证时起确认作用,以及在错误情况下做错误接触用。
电能公司电力表2000系列 Quick Start 指南说明书

ContentsDescription PageMechanical Installation . . . . . . . . . . . . . . . . . . . . .1Electrical Wiring . . . . . . . . . . . . . . . . . . . . . . . . . . .2Network Planning . . . . . . . . . . . . . . . . . . . . . . . . .4Locating the Gateway Card . . . . . . . . . . . . . . . . . .5Configuring the Meter’s Gateway Card for Network Accessibility . . . . . . . . . . . . . . . . . . . . . .6Configuring a Fixed IP Address for the Gateway Card using a local PC . . . . . . . . . . . . .6Verify the IP address . . . . . . . . . . . . . . . . . . . . .9Network Access . . . . . . . . . . . . . . . . . . . . . . . . . .9Restarting and Factory Defaults . . . . . . . . . . . . . .9Restart the Gateway Card . . . . . . . . . . . . . . . . .9Additional Information . . . . . . . . . . . . . . . . . . . . .10Power Xpert Meter 2000 SeriesCopyright © 2011 by Eaton Corporation . All rights reserved .Specifications contained herein are subject to change without notice .Power Xpert is a registered trademarks of Eaton Corporation .EATON CORPORATION - CONFIDENTIAL AND PROPRIETARY NOTICE TO PERSONS RECEIVING THIS DOCUMENT AND/OR TECHNICAL INFORMATIONTHIS DOCUMENT, INCLUDING THE DRAWING AND INFORMATION CONTAINED THEREON, IS CONFIDENTIAL AND IS THE EXCLUSIVE PROPERTY OF EATON CORPORATION, AND IS MEREL YON LOAN AND SUBJECT TO RECALL BY EATON AT ANY TIME . BY TAKING POSSESSION OF THIS DOCUMENT, THE RECIPIENT ACKNOWLEDGES AND AGREES THAT THIS DOCUMENT CANNOTBE USED IN ANY MANNER ADVERSE TO THE INTERESTS OF EATON, AND THAT NO PORTION OF THIS DOCUMENT MAY BE COPIED OR OTHERWISE REPRODUCED WITHOUT THE PRIOR WRITTEN CONSENT OF EATON . IN THE CASE OF CONFLICTING CONTRACTUAL PROVISIONS, THIS NOTICE SHALL GOVERN THE STATUS OF THIS DOCUMENT .DISCLAIMER OF WARRANTIES AND LIMITATION OF LIABILITYThe information, recommendations, descriptions and safety notations in this document are based on Eaton Electrical Inc . and/or Eaton Corporation’s (“Eaton”) experience and judgment and may not cover all contingencies . If further information is required, an Eaton sales office should be consulted .Sale of the product shown in this literature is subject to the terms and conditions outlined in appropriate Eaton selling policies or other contractual agreement between Eaton and the purchaser .THERE ARE NO UNDERSTANDINGS, AGREEMENTS, WARRANTIES, EXPRESSED OR IMPLIED, INCLUDING WARRANTIES OF FITNESS FOR A PARTICULAR PURPOSE OR MERCHANTABILITY, OTHER THAN THOSE SPECIFICALL Y SET OUT IN ANY EXISTING CONTRACT BETWEEN THE PARTIES . ANY SUCH CONTRACT STATES THE ENTIRE OBLIGATION OF EATON . THE CONTENTS OF THIS DOCUMENT SHALL NOT BECOME PART OF OR MODIFY ANY CONTRACT BETWEEN THE PARTIES . In no event will Eaton be responsible to the purchaser or user in contract, in tort (including negligence), strict liability or otherwise for any special, indirect, incidental or consequential damage or loss whatso-ever, including but not limited to damage or loss of use of equipment, plant or power system, cost of capital, loss of power, additional expenses in the use of existing power facilities, or claims against the purchaser or user by its customers resulting from the use of the information, recommendations and descriptions contained herein .PXM 2000 Quick Start GuideMechanical InstallationIM02601002E 1Mechanical Installation 4” Diameter round mounting 92 mm Square Form ANSI Studs 4” Round Form Caution: Do not overtightennuts as this can damage the me-ter. The maximum installationtorque is 0.4 Newton-Meter.92 mm square formUnscrew ANSI studs for DIN InstallationPXM 2000 Quick Start GuideElectrical Wiring2 IM02601002EElectrical WiringNote: Other wiring configurations are available . See the Power Expert Meter 2000 Userand Installation Guide for additional informationWYE Direct 3 Phase, 4-wireWYE with PTs 3 Phase, 4-wirePXM 2000 Quick Start GuideElectrical Wiring IM02601002E 3DELTA Direct 3 Phase, 3-wireDELTA with PTs 3 Phase, 3-wirePXM 2000 Quick Start GuideNetwork Planning4 IM02601002ENetwork PlanningThe hardware for the Power Xpert Meter 2000 family is similar to other EATON IQ 250 and 260 meters except that these meters include an integrated, multi-function Ethernet network gateway card . The Power Xpert Meter 2000 Gateway Card provides many of the features found in the rest of the Power Xpert line of meters, including:• Local web server • Modbus/TCP communitations • SNMP communications • Power Xpert Software (PXS) communications • BACnet/IP communications The Network PC requires a web browser (Internet Explorer versions 7 or 8 are sup-ported) and an installed version 6 or later of the JAVA J2SE JRE (Java Runtime Environ-ment) . If Java is not already installed, you or the network administrator may download it from www .java .com and install it per Sun’s instructions . See the Power Expert Meter 2000 User and Installation Guide for additional information .An Ethernet connection is used for configuring the meter’s gateway card communica-tion settings via a web browser . Y ou may need to contact your network administrator for some network and configuration information . In preparation, you will need to decide if the meter will be manually assigned a fixed (static) IP address or will be automatically assigned a fixed IP address by a DHCP server somewhere on the network . With either method the assigned network address must not change once the meter has been de-ployed . Changing the IP address will cause loss of communication until the associated client PCs change the corresponding meter’s IP addresses .Discuss with your network administrator whether you should manually configure the meter with an assigned IP address or whether the DHCP server will assign one . For the DHCP server to provide a fixed IP address, your network administrator will need to know the MAC address assigned to the meter .H C aution Eaton strongly recommends using a fixed IP address if an Eaton PXS system will be ac-cessing the meter . Otherwise, should the IP address change (after a power outage, for example), PXS will no longer be able to access data from the meter .The MAC address is found on a small label that consists of 14 letters and numbers . It looks something like: 002080850047EF Locate the MAC address on your meter and record it here . MAC Address : ______________________________________________________________Is DHCP going to be used to assign the IP address to your meter? ___ Y es ___ No If Yes : Provide the MAC address to the network administrator and record the fixed IP address the network administrator will assign to your meter in the DHCP server here:IP Address: __________________________________________________________________PXM 2000 Quick Start GuideLocating the Gateway CardIM02601002E 5The card will be configured remotely . Skip to the section entitled Verify the IP addressIf No :Record the following information provided by the network administrator here:IP Address: _________________________________________________________________Subnet Mask: _______________________________________________________________Default Gateway: ____________________________________________________________Primary DNS Server IP Address _______________________________________________Secondary DNS Server IP Address _____________________________________________Locating the Gateway CardFirst, ensure power is applied to the meter .The Power Expert Meter 2000 Gateway Card is the blue card installed in the right-most option slot (slot 2) on the rear of the meter . The card is labeled: Power Xpert GatewayPXM Series 2000 .PXM 2000 Quick Start GuideConfiguring the Meter’s Gateway Card for Network Accessibility6 IM02601002ELocation of Gateway CardThere are four indicator LEDs on the Gateway Card labeled: Status , DHCP , Ident , andPower . When power is first applied all the lights should be off for a few seconds and then the Power light will illuminate . This indicates the card has power and is running .Configuring the Meter’s Gateway Card for Network Accessibility Configuring a Fixed IP Address for the Gateway Card using a local PCY our network administrator provided an IP address, a subnet mask, and a default gate-way (which you entered in the previous section) . This information must be entered into the Gateway Card using a local PC, such as a laptop .This method requires a PC with the following:• an Ethernet port• an Ethernet cable (either straight-through or cross-over)• A web browser such as Internet Explorer 7 or 8• an installed version 6 or later JAVA J2SE JRE (Java Runtime Environment) . If not already installed you may download it from www .java .com and install it . (If Java isn’t installed, you’ll be prompted to install it .)To configure the Gateway Card:1 . On the PC, launch the Java Control Panel screen (available through the WindowsPXM 2000 Quick Start Guide Configuring the Meter’s Gateway Card for Network Accessibility IM02601002E 7Control Panel ) .2 . On the General tab, click the Settings button under Temporary Internet Files .3 . Ensure the Keep T emporary Files on My Computer check box is cleared . 4 . Connect the PC to the Gateway Card through an Ethernet cable (either a straight though or cross-over CAT 5 cable) .There are two green lights (LEDs) located on the gateway card’s Ethernet port . If the Ethernet cable is connected to an active Ethernet port on the PC both lights should be illuminated (the light labeled Act may be flickering reflecting network activity) . 5 . The card’s default Ethernet IP address is 192 .168 .1 .1 . Set the PC’s address to an address on the same subnet, such as 192 .168 .1 .100 . To do this, use the following steps:a . Click Window’s Start . b . Choose either Settings > Control Panel (Windows 2000) or Control Panel (Windows XP) .c . In the Control Panel , click Network Connections and right-click Local Area Connection . Select Properties from the shortcut menu .d . Click the Properties button .e . In the Properties dialog box, select Internet Protocol (TCP/IP) and click the Properties button .f . In the Internet Protocol (TCP/IP) Properties dialog box, select Use the follow-ing IP address and enter the following in the IP address field: 192.168.1.100g . Click OK throughout the various dialog boxes .6 . Launch a web browser and navigate to the following IP address: 192.168.1.1If an information screen appears stating the certificate cannot be verified and asking if you want to run anyway, select run.Loading Page Java will load and then the meter’s Home page will appear .PXM 2000 Quick Start GuideConfiguring the Meter’s Gateway Card for Network Accessibility8 IM02601002EMeter Home Page 7 . Click the Setup button . The Setup page will appear . (Y ou can also click the Setup Meter link at the bottom of the page to go directly to the Quick Setup folder .)8 . Locate and click the open icon to the left of the Quick Setup folder . The folder opens to show two subfolders: Meter and Network .Opening the Quick Setup Folder 9 . Click the Network folder . 10 . Click the Edit button .Edit Button (on the right of the page)A Login dialog box appears .11 . The default Username is admin and the default Password is admin . Log in using these credentials .PXM 2000 Quick Start GuideNetwork AccessIM02601002E 9Login dialog12 . I f you successfully logged in as admin you may now configure the card for the set-tings specified by your network administrator . Refer to the previously recorded net-work settings . Y ou can also enter such optional information as the meter’s location, who to contact in case of problems, etc .13 . W hen you’ve completed configuration, click the OK button .The new IP address will take effect shortly after clicking OK . The Gateway Card will redirect you to the new IP address and reload the Java applet . Y ou can continue to configure the meter after it is connected to your LAN .Refer to the PXM 2000 Meter User’s Guide (IM02601001E) for additional configura-tion details .14 . D isconnect the Ethernet cable to the PC and connect the meter to the LAN .Note: Remember to reconfigure the PC’s network settings for your LAN .This concludes network configuration . Y ou can now proceed to verify the IP address .Verify the IP addressTo check the IP address from the meter’s front panel:1 . If the meter has power, the display should be showing normal data, such as voltage, current, etc .2 . Push the menu button on the face of the meter . The main menu screen appears .3 . Push down repeatedly until IP blinks .4 . Push enter and the meter’s IP address appears, which should appear something like the following:010.222.051.066In this example the IP address is 010.222.051.066 . This should match the ad-dress the network administrator provided for this meter .5 . Push menu to return to the main menu .Network AccessOnce the network IP address is known, most meter functions and configuration can be done via the network . Use a networked client PC running version 6 or later of the JAVA J2SE JRE and a web browser such as Internet Explorer 7 or 8 to navigate to the meter’s IP address . See the meter’s complete user’s manual for additional information .PXM 2000 Quick Start GuideRestarting and Factory Defaults10 IM02601002E Restarting and Factory DefaultsThe gateway card provides the ability to restart and to reset itself to the factory defaults . There is a momentary push-button switch accessed through a small hole in the face plate of the gateway card . Although it is not used in normal operations, this switch al-lows you to restart the gateway card in the meter .Restart the Gateway CardThe gateway card restart push-button switch is located behind the hole in the card face plate closest to the LED labelled DHCP . This switch is used to restart just the gateway card (not the meter) should it be necessary to recover from some abnormal condition .Momentarily press the switch by pushing a small device into the hole to activate the switch .Detailed information on applications and options can be found in the PXM 2000 Meter User’s Guide (IM02601001E) on the CD shipped with the meter . The guide can also be found at http://www .eaton .com/powerxpert .Eaton Corporation Electrical Group 1000 Cherrington Parkway Moon Township, PA 15108United States 877-ETN-CARE (877-386-2273)Eaton .com© 2011 Eaton Corporation All Rights Reserved Printed in USA Publication No . IM02601002E October 2011PowerChain Management is a registered trademark of Eaton Corporation . All other trademarks are property of their respective owners .。
电源专家仪表2000网关卡套件快速起始指南说明书

Power Xpert® Meter 2000 GatewayCard KitT able of ContentsRemove the Meter From Service . . . . . . . . . . . . .2Disconnect Power Connections, CTs, andModbus . . . . . . . . . . . . . . . . . . . . . . . . . . . . . . .2Remove Meter from Panel. . . . . . . . . . . . . . . . .2Locate the Meter on the Bench. . . . . . . . . . . . .2Install the Gateway Card . . . . . . . . . . . . . . . . . . . .3Check Meter Firmware . . . . . . . . . . . . . . . . . . .4Connect to the Meter for Firmware Upgrade . .4Upgrade the Firmware . . . . . . . . . . . . . . . . . . . .4Configure the Gateway Card . . . . . . . . . . . . . . . .5Check Gateway Card Indicators . . . . . . . . . . . . .5Configure Network Access for the Gateway Card using a Local PC . . . . . . . . . . . . . . . . . . . . . . . . .5Verify the IP Address . . . . . . . . . . . . . . . . . . . . .7Network Access . . . . . . . . . . . . . . . . . . . . . . . . .7If Y ou Need to Restart The Gateway Card . . . . .7Additional Information . . . . . . . . . . . . . . . . . . . .8Reinstall the Meter . . . . . . . . . . . . . . . . . . . . . . . .82Quick Start Guide IL02601011EEffective December 2011Power Xpert® Meter 2000 Gateway Card KitEATON CORPORATION Remove the Meter From ServiceTurn power off at the breaker feeding the meter . There may be more than one breaker . Use local safety procedures such as “Lock out/ Tag out” to ensure the breaker(s) is not inadvertently energized . Ensure the high power connections on the meter are de-energized .•Current sensing wires may be connected directly to the load by simply passing the current carrying conductors (load or Current Transformers) directly through the meter . There is no physical connection to the meter .•Current sensing wires may be connected directly to the meter by attaching the current carrying conductors to “current gills” or quick connect terminals on the meter .Then remove or disconnect the current sensing wires from the meter .H WARNING!USE CAUTION TO ENSURE THE CURRENT THROUGH THE CTS IS OFF OR SUIT-ABLE PROTECTION IS IN PLACE TO PREVENT CONTACT WITH THE LEADS FROM THE CT.ENSURE THE CONTROL OR LOGIC POWER TO THE METER IS DE-ENERGIZED. THE VOLTAGE AT THESE TERMINALS IS THE LOCAL AC VOLTAGE.Disconnect Power Connections, CTs, and Modbus1 . Remove the large 13 position connector on the back of the meter .2 . If the installation is being done on an operational meter, this connector must be removed before installing the Gateway Card . Removing this connector will remove power to the meter . The Gateway Card is not designed to be hot-pluggable (installed with power on) .3 . If an extra 13 position connector is not available, make note of where the wires are connected to the 13 pin connector . Y ou will need this information when re-connecting the wires . Then remove the wires from the 13 position connector and replace the connector into the meter .Figure 1. 13 and 6 position connectors13 position GND L(+) 6 position Remove Meter from PanelWhen removing the meter keep the mounting hardware (screws, washers, etc .) in a safe place for use when re-installing the meter .For ANSI installations remove the four nuts and washers .Figure 2. Removing the four nuts and washersFor DIN installations remove the two screws and mounting brackets .Figure 3. Removing the DIN mounting bracketsFor DIN rail installations pull down on the mounting clips to release the meter .Figure 4. T ransducer version of meter mounted on DIN railLocate the Meter on the BenchThe installation procedure requires local power and an activeEthernet connection . To provide power to the meter, it may be usefulFour mounting nuts and lock washersMounting brackets and screws3Quick Start Guide IL02601011EEffective December 2011Power Xpert® Meter 2000 Gateway Card KitEATON CORPORATION to build an Aux cable to GND, L(+) and N(-) using a 13 position con-nector . This is particularly useful if installing many Gateway Cards .The Gateway Card must be installed in slot 2. If slot 2 is occu-pied, remove the card in slot 2 and place it into slot 1 . Otherwise,remove the option card cover over slot 2 . Retain the screws .Install the Gateway CardI C AUTION!USE LOCAL ELECTROSTATIC DISCHARGE PROTECTION OR TOUCH A SUITABLY GROUNDED METAL SURFACE TO DISCHARGE ANY STATIC ELECTRICAL CHARGE. FAILURE TO FOLLOW THESE GUIDELINES COULD CAUSE DAMAGE TO THE GATEWAY CARD.1 . Remove the Gateway Card from the protective wrap .2 . Locate the MAC address printed on the card . Record it here . MAC Address:_________________________________________The MAC address is on a small label and consists of 14 letters and numbers . It looks something like: 0020808500EF3 . Another MAC address label is included in that kit and should be applied to the flat area on top of the meter (above the meter’s infor-mation label) .Figure 5. Area for MAC address label4 . Verify the switch settings on the card . All switches should be in the off position .Figure 6. Card Switches Shown in the Off Position5 . Insert the Gateway Card into meter slot 2 using the meter’s built-in card guides (see the following figure) . Use care to correctly locate the card in the guides . Slide the card carefully into the meter until it stops . Gently push on the card until it “clicks” into place .Figure 7. Install Gateway Card into slot 26 . Secure the card by replacing the screws removed while removing the cover .7 . If available, connect the building Ethernet cable to the jack on the Gateway Card . Otherwise use a local Ethernet equipped PC and the seven-foot Ethernet cable shipped with this kit .8 . If available, connect the Modbus connector (6 position connector) that is attached to the Modbus network .9 . Attach the power cord . If an AUX power cord was assembled then insert the connector into the socket . Otherwise connect GND, L(+) and N(-) to the 13 position connector as indicated in the figure on page 2 .10 . A pply power to the power cord .11 . There are four indicator LEDs on the Gateway Card labeled:Status , DHCP , Ident , and Power . When power is first applied all the lights should be off for a few seconds and then the Power light will illuminate . This indicates the card has power and is running .12 . T here are two lights (LEDs) located on the Ethernet cable jack . If the Ethernet cable has an active Ethernet connection the light labeled Act may be flickering . The light labeled 100 will be lit if the Ethernet connection is active at 100 Mbps .Put MAC address I/O Card Guide Track4Quick Start Guide IL02601011EEffective December 2011Power Xpert® Meter 2000 Gateway Card KitEATON CORPORATION Figure 8. Location of LEDsCheck Meter FirmwareIf the meter firmware is lower than version 14, you must upgrade the firmware . Y ou can check the firmware version of a powered meter from the front panel .1 . Press menu .2 . Press the down button until Info is flashing (line A) .3 . Press enter .4 . An initial three-line display of values appears . After a few sec-onds, a second set of values appears . The firmware version number is in the middle line .5 . If the meter firmware version is 14 or greater, you do not needto upgrade the firmware and can proceed to Configure the Gateway Card on page 5 .6 . If you must upgrade the firmware, continue on with this proce-dure .7 . Press menu .8 . Press the down button until CfG is flashing (line A) .9 . Press enter .10 . P ress the down button until POrt is flashing (line A) .11 . Press enter .12 . T he Adr (address) screen appears . Record the address:13 . A ddress___________14 . P ress enter . The bAUD screen appears . Record the baud rate:15 . B aud rate:_________16 . P ress menu twice .Connect to the Meter for Firmware UpgradeThis procedure requires an RS-232 to RS-485 serial adapter, as you must connect to the meter through the RS-485 port .1 . Place the CD that accompanied your upgrade kit into the PC’s CD/DVD drive .2 . Install the Eaton Meter Configuration Software (double-click EatonMCSSetup .exe in the root folder of the Eaton Meter Configuration Software CD) .3 . After installation, launch the Configuration Software .4 . Click the Connect icon on the title bar or Connection > Quick Connect .5 . Make sure the Serial Port radio button is selected .6 . Enter the Device Address you previously recorded .7 . Select Baud Rate you previously recorded from the pull-down menu .8 . Select the port you are using from the pull-down menu . The Available Ports/All Ports radio buttons determine which port selec-tions the menu displays .9 . Select Modbus RTU from the Protocol pull-down menu .10 . S elect Flow Control: None .11 . Select Echo Mode: No Echo .Figure 9. Connection screen12 . C lick the Connect button . Y ou will see the Device Status screen .Figure 10. Device Status ScreenUpgrade the Firmware1 . At the Eaton Meter Configuration screen, select Tools > FlashMe. Y ou will see the following screen .Power LEDStatus LED5Quick Start Guide IL02601011EEffective December 2011Power Xpert® Meter 2000 Gateway Card KitEATON CORPORATION Figure 11. Firmware Update Dialog Box2 . Click Browse to locate the firmware update file on the CD .3 . Click Flash to update the firmware .4 . When the update is complete, click Exit to close the screen .otee:N If Flash Update fails, you will see a message to that effect . CheckDevice Status to see if your meter is in Boot Mode .•If the meter is in Boot Mode, clear the Starting from Run Mode box in the Flash Me screen and try flash updating the firmware again .•If the meter’s status is not displayed in the Device Status screen, the meter may be stuck in Boot Mode . If you are certain the com-munication settings are correct for the meter, try connecting to the meter using the following defaults:Address 001Baud Rate 9600ProtocolModbus RTUOnce you connect to the meter, you can try flash upgrading again .This concludes the firmware update . Y ou can now proceed to con-figure the Gateway Card .Configure the Gateway CardAn Ethernet connection is used for configuring the meter’s Gateway Card communication settings via a web browser . Y ou may need to contact your network administrator for some network and configura-tion information . In preparation, you will need to decide if the meter will be manually assigned a fixed (static) IP address or will be auto-matically assigned a fixed IP address by a DHCP server somewhere on the network . With either method the assigned network address must not change once the meter has been deployed . Changing the IP address will cause loss of communication until the associated cli-ent PCs change the corresponding meter’s IP addresses .Discuss with your network administrator whether you should manu-ally configure the meter with a static IP address (the dafault) or whether the DHCP server will assign one . For the DHCP server to provide a fixed IP address, your network administrator will need to know the MAC address assigned to the meter .H CAUTIONEATON STRONGLY RECOMMENDS USING A FIXED IP ADDRESS (THE DEFAULT) IF AN EATON PXS SYSTEM WILL BE ACCESSING THE METER. OTHERWISE,SHOULD THE IP ADDRESS CHANGE (AFTER A POWER OUTAGE, FOR EXAMPLE), PXS WILL NO LONGER BE ABLE TO ACCESS DATA FROM THE METER.Is DHCP going to be used to assign the IP address to your meter? ___ Y es ___ NoIf Yes :Provide the MAC address (previously noted on page 3) to the net-work administrator and record the fixed IP address the network administrator will assign to your meter in the DHCP server here:IP Address:The card will be configured remotely . Skip to the section entitled Verify the IP addressIf No :Record the following information provided by the network adminis-trator here:IP Address: _______________________________________________ Subnet Mask:______________________________________________ Default Gateway:___________________________________________ Primary DNS Server IP Address______________________________Secondary DNS Server IP Address____________________________Check Gateway Card IndicatorsFirst, ensure power is applied to the meter .There are four indicator LEDs on the Gateway Card labeled: Status , DHCP , Ident , and Power . When power is first applied all the lights should be off for a few seconds and then the Power light will illumi-nate . This indicates the card has power and is running .Configure Network Access for the Gateway Card using a Local PCY our network administrator either provided an IP address, a subnet mask, and a default gateway (which you entered in the previous sec-tion) or has decided to assign an address via DHCP . This information must be entered into the Gateway Card using a local PC, such as a laptop .This method requires a PC with the following:• an Ethernet port• an Ethernet cable (a seven-foot cable is provided in the kit) •a Java-enabled web browser, such as Microsoft Internet Explorer versions 7, 8, or 9 .•an installed version 6 or greater JAVA J2SE JRE (Java Runtime Environment) . If not already installed, when you connect to the meter you’ll be given the option to navigate to the Sun Java web-site and download the JRE .1 . On the PC, launch the Java Control Panel screen (available through the Windows Control Panel ) .2 . On the General tab, click the Settings button under Temporary Internet Files .6Quick Start Guide IL02601011EEffective December 2011Power Xpert® Meter 2000 Gateway Card KitEATON CORPORATION Figure 12. Settings Button3 . Ensure the Keep Temporary Files on My Computer check box is cleared .Figure 13. Keep Temporary Files on My Computer check box4 . Connect the PC to the Gateway Card through the seven-foot Ethernet cable shipped with the kit .There are two green lights (LEDs) located on the Gateway Card’s Ethernet port . If the Ethernet cable is connected to an activeEthernet port on the PC both lights should be illuminated (the light labeled Act may be flickering reflecting network activity) .5 . The card’s default Ethernet IP address is 192 .168 .1 .1 . Set the PC’s address to an address on the same subnet, such as 192 .168 .1 .100 .To do this, use the following steps:1 . Click Window’s Start .2 . Choose either Settings > Control Panel (Windows 2000) or Control Panel (Windows XP) .3 . In the Control Panel , click Network Connections and right-click Local Area Connection . Select Properties from the shortcut menu .4 . Click the Properties button .5 . In the Properties dialog box, select Internet Protocol (TCP/IP) and click the Properties button .6 . In the Internet Protocol (TCP/IP) Properties dialog box, select Use the following IP address and enter the following in the IP address field: 192.168.1.1007 . Click OK throughout the various dialog boxes .6 . Launch your Java-enabled web browser and navigate to the fol-lowing IP address: 192.168.1.1If an information screen appears stating the certificate cannot be verified and asking if you want to run anyway, select run.Java will load and then the meter’s Home page will appear .Figure 8. Loading Page7 . Click the Setup button or the Setup Meter link . The Setup page will appear .7Quick Start Guide IL02601011EEffective December 2011Power Xpert® Meter 2000 Gateway Card KitEATON CORPORATION Figure 9. Meter Home Page8 . Locate and click the open icon to the left of the Quick Setup fold-er . The folder opens to show two subfolders: Meter and Network .Figure 10. Opening the Quick Setup Folder9 . Click the Network folder . 10 . C lick the Edit button .Figure 11. Edit Button (on the right of the page)11 . A Login dialog box appears .12 . T he default Username is admin and the default Password is admin . Log in using these credentials .Figure 12. Login dialog13 . Configure the card for the settings specified by your network administrator . Y ou can also enter such optional information as the meter’s location, who to contact in case of problems, etc .14 . W hen you’ve completed configuration, click the OK button .15 . T he new IP address will take effect shortly after clicking OK . Communication with the PC will then be lost . Y ou can continue to configure the meter after it is connected to your LAN .16 . R efer to the PXM 2000 Meter User and Installation Guide (IM02601001E) for additional configuration details .17 . Disconnect the Ethernet cable to the PC and connect the meter to the LAN .otee:N Remember to reconfigure the PC’s network settings for your LAN .Verify the IP Address1 . If the meter has power the display should be showing normal data, such as voltage, current, etc .2 . Push the menu button on the face of the meter . The main menu screen appears .3 . Push down repeatedly until IP blinks .4 . Push enter and the meter’s IP address appears, which should appear something like the following:010.2 22.05 1.066In this example the IP address is 010.222.051.066 . This should match the address the network administrator provided for this meter . 5 . Push menu to return to the main menu .Network AccessOnce the network IP address is known, most meter functions and configuration can be done via the network . Use a networked client PC running version 6 or greater of the JAVA J2SE JRE and a Java enabled browser such as Internet Explorer version 7, 8, or 9 to navi-gate to the meter’s IP address . See the meter’s complete user’s manual for additional information .If You Need to Restart The Gateway CardY ou can restart the Gateway Card through a momentary push-button switch accessed through a small hole in the face plate of the Gateway Card . Although this is not used in normal operations, this switch allows you to restart the Gateway Card in the meter . The Gateway Card restart push-button switch is located behind the hole in the card face plate closest to the LED labelled DHCP . This switch is used to restart just the Gateway Card (not the meter) should it be necessary to recover from some abnormal condition .Momentarily press the switch by pushing a small device into the hole to activate the switch .Notee: It may take around five minutes before the meter pages begin to display values .Quick Start Guide IL02601011EEffective December 2011Power Xpert® Meter 2000 Gateway Card KitEaton CorporationElectrical Group1000 Cherrington ParkwayMoon Township, PA 15108United States877-ETN-CARE (877-386-2273)© 2011 Eaton Corporation All Rights Reserved Printed in USA Publication No. IL02601011E December 2011PowerChain Management is a registered trademark of Eaton Corporation.All other trademarks are property of theirrespective owners.PXM 2000 Meter User and Installation Guide (IM02601001E) on theThe guide can also be found at http://Reinstall the MeterRefer to the meter documentation for a more detailed description of installing and wiring the meter . The following is merely an overview of the steps you’ll need to perform .1 . Turn power off to the 13 position connector . If an AUX cable was used then remove the 13 position connector . Else, disconnect the GND, L(+), and L(-) wires from the 13 position connector . See the figure on page2 .2 . If a Modbus network was connected remove the six position net-work connector .3 . Return the meter to the mounting panel using any hardware removed in previous steps . See the figures on page 2 .4 . Reconnect the current sensing (CT or direct connections) wires .5 . If an AUX cable was not used, reconnect the wires to the 13 position connector . Otherwise plug the wired connector into the meter .6 . Reconnect the Modbus network using the six position Modbus connector .7 . Insert the Ethernet cable into the socket on the new Gateway Card . Be sure to route the cable away from any high voltage wires . Secure the cable in compliance with local electrical codes .8 . Take any necessary safety precautions in preparation for restoring power .9 . Turn the power on at the breaker(s) .10 . W atch the LEDs on the back of the Gateway Card . They should all turn off for a few seconds and then the right (Status) and the left (Power) lights should be illuminated to indicate the card has power and has started correctly . See the figure on page 4 for the location of the LEDs .。
W2000说明书

图六中蓝色区域为修改 W2000 串口服务器参数区域,可以更改 IP 地址和网关地址。修改结 束后点 Alter 保存参数。 注意:参数保存完毕,需要从新查询设备。 当查询到获得新 IP 地址的 W2000 串口服务器,双击 IP 地址出现以下 WEB 页(图七)。输 入用户名及密码,用户名及密码小写的“admin”。输入后进入串口参数及通信模式等选择页 (图八)。
此功能可让使用者进行系统设定数据备份及还原、备份文件经过特殊加密处理、以确保 数据安全性。
2.0 硬件定义及初始设定
2.1 硬件定义
2.11 RS-232接口定义:(DB9公头)
序号 (DB9公头)
定义
数据方向
PIN1
DCD
IN
PIN2
RXD
IN
PIN3
TXD
OUT
PIN4
DTR
OUT
PIN5
GND
-
PIN6
DSR
IN
PIN7
RTS
OUT
PIN8
RTS
IN
PIN9
RI
IN
2.12 RS-422/485引脚定义:(六位接线端子)
Terminal
No(左起)
1
2
34ຫໍສະໝຸດ 5RS-422 T+
T-
R+ R- VIN
RS-485 485+ 485-
-
- VIN
2.13 10/100M以太网的连接: W-2000以太网口连接交换机或HUB采用直连线如图1
图一 如“图一”所示双击“vsport.exe”出现下图。
图二 图二为对 W2000 串口服务器进行设置及虚拟串口定义界面。
- 1、下载文档前请自行甄别文档内容的完整性,平台不提供额外的编辑、内容补充、找答案等附加服务。
- 2、"仅部分预览"的文档,不可在线预览部分如存在完整性等问题,可反馈申请退款(可完整预览的文档不适用该条件!)。
- 3、如文档侵犯您的权益,请联系客服反馈,我们会尽快为您处理(人工客服工作时间:9:00-18:30)。
KW-2000电话拨号器说明书
提醒:若需市话启动IP ,请加设**271*,以防断线。
感谢您使用凯旺牌智能通信系列产品!KW-2000B 电话拨号器是为了您使用电信、网通、联通等电信公司的IP 业务和各种电话卡时,用来简化拨号过程,节省时间,提高效率的一种全自动智能拨号装置。
通用型电话拨号器(KW-2000B )主要功能:
■方便:无需拨卡号、密码,直拨即通;
■快捷:静音同步抢拨技术,最快时间内接通;
■自动:自动切换,可根据开通区域自动选择相对应的 IP 卡;
■兼容:可输入九组卡,兼容IP 卡、市话卡、200卡、300卡及其它网卡; ■多用途:适用于公用、家庭、公司电话,交换机中继线及分机使用; ■大容量:储存九组60位IP 卡号码,并可存储600组开通区域,; ■远程维护:具备远程编程功能。
操作说明:
提醒:想知道卡的设置程序,必须知道卡的自身的使用流程。
一、 I P 卡的设置
本拨号器每设置完一步程序后,会有语音提示,一声“嘟”表示正确,两声“嘟嘟”表示错误。
以下所有
程序需在摘机状态下设置。
1、 复位:**9**(恢复出厂状态)
2、 IP 卡的输入:
*9*
**
**
例:把上海电信卡输入在第一组(流程:17908-1-卡号#-密码#-电话号码#) *9*1**17908*1*卡号#*密码#**
3、 IP 主叫的输入:
*9*****
A 、 上海电信17908主叫设置如下(主叫号后有语言类型): **9**
*9*1**17908* #**
(#表示延时)
B 、 网通17931主叫设置如下(主叫号后直接拨号码类型) **9**
*9*1**17931**
*7*17931**(见功能一) *6*17931* (见功能五) 4、 市话功能设置:
注:市话功能的设卡程序,必须设置在第八组或第九组内
(1)启动市话功能:**221*
取消市话功能:**220* (2)开通市话或农话字头:
开通第八组市话字头:**5字头*字头*字头*……** 开通第九组市话字头:**6字头*字头*字头*……**
二、 拨打IP 电话
1、 直线:直接拨打对方号码。
2、 在分机上使用,须先拨出局号,听到拨号音后再拨打长途。
3、 不使用IP 卡直接拨打:摘机,拨#+长途号码
三、 余额查询
0#N 听语音,按语音提示查询余额。
(N=1---9卡的组号)
四、 优先使用IP 卡
当多组卡输入后,最后一组输入卡被系统默认为优先卡;按如下操作可选择性地
优先使用某IP 卡: *4*组号**(嘟)挂机。
功能设置
一、设置/删除某IP 卡为全部开通区域
设置:摘机,拨*7 *接入号* *
挂机(出厂默认所有接入号长途全部开通)
删除:摘机,拨*7*接入号*#挂机(锁长途开通区域)
二、系统密码管理
设置密码:**3*四位密码*
删除密码:*#四位密码,再拨**3**
(注:当设置了密码后,输入服务器任何指令都不生效)
三、远程编程:
用户方拨#加操作方电话号码,操作方提机后拨*#,听到嘟提示音即表示进入系统功能设置,任一方均可根据需要进行设置。
四、 延时设置:
(1)有些IP 网关的语音提示强,可能拨不通,需做延时设置:
在某一号码后插入*###*,表示延时1.5秒(每增加一个#表示多延时0.5秒)
本机出厂时,号码中插入#代表延时,如果此时的#在要拨的电话号码中,须拨出,则拨**241*;恢复为延时则拨**240*
(2)结束码延时加#(拨完电话号码后面加#)
**21T*,时间以1秒为单位,T=1-9。
五、 结束码设置:
IP 卡一般以#做结束码,用户可自行设置: *6*切入号# 为拨完号后不加结束码。
*6*切入号* 为拨完号后结束码为#。
(本拨号器自身有自动加#功能)
六、 不识别语音拨号(设置后可加快拨号速度)
打电话时不检测语音而直接拨卡号密码和电话号码: *6#切入号# 退出:*6#切入号*
拨号速度调节:**4*T*(T=1-9,1最慢,9最快)
七、 拨号限制功能:
**26N*拨完号码后,通话后,禁止再拨号码,最多再拨N 位 (N=1-9 0为无限制,出厂为0) 八、追拨功能:(指:多组卡时当前网关打不通,即跳转下一网关) **23N*(N=1时为开 N=0时为关 出厂默认为关)。