交换机(思科华为华三)产品日常维护指导书
交换机作业指导书

交换机作业指导书
1.1交换机月检作业
(1)到车控室办理请点手续.
(2)作业者按照要求穿着工作服,携带相应工器具及耗材,佩带劳动防护用具。
(3)工器具配备标准
(4)
(5)
由①号对作业时所记录的相关数据进行复查,确认无误后,作业的两名作业人员对记录数据进行签认。
(7)作业结束
作业结束后,作业人员应关闭打开的柜门,复查试验好才离开;整理好工器具及防护用品;离开设备房应重新锁好房门,回到车控室归还钥匙、消记后,在车控室值班员处办理消点手续。
1.2交换机年检作业
(1)到车控室办理请点手续.
(2)作业者按照要求穿着工作服,携带相应工器具及耗材,佩带劳动防护用具。
(3)工器具配备标准
(4)
(5。
H3C设备维护及故障处理指南

H3C设备维护及故障处理指南1.前言在日常网络运维工作中,H3C(华三)设备是企业常用的一种网络设备。
为了确保网络的正常运行,提高网络设备的可靠性和稳定性,及时解决故障是非常重要的。
本指南将介绍H3C设备的维护和故障处理方法。
2.H3C设备维护2.1定期备份设备配置为了防止设备故障或配置丢失导致的网络中断,我们应定期备份设备的配置文件。
可以通过命令行界面或Web界面进行备份,并将文件保存在安全的地方,以备不时之需。
2.2定期升级设备固件H3C公司定期会发布新的设备固件版本,其中包括修复了一些已知的漏洞和故障,并提供了一些新的功能和性能改进。
因此,我们应该及时升级设备的固件,以确保设备的安全性和稳定性。
2.3监控设备的运行状态我们应该使用H3C设备提供的监控工具,如SNMP(Simple Network Management Protocol)或Syslog,来实时监控设备的运行状态。
这样可以及时发现设备的异常行为,并采取相应的措施,预防故障的发生。
3.H3C设备故障处理3.1故障排查与定位当发生网络故障时,应首先进行故障排查与定位。
可以通过以下步骤来进行排查:a.检查设备的各个接口是否正常工作,如链路是否正常、接口是否有异常状态等。
b.检查设备的日志信息,查找可能有关的错误或警告。
c. 对设备所在的网络进行测试,如Ping测试、Traceroute测试等,以确定故障范围和位置。
3.2故障解决方案根据排查与定位的结果a.如果是单一设备的故障,可能需要进行设备重启或问题接口的关闭/开启等操作。
b.如果是局部网络的故障,可能需要对网络中的其他设备进行检查,如交换机、路由器等。
c.如果是全局网络的故障,可能需要考虑网络中的整体拓扑结构,找出可能的单点故障,并进行相应的维修或切换。
3.3故障记录与总结在处理故障的过程中,应及时记录故障的相关信息,包括故障现象、解决过程和方法、影响范围等。
这样可以帮助我们更好地总结故障原因和处理方法,以便于以后的故障处理和维护工作。
交换机维护方案

交换机维护方案引言交换机是计算机网络中非常重要的设备之一,负责连接和转发数据包。
随着网络规模的不断扩大和业务量的增加,交换机的维护变得愈发重要。
本文将介绍交换机维护的目标、方法和注意事项,以帮助管理员制定有效的交换机维护方案。
目标•提高交换机的可用性:确保交换机始终处于良好的工作状态,避免因交换机故障而导致的网络中断。
•提高交换机的性能:优化交换机的配置和参数设置,使其能够更有效地处理数据流量,提供较低的延迟和更快的传输速度。
•保障交换机的安全性:加强对交换机的安全防护措施,防止未经授权的访问和恶意攻击。
方法定期巡检定期对交换机进行巡检是维护交换机的重要手段之一。
巡检的内容包括但不限于以下几个方面:1.硬件健康状态:检查交换机的硬件状态,包括风扇、电源和连线等部件,确保其正常工作。
2.软件版本:检查交换机的软件版本,及时升级到最新的稳定版本以修复潜在的漏洞。
3.配置文件:检查交换机的配置文件,确保其与网络拓扑和需求相符合。
4.日志文件:检查交换机的日志文件,查找异常和错误信息,及时处理。
5.数据流量:监控交换机的数据流量情况,及时发现瓶颈和异常。
定期备份定期备份交换机的配置文件是非常重要的,以防止配置丢失或被篡改而导致的故障。
备份的具体方法包括:1.导出配置文件:使用交换机的命令行界面或管理界面导出配置文件,并保存到安全的地方,如离线存储设备或云存储。
2.定期更新备份:定期更新备份文件,以保持最新的配置信息。
3.测试恢复过程:定期测试使用备份文件恢复交换机的过程,以确保备份文件的可用性和完整性。
软件升级交换机的软件升级是提高性能和安全性的有效手段之一。
软件升级的步骤如下:1.定期了解最新版本:定期关注交换机厂商发布的最新软件版本,了解其中的新功能和修复的漏洞。
2.风险评估:评估升级软件的风险,包括与现有配置的兼容性、可能引入的新问题等。
3.测试环境:在测试环境中进行软件升级,并进行功能和性能测试,确保升级不会对网络造成负面影响。
思科设备维护手册说明书

Maintenance•Reset Device,page1•Reset Options and Load Upgrades,page2•Remote Lock,page3•Remote Wipe,page3•Boot Alternate Image for Cisco DX70,page4•Boot Alternate Image for Cisco DX80,page4•Boot Alternate Image for Cisco DX650,page5•Data Migration,page5•Debugging Log Profiles,page5•User Support,page6Reset DeviceA device reset provides a way to reset or restore various configuration and security settings or provides a wayto recover the device if the device encounters an error.The following procedure describes the types of resets that you can perform.All three reset methods cause deletion of all user data and reset all settings from the device.NoteThe following occurs on a device when you perform a reset:•User configuration settings-Reset to default values.•Network configuration settings-Reset to default values.•Call histories-Get erased.•Locale information-Reset to default values.•Security settings-Reset to default values;this includes deletion of the CTL file and change of the802.1xDevice Authentication parameter to Disabled.Do not power down the device until it completes the factory reset process.Note ProcedureYou can reset the device with any of these operations.Choose the operation that is appropriate for your situation.•Method 1:Cisco Unified Communications Manager Administrator Web GUI1From the Product Specific Configuration Layout area of the device configuration window,enableWipe Device .2Issue an Apply Config,Restart,or Reset command from the Admin GUI to push the wipe to thedevice.•Method 2:Settings application1In the Settings application,choose Backup &reset >Factory data reset .If a PIN or Password is configured on the device,it will need to be entered before the resetcan proceed.Note •Method 3:Key-press sequencesThis method should be used if the device is secured with a PIN or Password lock and the PIN/password has been lost.Follow these steps to reset a Cisco DX70on boot up:1Power on the device and wait for the Mute LED to blink.2Press and hold the Volume Up button until the Mute button is lit red.3Release the Volume Up button,then press and hold the Mute button for 3seconds.Follow these steps to reset a Cisco DX80on boot up:1Press and hold the Volume Up button and power on the device.2Release the Volume Up button when the Mute button is lit red,then press the Mute button.Follow these steps to reset a Cisco DX650on boot up:1Press and hold the #key and power on the device.2When the Message Waiting Indicator (MWI)flashes red once then stays lit,release the #key.Reset Options and Load UpgradesCisco DX Series devices receive configuration changes and load upgrades from Cisco Unified Communications Manager.The following protocol describes how the device handles change requests:•Reset waits for active call to end.MaintenanceReset Options and Load Upgrades•If the device screen is on,user receives a popup dialog box that notifies the user about the changes and the need for restart.The dialog box provides the following options:◦Restart:Dismisses the popup dialog box and restarts the device (default action).◦Snooze:Dismisses the popup dialog box for an hour.The user can set the device to snooze for amaximum of 24hours,after which the device willrestart.The popup dialog box has a countdown timer of 60seconds.The default action beginsif the user does not act.After the user sets the device to snooze,the user has the option to manually reset thedevice at any time from the notifications list.Note ◦If the device screen is off,active audio keeps the request waiting.Remote LockThis feature allows you to lock a device from the Device Configuration window in Cisco UnifiedCommunications Manager.When the device receives a remote lock request,the device immediately terminates any active calls,and the device locks.If the device is not registered with the system at the time of the request,the device is locked the next time that it registers to thesystem.After you issue a remote lock request,the request cannot be canceled.Note Remote Lock Device ProcedureStep 1In the Phone Configuration window for the device,click Lock .Step 2Click Lock to accept the Lock confirmation message.You can view the Lock status in the Device Lock/Wipe Status section of the Phone Configuration window for the device.Remote WipeThis feature allows you to erase the data on a device from the Device Configuration window in Cisco Unified Communications Manager.MaintenanceRemote LockWhen the device receives a remote wipe request,the device immediately terminates any active calls and erases the device data.If the device is not registered with the system at the time of the request,the data is erased the next time that the device registers to thesystem.After you issue a remote wipe request,the request cannot be canceled.Note Remote Wipe Device ProcedureStep 1In the Phone Configuration window for the device,click Wipe .Step 2Click Wipe to accept the Wipe confirmation message.You can view the Wipe status in the Device Lock/Wipe Status section of the Phone Configuration window for the device.Boot Alternate Image for Cisco DX70ProcedureStep 1Power on the device and wait for the Mute LED to blink.Step 2Press and hold the Volume Down button until the Mute button is lit red.Step 3Release the Volume Down button,then press and hold the Mute button for 3seconds.Boot Alternate Image for Cisco DX80ProcedureStep 1Press and hold the Volume Down button and power on the device.Step 2Release the Volume Down button when the Mute button is lit red,then press the Mute button.MaintenanceRemote Wipe DeviceBoot Alternate Image for Cisco DX650ProcedureStep 1Disconnect the power to turn the device off.Step 2Press and hold the *key,then connect the power supply.Step 3Keep the *key held until the message LED becomes solid.Step 4When the message LED flashes 3times,release the *key.The device uses the alternate image to boot.Data MigrationThe data migration feature ensures that a factory reset is not required when data incompatibility exists after a firmwareupgrade.Data may still be lost upon downgrade to an earlier release of firmware.If you upgrade to a newer firmwarerelease,you may not be able to revert to an earlier release without losing data.Note If you downgrade to earlier firmware and the device is not able to migrate data,you receive an alarm.Instruct the user to back up the user data or perform a remote wipe of the device.When the device registers to Cisco Unified Communications Manager,the device detects prior factory resets,overrides migration,downgrades,and reboots.When the device reboots,it loads the downgraded firmware.Debugging Log ProfilesYou can turn on debugging log profiles remotely for a device or group of devices.Set Debugging Log Profile for Call Processing ProcedureStep 1Go to the Product Specific Configuration Layout area of the individual device configuration window or Common Phone Profile window.Step 2Check Log Profile ,and choose Telephony.Step 3Save your changes.Step 4The user is notified that debug logging is enabled in the notification area.The user can expand the messagefor more information,but cannot dismiss the notification.MaintenanceBoot Alternate Image for Cisco DX650Reset Debugging Log Profile to Default ProcedureStep 1Go to the Product Specific Configuration Layout area of the individual device configuration window or Common Phone Profile window.Step 2Check Log Profile ,and select Default to reset all debugs to the default values.This includes debugs that have been set manually from Android Debug Bridge.Step 3Save and apply your changes.Step 4Choose Preset to keep the current debug levels.Step 5Save your changes.User SupportTo successfully use some of the features on their devices,users must receive information from you or from your network team or be able to contact you for assistance.Make sure to provide end users with the names of people to contact for assistance and with instructions for contacting those people.Cisco recommends that you create a web page on your internal support site that provides users with important information about their device.Problem Report ToolUsers submit problem reports to you with the Problem ReportTool.The Problem Report Tool logs are required by Cisco TAC when troubleshooting problems.Note To issue a problem report,users access the Problem Report Tool and provide the date and time that the problem occurred,and a description of the problem.You must add a server address to the Customer Support Upload URL field on Cisco Unified Communications Manager.If you are deploying devices with Mobile and Remote Access through Expressway,you must also add the PRT server address to the HTTP Server Allow list on the Expressway server.Configure Customer Support Upload URLYou must use a server with an upload script to receive PRT files.The PRT uses an HTTP POST mechanism,with the following parameters included in the upload (utilizing multipart MIME encoding):MaintenanceReset Debugging Log Profile to DefaultMaintenanceProblem Report Tool•devicename(example:“SEP001122334455”)•serialno(example:“FCH12345ABC”)•username(the username configured in CUCM,the device owner)•prt_file(example:“probrep-20141021-162840.tar.gz”)A sample script is shown below.This script is provided for reference only.Cisco does not provide supportfor the upload script installed on a customer's server.<?php//NOTE:you may need to edit your php.ini file to allow larger//size file uploads to work.//Modify the setting for upload_max_filesize//I used:upload_max_filesize=20M//Retrieve the name of the uploaded file$filename=basename($_FILES['prt_file']['name']);//Get rid of quotes around the device name,serial number and username if they exist$devicename=$_POST['devicename'];$devicename=trim($devicename,"'\"");$serialno=$_POST['serialno'];$serialno=trim($serialno,"'\"");$username=$_POST['username'];$username=trim($username,"'\"");//where to put the file$fullfilename="/var/prtuploads/".$filename;//If the file upload is unsuccessful,return a500error and//inform the user to try againif(!move_uploaded_file($_FILES['prt_file']['tmp_name'],$fullfilename)){header("HTTP/1.0500Internal Server Error");die("Error:You must select a file to upload.");}>ProcedureStep 1Set up a server that can run your PRT upload script.Step 2Write a script that can handle the parameters listed above,or edit the provided sample script to suit your needs.Step 3Upload your script to your server.Step 4In Cisco Unified Communications Manager,go to the Product Specific Configuration Layout area of the individual device configuration window,Common Phone Profile window,or Enterprise Phone Configurationwindow.Step 5Check Customer support upload URL and enter your upload server URL.Example:/prtscript.phpStep 6Save your changes.Maintenance Take Screenshot From Web BrowserTake Screenshot From Web BrowserProcedureUse your browser to go to this URL:http://<Endpoint IP Address>/CGI/ScreenshotYou receive a prompt that asks for e the associated user ID name and password. Take Screenshot From DeviceProcedurePress the Vol Down button and Power/Lock button for three seconds.Application SupportEvaluate whether the issue is a device issue or a problem with the application.If the problem is applicationrelated,contact the application support center directly.。
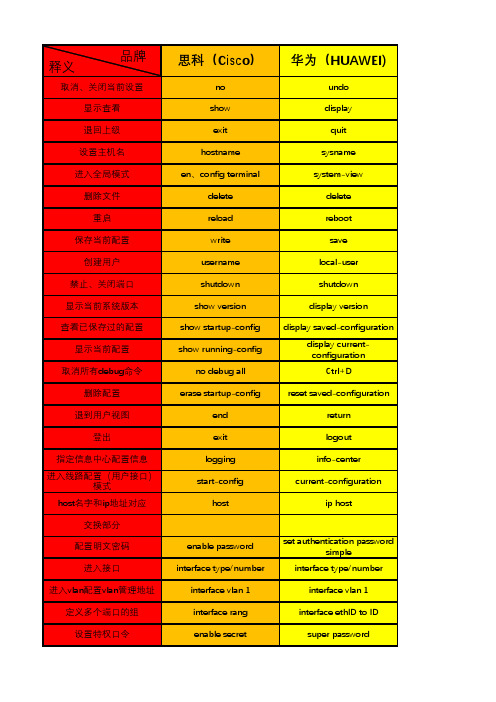
思科(Cisco)、华为(HUAWEI)、华三(H3C)路由器和交换机命令对比
nat server global <ip>[port] inside <ip> port [protocol]
interface type/number interface vlan 1 interface rang enable secret duplex (half|full|auto) speed(10/100/1000) switchport mode trunk vlan ID/no vlan ID switchport access vlan show interface show vlan ID encapsulation channel-group 1 mode on ip routing no switchport vtp domain spanning-tree vlan ID root primary spanning-tree vlan ID priority show spanning-tree
nat server global <ip>[port] inside <ip> port [protocol]
华三(H3C)
undo display quit sysname system-view delete reboot save local-user shutdown display version display savedconfiguration display currentconfiguration Ctrl+D reset savedconfiguration return logout info-center current-configuration ip host
enable password
H3C交换机维护命令大全

H3C交换机维护命令⼤全1 ⽇常维护1.1 环境及单板硬件状态观测表1 环境及单板硬件状态观测display enviroment命令参考显⽰当前环境的温度信息[H3C]dis environmentSystem Temperature information (degree centigrade):----------------------------------------------------SlotNo Temperature Lower limit Upper limit1 30 0 559 30 0 55表2 display environment命令显⽰信息描述表display device命令参考[H3C]dis deviceSlot 1SubSNo PortNum PCBVer FPGAVer CPLDVer BootRomVer AddrLM Type State 0 28 REV.C NULL 002 506 IVL MAIN Normal2 0 REV.A NULL NULL NULL IVL 2*10GE NormalSlot 9SubSNo PortNum PCBVer FPGAVer CPLDVer BootRomVer AddrLM Type State0 28 REV.C NULL 002 508 IVL MAIN Normal1 0 REV.A NULL NULL NULL IVL 2*10GE Normal display power命令参考查看系统电源模块使⽤状态:[H3C]dis powerSlot 1Power 1State : NormalType : ACSlot 9Power 1State : NormalType : AC表3 display power命令显⽰信息描述表display fan命令参考查看风扇状态:[H3C]dis fanSlot 1FAN 1State : NormalSlot 9FAN 1State : Normal注:系统中有多个风扇,只要有⼀个风扇故障则报Fault.1.2 CPU及存状态观测表4 CPU及存状态观测display cpu命令参考显⽰系统的CPU占⽤率:[H3C]dis cpuSlot 1 CPU usage:4% in last 5 seconds4% in last 1 minute3% in last 5 minutesSlot 9 CPU usage:6% in last 5 seconds5% in last 1 minute5% in last 5 minutes注:该命令将打印出所有当前在位的单板CPU使⽤率。
H3CS3100网络交换机操作维护规程

jumboframe enable
可选
缺省情况下,以太网端口允许通过的帧的最大长度为2048字节
配置基于Access端口的VLAN(在VLAN视图下)
配置
命令
说明
进入系统视图
system-view
-
进入VLAN视图
设置以太网端口的速率
speed{10|100|1000|auto}
可选
缺省情况下,端口的速率处于auto(自协商)状态
仅千兆端口支持配置速率为1000 Mbps
设置以太网端口的MDI(Medium Dependent Interface)模式
mdi{across|auto|normal}
可选
缺省情况下,端口的MDI模式为auto
3.2创建vlan
VLAN接口的基本配置
操作
命令
说明
进入系统视图
system-view
-
创建VLAN接口并进入VLAN接口视图
interface Vlan-interfacevlan-id
必选
缺省情况下,在交换机上不存在VLAN接口
指定当前VLAN接口的描述字符串
descriptiontext
可选
缺省情况下,VLAN接口的描述字符串为该VLAN接口的接口名,例如“Vlan-interface1 Interface”
-
打开以太网端口
undo shutdown
可选
缺省情况下,端口处于打开状态
如果想关闭端口,可以使用shutdown命令
设置以太网端口描述字符串
descriptiontext
软交换日常维护

6、监控单板的运行状态 在客户端的“MML命令行 - CGP”窗口执行DSP BRD命令,观察每
个机柜中所有机框的单板运行状态(包括前插板和后插板)。 7、监控 iGWB (话单池)的通信状态
第一部分:主要设备
• 前插板:通用处理板(UPB)、交换单元 (SWU)、机箱管理板(SMM)
• 后插板:通用业务接口单元(USI)、交换 接口单元(SWI)、机框数据板(SDM)。
• 操作维护功能: • 数据配置和数据库管理、故障管理、性能
测量、安全管理、话单管理、OMU维护、 环境监控
第一部分:主要设备
• ASI板即POTS接口板,提供32路POTS用户接口。 • 通过以下三种方式登录IAD管理系统: Web方式登
录,Telnet、本地串口方式通过命令行登录。
第一部分:主要设备
本地自交换组网示意图:
第二部分:组网及设备配置
一、本局软交换组网配置图:
第二部分:组网及设备配置
2、承载网络拓扑图
第二部分:组网及设备配置
接口板(MMIU)。其中: • 1、MMIU单板主要功能包括:外引6个FE接口、1个调试
串口、1个告警箱串口、1个环境监控串口。 • 2、MOMD单板主要功能包括:提供TDM业务交换管理功
能,时钟信号的输出,E1/T1接口和FE光接口。 • 3、MVPD完成语音业务的IP分组适配处理,提供H.248
第三部分:日常维护
一、日维护
(一)监控告警系统 1、监控配电框(华为统一机架)
检查每个机柜 的配电框前面板上的“ALM”告警指示灯。绿色 2、监控 ALUI 板
- 1、下载文档前请自行甄别文档内容的完整性,平台不提供额外的编辑、内容补充、找答案等附加服务。
- 2、"仅部分预览"的文档,不可在线预览部分如存在完整性等问题,可反馈申请退款(可完整预览的文档不适用该条件!)。
- 3、如文档侵犯您的权益,请联系客服反馈,我们会尽快为您处理(人工客服工作时间:9:00-18:30)。
H3C S7500E V7产品日常维护指导书V0.0杭州华三通信技术有限公司修订记录目录第1章日常维护建议 (2)1.1 S7500E V7日常维护建议 (2)1.2 S7500E产品运维建议 (3)第2章维护操作指导 (24)2.1 H3C S7500E V7设备日常维护操作指导 (24)2.2 H3C S7500E V7设备季度维护操作指导 (25)2.3 H3C S7500E V7设备年度维护操作指导 (25)第3章维护记录表格 (26)3.1 H3C S7500E V7设备日常维护值班日志 (26)3.2 H3C S7500E V7设备季度维护记录表 (27)3.3 H3C S7500E V7设备年度维护记录表 (28)3.4 H3C S7500E V7设备突发问题处理记录表 (29)3.5 硬件更换记录表 (30)3.6 系统参数修改记录表 (31)第4章常见故障处理 (32)4.1 密码忘记问题处理 (32)4.1.1 遗忘CONSOLE密码 (32)4.1.2 遗忘Telnet登录密码 (43)4.2 业务板运行过程中发生故障导致无法启动 (46)4.2.1 故障描述 (46)4.2.2 故障处理步骤 (46)4.3 电源运行中上报Fault问题处理方法 (48)4.3.1 故障现象 (48)4.3.2 故障处理步骤 (48)4.4 风扇框状态异常问题处理方法 (50)4.4.1 故障描述 (50)4.4.2 故障处理步骤 (50)4.5 配置系统故障 (51)4.5.1 客户侧判断 (51)4.5.2 设备侧判断 (51)4.6 运行过程中主控板重启故障处理 (52)4.6.1 故障描述 (52)4.6.2 故障处理步骤 (53)H3C S7500E V7日常维护指导书关键词:单板、电源、主网络、系统维护摘要:此指导书用于指导H3C S7500E V7的日常维护使用,主要描述用户维护部门周期性(每天、每周、每月、每年)对H3C S7500E V7进行健康性检查的相关事项。
适用对象:本文档适用于维护H3C 设备的工程师缩略语:第1章日常维护建议维护范围:日常维护主要涉及的范围是设备网元(包括主控板、接口板)以及管理维护系统的监控。
维护手段:巡检、优化、处理投诉、保障等1.1 S7500E V7日常维护建议尊敬的用户:感谢您使用H3C公司的S7500E V7。
系统运行的正常、稳定是我们共同的愿望,为了我们共同的目标,请您重视以下建议并参照《日常维护建议指导书》进行必要的日常维护。
1、无线设备的使用涉及到多种业务知识,应安排受过专业培训的专人进行日常维护。
2、保持机房清洁干净,防尘防潮,防止虫鼠进入。
3、每天参照《H3C S7500E V7日常维护指导书》中内容对设备进行例行检查和测试,并记录检查结果。
4、用于系统管理、设备维护和业务操作的用户名和口令应该严格管理,定期更改,并只向特定相关人员发放。
5、严禁向设备维护终端和WEB客户端主机装入业务无关软件,严禁用设备维护终端和WEB客户端主机玩游戏。
维护终端和WEB客户端主机应该定期杀毒。
6、遇有不明原因告警,请迅速与代理商工程师或者H3C公司服务热线联系(400-8100504/800-8100504)。
7、调整线缆一定要慎重,调整前要作标记,以防误接。
8、对设备硬件进行操作时应戴防静电手腕。
9、对设备进行复位、改动业务数据之前做好备份工作。
10、在对设备版本进行升级前,请详细阅读《版本说明书》中的升级指导,并全面备份相关配2016-03-14 H3C机密,未经许可不得扩散第2页,共57页置。
交换机设备运维日常的维护工作内容主要有季度巡检、故障处理、投诉处理、网络整改、通信保障等。
季度巡检:定期对所有设备进行一次现场巡检,对巡检时发现的问题现场进行处理并登记。
故障处理:主要通过网管系统发现故障并根据故障性质进行处理。
用户投诉:用户投诉要求在接到投诉后一定时限内赶到现场进行处理,处理完要求回访客户进行故障恢复确认。
网络优化:针对客户投诉、会议保障以及站点性质变化所作的较大的网络调整。
通讯保障:当有重大事情时会要求运维人员进行现场保障通信设备的稳定性。
1.2 S7500E产品运维建议1、设备开箱验货完成后,开始设备的安装和基本调试。
2、进行设备初始化配置,验证设备状态是否正常。
3、协调准备设备安装条件及环境,确定设备已升级到目前最新版本。
4、依据工程设计方案进行设备安装,无论是采用独立安装还是采用室内分布式系统,保证按照规范要求安装。
5、按照设计的网络拓扑进行线路连接,保证线路质量和走线方式符合要求。
6、配置基本接入功能,测试客户端可否正常接入。
7、根据开局设计的网络建设方案,进行完整性配置,并进行功能项实现测试。
在使用维护过程中需要关注许多方面,并以负责任的态度履行注意事项:●保证设备按照要求进行可靠接地。
●维护人员做好防静电措施。
●室外特殊环境下注意工程规范性和安全性要求。
2016-03-14 H3C机密,未经许可不得扩散第3页,共57页安装环境1、设备运行基本环境检查与维护:(1)确保设备安装环境符合设备工作要求,包括温度、湿度、防雷接地是否合格。
(2)设备供电方式有两种:直流供电或交流供电:2、设备运维巡检及问题处理方式(1)定期检查设备指示灯,根据指示灯来快速简便对故障及问题进行定位,一般设备上会有三种指示灯:2016-03-14 H3C机密,未经许可不得扩散第4页,共57页表2-2 管理用以太网电接口状态指示灯含义(一)表2-3 管理用以太网电接口状态指示灯含义(二)2016-03-14 H3C机密,未经许可不得扩散第5页,共57页对于具有管理用以太网SFP光接口的主控板,通过SFP光接口的指示灯,可以判断出该管理用以太网口的链路状态及当前数据收发状态,具体请参见表2-4。
表2-4 管理用以太网SFP光接口状态指示灯含义2. 电源状态指示灯S7500E系列交换机支持多种型号的主控板,不同型号的主控板上对应的电源状态指示灯形式存在差异。
·主控板提供一对电源状态指示灯PWR(OK指示灯和FAIL指示灯互相独立)时,电源状态指示灯含义如表2-5所示。
·主控板提供不同编号的电源状态指示灯PWR1和PWR2(OK指示灯和FAIL指示灯互相独立)时,各电源状态指示灯用来指示对应编号的可插拔电源模块状态(电源模块的编号已经在机箱上标注),电源状态指示灯含义如表2-6所示。
·主控板提供一个电源状态指示灯PWR(OK指示灯和FAIL指示灯合一)时,电源状态指示灯含义如表2-7所示。
表2-5 电源状态指示灯含义(一)2016-03-14 H3C机密,未经许可不得扩散第6页,共57页表2-6 电源状态指示灯含义(二)表2-7 电源状态指示灯含义(三)2016-03-14 H3C机密,未经许可不得扩散第7页,共57页3. 风扇框状态指示灯通过主控板上提供的风扇框状态指示灯,能够判断出机箱风扇框的工作状态。
·主控板提供两个风扇框状态指示灯(OK指示灯和FAIL指示灯互相独立),风扇框状态指示灯含义如表2-8所示。
·主控板提供一个风扇框状态指示灯(OK指示灯和FAIL指示灯合一),风扇框状态指示灯含义如表2-9所示。
表2-8 风扇状态指示灯含义(一)表2-9 风扇状态指示灯含义(二)2016-03-14 H3C机密,未经许可不得扩散第8页,共57页4. 单板状态指示灯·LSQM3MPUA0主控板表2-10 主控板状态指示灯含义表2-11 业务板状态指示灯含义·LSQM2MPUC0、LSQM2MPUD0、LSQM1SRP8X2QE0主控板表2-12 单板状态指示灯含义2016-03-14 H3C机密,未经许可不得扩散第9页,共57页·除LSQM3MPUA0、LSQM2MPUC0、LSQM2MPUD0、LSQM1SRP8X2QE0外,其他所有主控板表2-13 单板状态指示灯含义业务板指示灯S7500E系列交换机支持多种型号的业务板,不同型号业务板上的指示灯类型及数量存在差异。
1. RJ-45以太网端口状态指示灯具有RJ-45以太网端口的业务板上提供有RJ-45以太网端口状态指示灯,通过该指示灯,可以直观的显示出对应以太网端口的链路状态及当前数据收发状态,具体请参见表2-22。
表2-22 RJ-45以太网端口状态指示灯含义2016-03-14 H3C机密,未经许可不得扩散第10页,共57页2. Combo口状态指示灯一个Combo口由一个SFP口和对应的一个RJ-45以太网端口共同形成,同一时刻形成Combo口的两个端口只能使用一个。
具有Combo口的业务板上提供有Combo口状态指示灯,通过该指示灯,可以直观的显示出对应Combo口的链路状态及当前数据收发状态,具体请参见表2-23。
表2-23 Combo口状态指示灯含义说明:组成Combo口的SFP口和对应的RJ-45以太网端口中,同一时刻只有一个可用(只有一个处于active状态,另一个处于inacitve状态)。
缺省情况下,编号小的端口处于active状态。
如需使用Combo口中处于inactive状态的端口,首先要执行undo shutdown命令激活此端口。
该端口激活后,Combo口中原来处于active状态的端口会自动关闭变为inactive状态。
3. SFP口状态指示灯具有SFP口的业务板上提供有SFP口状态指示灯,通过该指示灯,可以直观的显示出对应SFP口的链路状态及当前数据收发状态,具体请参见表2-24。
表2-24 SFP口状态指示灯含义2016-03-14 H3C机密,未经许可不得扩散第11页,共57页2016-03-14 H3C 机密,未经许可不得扩散第12页, 共57页4. SFP+口状态指示灯具有SFP+口的业务板上提供有SFP+口状态指示灯,通过该指示灯,可以直观的显示出对应SFP+口的链路状态及当前数据收发状态,具体请参见表2-25和表2-26。
· LSQ1TGS8SC0的SFP+口状态指示灯含义 表2-25 SFP+口状态指示灯含义(一)·其他业务板的SFP+口状态指示灯含义 表2-26 SFP+口状态指示灯含义(二) 说明:您可以根据SFP+口状态指示灯的颜色判断端口速率,绿色表示10Gbit/s ,黄色表示1000Mbit/s 。
2016-03-14 H3C 机密,未经许可不得扩散 第13页, 共57页5. XFP 口状态指示灯具有XFP 口的业务板上提供有XFP 口状态指示灯,通过该指示灯,可以直观的显示出对应XFP 口的链路状态及当前数据收发状态,具体请参见表2-27。