teamcenter流程模板设计复习过程
teamcenter流程模板设计

1.1 流程模板设计工作流是完成目标的一个或几个业务流程的自动化操作,工作流程由用户发起,具体的工作流任务将指派给用户。
系统管理员登陆系统,选择工作流设计器应用程序,进入工作流设计器应用1.1.1 工作流任务模板系统中常用工作流任务模板有:do 任务,审核任务,条件任务,发布任务等。
Do 任务:是一个包含EPM-hold handler 的任务模板,当任务开始后,EPM-hold handler 能阻止任务自动完成。
这个任务模板有一个用户对话框,当任务完成后,用户可以选中对话框中的复选框表明任务已经完成。
“审核”任务:审核任务,是一个包含select-signoff-team 子任务和perform-signoffs 子任务的任务模板。
select-signoff-team 子任务用来指定执行审核的人员,而perform-signoffs 子任务则用来执行审核任务。
在设计工作流时可以为select-signoff-team 子任务限定执行此任务的组或角色,这样在启动流程为流程指定人员时,人员就被限定在指定的组或角色内。
“添加状态”任务:添加状态任务,用来为流程中的目标对象添加一个发布状态。
在流程设计时在该任务模板属性中选定发布状态,当流程启动后,将自动完成目标对象的发布状态。
“或”任务:当多个处于同一层次上的任务中只要有一个发生就能触发它们的后续任务时,需要用Or 任务。
不管Or 任务有多少前驱任务,只要有一个完成,系统就执行该任务,推动流程继续走下去。
“条件”任务:用于分支流程。
条件属性有一个结果属性,可以设置为一下三个值:True ,False ,Unset 。
创建一个流程时,条件任务的两种后续任务根据实际需要分别把条件路径设置为True和False,从而建立与Condition Task 任务的关联。
在流程设计中,Condition任务一般需要和Or任务组合使用。
1.1.2 新建工作流流程模板1.1.2.1 新建节点模板系统管理员于工作流设计器应用程序中,单击菜单“文件”->“新建节点模板”;打开新根节点模板对话框,输入模板名称,如果该流程可基于已有流程新建,可从基于根节点模板下拉框中选择已有流程,否则,默认空模板即可,模板类型选择流程,单击“确定”按钮;可在新建工作流窗口中选择任务模板创建新的流程模板,添加新任务模板的方式为:在工具栏中单击需要的任务模板,移动鼠标到流程创建区域内,在空白处双击鼠标左键,任务模板将被添加到新建流程区域内;在左侧的名称文本框中修改任务名称,注意,修改完成后,鼠标要单击拥有该名称的任务或单击上侧流程树中的空白处;在此修改任务名称任务模板添加完成后,需要通过流程箭头指定流程任务的先后执行顺序,方法如下:选择作为前续任务的任务节点,鼠标不要松开,拖动鼠标到作为后续任务的任务节点处,松开鼠标,一个连接前后任务节点的箭头将出现在两个任务中间。
Teamcenter10.1系统基础操作资料

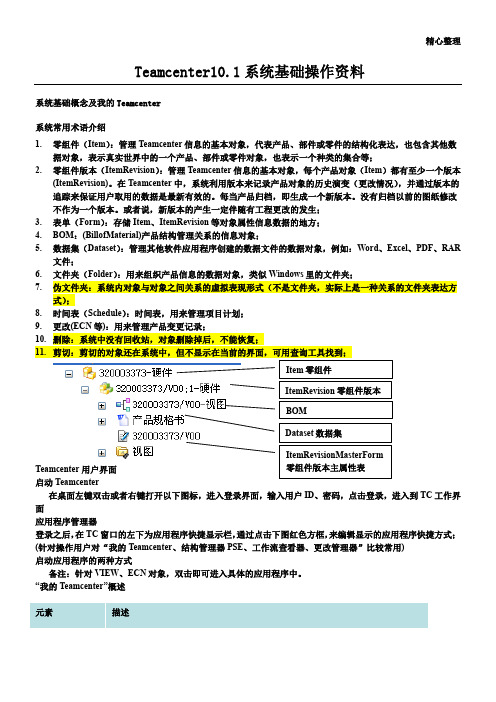
系统基础操作资料1系统基础概念及我的Teamcenter1.1系统常用术语介绍1.零组件(Item):管理Teamcenter信息的基本对象,代表产品、部件或零件的结构化表达,也包含其他数据对象,表示真实世界中的一个产品、部件或零件对象,也表示一个种类的集合等;2.零组件版本(Item Revision):管理Teamcenter信息的基本对象,每个产品对象(Item)都有至少一个版本(Item Revision)。
在Teamcenter中,系统利用版本来记录产品对象的历史演变(更改情况),并通过版本的追踪来保证用户取用的数据是最新有效的。
每当产品归档,即生成一个新版本。
没有归档以前的图纸修改不作为一个版本。
或者说,新版本的产生一定伴随有工程更改的发生;3.表单(Form):存储Item、Item Revision等对象属性信息数据的地方;4.BOM:(Bill of Material)产品结构管理关系的信息对象;5.数据集(Dataset):管理其他软件应用程序创建的数据文件的数据对象,例如:Word、Excel、PDF、RAR文件;6.文件夹(Folder):用来组织产品信息的数据对象,类似Windows里的文件夹;7.伪文件夹:系统内对象与对象之间关系的虚拟表现形式(不是文件夹,实际上是一种关系的文件夹表达方式);8.时间表(Schedule):时间表,用来管理项目计划;9.更改(ECN等):用来管理产品变更记录;10.删除:系统中没有回收站,对象删除掉后,不能恢复;11.剪切:剪切的对象还在系统中,但不显示在当前的界面,可用查询工具找到;Item 零组件Item Revision零组件版本BOMDataset数据集ItemRevisionMasterForm1.2Teamcenter用户界面1.2.1启动Teamcenter在桌面左键双击或者右键打开以下图标,进入登录界面,输入用户ID、密码,点击登录,进入到TC工作界面1.2.2应用程序管理器登录之后,在TC窗口的左下为应用程序快捷显示栏,通过点击下图红色方框,来编辑显示的应用程序快捷方式;(针对操作用户对“我的Teamcenter、结构管理器PSE、工作流查看器、更改管理器”比较常用)1.2.3启动应用程序的两种方式备注:针对VIEW、ECN对象,双击即可进入具体的应用程序中。
【精品培训资源】2_2Teamcenter系统架构理论知识

Web/App Server(s)
Business Logic Server(s)
Distributed Cache File Server(s)
Database Server
Master File Server(s)
Teamcenter异地协同平台架构
Teamcenter 站点 B
Teamcenter 站点 C
Rich客户端
安装在用户工作站上的基于 Java 的 Teamcenter 用户界面。胖客户 端使用远程或本地服务器访问 Teamcenter 数据库。
提供TC所有功能,客户也可以扩展标准的用户界面。胖客户端支持 两层和四层架构模式。
适合系统管理员、设计人员及管理人员等
Thin客户端
瘦客户端通过标准商业浏览器访问Teamcenter,用户界面提供了视 图方式查看存储在Teamcenter数据库中的产品信息。瘦客户端只有 在四层架构模式下使用,它可以由以下Web浏览器支持:
机上。客户端则分布在各个主机上,并通过多种网络技术与服务器连 接。
转换服务器
A dispatcher server functions as an independent compute server that translates files from one format to other formats;
主要应用程序。主要应用程序提供访问 最常用的Teamcenter应用视图。
次要应用程序。次要应用程序提供访问 不常用的Teamcenter应用视图。
服务器和用户界面条件标志。该标志显 示服务器通讯及用户界面的响应状态。
用户界面正常响应 用户界面未响应
服务器通讯正常,当前没有 服务器和客户端的大数据交 换服。务器忙 服务器闲置挂起 服务器连接中断 剪贴板按钮。剪贴板按钮显示剪贴板目 录包含从工作环境中复制和剪切的对象 及数量。
teamcenter 复习资料(Teamcenter复习资料).doc
teamcenter复习资料(Teamcenter复习资料)First, noun interpretation1.Item: said one of the products in the real world, components orparts of objects etc..2.ItemRevision: object for each product (Item) has at least oneversion (ItemRevision)3.Dataset: (storage) application software used to manage data generated by an object (file).The 4. Folder: folder is a kind of data organization, management object, can establish a link between the related data between the useof folders can also be classified through the establishment of the upper and lower level folder, all relevant data organization.5.Object Property: TC Engineering for each Workspace object, since its creation, the system of it were recorded and saved the information of Object, including ID, Owner, name, creation time, this information is called Object Property.6. Relation: products usually need to use many kinds of / strip information, which describes the "zero component" or "component revision" from different aspects, or is related to "zero component" or "component revision*. The relationship between TC Engineering (Relation) to establish the Association (description) (relationship). The main relationships include: specification relation (Specification), demand relation (Requirement), relation of representation (Manifestation) and reference relation (Reference).The 7. Check out/ Check in: check out command is used to lock the object in the database so that only you can modify the object, Check is contrary to the check out operation. The TC Engineering data objects that can be checked out are as follows: object folders, components and components, revisions, data sets, forms, BOM and BOM revisions.8.product object attributes: TC Engineering Form (table), all kinds of attribute information data directly into relational database. The Form directly associated with Item/ItemRevision is Item Master/ ItemRevision Master, both of which are identical with each other.9.property of product object attribute table: right-click Item Master/ ItemRevision Master, click attribute, the attribute here is attribute of this property table, different from product object attribute.10.roles : a group of users of the same duty, used to distinguish between jobs, jobs (or skills, responsibilities).Group 11. (Group): a group of users based on a project. An organization can contain multiple roles, and a role can belong to several different groups.12.personnel (Person) : each TC Engineering user defined in the real world of information.ers (User): TC Engineering (the actual user login ID).14.specific product structure: refers to a specific product for all components.plete product structure: including a product of all components (including all versions of components).16.version rule: the user set parameter that determines whichversion of the component will be loaded in a particular PSE window. Version of the rules can also be saved for the workspace object, for use in other applications.17.rules: rule version consists of a sequence of a list of rules.All types of rules are focused on a particular type of configuration.18.precise assembly: a single assembly, it will be regarded as a specific component of the version of the zero component.It also follows version rules, but the exact specified version of the component is configured according to the precise entries in the version rules. Non accurate assembly: a single assembly, it will be regarded as the component parts. The specific version is decided by the version of the rules set.19.variable rule: a set of option values that are usually set by marketing users to determine which variables to configure BOM (e. g. , car type = GLS, engine = 1200, gearbox = manual)20.product structure configuration: using the complete product structure established in accordance with the functional requirements to meet user requirements the design or selection of parts, these parts according to their functions, a combination rule (assembly) and some conditions of marshalling,After the formation of a specific product structure, called21.Process Viewer: progress allows end users to view the work flow. Users don't need to be a participant in this process.22.Process Designer: a graphical process designer. The system administrator can map the process template with it, and then the end user can start the workflow with templates.23.Task: the basic unit used to build process. Each task block defines a set of actions required to complete the task, rules and resources.24.Task Template: the definition of design task graph. According to the nature of real-world tasks, TC Engineering has developed different task templates, such as Do, Review, Condition, Routine and so on.25.In-Box: allows users to track their launch processes or tasks. In In-Box you can see a series of tasks, and ask you to complete these tasks. In~Box can let you check in the process task. Not involved in the task need to use the Process Viewer view. The Inbox task can be sent to check and execute Process Viewer.26.Process Template: the definition of design work flow chart. Different uses of processes are defined by different templates, which represent and apply to different event processes, and customers can tailor process templates to suit their own requirements through process templates.27.Job: every time the execution of workflow called Job. It is the new sales orders, tasks or change request.28.Node: a stage in the processTwo. Fill in the blanks1.query: Dataset. . . General. . . Remote. . . Item. . . Item, ID, Item Name, Item Revision .............2.visitor types: Approver: World: User: Group: Owning user:Owning Group .......3.categories: change permissions: check-in / check-out:replication; deletion; reading: writing ............4.permissions setting: check permissions have been granted that: Cross said restricted: the blank cells represent null values, i. e. any permissions are not licensed.5.permissions management: Based on the object, based on the rules.()6 Access Manager: rule tree meaning, Has Status (TCM Released) -TCM Released RuleI., II. value, III. ACL.The 7. panel data window: Summary: details: viewer: search reference device: data display8.order: to create organization personnel, user group, role.9.types of data sets: UGMASTER - UG - UG - UGPART model: the main models, such as MSWord - Word documents drawings:MSExcel - MSPowerPoint - Excel documents: PowerPoint document:DirectModel - visual documentation, JT formatText - text file10.in the product life cycle of product data at three stages:Released ----- issued, has been officially, never change:In In-Process一process, semi formal, modifications must be approved by the:Working ------ work, not fixed, often modify, legal personcontrol legal modification.The 11. tasks in the workflow designer template: Do Task: Review Task: Add Status Task: Or Task: Condition Task ...................12.version rule entries: work phase (Working) ; archive status (Status); substitution, substitution (Override); exact model (Precise);The latest version (Latest) ; date (Date); serial number (Unit No.) ; end Item (Enditem)13.BMIDE (BusinessModel Integrated Development Environment) business model is the integrated development environment14.ACL (Access Control List) access control list;15.three change types: CN (Change request) CR (Change order) CO (Change notification)16.two types of process management: (approval process CR, change process CM)17.TC four layer architecture (Client Tier, Web Tier, Enterprise Tier, Resource Tier) two layer architecture (Client Tier, Resource Tier)Priority of condition in 18. rule tree:On the same level, the rules closest to the top have precedence over the underlying rules:The condition in the sub branch takes precedence over the parent branchThree. OperationOperation of 1. data set:1)to view the data set version: select to view the data set, select the menu "file”, "view”, choose to view version in the pop-up dialog box (note that the system default only three version).2)clean the data set: select the data set to be cleaned, select the menu "Edit”, "clean”, you can.3)data set checkin check out: select the data set to be cleaned,right-click, in the pop-up menu, select "checkin / check out” -checkin or check outNote: check out data objects are not allowed to be deleted.2.mail:1)choose "Edit" to "option”, select "index" in the pop-up window, find "mail_server_name”, change the current value to the computer name.2)right click on clipboard to make sure that append is selected.3)need to send the copy files such as data set, select the menu "file”, "new" and "envelope”, click "Recipient”, add user or group for the recipient, click the "copy”, add a user or group, fill in the "theme”, add or delete attachments in attachments, complete a fter sending.3.change ownership:Select the object that you want to change ownership, edit, change ownership, select the user to change to the new ownership user. Click "OK"”4.query builder (example):Query ItemRevison. according to the value of "project ID" in ItemRevision MasterForm1)create a item, fill in the contents of the property table, such as the ItemRevision Master project ID set to 001.2)in query component new query selectid, search class is ItemVersionMaster, add search criteria for projectid, click 〃』〃〃create .3)click the "search" button in the toolbar, change the search,select the system defined search "select_id""4)enter the project ID to query, such as: 001.5)get query results.5.PSE (ProductStructureEditor) (example):1)put the assembly into the TC and send the kitchen to the PSE2)click the /z show / hide panel" button on the toolbar, add options: decorate grade = luxury / economy / well-off, and save.3)click the edit variables Rule button on the toolbar, and add variable conditions, such as:The variable condition of the furnace is "decoration grade = luxury OR economy OR well-off"”;The variable condition of oven is "decoration grade = luxury"”;The variable condition of the furnace is "decoration grade = luxury OR well-off"”.4)remove the hook before the menu "view - display the variables not configured”.5)click the toolbar, set the option value of the option module button, and select the value, such as luxury, then the panel will displayLuxury = oven + oven + garbage Cleaner + whirlpool dishwasher + oak cupboard”.6.workflow designer (example):1)select the workflow designer navigation panel option to enter the workflow designer.2)select the m enu "file" to "new root node template”, for example: new root node template name: NewProcess.3)select the "Do task template”, double-click the mouse in theblank area of the design panel, that is to establish a Do Task, the name is changed to: design.Simil arly, complete the "audit task template”, name: audit: add state task template, the name "pass"”.4)build the process, drag the mouse button from "start" to "design”, drag and drop to "audit”, drag to "drag" to "finish"”.5)select the new process (NewProcess), open the display task handler panel, select the fallback in the left list box, operation handler: demote, add parameter - level, value design, add.6)select the select-signoff-team in Review Task audit, open the display task issuing panel, add the group for the task, and the role (for many people). Select perform-signoffs, open the display task handler panel, select the "execute”, "operation handler”, "demote-on-reject”, and "add" in the select list box on the left.7)select the Do permission settings: Task: design, open display panel, click on the "task attribute" named ACL ”, select the appropriate ACL or create a new ACL, and add the appropriate permissions, and then click" assignment "button. Permission assignment of other tasks is identical.8)completed, sel ect "set the stage for the available”, and exit.7.BMIDE (New Item object):1)from the program "BusinessModel IDE”, started to enter the BMIDE, "to the table”.2)"file”, "new build”, "project”, select the "new business modeler IDE template project" in the wizard, and select "next 〃〃step .3)fill in the project name: NewPro, click next”.4)Teamcenter template folder: for example, C:\ProgramFiles\UGS\Teamcenter\Tc2007\bmide\templates, "finished.5)in the "business object" window, right-click the "organization" to "set the active extension file”, select "business_objects. xml"”.6)right click "find the business object, and search for" Item 〃〃7)select "Item”, right-click the "new business object”, enterthe name: and select "the next step"”.8)for the new Myltem form, add attributes, such as Color, Weightetc.. "Next step”, "next step..9)is Myltem new Revision form configuration above,10)"file" to "save the data model”.11)in the "business objects" window, right-click the deployment template”.12)enter the relevant content in the pop-up windowServer connection configuration file: TcDataProtocol: HOPUser ID:InfodbaPassword: InfodbaClick finish”.13)after successful deployment, the words "Success" visible in the log file.14)into the TC, will be the new object.Important operation button:1,: the workflow designer (task attribute display panel, display panel display task task processing program, issued by the panel (-) is set to stage available)In the toolbar (browse mode, edit mode and various task icon)2.Home:File: new to zero component: folder: form; data set: workflow; change process: BOM view version; envelope...File, view; view (only for support in data set) Edit paste: copy: copy paste paste: work flow. . . Remove the cleaning;:: immunity: remove immunity: user settings: option; change of ownership:To view the attributes : access: references to the current user name.。
TC默认的流程模板Process-常勇——【Team Center 精品培训资料】
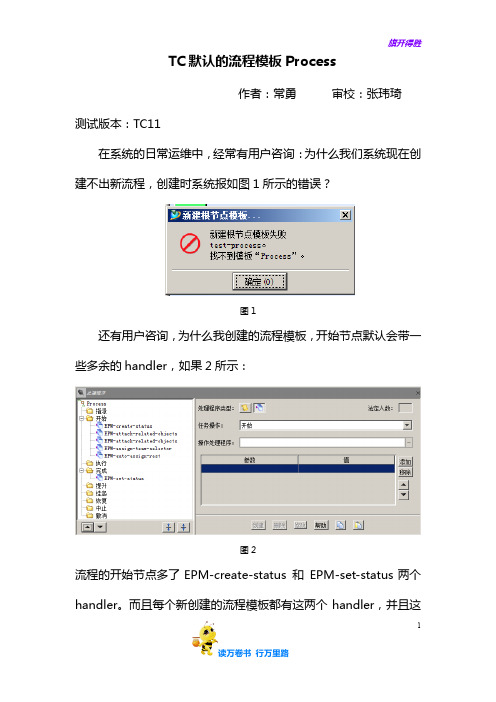
1TC 默认的流程模板Process作者:常勇 审校:张玮琦 测试版本:TC11在系统的日常运维中,经常有用户咨询:为什么我们系统现在创建不出新流程,创建时系统报如图1所示的错误?图1还有用户咨询,为什么我创建的流程模板,开始节点默认会带一些多余的handler ,如果2所示:图2流程的开始节点多了EPM-create-status 和 EPM-set-status 两个handler 。
而且每个新创建的流程模板都有这两个handler,并且这1两个handler 的位置以及顺序都相同?其实上面用户提到的两个问题都是和TC 默认的流程模板 Process 有关系。
在工作流程设计器中打开Process 流程模板,如下图所示:图3在流程开始节点的描述中可以看到,Process 流程模板是原始的流程模板。
其它新创建的流程都是基于该流程模板作为初始模板创建的。
因此对Process 流程模板的修改会影响到所有之后新创建的流程。
回到之前用户提出的问题。
用户提出的第一个问题应该是用户所在的Teamcenter 系统中对Process 流程模板进行了重命名或者该流程被删除,因此导致无法新创建流程模板。
第二个问题应该是用户对Process 流程模板进行了修改导致。
可以通过下面的测试验证上面的结论。
S1,在工作流程设计器中打开Process 流程模板,对Process流程模板进行重命名。
如下图所示。
然后保存修改。
图4S2,创建新的流程模板,点击确定,系统报错误,错误显示的内容同问题一中提到的相同。
S3,重新将该流程模板命名为Process,然后再创建新的流程,发现可以正常创建。
因此可以确定问题一就是Process流程模板引起的错误。
对于问题二,可以按照下面的方式进行测试:S1,在Process流程模板的开始节点添加handler EPM-validate-target-objects,如下图所示:1图5然后保存上面的修改。
Teamcenter10.1系统基础操作资料全
Teamcenter10.1系统基础操作资料1系统基础概念及我的Teamcenter1.1系统常用术语介绍1.零组件(Item):管理Teamcenter信息的基本对象,代表产品、部件或零件的结构化表达,也包含其他数据对象,表示真实世界中的一个产品、部件或零件对象,也表示一个种类的集合等;2.零组件版本(Item Revision):管理Teamcenter信息的基本对象,每个产品对象(Item)都有至少一个版本(Item Revision)。
在Teamcenter中,系统利用版本来记录产品对象的历史演变(更改情况),并通过版本的追踪来保证用户取用的数据是最新有效的。
每当产品归档,即生成一个新版本。
没有归档以前的图纸修改不作为一个版本。
或者说,新版本的产生一定伴随有工程更改的发生;3.表单(Form):存储Item、Item Revision等对象属性信息数据的地方;4.BOM:(Bill of Material)产品结构管理关系的信息对象;5.数据集(Dataset):管理其他软件应用程序创建的数据文件的数据对象,例如:Word、Excel、PDF、RAR文件;6.文件夹(Folder):用来组织产品信息的数据对象,类似Windows里的文件夹;7.伪文件夹:系统对象与对象之间关系的虚拟表现形式(不是文件夹,实际上是一种关系的文件夹表达方式);8.时间表(Schedule):时间表,用来管理项目计划;9.更改(ECN等):用来管理产品变更记录;10.删除:系统中没有回收站,对象删除掉后,不能恢复;11.剪切:剪切的对象还在系统中,但不显示在当前的界面,可用查询工具找到;Item 零组件Item Revision零组件版本BOMDataset数据集ItemRevisionMasterForm零组件版本主属性表1.2Teamcenter用户界面1.2.1启动Teamcenter在桌面左键双击或者右键打开以下图标,进入登录界面,输入用户ID、密码,点击登录,进入到TC工作界面1.2.2应用程序管理器登录之后,在TC窗口的左下为应用程序快捷显示栏,通过点击下图红色方框,来编辑显示的应用程序快捷方式;(针对操作用户对“我的Teamcenter、结构管理器PSE、工作流查看器、更改管理器”比较常用)1.2.3启动应用程序的两种方式备注:针对VIEW、ECN对象,双击即可进入具体的应用程序中。
Teamcenter10.1系统基础操作资料
精心整理Teamcenter10.1系统基础操作资料系统基础概念及我的Teamcenter系统常用术语介绍1.零组件(Item):管理Teamcenter信息的基本对象,代表产品、部件或零件的结构化表达,也包含其他数据对象,表示真实世界中的一个产品、部件或零件对象,也表示一个种类的集合等;2.零组件版本(ItemRevision):管理Teamcenter信息的基本对象,每个产品对象(Item)都有至少一个版本(ItemRevision)。
在Teamcenter中,系统利用版本来记录产品对象的历史演变(更改情况),并通过版本的应用程序管理器登录之后,在TC窗口的左下为应用程序快捷显示栏,通过点击下图红色方框,来编辑显示的应用程序快捷方式;(针对操作用户对“我的Teamcenter、结构管理器PSE、工作流查看器、更改管理器”比较常用)启动应用程序的两种方式备注:针对VIEW、ECN对象,双击即可进入具体的应用程序中。
“我的Teamcenter”概述条标签显示窗口标签更改属性列左侧控制面板可以自己定制个性化界面。
用户设置改变组和角色的设置:菜单:找到常规文件夹,在右侧进行编辑,进行个人基本设置,设置完成之后点击确定;菜单栏介绍“文件”菜单“编辑”菜单“视图”菜单其他介绍1、切换当前显示模块可快速进入已经打开的功能模块,例如用户打开了多个模块(我的Teamcenter、结构管理器(PSE)、分类、流程查看器),可用该按钮快速切换2、自定义工具条、模块显示自定义工具栏在工具栏空白处点击右键弹出选择定制工具条弹出如下窗口,对工具栏进行自己定义3、更改应用程序显示按图示操作,进入导航面板窗口侧的“信封1.2.3.1.2.1.2.1.2.PS:复制附加在复制处于不同位置的多个对象时可以提高工作效率:比如先复制A,再找到B,选择复制附加;然后选择要粘贴的位置,点击粘贴,就可以将A、B一起粘贴过去更改所有权1.更改数据的所有用户和所有用户组属性,一般只有“所有者”才有权限修改。
TeamCenter 复习资料
炉子的变量条件为“装修档次=豪华 OR 经济 OR 小康”;
烤箱的变量条件为“装修档次=豪华”;
炉子的变量条件为“装修档次=豪华 OR 小康”。
4)将菜单“查看——显示未配置的变量”前的勾去掉。
5)单击工具条“设定选项模块的选项值”按钮,选择值,如“豪华”,则面板将显示
14. ACL(Access Control List) 访问控制链表;
15. 三种更改类型:CN(Change request) CR(Change order) CO(Change notification)
16. 两类流程管理:(审批流程CR、更改流程CM)
17. TC的四层架构(Client Tier,Web Tier,Enterprise Tier,Resource Tier)两层架构(Client Tier,Resource Tier)
6)选中Review Task“审核”中的select-signoff-team,打开“显示任务签发面板”,为任务添加组,角色(可以为多人)。选中perform-signoffs,打开“显示任务处理程序面板”, 在左边的选择列表框中选择“执行”,“操作处理程序”:demote-on-reject,添加。
7.数据面板窗口:Summary;详细信息;查看器;搜索引用器;显示数据
8.组织创建顺序:人员→角色→组→用户。
9.数据集的类型:UGMASTER – UG主模型;UGPART – UG非主模型,如图纸;MSWord – Word文档;
MSExcel – Excel文档;MSPowerPoint – PowerPoint文档;DirectModel – 可视化文档,JT格式
- 1、下载文档前请自行甄别文档内容的完整性,平台不提供额外的编辑、内容补充、找答案等附加服务。
- 2、"仅部分预览"的文档,不可在线预览部分如存在完整性等问题,可反馈申请退款(可完整预览的文档不适用该条件!)。
- 3、如文档侵犯您的权益,请联系客服反馈,我们会尽快为您处理(人工客服工作时间:9:00-18:30)。
1.1 流程模板设计
工作流是完成目标的一个或几个业务流程的自动化操作,工作流程由用户发起,具体的工作流任务将指派给用户。
系统管理员登陆系统,选择工作流设计器应用程序,进入工作流设计器应用程序界面。
工作流设计器
1.1.1 工作流任务模板
系统中常用工作流任务模板有:do任务,审核任务,条件任务,发布任务等。
Do任务:是一个包含EPM-hold handler的任务模板,当任务开始后,EPM-hold handler能阻止任务自动完成。
这个任务模板有一个用户对话框,当任务完成后,用户可以选中对话框中的复选框表明任务已经完成。
“审核”任务:审核任务,是一个包含select-signoff-team子任务和perform-signoffs子任务的任务模板。
select-signoff-team子任务用来指定执行审核的人员,而perform-signoffs子任务则用来执行审核任务。
在设计工作流时可以为select-signoff-team子任务限定执行此任务的组或角色,这样在启动流程为流程指定人员时,人员就被限定在指定的组或角色内。
“添加状态”任务:添加状态任务,用来为流程中的目标对象添加一个发布状态。
在流程设计时在该任务模板属性中选定发布状态,当流程启动后,将自动完成目标对象的发布状态。
“或”任务:当多个处于同一层次上的任务中只要有一个发生就能触发它们的后续任务时,需要用Or任务。
不管Or任务有多少前驱任务,只要有一个完成,系统就执行该任务,推动流程继续走下去。
“条件”任务:用于分支流程。
条件属性有一个结果属性,可以设置为一下三个值:True,False,Unset。
创建一个流程时,条件任务的两种后续任务
根据实际需要分别把条件路径设置为True和False,从而建立与Condition Task 任务的关联。
在流程设计中,Condition任务一般需要和Or任务组合使用。
1.1.2 新建工作流流程模板
1.1.
2.1 新建节点模板
系统管理员于工作流设计器应用程序中,单击菜单“文件”->“新建节点模板”;
打开新根节点模板对话框,输入模板名称,如果该流程可基于已有流程新建,可从基于根节点模板下拉框中选择已有流程,否则,默认空模板即可,模板类型选择流程,单击“确定”按钮;
可在新建工作流窗口中选择任务模板创建新的流程模板,添加新任务模板的
方式为:在工具栏中单击需要的任务模板,移动鼠标到流程创建区域内,在空白处双击鼠标左键,任务模板将被添加到新建流程区域内;在左侧的名称文本框中修改任务名称,注意,修改完成后,鼠标要单击拥有该名称的任务或单击上侧流程树中的空白处;
在此修改任务名称
任务模板添加完成后,需要通过流程箭头指定流程任务的先后执行顺序,方法如下:选择作为前续任务的任务节点,鼠标不要松开,拖动鼠标到作为后续任务的任务节点处,松开鼠标,一个连接前后任务节点的箭头将出现在两个任务中间。
1.1.
2.2 流程回退任务的设置
对于流程中的审核节点,如果审核人不通过,则需要把任务回退到相应节点,这时需要设置流程的回退。
TC8中流程回退有比较简单的方式,使用反向箭头
来实现:鼠标放到需设置回退功能的任务节点处,按下鼠标左键,鼠标不要松开,拖动到流程将回退到的任务节点上,此时在原来已有联接箭头的基础上,出现一个反向箭头,选中该反向箭头,单击鼠标右键->设置为“拒绝”路径,此时反向箭头会变成虚线,表示,当审核任务执行结果为拒绝时,流程路线将沿虚线箭头返回。
1.1.3 修改任务属性
1.1.3.1 设置任务超时提醒
设置任务超时提醒后,如果任务执行人没有在设置时间内执行任务,系统将发TC内部邮件通知。
任务超时提醒设置方法:单击工作流设计器左下角的“显示任务属性面板”,弹出“属性”窗口,在“持续时间”处单击“设置”按钮,弹出“设置持续时间”窗口,在其中填入持续时间,例如,如果任务收到15分钟后仍然没被执行,需
要发邮件通知,可在分钟文本框中输入15;在接收者处单击“设置”按钮,弹出选择接收者对话框,选择任务超时后将接收超时提醒的组或用户。
显示任
务属性
面板
1.1.3.2 设置任务签发
对于审核任务,可为其子任务select-signoff-team指定签发概要表,这样,当客户端新建工作流时,需要根据流程模板中指定的签发概要表指定任务执行人。
例如:项目部标准化审核任务节点设置如下签发概要表:组为标准化组,角色为标准化人员,审核者数是1;
这样,当客户端新建工作流程,指派任务执行人时,必须至少指定一位角色为标准化组标准化人员的审核者来执行审核任务。
通过指定签发法定人数的数字
或百分比,可设置任务审核通过的标准:比如指定审核者数为3,签发法定人数指定为1,则在客户端执行该审核任务时,3人中只要有1人审核通过,即使其余两人拒绝,流程也将继续执行下一任务。
1.1.3.3 流程模板过滤
Teamcenter8中创建流程模板后,可根据权限设置流程模板过滤,针对具体的组为其指定特定的流程,通过这种方法可为不同组的用户筛选不同的流程,流程模板过滤由系统管理员来设置。
在流程模板过滤器中可为一个组指派多个流程模板,其中每个流程模板都基于一个具体的对象类型,比如基于itemrevision的零组件类型,为研发部这个组指派多个流程模板,这样当研发部这个组中的成员针对版本零组件新建工作流程时,可选的流程模板列表仅限于流程模板过滤器中指派的流程模板。
流程模板过滤器设置方式如下:
系统管理员在工作流设计器界面中,选择菜单“编辑”->“模板过滤器”,打开流程模板过滤器对话框;
在流程模板过滤器对话框中,从组名下拉框中选择研发部这个组,从对象类型中选择itemrevsion这个零组件类型,从窗口下方的定义的流程模板中选择研发部对零组件类型为itemrevision的对象将使用到的流程模板,单击按钮,流程模板将添加到左侧的指派的流程模板中。
单击“确定”按钮。
默认情况下,用户新建工作流时,系统界面中会有流程模板过滤器的提示。
如果选中全部,则流程模板列表将列出所有模板,如果选中指派的,则流程模板列表中的流程模板限制为流程模板过滤器中指定的针对用户所在组以及对象类型指派的流程模板。
系统管理员可通过设置系统的首选项CR_allow_alternate_procedures值为none,这样当用户新建工作流时,界面中流程模板过滤器提示消失,流程模板列表中只有流程模板过滤器中指定的针对用户所在组以及对象类型指派的流程模板。
无流程模板过滤器提示过滤后的流程模板。