kv8产品说明书
Roland TD-8KV 鼓系统用户手册说明书

Owner's ManualThank you, and congratulations on your choice of the TD-8KV Roland Drum System.Copyright © 2001 ROLAND CORPORATIONAll rights reserved. No part of this publication may be reproduced in any form without the written permission of ROLAND CORPORATION.2•Before using this unit, make sure to read theinstructions below, and the Owner’s Manual.•Do not open or perform any internal modifi-cations on the unit or its AC adaptor. (Theonly exception would be where this manual provides specific instructions which should be followed in order to put in place user-installable options; see p. 7, p. 8.)................................................................................................•Do not attempt to repair the unit, or replaceparts within it (except when this manual provides specific instructions directing you to do so). Refer all servicing to your retailer, the nearest Roland Service Center, or an authorized Roland distributor, as listed on the “Information” page.................................................................................................•Never use or store the unit in places that are:•Subject to temperature extremes (e.g.,direct sunlight in an enclosed vehicle, near a heating duct, on top of heat-generating equipment); or are •Damp (e.g., baths, washrooms, on wet floors); or are •Humid; or are •Exposed to rain; or are •Dusty; or are•Subject to high levels of vibration.................................................................................................•This unit should be used only with a rack orstand that is recommended by Roland.•When using the unit with a rack or standrecommended by Roland, the rack or stand must be carefully placed so it is level and sure to remain stable. If not using a rack or stand, you still need to make sure that any location you choose for placing the unit provides a level surface that will properly support the unit, and keep it from wobbling.................................................................................................•Do not allow any objects (e.g., flammablematerial, coins, pins); or liquids of any kind (water, soft drinks, etc.) to penetrate the unit.•In households with small children, an adultshould provide supervision until the child iscapable of following all the rules essential for the safe operation of the unit.................................................................................................•To prevent accidents, never allow smallchildren to play near the drum kit.3•Do not drop the unit!•To avoid personal injury and/or damage tothe unit, do not touch anything inside the frame of the PD-80 and PD-80R.................................................................................................•Try to prevent cords and cables frombecoming entangled. Also, all cords andcables should be placed so they are out of the reach of children.................................................................................................•Never climb on top of, nor place heavyobjects on the unit.•Should you remove screws, nuts, bolts,springs, washers, etc., make sure to put them in a safe place out of children's reach, so there is no chance of them being swallowedaccidentally.................................................................................................•Assemble the drum stand and TD-8KVcarefully, to avoid pinching your fingers.•Make sure to firmly tighten all clamps andbolts after you have assembled the stand andattached a pad or unit to it. You shouldprobably also try to make a habit of checking and retightening them if necessary before every performance. You risk injury if you have loose screws or clamps, since a pad or unit can fall unexpectedly.................................................................................................•Be sure to tighten the head tension beforeusing the KD-80, PD-80R, and PD-80. Striking the head when the head tension is loose may damage the sensor and head.................................................................................................•Do not apply excessive force to the sensor(and on the KD-80, the cushion) located below the center of the head of the KD-80, PD-80R, and PD-80. Doing so can interferewith accurate detection, and may damage it.................................................................................................•Due to the nature of the materials used in thesensor of the KD-80, PD-80R, and PD-80,changes in room temperature may affect the sensitivity of the sensor.................................................................................................•Please be aware that by using a felt beater forthe KD-80, you risk causing damage to the head as a result of the metal portions of the beater that can become exposed when the felt wears thin. For the kick pedal, werecommend that you use only the supplied beater, or a commercially available plastic beater.................................................................................................•To keep the KD-80 and FD-6 from slipping ormoving during play, the tips of the legs installed on the stand and the tips of theanchor bolts are pointed. Handle with care to avoid injury.................................................................................................•Brushes can be used to play the PD-80R andPD-80. When using brushes, be sure to use nylon brushes. Using metal brushes will not only scratch the head, but can also be hazardous, since the tip of the brush may catch in the mesh of the net.................................................................................................•The rubber portion of the PD-80R’s hoop isone component that eventually wears out (the more so if numerous rim shots are performed), and will require replacement.Errors may occur when attempting rim shots once the rubber portion has worn out. If this occurs, replace the hoop rubber. For more on replacing the hoop rubber, consult with your retailer, the nearest Roland Service Center, or an authorized Roland distributor, as listed on the “Information” page.................................................................................................4In addition to the items listed under “USING THE UNIT SAFELY” on page 2–3, please read and observe the following:Placement•Do not expose the unit to direct sunlight, place it near devices that radiate heat, leave it inside an enclosed vehicle, or otherwise subject it to temper-ature extremes. Excessive heat can deform or discolor the unit.•To avoid possible breakdown, do not use the unit in a wet area, such as an area exposed to rain or other moisture.•Do not allow rubber, vinyl, or similar materials to remain on the unit for long periods of time. Such objects can discolor or otherwise harmfully affect the finish.•Do not put anything that contains water (e.g., flower vases) on the unit. Also, avoid the use of insecti-cides, perfumes, alcohol, nail polish, spray cans, etc., near the unit. Swiftly wipe away any liquid that spills on the unit using a dry, soft cloth.Maintenance•For everyday cleaning wipe the unit with a soft, dry cloth or one that has been slightly dampened with water. To remove stubborn dirt, use a cloth impreg-nated with a mild, non-abrasive detergent. After-wards, be sure to wipe the unit thoroughly with a soft, dry cloth.•Never use benzine, thinners, alcohol or solvents of any kind, to avoid the possibility of discoloration and/or deformation.Additional Precautions•Use a reasonable amount of care when using the unit ’s buttons, sliders, or other controls; and when using its jacks and connectors. Rough handling can lead to malfunctions.•When connecting / disconnecting all cables, grasp the connector itself —never pull on the cable. This way you will avoid causing shorts, or damage to the cable ’s internal elements.•To avoid disturbing your neighbors, try to keep the unit ’s volume at reasonable levels. You may prefer to use headphones, so you do not need to beconcerned about those around you (especially when it is late at night).•This instrument is designed to minimize the extra-neous sounds produced when it ’s played. However, since sound vibrations can be transmitted through floors and walls to a greater degree than expected, take care not to allow these sounds to become a nuisance to neighbors, especially when performing at night and when using headphones.•Use a provided cable or a cable from Roland to make the connection. If using some other make ofconnection cable, please note the following precau-tions.•Some connection cables contain resistors. Do not use cables that incorporate resistors forconnecting to this unit. The use of such cables can cause the sound level to be extremely low, or impossible to hear. For information on cable specifications, contact the manufacturer of the cable.567897.Loosen the T-bolts for the stay and mount the legson the stay.Install the legs as shown in the figure so that the ends of the legs protrude by about 1 inch (2 cm).8.Tighten the T-bolts to secure the legs to the stand.9.Lift the KD-80 and place the stand and the four legsupright.10.Adjust the angle of the stand plate so that it's at aright angle to the floor.Loosen the T bolts that you tightened in step 8, and adjust the length of the legs so that the stand plate is vertical to the floor. Then firmly tighten the T bolts.11.Install the included beater on your kick pedal.12.Mount the kick pedal on the KD-80.•Install the kick pedal securely.•Set the KD-80 so no mechanical noise is heard when you step on pedal.•Make sure that KD-80 does not touch the drum stand or the other pads.If you are using a kick pedal with an under plate Adjust the length of the legs so that the four legs of the KD-80 and the heel of the kick pedal contact the floor evenly.13.Adjust the striking point for the beater.The beater's striking point is adjusted to fall at the center of the head.Adjust the striking point so that it doesn't extend beyond the cushion on the back of the head.When Using a Twin (Double Kick) PedalWith the KD-80, you can also play using a twin (double kick) pedal.Set this up so the striking points of the two beaters fall at equal distances to the left and right of the center of the head.When using a twin (double kick) pedal, as with a regular pedal, use the included beater or a plastic beater as the beater for the kick pedal.SpecificationsKD-80: V-Kick Trigger Pad Size: 8 inches Trigger: 1Dimensions:440 (W) x 340 (D) x 465 (H) mm17-3/8 (W) x 13-7/16 (D) x 18-5/16 (H) inchesWeight:4.8 kg10 lbs 10 oz1011prevents the cables from catching or getting tangle on the stand.2.Attach the CY-12R/C so the unit is oriented asshown in the diagram (bolt should be opposite the output jacks).3.Tighten the wing nut to obtain the desiredmovement.•Double sounding may occur if the wing nut is loose.•Do not use the washer or felt included with the drum stand (MDS series).About the Output JacksThe CY-12R/C features two different output jacks, BOW/BELL and BOW/EDGE.Use the BOW/BELL output jack when you want to play the bow and the bell sounds (used as a ride cymbal); use the BOW/EDGE output jack when you want to play the bow and the edge sounds (used as a crash cymbal).Use either the BOW/BELL or BOW/EGDE output jack, but not both at the same time. Connecting both jacks results in two separate trigger inputs playing simultaneously.” of “rim-12ChokingChoking (pinching) the cymbal ’s edge with the handimmediately after hitting the cymbal makes the sound stop.To make use of choking play techniques, you ’ll need to connect to a trigger input jack on the percussion sound module that accommodates rim shots.TroubleshootingThe sound does not change when an edge shot is made•Is the cable connected to the BOW/EDGE output?Make the connection to the BOW/EDGE output to enable the CY-12R/C to support edge shots (p. 11).•Are you striking the cymbal in the area with the edge sensors?Edge sensors are embedded only in the part of the CY-12R/C directly in front (p. 11).The sound does not change when a bell shot is made•Is the cable connected to the BOW/BELL output?Make the connection to the BOW/BELL output to enable the CY-12R/C to support bell shots (p. 11).•Use the shoulder of the stick when playing bell shots (p. 11).•Adjust the “Scan Time.”Choke play is not possible•Are you choking the cymbal in the area with the edge sensors?Edge sensors are embedded only in the part of the CY-12R/C directly in front (p. 12).Ride cymbal sounds odd(Other cymbal sound is heard simultaneously)•Connect either the CY-12R/C ’s Bow/Bell output or the Bow/Edge output to the TD-8 (p. 11).Double sounding•Are any cables touching the CY-12R/C?Secure the cables in place with the cable ties so that they do not touch the units. Also, be careful to make sure thatthe cables are not pulled by the movement of a cymbal when struck (p. 15).•Are the stopper, felt washer, and wing nut attached correctly?Double triggering may occur if the stopper and/or wing nut is loose. Use a tuning key (drum key) to tightenproperly (p. 10).*If double triggering still occurs, try adjusting trigger parameters, such as Retrigger Cancel, on your TD-8.SpecificationsCY-12R/C: V-Cymbal Ride/Crash Pad Size: 12 inchesTrigger: 3 (Bow, Bell, Edge)Dimensions:300 (W) x 300 (D) x 51 (H)11-13/16 (W) x 11-13/16 (W) x 2-1/16 (H)Weight:1.1 kg2 lbs 7 ozPD-7 (Pad)Attaching the Pad to a StandAttach the PD-7 to a stand (MDS series).When attaching the PD-7 to the pad mount, be sure to tighten the stand fixing screw securely. If any of them remain loose, the pad could fall off.SpecificationsPD-7: PadPad Size: 7.5 inches Trigger: 2 (Head, Rim)Dimensions:192 (W) x 230 (D) x 65 (H)7-9/16 (W) x 9-1/16 (W) x 2-9/16 (H)Weight:0.8 kg1 lb 13 oz13To prevent malfunction and/or damage to speakers or other devices, always turn down the volume, and turn off the power on all devices before making any connections.141503012067 ’03-5-3N。
KVH TracVision M3 Satellite TV System 产品说明书
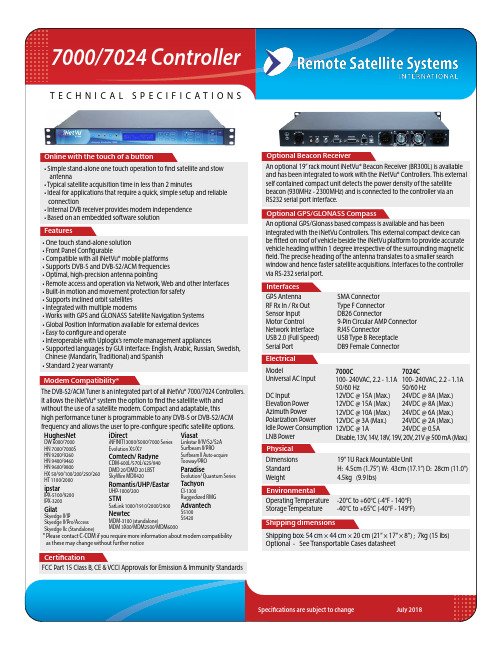
T e c h n i ca l s p e c i f i c a T i o n sElectricalPhysicalCertificationEnvironmentalShipping dimensionsModelUniversal AC InputDC Input Elevation Power Azimuth Power Polarization Power Idle Power Consumption LNB Power Dimensions Standard WeightFCC Part 15 Class B, CE & VCCI Approvals for Emission & Immunity StandardsOperating Temperature -20°C to +60°C (-4°F - 140°F)Storage Temperature -40°C to +65°C (-40°F - 149°F)Shipping box: 54 cm × 44 cm × 20 cm (21” × 17” × 8”) ; 7kg (15 lbs)Optional - See Transportable Cases datasheetDisable, 13V, 14V, 18V, 19V, 20V, 21V @ 500 mA (Max.) 7024C100- 240VAC, 2.2 - 1.1A50/60 Hz 24VDC @ 8A (Max.)24VDC @ 8A (Max.)24VDC @ 6A (Max.)24VDC @ 2A (Max.)19” 1U Rack Mountable UnitH: 4.5cm (1.75”) W: 43cm (17.1”) D: 28cm (11.0”) 4.5kg (9.9 lbs)• Simple stand-alone one touch operation to find satellite and stow antenna• Typical satellite acquisition time in less than 2 minutes• Ideal for applications that require a quick, simple setup and reliable connection• Internal DVB receiver provides modem independence • Based on an embedded software solutionAn optional 19” rack mount iNetVu® Beacon Receiver (BR300L) is available and has been integrated to work with the iNetVu® Controllers. This external self contained compact unit detects the power density of the satellite beacon (930MHz - 2300MHz) and is connected to the controller via an RS232 serial port interface.• One touch stand-alone solution • Front Panel Configurable• Compatible with all iNetVu® mobile platforms • Supports DVB-S and DVB-S2/ACM frequencies • Optimal, high-precision antenna pointing• Remote access and operation via Network, Web and other Interfaces • Built-in motion and movement protection for safety • Supports inclined orbit satellites • Integrated with multiple modems• Works with GPS and GLONASS Satellite Navigation Systems • Global Position Information available for external devices • Easy to configure and operate• Interoperable with Uplogix’s remote management appliances• Supported languages by GUI interface: English, Arabic, Russian, Swedish, Chinese (Mandarin, Traditional) and Spanish • Standard 2 year warrantyOnline with the touch of a buttonOptional Beacon ReceiverFeaturesInterfacesGPS Antenna RF Rx In / Rx Out Sensor Input Motor Control Network Interface USB 2.0 (Full Speed)Serial PortSMA Connector Type F Connector DB26 Connector9-Pin Circular AMP Connector RJ45 ConnectorUSB Type B Receptacle DB9 Female Connector7000C 100- 240VAC, 2.2 - 1.1A 50/60 Hz12VDC @ 15A (Max.)12VDC @ 15A (Max.)12VDC @ 10A (Max.)12VDC @ 3A (Max.) 12VDC @ 1A The DVB-S2/ACM Tuner is an integrated part of all iNetVu® 7000/7024 Controllers. It allows the iNetVu® system the option to find the satellite with and without the use of a satellite modem. Compact and adaptable, this high performance tuner is programmable to any DVB-S or DVB-S2/ACM frequency and allows the user to pre-configure specific satellite options.HughesNetDW 6000/7000HN 7000/7000S HN 9200/9260HN 9400/9460HN 9600/9800HX 50/90/100/200/250/260HT 1100/2000ipstar IPX-5100/9200IPX-3200GilatSkyedge II/IPSkyedge II/Pro/Access Skyedge IIc (Standalone)iDirect iNFINITI 3000/5000/7000 Series Evolution X5/X7Comtech/ RadyneCDM-600L/570L/625/840DMD 20/DMD 20 LBST SkyWire MDX420Romantis/UHP/EastarUHP-1000/200STMSatLink 1000/1910/2000/2900NewtecMDM-3100 (standalone)MDM 3X00/MDM2500/MDM6000Viasat Linkstar II/IV/S2/S2A Surfbeam ll/PROSurfbeam ll Auto-acquire Tooway/PROParadise Evolution/ Quantum Series TachyonCI-1300Ruggedized RMGAdvantechS5100S5420* Please contact C-COM if you require more information about modem compatibility as these may change without further noticeAn optional GPS/Glonass based compass is available and has beenintegrated with the iNetVu Controllers. This external compact device can be fitted on roof of vehicle beside the iNetVu platform to provide accurate vehicle heading within 1 degree irrespective of the surrounding magnetic field. The precise heading of the antenna translates to a smaller search window and hence faster satellite acquisitions. Interfaces to the controller via RS-232 serial port.Optional GPS/GLONASS CompassT e c h n i c a l s p e c i f i c a T i o n s• DVB Search - Searches directly for any DVB-S or DVB-S2 (ACM) carrier on the target satellite and peaks on it.• DVB Search, Opposite Polarity – Searches for DVB-S or DVB-S2 carrier in the opposite polarity on target satellite, then rotates p olarization axes and enables transmitter if modem signal attained.• DVB Search, Reference Satellite - Searches for a DVB-S or DVB-S2 carrier on ANY configured reference satellite then moves to t he target satellite and peaks on modem signal.• RF Automatic Search – The system will stop and search for modem signal when it senses an increase in RF energyreceived through t he DVB tuner as it passes by the target satellite. If the modem signal is found, the system will begin the peak process.• RF Override Search – The user specifies an RF Threshold such that the system stops when it reaches an area above the threshold a nd looks for modem signal to peak on.• Beacon Receiver – The Controller works seamlessly with the optional iNetVu® Beacon Receiver by searching for aspecified beacon frequency and then peaks on it (search gain level can be adjusted).• Auto-Deploy Method - Peaks on a reference satellite then uses precise pointing mechanism to locate the target satellite, even when n o modem RF or beacon signal is available to peak on.• Can be operated from a PC application using the USB port Via its web interface, it can be operated remotely or locally over a network connection• Can be completely configured from the front panel with a password protected configuration menu• Protects the platform and its components from damage, using current levels and sensor readings. It includes motion and movement protection as well• Provides automatic re-peaking if signal degradation occurs• Works correctly even when deployed while on an incline (in any direction) of up to 15°• Can search for both DVB-S and DVB-S2/ACM carriers• Supports full automatic and manual control of the iNetVu® Platform• Allows the users to select from multiple speed levels for both azimuth and elevation• Allows the system to operate unattended in remote locations• Is able to upload the recorded log information (Maximum of 12 hours) from the controller to the PC for troubleshooting • Supports full tracking of Inclined Orbit satellites by both signal strength and timed function• Is capable of powering the LNB with 13-21 Volts, selectable in software• Provides the option of saving the settings to a configuration file that can be used to configure additional controllers with the same configuration parameters• Works seamlessly with Uplogix Remote Management Appliances• Supports both GPS and GLONASS Satellite Navigation Systems• Supports Electronic Flux Gate Compass for increased speed of acquisition• Designed and manufactured to the highest standards of quality and reliability by C-COM• Supports all iNetVu® Mobile antenna platforms。
Omron K8AB-VW 一相超压下压电压报警器说明书
c All Rights Reserved
9419060-0 E
Precautions for Safe Use
Make sure to follow the instructions below to ensure safety.
1. Do not use or keep this product in the following environments.
devices. ɹɹɾPlaces subject to vibrations or physical shocks. ʢ2ʣMake sure to use setting values appropriate for the
controlled object. Failure to do so can cause unintended operation, and may result in accident or corruption of the product. ʢ3ʣDo not use thinner or similar solvent for cleaning. Use commercial alcohol. ʢ4ʣWhen discarding, properly dispose of the product as industrial waste. ʢ5ʣOnly use this product within a board whose structure allows no possibility for fire to escape. ʢ6ʣThis is a class A product. In residential areas it may cause radio interference, in which case the user may be required to take adequate measures to reduce interference. ˔About Installation ʢ1ʣWhen wiring, use only recommended crimp terminals. ʢ2ʣDo not block areas around the product for proper dissipation of heat. (If you do not secure space for heat dissipation, life cycle of the product will be compromised.) ʢ3ʣTo avoid electrical shocks, make sure that power is not supplied to the product while wiring. ʢ4ʣTo avoid electrical shocks, make sure that power is not supplied to the product when performing DIP switch settings. ˔Noise Conutermeasures ʢ1ʣDo not install the product near devices generating strong high frequency waves or surges. ʢ2ʣWhen using a noise filter, check the voltage and current and install it as close to the product as possible. ʢ3ʣIn order to prevent inductive noise, wire the lines connected to the product separately from power lines carrying high voltages or currents. Do not wire in parallel with or on the same cable as power lines. Other measures for reducing noise include running lines along separate ducts and using shield lines. ˔To avoid faulty operations, malfunctions, or failure, observe the following operating instructions. ʢ1ʣWhen turning on the power, make sure to realize rated voltage within 1 second from the time of first supply of electricity. ʢ2ʣMake sure to use power supply for operations, inputs, and transformer with the appropriate capacity and rated burden. ʢʣMaintenance and handling of this product may only be performed by qualified personnel. ʢ4ʣDo not use this product with circuits that have distor -ted input wave forms. Distortion in wave forms will result in errors. ʢ5ʣUsing this product for thyrister controls or inverters XJMSFTVMUJOFSSPST ʢʣWhen setting the volume, adjust the control from the minimum side to the maximum side.
KDK8型矿用多功能控制驱动器说明书20091028

KDK8型矿用多功能控制驱动器使用说明书产品执行标准:Q/320400 MZ097-2009天地(常州)自动化股份有限公司2009年10月KDK8型矿用多功能控制驱动器是矿用隔爆兼本质安全型设备,适用于存在瓦斯、煤尘爆炸危险的环境,可为矿用本质安全型设备提供本质安全型电源,并且可采集输入、输出口状态,并发送到总线上;也可接收总线上的信号,控制该驱动器的输出状态。
本驱动器可以与矿用本安型工业控制计算机、智能闭锁开关等设备配套使用,组成胶带机电控系统。
1.1 防爆型式矿用隔爆兼本质安全型,标志为Exd[ib]I。
1.2 型号意义KD K 8登记序号电控箱矿用电源电控设备及组件1.3 使用环境条件1)环境温度:0~40℃;2)空气相对湿度:不大于95%(+25℃);3)大气压力:80kPa~106kPa ;4)无显著振动和冲击的场合;5)煤矿井下有甲烷,煤尘等爆炸危险混合物,无破坏绝缘的气体和蒸汽的环境。
1.4 主要功能1)具有2路15V、2路18V直流本安电源输出,为矿用本安型控制机、智能闭锁开关等设备提供电源;2)通过现场总线(CAN)与其它设备进行通讯;3)从总线上接收开关量输出命令,经转换、驱动后以继电器接点形式输出控制;4)能够采集8路非安开关量(接点)输入信号、8路本安开关量(接点)输入信号和本机的部分状态信号,经信号净化处理后传送至总线,供其它设备采用;5)具有1路220V交流电源输出,并有漏电、过流保护功能。
可使开关量输出直接驱动可调型液力耦合器的伺服电机;6)具有远程、就地两种控制方式,在远程方式下,开关量输出由其它设备通过总线进行控制,在就地方式下,开关量输出由面板上的开关控制。
2主要技术指标2.1 电源2.1.1输入1)单相交流660/220/127V,输入视在功率800VA,各电压等级内部保险管电流值如表1。
2)输入电压的等级由用户通过隔爆腔内部接线端子跳线自行选定;3)电压变化范围:额定电压的75%~110%;4)频率:50Hz。
kV级及以下油浸式电力变压器使用说明书

kV级及以下油浸式电力变压器使用说明书————————————————————————————————作者:————————————————————————————————日期:常州特种变压器有限公司35kV级及以下油浸式电力变压器安装使用说明书0.460.001共15页第1 页1.引言1.1 适用范围本说明书作为35kV级及以下电力变压器安装使用说明的通用性技术文件,不包括由于产品本体结构而确定的特殊部分(此部分见产品专用安装说明书)及组件的安装使用说明书(此部分见组件安装使用说明书)。
1.2 使用方法1.2.1 变压器在运输、贮存、安装及投入运行等过程中,须以本安装使用说明书作为指导,以免发生变压器质量问题,并请做好有关记录。
1.2.2 安装与使用部门应按照工厂所提供的各类出厂技术文件、本安装使用说明书、产品专用安装说明书、各组部件的安装使用说明书进行施工。
若有疑问或不清楚之处,须直接与工厂联系,以便妥善解决。
2.变压器主体的起吊、顶升2.1 变压器主体起吊时应按变压器装配图的要求,使用设置在上节油箱中部或下节油箱的全部总重吊攀,使全部吊攀同时受力并且钢丝绳与垂线间的夹角不得大于30°,起吊时的变压器尺寸见总装图。
下节油箱上设有千斤顶底板,所有千斤顶底板必须同时均匀地受力,使其同步起升,并及时垫好垫板。
千斤顶底板位置见变压器总装配图。
3.运输、装卸3.1变压器主体由制造厂到安装地点的运输,当铁路运输时,应按铁道部门的有关规定进行;公路运输或短距离的公路机动车拖运或人工辊杠载运时,变压器在整个运输过程中倾斜角纵轴不得大于15°,横轴不得大于10°;水路运输时,本体倾斜角不大于15°(不包括远洋运输),并且应遵守下列规定3.1.1 公路运输与人工滚运过程中,变压器主体的震动与颠簸不得超过公路正常运输时的状况。
3.1.2 公路运输时,车速在高速公路或一级路面不超过15km/h,其他路面不超过10km/h。
柯达8毫米和超8毫米电影数字化器说明书

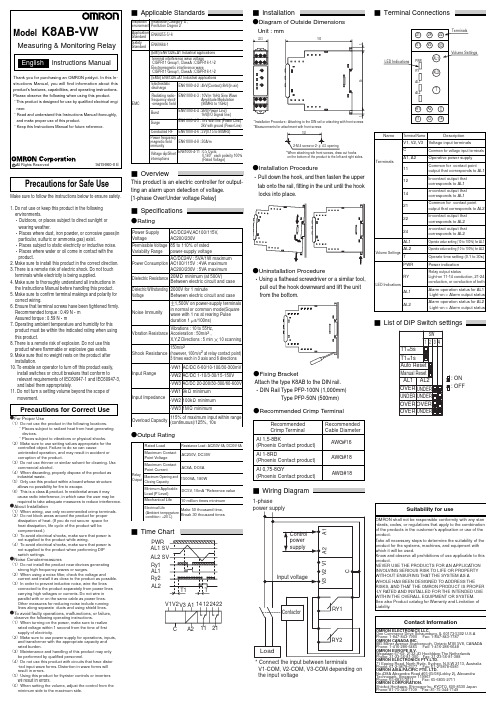
KODAKUser Manual12.4"H | 6.1"W | 8.4"D(31,5 cm | 15,4 cm | 21,3 cm) Please read all directions before using the product and retain this guide for reference.INTRODUCTION ................................................................................................................................................................SPECIFICATIONS ..............................................................................................................................................................PACKAGE CONTENTS .....................................................................................................................................................SAFETY PRECAUTIONS ..................................................................................................................................................ABOUT .................................................................................................................................................................................PRODUCT OVERVIEW .....................................................................................................................................................CONTROL PANEL OVERVIEW ......................................................................................................................................PORT PANEL OVERVIEW ................................................................................................................................................FILM INSTALLATION ....................................................................................................................................................OPERATING INSTRUCTIONS ........................................................................................................................................MENU FUNCTIONS ..................................................................................................................................................CUSTOMER SERVICE .....................................................................................................................................................WARRANTY ..................................................................................................................................................................444556677-9910-171717-1912345678910111213TO SEE THIS GUIDE INFRENCH, ITALIAN, OR GERMANPLEASE VISITOR USE THIS QR CODE:PARA VER ESTA GUÍA EN FRANCÉS, ITALIANO O ALEMÁN, VISITE O UTILICE ESTE CÓDIGO QR.POUR VOIR CE GUIDE EN FRANÇAIS, ITALIEN OU ALLEMAND, VEUILLEZ VISITER OU UTILISER CE CODE QR. UM DIESE ANLEITUNG AUF FRANZÖSISCH, ITALIENISCH ODER DEUTSCH ZU SEHEN, BESUCHEN SIE BITTE ODERVERWENDEN SIE DIESEN QR-CODE.PER VEDERE QUESTA GUIDA IN FRANCESE, ITALIANO O TEDESCO VISITATE IL SITO OUSATE QUESTO CODICE QR.Thank you for purchasing the KODAK REELZ Film Digitizer. This User Guide is intended to provide you with guidelines to ensure that operation of this product is safe and does not pose risk to the user.Any use that does not conform to the guidelines described in this User Guide mayvoid the limited warranty.Please read all directions before using the product and retain this guide for reference. This product is intended for household use only. It is not intended for commercial use.This product is covered by a limited one-year warranty. Coverage is subject to limits and exclusions. See warranty for details.Dimensions: 12.4″ x 6.1″ x 8.4″ (31,5 x 15,4 x 21,3 cm)Image sensor: 8.08 megapixels (3280 x 2464) 1/3” CMOS sensorNative resolution: 1296pDisplay: 5″ TFT LCDMemory capacity: Up to 128 GB SD™ cardFile output format: MPEG-4Power source: 12 V DCExposure control: Auto, manual (-2 to +2 EV)White balance: AutoFrame rate: 20 frames/secFocus system: Fixed focusScan speed: 2 frames/secLanguage options: English/Spanish/French/German/ItalianSupport systems: Windows XP, Vista/Windows 7, 8, and 10/Mac 10.7.3Compatible film reel sizes: 3" - 9" film reelsKODAK REELZ Film Digitizer7″ empty film reelAC/DC adapterGray reel adapterRed reel adapterMicro USB cableCleaning clothUser guide• Convert 8 mm and Super 8 reels into digital video files • Easy to operate• Transfer your converted video files to an SD™ card • No computers, software, or drivers required • High-quality, frame-by-frame digitizing process• WARNING: CHOKING HAZARD – Small parts. This product contains small parts and is not suitable for children under 3 years old.• Remove all packaging before using this device. Please keep all packaging materials out of reach of children and pets.• Properly dispose of all packing materials immediately after unpacking the product, as the bags used for packaging could present a suffocation or choking hazard.• Read all instructions carefully before attempting to operate this device. Improper usage could result in a reduction in efficacy.• Do not attempt to disassemble or modify any part of this device.• Do not use the device if smoke or unknown smell arises.• Do not use products such as alcohol, gasoline, thinner, or any other organic solvents to clean this device.• Do not operate the device in dusty or wet areas.• Make sure the device is properly clean before operating it.• Keep the scanner out of reach of children.• Never handle the scanner with damp or wet hands. This could damage the scanner or create the risk of electric shock.• Do not place, drop, or submerge the scanner in water or any other liquid.• If the scanner somehow falls into water despite you taking all of the above precautions, please do not reach into the water to retrieve it. Unplug it immediately and then retrieve it.• Take care that objects do not fall and liquids are not spilled onto the scanner.1. Control panel2. Display screen3. Reel shafts4. Film type switch5. Film spools6. Film lid7. Film lid tab8. Empty reel1. Power2. OK/Enter3. Back4. Left5. Down6. Right7. Up8. Minus9. Plus1. SD™ card slot2. MICRO USB slot3. DC 12 V port1. Unfold the two (2) reel shafts until they click into place.2. Carefully pull out the end of the film on your 8mm or Super 8 reel (not included). Then, fold up the end of the film nice and tight and slowly insert the end of the film in the slot on the empty reel (included). This process will help you connect your film to the empty reel.3. Spin your empty reel around a few times to make sure your film is now securely connected to the empty reel.4. Insert your reel onto the left reel shaft and place the empty reel onto the right reel shaft.(If the reel you’re using has a big mounting hole, use the provided red color reel adapter. If adapters are needed, always place red color adapter on the left reel shaft; gray color adapter on the right reel shaft.)5. Take the film between the two (2) reels and carefully thread it through the scanner. Use the white, solid line on the film scanner to follow how to thread the film on the film spools.6. Push the film lid tab to the left to lift the film lid and gently wipe down the film area with the cleaning cloth (included) before placing the film.7. Hold the film firmly in between your pointer finger and thumb. Slowly place the film under the first black tab (tab farthest left in the film area). Then, carefully twist the film and place it under the second black tab in the film area.8. Twist the film slightly again to fit the film under the third tab.SUPER 8STANDARD 87.90 mm7.90 mm3.3 mm(0.130")(0.158")(0.228")(0.177")8 mm film, also known as Standard 8, has a frame size of 4.5 x 3.3 mm. Super 8 film has a frame size of 5.79 x 4.01 mm. Make sure you adjust to the film type switch to the correct film type you are currently using.NOTE: If your picture is upside down, then you are at the end of the film and need to berewind onto another reel.1. Connect the power adapter to the scanner. Then, plug the other end of the power adapter intoa power outlet.2. Insert an SD™ card (not included) into the SD™ card slot. Make sure to insert the memorycard facing up.3. Press the Power button to turn on the scanner and the main menu will appear. The scannerwill take a few seconds to turn on. The white LED light will indicate that the scanner is on. NOTES: The scanner will automatically shut down after 15 minutes of inactivity.Keep in mind that it is common for the scanner to jam if parts of the film are distorted.Make sure film is in good condition. The scanner will not be able to operate on film that is damaged, overlapping, torn, unaligned, or crooked.Scotch tape can be used to repair torn parts of the film. Make sure to carefully apply thetape and only use a small amount. Overusing the scotch tape can cause the film tojam the scanner.Power On/Off Function• Press the Power button to start the machine and the main menu interface will appear.Recording Function1. Choose the “Record” option in the Video Preview Mode. Once selected, the record icon will appear white.2. Press the OK/Enter button to enter the prompt interface for switching between Super8 and 8mm.3. Use the film type switch in front of the film scanner to select film type. Then, press theOK/Enter button to record.2. After entering the adjustment interface, press the directional arrow buttons toadjust the margin and press the Plus or Minus button to zoom in or out.3. Once the desired settings are reached, press the OK/Enter to confirm.MAIN MENU: MENUSelect “Menu” in the main menu interface and press the OK/Enter button to enter the menu interface. In the menu interface, you should see the options: My Recordings, Rewind,NOTE: Use the dotted line to thread the negative for the rewind process.The film should be lifted out of the film slot so the gray pin doesn’t slow down the film. Fast Forward Function1. Press the Up or Down button to choose the “Fast Forward” option in the Menu.2. Press the OK/Enter button to enter the option.3. After entering, press the OK/Enter button according to the prompts.Language Section1. Select “Language” in the submenu and press the OK/Enter button to confirm.2. Use the directional arrow buttons to select a language and press the OK/Enter button to confirm your selection.Erase SD Card Section1. Press the Up or Down button to select “Erase SD Card” and then press the OK/Enter button to confirm.2. Select “No” and press OK/Enter button to go back to the previous screen.3. Select “Yes” and press OK/Enter button to clear files on the SD™ card.LIMITED WARRANTY TO ORIGINAL CONSUMERThis KODAK REELZ Film Digitizer (“Product”), including any accessories included in the original packaging, as supplied and distributed new by an authorized retailer is warranted by C&A Marketing, Inc. (the “Company”) to the original consumer purchaser only, against certain defects in material and workmanship (“Warranty”) as follows:To receive Warranty service, the original consumer purchaser must contact the Company or its authorized service provider for problem determination and service procedures. Proof of purchase in the form of a bill of sale or receipted invoice, evidencing that the Product is within the applicable Warranty period(s), MUST be presented to the Company or its authorized service provider in order to obtain the requested service.About Section1. Press the Up or Down button to select “About” and then press the OK/Enter button to view the website and version.2. Press the OK/Enter or Back button to exit from the screen.Service options, parts availability, and response times may vary and may change at any time.In accordance with applicable law, the Company may require that you furnish additional documents and/or comply with registration requirements before receiving warranty service. Please contact our customer service for details on obtaining warranty service:USA:*********************,844-516-1539International:*************************,+1-844-516-1540Shipping expenses to the Company’s Return Facility are not covered by this warranty, and must be paid by the consumer. The consumer likewise bears all risk of loss or further damage to the Product until delivery to said facility.EXCLUSIONS AND LIMITATIONS The Company warrants the Product against defects in materials and workmanship under normal use for a period of ONE (1) YEAR from the date of retail purchase by the original end-user purchaser (“Warranty Period”). If a hardware defect arises and a valid claim is received within the Warranty Period, the Company, at its sole option and to the extent permitted by law, will either (1) repair the Product defect at no charge, using new or refurbished replacement parts, (2) exchange the Product with a Product that is new or which has been manufactured from new or serviceable used parts and is at least functionally equivalent to the original device, or (3) refund the purchase price of the Product.A replacement Product or part thereof shall enjoy the warranty of the original Product forthe remainder of the Warranty Period, or ninety (90) days from the date of replacement or repair, whichever provides you longer protection. When a Product or part is exchanged, any replacement item becomes your property, while the replaced item becomes the Company’s property. Refunds can only be given if the original Product is returned.This Warranty does not apply to:(a) Any non-KODAK REELZ Film Digitizer product, hardware or software, even if packaged orsold with the Product;(b) Damage caused by use with non-KODAK REELZ Film Digitizer products;(c) Damage caused by accident, abuse, misuse, flood, fire, earthquake, or other external causes;(d) Damage caused by operating the Product outside the permitted or intended uses described by the Company;(e) Damage caused by third party services;(f) A Product or part that has been modified to alter functionality or capability without thewritten permission of the Company;(g) Consumable parts, such as batteries, fuses and bulbs;(h) Cosmetic damage; or(i) If any KODAK REELZ Film Digitizer serial number has been removed or defaced.This Warranty is valid only in the country where the consumer purchased the Product, and only applies to Products purchased and serviced in that country.The Company does not warrant that the operation of the Product will be uninterrupted or error-free. The Company is not responsible for damage arising from your failure to follow instructions relating to its use.NOTWITHSTANDING ANYTHING TO THE CONTRARY AND TO THE MAXIMUM EXTENT PERMITTED BY APPLICABLE LAW, THE COMPANY PROVIDES THE PRODUCT “AS-IS” AND“AS-AVAILABLE” FOR YOUR CONVENIENCE AND THE COMPANY AND ITS LICENSORS AND SUPPLIERS EXPRESSLY DISCLAIM ALL WARRANTIES AND CONDITIONS, WHETHER EXPRESSED,IMPLIED, OR STATUTORY, INCLUDING THE WARRANTIES OF MERCHANTABILITY, FITNESS FOR A PARTICULAR PURPOSE, TITLE, QUIET ENJOYMENT, ACCURACY, AND NON-INFRINGEMENT OF THIRD-PARTY RIGHTS. THE COMPANY DOES NOT GUARANTEE ANY SPECIFIC RESULTS FROM THE USE OF THE PRODUCT, OR THAT THE COMPANY WILL CONTINUE TO OFFER OR MAKE AVAILABLE THE PRODUCT FOR ANY PARTICULAR LENGTH OF TIME. THE COMPANY FURTHER DISCLAIMS ALL WARRANTIES AFTER THE EXPRESS WARRANTY PERIOD STATED ABOVE.YOU USE THE PRODUCT AT YOUR OWN DISCRETION AND RISK. YOU WILL BE SOLELY RESPONSIBLE FOR (AND THE COMPANY DISCLAIMS) ANY AND ALL LOSS, LIABILITY, OR DAMAGES RESULTING FROM YOUR USE OF THE PRODUCT.NO ADVICE OR INFORMATION, WHETHER ORAL OR WRITTEN, OBTAINED BY YOU FROMTHE COMPANY OR THROUGH ITS AUTHORIZED SERVICE PROVIDERS SHALL CREATE ANY WARRANTY.IN NO EVENT WILL THE COMPANY’S TOTAL CUMULATIVE LIABILITY ARISING FROM OR RELATED TO THE PRODUCT, WHETHER IN CONTRACT OR TORT OR OTHERWISE EXCEED THE FEES ACTUALLY PAID BY YOU TO THE COMPANY OR ANY OF ITS AUTHORIZED RESELLERS FOR THE PRODUCT AT ISSUE IN THE LAST YEAR FROM YOUR PURCHASE. THIS LIMITATION IS CUMULATIVE AND WILL NOT BE INCREASED BY THE EXISTENCE OF MORE THAN ONE INCIDENT OR CLAIM. THE COMPANY DISCLAIMS ALL LIABILITY OF ANY KINDOF ITS LICENSORS AND SUPPLIERS. IN NO EVENT WILL THE COMPANY OR ITS LICENSORS, MANUFACTURERS, AND SUPPLIERS BE LIABLE FOR ANY INCIDENTAL, DIRECT, INDIRECT, SPECIAL, PUNITIVE, OR CONSEQUENTIAL DAMAGES (SUCH AS, BUT NOT LIMITED TO, DAMAGES FOR LOSS OF PROFITS, BUSINESS, SAVINGS, DATA, OR RECORDS) CAUSED BY THE USE, MISUSE, OR INABILITY TO USE THE PRODUCT.Nothing in these terms shall attempt to exclude liability that cannot be excluded under applicable law. Some countries, states, or provinces do not allow the exclusion or limitation of incidental or consequential damages or allow limitations on warranties, so certain limitationsor exclusions may not apply to you. This warranty gives you specific legal rights, and you may have other rights that vary from state to state or province to province. Contact your authorized retailer to determine ifanother warranty applies.Kodak does NOT manufacture this Product or provide any Warranty or support.The Kodak trademark, logo, and trade dress are used under license from Eastman Kodak Company.MicroSD and SD are trademarks of SD-3C, LLC.Mac is a trademark of Apple Inc. in the U.S. and other countries.Windows is a trademark of Microsoft Corporation in the US and/or other countries.All other products, brand names, company names, and logos are trademarks of their respective owners,used merely to identify their respective products, and are not meant to connote any sponsorship, endorsement, or approval. Distributed by C&A Marketing, Inc., 114 Tived Lane East, Edison, NJ 08837 USA.© 2021. C&A IP Holdings LLC. All Rights Reserved. Made in China.。
HDIIJ-80KV 绝缘油介电强度测试仪操作手册说明书

HDIIJ-80KV绝缘油介电强度测试仪操作手册武汉华顶电力设备有限公司目录前言———————————————————————3概述———————————————————————4仪器特点——————————————————————4技术指标——————————————————————4使用条件——————————————————————5面板说明——————————————————————5操作步骤图解————————————————————7注意事项——————————————————————12简易故障排除————————————————————13油杯的清洗—————————————————————14仪器成套性—————————————————————14售后服务——————————————————————15前言尊敬的用户:感谢您选择了HDIIJ-80KV绝缘油介电强度测试仪!为方便您尽早尽快地熟练操作本仪器,我们特随机配备了内容详实的操作手册,从中您可以获取有关产品介绍、使用方法、仪器性能以及安全注意事项等诸多方面的信息。
在第一次使用仪器之前,请务必仔细阅读本操作手册,并按本手册对仪器进行操作和维护,这会有助于您更好的使用该产品,并且可以延长该仪器的使用寿命。
在编写本手册时,虽然我们本着科学和严谨的态度进行了工作,并认为本手册中所提供的信息是正确和可靠的。
然而,智者千虑必有一失,本手册也难免会有错误和疏漏之处。
如果您发现了手册中的错误,请务必于百忙之中抽时间,尽快设法告知我们,并烦请监督我们迅速改正错误!本公司全体职员将不胜感激!本公司保留对仪器使用功能进行改进的权力,如发现仪器在使用过程中其功能与操作手册介绍的不一致,请以仪器的实际功能为准。
我们希望本仪器能使您的工作变得轻松、愉快,愿您在繁忙的工作之中体会到办公自动化的轻松而美好的感觉!当您对本公司仪器感到满意时,请向您的朋友推荐!当您对本仪器有宝贵意见和建议时,请您一定要与我们联系,本公司定竭尽全力给您一个满意的答复。
高密度八线式接触器说明书

High-Speed Interconnect Solutions Rugged Electrical, Optical, and Hybrid Solutions for Mission-Critical Aerospace and Defense ApplicationsContacts and Insert Modules▪▪▪▪▪Our premier solution: Drop-in Size 8 octaxial contacts with outstanding high-speed signal integrity –now for both AWG#26 and AWG#24 wire! ▪▪▪▪▪▪▪Type I ▪▪▪Type II ▪▪▪Aerospace-grade wire for optimal protocol performance▪▪▪▪▪▪▪▪▪▪▪▪▪▪▪▪▪PlugReceptaclePlugReceptacleStraight Right Angle Straight Right AngleAdvanced-performance micro-miniature IAW D38999▪▪▪▪▪“Better than QPL” MIL -DTL-38999 high-speed solution ▪▪▪▪▪▪▪▪The next-generation mil-aero rectangular for high-speed datalink applicationsSingle-ended Point-to-point Ochito-to-COTSCircular and rectangular connector packagingThe faster ruggedized 4/8 pole interconnect system for Ethernet data applications▪▪▪▪▪Improved environmental sealing, grounding, and a broader range of wire termination options for RJ45 and USB —now for SuperSpeed 3.0▪▪▪▪DriveThru ▪▪▪▪▪▪▪Signature Twinax contact module optimized for high-bandwidth USB 3.1 gen 2, USB-C, SATA, PCIe, Display Port and HDMI▪▪▪▪▪▪▪▪▪Bypass high-loss board traces with low insertion loss / low latency jumpers▪▪▪Miniaturized Micro-D Connector / TwistPin contact solution with 10+ Gb/sec. performance per differential pair▪▪▪Smallest and lightest aerospace-grade high-speed connector solution▪▪▪Glenair mil-qualified 29504/4 and /5 termini ▪▪▪Nearly double the density of M28876 and D38999▪▪▪▪▪▪▪▪Unique terminus design for rapid integration ▪▪▪▪▪Ultra high-density, multiple termination (MT) commercial interconnect in a ruggedized mil-aero package ▪▪▪▪▪▪▪▪▪▪▪▪▪Heavy ion, proton, and gamma radiation tested devices (consult factory for exact tests and results)Absence of air in space requires cooling design changeFor high-speed signal/video applications such as Gigabit Ethernet, DVI, SMPTE 3G, HD-SDI etc.High-Speed Interconnect Solutions Rugged Electrical, Optical, and Hybrid Solutions for Mission-Critical Aerospace and Defense Applications。
- 1、下载文档前请自行甄别文档内容的完整性,平台不提供额外的编辑、内容补充、找答案等附加服务。
- 2、"仅部分预览"的文档,不可在线预览部分如存在完整性等问题,可反馈申请退款(可完整预览的文档不适用该条件!)。
- 3、如文档侵犯您的权益,请联系客服反馈,我们会尽快为您处理(人工客服工作时间:9:00-18:30)。
kv8产品说明书
篇一:KV8保洁智慧星
“KV8保洁智慧星”产品介绍
KV8保洁智慧星具有智能计算机系统、自动螺旋导航系统和21个感应头。
可以对房间做出测量,自动清洁房间的每个角落、记录您的理想设置,躲避墙壁、楼梯,即使您把放到桌子上面它也不会掉下来。
随机配备的虚拟墙发射器可发有效地阻止它进入您不想让它进入的地方。
它还配有大容量的垃圾箱。
超强活性炭可以净化室内空气,吸附有害物质,有效地提高空气质量。
超静音的吸尘箱和超强的吸附能力,可以轻松地清洁地面上的各种杂质。
它的粉尘净化率达到96%,而清扫效率更是高达100%。
圆牒式外观设计,可以使它轻松地钻到桌子下面,家具底下,沙发下面,清扫到您房间的每个角落。
总之,KV8保洁智慧星,具有操作简单,使用方便,智能,安全,清洁效果显著的特点。
功率:机器23W,充电器8W。
充电电池为镍铬的.外观材料ABS工程塑料。
虚拟发射器电源:二节一号D型电池或二节1.5V干电池(二节一号电池),用最大功率档(距离最远)72小时,如果每天工作1小时,可用6个月。
适用范围:家庭,办公室,电脑房,可以有效清扫各种木地板、水泥地板、瓷砖地板以及短毛地毯。
机器保修半年,
电池保修一年。
边扫毛刷变形,包装过程中的变形,要反方向扭一下即可。
特点与功能:
特点:省时省力、净化空气、低噪音、超强吸力、轻便小巧、舒适、安全。
功能:它具有智能计算机系统、自动螺旋导航系统、记忆系统、21个感应头。
扫地、吸尘、净化空气三大功能同步进行清洁。
与普通吸尘器的区别:
(1)省时、省力:整个清洁过程不需要人控制,减轻您操作负担,省下时间看电视、陪家人。
(2)低噪音:小于50分贝,清洁房间的过程免受噪音之苦。
(3)净化空气:内置活性碳、吸附空气中有害物质,粉尘净化率高达96%,清扫效率100%。
(4)轻便小巧:轻松打扫普通吸尘器清理不到的死角。
主要组成部分:
正面:红外接头、手柄、低电量指示、启动按键、垃圾盒。
背面:充电电池、边毛刷、吸尘箱、过滤网。
侧面:电源开关、充电接口。
使用方法:
充电:首次充电必须满8小时,整个充电时间约4小时,能用约1小时。
电池可循环使用800次,正常家庭可用约2年。
房间大小自行选择:小档,智慧星会在大约3英尺的直径范围内螺旋式的反复运动,重点对某一地方进行集中清洁,工作时间大约4分钟,此模式适用于房间局部脏污地面的清洁;中档,智慧星会自动在房间进行清扫,工作时间大约30分钟,此模式适用于面积较小的房间;大档智慧星会一直运行,直到电量全部耗尽为止,工作时间大约60分钟左右,如果使用了自动充电基座,智慧星会自动搜寻返回基座充电。
低电量指示灯发红光。
工作:机器人会按照不同的模式运行。
如果在机器工作途中把安提起,也会在三秒中后自动停机。
边扫、侧刷可更换。
虚拟墙发射器射出的红外线不会对宠物造成伤害,它射出的红外线所形成的虚拟墙体最多可达3.9米以上宽,有效距离(长)有三档,0-3米,3-7米,和7米以上。
潮湿、油渍、地上有能以打扫。
频繁开关机不会影响机器的使用寿命。
清洁机器:
1、每次用完机器,用干布清洗以下部位:垃圾盒;左、右轮;用手旋转底部中扫毛刷,将毛刷上的灰尘,清理干净;
清洁边扫毛刷,整形;打开吸尘盖板,清洁吸尘室和风机;前壳底部的4个感应头,要用干净的布,擦拭干净。
2、过滤网是纳米级过滤网,用水冲洗即可,洗后不要放在太阳低下晒,要放在阴凉处晾干。
3、一般用1个月左右,中扫毛刷要打开清理一下。
注意事项:
1、使用完后关闭电源,将虚拟墙发射器里的电池取出。
2、吸尘器在行走过程中,一些轻小的物体,诸如花瓶、小纸箱可能被碰倒,注意清扫前把此类物品移开。
3、使用虚拟墙发射器时,发射头不要对准人的眼睛。
4、吸尘器开机启动在一段音乐响过之后又马上关机,可以是电池电量不足,请及时充电。
5、智能吸尘器不能放在长毛地毯上行走,以防丝毛被卷入。
6、智能吸尘器所有可能经过的地方不能有丝状物品、电线、毛巾等。
防止被吸尘器吸入而缠绕住毛刷。
7、长时间不用,请将电池充满电,并取出电池放于阴凉干燥处。
篇二:3300kv8组合开关
篇三:KV8保洁智慧
KV8保洁智慧星厂家简介】
深圳市嘉宝燊商贸有
限公司是一家位于深圳特区内的民营企业,成立于1990年,于20XX年8月搬迁至深圳福田中心区后由金禧达电子有限公司和深圳市嘉威宝健康用品有限公司合并为深圳市嘉宝燊商贸有限公司。
公司主要以家用电器、家居用品、健康美容产品等高新技术产品为发展方向;以电视购物、传统渠道销售、特殊渠道销售、网络销售等为主要销售方式。
公司积极推行ISO9001国际质量体系,严格按照体系要求进行管理,具有独立高效的产品设计、开发、生产技术团队和管理队伍以及最尖端的销售团队。
由我司自主研发创新的KV8保洁机器人,具有智能计算机系统、记忆功能、自动导航系统、无尘袋透明灰尘盒设计等高科技术成份。
国家总理温家宝在20XX年第8届高新技术产品交易会上高度评价其为“高科技民用化的代表”,同时被誉为“深圳展团创新产品第一名”。
同年11月,在中国工博会上,kv8保洁机器人被权威期刊誉为“科技创新成果大放光芒”。
目前,该产品年生产能力可达40万台以上,且产品质量、价格、服务、种类等在国内外同类产品中占有绝对优势。
同时,嘉宝燊公司在家居用品、健康美容方面也颇有建树,其所开发多种产品均获得了极大的成功,诸如止鼾枕、美腿仪、美胸组合等等。
由于良好的产品质量、完善的售后服务以及诚信的市场操作等,Kv8产品成功的畅销法国、德国、日本,韩国、台湾、香
港等国家和地区,并一度引领国际家用电器的新潮流,倍受国内外用户的青睐。
此外,央视、浙江卫视、湖南卫视、江苏卫视、东南卫视等多家电视台均为我司的长期合作伙伴,kv8产品广告发布频率高,时效长,收视效果好,为产品销售提供强势推广。
嘉宝燊以质量、服务、创新为根本,团队为保证,并以品牌经营为追求的目标;以友善、团结、拼博的精神来面对客户与市场,并以最具竞争力的品质和服务竭诚为新老客户提供一个更为广阔的市场环境。
天高任鸟飞,海阔任鱼跃,我们一如既往的坚持我们的理念和方针,与新老客户一同迈向更加成功的明天!!!
【KV8保洁智慧/彩星与第三代智多星的区别】
请买家仔细看下哦....
这个是我们在进行两个机器在一起使用时候所检测得到的区别!
相对第三代的KV8智多星,智慧星保洁机器人有以下优点:
1:噪音更小,吸尘效果却更好,智多星厂家标出的工作噪音是50db,而很多买过智多星的客户都反应
实际工作噪音远远不止50db,而智慧星的实际工作噪音就真正达到了50db左右,而吸尘效果却更好了,粉尘净率真正达到96%以上,而颗粒清扫率达到100%
2:机器和充电基座的感应距离大大增加,之前很多客户反应他的房子比较大,机器跑到房子的一个角落没电后就找不到自动充电基座,最后要我们自己把他拎到基座附近才能自动充电,这样实际上都是半自动充电了,而第四代智慧星真正实现了全自动充电,不管您的房子是200平米还是400平米,都不可能出现这样的情况!
3:机身更薄,智慧星上面是突起来,很多时候我们需要清扫沙发或者床底的垃圾时,由于机身太后,进不了床底,而智慧星就没有这个问题,可以轻松钻到床底或者沙发底进行清扫.
4:质量更稳定,全新开发的电路主板解决了过去智多星可能出现的一切质量问题,更加防潮,防热,防冻,质量更稳定,全面杜绝因为潮湿,高温,极度严寒而造成的不稳定现象!
“KV8保洁智慧星”产品介绍
【KV8保洁智慧星-功率介绍】
机器23W,充电器8W。
.外观材料ABS工程塑料。
虚拟发射器电源:二节一号D型电池或二节1.5V干电池(二节一号电池),用最大功率档(距离最远)72小时,如果每天工作1小时,可用6个月。
【KV8保洁智慧星-实用范围】
家庭,办公室,电脑房,可以有效清扫各种木地板、水泥地板、瓷砖地板以及短毛地毯。
机器保修半年,电池保修
一年。
边扫毛刷变形,包装过程中的变形,要反方向扭一下即可。
【KV8保洁智慧星-特点与功能】
特点:省时省力、净化空气、低噪音、超强吸力、轻便小巧、舒适、安全。
功能:它具有智能计算机系统、自动螺旋导航系统、记忆系统、21个感应头。
扫地、吸尘、净化空气三大功能同步进行清洁。
【KV8保洁智慧星-与普通清洁机的区别】
(1)省时、省力:整个清洁过程不需要人控制,减轻您操作负担,省下时间看电视、陪家人。
(2)低噪音:小于50分贝,清洁房间的过程免受噪音之苦。
(3)净化空气:内置活性碳、吸附空气中有害物质,粉尘净化率高达96%,清扫效率100%。
(4)轻便小巧:轻松打扫普通吸尘器清理不到的死角。