STAR NX-600_说明书
Star-Max电热平台操作和安装说明书
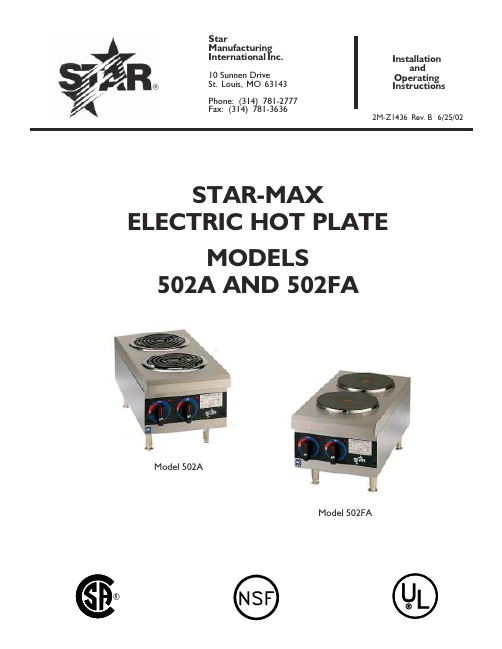
Star Manufacturing International Inc.10 Sunnen DriveS t. Louis, MO 63143Phone: (314) 781-2777Fax: (314) 781-3636Installation and Operating Instructions STAR-MAXELECTRIC HOT PLATEMODELS502A AND 502FA2M-Z1436 Rev. B 6/25/02Model 502AModel 502FASAFETY SYMBOLThis symbol is intended to alert the user to the presence of Arrayimportant operating and maintenance instructions in the manualaccompanying the appliance.RETAIN THIS MANUAL FOR FUTURE REFERENCENOTICEUsing any part other than genuine Star factory suppliedparts relieves the manufacturer of all liability.NOTICEStar reserves the right to change specifications and productdesign without notice. Such revisions do not entitle thebuyer to corresponding changes, improvements, additionsor replacements for previously purchased equipment.MAINTENANCE AND REPAIRSContact your local authorized service agent for service or required maintenance. Refer to the authorizedservice center listing provided with the unit. The Star Service Help Desk (1-800-807-9054) is available duringnormal business hours to answer any questions that may arise. Please have your model number and serialnumber for faster service.CAUTION CAUTIONThis equipment is designed and sold for commercialuse only by personnel trained and experienced in itsoperation and is not sold for consumer use in andaround the home nor for use directly by the generalpublic in food service locations. For equipment tobe used by the general public, please contact thefactory.The Star-Max models 502A and 502FA Electric HotPlates are equipped for the voltage indicated on thenameplate mounted on the front panel. This unit isdesigned to operate on alternating current (A.C.),two wire single phase service only. DO NOTCONNECT TO DIRECT CURRENT (D.C.).Total Connected Load502FA - at 240 Volts, Wattage is 5200.at 208 Volts, Wattage is 3900.502A - at 240 Volts, Wattage is 4200.at 208 Volts, Wattage is 3150.INSTALLATIONFor your protection, we recommend that aqualified electrician install this appliance. Theelectrician should be familiar with electricalinstallations and your local electrical requirements.The external wiring should be in conduit or anapproved type of flexible cable and of suitable sizeto carry the load. The supply circuit should beproperly fused and equipped with a means ofdisconnecting as required by local electrical code.The body of the hot plate should be grounded (Donot ground to a gas supply pipe). The connectionsare made in this unit at the pigtail leads located inthe junction box on the back of the unit. To gainaccess to the pigtail leads remove cover on junctionbox.LEVELING UNIT Level unit by adjusting the (4) feet for accurate and perfect line up with other Star-Max series units.CAUTION GENERAL OPERATING INSTRUCTIONSUSE ONLY FLAT BOTTOM PANS AND POTS! DO NOT USE RAISED BOTTOM UTENSILS OR BUCKETS! GOOD HEAT TRANSFER DEPENDS UPON GOOD CONTACT BETWEEN THE ELEMENT AND POT.Two (2) heating elements are used. For the 502FA each element draws 2600 watts on 240 Volts and 1950 watts on 208 Volts. For the 502A each element draws 2100 watts on 240 Volts and 1575watts on 208 Volts. Each element is controlled by an infinite position switch. The right control knob controls the rear cooking element and the left control knob controls the front cooking element.On "HI" the element delivers uninterrupted full heat. Between "LO" and "5" any desired amount of heat can be obtained between 6% and 60% of full heat.Signal lights are provided above the control knobs to give a visual check if either one or both heating units are turned on.OPERATING PROCEDURE DO NOT INSTALL WITHOUT FEET.LOCATE THE UNIT Do not install the unit closer than 1 inch from a side wall and/or closer than 1 inch from a rear wall.CLEANINGThe exterior surfaces can be kept clean and attractive by regularly wiping with a clean soft cloth. Any discoloration can be removed with a non-abrasive cleaner.For model 502A, the heating elements may be raised for access to the drip pans, which may be removed for cleaning and the bottom pan may be removed by sliding pan forward. REPLACEMENT OF INFINITE CONTROLBE SURE POWER IS DISCONNECTED BEFORE ATTEMPTING TO SERVICE UNIT.1.Pull control knobs on front panel forward toremove.2.Remove 4 screws from front panel and tiltfront panel forwards.3.Remove the nut that mounts the inoperativecontrol and pull the control to the side.4.Remove one wire at a time from theinoperative control and connect at the sameterminal on the new control. Carefully checkto see that proper wires have been connected to the terminals of the control. See attachedwiring diagram.5.Assemble new control to the front panel. MAINTENANCE AND REPAIRSContact the factory or one of its representatives or a local service company for service or maintenance if required.RETAIN THIS MANUAL FOR FUTURE REFERENCE Part No. 2M-Z1436 Rev. B 6/25/02Part# 2M-4497-2 01/02The foregoing warranty is in lieu of any and all other warranties expressed or implied and constitutes the entire warranty.FOR ASSISTANCEShould you need any assistance regarding the Operation or Maintenance of any Star equipment; write, phone, fax or email our Service Department.In all correspondence mention the Model number and the Serial number of your unit, and the voltage or type of gas you are using.ALL:* Pop-Up Toasters * Butter Dispensers * Pretzel Merchandisers * Pastry Display Cabinets * Nacho Chip Merchandisers * Accessories of any kind * Sneeze Guards * Pizza Ovens * Heat Lamps * Hot Cups * Pumps Visit our Website at: Email: **********************************************:(800) 807-9814THOROUGHLY INSPECT YOUR UNIT ON ARRIVALThis unit has been tested for proper operation before leaving our plant to insure delivery of your unit in perfect condition. However, there are instances in which the unit may be damaged in transit. In the event you discover any type of damage to your product upon receipt, you must immediately contact the transportation company who delivered the item to you and initiate your claim with same. If this procedure is not followed, it may affect the warranty status of the unit.LIMITED EQUIPMENT WARRANTYAll workmanship and material in Star products have a one (1) year limited warranty on parts & labor in the United States and Canada. Such warranty is limited to the original purchaser only and shall be effective from the date the equipment is placed in service. Star's obligation under this warranty is limited to the repair of defects without charge, by the factory authorized service agency or one of its sub-agencies. Models that are considered portable (see below)should be taken to the closest Star service agency, transportation prepaid.>Star will not assume any responsibility for loss of revenue.>On all shipments outside the United States and Canada, see International Warranty.*The warranty period for the JetStar series six (6) ounce popcorn machines is two (2) years.*The warranty period for the Chrome-Max Griddles is five (5) years on the griddle surface. See detailed warranty provided with unit.* The warranty period for Teflon/Dura-Tec coatings is one year under normal use and reasonable care. This warranty does not apply if damage occurs to Teflon/Dura-Tec coatings from improper cleaning, maintenance, use of metallic utensils, or abrasive cleaners. This warranty does not apply to the “non-stick” properties of such materials.>This warranty does not apply to "Special Products" but to regular catalog items only. Star's warranty on "Special Products" is six (6) months on parts and ninety (90) days on labor.>This warranty does not apply to any item that is disassembled or tampered with for any purpose other than repair by a Star Authorized Service Center or the Service Center's sub-agency.>This warranty does not apply if damage occurs from improper installation, misuse, wrong voltage, wrong gas or operated contrary to the Installation and Operating instructions.PARTS WARRANTYParts that are sold to repair out of warranty equipment are warranted for ninety (90) days. The part only is warranted. Labor to replace the part is chargeable to the customer.SERVICES NOT COVERED BY WARRANTYPORTABLE EQUIPMENTStar will not honor service bills that include travel time and mileage charges for servicing any products considered "Portable" including items listed below.These products should be taken to the Service Agency for repair:1.Travel time and mileage rendered beyond the 50 mile radius limit 2.Mileage and travel time on portable equipment (see below) 3.Labor to replace such items that can be replaced easily during a daily cleaning routine, ie; removable kettles on fryers, knobs, grease drawers on griddles, etc. 4.Installation of equipment 5.Damages due to improper installation 6.Damages from abuse or misuse 7.Operated contrary to the Operating and Installation Instructions 8.Cleaning of equipment 9.Seasoning of griddle plates10.Voltage conversions 11.Gas conversions 12.Pilot light adjustment 13.Miscellaneous adjustments 14.Thermostat calibration and by-pass adjustment 15.Resetting of circuit breakers or safety controls 16.Replacement of bulbs 17.Replacement of fuses 18.Repair of damage created during transit, delivery, &installation OR created by acts of God * The Model 510F Fryer.* The Model CFS Series Food Steamer.* The Model 526TO Toaster Oven.* The Model 526WO Warming Oven.* The Model J4R, 4 oz. Popcorn Machine.* The Model 518CM & 526CM Cheese Melter.* The Model 12NCPW & 15NCPW Nacho Chip/Popcorn Warmer.* All Hot Dog Equipment except Roller Grills & Drawer Bun Warmers.* All Nacho Cheese Warmers except Model 11WLA Series Nacho Cheese Warmers.* All Condiment Dispensers except the Model CSD Series Chili/Cheese Dispenser.* All Specialty Food Warmers except Model 130R, 500, 11RW Series, and 11WSA Series.March 18, 2009 RB W/Ceramic Block。
STARNX-600_说明书

l 连接电源插头 注意:一定要检查电源开关在 OFF 的位置
5
第一章 如何安装打印机
1-5 使用连续穿孔打印纸
l 装纸 1、将被打印的穿孔打印纸放置在打印机后面并应低于打印机
2、检查送纸调杆的位置,一定要在链式纸进纸位置(向上)
·工作台应平坦且有足够的空间 ·避免靠近热源 ·避免过度潮湿与灰尘过多 ·避免与电冰箱之类大功率或有干扰的电器用同一电源, 以保持电
源稳定 ·确保电源的电压值为 220V ·打印机应最好放置在接近插座的地方,便于使用 ·打印机在工作台上要留有足够的走纸空间 ·打印机并行接口连接电缆长度一般应在 2 米范围内。用串行接口
8
第一章 如何安装打印机
4、 在脱机状态按【装纸/退纸】键,打印机将自动退纸一页或打印纸退 至装纸位置。
I
目录
注意事项 ................................................................................................................................I 第一章 如何安装打印机 .....................................................................................................1
1-1 打印机放置环境的选择...........................................................................................1 1-2 打印机的开箱检查 ..................................................................................................1 1-3 打印机外型结构......................................................................................................2 1-4 安装打印机 .............................................................................................................3 1-5 使用连续穿孔打印纸...............................................................................................6 1-6 以平推方式使用单张纸或多层纸(前面板进纸)...................................................9 1-7 接口电缆连接........................................................................................................ 10 1-8 打印机纸厚调杆的设置......................................................................................... 11 第二章 打印机控制面板 ................................................................................................... 12 2-1 脱机状态下的面板功能操作:.............................................................................. 12 2-2 面板操作开机功能 ................................................................................................ 14 2-3 联机状态下的面板功能操作.................................................................................. 15 第三章 参数设置 .............................................................................................................. 16 3-1 如何设置参数........................................................................................................ 16 3-2 参数描述............................................................................................................... 18
STAR NX-6800使用说明书

中国民航信息网络 eTerm3 插件-T4 联打印 说明书

票样格式设置:用户可以选择 ICS(航空公司本票)格式、BSP 票格式或者 默认(由所输入票号来判断是 ICS 或是 BSP)格式。
16
注意事项: 插件文件和插件支持库文件必须都安装才能正常使用插件功能, 请大家务必全部 下载安装。
运行环境要求: 1.硬件要求 能够运行所需操作系统的机器,586 以上机型。 2.操作系统 支持 WIN98 第 2 版,WIN 2000,WIN XP,中英文均可。 强烈建议使用 WIN 2000,WIN XP。 3.IE 必须 IE5.5 以上。 4.打印机 通过测试的打印机型号如下: TI885/895、HDL-2000、RICH-PY6810、实达打印机、 EPSON 670K+,EPSON 670K+T(只适用于 EPSON 针对民航做了升级的打印机)。 正在测试的打印机型号: STAR NX-600。 5. Eterm3.061 以上版本,推荐 Eterm3.15 以上。
中国民航信息网络股份有限公司 2005 年 2 月
2
目
目
录
前言 ............................................................................................................................................... 2 录 ...................................................................................................................................... 3 一、电子客票_T4 联打印简介...................................................................................................... 4 二、手工建立与 ETERM3 的连接 .................................................................................................. 5 三、断开连接................................................................................................................................ 6 四、选择工作 SESSION .................................................................................................................. 7 五、创建 T4 联 ............................................................................................................................. 8 六、配置打印机 .......................................................................................................................... 10 6.1 打印 T4 联到自己的打印机 .............................................................................................. 10 6.2 打印 T4 联到其他人的打印机 ........................................................................................... 11 6.3 在插件中配置打印机选项(不可以用于打印 T4 联)..................................................... 14 七、打印 T4 联 ........................................................................................................................... 15 八、设置系统信息 ...................................................................................................................... 16
SAMSON 伺服 技术手册600

PROP R O D U C TS P E C I F I C A T I O N S H E E TA M P L I F I E R STYPE:POWER AMPLIFIERSPRODUCTDESCRIPTIONSERVO 600POWER AMPLIFIERSERIESCATEGORYSERVO 600AMPLIFIERSFRONT PANELBACK PANELGENERAL DESCRIPTIONThe Samson Servo 600 stereo power amplifier has been designed to provide robust, clean output with low distortion and wide dynamic range, along with the dependability demanded by the most professional audio engineers and installers.The convenient 2 rack-space design is compact, and yet there’s plenty of power available, with 2 x 225 Watts at 8Ω, 2 x 300 Watts at 4Ω over the full frequency spectrum, from 10 Hz to 55 kHz.For mono applications, a Bridge mode links both channels of the amplifiers, thus providing even more single channel power, with a power rating of 600 watts into an 8 Ohm load.Input connections are available for both unbalanced RCA connections and balanced 1/4-inch TRS connections. For the outputs, the Servo 600 amplifier provides standard 5-way binding posts and 1/4” phone jacks. Front-panel controls and displays include a power switch with LED indicator, as well as independent left and right channel input level controls. To help you set the correct operating levels, the Servo 600 amplifier includes front panel Signal, Peak and Protection LED indicators. There's also a ten-segment VU meter to help you set a good operating level.Like all serious power amplifiers, the Servo 600’s internal electronics are based around a serious power-core, with an over-sized toroidal transformer and large extruded heat sink. To keep the Servo 600 amplifierrunning cool, the design employs twin internal wind tunnels with forced-air cooling via two temperature-sensitive, variable speed fans, which greatly reduce the chance of thermal and overheating problems. Multi-stage protection for power-up, over-heating, over-current, short circuit, low outputimpedance and DC voltage, assures high reliability under the most demanding situations.The Servo 600 amp is road tough with its all steel chassis and 19-inch rack mount design. The Servo 600 amplifier is ready for a life on the road, or to make its home in a fixed installation.Optimized for live sound venues, houses of worship, commercial installations, and for driving small and medium-sized live PA systems, the Servo Series amplifiers will deliver reliable power from gig-to-gig, venue-to-venue and day-to-night.FEATURES> P ower to spare - 2 x 225 Watts at 8Ω, 2 x 300 Watts at 4Ω> F or mono applications, a Bridge mode links both channelsof the amplifiers, thus providing even more power, with a power rating of 600 watts driving an 8 Ohm load.> C lean, crisp sound - Impressive audio specifications suchas 0.04% THD, dynamic range of 105 dB, crosstalk of 80 dB, and frequency response of 10 Hz to 55 kHz guarantee ultra-clean sound quality.> I ndependent input level controls for each channel allowprecision adjustments.continues»©2006 Samson v1.0 5/06SERVO 600 PRODUCT SPECIFICATION SHEETSERIES DESCRIPTION CATEGORYSERVO 600POWER AMPLIFIER AMPLIFIERSARCHITECT’S & ENGINEER’S SPECIFICATIONSThe Samson Servo 600 shall be a two space, rackmount stereo power amplifier. It shall deliver 300 watts per channel at 4 Ohms or 600 watts into 8 Ohms in bridge mono mode. It shall have 1/4 inch balanced inputs and RCA unbalanced inputs. It shall be a bi-polar design and use a toroidal transformer. The front panel shall have volume controls and LED metering for each channel. The rear panel shall also have 5 way binding posts for the amplifier outputs.SERVO 600 SPECIFICATIONSStereo both channel driven8 Ohms ..............................225 Watts x 24 Ohms ..............................300 Watts x 2Bridged mono8 Ohms ..............................600 WattsSignal to Noise Ratio (20Hz-20k) ......104dBDistortion (SMPTE-IM) .....................0.04%Input sensitivity @8 Ohms ................1.24V(4dBu)Voltage Gain....................................34dBOutput Circuitry Class.......................ABAC Power@1/8 rated power 4 Ohms, max. .......1.3A@1/3 rated power 4 Ohms, max. .......3.3A@ rated power 4 Ohms, max. ............10ADistortion (typical @4 Ohms)20Hz-20kHz,10dBbelow rated power ...............0.03%IkHz,rated power .................0.1%Frequency Response@8 Ohms 1Watt, 20Hz-20kHz ..........0/-0.5dBDamping Factor (400Hz) (350)Input Impedance ..............................15k Ohm Unbalanced,30k Ohm BalancedInput Clipping ..................................10 Vrms(22dBu) Cooling...........................................C ontinuously variable speed,fan forced airConnectors (each channel)Input .................................R CA unbalanced and1/4”(6.3mm)TRS, balanced Output ...............................5-way Binding post and1/4” Phone Controls..........................................A C power switch, Channel 1and 2 volumeIndicators .......................................P ower on (blue), Protection(amber), Signal (green) foreach Ch., Peak(red) for eachCh. Level: , -24 dB, -20 dB,-16 dB, -12 dB, -8 dB, -4dB, -2 dB, O, +2 dB and+4 dB (PEAK). Protection.......................................S hort circuit, Thermal,Currentlimit,DC offset,Current inrush,RF protection, Turn on/Turnoff mutingPower Requirements.........................115/230,240VAC,50/60Hz Dimensions (W x H x D) ....................19” x 3.5” x 11.7”(483mm x 89mm x 297mm) Net Weight ......................................24 lbs (10.91 kg)FEATURES(continued)>10 segment LED signal indicators for each channel continuously display power output levels and allow you to correct for overloading (clipping) conditions.>U nique stable bipolar circuit design that continuously keeps DC output during idling at or near zero volts (thus keeping idle speakers at their zero point). This serves to minimize heat overload problems by effectively preventing the Servo 600 from applying power when unnecessary.>F orced air cooling via two temperature-sensitive, variable speed fans provides reliable performance without thermal and overheating problems.>P rotection relay circuitry (with dedicated LEDs for each channel) that guards against overheating or faulty wiring conditions and also prevents “thumps” when powering on or off. This means that you can use the Servo Series with a single power strip into which a mixer or other audio devices are connected, without danger of damage to connected speakers. >I nput connectors for each channel accommodate both RCA or balanced 1/4-inch TRS plugs.>O utput connections are made via 5-way binding posts.>T oroidal transformer power supply for high current and low profile. >T he Servo 600 can be mounted in any standard 19" rack (taking just two rack spaces), making it easy to integrate the amp into any fixed or traveling PA rig.>R ugged construction (an all-steel chassis with a cool gray finish and a lightweight anodized aluminum heat sink) makes the Servo 600 eminently roadworthy.>E xtended three-year warranty.。
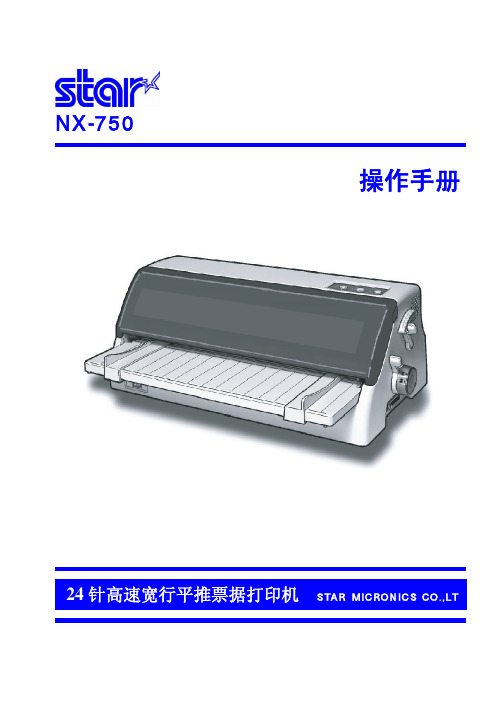
star nx-750针式打印机说明书
2、EDS-2 设置 ........................................................... 43
3、EDS-3 设置 ........................................................... 46
4、EDS-4 设置 ........................................................... 48
第2页
Star NX-750 打印机
操作手册
第一章 如何安装打印机
本章描述如何安装一台新的打印机,安装步骤如下: z 选择放置打印机环境 z 开箱检查打印机 z 打印机各部分名称 z 安装盒式色带 z 将打印机连到计算机上 如需用打印机可选附件,安装打印机后,请参考附表选件。
1-1 打印机放置环境的选择
2、使用点调整模式 ....................................................... 54
第五章 打印机控制码 ........................................................... 56
5-1 概述 .................................................................... 56
NX-750
操作手册
24 针高速宽行平推票据打印机 STAR MICRONICS CO.,LT
序言
承蒙惠顾,购得 STAR NX-750 打印机。在使用本机前,请详细阅读本用户 手册,以便能正确使用。并且请妥善保存软件光盘,万一不了解打印机的各项性 能或发生故障时,软件光盘会给您很大的帮助。
Ray star EP-600全自动咖啡机 说明书

AUTOMATIC COFFEE MACHINEEP-600 全自動咖啡機使用說明書MADE IN TAIWAN 本產品全球多國專利申請在案,抄襲必究。
保証台灣設計製造。
本機已獲歐盟GS 和台灣CNS 認証,品質保證。
EP-600全自動咖啡機說明書安全注意事項在使用本機前,請仔細閱讀下列事項及使用說明,閱後請妥善保存,以備將來參考:1﹒本機請勿置於雨中,濕氣中或避免陽光直射及其它會產生熱能的裝置的地方。
2.本機器不得浸水清洗。
3.若電源線損壞時,必須由製造廠商或其服務處或具有相關資格的人員加以更換以避免危險。
4.本機請勿太靠近電視、電腦、錄影機及手機,以免受干擾,產生誤動作。
5.長期不使用本機時,需將電源插頭從插座拔除。
6.請勿將雜物或液體從機體開口處或縫隙倒入。
7.請勿擅自拆下機殼進行任何調校,以免損壞機器。
8.當本機出現如下狀況時,請交由本公司專業人員進行維修:A :故障或雜物、液體落入本機內。
B :受到雨淋。
C :無法正常操作或出現明顯變化。
D :不慎跌落或外殼受損。
9.使用蒸汽時,蒸汽管溫度很高,請勿以手碰觸,注意燙傷。
10.本機僅限用於原製造目的之使用範圍, 任何原因在本機上的修改以及不當的使用都是不被允許的。
11‧本機的專利申請在案,抄襲必究。
12‧電壓僅可使用110V/60HZ。
13‧本機僅限成人操作,絕對禁止小孩玩弄,以避免發生危險.外型及各部位名稱1.水箱蓋 2.晾杯盤 3.儲豆槽蓋 4.儲豆槽 5.控制面板 6.蒸汽開關旋鈕7.咖啡流道 8.滴水盤蓋 9.滴水盤 10.側蓋 11.蒸汽管 12.混奶管1 3 ‧進豆比例調整鈕 1 4 ‧粉末調整鈕 1 5 ‧水箱控制面板1.電源開關按鍵 6.電源指示燈2.煮咖啡鍵 7.煮咖啡燈 ( 小杯 )3.濃淡調整鍵 ( 大杯 ) 8.濃淡切換燈4.蒸汽/熱水 切換鍵 9.蒸汽/熱水 燈5.清洗鍵 10.清洗燈第一次使用新機第一次使用﹐先以乾淨布擦拭外殼,並確認電源線完好無破損。
600系列说明书

600系列三相电力仪表(版本号:4.00)使用说明书(使用前请详细阅读此说明书)目录1、简述 (1)1.1 600的功能 (1)1.2 600功能描述 (1)1.3 600的特点 (1)2、安装、接线与配置 (2)2.1 尺寸与安装 (2)2.2 接线与配置 (3)3、界面显示说明 (5)3.1 显示模式下按键功能示意图 (5)3.2 编程模式下参数查询及修改按键功能示意图 (5)3.3 显示模式下功能显示灯指示说明 (6)4、操作说明 (6)4.1 循环显示说明 (6)4.2 键盘编程说明 (6)4.3 功能设置 (6)5、运输与贮藏 (7)6、保修期限及订货说明 (7)附表:常见故障排除 (8)1、简述1.1 600系列的功能600系列三相电力仪表是用于低压电力系统的智能化装置,该系列产品包括电流表、电压表、有功功率表、无功功率表、功率因数表、电度表等适合用户不同应用需求的仪表产品,该系列仪表可以完全替各种代指针式电力仪表,且精确度更好、性能更加稳定。
600系列三相电力仪表具有选配4路开关量输入、2路脉冲输出、RS485通讯接口,通讯协议为MODBUS通讯协议或其它指定通讯协议。
1.2 600系列功能描述1.2.2 通讯功能(扩展功能)600系列产品均可选配RS485通讯接口,通讯协议为MODBUS通讯协议或其它指定通讯协议。
可通过通讯口,可查询全部的测量监控信息。
面板带有带有LED指示灯,用于通讯收/发指示。
1.2.3 1~4路开关量输入功能(扩展功能)600系列产品均可选配1~4路开关量输入,为无源节点输入。
可在测量显示区查看开关量的状态。
1.2.4 模拟量输出功能(扩展功能)600系列部分产品可选配1~2路DC4~20mA,通过编程设置可将模拟量(DC 4-20mA)输出设置为与某一被测参数(定货时需指定)成比例的输出。
模拟量输出的最大负载为300Ω,可选择项为三相电流表的IA、IB、IC,三相电压表的UA、UB、UC。
- 1、下载文档前请自行甄别文档内容的完整性,平台不提供额外的编辑、内容补充、找答案等附加服务。
- 2、"仅部分预览"的文档,不可在线预览部分如存在完整性等问题,可反馈申请退款(可完整预览的文档不适用该条件!)。
- 3、如文档侵犯您的权益,请联系客服反馈,我们会尽快为您处理(人工客服工作时间:9:00-18:30)。
1-2 打印机的开箱检查
打开纸箱,对照图 1-1 检查箱内部件是否齐全(应有 9 件)。 a.打印机 b.旋钮 c.盒式色带
1
第一章 如何安装打印机
d.保修卡,维修商名录,合格证 e.软件光盘(含操作手册及驱动) f.电源线,USB 线
1-3 打印机外型结构
2
第一章 如何安装打印机
导纸板:可左右移动,调整单张纸进纸时的左右边界。 进纸板:单张进纸时使用 送纸调杆:用链式进纸时向上,用单张平推进纸时向下。 面盖:打印时必须盖好以降低打印时噪音。 控制面板:对打印机进行各种操作。 送纸旋钮:手动进行进退打印纸。 接口:连接计算机电缆插座。 色带盒:内装打印色带。 间距调杆:调整打印头和打印纸间的距离,以配合纸张厚度。
3-2-1 系统参数设置 ............................................................................................. 18 3-2-2 仿真参数设置 ............................................................................................. 20 3-2-3 纵向校正参数设置...................................................................................... 22 3-2-4 恢复出厂设置 .............................................................................................. 22 第四章 打印字体说明....................................................................................................... 23 4-1 前言 ...................................................................................................................... 23 4-2 术语说明............................................................................................................... 23 第五章 故障及保养........................................................................................................... 28 5-1 故障与处理 ............................................................................................................ 28 5-2 保养与维护 ........................................................................................................... 32
7、锁定锁杆位置
8、打开打印机电源开关,打印机会发出鸣响,指示没有装入打印纸, 缺纸灯亮起。
9、现在按【装纸/退纸】键,打印纸会自动装入至打印起始位置。(如 果你要设置不同的起始位置请参阅第四章) l 自动撕纸位和退纸
1、 电源应在 ON 位置,送纸调杆应在链式纸位置。 2、 在联机状态按【装纸/退纸】键,打印机将自动走纸到撕纸位置。 3、 撕去打印过的纸。再有打印命令接受时,打印纸将先退回到正常打 印位置再进行打印。
8
第一章 如何安装打印机
4、 在脱机状态按【装纸/退纸】键,打印机将自动退纸一页或打印纸退 至装纸位置。
1-1 打印机放置环境的选择...........................................................................................1 1-2 打印机的开箱检查 ..................................................................................................1 1-3 打印机外型结构......................................................................................................2 1-4 安装打印机 .............................................................................................................3 1-5 使用连续穿孔打印纸...............................................................................................6 1-6 以平推方式使用单张纸或多层纸(前面板进纸)...................................................9 1-7 接口电缆连接........................................................................................................ 10 1-8 打印机纸厚调杆的设置......................................................................................... 11 第二章 打印机控制面板 ................................................................................................... 12 2-1 脱机状态下的面板功能操作:.............................................................................. 12 2-2 面板操作开机功能 ................................................................................................ 14 2-3 联机状态下的面板功能操作.................................................................................. 15 第三章 参数设置 .............................................................................................................. 16 3-1 如何设置参数........................................................................................................ 16 3-2 参数描述............................................................................................................... 18
Star NX-600 打印机
操作手册
24 针 高速平推票据打印机
Star NX-600 打印机
注意事项
为了避免受到电击和伤害及防止损坏打印机,在接上电源之前,务请注意以下重要事项: l 请仔细阅读有关操作手册。 l 确保输入正确工作交流电压。 l 打印机必须平放在固定的台面上。 l 打印机应放置在走纸空间足够的地方。 l 防止及避免震动、碰撞、高温和阳光直射等。 l 避免灰尘过多的地方。 l 勿将打印机置于潮湿的环境中,勿让任何液体和雨水沾湿打印机。 l 请勿接触打印头外壳以防止高温伤害。 l 接上稳定电源,避免与电冰箱之类大功率或有干扰的电器同一电源。 l 关掉打印机后才能拔掉插头,打印机应最好放置在接近插座的地方,便于使用。 l 如果用打印机并行接口连接,确保其电缆长度在 2 米(6 英尺)范围内。用串行接
1-4 安装打印机
l 清除打印机包装固定物(包装物品用于打印机运输)
l 安装送纸旋钮
3
第一章 如何安装打印机
l 安装色带盒 1、 先把面盖揭起
2、将打印头移至中央缺口处
3、 安装色带盒在字车座上并卡紧,注意色带应夹在打印头和打印头保
4
第一章 如何安装打印机
护片中间,并顺时针转动色带盒上旋钮三圈,以保证色带拉紧。
第一章 如何安装打印机
第一章 如何安装打印机
本章描述如何安装一台新的打印机,步骤如下: ·选择放置打印机环境 ·开箱 ·安装送纸旋钮 ·安装盒式色带 ·安装打印纸 ·将打印机联到计算机上
如果需用打印机可选附件,安装打印机后,请参考附表选件。
1-1 打印机放置环境的选择
在开箱安装打印机之前,首先要选择一个合适的环境放置打印机。此环境 应满足以下要求:
·工作台应平坦且有足够的空间 ·避免靠近热源 ·避免过度潮湿与灰尘过多 ·避免与电冰箱之类大功率或有干扰的电器用同一电源, 以保持电
源稳定 ·确保电源的电压值为 220V ·打印机应最好放置在接近插座的地方,便于使用 ·打印机在工作台上要留有足够的走纸空间 ·打印机并行接口连接电缆长度一般应在 2 米范围内。用串行接口