android arraylist用法
android listview的用法

android listview的用法
Android中的ListView是一种可以显示垂直列表的滚动控件。
它为用户提供了一种可以浏览许多项目,而无需滚动屏幕的便捷方式。
ListView通常用来显示一组有序的数据,这些数据可以是文本,图像,或者其他任意形式的内容。
ListView可以包含任意数量的项目,而不会对屏幕上的性能造成影响。
使用ListView时,必须将它与ArrayAdapter(或其他类型的适配器)结合起来,这样ListView才能正确地显示数据。
ArrayAdapter可以将数据转换为ListView可以显示的格式。
要实现ListView,首先要在布局文件中定义ListView,然后在Activity中初始化ListView,并将ArrayAdapter与ListView绑定。
最后,可以为ListView 注册一个OnItemClickListener监听器,用于处理项目被单击时发生的事件。
arraylist操作方法

arraylist操作方法一、ArrayList的基本概念。
1.1 ArrayList就像是一个超级灵活的容器。
它可以装各种各样的东西,就像你有个魔法口袋一样。
在Java里,它是用来存储一组对象的。
比如说,你想把一群学生的信息存起来,每个学生的信息就是一个对象,那就可以放到ArrayList里。
1.2 它的大小是可变的。
这可太方便了,不像有些数组,一旦定下来大小就不能轻易改变。
就好比你盖房子,ArrayList这个房子可以根据你东西的多少随时扩建或者缩小,不会让你因为东西多了没地方放而抓耳挠腮。
二、ArrayList的操作方法。
2.1 添加元素。
2.1.1 可以使用add方法来添加元素。
这就像是往你的购物袋里放东西一样简单。
比如说,你有一个ArrayList用来存水果名字,你想加入“苹果”这个元素,那就直接调用add方法把“苹果”放进去就好了。
这是最基本的操作,就像走路先迈左脚一样基础。
2.1.2 还可以在指定位置添加元素。
这就有点像插队了,不过在程序里是合理的。
你可以指定在某个已经存在的元素前面或者后面插入新元素。
比如在水果列表里,你想把“香蕉”插到“苹果”后面,就可以通过指定位置来做到。
这时候你得清楚位置信息,不然就可能乱套了,就像排队你要是插错位置,那可就不地道了。
2.2 获取元素。
2.2.1 要获取ArrayList里的元素,可以使用get方法。
这就好比你在一个装满宝藏的箱子里找特定的宝贝。
你告诉它你要第几个宝贝,它就会把那个元素给你。
但是要小心,如果你要的位置不存在,那就会出问题,就像你去一个没有那个东西的地方找东西,那肯定是竹篮打水一场空。
2.2.2 如果想遍历获取所有元素,有多种方法。
你可以用for循环,一个一个地把元素拿出来,这就像你一个一个地检查你的收藏品一样。
还有一种高级一点的方法是使用迭代器,就像有个小助手帮你把元素一个个拿出来展示。
不过对于初学者来说,for循环就像老朋友一样可靠,容易理解。
Arraylist基本用法

Book book2 = new Book();
Book book3 = new Book();
books.add(book1);
books.add(book2);
books.add(book3);
添加在指定索引处
例:
// 虽然加book1后直接加book3了,但book2是被加在索引1的地方
原方法:
if (books.isEmpty()) {
}
直接判断大小:
if (books.size() == 0) {
}
7、判断ArrayList中是否已经存在了某对象
例:
// 判断是否已经存在book2对象
if (books.contains(book2)) { // 已经存在
while (iter.hasNext()) {
Book book = iter.next();
System.out.println(book.getName());
}
5、移除元素
移除指定索引处的元素
例:
books.remove(0); // 移除book1
books.remove(1); // 移除book2
例:
for (int i = 0; i < books.size(); i++ {
Book newBook = books.get(i);
// 不带泛形的注意要转型
Book book = (Book) books.get(i);
System.out.println(book.getName());
Android ListView控件基本用法
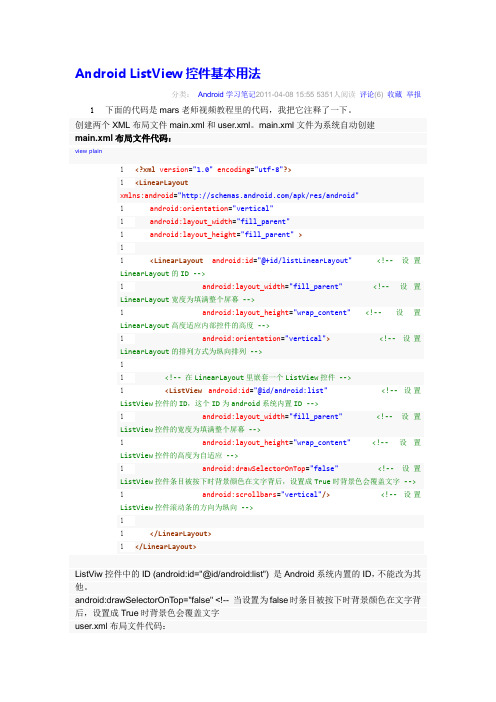
Android ListView控件基本用法分类:Android学习笔记2011-04-08 15:55 5351人阅读评论(6) 收藏举报1下面的代码是mars老师视频教程里的代码,我把它注释了一下。
创建两个XML布局文件main.xml和user.xml。
main.xml文件为系统自动创建main.xml布局文件代码:view plain1<?xml version="1.0"encoding="utf-8"?>1<LinearLayoutxmlns:android="/apk/res/android"1android:orientation="vertical"1android:layout_width="fill_parent"1android:layout_height="fill_parent">11<LinearLayout android:id="@+id/listLinearLayout"<!-- 设置LinearLayout的ID -->1android:layout_width="fill_parent"<!-- 设置LinearLayout宽度为填满整个屏幕 -->1android:layout_height="wrap_content"<!-- 设置LinearLayout高度适应内部控件的高度 -->1android:orientation="vertical"><!-- 设置LinearLayout的排列方式为纵向排列 -->11<!-- 在LinearLayout里嵌套一个ListView控件 -->1<ListView android:id="@id/android:list"<!-- 设置ListView控件的ID,这个ID为android系统内置ID -->1android:layout_width="fill_parent"<!-- 设置ListView控件的宽度为填满整个屏幕 -->1android:layout_height="wrap_content"<!-- 设置ListView控件的高度为自适应 -->1android:drawSelectorOnTop="false"<!-- 设置ListView控件条目被按下时背景颜色在文字背后,设置成True时背景色会覆盖文字 -->1android:scrollbars="vertical"/><!-- 设置ListView控件滚动条的方向为纵向 -->11</LinearLayout>1</LinearLayout>ListViw控件中的ID (android:id="@id/android:list") 是Android系统内置的ID,不能改为其他。
7.2.1-1ArrayList集合类及常用方法

ArrayList集合类及常用方法
ArrayList集合类 ArrayList 类的常用构造方法有两种重载形式
方法
ArrayList()
ArrayList(Collection<?extends E>c)
解析
构造一个初始容量为 10 的空列表
构造一个包含指定 Collection 元法
ArrayList 集合类及常用方法
目录
Contents
1.ArrayList集合类及常用方法
重载形式 常用方法
2.案例:ArrayList使用 3.任务:编写程序 4.总结
01
ArrayList集合类
ArrayList集合类及常用方法
ArrayList集合类
该类也是实现了List的接口,实现了可变大小的数组,随机访问和遍历元素时, 提供更好的性能。是一个动态数组,其容量能自动增长。
ArrayList常用方法
E set(int index, Eelement):修改指定索引位置的元素修改为 element 参 数指定的对象。
List<E> subList(int fromlndex, int tolndex):返回新的集合,新集合中 包含 fromlndex 和 tolndex 索引之间的所有元素。
感谢聆听
THANK
S
石家庄科技工程职业学院软件技术专业群教学资源库
ArrayList常用方法
E get(int index):获取指定索引位置的元素; int index(Object o):返回集合中第一次出现指定元素的索引,不包含则返
-1; int lastIndexOf(Object o):返回集合中最后一次出现指定元素的索引,不
Android控件之ListView用法实例详解

Android控件之ListView⽤法实例详解本⽂实例讲述了Android控件之ListView⽤法。
分享给⼤家供⼤家参考。
具体如下:⽰例⼀:在android开发中ListView是⽐较常⽤的组件,它以列表的形式展⽰具体内容,并且能够根据数据的长度⾃适应显⽰。
main.xml布局⽂件:<?xml version="1.0" encoding="utf-8"?><LinearLayout android:id="@+id/LinearLayout01"android:layout_width="fill_parent" android:layout_height="fill_parent"xmlns:android="/apk/res/android"><ListView android:layout_width="wrap_content"android:layout_height="wrap_content"android:id="@+id/MyListView"></ListView></LinearLayout>my_listitem.xml布局⽂件:<?xml version="1.0" encoding="utf-8"?><LinearLayout android:layout_width="fill_parent"xmlns:android="/apk/res/android"android:orientation="vertical"android:layout_height="wrap_content"android:id="@+id/myListItem"android:paddingBottom="3dip"android:paddingLeft="10dip"><TextView android:layout_height="wrap_content"android:layout_width="fill_parent"android:id="@+id/itemTitle"android:textSize="20dip"></TextView><TextView android:layout_height="wrap_content"android:layout_width="fill_parent"android:id="@+id/itemText"></TextView></LinearLayout>LsActivity类:package com.ljq.ls;import java.util.ArrayList;import java.util.HashMap;import java.util.List;import android.app.Activity;import android.os.Bundle;import android.widget.ListView;import android.widget.SimpleAdapter;public class LsActivity extends Activity {private ListView list = null;public void onCreate(Bundle savedInstanceState) {super.onCreate(savedInstanceState);setContentView(yout.main);list = (ListView) findViewById(R.id.MyListView);//组织数据源List<HashMap<String, String>> mylist = new ArrayList<HashMap<String, String>>();for(int i=0;i<10;i++) {HashMap<String, String> map = new HashMap<String, String>();map.put("itemTitle", "This is Title");map.put("itemText", "This is text");mylist.add(map);}//配置适配器SimpleAdapter adapter = new SimpleAdapter(this,mylist,//数据源yout.my_listitem,//显⽰布局new String[] {"itemTitle", "itemText"}, //数据源的属性字段new int[] {R.id.itemTitle,R.id.itemText}); //布局⾥的控件id//添加并且显⽰list.setAdapter(adapter);}}运⾏结果如下图所⽰:⽰例⼆:⽬录结构main.xml布局⽂件:<?xml version="1.0" encoding="utf-8"?><!-- 使⽤相对布局 --><RelativeLayoutxmlns:android="/apk/res/android" android:orientation="vertical"android:layout_width="wrap_content"android:layout_height="wrap_content"><TextView android:layout_width="100dip"android:layout_height="wrap_content"android:layout_marginLeft="30dip"android:textSize="20dip"android:id="@+id/id"/><TextView android:layout_width="100dip"android:layout_height="wrap_content"android:layout_alignTop="@id/id"android:layout_toRightOf="@id/id"android:textSize="20dip"android:id="@+id/name"/><TextView android:layout_width="wrap_content"android:layout_height="wrap_content"android:layout_alignTop="@id/name"android:layout_toRightOf="@id/name"android:textSize="20dip"android:id="@+id/age"/></RelativeLayout>实体JavaBean:package com.ljq.domain;public class Person {private String id;private String name;private String age;public Person() {super();}public Person(String id, String name, String age) {super();this.id = id; = name;this.age = age;}public String getId() {return id;}public void setId(String id) {this.id = id;}public String getName() {return name;}public void setName(String name) { = name;}public String getAge() {return age;}public void setAge(String age) {this.age = age;}}⾃定义适配器PersonAdapterpackage com.ljq.ls;import java.util.List;import com.ljq.domain.Person;import android.content.Context;import youtInflater;import android.view.View;import android.view.ViewGroup;import android.widget.ArrayAdapter;import android.widget.TextView;/*** ListView加载adapter的过程** 1、先判断adapter有多少数据项,根据这个数据确定有多少个item** 2、确定每个item⾥加载哪个view** 3、在view⾥加载要显⽰的数据** @author jiqinlin**/public class PersonAdapter extends ArrayAdapter{private LayoutInflater layoutInflater = null;private List<Person> persons;public PersonAdapter(Context context, int textViewResourceId, List objects) {super(context, textViewResourceId, objects);layoutInflater = LayoutInflater.from(context);persons = objects;}/*** 获取adapter⾥有多少个数据项*/@Overridepublic int getCount() {return persons.size();}@Overridepublic Object getItem(int position) {return persons.get(position);}@Overridepublic long getItemId(int position) {return position;}/*** 创建显⽰的数据界⾯** Adapter的作⽤就是ListView界⾯与数据之间的桥梁,* 当列表⾥的每⼀项显⽰到页⾯时,都会调⽤Adapter的getView⽅法返回⼀个View。
arraylist和linkedlist的方法

arraylist和linkedlist的方法arraylist和linkedlist是两种常见的数据结构,它们都实现了List接口,但是它们的实现方式和性能特点却有所不同。
下面是它们常用的方法介绍:1. add(E e):在列表尾部添加元素e。
arraylist:O(1)linkedlist:O(1)2. add(int index, E element):在指定位置添加元素element。
arraylist:O(n),需要将index后的元素都向后移动一位。
linkedlist:O(1),可以直接通过前驱节点和后继节点改变节点的指向。
3. remove(Object o):从列表中移除指定元素o。
arraylist:O(n),需要遍历整个列表找到o。
linkedlist:O(n),需要遍历整个列表找到o的节点,并改变前驱节点和后继节点的指向。
4. remove(int index):移除指定位置的元素。
arraylist:O(n),需要将index后的元素都向前移动一位。
linkedlist:O(n),需要遍历整个列表找到index的节点,并改变前驱节点和后继节点的指向。
5. get(int index):获取指定位置的元素。
arraylist:O(1),可以直接通过下标获取元素。
linkedlist:O(n),需要遍历整个列表找到index的节点。
6. size():返回列表元素个数。
arraylist:O(1),可以直接获取列表大小。
linkedlist:O(1),维护了列表大小的变量。
7. clear():清空列表所有元素。
arraylist:O(n),需要遍历整个列表将元素都清空。
linkedlist:O(1),可以直接将头节点和尾节点的指向置为null。
综上所述,arraylist在随机访问元素方面性能更优,而linkedlist在插入和删除元素方面性能更优。
根据具体应用场景选择不同的数据结构可以提高程序的效率。
Android控件ListView使用方法详解

Android控件ListView使⽤⽅法详解Android控件ListView使⽤⽅法介绍,具体如下⼀、ListView的简单⽤法⾸先新建⼀个ListViewTest项⽬,并让Android Studio⾃动创建好活动。
然后修改activity_main.xml中的代码,如下:<?xml version="1.0" encoding="utf-8"?><LinearLayout xmlns:android="/apk/res/android"android:layout_width="match_parent"android:layout_height="match_parent"><ListViewandroid:id="@+id/list_view"android:layout_width="match_parent"android:layout_height="match_parent"></ListView></LinearLayout>接下来修改MainActivity中的代码:public class MainActivity extends AppCompatActivity {private String[] data={"Apple","Banana","Orange","Watermelon","Pear","Grape","Pineapple","Strawberry","Cherry","Mango","Apple","Banana","Orange","Watermelon","Pear","Grape","Pineapple","Strawberry","Cherry","Mango"}; @Overrideprotected void onCreate(Bundle savedInstanceState) {super.onCreate(savedInstanceState);setContentView(yout.activity_main);ArrayAdapter<String> adapter=new ArrayAdapter<String>(MainActivity.this,yout.simple_list_item_1,data);ListView listview=(ListView)findViewById(R.id.list_view);listview.setAdapter(adapter);}}数组中的数据⽆法直接传递给ListView,需要借助适配器来实现。
- 1、下载文档前请自行甄别文档内容的完整性,平台不提供额外的编辑、内容补充、找答案等附加服务。
- 2、"仅部分预览"的文档,不可在线预览部分如存在完整性等问题,可反馈申请退款(可完整预览的文档不适用该条件!)。
- 3、如文档侵犯您的权益,请联系客服反馈,我们会尽快为您处理(人工客服工作时间:9:00-18:30)。
android arraylist用法
- Android ArrayList是什么?
Android ArrayList是一种常见的数据结构,它是一个动态数组,可以存储任何类型的数据。
在Android开发中,ArrayList通常用来存储和管理数据集合,比如列表数据、图片资源等。
- 如何创建ArrayList?
创建ArrayList非常简单,只需要使用以下代码即可:
```
ArrayList<String> list = new ArrayList<>();
```
其中,`String`是ArrayList中存储的数据类型,你可以根据需要替换为其他类型。
- 如何向ArrayList中添加元素?
向ArrayList中添加元素也非常简单,只需要使用以下代码即可:```
list.add("item1");
list.add("item2");
```
其中,`add()`方法用于向ArrayList中添加元素,你可以添加任意多个元素。
- 如何获取ArrayList中的元素?
获取ArrayList中的元素也非常简单,只需要使用以下代码即可:```
String item = list.get(0);
```
其中,`get()`方法用于获取指定位置的元素,索引从0开始。
- 如何遍历ArrayList中的元素?
遍历ArrayList中的元素也非常简单,只需要使用以下代码即可:
for (String item : list) {
// do something with item
}
```
其中,`for`循环用于遍历ArrayList中的所有元素,每次循环将一个元素赋值给`item`变量。
- 如何从ArrayList中删除元素?
从ArrayList中删除元素也非常简单,只需要使用以下代码即可:```
list.remove(0);
```
其中,`remove()`方法用于删除指定位置的元素,索引从0开始。
- 如何判断ArrayList是否为空?
判断ArrayList是否为空也非常简单,只需要使用以下代码即可:```
if (list.isEmpty()) {
// list is empty
} else {
// list is not empty
}
```
其中,`isEmpty()`方法用于判断ArrayList是否为空。
- 如何获取ArrayList的大小?
获取ArrayList的大小也非常简单,只需要使用以下代码即可:```
int size = list.size();
```
其中,`size()`方法用于获取ArrayList的大小,即元素的个数。
- 如何将ArrayList转换为数组?
将ArrayList转换为数组也非常简单,只需要使用以下代码即可:
String[] array = list.toArray(new String[list.size()]);
```
其中,`toArray()`方法用于将ArrayList转换为数组,你需要传入一个类型相同的空数组作为参数。
- 如何将数组转换为ArrayList?
将数组转换为ArrayList也非常简单,只需要使用以下代码即可:```
ArrayList<String> list = new
ArrayList<>(Arrays.asList(array));
```
其中,`Arrays.asList()`方法用于将数组转换为List,然后使用ArrayList的构造方法将List转换为ArrayList。