实验5 linux内核的裁剪移植
Linux内核裁剪移植——内核的主要组成部分

接口。 虚拟文件系统隐藏了不同类型硬件的具体细节,为所有的硬件设备提供了一个标准的接口,
VFS提供了十多种不同类型的文件系统。
Linux内核裁剪移植——内核的主要组成部分 5
网络接口提供了对各种网络标准的存取和各种网络硬件的支持。 进程通信部分用于支持进程间各种不同的通信机制。 进程调度处于核心位置,内核的其他子系统都要依赖它,因为每个子系统都存在进程挂起或恢
Linux内核裁剪移植 ——内核的主要组成部分
Linux内核裁剪移植——内核的主要组成部分 2
内核,即操作系统。它为底层的可编程部件提供服务,为上层应用程序提供执行环境。 内核裁剪就是对这些功能进行裁剪,选取满足特定平台和需求的功能。不同的硬件平台对内核
要求也不同,因此从一个平台到另一个平台需要对内核进行重新配置和编译。 操作系统从一个平台过渡到另一个平台称为移植。 Linux是一款平台适应性且容易裁剪的操作系统,因此Linux在嵌入式系统得到了广泛的应用。
Linux内核裁剪移植——内核的主要组成部分 3
Linux内核主要的5个部分:进程调度、内存管理、虚拟文件系统、网络接口、进程通信。在系 统移植的时候,它们是内核的基本元素。
Linux内核裁剪移植——内核的主要组成部分 4
进程调度部分负责控制进程对CPU的访问。 内存管理允许多个进程安全地共享主内存区域。内存管理从逻核的主要组成部分 7
虚拟文件系统与网络接口之间的关系: ➢ 虚拟文件系统通过依赖网络接口支持网络文件系统(NFS) ➢ 也通过依赖内存管理支持RAMDISK设备。
内存管理与虚拟文件系统之间的关系: ➢ 内存管理利用虚拟文件系统支持交换 ➢ 交换进程定期地由调度程序调度,这也是内存管理依赖于进程调度的唯一原因。 ➢ 当一个进程存取的内存映射被换出时,内存管理将会向文件系统发出请求,同时,挂起当 前正在运行的进程。
linux内核裁剪、编译与烧写

linux内核裁剪、编译与烧写实验日志实验题目:linux内核裁剪、编译与烧写实验目的:1、了解linux内核移植的相关知识2、熟练掌握linux内核裁剪的一般过程3、完成一个自己linux内核裁剪4、熟练掌握内核烧写实验步骤及结果:1、硬件连接连接好实验箱电源线、串口线、网线,并打开实验箱电源。
2、打开桌面上的超级终端arm打开超级终端后,并敲回车键,直到出现开发板的启动界面[/mnt/yaffts]3、测试自带avi文件[/mnt/yaffts] cd mplayer。
mplayer test.avi这时可以看得见在lcd上有图像显示,并且伴有声音没有声音出现。
4、内核裁剪从linux终端到/arm2410cl/kernel/linux-2.4.18-2410cl/目录,输入命令make memuconfig 回车,即可打开裁剪的主界面,根据自己情况对裁剪选项进行选择,不清楚的选项就选择默认选项。
在裁剪选择时,上下箭头可以上下选择,进入某一层用回车键,用空格键对其进行选择切换。
我们这里至少要把满足根文件系统的linux内核要求选项选上:(1) 配置MTD·要使用Cramfs和YAFFS文件系统,首先需要配置MTD.在Memory Technology Devices (MTD) --->选项中选中如下选项(图略):<*> Memory Technology Device (MTD) support MTD支持[*] MTD partitioning support MTD分区支持<*> Direct char device access to MTD devices 字符设备的支持<*> Caching block device access to MTD devices 块设备支持NAND Flash Device Drivers ---> 对NAND Flash的支持<*> SMC Device Support<*> Simple Block Device for Nand Flash(BON FS)<*> SMC device on S3C2410 SMDK[*] Use MTD From SMC(2) 配置文件系统(图略)。
linux内核裁剪

《Linux操作系统》实验报告
实验序号:实验项目名称:内核裁减
1 在虚拟机上裁减系统内核
1)检查编译器的版本
进入系统内核源代码目录查看
删除过时的目标文件
使用X图形来运行系统内核,此方法采用图形窗口按钮进行人机交换
配置完成后,保存并退出:
2)编译新内核
A.执行make dep 命令
B.执行make clean 命令
运行以上两条命令没有出现错误,则执行命令make bzImage,生成一个全新内核
查看产生的bzImage文件
运行命令make modules
运行命令make modules_install
3)使用新内核启动系统
备份正在使用的系统内核
因为要用GRUB配置文件启动,必需修改grub.conf文件
重新启动。
linux内核裁剪的具体步骤(Linuxkernelcuttingspecificsteps)
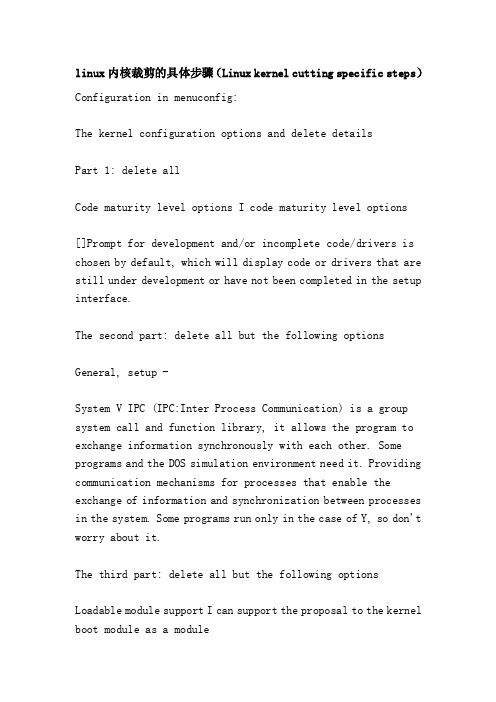
linux内核裁剪的具体步骤(Linux kernel cutting specific steps)Configuration in menuconfig:The kernel configuration options and delete detailsPart 1: delete allCode maturity level options I code maturity level options[]Prompt for development and/or incomplete code/drivers is chosen by default, which will display code or drivers that are still under development or have not been completed in the setup interface.The second part: delete all but the following options General, setup -System V IPC (IPC:Inter Process Communication) is a group system call and function library, it allows the program to exchange information synchronously with each other. Some programs and the DOS simulation environment need it. Providing communication mechanisms for processes that enable the exchange of information and synchronization between processes in the system. Some programs run only in the case of Y, so don't worry about it.The third part: delete all but the following optionsLoadable module support I can support the proposal to the kernel boot module as a moduleEnable loadable module support [] this option allows your kernel support module, what is a module? The module is a small piece of code that can be dynamically added to the kernel when the system kernel is run, thus adding some features to the kernel or supporting some hardware. Generic drivers or features that are not commonly used can be compiled into modules to reduce kernel size. At run time, you can use the modprobe command to load it into the kernel (remove it when you don't need it). Some properties are compiled for the module principle is rarely used, especially when the system starts to drive can be compiled as a module, if it is in the drive system when you start to use such as file system, system bus support is not for a module, or unable to start system.[]Automatic kernel module loading in general, if our kernel in some tasks to use some is compiled as a module driver or characteristics, we need to use the modprobe command to load it, you can use the kernel. However, if you choose this option, when the kernel needs some modules, it automatically calls the modprobe command to load the required modules, which is a great feature, of course, choose Y.The fourth part: delete allBlock layer----- block deviceThe fifth part: delete all but the following optionsProcessor type and features processor type ISubarchitecture Type (PC-compatible) this option his main purpose is to make the Linux can support a variety of PC standard, we use the general PC machine is to follow the so-called IBM compatible structure (pc/at). This option allows you to select some other architecture. We usually choose PC-compatible.Processor family (386): it will be optimized for each type of CPU, so that it runs fast and sound, generally speaking, you are what type of model, you choose what kind of. I chose 386, so that the kernel saves a lot of spaceThe sixth part: delete all but the following optionsPower management options (ACPI, APM) his power management options[[] Power Management Debug Support power management debugging information support, if not to debug the kernel, power management section, please do not select this item.ACPI Support - - advanced power interface configuration support, if BIOS support, it is recommended to choose this item[]Button this option is used to register the power button based on events, such as power, sleep, when you press the button when the event will happen, a daemon will read /proc/acpi/event, and execute the user defined in these events on the action such as the system shutdown. Can not choose, according to their own needs.The seventh part: in addition to the following options,其它全部删除bus options (pci, pcmcia, eisa, mca, isa) -- > 总线选项pci support. []pci access mode (any) -- > pci外围设备配置, 强列建议选any, 系统将优先使用mmconfig, 然后使用bios, 最后使用direct检测pci 设备.第八部分除以下选项, 其它全部删除.- filing file formats.kernel support for elf binaries elf是开放平台下最常用的二进制文件, 它支持不同的硬件平台.一定要选.第九部分除以下选项, 其它全部删除.networkingnetworking options -- >unix domain sockets []tcp / ip networking []第十部分除以下选项, 其它全部删除.device drivers -- > 设备驱动block devices, 〉compaq smart2 support. []compaq smart array 5xxx support. [][] loopback device support 大部分的人这一个选项都选n, 因为没有必要.但是如果你要mount iso文件的话, 你得选上y.这个选项的意思是说, 可以将一个文件挂成一个文件系统.如果要烧光盘片的, 那么您很有可能在把一个文件烧进去之前, 看看这个文件是否符合is09660的文件系统的内容, 是否符合您的需求.而且, 可以对这个文件系统加以保护.不过, 如果您想做到这点的话, 您必须有最新的mount程序, 版本是在2.5x版以上的.而且如果您希望对这个文件系统加上保护, 则您必须有 des.1.tar.gz 此处与网络无关.建议编译成模块这个程序.注意.ram disk support. []scsi device support - - - > 里面有关于usb支持的, 要选择[] usb要用 scsi device support, 必须选择[] "/ proc / scsi / support usb要用, 必须选择scsi disk support usb要用 [], 必须选择scsi low-level drivers[] serial ata (sata) support[] intel sata hard 这个必须选择 price / ich, 否则无法产生引导文件via sata format. []networking device support - - - > 这个下面是选网卡驱动, 一定要选ethernet (1000mbit) & # 我的电脑是千兆网卡所以就选这个61664.broadcom tigon3support []input device support - - - > 这个里面要设置你的鼠标键盘什么的[] the "/ dev / psaux devicegraphics card - - - "[] support for frame buffer devices 支持frame buffer的, 一定要选择drive support - - - "usb device filesystem 这个好象是用u盘必须的 [][] ehci hcd media (usb 2.0) 有usb2.0就选上把, 编译成模块必须选择 ohci hcd media [], 编译成模块[] uhci hcd (most intel and via support 必须选择, 编译成模块usb mass storage support 用u盘必须选择 []usb human interface device (a device 如果你有一定选上这个必需选里面选择usb鼠标和usb键盘 hid).the support 应该选择 hid inputa hid device / dev / hiddev support如果这里有usb键盘和鼠标选项, 一定要选择第十一部分除以下选项, 其它全部删除.file systems 文件系统 -- >< * > second extended fs support[*] ext2 extended attributes[*] ext2 POSIX访问控制列表[*] ext2安全标签<m> Ext3文件系统支持[*] Ext3扩展属性[*] ext3 POSIX访问控制列表[*] ext3防伪标签以上这些肯定是要选择的,Linux的标准文件系统<m>内核自动支持内核自动挂载的,当然要选<m>内核自动版本4的支持(同时支持V3)当然要选DOS /脂肪/ NT文件系统——>dos支持<m> MSDOS fs的支持<m> VFAT(95)FS支持NTFS文件系统支持本地语言支持和# 61664;语言支持,这里就支持英语和汉语就行了,不多说了[ ] NLS ISO 8859-1必须选择,这个是关于U盘挂载的。
实验5-3 Linux 内核移植实验
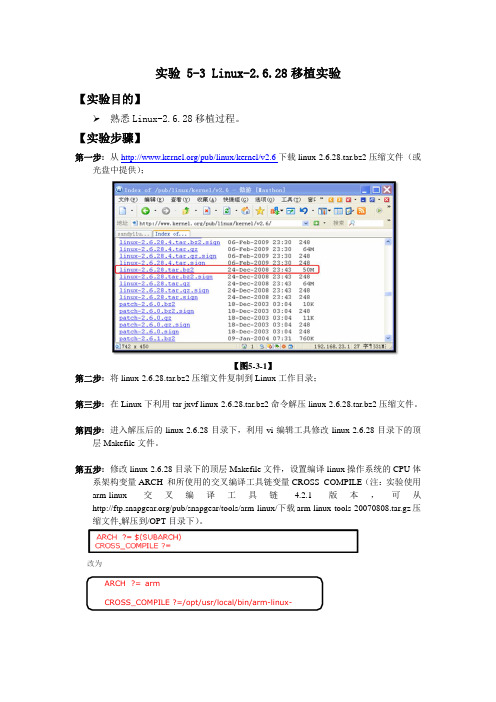
实验 5-3 Linux-2.6.28移植实验【实验目的】熟悉Linux-2.6.28移植过程。
【实验步骤】第一步:从/pub/linux/kernel/v2.6下载linux-2.6.28.tar.bz2压缩文件(或光盘中提供);【图5-3-1】第二步:将linux-2.6.28.tar.bz2压缩文件复制到Linux工作目录;第三步:在Linux下利用tar jxvf linux-2.6.28.tar.bz2命令解压linux-2.6.28.tar.bz2压缩文件。
第四步:进入解压后的linux-2.6.28目录下,利用vi编辑工具修改linux-2.6.28目录下的顶层Makefile文件。
第五步:修改linux-2.6.28目录下的顶层Makefile文件,设置编译linux操作系统的CPU体系架构变量ARCH 和所使用的交叉编译工具链变量CROSS_COMPILE(注:实验使用arm-linux交叉编译工具链 4.2.1版本,可从/pub/snapgear/tools/arm-linux/下载arm-linux-tools-20070808.tar.gz压缩文件,解压到/OPT目录下)。
改为ARCH ?= armCROSS_COMPILE ?=/opt/usr/local/bin/arm-linux-【图5-3-2】第六步:将linux-2.6.28目录下的arch/arm/configs/mainstone_defconfig文件复制为xsbase270_defconfig文件。
第七步:在linux-2.6.28/arch/arm/mach-pxa目录下增加一个xsbase270.c文件(实际上从该目录下的mainstone.c复制而来.也可以直接复制实验代码中的文件),然后根据实际平台进行修改。
第八步:修改linux-2.6.28\arch\arm\mach-pxa目录下的Makefile文件,增加编译xsbase270.c 的编译选项,即:obj-$(CONFIG_MACH_XSBASE270) += xsbase270.o。
linux内核的裁剪与移植

1,获得源码,解压,进入解压后的目录;命令;2,修改makefile;为了能让此目录被执行所以在顶级目录的makefile中同时也进行修改;3,得到.config文件;命令;编译内核时对.config文件的依赖比较大,我们需要一个自己的.config文件,又因为我们的板子和smdk2410的很像,仅需将smdk2410的.config 文件复制到顶级目录即可不用修改;4;修改nandflash 分区;此系统启动时从nandflash 中启动而我们的板子不是的所以对其进行必要的修改;5,添加网卡驱动;arch/arm/mach-s3c2410/mach-smdk2410.c开发板上已经配置要的相应的网卡,并且内核中也有相应的实现代码我们只需做一下简单的修改;6添加yaffz文件系统支持将yaffz 源码包考到和linux-2.6.24 同一级目录下解压;在给内核打上补丁;命令是;7、配置和编译内核到现在,一个简单的内核就准备好了,我们还需要做一些配置,然后编译,内核才能正常使用。
在内核源代码的根目录下运行make menuconfig命令,进入配置界面:8,用u-boot启动内核;编译U-Boot时在源代码的tools目录下会生成一个mkimage可执行文件,用这个工具可以对前面编译内核时生成的zImage进行处理,以供U-Boot启动。
cd linux-2.6.24.4/arch/arm/bootcp /up-Star2410/kernel/linux-2.6.24.4/mkimage . 获取mkimage工具./mkimage -A arm -T kernel -C none -O linux -a 0x30008000 -e 0x30008040 -d zImage -n 'Linux-2.6.24' uImage9,最后把生成的uimage 放到主机tftp同目录下,启动开发板;用u-boot的tftp命令下载到sdram;。
基于ARM的嵌入式linux内核的裁剪与移植.

基于ARM的嵌入式linux内核的裁剪与移植0引言微处理器的产生为价格低廉、结构小巧的CPU和外设的连接提供了稳定可靠的硬件架构,这样,限制嵌入式系统发展的瓶颈就突出表现在了软件方面。
尽管从八十年代末开始,已经陆续出现了一些嵌入式操作系统(比较著名的有Vxwork、pSOS、Neculeus和WindowsCE)。
但这些专用操作系统都是商业化产品,其高昂的价格使许多低端产品的小公司望而却步;而且,源代码封闭性也大大限制了开发者的积极性。
而Linux的开放性,使得许多人都认为Linu0 引言微处理器的产生为价格低廉、结构小巧的CPU和外设的连接提供了稳定可靠的硬件架构,这样,限制嵌入式系统发展的瓶颈就突出表现在了软件方面。
尽管从八十年代末开始,已经陆续出现了一些嵌入式操作系统(比较著名的有Vxwork、pSOS、Nec uleus和Windows CE)。
但这些专用操作系统都是商业化产品,其高昂的价格使许多低端产品的小公司望而却步;而且,源代码封闭性也大大限制了开发者的积极性。
而Linux的开放性,使得许多人都认为Linux 非常适合多数Intemet设备。
Linux操作系统可以支持不同的设备和不同的配置。
Linux对厂商不偏不倚,而且成本极低,因而很快成为用于各种设备的操作系统。
嵌入式linux是大势所趋,其巨大的市场潜力与酝酿的无限商机必然会吸引众多的厂商进入这一领域。
1 嵌入式linux操作系统Linux为嵌入操作系统提供了一个极有吸引力的选择,它是个和Unix 相似、以核心为基础、全内存保护、多任务、多进程的操作系统。
可以支持广泛的计算机硬件,包括X86、Alpha、Sparc、MIPS、PPC、ARM、NEC、MOTOROLA 等现有的大部分芯片。
Linux的程序源码全部公开,任何人都可以根据自己的需要裁剪内核,以适应自己的系统。
文章以将linux移植到ARM920T内核的s3c2410处理器芯片为例,介绍了嵌入式linux内核的裁剪以及移植过程,文中介绍的基本原理与方法技巧也可用于其它芯片。
Linux内核安装、裁剪图文教程

目录Practice1 (4)一编译过程 (4)1 安装必要的软件 (4)2 下载linux内核源文件 (4)3 解压缩源文件 (5)4 复制config文件 (6)5 进行menucofig配置 (6)6 menuconfig配置页面 (7)7 对驱动设置进行简单配置 (8)8 选择cpu类型 (8)9 设置完成保存退出 (9)10 开始编译内核 (9)11 内核编译过程 (10)12 内核编译过程(3小时后) (11)13 内核编译成功 (12)14 安装新内核 (12)15 新内核安装过程 (13)16 比较两个内核 (14)17 重新启动系统 (14)18 登录新内核 (15)19 新内核登录成功 (15)20 查看新内核版本号号 (16)二、编译过程中遇到的问题 (16)1 错误VFS:Unable to mount root (16)2错误Driver ‘mdio-gpio’ (18)Practice2 (20)一、内核选项翻译及选择理由 (20)1. General setup 常规设置 (20)二、裁剪过程 (21)1.进入设置界面 (21)2. General setup页设置 (22)3. Enable the block layer页设置 (23)4. Processor type and features页设置 (24)5. Power Management and ACPI options页设置 (28)6. Bus options页设置 (29)7. Executable file formats页设置 (30)8. Networking options页设置 (31)9. Device Drivers 页设置 (34)10. Firmware Drivers页设置 (37)11. File systems页设置 (38)12. Kernel hacking页设置 (40)13 CryptographicAPI页设置 (41)14. 裁剪后内核运行截图 (42)15. 内核大小9.6M (43)感受和体会 (44)Practice1一编译过程1 安装必要的软件代码: $sudo apt-get install build-essential kernel-package libncurses5-dev2 下载linux内核源文件/下载2.6.38.8full版3 解压缩源文件代码:$ mkdir src && tar jfx linux-2.6.25.10.tar.bz2 -C src/4 复制config文件命令:cp /boot/config-`uname -r` ./.config5 进行menucofig配置代码:$sudo make menuconfig6 menuconfig配置页面7 对驱动设置进行简单配置8 选择cpu类型9 设置完成保存退出10 开始编译内核代码:$ sudo make-kpkg -initrd --initrd --append-to-version=bo100 kernel_image kernel-headers11 内核编译过程12 内核编译过程(3小时后)13 内核编译成功14 安装新内核代码:$ sudo dpkg -i linux-image-2.6.38bo10015 新内核安装过程16 比较两个内核17 重新启动系统18 登录新内核19 新内核登录成功20 查看新内核版本号号二、编译过程中遇到的问题1 错误VFS:Unable to mount root描述:内核安装成功后,启动内核出现如下图错误原因:在执行内核安装的时候,initrd可能没有被安装出现以下错误如图,新版本的initrd并没有安装成功,vmlinu有两份,而initrd只有一份。
- 1、下载文档前请自行甄别文档内容的完整性,平台不提供额外的编辑、内容补充、找答案等附加服务。
- 2、"仅部分预览"的文档,不可在线预览部分如存在完整性等问题,可反馈申请退款(可完整预览的文档不适用该条件!)。
- 3、如文档侵犯您的权益,请联系客服反馈,我们会尽快为您处理(人工客服工作时间:9:00-18:30)。
实验5 linux内核的裁剪移植
一、实验目的:
学习利用menuconfig配置文件进行裁减内核,编译内核并移植到开发板上。
二、实验内容
一、开发环境
宿主机:ubuntu10.04
开发板:tiny6410
编译器:4.3.2
二、内核移植
1.下载源码
ftp:///pub/linux/kernel/v2.6/linux-2.6.38.tar.bz2
此实验所需的文件放到/home/embedded/11目录下:
linux-2.6.38.tar.bz2, yaffs2.tar.bz2
s3c_nand.c , s3c_nand_mlc.fo ,nand_base.c ,Kconfig ,regs-nand.h
2.解压
(进入根目录下的/home/poplar/expr4/kernel目录,解压源码)# cd /home
# mkdir poplar/expr4/kernel –p
# cd /home/poplar/expr4/kernel
# cp /home/embedded/11/linux-2.6.38.tar.bz2 ./
tar xvfj /home/poplar/expr4/kernel/linux-2.6.38.tar.bz2
3.修改架构,编译器(需要在arm上运行,所以用交叉编译器)解压完进入解压出来的linux-2.6.38目录
#cd linux-2.6.38
#vi Makefile (或者用gedit)
191行改为
ARCH ?= arm //191行CROSS_COMPILE ?= /usr/local/arm/4.3.2/bin/arm-linux- (找到其交叉编译环境,把路径加全) //192行
4.生成默认配置文件
#cp arch/arm/configs/s3c6400_defconfig .config
如省略这个操作的话 后面会找不到System Type Linux内核中已经自带了关于我们6410开发板的配置。
5.修改配置项
#make menuconfig
System Type->[*] MINI6410 选上,
6.拷贝NAND FLASH驱动到根目录下的/home/poplar/expr4/kernel下的linux-2.6.38里相应的文件位置处(以下的文件在实验五文件夹里有)
drivers/mtd/nand/s3c_nand.c
arch/arm/plat-samsung/include/plat/regs-nand.h
drivers/mtd/nand/s3c_nand_mlc.fo
drivers/mtd/nand/nand_base.c
drivers/mtd/nand/Kconfig
执行命令:
#cp /home/embedded/11/s3c_nand.c ./drivers/mtd/nand/
#cp /home/embedded/11/s3c_nand_mlc.fo ./drivers/mtd/nand/ #cp /home/embedded/11/nand_base.c ./drivers/mtd/nand/
#cp /home/embedded/11/Kconfig ./drivers/mtd/nand/
#cp /home/embedded/11/regs-nand.h ./arch/arm/
plat-samsung/include/plat/
7修改nand 驱动makefile
输入指令#cd drivers/mtd/nand
#vi Makefile
drivers/mtd/nand/Makefile中20行增加
obj-$(CONFIG_MTD_NAND_S3C) += s3c_nand.o
末尾再增加
obj-$(CONFIG_MTD_NAND_S3C) += s3c_nand_mlc.fo
8.增加相应选项
输入指令#cd /home/poplar/expr4/kernel/linux-2.6.38
#make menuconfig
Device Drivers--->
<*> Memory Technology Device (MTD) support --->
[*] MTD partitioning support
[*] Command line partition table parsing
<*> Direct char device access to MTD devices <*> Caching block device access to MTD devices <*> NAND Device Support --->
< > NAND Flash support for Samsung S3C SoCs 去掉不要选
<*> NAND Flash support for S3C SoC [*] S3C NAND Hardware ECC
三、添加yaffs2文件系统的支持
首先向内核源代码中加入支持yaffs2的源代码】
解压yaffs2.tar.bz2
#cd /home/poplar/expr4/kernel
#cp /home/embedded/11/yaffs2.tar.bz2 ./
#tar xvfj yaffs2.tar.bz2
进入解压出的目录#cd yaffs2
执行如下命令
./patch-ker.sh c m +内核源码路径# ./patch-ker.sh c m ../linux-2.6.38
然后进入内核源码目录
#cd /home/poplar/expr4/kernel/linux-2.6.38
执行make menuconfig
选择File systems
选择[*] Miscellaneous filesystems --->
选择上<*> yaffs2 file system support以及与yaffs2相关选项。
配置结果如下:
退出保存
四、添加对UBIFS文件系统的支持
1. 配置内核支持UBIFS
#make menuconfig
Device Drivers --->
Memory Technology Device (MTD) support --->
Enable UBI - Unsorted block images --->
2.配置mtd支持UBI接口
File systems --->
Miscellaneous filesystems --->
UBIFS file system support
3.再次make
#make zImage
一、下载到开发板(见实验三操作说明)
先将zImage用DNW下载到开发板,然后将开关拨动到nand方式启动,观察超级终端此时启动会出现如下问题
如果成功,如下图:。