南邮实验报告JAVA 线程程序设计
南京邮电大学java实验报告语言特性
实验报告班级:姓名:学号:课程名称Java程序设计实验项目Java语言特性实验项目类型验证演示综合设计指导教师吴伟敏成绩√一、实验目的1.了解线程的基本概念;2.掌握异常以及错误处理的方式;3.掌握Java程序调用I/O以及界面设计的方法;二、实验步骤1.假设某家银行,它可接受顾客的汇款,每做一次汇款,便可计算出汇款的总额。
现有两个顾客,每人都分3次,每次100元将钱到入。
试编写一个程序,模拟实际作业。
测试以下程序,说出此程序的运行机制,体会多线程程序设计以及异常处理的方法。
程序如下:class CBank{private static int sum=0;public static void add(int n){int tmp=sum;tmp=tmp+n; // 累加汇款总额try{Thread.sleep((int)(10000*Math.random()));}catch(InterruptedException e){}sum=tmp;System.out.println("sum= "+sum);}}class CCustomer extends Thread {// CCustomer类,继承Thread类public void run(){ // run() methodfor(int i=1;i<=3;i++)CBank.add(100); // 将100元分三次汇入}}public class Ex3_1{public static void main(String args[]) {CCustomer c1=new CCustomer();CCustomer c2=new CCustomer();c1.start();c2.start();}}基本要求运行程序5次,观察每次运行结果是否相同。
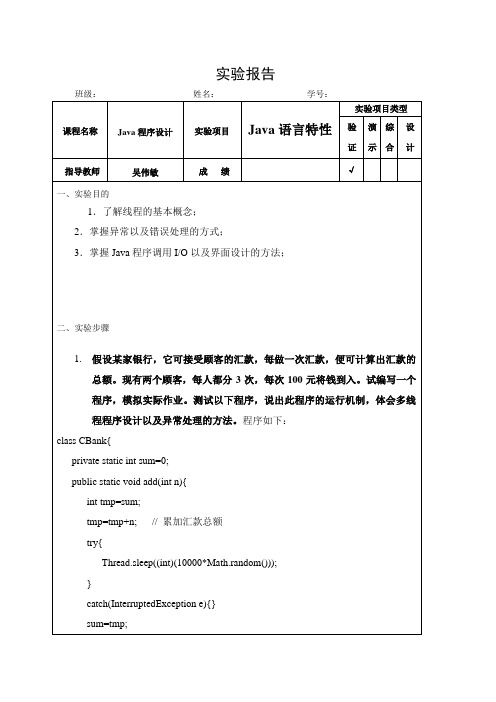
运行结果有时相同,有时不同,5次运行结果如下图所示:思考问题运行结果每次是否相同,运行时间是否相同,为什么?程序运行结果有时相同,有时不同,结果并不确定,运行时间也是不相同的,因为存钱的方法未同步,导致两位顾客的存钱行为是分步进行的,相当于各自存各自的钱,两个sum,最终两位顾客的存钱结束,会有各自的两个sum,都为300。
java多线程程序设计实验总结
java多线程程序设计实验总结一、实验目的本次实验旨在通过编写Java多线程程序,掌握多线程编程的基本概念和技能,理解多线程程序的运行原理,提高对Java语言的熟练度。
二、实验内容本次实验分为三个部分:创建线程、线程同步和死锁。
2.1 创建线程创建线程有两种方式:继承Thread类和实现Runnable接口。
继承Thread类需要重写run方法,在run方法中编写线程执行的代码;实现Runnable接口需要实现run方法,并将其作为参数传入Thread类的构造函数中。
在创建多个线程时,可以使用同一个Runnable对象或者不同的Runnable对象。
2.2 线程同步当多个线程同时访问共享资源时,可能会出现数据不一致等问题。
为了避免这种情况,需要使用同步机制来保证各个线程之间的协调运行。
常见的同步机制包括synchronized关键字和Lock接口。
synchronized关键字可以用来修饰方法或代码块,在执行该方法或代码块时,其他所有试图访问该方法或代码块的线程都必须等待当前执行完成后才能继续执行。
Lock接口提供了更加灵活和高级的锁机制,可以支持更多种类型的锁,如读写锁、可重入锁等。
2.3 死锁死锁是指两个或多个线程在互相等待对方释放资源的情况下,都无法继续执行的现象。
死锁的发生通常由于程序设计不当或者资源分配不合理所导致。
为避免死锁的发生,可以采取以下措施:避免嵌套锁、按照固定顺序获取锁、避免长时间占用资源等。
三、实验过程本次实验我编写了多个Java多线程程序,包括创建线程、线程同步和死锁。
其中,创建线程部分我使用了继承Thread类和实现Runnable 接口两种方式来创建线程,并测试了多个线程之间的并行执行情况;在线程同步部分,我使用synchronized关键字和Lock接口来保证共享资源的访问安全,并测试了多个线程同时访问共享资源时是否会出现数据不一致等问题;在死锁部分,我编写了一个简单的死锁程序,并通过调整程序代码来避免死锁的发生。
实验报告java程序设计

实验报告java程序设计一、引言本次实验是针对Java程序设计的实践性活动。
Java是一种广泛应用于各种平台的编程语言,具有跨平台、面向对象、安全性高等特点。
通过本次实验,我们将学习如何利用Java语言进行程序设计,并进一步熟悉Java的基本语法和面向对象的思想。
二、实验目的1. 掌握Java的基本语法和面向对象的思想;2. 熟悉Java程序的编写和运行过程;3. 学会利用Java进行简单的程序设计。
三、实验内容3.1 实验环境为了进行本次实验,我们需要安装以下工具和环境:- JDK(Java Development Kit):Java开发工具包,包含了编译器和相关工具;- IDEA(Integrated Development Environment for Java):一种常用的Java集成开发环境。
3.2 实验步骤1. 安装JDK和IDEA,并完成相应的配置工作;2. 创建一个Java项目,并创建一个名为`HelloWorld`的Java类;3. 在`HelloWorld`类中编写代码,实现输出`Hello, World!`的功能;4. 编译和运行程序,观察结果。
四、实验过程和结果4.1 实验过程首先,我们需要安装JDK和IDEA,并完成相应的配置工作。
然后,我们打开IDEA,创建一个新的Java项目。
接着,在该项目中创建一个名为`HelloWorld`的Java类。
在`HelloWorld`类中,我们编写以下代码:javapublic class HelloWorld {public static void main(String[] args) {System.out.println("Hello, World!");}}完成代码编写后,我们点击IDEA工具栏上的编译按钮,对代码进行编译。
编译成功后,我们点击运行按钮,运行程序。
4.2 实验结果在IDEA的控制台窗口上,我们可以看到以下输出:Hello, World!这就是我们期望的输出结果,说明我们成功地使用Java编写并运行了一个程序。
南京邮电大学Java实验分析报告三

南京邮电大学Java实验报告三————————————————————————————————作者:————————————————————————————————日期:实验报告(2015/2016学年第一学期)课程名称JA V A语言程序设计实验名称流处理程序设计实验时间2015 年12 月25 日指导单位计算机学院软件工程系指导教师邓玉龙学生姓名李健琅班级学号B14070427 学院(系) 物联网专业网络工程实验报告实验名称流处理程序设计指导教师邓玉龙实验类型设计实验学时 2 实验时间2015-12-25 一、实验目的和任务要求学生能在学习和理解课堂学习内容中JA V A流编程理论的基础上,学习并逐步掌握JA V A流程序的编写和调试,学习根据处理需求对不同流的正确选择使用和组合使用方法。
二、实验环境(实验设备)PC微型计算机系统,Microsoft Windows操作系统,,SUN Java Development Kit开发工具包,NetBeans开发工具。
三、实验原理及内容(包括操作过程、结果分析等)实验内容:设计和编写一个程序从键盘读入一行字符串,将其写入一个文本文件中,再编写另一个程序从文本文件中读入字符串并在命令行窗口显示出来。
实验源程序:(1)写入文本程序:import java.io.*;import java.util.Scanner;public class Write {public static void main(String args[]) {File f=new File("test.txt"); //创建文本文件对象FileWriter fw; //字符输出流对象Scanner in = new Scanner(System.in); //准备从键盘输入字符串System.out.print("请输入文本字符:"); //键盘输入提示String s = in.nextLine(); //从键盘输入文本字符串try{fw=new FileWriter(f); //创建字符输出流对象fw.write(s + "\n"); //写字符串到文件fw.close(); //关闭字符输出流System.out.println("写文本文件完毕");}catch (IOException e) {System.out.println("写文件错误!");}}}(2)读取文本程序:import java.io.*;import java.util.Scanner;public class Read {public static void main(String args[]){File f;FileReader fr; //字符/输入流对象BufferedReader br; //字符输入缓冲流Scanner in =new Scanner(System.in); //准备从键盘输入字符串System.out.print("请输入要读入的文件名:"); //键盘输入提示String s=in.nextLine(); //从键盘输入文件名try{f =new File(s); //创建文件对象fr =new FileReader(f); //创建字符输入流对象br =new BufferedReader(fr); //字符输入流接入到输入缓冲流String str; //变量s存放读入的文本行System.out.println("读出的文本文件为:");while(true){str=br.readLine(); //从文本文件读入一行if(str == null) break; //读入结束System.out.println(str); //输出显示读入的文本}fr.close();br.close();}catch (IOException e) {System.out.println("您所要读写的文件不存在!");//显示错误信息}}}实验结果:四、实验小结(包括问题和解决方法、心得体会等)通过本次实验,让我学会了用Java语言进行文本文件的读写,并且加强了自己对Java语言的运用编程能力,真正理解了关于流处理的一些知识内容。
java多线程的实验报告
java多线程的实验报告Java多线程的实验报告一、引言多线程是计算机科学中一个重要的概念,它可以提高程序的并发性和效率。
Java作为一种广泛应用的编程语言,也提供了丰富的多线程支持。
本实验旨在通过编写多线程程序,探索Java多线程的特性和使用方法。
二、实验目的1. 理解多线程的概念和原理;2. 掌握Java多线程的基本使用方法;3. 分析多线程程序的执行过程和效果。
三、实验过程1. 创建多线程在Java中,可以通过继承Thread类或实现Runnable接口来创建多线程。
本实验选择实现Runnable接口的方式。
首先,定义一个实现了Runnable接口的类MyThread,重写run()方法,在该方法中编写线程的具体逻辑。
2. 启动多线程在主线程中,创建MyThread对象,并通过Thread类的构造函数将其作为参数传入。
然后,调用Thread类的start()方法启动线程。
3. 线程同步在多线程程序中,为了避免线程之间的数据竞争和冲突,需要进行线程同步。
Java提供了synchronized关键字和Lock接口来实现线程同步。
本实验使用synchronized关键字来保证线程的安全性。
4. 线程通信多线程之间的通信可以通过共享变量、wait()和notify()方法来实现。
本实验通过共享变量来实现线程通信,其中一个线程负责生产数据,另一个线程负责消费数据。
5. 线程池Java提供了Executor框架来管理线程池。
通过使用线程池,可以减少线程的创建和销毁开销,提高程序的性能。
本实验使用Executor框架来管理线程池,并设置合适的线程数量。
四、实验结果通过以上实验过程,成功实现了多线程程序,并观察到了以下结果:1. 多线程的执行顺序是不确定的,不同线程的执行顺序可能不同;2. 多线程程序可以提高程序的并发性和效率;3. 线程同步能够保证多线程程序的安全性;4. 线程通信可以实现多线程之间的数据交换和协作;5. 使用线程池可以提高程序的性能。
南邮_JAVA实验1

运行结果:
实验说明:P117页(1)人员类(Person)的多态性设计,要求分别用接口、抽象类的方式设计程序实现多态性。即第一种方案将Person定义成抽象类,然后通过定义该类的子类来实现。第二种方案将Person定义成接口,然后定义实现该接口的类。
代码:
接口实现:
抽象类实现:
测试代码:
运行结果:
实验报告
(2015 / 2016学年第2学期)
课程名称
JAVA语言程序设计
实验名称
实验3:子类与继承
实验时间1
日
指导单位
计算机学院软件工程系
指导教师
杨健
学生姓名
李翔
班级学号
B15041419
学院(系)
计软院
专业
软件工程NIIT
实验名称
实验3:子类与继承
指导教师
成杨健
实验类型
验证&设计
实验学时
2
实验时间
2015-6-14
一、实验目的
(1)掌握多态性的实现
(2)掌握抽象类和抽象方法的定义和使用
(3)掌握接口的定义和使用
二、实验环境(实验设备)
Intellij IDEA
三、实验内容
实验说明:定义一个类Rectangle代表矩形,在该类中定义成员变:Length和Width;方法:getLength()、getWidth()、setLength()、setWidth()、getAera()和toString()。为Rectangle类派生出一个子类Box代表立方体,定义成员变:Height,定义方法:getHeight()、setHeight()、getVolume()和toString()
java多线程实验报告
java多线程实验报告一、实验目的本次实验旨在探究Java多线程编程的原理和技巧,以及如何应用多线程编写高效、稳定、可靠的多线程应用程序。
二、实验环境本次实验使用的环境为:硬件:Intel Core i5 2.5 GHz处理器,8GB内存,256GB SSD硬盘软件:Windows 10操作系统,JDK 1.8开发工具三、实验步骤1. 编写并运行多线程程序2. 对程序进行分析、调试和优化3. 测试程序的效率和稳定性4. 记录实验过程和实验结果5. 撰写实验报告四、实验过程1. 编写并运行多线程程序本次实验编写的多线程程序是一个简单的计时器,程序的主要功能是在控制台上输出1-100的数字,并在输出每一个数字之前暂停一段时间,以模拟实际应用中的处理等待。
具体代码如下:public class MyThread extends Thread {private int delay;private int count;public MyThread(int delay, int count) {this.delay = delay;this.count = count;}@Overridepublic void run() {for (int i = 1; i <= count; i++) {try {Thread.sleep(delay);} catch (InterruptedException e) {e.printStackTrace();}System.out.println(i);}}}public class Main {public static void main(String[] args) {MyThread thread1 = new MyThread(100, 100); MyThread thread2 = new MyThread(50, 100); thread1.start();thread2.start();}}2. 对程序进行分析、调试和优化在程序分析、调试和优化的过程中,我遇到了以下几个问题和解决方法:问题1:程序多次运行时,会出现线程执行顺序不同的情况;解决方法:使用Thread.sleep和yield方法来控制线程执行顺序。
实验六:java多线程编程
计算机科学系实验报告实验六: java多线程编程一、实验目的1.掌握 Java 多线程编程方法.二、实验仪器设备与实验环境条件1.PC机2.Windows 7系统3.Inernet连接4.Eclipse开发平台三、实验内容、步骤、结果1.Modify Simpl eThread.java so that all the threads are daemon threads andverify that the program ends as soon as main( ) is abl e to exitCreat.tw.Threa.subclasses.on.wit..run( .tha.start.u.an.the.call.wait( ).Th.othe.class ’.run( .shoul.captur.th.referenc.o.th.firs.Threa.object.It.run( .shoul.cal.notifyAll( .f o.th.firs.threa.afte.som.numbe.o.second.hav.passe.s.tha.firs.threa.ca.prin..message.2.Inherit a class from java.util.Timer and impl ement the requestStop( ) methodas in Stopping.java.源代码:1).package MyThread;public class SimpleThread extends Thread{private int countDown = 5;private static int threadCount = 0;public SimpleThread() {super("" + ++threadCount);}public String toString() {return"#" + getName() + ": " + countDown;}public void run() {while(true) {System.out.println(this);if(--countDown == 0) return;}}public static void main(String[] args) { SimpleThread simple = null;for(int i = 0; i < 5; i++){simple=new SimpleThread();simple.setDaemon(true);simple.start();}}}实验结果截图2).package MyThread;public class TwoThread extends Thread{public TwoThread() {}public static void main(String[] args) { ThreadFirst first = new ThreadFirst();System.out.println("Start Thread First!"); first.start();ThreadSecond second = new ThreadSecond(first);System.out.println("Start Thread Second!"); second.start();System.out.println("Main Thread Exit!");}}class ThreadFirst extends Thread {public void run() {try {Thread.sleep(1000);waitMethod();} catch (InterruptedException e) {e.printStackTrace();}}public synchronized void waitMethod() {try {System.out.println("Thread First Wartting....");this.wait();System.out.println("Thread First Printting...."); } catch (InterruptedException e) {e.printStackTrace();}}public synchronized void notifyMethod() {try {this.notifyAll();System.out.println("Thread First Notify!");} catch (Exception e) {e.printStackTrace();}}}class ThreadSecond extends Thread {ThreadFirst first;public ThreadSecond(ThreadFirst first) {this.first = first;}public void run() {try {Thread.sleep(4000);first.notifyMethod();} catch (InterruptedException e) {e.printStackTrace();}}}实验结果截图3).package MyThread;import java.util.TimerTask;public class Stopping {public static void main(String[] args) {final CanStop stop=new CanStop();java.util.Timer timer=new java.util.Timer(true);stop.start();timer.schedule(new TimerTask(){public void run() {System.out.println("Requesting stop...");stop.requestStop();}}, 200);}}class CanStop extends Thread {private volatile boolean stop = false;private int counter = 0;public void run() {while(!stop && counter < 10000) {System.out.println(counter++);}if(stop)System.out.println("Detected stop...");}public void requestStop() { stop = true; }}实验结果截图四、实验心得这实验有点难, 线程我真的不是很理解, 前面学得的java基本没什么问题, 但是到了线程这一章, 我感觉有点难学了, 不是很懂。
8-实验八Java多线程操作(实验报告内容)
8-实验八Java多线程操作(实验报告内容)实验八 Java多线程操作(实验报告)一、目的1.掌握Java多线程操作。
二、实验内容启动线程,线程休眠,线程同步,等待和唤醒三、实验环境JDK1.6+dos环境四、实验原理通过案例掌握多线程操作。
五、实验步骤1、设计一个线程操作类,要求可以产生三个线程对象,并可以分别设置三个线程的休眠时间,如下所示:线程A,休眠10秒线程B,休眠20秒线程C,休眠30秒2、生产者与消费者问题,生产者生产一台电脑,消费者马上将生产出的电脑取走。
六、实验小结1、class MyThread implements Runnable{String name;int time;public MyThread(String name,int time){/doc/0713104097.html,=name;this.time=time;}public void run(){try{Thread.sleep(this.time);}catch(Exception e){}System.out.println(/doc/0713104097.html, +"线程,休眠"+this.time/1000+"秒");}}public class Demo08{public static void main(String args[]){MyThread mt1=new MyThread("线程A",10000);MyThread mt2=new MyThread("线程B",20000);MyThread mt3=new MyThread("线程C",30000);new Thread(mt1).start();new Thread(mt2).start();new Thread(mt3).start();}}//生产电脑和搬运电脑class Computer{private String name;public static int sum=0;private boolean flag=true;public Computer(String name){/doc/0713104097.html,=name;}public synchronized void set(){ //生产电脑if(!flag){try{super.wait();}catch(Exception e){e.printStackTrace();}}sum=sum+1;System.out.println("第"+sum+"台"+name+"电脑被生产");flag=false;super.notify();}public synchronized void get(){ //搬走电脑if(flag){try{super.wait();}catch(Exception e){e.printStackTrace();}}System.out.println("第"+sum+"台"+name+"电脑被搬走");flag=true;super.notify();}}class Producter implements Runnable{ private Computer c=null;public Producter(Computer c){this.c=c;}public void run(){for(int i=0;i<1000;i++){this.c.set();}}}class Worker implements Runnable{ private Computer c=null;public Worker(Computer c){this.c=c;}public void run(){for(int i=0;i<1000;i++){this.c.get();}}}public class Test{public static void main(String args[]){ Computer c=new Computer("联想");Producter p=new Producter(c);Worker w=new Worker(c);new Thread(p).start();new Thread(w).start();}}。
南邮Java实验报告1-综合图形界面程序设计
南邮Java实验报告1-综合图形界面程序设计英文回答:This report presents the findings of a comprehensive study on the design and implementation of a graphical user interface (GUI) program using Java. The experiment involved the development of a simple calculator application with basic arithmetic functions. The GUI was designed using the Java Swing library, which provided a wide range of pre-built components for creating user interfaces.The development process began with a thorough analysis of the user requirements for the calculator application. Based on this analysis, a user interface prototype was created using a wireframing tool. This prototype served as the blueprint for the final GUI design.The next step was to implement the GUI using Java Swing components. These components include buttons, text fields,labels, and panels, which were arranged and configured to create a user-friendly and intuitive interface. The calculator's basic arithmetic operations were implemented using simple mathematical expressions and conditional statements.Throughout the development process, extensive testing was conducted to ensure the functionality and reliability of the GUI program. Unit tests were used to verify the behavior of individual components, while integration tests ensured that the components worked together seamlessly. Performance tests were also conducted to assess the responsiveness of the GUI under various loads.The final GUI program was a fully functional calculator with a user-friendly interface and reliable performance. It demonstrated the effectiveness of Java Swing for creating complex GUI applications with ease and efficiency.中文回答:南邮Java实验报告1-综合图形界面程序设计。
- 1、下载文档前请自行甄别文档内容的完整性,平台不提供额外的编辑、内容补充、找答案等附加服务。
- 2、"仅部分预览"的文档,不可在线预览部分如存在完整性等问题,可反馈申请退款(可完整预览的文档不适用该条件!)。
- 3、如文档侵犯您的权益,请联系客服反馈,我们会尽快为您处理(人工客服工作时间:9:00-18:30)。
5
} public void run() {
while (true) { try { Thread.sleep(1000); //休眠一秒 } catch (Exception ex) {
}
second += 6; //每一秒,秒针动 6 度
if (second == 60 || second == 120 || second == 180 || second == 240 || second == 300) {
x1 = (int)((r - j) * Math.sin(rad * d)); y1 = (int)((r - j) * Math.cos(rad * d)); g.drawString(".", x + r + x1 - 1, x + r - y1 + 1); } d += 6; } g.setColor(c);
//分针 g.setColor(Color.BLUE); x1 = (int)((r - r / 2.5) * Math.sin(rad * minute)); y1 = (int)((r - r / 2.5) * Math.cos(rad * minute)); g.drawLine(x + r, y + r, x + r + x1, y + r - y1);
2
// cp.setBackground(Color.blue); this.add(cp); this.setSize(200, 200); this.setLocation(300, 200); this.setTitle("小时钟"); this.setVisible(true); this.setResizable(false);//不可放大 //this.setBackground(Color.MAGENTA); } public static void main(String[] s) { new Clock(); } }
class ClockPaint extends JPanel implements Runnable { int x, y, r; int hour, minute, second; //时,分,秒 final double rad = Math.PI / 180; public ClockPaint(int x, int y, int r) { this.x = x; this.y = y; this.r = r; Calendar now = new GregorianCalendar(); //获得时间转换成度数 second = now.get(Calendar.SECOND) * 6; minute = now.get(Calendar.MINUTE) * 6; hour = (now.get(Calendar.HOUR_OF_DAY) - 12) * 30 +
minute += 1; //每 10 秒,分针动 1 度
}
//大于一分钟,分针和时针开始出现改变
if (second == 360) {
second = 0;
minute += 1;
288) {
if (minute == 72 || minute == 144 || minute == 216 || minute ==
实 验报 告
(2016 学年 第 1 学期 )
课程名称: 实验名称: 实验时间: 指导单位: 指导老师:
学生姓名: 学院(系):
Java 语言 线程程序设计
班级学号: 专 业:
1
实验名称 线程程序设计
指导老师
实验类型
实验学时 2 实验时间
一、 实验目的和要求
本实验旨在通过实验,培养学生将 JAVA 线程的相关知识点(包 括线程调度,线程同步等)有机结合并加以综合应用,在实验中设计 多线程程序的能力。
四、 实验原理(源代码)
代码: package cn.zhang.experiment_4; import java.awt.*; import javax.swing.*; import java.util.*;
public class Clock extends JFrame { public Clock() { ClockPaint cp = new ClockPaint(20, 20, 70);
二、 实验环境(实验设备)
PC 微型计算机系统,Microsoft Windows 操作系统,SUN Java Development Kit 开发工具包,NetBeans 开发工具。(本人使用 IDE 为 Windows 下 Eclipse,jdk 为 8.0 版本)
三、 实验内容
设计和编写一个编写一个指针式时钟程序,应用线程实现时钟的 走动。
4
//数字 g.setColor(Color.BLACK); int d = 28; for (int i = 1; i <= 12; i++) {
x1 = (int)((r - 10) * Math.sin(rad * d)); y1 = (int)((r - 10) * Math.cos(rad * d)); g.drawString(i + "", x + r + x1 - 4, x + r - y1 + 5); d += 30; }
hour += 6;
}
if (minute >= 360) {
minute = 0;
hour += 6;
}
if (hour >= 360) {
hour = 0;
}
}
6
this.repaint(); } } }
五、测试数据及结果分析
测试数据:
六、实验总结
成绩
批阅人
日期
7
//刻度线 d = 0; for (int i = 0; i < 60; i++) {
int len = 0; //控制每个分割点的长度,数字点上的分割线长一点 if(d % 30 == 0) {
len = 5; } else {
len = 2; } for (int j = 1; j <= len; j++) {
now.get(Calendar.MINUTE) / 12 * 6; Thread t = new Thread(this);
3
t.start(); }
public void paint(Graphics g) { super.paint(g); Color c=g.getColor(); g.setColor(Color.WHITE); g.fillRect(0, 0, r * 3, r * 3); g.setColor(Color.BLACK); g.drawOval(x, y, r * 2, r * 2);
//秒针 g.setColor(Color.RED); int x1 = (int)((r - 10) * Math.sin(rad * second)); int y1 = (int)((r - 10) * Math.cos(rad * second)); g.drawLine(x + r, y + r, x + r + x1, y + r - y1);