最新海康控制键盘操作说明教学教材
DS-1100K操作手册v1.1

第 2 章. 操作必读........................................................................................................................ 8
2.1
用户说明.................................................................................................................... 8
3.1.7 重启.................................................................................................................. 22
3.1.8 关机.................................................................................................................. 22
3.1.1.4 时间设置.................................................................................................. 15
3.1.1.5 语言设置.................................................................................................. 16
3.1.3.3 修改用户密码和删除用户 ...................................................................... 21
海康威视DS1003键盘说明书资料
在连接和使用本设备前,请仔细阅读本使用手册并妥善保存以备日后参考。
第五章 技术参数
指标
二维键盘
三维键盘
可控制 DVR 可控制快球
控制摇杆 通信端口
显示屏
通讯电缆长度 工作环境温度
电源
功耗 尺寸
31(台) 128(台) 二维摇杆
31(台) 128(台) 三维摇杆
控制
完全取代嵌入式硬盘录像机前面板的所有功能操作按键;
所有的操作在液晶显示屏上均有显示说明;
一台设备可以同时控制 31 台嵌入式硬盘录像机;
控制快球及解码器:快球、解码器地址范围从
0~254,同时可控制
128 台。
控制协议
备有 9 种快球、解码器协议,遇到没有集成的协议时,可以按照用户提供的 协议做添加,在不更换硬件的情况下,把修改好的程序文件发给客户,让客 户通过 RS485 口在线刷新程序。
6
2.2.3 液晶屏显示说明………………………………………
6
2.3 DS-1003K 前面板说明………………………………………
7
2.3.1 按键功能说明…………………………………………
7
2.3.2 摇杆控制说明…………………………………………
9
2.3.3 液晶屏显示说明………………………………………
RS485 半双工 通信速率: 1200~19200 LCD :122×32 中文
蓝屏 最大 1200 米
RS485 半双工 通信速率:
1200~19200 LCD : 128×64 中文
蓝屏 最大 1200 米
-10~+50℃
-10~+50℃
DS-1000KI Network Keyboard User Manual V1.2.2
DS-1000KI Network Keyboard User Manual(Version 1.2.2)Thanks a lot for purchasing our product. If there is any question, please feel free to contact us.This manual may have something inaccurate in technology, unsuited with the product’s functions and operations or the misprints. The manual’s contents will be changed with the enhanced functions of the product, as well as give the regular advance or renew the product and procedure in this manual. The renewed contents will be added in the new edition of this manual and no separate notice will be given.IndexChapter1Features of DS-1000KI (3)1.1Main Features (3)1.2Sketch of DS-1000KI (5)1.3Rear Board Description (7)1.4Keyboard Connection (8)Chapter2Keyboard Operation (9)2.1Enter into keyboard system (9)2.2Keyboard Configuration (11)2.2.1System Configuration (11)2.2.2User Configuration (14)2.2.3Defense Configuration (20)2.3Control DVR (22)2.3.1Login DVR (22)2.3.2DVR Configuration (24)2.3.2Video playback (25)2.3.3Manual Video Recording (27)2.3.4PTZ control (28)2.3.5Preview (30)2.3.6Alarm handling (31)2.4Other Information (33)2.4.1Keyboard lock (33)2.5Upgrade Keyboard Firmware (34)2.5.1FTP Server Setup (34)2.5.2Upgrade Firmware (37)Appendix A: Specification (38)Appendix B: Troubleshooting (39)Appendix C: Notes (40)Chapter1 Features of DS-1000KI1.1 Main Features●Support DVR cascade. One DS-1000KI keyboard can maximum control 99DVR units via network. If you use RS485 bus mode, one keyboard can maximum control 32 DVR units.●DS-1000KI Keyboard has two liquid crystal screens with the left one showingthe controlling and configuring menu respectively. Press the key 【Menu】for less than 2 seconds and enter into the controlling menu, while press【Menu】for more than 2 seconds and enter into the keyboard configuring menu. The right one shows the information including the user information, the present login state, alarm information etc.●DS-1000KI has two communication modes: Network mode and RS485 busmode. You can use either of them to control DVR.●DS-1000KI keyboard users are divided into administrator and operator.Administrator can operate both the controlling and configuring menu while the operator can only operate the controlling menu.●DS-1000KI has the function to lock keyboard. Presskey to lock the●DS-1000KI controlling menu can carry out DVR configuration, video playback,manual record, PTZ control, DVR local preview and other functions. Both the administrator and operator can control them.●DS-1000KI configuring menu can set up keyboard IP address, user ID number,keyboard communication mode, keyboard password management etc. This part is only controlled by the administrator.●DS-1000KI can control the different DVR units. Before operating DVR, enterthe configuring menu, in the “SysCfg” menu, select the keyboard control mode (either network mode or RS485 bus mode). In the “UserCfg” menu, create one new user, input the user ID, then input the information of the DVR including DVR user name, password, DEV ID, DVR IP etc. After setting up the user information, press the key【ID】and input the correct user ID, you can login and operate the corresponding DVR.●DS-1000KI network keyboard is equipped with the joystick. Y ou can use it tocontrol PTZ easily.●DS-1000KI network keyboard could receive the alarm information of DVR.Before being permitted, it should set up to receive the alarm. In the alarm configuration of the keyboard configuring menu, set up the information on permitting to receive the alarm. Then, by choosing the alarm handling in the keyboard controlling menu: set “Arm” to receive the alarm; set “Disarm” not to receive the alarm. Meanwhile, the keyboard can receive the alarm informationof 10 DVR at most.DS-1000KI network keyboard has four alarm outputs and can set up or clear the alarm output by operating the alarm handling in the controlling menu.Note: If you use DS-1000KI network keyboard to control DS-8000 series DVR, the firmware of DVR must be version1.4 above.1.2Sketch of DS-1000KIFig 1.1.11------ Menu area: Show the keyboard menu;2------【Menu 】: Menu key. Press it more than 2 seconds, the menu area will display the keyboard menu, otherwise the menu area will display the controlling menu;3------ Information Display area: Display the input information, communication mode, DVR information, alarm information, etc.4------【ID 】: The user code name. Use it to select DVR to control.5------【Zoom 】: Zoom function in PTZ control mode.6------【Focus 】: Focus function in PTZ control mode.7------【Iris 】: Iris function in PTZ control mode.8------ Joystick: Control Pan/Tilt in PTZ control mode.9------【】: The key to choose the left keyboard menu.10-----】: The key to choose the right keyboard menu.11----【Cam 】: Camera ID number (Corresponding the DVR channel number).12----【0】~【9】: Number and character keys.13----【Enter 】: Confirmation key.14----【Mon 】: Monitor ID key (Reserved).15---- Lamps: Ready ,Status ,Link ,Tx/Rx ,Com ,Alarm ,Power .16----【Del 】: Delete key.17----【*】: Input key to choose uppercase character, lowercase character or number.18----【Shot】: The key to adjust the PTZ preset.19----【Freeze】: Reserved.20----【▲】: Page Up key in the information display area. When you input IP address, you can use it as delete key.21----【▼】: Page Down key in the information area. When you input IP address, you can use it as space key.22----: Keyboard lock key.Fig 1.2.11------ Dial Switches. The factory default values are “on on off off off off off off (11000000)”.From the picture we can see the dial switch consists of 8 sub-switches. Now the function of each sub-switch is following:Switch 1: When in “on”, PORT A full-duplex 485 is changed into half-duplex 485. It must be used together with Switch 2.Switch 2: When in “on”, PORT A full-duplex 485 is changed into half-duplex 485. It must be uses together with Switch 1.Switch 3: When in “on”, PORT A R+, R- add the matching resistance of 120Ω.Switch 4: When in “on”, PORT A T+, T- add the matching resistance of 120Ω.Switch 5: When in “on”, PORT B D+, D- add the matching resistance of 120ΩSwitch 6: “off”. Reserved.Switch 7: “off”. Reserved.Switch 8: “off”. Reserved.2------ RS485 BUS PORT A ( full-duplex mode SW = 00000000, half-duplex mode SW = 11000000), connecting with KEYBOARD port of DVR.3------ RS485 BUS PORT B.4------ RS232 Interface (RJ45).5------ Network Interface (RJ45).6------ Alarm output interface.4 kinds of switches (dry nodes) will output the alarm information. With A and B as a group,they will turn off when there is an alarm. Otherwise, they will turn on.7------ 5V DC Socket.1.4.1 Network connectionIf you use keyboard network work mode, just use one network cable to connect keyboard UTP port with network switch or hub. In keyboard “SysCfg” menu, setup one IP address for the keyboard and select “Net” mode. Please refer to chapter2.2 for detail configuration.1.4.2 RS-485 connectionIf you use keyboard RS-485 bus work bus. On the keyboard rear panel, Port A has R+, R- pins. On DVR rear panel, there are two RJ45 keyboard interface. You can select one to connect keyboard, and the other one for DVR cascade. The DVR RJ45 pin definition is following:DVR keyboard RJ45 interfacePin definitionTo make the connect cable according the follows. As to left point of RJ45 head, 1st and 2nd cables are the anode and cathode line for sending, 3rd and 4th cables are the anode and cathode line for receiving, 7 is the shared grounding line:You can connect DS-1000KI Port A R+ R- pins with DVR keyboard interface Pin3 and Pin4, shown as following:DVR KBIn keyboard “SysCfg” menu, select “Bus” control mode.Chapter2 Keyboard Operation2.1 Enter into keyboard systemWhen DS-1000KI network keyboard is in power, the menu screen will show the following information:Fig 2.1.1When “Password”appears on the information screen, input the password (The default administrator password of DS-1000KI keyboard is 111 and the common password is 222) and enter into the system operation by pressing the key【Enter】, as shown following:Fig 2.1.2Note: DS-1000KI keyboard can control DVR by either network mode or RS485 bus mode. Here we just describe the usage of network mode. It is the same for RS485 bus mode.2.2 Keyboard ConfigurationBefore controlling DVR, you should first configure DS-1000KI net keyboard including system configuration, user configuration and defense configuration. Press the key【Menu】for more than 2 seconds, you will enter into the keyboard configuration (the administrator password is needed to login), as shown in Fig 2.1.1Fig 2.2.1 Keyboard Configuration2.2.1 System ConfigurationAfter entering into the configuration interface, we could see three corresponding menu items named “SysCfg”(Keyboard System Configuration), “UserCfg”(User Configuration) and “ArmCfg”(Defense Configuration) on the menu screen. Press “SysCfg”and enter into the system configuration interface, as shown in Fig 2.2.2. In this configuration menu, you can setup all detail keyboard parameters such as Keyboard IP, Keyboard ID, port number, super password, operator password and controlling modes. Each parameter setting is shown below:Fig 2.2.2 Keyboard System Configuration⏹Prev.: Previous menu.⏹IP Addr: IP address of DS-1000KI network keyboard. Press【1】to modify itwhile press【2】to confirm it as shown in Fig 2.2.3-1.⏹KBD ID: Keyboard number. Input the keyboard number with the numeral keysand press【Enter】to confirm it as shown in Fig 2.2.3-2⏹MaskIP: The sub net IP of DS-1000KI network keyboard. The default factoryvalue is 255.255.255.0. Press【2】to confirm it. Press【1】to modify it and press 【Enter】to confirm the new mask IP as shown in Fig 2.2.3-3⏹Port: The network port. Default factory value is 8000. Press【2】to confirm it.Press【1】to modify it and press【Enter】to confirm the new port number as shown in Fig 2.2.3-4.⏹Gateway: The gateway IP address of the keyboard.⏹SupPwd: The password of the administrator. The default factory value is 111.Input the new password with the numeral keys and press【Enter】to confirm it as shown in Fig 2.2.3-5 and Fig 2.2.3-6.⏹Password: The password of the operator. The default factory value is 222. Thesetup usage is the same as the super password.⏹CtrlMod: You can select either RS485 BUS mode or network mode to controlDVR. Press【1】to choose the bus mode and press【2】to choose the net mode as shown in Fig.2.2.3-7.⏹Reboot: Reboot keyboard.⏹Upgrade: You can upgrade the firmware of DS-1000KI keyboard via network.In the upgrade menu, input the FTP server IP. Then keyboard will connect with the FTP server and download the firmware via network. Please refer to FTP server user manual.Fig 2.2.3 Parameter Settings2.2.2 User ConfigurationIn the “User Configuration” menu, you can setup many users. Each user can only control one DVR. After you create the relationship between the user and DVR, you can input the username to login the corresponding DVR and control DVR using the keyboard. In the “User Configuration” menu, you can add, delete, modify and query the users and related DVRs.Fig 2.2.4 User ConfigurationNew UserFor example, if you want to control DVR with IP address of 192.0.1.99 by DS-1000KI network keyboard. First, you should create one new user. Choose “New”item in the user configuration menu, you will enter into new user input menu as shown in Fig 2.2.5. You can input the new user name. Press【*】to shift the input method as shown in Fig 2.2.5.Fig 2.2.5 Input Methods of DS-1000KIFor example, here I input “01” as the user name and press【Enter】to confirm it as shown in Fig 2.2.6-1.Fig 2.2.6Then, choose the device type (“1.DVR”as shown in Fig 2.2.6-2), press【1】tochoose “DVR” and input the user name, password of the DVR. The keyboard must use this username and password to login the DVR. For example, the default user name of DVR 192.0.1.99 is “admin” and the default password of the DVR is “12345”. Here we also input the same username and password as shown in Fig 2.2.6-3, 2.2.6-4.For Dev ID and Dev Port as shown in Fig 2.2.6-5, Fig 2.2.6-7, you must input the same Dev ID and port number as DVR has. In the “Display”menu of DVR, you can find out the Dev ID. The default ID of DVR is “88”. Here we input “01” because the Dev ID of DVR (192.0.1.99) is 01.Note: If you use RS485 Bus control mode, please make sure that each DVR has different Dev ID so that the user can login the corresponding DVR.Finally, input DVR IP address of “192.0.1.99”, then save the configuration. You can create other new users with the above steps.ModifyIn case of revising some users, here we use the above example to explain the operation. We know that the user of “01” can control DVR with “192.0.1.99” IP address. Now, we will change it into controlling DVR with “192.0.1.9” IP address. The detailed operation is following:1. Input user name:In the user configuration menu as shown in Fig2.2.4, choose the “Modify” menu item. In the information display area screen, input the user name of “01” and press【Enter】to confirm it as shown in Fig 2.2.7.Fig 2.2.7 Input User Name2. Modify Device Type: In the information display screen as shown in Fig 2.2.8, we could see the original configuration of user “01” is DVR. If the new configuration is also DVR, press【2】; If you want to change into other device type, press【1】to choose new device type (At present, only DVR device type can be selected).Fig 2.2.8 Change device type3. Modify Device Username: Modify device username according to the indication.If there is no need to revise, press【2】to confirm it and enter the next operation as shown in Fig 2.2.9.Fig 2.2.9 Modify Device UsernameSee Fig 2.2.10.4. Modify Device Password:See Fig 2.2.11.5. Modify Device ID:See Fig 2.2.126. Modify Device IP address:7. Modify Device Port: See Fig 2.2.13.Fig 2.2.13 Modify Device Port8. Save modification: Press 【1】to save the revise of user “01” as shown in Fig 2.2.14.Fig 2.2.14 Save Revised Configuration●Delete UserInput the user name to be deleted according to the indication, press【Enter】to confirm it, press【1】to delete or press【2】to exit. In the network control mode, Device IP address is displayed. In RS485 bus mode, device ID is displayed as shown in Fig 2.2.15.Fig 2.2.15 Delete User●QueryChoose “Query” item to show the user information, press【▲】to show the previous information and press【▼】to show the next information. In network mode, device IP is display. In RS485 bus mode, device ID is displayed, as shown in Fig 2.2.16. In the case of no user configuration in the keyboard, press “Query” item and system will give thesuggestion of “Not Existing User”.Fig 2.2.16 Query User InformationDelete allIf we need to delete all the users, press “DelAll” item and press【1】to confirm it so that all the built users will be deleted. Press【2】to exit and return to the previous menu. It’s interface is shown in Fig 2.2.17.2.2.3 Defense ConfigurationChoose “ArmCfg” item, if there is no defense setting, the information display area will be shown as Fig 2.2.18-1. Press【1】to defense or press【2】to exit and enter into the next user. If there is defense setting, the interface will be displayed as Fig 2.2.18-2. Press【1】to remove the defense or press【2】to enter into the next user.For each user, the operation of setting up or removing the defense is the same. After you finish for all users, press【2】to exit “Defense Configuration”as shown in Fig 2.2.18-3 and Fig 2.2.18-4.Fig 2.2.18 Defense ConfigurationAfter you finish the defense configuration, press [Menu] button of the keyboard to enter into DVR control menu as following:Fig 2.2.19Choose “DealAlm”item and enter into alarm response menu as shown in Fig 2.2.20:Fig 2.2.20 Keyboard Response DVR AlarmIn the defense configuration as shown in Fig 2.2.18, if you enable arm function and in the alarm response menu shown in Fig 2.2.20, if you choose “Arm”item, then DS-1000KI keyboard will listen and receive alarm information from DVR. Please note in the DVR menu, enable the “Upload to center” option so that DVR will send alarm information to the keyboard. When the keyboard receives the alarm information from DVR, keyboard will display it in the information display area. There are 4 alarm output ports in the rear panel of the keyboard, you can choose alarm output items to trigger the corresponding alarm output. Please refer to section 2.3.6.At present, the keyboard can manage alarm information from 10 DVRs.2.3 Control DVRAfter finishing the user configuration, we can choose the user name to control the relevant DVR.Please note, at one time you can only select DVR front panel or keyboard to control DVR.2.3.1 Login DVRPress【ID】button, you will enter into the following menu.Fig 2.3.1 Input User NameIf the DVR is in local preview status (no one is controlling DVR using either DVR front panel or other keyboards) and connection is OK, after you enter into the user and press [Enter] button, you will login the corresponding DVR as shown in Fig 2.3.2.You can press【*】to shift the inputting method like numeral【Num】, lower case 【Lower】, upper case【Upper】.Fig 2.3.2 Login DVRAfter you input the user and login the corresponding DVR, in the network mode, keyboard will display the DVR IP address while in the RS485 bus mode, will display DVR ID number.2.3.2 DVR ConfigurationChoose “DVRCfg”item and show the information as in Fig 2.3.3Fig 2.3.3 DVR Configuration MenuThe items in the keyboard controlling menu are the same as those of DVR local front panel. We could see the menu below on the menu screen and describe them respectively below:【Prev.】: Return to the previous menu of the keyboard.【Power】: The power switch of DVR.【Menu】: Shift the operating interface of DVR local menu and can also control the wiper in the PTZ mode.【A】: Shift to different input methods such as numeral, lower case, upper case, and symbol characters.【Esc】: Cancel the present operation and return to the previous DVR menu.【Edit】: In the edition mode, delete the wrong character. In preview mode, shift the picture preview channel.【Info】: Show the DVR information. (Reserved)【V oice】: Start a voice talk function. (Reserved)【F1】: Turn on or off the sound when playback. Open or close the light in the PTZ mode (Reserved).【F2】: Control the auxiliary functions in the PTZ mode (Reserved).【Up】: Choose the items in the menu.【Down】: Choose the items in the menu.【Left】: Shift the items in the menu.【Right】: Shift the items in the menu.2.3.2 Video playbackChoose “Playback”item as shown in Fig 2.3.2 and enter into playback menu as shown in Fig 2.3.4.Fig 2.3.4 PlaybackChoose “Begin Time”and “End Time”, input the start and end time and press 【Enter】. DVR will search and list the matched files in DVR local playback menu. Choose “BgnTime”item and show the information as shown in Fig 2.3.5-a. Input “Year”, “Month”and “Date”respectively as shown in Fig 2.3.5-c, press【Enter】to confirm it and enter the time set, input “Hour, “Minute”and “Second”respectively. Please note the above information must be input into two numbers. For example, in the case of inputting 8:5:5am, July 25th, 2005, the inputting format is “05/07/25”and “08/05/05” not “5/7/25” and “8/5/5”. Similarly, choose “End Time” and set the end time. Press【Enter】to search and list the matched video files.Return DVR configuration menu as shown in Fig 2.2.3, use【Up】【Down】button to select one file and press【Enter】, DVR will start playing the selected file.In the playback menu of keyboard, you can choose the relevant items to playback, pause, stop, fast play, slow play, forward, backward and the volume. If you press “Fast”or “Slow”, the playback speed will increase or reduce one time. The maximum speed is 16 times while the minimum speed is 1/16 time. Press “Forward” and “Backward” to go forward or draw back for about 30 seconds. Press the numeral keys or【Cam】to change the channel.Fig 2.3.5 Set Start TimeFig 2.3.6 Set End Time2.3.3 Manual Video RecordingChoose “Record” as shown in Fig 2.3.2 and display the information as shown in Fig 2.3.7. Choose the relevant items to control the manual video recording function of DVR including starting and stopping recording of one channel or all channels. Press numeral keys or【Cam】to change the channels. Choose “Prev.”to return the previous controlling menu of the keyboard.Fig 2.3.7 Manual Recording2.3.4 PTZ controlChoose “PTZ” as shown in Fig 2.3.2 and display the information as shown in Fig 2.3.8:Fig 2.3.8 PTZ ControlChoose the above items,【Focus】,【Iris】,【Zoom】,【Shot】and joystick to realize PTZ control of DVR. Press numeral keys or【Cam】to change the channel (any numeral between 1-32; The default channel is 1 if above 16). Choose “Prev.” to enter into the previous controlling menu of the keyboard.Choose “PsetCfg” item, input the preset number and press【Enter】to save the PTZ preset.Choose “DelPset”item, input the preset number and press【Enter】to delete the corresponding PTZ preset.Fig 2.3.9 PTZ Preset Configuration Note: The preset function needs PTZ support.2.3.5 PreviewChoose “Preview” as shown in Fig 2.3.2 and enter into the preview control menu as shown in Fig 2.3.10.Fig 2.3.10 PreviewChoose the above items and realize DVR local preview shift.Select preview mode:There are 4 preview modes: 1 Screen, 4 Screen, 9 Screen and 16 Screen. You can press the corresponding key as shown in Fig 2.3.10 to select one preview mode. Switch preview camera:In the one screen preview mode, press【Cam】or any numeral key, input the channel number in the information display area (At present it can be input any numerals between 1-32. The default channel is 1 if the input is bigger than16), then press【Enter】to shift the previewing web page on the different channels.Start preview cycle:Choose “StarCyl”, DVR will start cycle previewing according to the preview sequence and switch interval. Please note the switch interval time must not be set as “Never”.Stop preview cycle:If there is no need to cycle preview between channels, choose “StopCyl” and choose “Prev.” to exit into the control menu of the keyboard.2.3.6 Alarm handlingChoose “DealAlm”as shown in Fig2.3.2 and enter into the following alarm handling control menu:Fig 2.3.11 Alarm HandlingChoose “Arm”or “Disarm”to start or stop receiving the alarm information sent from DVR. The alarm information includes view tampering alarm, motion detection alarm, video loss alarm and external sensor alarm.Example when the alarm information is received:Fig 2.3.12 External Sensor Alarm InputFig 2.3.12 means all 16 sensors alarm happened.Fig 2.3.13 Video Loss Alarm Fig 2.3.13 means video lost of the 2nd, 6th and 9th channels.2.4 O ther Information2.4.1 Keyboard lockkey on the keyboard, the keyboard will be locked. If you press any key,Pressthere is a message “Password”as shown in Fig 2.5.1. Input the correct password to unlock the keyboard. The unlock password is the same as the keyboard login password (the default factory password is 111 for the administrator and 222 for the operator). Y ouhave to input the password to login again if the keyboard is locked.2.5 Upgrade Keyboard FirmwareYou can upgrade DS-1000KI keyboard firmware via network. In keyboard setup menu, enter into upgrade mode, and input PC IP where keyboard firmware file is placed, keyboard will connect with PC and download firmware via network.2.5.1 FTP Server SetupThe FTP server software is run in one PC. You can download FTP server software through internet. Here we use wftpd32.exe as the example:1.Run wftpd32.exe (FTP server software).2. Select “Logging ” in the menu ,choose Log Options in the sub menu, and give the choice as following:3.Select “Users/rights”under “Security”menu item. The following dialog box will be pop-up.4.Create new user. Click “new user’. New user dialog pops up. Input user name “target”. Click “OK”.5.In the password dialog, input password “target”in “New Password”and “V erify Password” edit box. Click “OK” to save and exit the dialog box.6.In the “User/Rights Security”Dialog, select “User Name”as “target”. In “Home Directory” edit box, input the path where the firmware file (digicap) is placed. Then press “Done” to exit. Here I place keyboard firmware file in folder named “C:\firmware”.7. Next time, you need not setup again, just double click and open “wftpd32.exe” to upgrade the firmware.2.5.2 Upgrade FirmwarePlease make sure that DS-1000KI and PC are in the same sub net. You can use Ping command to check.Enter into keyboard system configuration menu as following:Press “Upgrade” button, input PC IP address, keyboard will connect the PC and try to download firmware file via network.Appendix A: SpecificationAppendix B: TroubleshootingDS-1000KI Keyboard User ManualAppendix C: Notes1)Place net keyboard in the adequately ventilated space.2)Net keyboard shall work in the allowed temperature and humidity scope3)Do not touch LCD screen with hard objects.4)Do not splash water or other liquid onto the keyboard when using, to avoidshort-circuit or corrosion.Copyright © 2005. All rights reserved.Page 40。
海康威视 Hikvision 数字控制器操作指南说明书

INSTRUCTIONS FOR OPTIONS 9175 AND 9176Option 9176: AUTO/MAN Key 4-Stage Set Point CyclingThis option allows the operator to easily cycle through four set points by pressing the AUTO/MAN key while in the HOME display. They are displayed as 1SP1, 2SP1, 3SP1,and 4SP1. Only one of these set points may be active at a time. After selecting which set point is to be active, the operator will press INDEX to access the primary menu which will allow the user to edit the set point’s value. Each of these set points contain a target process value, and all of the values associated with the tunE menu items.Option 9175: Temporary User Adjustable Set PointThis option allows the operator to use a temporary set point, which they can make changes to without affecting the original stored set point, and then revert back to original set point after the test is completed. When the temporary set point is cancelled, the unit discards the temporary set point value and resumes normal operation.This temporary set point operates like the originally stored set point, SP1, normally does. The set point is displayed as tSP1. In order to access the temporary set point,press the UP or DOWN key while in the home display to bring up a menu where tSP1can be adjusted. Pressing the ENTER key will confirm the displayed value. Pressing the INDEX key will exit the menu. After tSP1is confirmed once, it will become active.tSP1can be cancelled by changing and confirming the value of SP1, #SP1, or SP2.When used in conjunction with option 9176, cycling to the next #SP1will also cancel tSP1. When used with option 948, selecting another #SP1via the secondary menu will also cancel tSP1. #SP1represents the 1SP1through 4SP1series of set points.This option replaces the normal manual override functionality of theAUTO/MAN key.FR# 949-9516 Rev. 1。
DS-1000K网络键盘说明书_v1[1].1
![DS-1000K网络键盘说明书_v1[1].1](https://img.taocdn.com/s3/m/1cf1b6edb8f67c1cfad6b825.png)
DS-1000K网络键盘用户使用手册版本 1.1非常感谢您购买我公司的产品,如果您有什么疑问或需要请随时联系我们。
本手册可能包含技术上不准确的地方、或与产品功能及操作不相符的地方、或印刷错误。
本手册的内容将根据产品功能的增强而更新,并将定期改进或更新本手册中描述的产品或程序,更新的内容将会在本手册的新版本中加入,恕不另行通知。
目录1DS-1000K网络键盘功能结构 (2)1.1键盘的主要功能 (2)1.2键盘示意图 (3)1.3后面板说明 (4)2DS-1000K网络键盘的操作 (5)2.1进入系统 (5)2.2键盘配置 (6)2.2.1系统配置 (6)2.2.2用户配置 (8)2.2.3设防配置 (12)2.3控制DVR设备 (13)2.3.1DVR配置 (14)2.3.2图像播放 (15)2.3.3手动录像 (16)2.3.4云台操作 (17)2.3.5画面预览 (18)2.3.6报警处理 (19)2.4其它信息 (20)2.4.1键盘锁 (20)技术指标 (21)常见故障 (22)附录I海康威视产品服务 (23)附录II用户信息卡 (24)1DS-1000K网络键盘功能结构1.1键盘的主要功能●DS-1000K网络键盘有两种方式控制DVR:网络控制方式和RS485总线控制方式,通过网络最多可以控制99台DVR,通过RS485总线可以控制32台;●DS-1000K网络键盘可以实现DVR设备配置、图像播放、手动录像、云台操作、画面预览等功能,并可以通过摇杆及相应的快捷键很方便的控制接在DVR上的云台解码器;●DS-1000K网络键盘有两级权限:管理员和操作员,管理员可以操作控制菜单和配置菜单,操作员只可以操作控制菜单;●DS-1000K网络键盘有键盘锁功能;●DS-1000K网络键盘可以接收DVR设备的报警信息,最多接收10台DVR设备的报警信息;●DS-1000K网络键盘支持报警连动功能,本身有4个报警输出口,通过操作控制菜单的报警处理项,设置或解除报警输出。
海康威视 DS-1100K 系列网络键盘 快速入门指南说明书
DS-1100K系列网络键盘快速入门指南法律声明版权所有©杭州海康威视数字技术股份有限公司2020。
保留一切权利。
本手册的任何部分,包括文字、图片、图形等均归属于杭州海康威视数字技术股份有限公司或其关联公司(以下简称“海康威视”)。
未经书面许可,任何单位或个人不得以任何方式摘录、复制、翻译、修改本手册的全部或部分。
除非另有约定,海康威视不对本手册提供任何明示或默示的声明或保证。
关于本产品本手册描述的产品仅供中国大陆地区销售和使用。
本产品只能在购买地所在国家或地区享受售后服务及维保方案。
关于本手册本手册仅作为相关产品的指导说明,可能与实际产品存在差异,请以实物为准。
因产品版本升级或其他需要,海康威视可能对本手册进行更新,如您需要最新版手册,请您登录海康威视官网查阅( )。
海康威视建议您在专业人员的指导下使用本手册。
商标声明• 为海康威视的注册商标。
•本手册涉及的其他商标由其所有人各自拥有。
责任声明•在法律允许的最大范围内,本手册以及所描述的产品(包含其硬件、软件、固件等)均“按照现状”提供,可能存在瑕疵或错误。
海康威视不提供任何形式的明示或默示保证,包括但不限于适销性、质量满意度、适合特定目的等保证;亦不对使用本手册或使用海康威视产品导致的任何特殊、附带、偶然或间接的损害进行赔偿,包括但不限于商业利润损失、系统故障、数据或文档丢失产生的损失。
•您知悉互联网的开放性特点,您将产品接入互联网可能存在网络攻击、黑客攻击、病毒感染等风险,海康威视不对因此造成的产品工作异常、信息泄露等问题承担责任,但海康威视将及时为您提供产品相关技术支持。
•使用本产品时,请您严格遵循适用的法律法规,避免侵犯第三方权利,包括但不限于公开权、知识产权、数据权利或其他隐私权。
您亦不得将本产品用于大规模杀伤性武器、生化武器、核爆炸或任何不安全的核能利用或侵犯人权的用途。
•如本手册内容与适用的法律相冲突,则以法律规定为准。
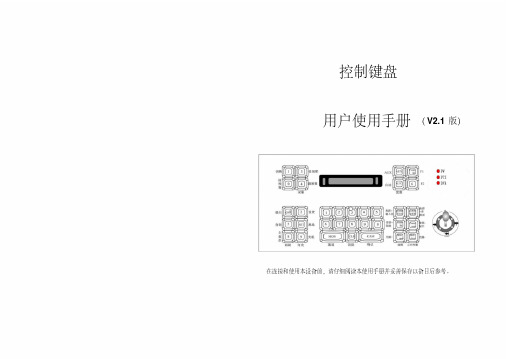
海康三维键盘1002K1003K用户使用手册
DS-1002/3K用户使用手册V2.1在使用前,请仔细阅读本使用手册并妥善保存以备日后参考。
本手册可能包含技术上不准确的地方或印刷错误。
本手册的内容将做不定期的更新,恕不另行通知;更新的内容将会在本手册的新版本中加入。
我们随时会改进或更新本手册中描述的产品或程序。
注意事项:●液晶显示屏为易损体,切勿挤压,或长久时间内在强光下直射;●摇杆为易损体,返修时,切记用原包装或妥善包装好再托运;●使控制键盘在技术指标允许的温度及湿度范围内工作;●请严格按照本手册的接线方式连接。
设备配置清单:目录功能简介 .............................................................................................................................................. 错误!未定义书签。
安装说明 .............................................................................................................................................. 错误!未定义书签。
后面板接口说明........................................................................................................................... 错误!未定义书签。
DS-1002K前面板说明.................................................................................................................. 错误!未定义书签。
海康DS-1100K网络控制键盘说明书
工作温度 工作湿度
尺寸 重量
网络方式
DS‐1100K
7 英寸 TFT LCD 触立体声(电平:2.0Vp‐p,阻抗:1kΩ)
1 个,3.5mm 立体声(线性电平,阻抗:600Ω)
1 个,RJ45 100M/1000M 自适应以太网口 1 个,标准 RS‐232 串行接口 1 个,标准 RS‐485 串行接口 1 个,USB 2.0
订货型号
DS-1100K
功能特性
支持控制视频综合平台、多路解码器的矩阵切换和前端通道的云台控制。 支持直接控制前端设备的云台控制。 采用 800*480 的触摸式液晶屏,显示内容丰富,屏幕帮助信息齐全 利用四维摇杆控制 PTZ。 支持飞梭旋钮控制。 采用人体工学设计,支持触摸式控制,产品简单易用。 支持直接在触控屏预览/播放前端视频,支持 1080p/720p/4CIF/DCIF/2CIF/CIF 等多种分辨率的网
正面图
物理接口
区域 ① ③ ⑤ ⑦ ⑨
说明 触摸笔 语音对讲输入 预留接口 网口 USB 口 电源开关
区域 ② ④ ⑥ ⑧ ⑩
说明 接地端 音频输出 预留接口 RS‐232 串口 电源输入 抓图按钮
技术参数
型号 控制方式 TFT LCD 面板 操纵杆 语音对讲输入 音频输出 网络接口 串行接口
海康威视使用说明 ppt课件
预览界面中,显示/隐藏通道状态。
变倍快捷键【变倍+】。
海康威视使用说明 序号 类型 名称
说明
1、本地回放快捷键;2、自动巡航快捷键。
1、手动录像快捷键;2、调用预置点快捷键
放像
。
录像 1、进入云台控制模式;2、光圈控制键【光
6 复合键 云台控制
圈-】。
多画面 1、预览时多画面切换;2、从菜单模式切换
自己来制作。
连接RS-485设备,如解码器等,可使用RJ45 接口的1、2线连接解码器,连接线的制作方
法请参见附录2。理接口 UTP网络接口
报警输入(IN)
连接说明
连接以太网络设备,如以太网交换机、以太 网集线器(HUB)等。网线制作方法参见附
录2。
接报警输入(8/16路开关量,连接方法介绍 参见2.4节)。
海康威视使用说明
海康威视使用说明
海康威视使用说明
序号 1
类型 开关键
名称 POWER
2
状态灯 1-16
3
输入键 数字键
功能键 F1
F2
说明
设备开关,带电源指示灯,绿色表示设备正在工作,红色 表示设备已经停止工作,指示灯灭表示后面板电源开关已 经关闭或电源线已经拔掉。
通道1-16状态显示。绿色表示正在录像,红色表示正在网 传,橙色表示正在录像和网传。指示灯闪烁并呈红色,表 示对应序号的硬盘有错误。
海康威视使用说明
回放操作要求用户具有“回放”操作权限。 在预览模式下按前面板的【放像/PLAY】键,弹出登录对话框,选择一
个用户名并输入正确的密码可进入回放操作界面。 在菜单操作模式下按前面板的【放像/PLAY】键可直接进入回放操作界
面。
海康二维控制键盘用户手册
海康二维控制键盘用户手册控制键盘用户手册1 性能介绍1.1概述控制键盘是配合DVR主机、嵌入式硬盘录像机等前端设备来控制高速智能球机、解码器、恒速球等设备的产品。
控制键盘与接收器之间采用EIA/RS - 485电气接口,在不加总线驱动的情况下,一台键盘最多可控制128个终端设备,键盘与终端设备的最大通信距离达1.5Km。
利用控制键盘可方便地对终端设备进行控制。
如果使用海康、大华、大力、视联、深傲嵌入式硬盘录像机,则可以通过控制键盘操作硬盘录像机。
1.2性能指标1.2.1电气参数供电电源:DC9V /500mA电源适配器:输入AC220V±10% 50/60HZ输出DC9V 500mA通信接口:与主机、终端设备连接采用RS-485总线控制方式波特率:1200bps、2400bps、4800bps、9600bps、19200bps1.2.2机械尺寸规格:270(长)×165(宽)×70(高)mm1.2.3环境参数温度:0℃~60℃湿度:90%RH2 主要功能介绍1. 控制键盘485接口采用光电隔离技术,抗干扰性强,传输距离远。
2. 控制恒/高速球摄像机或解码器的地址范围为1~128,并对其进行远程控制。
3. 可对高速球的云台进行变速操作。
4. 可对高速球进行预置点设置和调用。
5. 手动控制摄像机的聚焦﹑变焦﹑光圈。
6. 可实现与单台或多台(最多四台)嵌入式硬盘录像机联控。
与海康、大华嵌入式硬盘录像机配合使用,则可以控制多达14台。
7. 如果使用海康、大华、大力、视联、深傲嵌入式硬盘录像机,则可以通过控制键盘操作硬盘录像机。
3 控制键盘面板介绍以海康嵌入式硬盘录像机为例,设备外形见下图1。
3.1正面面板控制键盘正面面板上主要有控制摇杆,按键和LED数码管。
摇杆控制云台上、下、左、右动作,对于高速球,通过摇杆的倾斜度不同,可控制高速球动作的速度。
LED数码管显示系统状态及操作信息。
- 1、下载文档前请自行甄别文档内容的完整性,平台不提供额外的编辑、内容补充、找答案等附加服务。
- 2、"仅部分预览"的文档,不可在线预览部分如存在完整性等问题,可反馈申请退款(可完整预览的文档不适用该条件!)。
- 3、如文档侵犯您的权益,请联系客服反馈,我们会尽快为您处理(人工客服工作时间:9:00-18:30)。
1.连接
Ta(2号口)连接DVR的485的Ra
Tb(1号口)连接DVR的485的Rb
2.解码器或DVR配置
(1)在GUI上,串口配置中,选中控制键盘,
波特率9600
数据位8
停止位1
校验位无
协议海康键盘
(2)也可以在web上控制键盘界面进行如上配置
因为海康控制键盘这些参数固定不能配置,所以这个界面的配置不要修改,否者会无法控制。
3.控制键盘方式选择
控制键盘有两个功能,一是控制DVR,二是控制云台
这两个功能通过“切换”键进行切换
选中DVR时,显示屏上会显示类似于DVR-01等字样其中01为地址位,对应我们DVR的普通设置中的本地编号,DVR默认为8
序中ptz时,显示屏上会显示类似于球机-001等字样,001为球机地址
我们目前采用在DVR模式下工作
4.地址位选择
DVR控制模式下,需要选择地址位
和DVR的本机编号相配套。
DVR的地址位就是普通设置界面配置的本机编号,默认是8,可以进行配置。
键盘上在选中DVR模式后,按“地址”键,显示屏会提示“DVR:”,这时输入8来选中地址8,然后按“确认”键
这时显示屏上会显示DVR-08
5.控制DVR
(1)在主界面上无菜单输出时按1,2,3,4键进入相应通道的单画面预览,
(2)在主界面上按“调预置”焦距-/多画面进行单画面和多画面的切换
(3)在主界面按“确认”键进入控制菜单
(4)单画面主界面情况下按“光圈-/云台控制”进入云台控制和图像颜色设置菜单
(5)在菜单模式下,主要通过以下键进行操作:
“摇杆”向上,向下:激活的控件向上向下移动,在主菜单时对系统设置,管理工具,系统信息等进行选择
“摇杆”向左,向右:激活的控件向左向右移动,在主菜单时对系统设置等的子菜单进行选择,如普通设置,网络设置等
“退出”回到上一级菜单
“确认”确认或激活选中控件
“调预置/录像”切换输入法,进入录像控制
“雨刷/主菜单”删除错误输入
0-9数字键进行数字输入,切换中英文输入法采用手动录像按钮
要进行云台控制必须通过“光圈-/云台控制”或则“雨刷/主菜单”进入云台控制界面进行操作,
可以采用摇杆进行方向移动,其他操作如设置预置点等和其他菜单相同。
需要编码器先配置好云台的属性。
完整的C4D快捷键大全
目录
【主菜单】 (2)
【建模】 (2)
【材质管理器】 (3)
【物体管理器】 (4)
【图片浏览器】 (4)
【结构管理器】 (4)
【浏览器】 (4)
【编辑器】 (4)
【动画模块】 (5)
【属性管理器】 (5)
【Body Paint 3D】 (5)
【时间线】 (5)
【视窗】 (5)
【Mocca】 (6)。