中性三合一光猫说明书
NETGEAR S350系列8口光纤猫咪网络管理开关操作指南说明书

1. Register With the NETGEAR Insight AppUse the NETGEAR Insight App to register your switch.1. On your iOS or Android mobile device, visit the app store, search forNETGEAR Insight, and download the latest app.2. Open the NETGEAR Insight app.3. If you did not set up a NETGEAR account, tap Create NETGEAR Account andfollow the onscreen instructions.4. Enter the email address and password for your account and tap LOG IN .5. Tap + in the upper right corner.6. Either use the camera on your phone to scan the serial number bar codelocated on the bottom of the switch, or type in the serial number. 7. Tap Go .8. Tap View Device to add the switch to a network.The switch is registered and added to your account.NETGEAR® S350 Series 8-Port Gigabit Ethernet Smart Managed Pro Switch (GS308T)NETGEAR® S350 Series 8-Port Gigabit PoE+ Ethernet Smart Managed Pro Switch with 2 SFP • Switch model GS308T or GS310TP• GS308T power adapter (varies by region) orGS310TP adapter with detatchable power cord (varies by region)•Installation guide2. Connect the SwitchNote: For more information, see the hardware installation guide which you can download from https:///support/.3. Check the PoE Status (GS310TP Only)PoE+ power is provided by the GS310TP switch on ports 1-8. The switch can supply up to 30W PoE+ (IEEE 802.3at) to each port, with a maximum PoE power budget of 55W across all active PoE+ ports.The PoE Max LED indicates the status of the PoE budget on the switch:• Off . Sufficient (more than 7W of) PoE power is available.• Solid yellow . Less than 7W of PoE power is available.• Blinking yellow . At least once during the previous two minutes, less than 7Wof PoE power was available.4. Discover the IP AddressAn IP address is required to configure your switch. The switch gets an IPaddress from a DHCP server (such as your router) by default. If your switch is not connected to a DHCP server, use the default IP address: 192.168.0.239.Note: Make sure that you are using the latest version of the app.1. On your mobile device, connect with WiFi to the same router as the switch.2. Open the NETGEAR Insight app and log in to your account.The current IP address of the switch is displayed.GS308T switchGaming consoleDesktopNETGEAR, Inc.350 East Plumeria DriveSan Jose, CA 95134, USA NETGEAR INTL LTDBuilding 3, University Technology Centre Curraheen Road, Cork, Ireland© NETGEAR, Inc., NETGEAR and the NETGEAR Logo are trademarks of NETGEAR, Inc. Any non‑NETGEAR trademarks are used for reference purposes only.SupportThank you for purchasing this NETGEAR product. You can visithttps:///support/ to register your product, get help, access the latest downloads and user manuals, and join our community. We recommend that you use only official NETGEAR support resources.Si ce produit est vendu au Canada, vous pouvez accéder à ce document en français canadien à https:///support/download/.(If this product is sold in Canada, you can access this document in Canadian French at https:///support/download/.)For regulatory compliance information including the EU Declaration of Conformity, visit https:///about/regulatory/.See the regulatory compliance document before connecting the power supply.Do not use this device outdoors. If you connect cables or devices that are outdoors to this device, see https:///000057103 for safety and warranty information.November 20185. Configure the SwitchWe recommend that you use a web browser on a computer or tablet to configure the switch.Note: If your computer is a Mac, use the NETGEAR Switch Discovery Tool, as described in the following section.1. Open a web browser from a computer or tablet connected to the samenetwork as your switch.You can use a WiFi or wired connection. 2. Enter the IP address of the switch.3. Enter the password.The default password is password . We recommend that you change the password to a more secure password.4. Click the Login button.Other Discovery and Configuration MethodsThe NETGEAR Switch Discovery Tool and the Smart Control Center Utility let you discover the IP address and configure the switch. •NETGEAR Switch Discovery Tool . You can use a Mac or a 64-bit Windows-based computer that is on the same network as the switch. You can use a WiFi or wired connection. When you discover the switch, this tool provides access to the local browser interface to c onfigure the switch. To download the NETGEAR Switch Discovery Tool, visit/support/product/netgear-switch-discovery-tool.aspx .•Smart Control Center Utility . You can use a Windows-based computer that is on the same network as the switch. This utility requires Adobe Air. If Adobe Air is not detected during Smart Control Center Utility installation, you are prompted to allow Adobe Air to be installed. To download this utility, visit /support/product/SCC .Note: If you cannot discover or configure the switch, you might need totemporarily disable the firewall, Internet security, or antivirus programs. Make sure to reenable these security services after you discover and configure the switch.PoE ConsiderationsThe PoE and PoE+ power supplied by the GS310TP switch is prioritized in ascending port order (from port 1 to port 8), with a total power budget of 55 watts with a 67.5 watt power adapter. If the power requirements for the attached powered devices (PDs) exceed the total power budget of the switch, the PD on the highest-numbered port is disabled to make sure that the PDs that are connected to the higher-priority, lower-numbered ports are supported first.Just because a PD is listed as an 802.3at PoE powered device does notnecessarily mean that it requires the maximum power limit of the specification. Many PDs require less power, allowing all eight PoE+ ports to be active simultaneously.The following table describes the PoE and PoE+ classes and switch allocations.Device ClassStandardClassDescription PowerReserved by the Device PowerDelivered to the Device*0PoE and PoE+Default power (full)15.4W0.44W–12.95W1PoE and PoE+Very low power4.0W 0.44W–3.84W2PoE and PoE+Low power 7.0W 3.84W–6.49W 3PoE and PoE+Mid power 15.4W 6.49W–12.95W 4PoE+ onlyHigh power30.0W12.95W–25.5W* Calculated with the maximum cable length of 328 feet (100 meters). Shorter cable lengths will provide power closer to the power reserved by the switch.。
光猫设置指南(FLET'S光)说明书

01插口上带有盖子的类型直接插入的类型光纤线电源适配器光纤插座有以下几种类型。
进行连接之前 请确认!根据光纤插座的类型不同,打开连接端口的方法也不同。
光纤插座的插口不窥视!家庭型光配线方式公寓型光配线方式公寓型VDSL配线方式光纤线电源适配器申请最大通信速度为 10Gbps服务的用户小型ONU光纤线电源适配器多功能路由器多功能路由器(带有ONU 功能)多功能路由器ONU 向作为任选申请多功能路由器的用户,另外发送机器。
2无线网卡情况A P.05-P.06(上方)仅申请因特网的用户情况B 申请电话和因特网的 用户情况C 申请小型ONU的用户电源适配器电话线 VDSL 调制解调器情况D 仅申请因特网的用户连接情况的确认根据NTT西日本提供的机器及申请的内容请确认用户的连接情况,进入相应的页面。
连接情况及下页以后的配置图 连接顺序是使用NTT机器时的代表性 示例。
详情(包括指示灯状态等确认连接完成的方法),请确认使用的机器 所附带的使用说明书。
P.05-P.06(下方)P.05-P.06P.07-P.08电源适配器电源适配器电话线网线多功能路由器 VDSL 调制解调器情况E 申请电话和因特网的用户P.09-P.10(下方)P.09-P.10(上方)0304S T E P 2连 接连接光纤线连接到电脑接通电源光纤插座电源插座光纤线网线电脑ONU关于光纤插座,请参阅P03-04。
关于光纤插座,请参阅P03-04。
在达到 的指示灯状态之前,请勿拔掉电源线、网线。
5243如要连接作为任选的多功能路由器,请在 之间连接!3一定在 之后!24个指示灯点亮指示灯状态「 (认证)」「 」「 (光回线)」「 (电源)」(绿色)点亮(绿色)点亮(绿色)点亮(绿色)点亮确认连接5查看ONU的指示灯,确保正确连接。
ONU用力按住●所示的部分,同时按箭头方向打开盖子。
取下套子并插入。
关于ONU的操作套子请在施工当天的8点 22点之间连接机器。
光猫配置教程一步步设置网络连接

光猫配置教程一步步设置网络连接随着互联网的普及,越来越多的家庭开始安装宽带网络,并且分布式网络设备也开始逐渐取代传统的宽带连接方式。
其中一种常见的设备就是光猫。
光猫是一种将光信号转换为电信号的设备,常用于光纤宽带接入。
本文将为大家介绍一步步设置光猫网络连接的教程,帮助你轻松配置网络。
第一步:确定光猫的类型和接口在开始设置之前,首先要了解你所使用的光猫的类型和接口。
常见的光猫类型有EPON和GPON,它们的光接口和电口数量也有所不同。
确定光猫接口的数量和类型,可以帮助你更好地了解如何进行连接。
第二步:插上光纤线在设置之前,确保你已经正确地插入光纤线。
光纤线是将光信号传输到你的光猫设备的重要媒介。
通常光纤线具有特定的接口,因此请确保将其正确插入到相应的光口。
第三步:插上电源线光猫通常需要供电才能正常工作,因此请将光猫的电源线正确插入到电源插座中。
确保电源线连接牢固,避免电源线断开导致网络中断。
第四步:连接路由器或计算机完成光猫的电源连接之后,接下来需要将光猫与路由器或计算机进行连接。
如果你使用的是路由器,使用网线将光猫与路由器的WAN口相连;如果你使用的是计算机,可以直接使用网线将光猫与计算机相连。
确保连接稳固,避免松动导致网络问题。
第五步:配置网络参数连接完成后,你需要进行网络参数的配置。
一般情况下,光猫会自动获取网络参数,如果没有自动获取,则需要手动配置。
配置的参数包括IP地址、子网掩码、网关地址和DNS服务器等。
许多光猫设备都提供了图形化的配置界面,你可以通过打开浏览器输入默认的网关IP地址,进入设备的管理页面进行配置。
网关IP地址通常可以在光猫的说明书或者设备背面的标签上找到。
在进入管理界面后,按照界面的指引进行网络参数的配置。
一般来说,你只需要根据你的网络服务商提供的信息填写相应的参数即可。
第六步:保存配置并重启设备完成网络参数的配置后,记得保存配置并重启设备。
保存配置的方式通常是点击页面上的"保存"或者"应用"按钮,然后等待设备重启即可。
中移动无线电力猫通用设置说明书

中移动无线电力猫通用设置说明书说明:本电力猫为中移动CMCC工程设备,功能十分强大,教程未提及的设置请不要随意更改。
此设备有电力猫、无线AP、无线路由三种模式,其中电力猫与AP模式默认开启,且电力猫配对功能为自动配对!一、电力猫或AP模式设置方法1、连接线路:将小的主机与路由器LAN口用网线连接,然后将大的无线副机通电后,用网线与电脑连接(必须用网线连接,因设备默认关闭DHCP,不会自动分配IP),此时PLC灯亮起表示配对成功,反之表示未成功配对。
2、设置IP:然后将电脑本地连接IP设置为192.168.1.2,如下图:设置路径:打开网络共享中心—更改适配器设置—本地连接—属性—TCP/IPV43、进入设置页面:打开浏览器,输入192.168.1.100进入设置管理页面,用户名:admin 密码:admin4、修改无线名称:选择左侧菜单,无线网络设置—基本设置,设置您自己的网络名称,(建议设置与原路由器完全一样的无线名称和密码,这样可以实现无缝自动漫游)最后点确定保存设置5、修改无线名称:无线网络设置—安全设置,安全模式:WPA2-PSK 算法:AES,无线密码设置与原路由一致,最后点击确定6、最后将本地连接的IP修改为自动获取,点击两次确定后,所有设置完毕,大功告成!二、路由器模式设置方法1、线路连接:与电力猫/AP相同,唯一区别在于小的主机直接与modem猫连接,不是与路由连接。
1、选择模式:点击运作模式,选择Gateway,并确定。
2、设置宽带账号与密码:选择网络设置—广域网络,输入宽带账号与密码(运营商提供的账号与密码)3、查看联网状态:进入系统管理—状态,如果广域网络IP地址有显示具体的IP数值,表示已设置联网成功,反之表示未连接成功!4、设置完成后,进入局域网设置,将DHCP服务打开,此操作可让以后可以无需设置固定ip就能直接进入设备管理页面。
4、切记:设置好以后必须将电脑本地连接的IP地址改回自动获取,否则电脑将无法上网。
中性三合一光猫说明书

中性三合一光猫说明书High-speed RS232/RS485/RS4223 in 1 Fiber optic modem光纤调制解调器使用说明书一、概述它是多功能的支持异步RS-232,RS-485,RS-422通信接口的光纤MODEM,是连接远程终端单元(RTU)到主机(HOST)或分布式数据采集系统(SCADA)控制器的最佳选择。
支持RS-232,RS-485,RS-422多种异步通信协议,可以同时混合使用两个RS-232,RS-485或RS-422接口,支持2线(半双工)RS-485和4线(全双工)RS-422工作方式。
它的RS-485方式支持数据(TXD或SD)发送控制,从而提高了适应各类软件的能力,也简化了控制方式,光纤调制解调器支持异步串行口之间的多种光纤连接方式,它支持两个异步串行口的设备通过光纤进行全双工或半双工通信,通信距离最远可达多模4公里,单模20公里,RS-232信号的传输速率最高为115.2Kbps,RS-485/RS-422的信号传输速率最高可达460Kbps,不同电气标准的接口可以混合使用,可以用RS-232的设备去连接RS-485/RS-422的设备,可以代替RS-232到RS-485/422接口转换器或光电隔离器,并提供了优良的EMI/RFT特性。
它支持两个数据信号的传输:发送数据和接收数据,同时还提供了RS-485/RS-422的数据传输自动使能控制电路。
零延迟转换时间,所有的串行口都是通过接线柱连接,光纤的连接通过两个ST接口。
二、性能参数1、使用单模光纤工作距离达20KM2、支持点对点连接3、支持RS-232,RS-422,RS-485异步通信协议4、可同时混合使用两个RS-232,RS-422,RS-485接口5、支持2线(半双工)和4线(全双工) RS-485工作方式6、通信速率可达460Kbps7、使用ST光纤接口(可选SC、FC接口)8、工作环境:温度-35℃-75℃,相对湿度5%-95%9、工作波长:1310nm10、电器接口:RS232、RS485\RS422 采用带螺丝接线柱;光口:ST(标准),SC/FC可选11、输入电压:DC9-35V12、接口保护:±15KV ESD保护,RS485/RS422采用TVS 管保护三、连接器和信号带螺丝接线端子引脚分配四、光纤连接示意图它必须成对使用,采用两根光纤交叉连接,具体如下:。
ftth型三合一智能终端说明书

ftth型三合一智能终端说明书
三合一光纤分纤箱【三网合一】使用说明ftth惶外璧挂式光分胳器箱用于光翁与光通信设备的线注接,通过配线箱内的适配藩。
三合一光纤分纤箱【三网舍一】使用说明用光纤跳线引拙出光信号,实双光醒线功能。
适用于仙工程光能虽楼后使用,三合一光纤分纤箱【三网舍一】使用说明安装于擞道、地下宝、机房和大楼外遣·光就也可以经分米阎练格开拔盘染后与入户光眈格接引出。
三合一光纤分纤箱【三网台一】传用说明实现光将的直通功能,满足传统传输网络工程的需求。
主要特点:
1.有效做到移动﹑联通、电信三网合一。
大大节省了施工空间和施工强度。
2.箱体采用冷轧板制成,经静电喷塑处理,美观大方,线条清晰,防腐防水性能好,使用寿命长。
3.光分路器模块采用抽屉式模块化设计,具有很强的互换性和通用性。
4.采取左右结构和上下结构组合结构的设计,左右两边都有光纤熔接层,而右边上层为光分路器配线层,下层为光纤熔接层。
5.在机箱形式及厚度保持一致的情况下,光纤熔接盘大支持6片,满足施工过程中任意形式的接续。
6.各种接头端接方便,安装灵活。
用于配线间和设备间光缆的端接﹑使用和管理。
7.i门锁采用优质户外防水锁,箱体挂墙安装。
8.具有临时尾纤存储区域。
EPON产品使用指南

PON(光纤猫)产品使用指南购买之前先确认以下两点1、确认所申请的光纤网络所采用的技术是EPON还是GPON。
目前我司EPON产品有TL-EP110、TL-EP140,GPON产品有TL-GP110。
2、请确认运营商支持用户自行到市场中购买PON设备,如遇运营商进行限制,产品将存在无法使用的风险。
PON产品使用流程1、请按下图提示进行硬件连接(图中以TL-EP110为例)。
其中TL-GP110采用SC-UPC接口,请确认入户的光纤线缆也是SC-UPC接口,如果用APC 接口插入我们的产品,可能会导致UPC端面受损造成设备损坏。
UPC接口图:端面为平面若光信号状态指示灯处于非正常状态,请按以下方式进行检查。
TL-EP110telnet 192.168.1.1,para得到当前光参数。
TL-EP140通过web可以直接看到如下。
TL-GP110 1.0通过web可以直接看到如下。
说明:“-”或“--”代表无光纤连接。
2、观察产品是否完成注册。
产品完成注册后,PON灯处于常亮状态。
若无法完成注册请与运营商或总部技术支持联系。
3、若注册后仍然无法连接上网,请联系总部技术支持进行以下确认。
(1)、抓取相关LOG(研发已经安排针对TL-EP110以及TL-GP110开发抓取LOG信息的软件,使用方法以及软件在完成后会尽快发出)。
(2)、进行功能性调试。
目前需要办事处或用户配合完成,但研发现已经针对性的在产品上开发诊断测试功能,并且会提供一份技术指导书。
主要存在的问题如下:1、VLAN配置需确认实际用户环境中的VLAN模式:tag、转换、透传。
2、组播配置SFU:需要查看当前组播方式(IGMP Snooping方式,还是CTC可控组播方式)和组播VLAN。
HGU:需要查看IGMP Proxy是否开启。
3、调度配置运营商远程可能会配置ONU的Qos,针对Qos的配置可能会影响到数据包的转发,需要查看当前Qos规则。
千兆光猫用户手册说明书
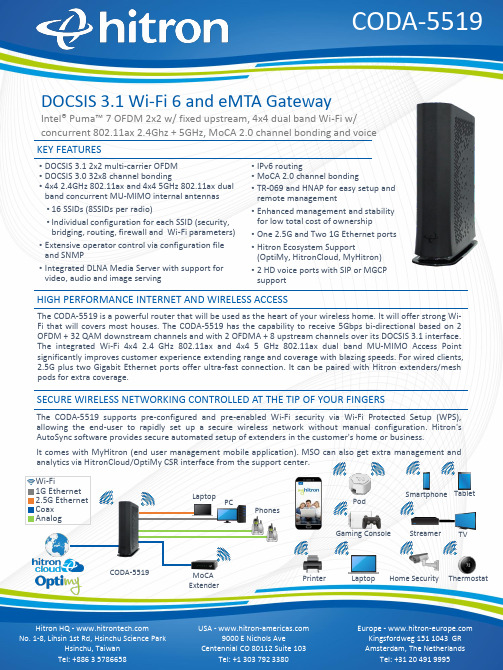
The CODA-5519is a powerful router that will be used as the heart of your wireless home.It will offer strong Wi-Fi that will covers most houses.The CODA-5519has the capability to receive 5Gbps bi-directional based on 2OFDM +32QAM downstream channels and with 2OFDMA +8upstream channels over its DOCSIS 3.1interface.The integrated Wi-Fi 4x42.4GHz 802.11ax and 4x45GHz 802.11ax dual band MU-MIMO Access Point significantly improves customer experience extending range and coverage with blazing speeds.For wired clients,2.5G plus two Gigabit Ethernet ports offer ultra-fast connection.It can be paired with Hitron extenders/mesh pods for extra coverage.•DOCSIS 3.1 2x2 multi-carrier OFDM •DOCSIS 3.0 32x8 channel bonding•4x4 2.4GHz 802.11ax and 4x4 5GHz 802.11ax dual band concurrent MU-MIMO internal antennas •16 SSIDs (8SSIDs per radio)•Individual configuration for each SSID (security, bridging, routing, firewall and Wi-Fi parameters)•Extensive operator control via configuration file and SNMP•Integrated DLNA Media Server with support for video, audio and image servingDOCSIS 3.1 Wi-Fi 6 and eMTA GatewayIntel® Puma™ 7 OFDM 2x2 w / fixed upstream, 4x4 dual band Wi-Fi w/ concurrent 802.11ax 2.4Ghz + 5GHz, MoCA 2.0 channel bonding and voice HIGH PERFORMANCE INTERNET AND WIRELESS ACCESSThe CODA-5519supports pre-configured and pre-enabled Wi-Fi security via Wi-Fi Protected Setup (WPS),allowing the end-user to rapidly set up a secure wireless network without manual configuration.Hitron's AutoSync software provides secure automated setup of extenders in the customer's home or business.It comes with MyHitron (end user management mobile application).MSO can also get extra management and analytics via HitronCloud/OptiMy CSR interface from the support center.SECURE WIRELESS NETWORKING CONTROLLED AT THE TIP OF YOUR FINGERSKEY FEATURES•IPv6 routing•MoCA 2.0 channel bonding•TR-069 and HNAP for easy setup and remote management•Enhanced management and stability for low total cost of ownership•One 2.5G and Two 1G Ethernet ports •Hitron Ecosystem Support (OptiMy, HitronCloud, MyHitron)•2 HD voice ports with SIP or MGCP supportTVStreamer Smartphone TabletThermostatHome Security LaptopCODA-5519Printer PCMoCA ExtenderPhonesWi-Fi1G Ethernet Analog2.5G Ethernet Coax PodLaptop Gaming ConsoleConnectivity•RF F-Type 75Ωfemale connector•2x RJ-45 Ethernet port 10/100/1000Mbps•1x RJ-45 Ethernet port 10/100/1000/2500Mbps•USB 3.0 type A connector with host interface•2x RJ-11 HD voice ports•EBBU jackManagement•Protocol support: TR-069, TFTP, SSHv2, SNMP v2C, v3•Web-based GUI control, configuration and management •Power-on self diagnostic•Hitron proprietary MIBs for extended support onDOCSIS, router management, Wi-Fi managementand MoCA management•app support•and back end supportReception-Demodulation•DOCSIS 3.1/3.0/2.0•DOCSIS 3.1 demodulation: Multi-carrier OFDM 16 to 4096QAM •DOCSIS 3.1 data rate: Up to 5Gps with 2 OFDM 192MHz downstream channels +32 QAM•DOCSIS 3.0 demodulation: 64QAM, 256QAM•DOCSIS 3.0 data rate: Up to 1.2Gbps with 32 bonded downstream channels•Frequency (edge-to-edge): 108-1218MHz and 258-1218 •Channel Bandwidth: 6MHz•Signal level: -15dBmV to 15dBmVTransmitter-Modulation•DOCSIS 3.1/3.0/2.0•DOCSIS 3.1 modulation: Multi-carrier OFDMA BPSK to 4096QAM •DOCSIS 3.1 data rate: Up to 700Mbps with OFDMA 96MHz upstream channels•DOCSIS 3.0 modulation: QPSK, 8QAM, 16QAM, 32QAM, 64QAM, and 128QAM (SCDMA only)•DOCSIS 3.0 data rate: Up to 320Mbps with 8 bonded upstream channels•Frequency: Fixed 5-85MHz•Upstream transmit signal level: +11 to 65dBmVMoCA 2.0 Reception / Transmitter-Modulation •Demodulation/ Modulation: BPSK, QPSK, 8QAM, 16QAM,32QAM, 64QAM, 128QAM, 256QAM, 512QAM, 1024QAM •PHY data rate: 700Mbps (baseline Mode) / 1400Mbps (bonding channel)•Throughput: 400+Mbps (baseline mode) / 500+Mbps (turbo mode, point to point) / 800Mbps (bonding channel)•Frequency (center frequencies): 1400-1625MHz•Channel bandwidth: 100MHz (baseline mode) / 225MHz (bonding channel)Voice•Protocol support: SIP or MGCP•2x 8kHz each HD voice•Audio codecs: G.711 (a-law and mu-law), G.722 (HD codec), G.723.1, G.726, G.728, and G.729Routing Support•Protocol support: IGMP v3 for IPTV service capability•MAC address filtering (IPv4/IPv6)•IP source/destination address filtering (IPv4/IPv6)•DHCP, TFTP and ToD clients (IPv4/IPv6)•DHCP server supports RFC 1541 (IPv4)•DHCPv6 obtains prefix from DHCPv6 server through prefix delegation•Firewall with stateful inspection (IPv4/IPv6)•Hacker intrusion prevention and detection•Application content filtering (IPv4/IPv6)•Complete NAT software implemented as per RFC 1631 with port and address mapping (IPv4)•DSLite support for IPv4 in-home support with IPv6 MSO backbone •6RD support for quick IPv6 deployment over IPv4 backbone •RIPv2 for static IP supportWireless•802.11a/b/g/n/ac/ax•4T4R 2.4GHz 11ax and 4T4R 5GHz 11ax dual band concurrent MU-MIMO with 1Gbps+4.8Gbps PHY rate•20/40/80/160MHz channel bandwidth•Up to 8 SSIDs for each frequency•Security: WPA-PSK/WPA2-PSK (TKIP/AES), WPA3, WAPI •QoS: WMM/WMM-PS•WPS (Wi-Fi Protected Setup) PBC, PIN•Airtime Fairness (ATF), Band Steering (BS)•Dynamic Frequency Selection (DFS)•Wi-Fi output power range: Max permitted by FCC/IC Electrical•Input power: 12VDC, 4A•Power adaptor: 100-240VAC, 50/60Hz•Power consumption: 4.92 (power saving), 22W (typ.), 38W (Max)•Support power outage for 24 hours on Hitron external battery •Surge protection: RF input sustains at least 4KVEthernet RJ-45 sustains at least 4KV Mechanical•Factory default reset button•WPS button•Dimensions: 74.3mm (W) x 251.5mm (H) x 230.8mm (D)•Weight: Weight: 1850 ±10gEnvironmental•Operating temperature: 0°C (32°F) ~ 40°C (104°F)•Operating humidity: 10% ~ 90% (Non-condensing)•Storage temperature: -40°C (-40°F) ~ 60°C (140°F) Compliance Certificates•RoHS compliant•FCC, IC, ULSPECIFICATIONS。
- 1、下载文档前请自行甄别文档内容的完整性,平台不提供额外的编辑、内容补充、找答案等附加服务。
- 2、"仅部分预览"的文档,不可在线预览部分如存在完整性等问题,可反馈申请退款(可完整预览的文档不适用该条件!)。
- 3、如文档侵犯您的权益,请联系客服反馈,我们会尽快为您处理(人工客服工作时间:9:00-18:30)。
High-speed RS232/RS485/RS422
3 in 1 Fiber optic modem
光纤调制解调器使用说明书
一、概述
它是多功能的支持异步RS-232,RS-485,RS-422通信接口的光纤MODEM,是连接远程终端单元(RTU)到主机(HOST)或分布式数据采集系统(SCADA)控制器的最佳选择。
支持RS-232,RS-485,RS-422多种异步通信协议,可以同时混合使用两个RS-232,RS-485或RS-422接口,支持2线(半双工)RS-485和4线(全双工)RS-422工作方式。
它的RS-485方式支持数据(TXD或SD)发送控制,从而提高了适应各类软件的能力,也简化了控制方式,光纤调制解调器支持异步串行口之间的多种光纤连接方式,它支持两个异步串行口的设备通过光纤进行全双工或半双工通信,通信距离最远可达多模4公里,单模20公里,RS-232信号的传输速率最高为115.2Kbps,RS-485/RS-422的信号传输速率最高可达460Kbps,不同电气标准的接口可以混合使用,可以用RS-232的设备去连接RS-485/RS-422的设备,可以代替RS-232到
RS-485/422接口转换器或光电隔离器,并提供了优良的EMI/RFT特性。
它支持两个数据信号的传输:发送数据和
接收数据,同时还提供了RS-485/RS-422的数据
传输自动使能控制电路。
零延迟转换时间,所有
的串行口都是通过接线柱连接,光纤的连接通过
两个ST接口。
二、性能参数
1、使用单模光纤工作距离达20KM
2、支持点对点连接
3、支持RS-232,RS-422,RS-485异步通信协议
4、可同时混合使用两个RS-232,RS-422,RS-485
接口
5、支持2线(半双工)和4线(全双工) RS-485
工作方式
6、通信速率可达460Kbps
7、使用ST光纤接口(可选SC、FC接口)
8、工作环境:温度-35℃-75℃,相对湿度5%-95%
9、工作波长:1310nm
10、电器接口:RS232、RS485\RS422 采用带螺
丝接线柱;光口:ST(标准),SC/FC可选
11、输入电压:DC9-35V
12、接口保护:±15KV ESD保护,RS485/RS422采用TVS
管保护
三、连接器和信号
带螺丝接线端子引脚分配
四、光纤连接示意图
它必须成对使用,采用两根光纤交叉连接,具体如下:。