jQuery多图上传插件imgUp.js
JsJq截图并上传

JsJq 截图并上传今天想做⼀个 Js + Jq 截取⽹页图并上传到后端,经过⼀番折腾最终达到了效果。
1·⾸先需要⽤到⼀个⾮常强⼤的外部依赖库 html2canvashtml2canvas 官⽹:去官⽹复制 Js 依赖代码 ( html2canvas.js 或 html2canvas.min.js )新建⼀个js⽂件,把复制的代码放进去,哪个页⾯要⽤就导⼊这个 js导⼊ js 后官⽹给的⽰例只需要两份代码(HTML + Js)代码放⼊后会有两个 Hello world! 下⾯那个就是图⽚,右键可下载2·Base64 转 blob函数3·获取⽣成的图⽚<div id ="capture" style ="padding: 10px; background: #f5da55"><h4 style ="color: #000; ">Hello world!</h4></div >html2canvas(document.querySelector("#capture")).then(canvas => {document.body.appendChild(canvas);});function base64ToBlob(base64, mime) {mime = mime || '';var sliceSize = 1024;var byteChars = window.atob(base64);var byteArrays = [];for (var offset = 0, len = byteChars.length; offset < len; offset += sliceSize) { var slice = byteChars.slice(offset, offset + sliceSize);var byteNumbers = new Array(slice.length);for (var i = 0; i < slice.length; i++) {byteNumbers[i] = slice.charCodeAt(i);}var byteArray = new Uint8Array(byteNumbers);byteArrays.push(byteArray);}return new Blob(byteArrays, {type: mime});}function getCanvas() {// 获得Canvas 对象let canvas = document.getElementsByTagName("canvas")[0];let ctx = canvas.getContext('2d');ctx.drawImage(canvas, 0, 500, 500, 500); // 参考 drawImage() 函数⽤法 let dataURL = canvas.toDataURL("image/png"); // 将canvas 转换成base64 dataURL = dataURL.substring(dataURL.indexOf(',') + 1, dataURL.length); // console.log(dataURL);var blob = base64ToBlob(dataURL, 'image/png'); // 将base64转换成blob var imgData = new FormData();imgData.append('file', blob); // 上传$.ajax({url: 'http://127.0.0.1:8080/testData',type: "POST",dataType: 'json',contentType: false , //必须加4·SpringBoot接收上⽂有的 Js 可以⽤ Jq 替代,这⾥就不作修改了。
jquery fileupload控件的用法

jquery fileupload控件的用法`jQuery File Upload`是一个基于`jQuery`的文件上传插件,用于实现文件的异步上传功能。
其用法如下:1. 需要加载的`js`文件:`jquey-1.8.3.min.js`、`jquery-ui-widget.js`、`jquery.iframe-transport.js`、`jquery.fileupload.js`。
2. `html`代码:```html<input id="fileupload" type="file" name="files()" data-url="server/php/" multiple>```3. `js`代码:```javascript$(function () {$("#fileupload").fileupload({dataType: 'json',done: function (e, data) {$.each(data.result.files, function (index, file) {$("<p/>").text().appendTo(document.body);})},progressall: function (e, data) {var progress = parseInt(data.loaded / data.total * 100, 10);$("#progress .bar").css("width", progress + "%");},// 需要一个<div>容器用来显示进度<div id="progress"><div class="bar" style="width: 0%;"></div>});})```4. `API`:- `Initialization`:在上传按钮上调用`fileupload()`方法。
jquery插件ajaxupload实现文件上传操作

jquery插件ajaxupload实现⽂件上传操作本⽂实例讲述了jquery插件ajaxupload实现⽂件上传操作代码。
分享给⼤家供⼤家参考。
具体如下:运⾏效果截图如下:图1 ⽂件上传前图2 ⽂件上传后具体代码如下:1、创建页⾯并编写HTML上传⽂档:<div class="uploadFile"><span id="doc"><input type="text" disabled="disabled" /></span><input type="hidden" id="hidFileName" /><input type="button" id="btnUploadFile" value="上传" /><input type="button" id="btnDeleteFile" value="删除" /></div>上传图⽚:<div class="uploadImg"><img id="imgShow" src="/images/nophoto.gif" /><input type="hidden" id="hidImgName" /><input type="button" id="btnUploadImg" value="上传" /><input type="button" id="btnDeleteImg" value="删除" /></div>2、引⽤AjaxUpload.js⽂件<script src="/js/common/AjaxUpload.js" type="text/javascript"></script>3、编写JS脚本window.onload = function() {init(); //初始化}//初始化function init() {//初始化⽂档上传var btnFile = document.getElementById("btnUploadFile");var doc = document.getElementById("doc");var hidFileName = document.getElementById("hidFileName");document.getElementById("btnDeleteFile").onclick = function() { DelFile(doc, hidFileName); };g_AjxUploadFile(btnFile, doc, hidFileName);//初始化图⽚上传var btnImg = document.getElementById("btnUploadImg");var img = document.getElementById("imgShow");var hidImgName = document.getElementById("hidImgName");document.getElementById("btnDeleteImg").onclick = function() { DelImg(img, hidImgName); };g_AjxUploadImg(btnImg, img, hidImgName);}var g_AjxTempDir = "/file/temp/";//⽂档上传function g_AjxUploadFile(btn, doc, hidPut, action) {var button = btn, interval;new AjaxUpload(button, {action: ((action == null || action == undefined) ? '/Common/UploadHandler.ashx?fileType=file' : action),data: {},name: 'myfile',onSubmit: function(file, ext) {if (!(ext && /^(rar|zip|pdf|pdfx|txt|csv|xls|xlsx|doc|docx|RAR|ZIP|PDF|PDFX|TXT|CSV|XLS|XLSX|DOC|DOCX)$/.test(ext))) {alert("您上传的⽂档格式不对,请重新选择!");return false;}},onComplete: function(file, response) {flagValue = response;if (flagValue == "1") {alert("您上传的⽂档格式不对,请重新选择!");}else if (flagValue == "2") {alert("您上传的⽂档⼤于2M,请重新选择!");}else if (flagValue == "3") {alert("⽂档上传失败!");}else {hidPut.value = response;doc.innerHTML="<a href='" + g_AjxTempDir + response + "' target='_blank'>" + response + "</a>";}}});}//图⽚上传function g_AjxUploadImg(btn, img, hidPut) {var button = btn, interval;new AjaxUpload(button, {action: '/Common/UploadHandler.ashx?fileType=img',data: {},name: 'myfile',onSubmit: function(file, ext) {if (!(ext && /^(jpg|JPG|png|PNG|gif|GIF)$/.test(ext))) {alert("您上传的图⽚格式不对,请重新选择!");return false;}},onComplete: function(file, response) {flagValue = response;if (flagValue == "1") {alert("您上传的图⽚格式不对,请重新选择!");}else if (flagValue == "2") {alert("您上传的图⽚⼤于200K,请重新选择!");}else if (flagValue == "3") {alert("图⽚上传失败!");}else {img.src = g_AjxTempDir + response;}}});}//删除⽂档function DelFile(doc, hidPut) {hidPut.value = "";doc.innerHTML = "<input type=\"text\" disabled=\"disabled\" />";}//删除图⽚function DelImg(img, hidPut) {hidPut.value = "";img.src = "/images/nophoto.gif";}4、创建/Common/UploadHandler.ashx处理程序<%@ WebHandler Language="C#" Class="UploadHandler" %>using System;using System.Web;using System.Text.RegularExpressions;using System.IO;public class UploadHandler : IHttpHandler {private string _filedir = ""; //⽂件⽬录/// <summary>/// 处理上传⽂件(1:⽂件格式不正确、2:⽂件⼤⼩不正确、3:上传失败、⽂件名称:上传成功)/// </summary>/// <param name="context"></param>public void ProcessRequest (HttpContext context) {_filedir = context.Server.MapPath(@"/file/temp/");try{string result = "3";string fileType = context.Request.QueryString["fileType"]; //获取上传⽂件类型if (fileType == "file"){result = UploadFile(context); //⽂档上传}else if (fileType == "img"){result = UploadImg(context); //图⽚上传}context.Response.Write(result);}catch{context.Response.Write("3");//3⽂件上传失败}}/// <summary>/// ⽂档上传/// </summary>/// <param name="context"></param>/// <returns></returns>private string UploadFile(HttpContext context){int cout = context.Request.Files.Count;if (cout > 0){HttpPostedFile hpf = context.Request.Files[0];if (hpf != null){string fileExt = Path.GetExtension(hpf.FileName).ToLower();//只能上传⽂件,过滤不可上传的⽂件类型string fileFilt = ".rar|.zip|.pdf|.pdfx|.txt|.csv|.xls|.xlsx|.doc|.docx......";if (fileFilt.IndexOf(fileExt) <= -1){return "1";}//判断⽂件⼤⼩int length = hpf.ContentLength;if (length > 2097152){return "2";}Random rd = new Random();DateTime nowTime = DateTime.Now;string newFileName = nowTime.Year.ToString() + nowTime.Month.ToString() + nowTime.Day.ToString() + nowTime.Hour.ToString() + nowTime.Minute.ToString() + nowTime.Second.ToString() + rd.Next(1000, 1000000) + Path.GetExtension(hpf.FileName); if (!Directory.Exists(_filedir)){Directory.CreateDirectory(_filedir);}string fileName = _filedir + newFileName;hpf.SaveAs(fileName);return newFileName;}}return "3";}/// <summary>/// 图⽚上传/// </summary>/// <param name="context"></param>/// <returns></returns>private string UploadImg(HttpContext context){int cout = context.Request.Files.Count;if (cout > 0){HttpPostedFile hpf = context.Request.Files[0];if (hpf != null){string fileExt = Path.GetExtension(hpf.FileName).ToLower();//只能上传⽂件,过滤不可上传的⽂件类型string fileFilt = ".gif|.jpg|.php|.jsp|.jpeg|.png|......";if (fileFilt.IndexOf(fileExt) <= -1){return "1";}//判断⽂件⼤⼩}Random rd = new Random();DateTime nowTime = DateTime.Now;string newFileName = nowTime.Year.ToString() + nowTime.Month.ToString() + nowTime.Day.ToString() + nowTime.Hour.ToString() + nowTime.Minute.ToString() + nowTime.Second.ToString() + rd.Next(1000, 1000000) + Path.GetExtension(hpf.FileName); if (!Directory.Exists(_filedir)){Directory.CreateDirectory(_filedir);}string fileName = _filedir + newFileName;hpf.SaveAs(fileName);return newFileName;}}return "3";}#region IHttpHandler 成员public bool IsReusable{get { throw new NotImplementedException(); }}#endregion}附件1:页⾯CSS样式/*上传⽂件*/.uploadFile{margin-bottom:10px;}/*上传图⽚*/.uploadImg{}.uploadImg img{width:102px; height:64px; border:1px solid #CCCCCC; display: block;}附件2:AjaxUpload.js⽂件/*** AJAX Upload ( /ajax-upload/ )* Copyright (c) Andris Valums* Licensed under the MIT license ( /mit-license/ )* Thanks to Gary Haran, David Mark, Corey Burns and others for contributions*/(function () {/* global window *//* jslint browser: true, devel: true, undef: true, nomen: true, bitwise: true, regexp: true, newcap: true, immed: true *//*** Wrapper for FireBug's console.log*/function log() {if (typeof(console) != 'undefined' && typeof(console.log) == 'function') {Array.prototype.unshift.call(arguments, '[Ajax Upload]');console.log(Array.prototype.join.call(arguments, ' '));}}/*** Attaches event to a dom element.* @param {Element} el* @param type event name* @param fn callback This refers to the passed element*/function addEvent(el, type, fn) {if (el.addEventListener) {el.addEventListener(type, fn, false);} else if (el.attachEvent) {el.attachEvent('on' + type, function () {fn.call(el);});} else {throw new Error('not supported or DOM not loaded');}}/*** Attaches resize event to a window, limiting* number of event fired. Fires only when encounteres* delay of 100 after series of events.** Some browsers fire event multiple times when resizing* /dom/events/resize.html** @param fn callback This refers to the passed element*/function addResizeEvent(fn) {var timeout;addEvent(window, 'resize', function () {if (timeout) {clearTimeout(timeout);}timeout = setTimeout(fn, 100);});}// Needs more testing, will be rewriten for next version// getOffset function copied from jQuery lib (/)if (document.documentElement.getBoundingClientRect) {// Get Offset using getBoundingClientRect// /blog/getboundingclientrect-is-awesome/var getOffset = function (el) {var box = el.getBoundingClientRect();var doc = el.ownerDocument;var body = doc.body;var docElem = doc.documentElement; // for ievar clientTop = docElem.clientTop || body.clientTop || 0;var clientLeft = docElem.clientLeft || body.clientLeft || 0;// In Internet Explorer 7 getBoundingClientRect property is treated as physical,// while others are logical. Make all logical, like in IE8.var zoom = 1;if (body.getBoundingClientRect) {var bound = body.getBoundingClientRect();zoom = (bound.right - bound.left) / body.clientWidth;clientTop = 0;clientLeft = 0;}var top = box.top / zoom + (window.pageYOffset || docElem && docElem.scrollTop / zoom || body.scrollTop / zoom) - clientTop, left = box.left / zoom + (window.pageXOffset || docElem && docElem.scrollLeft / zoom || body.scrollLeft / zoom) - clientLeft; return {top: top,left: left};};} else {// Get offset adding all offsetsvar getOffset = function (el) {var top = 0,left = 0;do {top += el.offsetTop || 0;left += el.offsetLeft || 0;el = el.offsetParent;} while (el);return {left: left,top: top};};}/*** Returns left, top, right and bottom properties describing the border-box,* in pixels, with the top-left relative to the body* @param {Element} el* @return {Object} Contains left, top, right,bottom*/function getBox(el) {var left, right, top, bottom;var offset = getOffset(el);left = offset.left;top = offset.top;right = left + el.offsetWidth;bottom = top + el.offsetHeight;return {left: left,right: right,top: top,bottom: bottom};}/*** Helper that takes object literal* and add all properties to element.style* @param {Element} el* @param {Object} styles*/function addStyles(el, styles) {for (var name in styles) {if (styles.hasOwnProperty(name)) {el.style[name] = styles[name];}}}/*** Function places an absolutely positioned* element on top of the specified element* copying position and dimentions.* @param {Element} from* @param {Element} to*/function copyLayout(from, to) {var box = getBox(from);addStyles(to, {position: 'absolute',left: box.left + 'px',top: box.top + 'px',width: from.offsetWidth + 'px',height: from.offsetHeight + 'px'});}/*** Creates and returns element from html chunk* Uses innerHTML to create an element*/var toElement = (function () {var div = document.createElement('div');return function (html) {div.innerHTML = html;var el = div.firstChild;return div.removeChild(el);};})();/*** Function generates unique id* @return unique id*/var getUID = (function () {var id = 0;return function () {return 'ValumsAjaxUpload' + id++;};})();/*** Get file name from path* @param {String} file path to file* @return filename*/function fileFromPath(file) {/*** Get file extension lowercase* @param {String} file name* @return file extenstion*/function getExt(file) {return (-1 !== file.indexOf('.')) ? file.replace(/.*[.]/, '') : '';}function hasClass(el, name) {var re = new RegExp('\\b' + name + '\\b');return re.test(el.className);}function addClass(el, name) {if (!hasClass(el, name)) {el.className += ' ' + name;}}function removeClass(el, name) {var re = new RegExp('\\b' + name + '\\b');el.className = el.className.replace(re, '');}function removeNode(el) {el.parentNode.removeChild(el);}/*** Easy styling and uploading* @constructor* @param button An element you want convert to* upload button. Tested dimentions up to 500x500px* @param {Object} options See defaults below.*/window.AjaxUpload = function (button, options) {this._settings = {// Location of the server-side upload scriptaction: 'upload.php',// File upload namename: 'userfile',// Additional data to senddata: {},// Submit file as soon as it's selectedautoSubmit: true,// The type of data that you're expecting back from the server.// html and xml are detected automatically.// Only useful when you are using json data as a response.// Set to "json" in that case.responseType: false,// Class applied to button when mouse is hoveredhoverClass: 'hover',// Class applied to button when AU is disableddisabledClass: 'disabled',// When user selects a file, useful with autoSubmit disabled// You can return false to cancel uploadonChange: function (file, extension) {},// Callback to fire before file is uploaded// You can return false to cancel uploadonSubmit: function (file, extension) {},// Fired when file upload is completed// WARNING! DO NOT USE "FALSE" STRING AS A RESPONSE!onComplete: function (file, response) {}};// Merge the users options with our defaultsfor (var i in options) {if (options.hasOwnProperty(i)) {this._settings[i] = options[i];}}// button isn't necessary a dom elementif (button.jquery) {// jQuery object was passedbutton = button[0];} else if (typeof button == "string") {if (/^#.*/.test(button)) {// If jQuery user passes #elementId don't break itbutton = button.slice(1);}button = document.getElementById(button);}if (!button || button.nodeType !== 1) {throw new Error("Please make sure that you're passing a valid element"); }if (button.nodeName.toUpperCase() == 'A') {// disable linkaddEvent(button, 'click', function (e) {if (e && e.preventDefault) {e.preventDefault();} else if (window.event) {window.event.returnValue = false;}});}// DOM elementthis._button = button;// DOM elementthis._input = null;// If disabled clicking on button won't do anythingthis._disabled = false;// if the button was disabled before refresh if will remain// disabled in FireFox, let's fix itthis.enable();this._rerouteClicks();};// assigning methods to our classAjaxUpload.prototype = {setData: function (data) {this._settings.data = data;disable: function () {addClass(this._button, this._settings.disabledClass);this._disabled = true;var nodeName = this._button.nodeName.toUpperCase();if (nodeName == 'INPUT' || nodeName == 'BUTTON') {this._button.setAttribute('disabled', 'disabled');}// hide inputif (this._input) {// We use visibility instead of display to fix problem with Safari 4 // The problem is that the value of input doesn't change if it// has display none when user selects a filethis._input.parentNode.style.visibility = 'hidden';}},enable: function () {removeClass(this._button, this._settings.disabledClass);this._button.removeAttribute('disabled');this._disabled = false;},/*** Creates invisible file input* that will hover above the button* <div><input type='file' /></div>*/_createInput: function () {var self = this;var input = document.createElement("input");input.setAttribute('type', 'file');input.setAttribute('name', this._);addStyles(input, {'position': 'absolute',// in Opera only 'browse' button// is clickable and it is located at// the right side of the input'right': 0,'margin': 0,'padding': 0,'fontSize': '480px','cursor': 'pointer'});var div = document.createElement("div");addStyles(div, {'display': 'block','position': 'absolute','overflow': 'hidden','margin': 0,'padding': 0,'opacity': 0,// Make sure browse button is in the right side// in Internet Explorer'direction': 'ltr',//Max zIndex supported by Opera 9.0-9.2'zIndex': 2147483583});// Make sure that element opacity exists.// Otherwise use IE filterif (div.style.opacity !== "0") {if (typeof(div.filters) == 'undefined') {throw new Error('Opacity not supported by the browser');}div.style.filter = "alpha(opacity=0)";}addEvent(input, 'change', function () {if (!input || input.value === '') {return;}// Get filename from input, required// as some browsers have path instead of itvar file = fileFromPath(input.value);if (false === self._settings.onChange.call(self, file, getExt(file))) { self._clearInput();return;}// Submit form when value is changedif (self._settings.autoSubmit) {self.submit();}});addEvent(input, 'mouseover', function () {addClass(self._button, self._settings.hoverClass);});addEvent(input, 'mouseout', function () {removeClass(self._button, self._settings.hoverClass);// We use visibility instead of display to fix problem with Safari 4 // The problem is that the value of input doesn't change if it// has display none when user selects a fileinput.parentNode.style.visibility = 'hidden';});div.appendChild(input);document.body.appendChild(div);this._input = input;},_clearInput: function () {if (!this._input) {return;}// this._input.value = ''; Doesn't work in IE6removeNode(this._input.parentNode);this._input = null;this._createInput();removeClass(this._button, this._settings.hoverClass);/*** Function makes sure that when user clicks upload button,* the this._input is clicked instead*/_rerouteClicks: function () {var self = this;// IE will later display 'access denied' error// if you use using self._input.click()// other browsers just ignore click()addEvent(self._button, 'mouseover', function () {if (self._disabled) {return;}if (!self._input) {self._createInput();}var div = self._input.parentNode;copyLayout(self._button, div);div.style.visibility = 'visible';});// commented because we now hide input on mouseleave/*** When the window is resized the elements* can be misaligned if button position depends* on window size*///addResizeEvent(function(){// if (self._input){// copyLayout(self._button, self._input.parentNode);// }//});},/*** Creates iframe with unique name* @return {Element} iframe*/_createIframe: function () {// We can't use getTime, because it sometimes return// same value in safari :(var id = getUID();// We can't use following code as the name attribute// won't be properly registered in IE6, and new window// on form submit will open// var iframe = document.createElement('iframe');// iframe.setAttribute('name', id);var iframe = toElement('<iframe src="javascript:false;" name="' + id + '" />');// src="javascript:false; was added// because it possibly removes ie6 prompt// "This page contains both secure and nonsecure items"// Anyway, it doesn't do any harm.iframe.setAttribute('id', id);iframe.style.display = 'none';document.body.appendChild(iframe);return iframe;},/*** Creates form, that will be submitted to iframe* @param {Element} iframe Where to submit* @return {Element} form*/_createForm: function (iframe) {var settings = this._settings;// We can't use the following code in IE6// var form = document.createElement('form');// form.setAttribute('method', 'post');// form.setAttribute('enctype', 'multipart/form-data');// Because in this case file won't be attached to requestvar form = toElement('<form method="post" enctype="multipart/form-data"></form>'); form.setAttribute('action', settings.action);form.setAttribute('target', );form.style.display = 'none';document.body.appendChild(form);// Create hidden input element for each data keyfor (var prop in settings.data) {if (settings.data.hasOwnProperty(prop)) {var el = document.createElement("input");el.setAttribute('type', 'hidden');el.setAttribute('name', prop);el.setAttribute('value', settings.data[prop]);form.appendChild(el);}}return form;},/*** Gets response from iframe and fires onComplete event when ready* @param iframe* @param file Filename to use in onComplete callback*/_getResponse: function (iframe, file) {// getting responsevar toDeleteFlag = false,self = this,settings = this._settings;addEvent(iframe, 'load', function () {if ( // For Safariiframe.src == "javascript:'%3Chtml%3E%3C/html%3E';" ||// For FF, IEiframe.src == "javascript:'<html></html>';") {// First time around, do not delete.// We reload to blank page, so that reloading main page// does not re-submit the post.if (toDeleteFlag) {// Fix busy state in FF3removeNode(iframe);},0);}return;}var doc = iframe.contentDocument ? iframe.contentDocument : window.frames[iframe.id].document; // fixing Opera 9.26,10.00if (doc.readyState && doc.readyState != 'complete') {// Opera fires load event multiple times// Even when the DOM is not ready yet// this fix should not affect other browsersreturn;}// fixing Opera 9.64if (doc.body && doc.body.innerHTML == "false") {// In Opera 9.64 event was fired second time// when body.innerHTML changed from false// to server response approx. after 1 secreturn;}var response;if (doc.XMLDocument) {// response is a xml document Internet Explorer propertyresponse = doc.XMLDocument;} else if (doc.body) {// response is html document or plain textresponse = doc.body.innerHTML;if (settings.responseType && settings.responseType.toLowerCase() == 'json') {// If the document was sent as 'application/javascript' or// 'text/javascript', then the browser wraps the text in a <pre>// tag and performs html encoding on the contents. In this case,// we need to pull the original text content from the text node's// nodeValue property to retrieve the unmangled content.// Note that IE6 only understands text/htmlif (doc.body.firstChild && doc.body.firstChild.nodeName.toUpperCase() == 'PRE') {response = doc.body.firstChild.firstChild.nodeValue;}if (response) {response = eval("(" + response + ")");} else {response = {};}}} else {// response is a xml documentresponse = doc;}settings.onComplete.call(self, file, response);// Reload blank page, so that reloading main page// does not re-submit the post. Also, remember to// delete the frametoDeleteFlag = true;// Fix IE mixed content issueiframe.src = "javascript:'<html></html>';";});},/*** Upload file contained in this._input*/submit: function () {var self = this,settings = this._settings;if (!this._input || this._input.value === '') {return;}var file = fileFromPath(this._input.value);// user returned false to cancel uploadif (false === settings.onSubmit.call(this, file, getExt(file))) {this._clearInput();return;}// sending requestvar iframe = this._createIframe();var form = this._createForm(iframe);// assuming following structure// div -> input type='file'removeNode(this._input.parentNode);removeClass(self._button, self._settings.hoverClass);form.appendChild(this._input);form.submit();// request set, clean upremoveNode(form);form = null;removeNode(this._input);this._input = null;// Get response from iframe and fire onComplete event when readythis._getResponse(iframe, file);// get ready for next requestthis._createInput();}};})();更多精彩内容请参考专题,和进⾏学习。
jQueryFileUpload文件上传插件使用详解
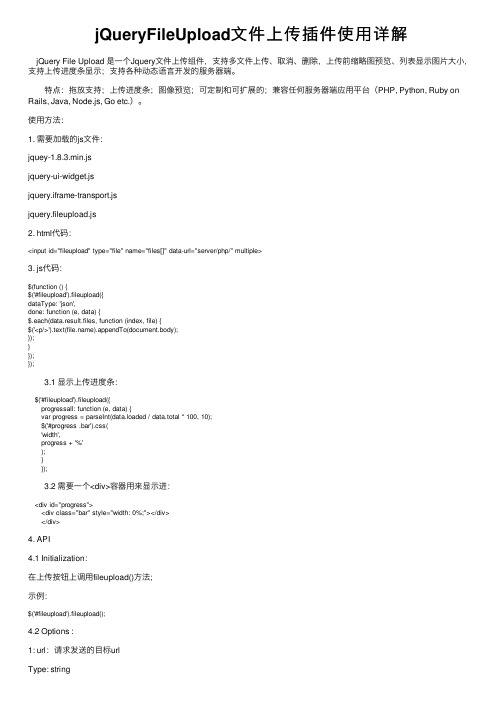
jQueryFileUpload⽂件上传插件使⽤详解 jQuery File Upload 是⼀个Jquery⽂件上传组件,⽀持多⽂件上传、取消、删除,上传前缩略图预览、列表显⽰图⽚⼤⼩,⽀持上传进度条显⽰;⽀持各种动态语⾔开发的服务器端。
特点:拖放⽀持;上传进度条;图像预览;可定制和可扩展的;兼容任何服务器端应⽤平台(PHP, Python, Ruby on Rails, Java, Node.js, Go etc.)。
使⽤⽅法:1. 需要加载的js⽂件:jquey-1.8.3.min.jsjquery-ui-widget.jsjquery.iframe-transport.jsjquery.fileupload.js2. html代码:<input id="fileupload" type="file" name="files[]" data-url="server/php/" multiple>3. js代码:$(function () {$('#fileupload').fileupload({dataType: 'json',done: function (e, data) {$.each(data.result.files, function (index, file) {$('<p/>').text().appendTo(document.body);});}});}); 3.1 显⽰上传进度条: $('#fileupload').fileupload({ progressall: function (e, data) { var progress = parseInt(data.loaded / data.total * 100, 10); $('#progress .bar').css( 'width', progress + '%' ); } }); 3.2 需要⼀个<div>容器⽤来显⽰进: <div id="progress"> <div class="bar" style="width: 0%;"></div> </div>4. API4.1 Initialization:在上传按钮上调⽤fileupload()⽅法;⽰例:$('#fileupload').fileupload();4.2 Options :1: url:请求发送的⽬标urlType: stringExample: '/path/to/upload/handler.json'2.Type: ⽂件上传HTTP请求⽅式,可以选择“POST”,“PUT”或者"PATCH",默认"POST"Type: stringExample: 'PUT'3. dataType:希望从服务器返回的数据类型,默认"json"Type: stringExample: 'json'4. autoUpload:默认情况下,只要⽤户点击了开始按钮被添加⾄组件的⽂件会⽴即上传。
聊一聊jquery文件上传(支持多文件上传)
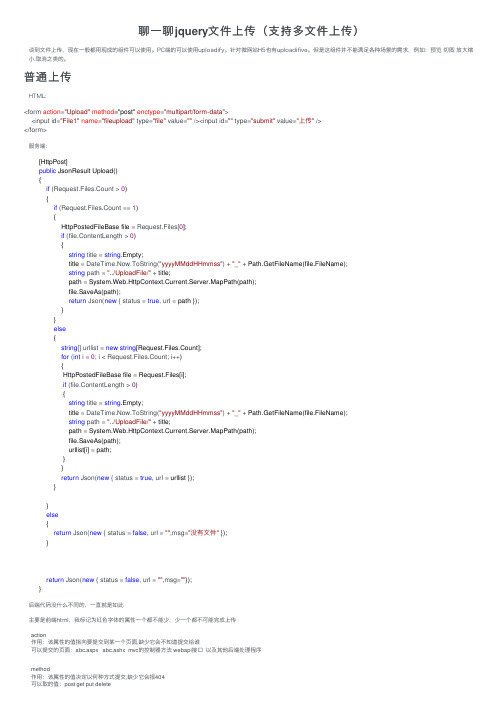
聊⼀聊jquery⽂件上传(⽀持多⽂件上传)谈到⽂件上传,现在⼀般都⽤现成的组件可以使⽤。
PC端的可以使⽤uploadify。
针对微⽹站H5也有uploadifive。
但是这组件并不能满⾜各种场景的需求,例如:预览 切图 放⼤缩⼩,取消之类的。
普通上传HTML:<form action="Upload"method="post" enctype="multipart/form-data"><input id="File1"name="fileupload" type="file" value="" /><input id="" type="submit" value="上传" /></form>服务端:[HttpPost]public JsonResult Upload(){if (Request.Files.Count > 0){if (Request.Files.Count == 1){HttpPostedFileBase file = Request.Files[0];if (file.ContentLength > 0){string title = string.Empty;title = DateTime.Now.ToString("yyyyMMddHHmmss") + "_" + Path.GetFileName(file.FileName);string path = "../UploadFile/" + title;path = System.Web.HttpContext.Current.Server.MapPath(path);file.SaveAs(path);return Json(new { status = true, url = path });}}else{string[] urllist = new string[Request.Files.Count];for (int i = 0; i < Request.Files.Count; i++){HttpPostedFileBase file = Request.Files[i];if (file.ContentLength > 0){string title = string.Empty;title = DateTime.Now.ToString("yyyyMMddHHmmss") + "_" + Path.GetFileName(file.FileName);string path = "../UploadFile/" + title;path = System.Web.HttpContext.Current.Server.MapPath(path);file.SaveAs(path);urllist[i] = path;}}return Json(new { status = true, url = urllist });}}else{return Json(new { status = false, url = "",msg="没有⽂件" });}return Json(new { status = false, url = "",msg=""});}后端代码没什么不同的,⼀直就是如此主要是前端html,我标记为红⾊字体的属性⼀个都不能少,少⼀个都不可能完成上传action作⽤:该属性的值指向要提交到某⼀个页⾯,缺少它会不知道提交给谁可以提交的页⾯:abc.aspx abc.ashx mvc的控制器⽅法 webapi接⼝以及其他后端处理程序method作⽤:该属性的值决定以何种⽅式提交,缺少它会报404可以取的值:post get put deleteenctype作⽤:指定类型缺少它在后台接收时⽂件并不会包含进去可以取的值:multipart/form-data application/x-www-form-urlencoded text/plain 此处必须使⽤ multipart/form-data才能将⽂件传到服务端nameinput file ⾥⾯必须包含name属性才能够将⽂件传递到服务器,具体原因不知道,有兴趣的可以尝试下如果有知道的⿇烦解惑相信到了这⾥你⼀定可以完成上传⽂件操作了!⽂件类型筛选能完成基本的⽂件上传操作之后,我们会对它有更多的要求,⽐如:⽂件筛选相信⼤家都不愿意让⼈什么类型的⽂件都往服务器上传,万⼀是病毒或者脚本之类的就⿇烦⼤了。
jquery组件WebUploader文件上传用法详解

jquery组件WebUploader⽂件上传⽤法详解WebUploader是由Baidu WebFE(FEX)团队开发的⼀个简单的以HTML5为主,FLASH为辅的现代⽂件上传组件,下⽂来为各位演⽰⼀下关于jquery WebUploader⽂件上传组件的⽤法。
使⽤WebUploader还可以批量上传⽂件、⽀持缩略图等等众多参数选项可设置,以及多个事件⽅法可调⽤,你可以随⼼所欲的定制你要的上传组件。
接下来我以图⽚上传实例,给⼤家讲解如何使⽤WebUploader。
HTML我们⾸先将css和相关js⽂件加载。
<link rel="stylesheet" type="text/css" href="css/webuploader.css"><script src="/jquery/1.12.4/jquery.min.js"></script><script type="text/javascript" src="js/webuploader.min.js"></script>然后我们需要准备⼀个按钮#imgPicker,和⼀个⽤来存放添加的⽂件信息列表的容器#fileList,在body中加⼊如下代码:<div id="uploadimg"><div id="fileList" class="uploader-list"></div><div id="imgPicker">选择图⽚</div></div>JAVASCRIPT⾸先创建Web Uploader实例:var uploader = WebUploader.create({auto: true, // 选完⽂件后,是否⾃动上传swf: 'js/Uploader.swf', // swf⽂件路径server: 'upload.php', // ⽂件接收服务端pick: '#imgPicker', // 选择⽂件的按钮。
课题_jquery批量上传图片+缩略图+水印
jquery批量上传图片+缩略图+水印图片上传+缩略图+水印处理代码://文件上传Public function _upload( $thumb = false , $thumbWidth = '' , $thumbHeight = '') {$upload = new \Think\Upload();// 实例化上传类$upload->maxSize = 3145728 ;// 设置附件上传大小$upload->exts = array('jpg', 'gif', 'png', 'jpeg');// 设置附件上传类型$upload->savePath = '/' . CONTROLLER_NAME .'/'; // 设置附件上传目录$info = $upload->upload();if(!$info) {return array('status' =>0, 'info'=> $upload->getError() );}else{if( $thumb ) { //生成缩略图$image = new \Think\Image();foreach($info as $file) {$thumb_file = './Uploads/' . $file['savepath'] . $file['savename'];$save_path = './Uploads/' .$file['savepath'] . 'mini_' . $file['savename'];$image->open( $thumb_file )->text('德兴房产','./data/1.otf',30,'#A7AAA4',\Think\Image::IMAGE_WATER_SOUTHWEST)->save( $thumb_file ); $image->open( $thumb_file )->text('德兴房产','./data/1.otf',24,'#A7AAA4',\Think\Image::IMAGE_WATER_SOUTHWEST)->thumb( $thumbWidth, $thumbHeight )->save( $save_path );return array('status' => 1,'savepath' => $file['savepath'],'savename' => $file['savename'],'pic_path' => $file['savepath'] . $file['savename'],'mini_pic' => $file['savepath'] . 'mini_' .$file['savename']);}}else{foreach($info as $file) {return array('status' => 1,'savepath' => $file['savepath'],'savename' => $file['savename'],'pic_path' => $file['savepath'].$file['savename']);}}}}前端主要代码(参考:///code/151.html):<div class="tab-pane" id="tab3"><div class="row"><div class="col-md-12"><div class="tab-pane"><div class="form-group"><input type="file" id="upload" class="form-control input-medium" /></div><div style="width:100%; float:left;padding:10px 20px 20px; background-color:#ccc"><p><ul class="imagelist" id="image_result"></ul></p></div></div></div></div></div> <!-- END #TAB3 --><div class="margin-top-10"><button type="submit" class="btn green ajax-post">确认</button><a href="javascript:" onclick="javascript:history.back(-1);return false;" class="btn default">返回</a></div></div></div></form></div></div></block><block name="foot"><link href="__PUBLIC__/assets/plugins/uploadify/uploadify.css" rel="stylesheet" type="text/css"/><link href="__PUBLIC__/assets/plugins/uniform/css/uniform.default.css" rel="stylesheet" type="text/css"/><script src="__PUBLIC__/assets/plugins/uniform/jquery.uniform.min.js" type="text/javascript" ></script><script src="__PUBLIC__/assets/plugins/uploadify/jquery.uploadify.min.js" type="text/javascript" ></script><script type="text/javascript">$(function(){var sid = "{:session_id()}";$('#upload').uploadify({'swf':'__PUBLIC__/assets/plugins/uploadify/uploadify.swf','buttonText': '选择图片','formData': { 'session_id':sid},'uploader': "{:U('uploadPic')}",'fileTypeDesc':'Image File','fileTypeExts':'*.jpg; *.jpeg; *.gif; *.png','auto' : true,'removeCompleted': false,onUploadSuccess: function(file, data, response) {$('#progress').hide();var result = $.parseJSON(data);//错误处理。
jquery异步上传图片
jquery异步上传图⽚⽤ajaxfileupload.js插件实现图⽚的异步上传html代码<input id="img" type="file" name="img" />Js代码$('#img').change(function () {$.ajaxFileUpload({url:'demo.php', //你处理上传⽂件的服务端secureuri:false,fileElementId:'img',//与页⾯处理代码中file相对应的ID值 processData : false, contentType : false, dataType: 'text', //返回数据类型:看后端返回的是什么数据,在IE下后端要设置请求头的Content-Type:text/html; charset=UTF-8 success: function (data, status) {},error: function(data, status, e){ //提交失败⾃动执⾏的处理函数alert(e);}})});//可以添加⽂件后缀判断php代码<?php$path = "./";$extArr = array("jpg", "png", "gif");if(isset($_POST) and $_SERVER['REQUEST_METHOD'] == "POST"){$name = $_FILES['img']['name'];$size = $_FILES['img']['size'];if(empty($name)){echo '请选择要上传的图⽚';exit;}$ext = extend($name);if(!in_array($ext,$extArr)){echo '图⽚格式错误!';exit;}if($size>(100*1024)){echo '图⽚⼤⼩不能超过100KB';exit;}$image_name = time().rand(100,999).".".$ext;$tmp = $_FILES['img']['tmp_name'];if(move_uploaded_file($tmp, $path.$image_name)){echo '<img src="'.$path.$image_name.'" class="preview">';}else{echo '上传出错了!';}exit;}//获取⽂件类型后缀function extend($file_name){$extend = pathinfo($file_name);$extend = strtolower($extend["extension"]);return $extend;}参考博客:。
jQueryFileUpload等插件的使用实例
jQueryFileUpload等插件的使⽤实例1、jQuery FileUpload需要的js:jquery.jsjquery.fileupload.jsjquery.iframe-transport.jsjquery.xdr-transport.jshtml:<div id="divAdd" title="添加"><div>+</div><input id="fileUpload" type="file"/></div>CSS:/** 选择⽂件按钮样式*/#fileUpload {position: absolute;top: 0;right: 0;margin: 0;opacity: 0;-ms-filter: 'alpha(opacity=0)';direction: ltr;cursor: pointer;width:100px;height:100px;}/* Fixes for IE < 8 */@media screen\9 {#fileUpload {filter: alpha(opacity=0);}}/** 其他样式*/#divAdd{border:1px solid #ccc;width:99px;height:99px;text-align:center;font-size:40px;margin:17px 5px 10px 5px;cursor: pointer;position: relative;overflow:hidden;}#divAdd div{margin-top:18%;}js初始化:function initUploadDlg(){$("#fileUpload").fileupload({url: "/WealthManagement/WFC/FileUpload.aspx",dataType: 'json',add: function (e, data) {var fileName = data.files[0].name;var fileType = fileName.substr(stIndexOf(".") + 1);// 可以通过data.files[0].size获取⽂件⼤⼩$.blockUI({message: $("#downloadMsg")});title = fileName.substring(stIndexOf('\\') + 1, stIndexOf('.'));$("#fileUpload").fileupload('option','formData',{'title': title, 'validDate': '', 'windcode': pageBaseInfo.Windcode}); // 传参不能放在初始化语句中,否则只能传递参数的初始化值data.submit();},progress: function (e, data) {var progress = parseInt(data.loaded / data.total * 100, 10);$("#downloadMsg").html('已上传' + progress + '%');if(progress == '100'){$("#downloadMsg").html('处理中...');}},done: function (e, data) {var res = data.result.Response;if(res && res.Status == 0){// 更新⽂件列表updateFundFiles();}else{alert(res ? res.Message : "上传失败,请重试!");}$.unblockUI();}});后台代码(HttpHandler.cs)public class FileUploadHandler : IHttpHandler{public override void ProcessRequest(HttpContext context){FileUploadResponse res = new FileUploadResponse();try{// 获取⽂件流HttpFileCollection files = context.Request.Files;if (files.Count > 0){// 获取相关参数的⽅法string title = context.Request["title"];string validDate = context.Request["validDate"];string windcode = context.Request["windcode"] ;string path = FundIntroductionBiz.tempFilePath;if (!Directory.Exists(path)){Directory.CreateDirectory(path);}string fileName = windcode + "_" + DateTime.Now.ToString("yyyyMMddHHmmss") + System.IO.Path.GetExtension(files[0].FileName);string fullPath = path + fileName;files[0].SaveAs(fullPath);res.Response.Status = 0;res.Response.Message = "上传成功!";}}catch (Exception ex){res.Response.Status = 2;res.Response.Message = ex.Message;}context.Response.Write(JsonHelper.ToJson(res));context.Response.End();}}///<summary>///⽂件上传响应实体类///</summary>public class FileUploadResponse{public FileUploadEntity Response { get; set; }public FileUploadResponse(){Response = new FileUploadEntity();}///<summary>///返回信息实体类///</summary>public class FileUploadEntity{///<summary>/// 0:上传成功,1:上传失败, 2:程序异常///</summary>public int Status { get; set; }///<summary>///详细信息///</summary>public string Message { get; set; }}}注:上传按钮的样式采⽤的⽅式为,将input定位在所需按钮之上,并设为透明。
jquery批量上传图片实现代码
jquery批量上传图⽚实现代码复制代码代码如下:<!DOCTYPE html PUBLIC "-//W3C//DTD XHTML 1.0 Transitional//EN" "/TR/xhtml1/DTD/xhtml1-transitional.dtd"><html xmlns="/1999/xhtml"><head runat="server"><title>upload</title><link href="upload.css" rel="Stylesheet" /></head><body><form><ul><li><button id="SubUpload" onclick="TSubmitUploadImageFile();return false;">确定上传</button> <button id="CancelUpload" class="ManagerButton" onclick="javascript:history.go(-1);">取消</button> <button id="AddUpload" class="ManagerButton" onclick="TAddFileUpload();return false;">增加</button></li></ul><ul id="loadimage"><li><div class="imagelabel">图⽚1:</div><div class="imagepath"><input name="" size="45" id="uploadImg1" type="file" /></div><div class="loadinfo"><span id="uploadImgState1"></span></div></li></ul></form></body></html><script type="text/javascript" src="/JS/jquery-1.3.2-vsdoc.js"></script><script type="text/javascript">var TfileUploadNum = 1; //记录图⽚选择框个数var Tnum = 1; //ajax上传图⽚时索引//增加上传按钮function TAddFileUpload() {var idnum = TfileUploadNum + 1;var str = "<li>";str += "<div class='imagelabel'>图⽚" + idnum + ":</div>";str += "<div class='imagepath'><input name='' size='45' id='uploadImg" + idnum + "' type='file' /></div>";str += "<div class='loadinfo'><span id='uploadImgState" + idnum + "'></span></div>";str += "</li>";$("#loadimage").append(str);TfileUploadNum += 1;}//开始上传function TSubmitUploadImageFile() {document.getElementById("SubUpload").disabled = true;document.getElementById("CancelUpload").disabled = true;document.getElementById("AddUpload").disabled = true;setTimeout("TajaxFileUpload()", 1000); //此为关键代码}//Ajax上传⽅法function TajaxFileUpload() {if (Tnum < TfileUploadNum + 1) {//准备提交处理$("#uploadImgState" + Tnum).html("<img src='/gif/upfileloader.gif'/>");//开始提交$.ajax({type: "POST",url: "Handler.ashx",data: { upfile: $("#uploadImg" + Tnum).val()},success: function(data, status) {var stringArray = data.split("|");//stringArray[0] 成功状态(1为成功,0为失败)//stringArray[1] 上传成功的⽂件名//stringArray[2] 消息提⽰if (stringArray[0] == "1") {//上传成功$("#uploadImgState" + Tnum).html("<img src='/gif/Success.gif' />" + stringArray[1] + "--" + stringArray[2]); }else {//上传出错$("#uploadImgState" + Tnum).html("<img src='/gif/Error.gif' />" + stringArray[1] + "--" + stringArray[2]);}Tnum++;setTimeout("TajaxFileUpload()", 1000);}});}else {document.getElementById("SubUpload").disabled = false;document.getElementById("CancelUpload").disabled = false;document.getElementById("AddUpload").disabled = false;}} </script>复制代码代码如下:<%@ WebHandler Language="C#" Class="Handler" %>using System;using System.Web;using System.IO;using System.Text;using ;public class Handler : IHttpHandler{public void ProcessRequest(HttpContext context){//源图⽚路径string _fileNamePath = "";try{_fileNamePath = context.Request.Form["upfile"];string _savedFileResult = UpLoadFile(_fileNamePath); //开始上传context.Response.Write(_savedFileResult);//返回上传结果}catch{context.Response.Write("0|error|⽂件路径错误");}}/// <summary>/// 保存图⽚/// </summary>/// <param name="fileNamePath"></param>/// <returns></returns>private string UpLoadFile(string fileNamePath){//图⽚格式string fileNameExt = fileNamePath.Substring(fileNamePath.IndexOf('.')).ToLower();if (!CheckFileExt(fileNameExt)) return "0|error|图⽚格式不正确!";//保存路径string toFilePath = "ProductUpload/";//物理完整路径string toFileFullPath = HttpContext.Current.Server.MapPath(toFilePath);//检查是否有该路径没有就创建if (!Directory.Exists(toFileFullPath)){Directory.CreateDirectory(toFileFullPath);}//⽣成将要保存的随机⽂件名string toFileName = GetFileName();//将要保存的完整路径string saveFile=toFileFullPath +toFileName + fileNameExt;///创建WebClient实例WebClient myWebClient = new WebClient();//设定windows⽹络安全认证myWebClient.Credentials = CredentialCache.DefaultCredentials;//要上传的⽂件FileStream fs = new FileStream(fileNamePath, FileMode.Open, FileAccess.Read); BinaryReader r = new BinaryReader(fs);//使⽤UploadFile⽅法可以⽤下⾯的格式myWebClient.UploadFile(saveFile,fileNamePath);return "1|"+toFileName+fileNameExt+"|保存成功.";}/// <summary>/// 检测图⽚类型/// </summary>/// <param name="_fileExt"></param>/// <returns>正确返回True</returns>private bool CheckFileExt(string _fileExt){string[] allowExt = new string[] { ".gif", ".jpg", ".jpeg" };for (int i = 0; i < allowExt.Length; i++){if (allowExt[i] == _fileExt) { return true; }}return false;}/// <summary>/// 得到随机图⽚名/// </summary>/// <returns></returns>public static string GetFileName(){Random rd = new Random();StringBuilder serial = new StringBuilder();serial.Append(DateTime.Now.ToString("yyMMddHHmmssff"));serial.Append(rd.Next(0, 9999).ToString());return serial.ToString();}public bool IsReusable{get{return false;}}}复制代码代码如下:body{font-size: 12pt;}ul{list-style: none;}li{margin: 0px;}#loadimage{width: 860px;overflow: hidden;}.imagelabel{ float: left; width: 60px; height: 25px;} .imagepath{float: left; width: 400px; height: 25px; } .loadinfo{float: left; width: 400px;height: 25px;}。
- 1、下载文档前请自行甄别文档内容的完整性,平台不提供额外的编辑、内容补充、找答案等附加服务。
- 2、"仅部分预览"的文档,不可在线预览部分如存在完整性等问题,可反馈申请退款(可完整预览的文档不适用该条件!)。
- 3、如文档侵犯您的权益,请联系客服反馈,我们会尽快为您处理(人工客服工作时间:9:00-18:30)。
本文由我司收集整编,推荐下载,如有疑问,请与我司联系
jQuery 多图上传插件imgUp.js
2017/08/07 0 开发环境:idea mysql
效果:
前台步骤如下:
1)首先导入imgPlugin.js
注:实际项目中使用的时候只需要引用:imgPlugin.js 这个就可以了,因为这
个是对imgUp.js 的封装
script type= text/javascript src= ../style-wechat/js/imgPlugin.js /script
2)在页面中加入它需要的js
script type= text/javascript var imgUrls= ; $( #file ).takungaeImgup({ formData: { name : file }, url: 192.168.1.109:8080/imgUp , success: function(data) { imgUrls =data.url , ; }, error: function(err) { alert(err); } }); function addComm(){ jQuery.ajax({ url: /addComment.action , type: ‘POST’,data: {‘imageUrls’:imgUrls}, dataType: ‘json’, success: function (data) { alert( 发布成功); } }) } /script 3)在页面
中代码添加内容div > section > div > section > img src= ../../style- wechat/images/a11.png > input type= file name= file id= file > /section /div /section /div aside > div > p > p > /div /aside 后台接受图片代码:
tips:感谢大家的阅读,本文由我司收集整编。
仅供参阅!。