magento中文操作手册
Magento模板制作官方教程中文版
Magento设计人员专业名词(Magento Design Terminologies)为了能够更好的理解本设计人员中文手册,熟悉一下Magento系统中的设计方面的术语是很关键的。
术语的这一章介绍可能对于你来说是比较新的概念,因此,您可以利用这段时间彻底的读通他们。
但最重要的,如果你不能充分把握这些概念,不要灰心,所有这些新名词-本章仅仅向你介绍一次,在后面的章节会对这些简单的定义进一步深入研究和扩大。
这一章介绍的术语包括:网站和网店(Website and Store)Magento中的一个网站(Website)是一些共享相同的客户、订单信息和购物车信息的商店(Store)的集合。
Store是一些Store View的集合。
这些都是比较笼统的概念,我们在确立个别特别需要的网店时用这些概念可以很好的建立。
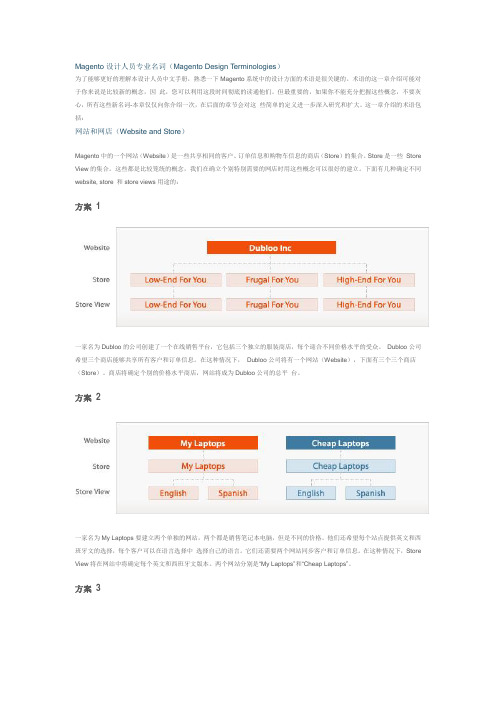
下面有几种确定不同website, store 和store views用途的:方案 1一家名为Dubloo的公司创建了一个在线销售平台,它包括三个独立的服装商店,每个迎合不同价格水平的受众。
Dubloo公司希望三个商店能够共享所有客户和订单信息。
在这种情况下,Dubloo公司将有一个网站(Website),下面有三个三个商店(Store)。
商店将确定个别的价格水平商店,网站将成为Dubloo公司的总平台。
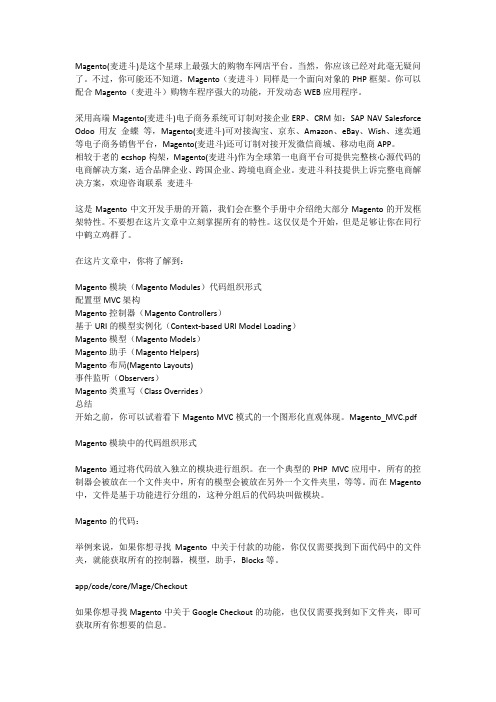
方案 2一家名为My Laptops要建立两个单独的网站,两个都是销售笔记本电脑,但是不同的价格。
他们还希望每个站点提供英文和西班牙文的选择,每个客户可以在语言选择中选择自己的语言。
它们还需要两个网站同步客户和订单信息。
在这种情况下,Store View将在网站中将确定每个英文和西班牙文版本。
两个网站分别是―My Laptops‖和―Cheap Laptops‖。
方案 3一家名为Bongo's Instruments想创建一个在线的销售网点。
没有其他分支店,Bongo's Instruments就是是商店以及网站。
Magento(麦进斗)中文开发手册开篇
Magento(麦进斗)是这个星球上最强大的购物车网店平台。
当然,你应该已经对此毫无疑问了。
不过,你可能还不知道,Magento(麦进斗)同样是一个面向对象的PHP框架。
你可以配合Magento(麦进斗)购物车程序强大的功能,开发动态WEB应用程序。
采用高端Magento(麦进斗)电子商务系统可订制对接企业ERP、CRM如:SAP NAV Salesforce Odoo 用友金蝶等,Magento(麦进斗)可对接淘宝、京东、Amazon、eBay、Wish、速卖通等电子商务销售平台,Magento(麦进斗)还可订制对接开发微信商城、移动电商APP。
相较于老的ecshop构架,Magento(麦进斗)作为全球第一电商平台可提供完整核心源代码的电商解决方案,适合品牌企业、跨国企业、跨境电商企业。
麦进斗科技提供上诉完整电商解决方案,欢迎咨询联系麦进斗这是Magento中文开发手册的开篇,我们会在整个手册中介绍绝大部分Magento的开发框架特性。
不要想在这片文章中立刻掌握所有的特性。
这仅仅是个开始,但是足够让你在同行中鹤立鸡群了。
在这片文章中,你将了解到:Magento模块(Magento Modules)代码组织形式配置型MVC架构Magento控制器(Magento Controllers)基于URI的模型实例化(Context-based URI Model Loading)Magento模型(Magento Models)Magento助手(Magento Helpers)Magento布局(Magento Layouts)事件监听(Observers)Magento类重写(Class Overrides)总结开始之前,你可以试着看下Magento MVC模式的一个图形化直观体现。
Magento_MVC.pdfMagento模块中的代码组织形式Magento通过将代码放入独立的模块进行组织。
在一个典型的PHP MVC应用中,所有的控制器会被放在一个文件夹中,所有的模型会被放在另外一个文件夹里,等等。
Magento 2 Login as Customer 用户指南说明书

Last update: 2020/05/26 14:26magento_2:login_as_customer https:///docs/doku.php?id=magento_2:login_as_customer For more details see how the Login as Customer for Magento 2 extension works.Guide for Login as Customer for Magento 2Use the special button to login as any existing customer just in one click. Grant permissions to sub-admin users to login as customer, as well as monitor the login attempts on the special grid.Fast login to any customer's accountView all login attempts in the logProvide permissions to sub-admin users to login as customerConfigurationTo adjust general module settings, navigate to Stores → Configuration → Amasty Extensions →Login as Customer.Expand the General tab.Open Customer`s Account in the New Tab - if set to `Yes`, the customer account page will be open in a new tab of your browser, otherwise, it will be open in a current tab.Allow Selecting Store View to Login - if a customer accounts shared per website, for logging you will be able to choose only those store views of the website this customer is associated with.Please note that this setting depends on the `Account Sharing Options` (Store - Configuration -Customers - Customer Configuration).2020/05/26 14:263/7Guide for Login as Customer for Magento 2 How to Login as CustomerTo login as any existing customer, please, go to Customers → All Customers and select the required one from the grid. Then, click the Select link. In the dropdown, choose the Login as Customer option to proceed to the user's dashboard on the frontend.Last update: 2020/05/26 14:26magento_2:login_as_customer https:///docs/doku.php?id=magento_2:login_as_customerAlternatively, you can select the required customer from the grid. Then, hit the Login as Customer button in the account to automatically login to the user's account.2020/05/26 14:265/7Guide for Login as Customer for Magento 2When you have multiple store views the customer is assigned to, than you may need to select the required one to login.Login as Customer LogTo see all the login as customer attempts, please, go to Reports → Login as Customer Log.Last update: 2020/05/26 14:26magento_2:login_as_customer https:///docs/doku.php?id=magento_2:login_as_customerOn the grid you can see all login attempts with the detailed information about them.Login as Customer PermissionsStore admin can distribute a permission to login as customer to sub-admin users.Please, go to System → User Roles and select the role you want to grant permission. Switch to the Role Resources tab. Optionally, switch the Resource Access option to Custom.You can enable or disable the following role resources:Customers → Amasty Login as Customer → Login as Customer PermissionCustomers → Amasty Login as Customer → Login GridFind out how to install the Login as Customer extension via Composer.Rate the user guide2020/05/26 14:267/7Guide for Login as Customer for Magento 2(Details)0 visitor votes0 visitor votes0 visitor votes0 visitor votes。
Magento (v2.0.x - v2.1) - Mercado Pago Module用户指南说

1. Go to Stores > Configuration > Sales > Payment Methods. Select Mercado Pago - Classic Checkout.
2. Enable the solution and set your Client Id and Client Secret. Get them in the following address: o Argentina: https:///mla/herramientas/aplicacion es o Brazil: https:///mlb/ferramentas/aplicacoes o Chile: https:///mlc/herramientas/aplicaciones o Colombia: https:///mco/herramientas/aplicacion es o Mexico: https:///mlm/herramientas/aplicaciones o Venezuela: https:///mlv/herramientas/aplicacio nes o Peru: https:///mpe/herramientas/aplicaciones
Custom Checkout Payment Solution: .................................................................................4 Standard Checkout Payment Solution:...............................................................................6 Mercado Envios...................................................................................................................... 8
Magento中文操作手册
MEGENTO系统功能目录一、会员中心.................................................................................................................... 错误!未指定书签。
二、多网站、多语言、多货币功能................................................................................ 错误!未指定书签。
三、分类排序.................................................................................................................... 错误!未指定书签。
四、搜索功能.................................................................................................................... 错误!未指定书签。
五、产品............................................................................................................................ 错误!未指定书签。
六、购物车........................................................................................................................ 错误!未指定书签。
七、结账流程.................................................................................................................... 错误!未指定书签。
Magento Magic Slideshow用户指南说明书
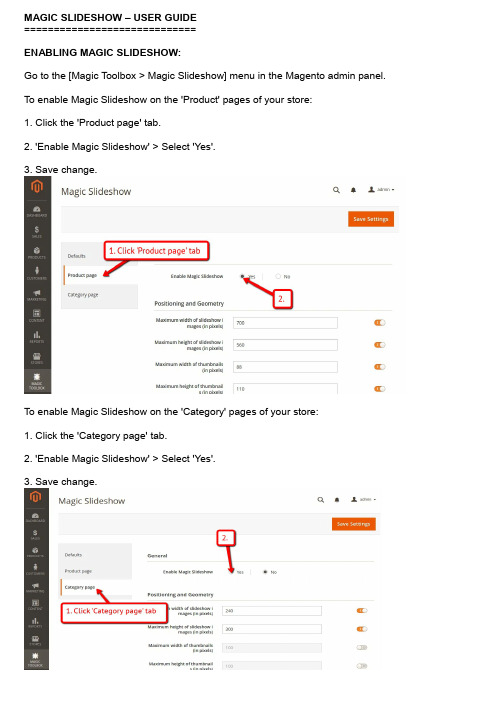
MAGIC SLIDESHOW – USER GUIDE=============================ENABLING MAGIC SLIDESHOW:Go to the [Magic Toolbox > Magic Slideshow] menu in the Magento admin panel. To enable Magic Slideshow on the 'Product' pages of your store:1. Click the 'Product page' tab.2. 'Enable Magic Slideshow' > Select 'Yes'.3. Save change.To enable Magic Slideshow on the 'Category' pages of your store:1. Click the 'Category page' tab.2. 'Enable Magic Slideshow' > Select 'Yes'.3. Save change.CUSTOMIZING:Customize Magic Slideshow settings to suit your needs - go to the [Magic Toolbox > Magic Slideshow] menu in the Magento admin panel.For customizations to only apply to Product pages, make all changes on the 'Product page' tab:For customizations to only apply to Category pages, make all changes on the 'Category page' tab:If you would like customizations to apply to both Product and Category pages, make changes on the 'Defaults' tab:HOME PAGE CAROUSEL:There is no dedicated home page settings page for Magento 2 but you can still create an amazing slider on the homepage of your store using HTML.In your home page content area or template, create a div with a class of MagicSlideshow. Slideshows can have as many images as you want. Here is a slideshow of 7 images, each linking to a URL:<div class="MagicSlideshow"><a href="/page-1/"><img src="example1.jpg"/></a><a href="/page-2/"><img src="example2.jpg"/></a><a href="/page-3/"><img src="example3.jpg"/></a><a href="/page-4/"><img src="example4.jpg"/></a><a href="/page-5/"><img src="example5.jpg"/></a><a href="/page-6/"><img src="example6.jpg"/></a><a href="/page-7/"><img src="example7.jpg"/></a></div>。
Magento后台中文操作教程
Magento后台中⽂操作教程Magento操作图⽂教程登录后台默认下登录地址为:http://域名/admin【路径可在配置⽂件app-etc-loca.xml 修改】输⼊账户密码登录后台默认为admin admin8888 【可在后台修改】⼀、产品上传和分类管理—产品模块步骤,新建产品分类,再传产品1.新建产品分类导航—⽬录---管理分类—点进进⼊分类管理⾯板中⽂英⽂default category 是总⽬录,在新建分类的时候要先点击选中该分类,【所有产品分类都属于这个⽬录下】然后在点击添加⼦⽬录默认下,我们只需要填写基本信息即可说明:/doc/871712d45022aaea998f0faa.html * 必填项⽬,分类名2.in Active: 是否在前台显⽰3.Description: 分类描述,可填写可不填写,填写可丰富⽹站内容、利于客户了解该产品以及利于SEO关键字密度:如下图4.image:分类图⽚:可浏览从本地导⼊分类图⽚,效果举例如下:5.Page Title:可以⾃⼰定义⽹页标题显⽰的⽂字,利于SEO优化,举例如下6.Meta Keywords:关键字,⽹页前台不显⽰,利于SEO优化7.Meta Description:描述,利于SEO优化8.Include in Navigation Menu:是否显⽰在导航,这个具体跟模板设计有关系,如果模板是程序指定显⽰内容,那么该功能⽆效,如果导航默认为推荐的产品分类,那么该选项有效其他红⾊框选中模块默认,暂时不⽤理会。
然后点击右上⾓的保存分类中⽂英⽂OK,⼀个名为Handbags的分类已经建⽴好了,(0)该分类下⽬前0个产品接下来,我们重新点击选中Default Category(0) 新建⼏个主分类、接下来,新建⼦分类⿏标单击选中Handbags分类,点击添加⼦⽬录填写⼦分类的分类信息,红⾊星号为必填选项,其他可填可不填然后右上⾓点击保存分类继续添加⼦⽬录,当然,我们还可以新建三级⼦⽬录,步骤⼀样。
Magento 2 用户手册 发票 PDF 生成器 Pro 用户手册说明书
USER MANUAL INVOICE PDF GENERATOR PRO-Magento 2 -SET UP IN MAGENTOAfter the install you need to go to the System Configuration area in Magento to enable the module and to enable the email attachments.User Permission SettingsTo set up user permissions, go to System > Permissions > User Roles. If the user can print out the standard Magento PDF invoice he will be able to the same with the custom one from our extension.PDF Print-outs uses Stores -> Settings -> Configurations -> PDF Print-outsDefault permission settings give the Admin access to all Eadesigndev_Invoicepdfgenerator settings. For users with limited roles, you will need to add them (the same as standard Magento).HOW TO USEUsing EaDesign Invoice PDF Generator Pro the admin user can print PDF files with customized printout layouts.The admin user can use the template system from our extension to customize the PDF design in the same way he can customize the email templates. That is a big plus because the store owner can do that for each store.How to start to use the Invoice PDF Generator ProFirst of all you need to know that the Invoice PDF Generator Pro uses the same system to process the template variables and data from the template.1.So, you can go to Marketing -> Email Templates and copytemplate body in area body of PDF templates.2.Select the New Invoice tab from the list to have access to thecontent3.Copy all from the box4.Go to EaDesign -> Manage PDF Templates5.Add a new template from the "Add new template" button. Thiswill prompt you with a set of fields.6.To use it, you need to enable the template in order - Enabletemplate;7.For the current store make the template as default - Defaulttemplate;On the template body tab you can find the source (invoice) you need to load the variables for. This is the actual invoice id, 1 for the first invoice created but you can use the one you need.Using the template variables you can achieve any design and configuration. As you can see in the next 2 images there are a lot of variables to choose from.What are the buttons for?1. Source Variables button contains variables which arestandards Magento for the current entity;2.Standard Variables button contains variables which are thesame as transactional email variables;3.Source Barcode Variables button contains barcode variables.You have a lot of barcodes types but you must to check what barcode you want first;4.Source Depend Variables button contains depend variablesthat check if the value is 0 then return nothing;5.Source Currency Variables button contains currency variables,all the values that contain numbers;6.Source Items Variables button contains variables only foritems, and you can use them only between“##productlist_start##” and “##productlist_end##”. Outside from this area are not recognized.7.Order Items Variables button contains variables only for orderitems and also available between “##productlist_start##” and “##productlist_end##”.8.Customer Variables button contains variables for customerwith all the information about them.9.Order Variables button contains variables only for order type.This is an example for the Depend values variables generated on our development system for the invoice number 1.This is an example for the Currency values variables generated onour development system for the invoice number 1.In CSS section you can create styles for the html like "h1 {color:red;} h2 {color:blue}", it’s not necessary to use the style tag. In the body you can the html you copied from the email templates.In Settings are used to shape the template as you need. The "Template file name" can be made from variables as long as they are ok for file naming {{var invoice.increment_id}}-{{var invoice.id}}-file-invoice. You can modify the orientation of page as landscape or portrait and also the format.In Magento 2 you can localize your template using the trans directive. {{trans "Thank you for your order from %store_name." store_name=$store.getFrontendName()}}{{trans "Once your package ships we will send you a tracking number."}}Using this module you are able to modify the Invoice PDF as you desire using your html and css knowledge only. The extension has multiple features as follows:change the Magento Invoice PDF to meet your needs;add custom CSS to your template to further personalize the PDF;add templates for each store with different design and features;change the file name of the PDF file using variables.。
Magento (v2.0.x - v2.1) - Mercado Pago Module说明书
powered byMagento (v2.0.x - v2.1) - Mercado Pago ModuleTable of ContentsMagento (v2.0.x - v2.1) - Mercado Pago Module (2)Features (3)Wizard Installation (Magento Component Manager) (4)Manual Installation (FTP) (5)Configuration (6)Custom Checkout Payment Solution: (7)Standard Checkout Payment Solution: (9)Mercado Envios (11)FeaturesCheckout options right for your business: We offer two checkout methods that make it easy to securely accept payments from anyone, anywhere.Custom CheckoutOffer a checkout fully customized to your brand experience with our simple-to-use payments API.•Seamless integration— no coding required, unless you want to.•Full control of buying experience.•Store buyer’s card for fast checkout.•Accept tickets in addition to cards.•Accept Mercado Pago's discount coupons.•Improve conversion rate.Available for Argentina, Brazil, Colombia, Mexico, Peru and VenezuelaStandard CheckoutGreat for merchants who want to get going quickly and easily.•Easy website integration— no coding required.•Limited control of buying experience— display Checkout window as redirect, modal or iframe.•Store buyer’s card for fast checkout.•Accept tickets, bank transfer and account money in addition to cards.•Accept Mercado Pago's discount coupons.Available for Argentina, Brazil, Chile, Colombia, Mexico, Peru and Venezuela Shipment integrationThis feature allows to setup and integrate with Mercado Envios shipment method as another shipment option for customers. It includes the possibility to print the shipping label directly from the Magento Admin Panel. Free shipping is also available. Available for Argentina, Brazil and Mexico only with Standard CheckoutWizard Installation (Magento Component Manager)1.Log in to the Magento Admin as an administrator.2.Click System > Web Setup Wizard. The following page displays.3.Click System Configuration.4.If you haven’t already done so, enter your authentication keys in the providedfields.The following figure shows an example if you have already entered your keys.5.Click Save Config.6.Click Component Manager and continue with Manage your components.To upgrade Magento system software instead, see Run System Upgrade.Manual Installation (FTP)1.Copy the folder app/code/MercadoPago to the Magento root installation.Make sure to keep the Magento folders structure intact.2.Enable modules from console.o bin/magento module:enable MercadoPago_Coreo bin/magento module:enable MercadoPago_MercadoEnvios Then update magento with new modules:o bin/magento setup:upgradeConfiguration1.Go to Stores > Configuration > Sales > Payment Methods. Select MercadoPago – Global Configuration.2.Set your Country to the same where your account was created on, and saveconfig. Note: If you change the Country where your account was created you need save configuration in order to refresh the excluded payment methods.3.Other general configurations:o Category of your store: Sets up the category of the store.o Choose the status of approved orders: Sets up the order status when payments are approved.o Choose the status of refunded orders: Sets up the order status when payments are refunded.o Choose the status when payment is pending: Sets up the order status when payments are pending.o Choose the status when client open a mediation: Sets up the order status when client opens a mediation.o Choose the status when payment was reject: Sets up the order status when payments are rejected.o Choose the status when payment was canceled: Sets up the order status when payments are canceled.o Choose the status when payment was chargeback: Sets up the order status when payments are chargeback.o Logs: Enables/disables system logs.o Debug Mode: If enabled, displays the raw response from the API instead of a friendly message.Custom Checkout Payment Solution:1.Go to Stores > Configuration > Sales > Payment Methods.Select Mercado Pago - Custom Checkout.2.Set your Public Key and Access Token. In order to get them check thefollowing links according to the country you are operating in:o Argentina: https:///mla/account/credentialso Brazil: https:///mlb/account/credentialso Chile: https:///mlc/herramientas/aplicacioneso Colombia: https:///mco/account/credentialso Mexico: https:///mlm/account/credentialso Venezuela: https:///mlv/account/credentialso Peru: https:///mpe/account/credentialsIf you want to enable credit card solution, check the configurations under Checkout Custom – Credit Card:•Enabled: Enables/disables this payment solution.•Payment Title: Sets the payment title.•Statement Descriptor: Sets the label as the customer will see the charge for amount in his/her bill.•Binary Mode: When set to true, the payment can only be approved or rejected. Otherwise in_process status is added.•Banner Checkout: Sets the URL for the banner image in the payment method selection in the checkout process.•Checkout Position: The position of the payment solution in the checkout process.•Marketing - Coupon Mercado Pago: Enables/disables the coupon form.If you want to enable ticket solution, check the configurations under Checkout Custom - Ticket:•Enabled: Enables/disables this payment solution.•Payment Title: Sets the payment title.•Banner Checkout: Sets the URL for the banner image in the payment method selection in the checkout process.•Checkout Position: The position of the payment solution in the checkout process.•Marketing - Coupon Mercado Pago: Enables/disables the coupon form.Standard Checkout Payment Solution:1.Go to Stores > Configuration > Sales > Payment Methods.Select Mercado Pago - Classic Checkout.2.Enable the solution and set your Client Id and Client Secret.Get them in the following address:o Argentina: https:///mla/herramientas/aplicacion eso Brazil: https:///mlb/ferramentas/aplicacoeso Chile: https:///mlc/herramientas/aplicacioneso Colombia: https:///mco/herramientas/aplicacion eso Mexico: https:///mlm/herramientas/aplicacioneso Venezuela: https:///mlv/herramientas/aplicacio neso Peru: https:///mpe/herramientas/aplicaciones3.Check the additional configurations:o Payment Title: Sets the payment title.o Banner Checkout: Sets the URL for the banner image in the payment method selection in the checkout process.o Checkout Position: The position of the payment solution in the checkout process.o Type Checkout: Sets the type of checkout, the options are:§Iframe: Opens a Magento URL with a iframe as the content.§Redirect: Redirects to Mercado Pago URL.§Lightbox: Similar to Iframe option but opens a lightbox instead of an iframe.11Mercado EnviosIn order to setup Mercado Envios follow these instructions:1. Setup Mercado Pago Standard Checkout following these instructions.2. Go to Sales > Configuration > Sales > Shipping Methods > Mercado Envios.3. Setup the plugin:•Enabled: Enables/disables this Mercado Envios solution.•Title: Sets up the shipping method label displayed in the shipping section in checkout process.•Product attributes mapping: Maps the system attributes with the dimensions and weight. Also allows to set up the attribute unit.•Available shipping methods: Sets up the shipping options visible in the checkout process.•Free Method: Sets up the method to use as free shipping.•Free Shipping with Minimum Order Amount: Enables/disables the order minimum for free shipping to be available.•Show method if not applicable: If enabled, the shipping method is displayed when it's not available.•Displayed Error Message: Sets up the text to be displayed when the shipping method is not available.•Debug Mode: If enabled, displays the raw response from the API instead of a friendly message.•Sort order: Sets up the sort order to be displayed in the shipping step in checkout process.。
Magento数据Cue模块用户指南说明书
Magento User GuideBefore You StartHere are some things to know before you begin the integration process.•The DataCue module for Magento requires at least Magento 2.3 or higher.•Please test this module in a staging environment first before installing it on production servers. Modules may sometimes affect each other, and the LAST place you want to discover this is onyour live site. Ideally, your staging environment is a clone of your actual production site.•DataCue for Magento syncs your products, your customer’s first name, last name, email address, and orders.•It also installs our Javascript library on your home page, product pages, category pages and search results page. The Javascriptlibrary personalizes your website content to each visitor's activity.•Depending on your countries privacy laws, you may need to explicitly get permission from the user to use contentpersonalization. Please consult with legal counsel if you're in any doubt.•Installing the module1.Install the DataCue extension package for Magento2.Go to the root directory of your Magento installation.3.Run the following commands4.Optional but recommended stepsInstalling the module5. Login to your Magento store's admin panel. You will find a link called DataCue Settings under the Marketing section. Click on it.6.Enter your API key and API secret (you can find it on your dashboard) and press Save. Depending on the size of your store the sync process can take a few mins to a few hours. Make sure that you have created an account with DataCue, cick here.Add recommendationsBanners1.Upload a fixed banner that all your visitors see. Make sure it has a publiclyaccessible URL, you'll need it later.2.If you're unsure, pick a banner to highlight your most popular collection or apromotion. Ensure the image has an aspect ratio of 5:3 (recommended size is 1200 x 720 px). Learn more about static banners here.3.Click Content on your left side bar.4.Pick a Block thats in your home page, or directly go to your home pageunder Pages. Click on Edit.5.Click on the Insert Widget button.6.In widget type selector, choose DataCue Banner, fill in Banner Image withthe URL from step 1 and enter the link for that banner under Banner Link.7.Click Insert Widget and then save the current page or block.8.You should see the banner image that you uploaded on your home page.9.The default layout DataCue uses for your banners shows 2 dynamic bannersand 1 static banner on one row. You can customize this by going to Settings > Banners in your DataCue dashboard. Read more about it here.10.Want to build your own custom layout?read this.Changing your static banner later1.Upload a new image to your server and copy the URL. Ensure the image hasan aspect ratio of 5:3 (recommended size is 1200 x 720 px). Update the link for the static banner if necessary.2.Edit the block or page where you inserted the banner widget. Edit the imageURL to the new image you uploaded and and change the link to the banner as appropriateAdd recommendations1.Click Content on your left side bar.2.Pick a Block or Page corresponding to the page you want to insert therecommendations.3.Click on the Insert Widget button and choose Datacue Products.Pick All and save your changes.4.As soon as product recommendations are ready, you will start seeing themon your site.Match widgets to your themeDataCue's product carousels have a default design which will need some adjustments to match the look/feel of your store. This is really important so nothing looks out of place.Test modeThe first thing you should do is set DataCue into test mode. In test mode, you can pick a list of user accounts as test users. To see the recommendations, you have to sign in as a test user to your store. All other visitors don't see any changes. This is very helpful to play with the design till you're happy with the look/feel. You will need to know a little CSS to match the design, so there are two options1. Let us help you (recommended)When you sign up, we'll get in touch with you and offer to help you with setting up your store.2. Do it yourselfFeel free to reach out if you need any help.Disable or Uninstall the moduleWhen you deactivate and delete DataCue for Magento, we remove all changes made to your store including the Javascript. We also immediately stop syncing any changes to your store data with DataCue. To deactivate DataCue for Magento, follow these steps.1.Go to the root directory of Magento.2.You may need to change file permissions or ownership of the generated filesafter the uninstallation.3.Confirm the module is now deleted.E-commerce personalisation for everyone ******************************@DataCueCo。
- 1、下载文档前请自行甄别文档内容的完整性,平台不提供额外的编辑、内容补充、找答案等附加服务。
- 2、"仅部分预览"的文档,不可在线预览部分如存在完整性等问题,可反馈申请退款(可完整预览的文档不适用该条件!)。
- 3、如文档侵犯您的权益,请联系客服反馈,我们会尽快为您处理(人工客服工作时间:9:00-18:30)。
2)比较感兴趣的产品展示
3)优惠券功能
4)配送费率计算功能
七、结账流程
介绍:客户点击CHECKOUT时可通过匿名购买或注册登陆后购买,并且账单地址与配送地址可选择相同的或添加不同的地址。
八、优惠功能
介绍:后台可设置多种优惠规则,包括产品的优惠,购物车的优惠,多种优惠规则可设置排序进行叠加
2)高级搜索:高级搜索中每个属性包含单独领域,在一个特定的属性中,查询将查找属性值中出现字符的属性产品。
五、产品
产品可设置为以下几种:
1)简单产品:如一般产品显示一样,包括一些简单属性描述的显示。
2)可设置产品:可创建一些关联属性的产品,如有两个下拉框,一个为颜色下拉框,另一个为大小下拉框,当选择红色时,大小的下拉框则显示红色具有的大小。
四、搜索功能
介绍:搜索功能分为快速搜索以及高级搜索。
1)快速搜索:当进行搜索,将会搜索所有可搜索产品的可搜索属性,并显示结果。因为产品的所有的特点被认为是一种产品属性-如名称、说明和颜色-您可以搜寻任何有关的任何产品。只要确保产品是可搜索的。当客户在搜索框中输入字符并搜索时,如果之前没有人搜索过的话输入的字符将创建一个新的搜索字词。无论有没有返回的结果这个字词都会保存。
3)分组产品:将任何产品关联到组合产品,Magento的分组产品(Grouped Product)就像前面的可配置产品(Configurable Product),除非建立了要关联的两个或以上的简单产品,不然分组产品是没有用的。
4)相关产品:设置相关联的产品。
5)推荐销售:设置推荐的产品。
6)交叉销售:它是显示在购物车页面,就如杂货店收银机旁边的杂志和糖果。通常,他们是客户正购买产品时可能会喜欢的产品。如果购物车中有多个项目,每一个都有自己交叉销售产品,交叉销售的产品在每次购物车更新时将轮流显示。
具体内容为:
1.销售方面报表
1)销售报表
本报告可以按照范围和指定的时间段统计销售信息。范围可以在页面上方的Show Report for下拉菜单中指定。将在每个时期之间有一条线。一个日期段可以是日,月,或一年,可以在页面顶部的Show by下拉菜单中指定。日期段的一些报告中依赖于在顶部指定的日期范围。每一日期段,您可以看到总的订单数,总的项目数,小计、税金、运费、折扣、总额等各 类的总金额。在报告中的最后一行是总计所有的数目的。
2)税报表
本报告可以按照范围和指定的时间段统计税金信息。范围可以在页面上方的Show Report for下拉菜单中指定。将在每个时期之间有一条线。一个日期段可以是日,月,或一年,可以在页面顶部的Show by下拉菜单中指定。日期段的一些报告中依赖于在顶部指定的日期范围。每一日期段,您可以看到使用此税率的总订单数,和使用此税率所缴纳的税金。在报告中 的最后一行是总计所有的数目的。
具体可分为:
页面管理:可根据不同的店面设置onepage,方便前台调用以及管理
静态模块:创建一个或多个静态模块方便前台调用以及管理
部件:挂件可作为扩展性使用
投票:可设置投票项,让浏览者进行投票,获取投票信息
九、
介绍:提供分析与报告,包括销售报告、税费报告、被放弃的购物车报告、访问最多的商品报告、订购最多的商品报告、低库存报告、搜索关键词报告、商品评论报告、优惠券使用报告等。
4)所有发票
本报告可以按照范围和指定的时间段统计发货信息。范围可以在页面上方的Show Report for下拉菜单中指定。将在每个时期之间有一条线。一个日期段可以是日,月,或一年,可以在页面顶部的Show by下拉菜单中指定。日期段的一些报告中依赖于在顶部指定的日期范围。每一日期段,您可以看到已经有关联发票的总订单数,和总的发票金额,包括多少金额是 获得了多少没有获得。在报告中的最后一行是总计所有的数目的。
购物车价格规则:可设置购物车的一些优惠规则方案,例如购物券等
七、Newsletter订阅
介绍:设置Newslette的邮件模板,能结合不同语言的网店设置不同语言的邮件模板,一旦你创建了一个模板,您可以把您的newsletter放入发送的队列中,根据设置的时间进行发送。
八、
介绍:magento中的CMS管理模块不是传统意义上的CMS,我们可以理解他为动态静态块, 通俗点讲就是有些HTML代码或者某一个代码块我们可以放入CMS的static block 中,然后再在. Magento中调用CMS静态块 (Static Block) 来优雅的动态显示我们需要显示的内容
3)产品标签:显示所有用户添加的关于产品的标签,和这些标签被使用的次数。
4)产品比较:客户可以把产品加入到产品对比菜单进行产品之间的比较。
5)产品库存:就像重量,一个可配置产品的库存选项是取决于与其关联的各自简单产品。在后台Inventory 标签中,您只可以把可配置产品设置为In stock 和Out of stock。如选择了In stock ,在前台将显示该为In stock ,但是每个可配置属性对应的简单产品要是In stock才能销售。如果您的客户购买一个Out of stock 的关联简单产品,那么他们将收到一条警告:“该产品是目前缺货(This product is currently out of stock )”。如果选择了Out of stock ,前台将显示为Out ofstock ,即使是对应的关联的简单产品是In stock也不能购买。
4)自动生成展示在站点的网站地图
5)自动生成热门搜索关键词页面
十三、CACHE缓存机制
介绍:系统配备了非常完善的缓存管理机制,简单的说它可以使浏览者尽可能快地看到他们想看到的页面,一个载入速度非常迅速的页面对客户体验也是非常好的,因此也可能会直接或间接地增加您店铺的业绩。它可以完全缓存静态页面和动态页面的绝大部分内容(包括了页面缓存、图片缓存、SESSION缓存等)。
后台功能
一、
二、
介绍:销售管理是客户关系管理的有效延伸,能更好的把个性化、差异化服务有机的融入到客户管理去。
这里面包括了:
1)显示订单列表,可进行订单的处理如添加、修改、查询。
2)税务的管理:可设置税收的规则、管理税收的项目
三、
介绍:管理产品、管理分类、设置产品属性、评论与评级管理、标签管理、URL重写管理、网站地图。
九、投票功能
介绍:通过投票功能网站能从客户中收取到某些信息,例如如何得知本站的、对产品的看法等(通过后台的CMS里的投票设置,可添加或删除投票项)
十、
介绍:客户可通过订阅即时获得网站的最新信息,大大提高了客户与网站的粘性。
(后台能设置Newslette的邮件模板,能结合不同语言的网店设置不同语言的邮件模板,一旦你创建了一个模板,您可以把您的newsletter放入发送的队列中,根据设置的时间进行发送)
十一、邮件发送功能
介绍:会员在注册时、购买完产品、退款、配送、订阅等常用操作时,系统都会自动发送相关的邮件通知客户
(后台可在系统的Transactional email进行不同模板的设置,更显得企业服务的专业性)
十二、SEO
1)100%搜索引擎友好
2)Google 网站地图
3)URL 重写以全面掌控URL
3)发货报表
本报告可以按照范围和指定的时间段统计发货信息。范围可以在页面上方的Show Report for下拉菜单中指定。将在每个时期之间有一条线。一个日期段可以是日,月,或一年,可以在页面顶部的Show by下拉菜单中指定。日期段的一些报告中依赖于在顶部指定的日期范围。每一日期段,您可以看到使用此包裹/方法的总订单数,和使用此包裹/方法所缴纳的运 费。在报告中的最后一行是总计所有的数目的。
四、Mobile
介绍:Mobile支持iPad、iPhone和Android平台。强大的应用,可以使商家为他们的客户在iphone上面创建独特的、品牌性的体验。
五、客户
介绍:可进行客户管理,显示已有的用户进行修改、创建、删除用户。设置客户分组级别。显示在线客户,即时掌握客户相关信息。
六、
目录价格规则:可设置产品以及分类处的一些优惠规则方案
2)多语言:适合不同国家不同语言界面的转换,大大方便了各国不同客户对网站的浏览。
3)多种货币:能转换客户相应的货币支付,并且系统具有灵活的税率管理功能。
三、分类排序
介绍:产品可根据分类以及相关的产品属性进行查询显示,例如可根据价格、颜色、大小等属性进行查询,并且各属性间能显示相应的产品数量。(后台属性的设置过程中可根据网站的需要设置定的时间段统计信用备忘信息。范围可以在页面上方的Show Report for下拉菜单中指定。将在每个时期之间有一条线。一个日期段可以是日,月,或一年,可以在页面顶部的Show by下拉菜单中指定。日期段的一些报告中依赖于在顶部指定的日期范围。每一日期段,您可以看到已经有关联信用备忘的总订单数,和总的退款金额,包括多少是 在线退款多少是线下退款。在报告中的最后一行是总计所有的数目的。
6)优惠券报表
本报告可以按照范围和指定的时间段优惠券信息。范围可以在页面上方的Show Report for下拉菜单中指定。将在每个时期之间有一条线。一个日期段可以是日,月,或一年,可以在页面顶部的Show by下拉菜单中指定。日期段的一些报告中依赖于在顶部指定的日期范围。每一日期段,您可以看到使用此优惠券的总订单数,和使用此优惠券的订单的小计,折扣 和总额。在报告中的最后一行是总计所有的数目的。
3.商品方面的报表
1)畅销商品
本报告可以按照范围和指定的时间段产品信息。范围可以在页面上方的Show Report for下拉菜单中指定。将在每个时期之间有一条线。一个日期段可以是日,月,或一年,可以在页面顶部的Show by下拉菜单中指定。日期段的一些报告中依赖于在顶部指定的日期范围。每一日期段又分开显示每个产品,每个产品您可以看到产品价格和此产品已经下单的数 量。在报告中的最后一行是总计所有的数目的