Subtitle Workshop教程 Microsoft Word 文档
微软Office和Adobe软件的使用指南说明书

MICROSOFT ® WORD ............................................................................. PÁG. 2MICROSOFT ® POWERPOINT ................................................................ PÁG. 4MICROSOFT ® PUBLISHER .................................................................... PÁG. 6ADOBE ® PHOTOSHOP ........................................................................... PÁG. 9ADOBE ® ILLUSTRATOR ....................................................................... PÁG. 13CORELDRAW ® ....................................................................................... PÁG. 17INDESIGN ............................................................................................... PÁG. 21INKSCAPE ............................................................................................... PÁG 26 E MCEXPLANATORY GUIDEMICROSOFT® OFFICE WORDIn the upper bar select Page Layout . Then click on Size and, further down, on More Paper Sizes...In the box that opens, enter the size of your document.CREATE DOCUMENTCPage Layout . Then click on Size More Paper Sizes...In the box that opens, enter the size of your document.Certi fique is added 4mm (0,4cm) to the height and width of the your document. In the case of the business card with 8,5x5,5cm insert 8,9x5,9cm.To save your document choose File > Save As.Choose Save as type: PDF . Then select the Save .BLEED Bleed is the extra measure you should put on your document to ensure that it does not have white borders around it.You should therefore add 4 mm to the height and width of your document.SAVE DOCUMENT It is recommended that you save the PDF document in order to guarantee its quality.In the upper bar select Page Layout . Then click on Sizeand, further down, on More Paper Sizes...In the box that opens, enter the size of your document.C XPLANATORY GUIDE ICROSOFT® OFFICE WORDREATE DOCUMENTIn the box that opens put the size of your document.BLEED Bleed is the extra measure you should put on your document to ensure that it does not have white borders around it.99In the upper bar select Design and then on the right side in and in Custom Slide Size.CXPLANATORY GUIDEICROSOFT® OFFICE WORDGo to Page Design > Page Setup (right arrow).It will open a window (image below) where you can define the settings of the document.Add another 4mm (0,4cm) to the height and width so that your document has enough margin for cutting.6CREATE DOCUMENTIn the case of a business card with the dimension 8,5x5,5cm, in Page place 89mm (8,9 cm) in width and 59mm (5,9 cm) in height.In Layout type select the option One page per sheet.Add 0,2 cm to the margins (Margins Guides ) to make surethat you do not place important text or images outside the margin line, as this is the line where the product will be cut.In the box that opens, enter the size of your document.In Margin Guides add 0.2cm to each side, this will causea line to appear around your card.This line serves as a guide, so we know how far we can write or put images, because it will be here that the product will be cut.8Select Okand save the document.In the upper bar select Page Layout . Then click on Sizeand, further down, on More Paper Sizes...In the box that opens, enter the size of your document.In the box that opens, enter the size of your document.BLEED Bleed is the extra measure you should put on your document to ensure that it does not have white borders around it.You should therefore add 4 mm to the height and width of your document.Push on the ruler and pull the guides to the endsof the document.do documento.In the box that opens, enter the size of your document.C.In Canvas Size (image below) indicate the size of your documentnot forgetting to put more 4 mm in height and width to create theBleed.You will see lines that de fi ne your Bleed, so extend your templateto the limits of Bleed.In the example below, the pink ornament should be extended to thenew end created.11. Then click on SizeIn the box that opens, enter the size of your document.Before you save the document, be sure to place it in CMYKso that there are no changes in color.Go toImage > Mode > CMYK Color.Save the document in File > Save As and select the PDF format.Click Save.SAVE DOCUMENTIt is recommended that you save the PDF document in order to guarantee its quality.Para qualquer esclarecimento contacte-nos através do email:****************************In the window that opens, in Adobe PDF Preset select [PDF/X-1a:2001].This option ensures that the PDF will not be changed.Do lado esquerdo clique em Compression e de seguida do lado direitoin Options select the option Do Not Downsaple.Then select Output and on the right side in Color Conversionselect No Conversion option. This option ensures that you burn your files with no color prompts.NOTA: Please note that the Standard field continues with thePDF/X-1a:2001 option selected, otherwise your file will not be Below, click Save Preset… , save these PDF presets with whatevername you want, so you can always reuse them.Clique on Save PDF .correctly saved.In the upper bar select Page Layout . Then click on Sizeand, further down, on More Paper Sizes...In the box that opens, enter the size of your document.Go to File > New.It will open a window (image below) where you can definethe settings of the document.In Units choose the unit you prefer, in this case we usedMilimeters.CREATE DOCUMENTbusiness card11In the box that opens put the size of your document.CIn the top menu, click the Document Setup button.BLEED Bleed is the extra measure you should put on your document to ensure that it does not have white borders around it.You should therefore add 4 mm to the height and width of your document.14It will open a window (image below). In the Bleedoption put2 mm in all fields.Select Ok.An external line will appear in your document.In the upper bar select Design and then on the right side in Slide Size and in Custom Slide Size.In the box that opens put the size of your document.4C15Before you save the document, be sure to place it in CMYKso that there are no changes in color.Go to File > Document Color Mode > CMYK Color.SAVE DOCUMENT It is recommended that you save the PDF document in order to guarantee its quality.In the upper bar select Design and then on the right side in Slide Size and in Custom Slide Size.42Save the document in File > Save As and select the PDF format.3In the window that opens, inAdobe PDF Preset select [PDF/X-1a:2001]. Esta opção garante que o PDF não sofrerá alterações.4On the left side click on Marks and Bleeds , and then under Bleeds select the Use Document Bleed Settings option (this allows the document to be saved with the safety margins you created earlier.5In Output and then in Destination select the FOGRA39color profile, which will prevent your filw with a different color tone at the time of printing..6After all changed fields, make sure that the Standardfield continues with the selected PDF/X-1a:2001 option, otherwise your fi le will not be recorded correctly.7Click Save Preset, save these PDF presets with the name you want,so you can always reuse it.Finally, click Save PDF .NOTA: If you are using a newer version of Illustrator, the Save Presetoption will not appear, so you do not need to follow this step.In the upper bar select Design and then on the right side in Slide Size and in Custom Slide Size.In the box that opens put the size of your document.Cbusiness cardIn the box that opens, enter the size of your document.Go to Tools > Options.BLEED Bleed is the extra measure you should put on your document to ensure that it does not have white borders around it.You should therefore add 4 mm to the height and width of your document.18On the Bleed panel place the 2mm measurement on the editable Show bleed area ..Your document should look similar to the one shown below.Then, extend the bottom of your fi lter to the bleed area.In the Options window, open the Document > Page Size option.In the upper bar select Page Layout . Then click on Sizeand, further down, on More Paper Sizes...In the upper bar select Page Layout. Then click on Size and, further down, on More Paper Sizes...In the window that will open, click Settings... In the box that opens, enter the size of your document.CIn the box that opens, enter the size of your document.8555In the box that opens, enter the size of your document.In the top menu, click File > Document Setup.BLEED Bleed is the extra measure you should put on your document to ensure that it does not have white borders around it.You should therefore add 4 mm to the height and width of your document.22Will open a window (image below). Click More Options.In Bleed and Slug write 2 mm in all fields, as in the imagebelow.In the upper bar select Page Layout . Then click on Sizeand, further down, on More Paper Sizes...In the box that opens, enter the size of your document.EM CSAVE DOCUMENT It is recommended that you save the PDF document in order to guarantee its quality.In the upper bar select Page Layout . Then click on Sizeand, further down, on More Paper Sizes...In the box that opens, enter the size of your document.EMClick Savein this new window.In the window that opens, in Adobe PDF Preset select [PDF/X-1a:2001].This option ensures that the PDF will not be changed.On the left side click on Marks and Bleeds and, below inBleeds select the optionUse Document Bleed Settings.24 In the upper bar select Page Layout. Then click on Sizeand, further down, on More Paper Sizes...In the box that opens, enter the size of your document.In Output and then in Destination select the FOGRA39 colorprofile, which will prevent your file from having a different colortone at the time of printing.After all changed fields, make sure that the Standard fieldcontinues with the selected PDF/X-1a:2001 option, otherwiseyour file will not be recorded correctly.7Click Save Preset, save these PDF presets with the name you want,so you can always reuse it.Finally, click Export.NOTA: If you are using a newer version of InDesign, athe Save Preset option will not appear, so you do not need to followthis step.25In the upper bar select Design and then on the right side inSlide Sizeand in Custom Slide Size.In the box that opens put the size of your document.4EMCEXPLANATORY GUIDEINKSCAPEGo to File > New .It will open a window (image below) where you can definethe settings of the document.In Units choose the unit you prefer, in this case we usedMilimeters.CREATE DOCUMENTIn Width set the width of your document, and in the Height field a altura do mesmo.26tab under Available Color Profiles select so that there are no changes to the color.In the upper bar select Page Layout . Then click on Sizeand, further down, on More Paper Sizes...In the box that opens, enter the size of your document.Make sure you add 4 mm to the height and width of your document.In the case of the business card with 85x55mm insert 89x59mm.BLEED Bleed is the extra measure you should put on your document to ensure that it does not have white borders around it.You should therefore add 4 mm to the height and width of your document.27Go to File > Save As and in the window that opens (image below),select Portable Document Format (PDF) and then click Save . SAVE DOCUMENT It is recommended that you save the PDF document in order to guarantee its quality.In the new window that opens, select Convert texts to path optionso that your document does not change.In Resolution for rasterization (dpi) insert 300.Click Ok .Copyright © 2019 360onlineprint. All rights reserved.Copyright © 2019 Bizay. All rights reserved。
Office Word 2024高级培训教程

06 协作共享与版本 控制实践指导
多人同时编辑文档功能体验
01
实时协作
允许多个用户在同一时间内编辑同一个文档,实现实时数据同步和更新。
02
权限控制
管理员可以设置不同用户的编辑权限,确保文档的安全性和完整性。
03
冲突提示
当不同用户同时编辑同一部分内容时,系统会自动提示冲突,并提供解
决方案。
版本控制概念及其重要性阐述
丰富的模板库
提供大量内置模板,满足用户 快速创建专业文档的需求。
文件格式兼容性及转换方法
01
02
03
支持的文件格式
列举Word 2024支持的文 件格式,包括DOC、 DOCX、PDF、RTF等。
文件格式转换
提供不同文件格式间的转 换方法,如将PDF转换为 可编辑的Word文档等。
兼容性设置
针对旧版本Word文档, 提供兼容性设置选项,确 保文档在不同版本间的正 常显示和编辑。
插入图片
通过“插入”选项卡中的“图片” 功能,选择本地或在线图片进行
插入。
裁剪和旋转
使用“图片工具”中的“裁剪” 和“旋转”功能,对图片进行进 一步编辑。
调整大小和位置
选中图片后,通过拖动边角或使 用“图片工具”中的“大小”和 “位置”选项进行调整。
插入图形
通过“插入”选项卡中的“形状” 功能,选择所需图形进行插入, 并使用“绘图工具”进行编辑。
表格样式
了解如何应用预设的表格样式,以及自定义表格边框、底纹和字 体等格式。
表格数据排序、筛选和汇总操作
数据排序
掌握按照某一列或多列数据进行排序的方法,包 括升序和降序排列。
数据筛选
了解如何根据特定条件筛选表格中的数据,只显 示符合条件的行。
字幕软件使用方法Subtitle Workshop

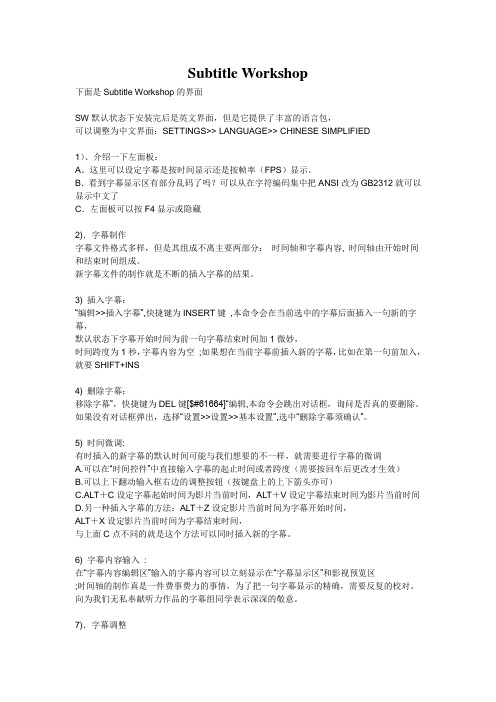
Subtitle Workshop下面是Subtitle Workshop的界面SW默认状态下安装完后是英文界面,但是它提供了丰富的语言包,可以调整为中文界面:SETTINGS>> LANGUAGE>> CHINESE SIMPLIFIED1)、介绍一下左面板:A。
这里可以设定字幕是按时间显示还是按帧率(FPS)显示。
B.看到字幕显示区有部分乱码了吗?可以从在字符编码集中把ANSI改为GB2312就可以显示中文了C.左面板可以按F4显示或隐藏2).字幕制作字幕文件格式多样,但是其组成不离主要两部分:时间轴和字幕内容, 时间轴由开始时间和结束时间组成。
新字幕文件的制作就是不断的插入字幕的结果。
3) 插入字幕:“编辑>>插入字幕”,快捷键为INSERT键,本命令会在当前选中的字幕后面插入一句新的字幕,默认状态下字幕开始时间为前一句字幕结束时间加1微妙,时间跨度为1秒,字幕内容为空;如果想在当前字幕前插入新的字幕,比如在第一句前加入,就要SHIFT+INS4) 删除字幕:移除字幕”,快捷键为DEL键[$#61664]“编辑,本命令会跳出对话框,询问是否真的要删除。
如果没有对话框弹出,选择“设置>>设置>>基本设置”,选中“删除字幕须确认”。
5) 时间微调:有时插入的新字幕的默认时间可能与我们想要的不一样,就需要进行字幕的微调A.可以在“时间控件”中直接输入字幕的起止时间或者跨度(需要按回车后更改才生效)B.可以上下翻动输入框右边的调整按钮(按键盘上的上下箭头亦可)C.ALT+C设定字幕起始时间为影片当前时间,ALT+V设定字幕结束时间为影片当前时间D.另一种插入字幕的方法:ALT+Z设定影片当前时间为字幕开始时间,ALT+X设定影片当前时间为字幕结束时间,与上面C点不同的就是这个方法可以同时插入新的字幕。
6) 字幕内容输入:在“字幕内容编辑区”输入的字幕内容可以立刻显示在“字幕显示区”和影视预览区;时间轴的制作真是一件费事费力的事情,为了把一句字幕显示的精确,需要反复的校对。
AtmelStudio-6.0简易入门教程(精炼实用)(2021年整理精品文档)

(完整word版)AtmelStudio-6.0简易入门教程(精炼实用)编辑整理:尊敬的读者朋友们:这里是精品文档编辑中心,本文档内容是由我和我的同事精心编辑整理后发布的,发布之前我们对文中内容进行仔细校对,但是难免会有疏漏的地方,但是任然希望((完整word 版)AtmelStudio-6.0简易入门教程(精炼实用))的内容能够给您的工作和学习带来便利。
同时也真诚的希望收到您的建议和反馈,这将是我们进步的源泉,前进的动力。
本文可编辑可修改,如果觉得对您有帮助请收藏以便随时查阅,最后祝您生活愉快业绩进步,以下为(完整word版)AtmelStudio-6.0简易入门教程(精炼实用)的全部内容。
一、建议工程文件AtmelStudi6。
0这个全新的环境使用起来极其不顺手,因为首先我对AtmelStudio以前的版本也根本没有使用经验,就根据很陌生,其次,这个新版本软件还根本没有人用,根本没有任何的相关教程资料,唯一可以参考的只是官网的比较简单的视频教程,还是英文讲解,反正没怎么搞透。
不过还是硬着头皮用下去,因为软件是免费的,而且当后来我知道代码编辑环境其实就是微软VS环境的时候,我就更不犹豫了,大家应该都了解VS的代码编写环境是很智能的,尤其自动补全功能。
现在,我已经能很熟练的使用AtmelStudio6。
0软件了,随着使用我也更加喜欢玩AVR单片机做一些小作品了,而不再用普通51和STC了。
当使用熟练以后也就感觉到其实这个免费智能的编译环境其实是很简单的,那现在我就帮助更多喜欢使用AVR而没用使用AtmelStudio软件的同学们轻松越过这一个门槛,进入一个美好的编程世界.该软件的不足之处:一是软件相对较大,打开比较慢,但是运行还是比较顺利的;二是不支持山寨仿真器,这可苦了没钱的劳苦电工们了。
(不过我都是用ISP烧录调试,一般不用仿真)最下面附件有一个简单的LED_test工程文件,编译通过的.大家可以试用。
Microsoft Office 文档编辑器用户指南说明书

Afficher ou masquer le ruban Cliquez sur cette flèche pour masquer le ruban. Pour afficher le ruban, cliquez sur un onglet, puis cliquer sur l’icône d’épingle.
Lorsque vous insérez plusieurs images à la fois, Publisher 2013 les insère dans une colonne dans le plan de montage. À partir du plan de montage, vous pouvez faire glisser une image sur la page de votre composition et l’en retirer, ou remplacer l’image par une autre si elle ne vous convient pas.
Ajoutez une ou plusieurs images dans votre composition à partir de votre ordinateur, à partir de la galerie d’images clipart ou à partir du web.
Intervertir des images
Vous pouvez facilement remplacer une image dans votre disposition par undeux sur la même page ou que l’une d’elles se trouve sur le plan de montage.
Microsoft office word教程

Microsoft office word教程 word教程
中文版word2003是微软公司推出的中文版 office2003软件套装中的重要组成部分,它具 软件套装中的重要组成部分, 有强大的文本编辑和文件处理功能,是实现无 有强大的文本编辑和文件处理功能, 纸化办公和网络办公不可或缺的应用软件之一
• •
• •
浏览程序窗口
• Word2003的程序窗口主要包括标题栏 • 、菜单栏、工具栏、文档窗口、任务窗格 和状态栏。请熟练掌握本小节中讲解的关 于菜单栏、工具栏和任务窗格的浏览方式, 这对您今后的学习中文版Word2003
• • 一、安装程序 安装word2003和安装其它软件并无二致,需要说明一下的是光盘版的安装。当您将中 文版office2003光盘放入光驱后,请不要自动播放,因为自动播放会弹出图形化的安装 界面,读屏软件无法操作。您可以在插入光盘后,打开“我的电脑”找到CD驱动器, application键弹出快捷菜单,通过“打开(O)菜单”来打开光盘,然后在列表中选中 office文件夹,打开以后,列表中出现几个文件夹,由于版本不同,文件夹数量和名称 可能会略有区别,不过没关系,在这些文件夹中寻找setup.exe并回车执行,您就能顺 利地用键盘完成安装操作了。 二、启动程序 按下Windows键弹出“「开始」菜单”,展开“所有程序(P)菜单”后。上下光标到 “MicrosoftOffice子菜单”,右光标展开该子菜单后,上下光标找到 “MicrosoftOfficeWord2003菜单”回车即可启动Word程序。另外,当您在资源管理器 中选择任意一个后缀名为.doc的文档回车时,计算机也会为您启动word程序,同时打 开您选中的文档。 三、退出程序 在程序窗口按下快捷键:“Alt+F4”是退出程序最简便的方法。当然您还可以在程序窗 口按下Alt键激活菜单栏,下光标展开“文件(F)子菜单”并找到到“退出(X)菜单”回车, 或在程序窗口按下“Alt+空格”弹出控件菜单,上下光标找到“关闭(c)菜单”回车即 可退出程序。
MOS:word教程
Microsoft Office Specialist认证篇Word 2003教程一、文档段落的高级设定 (3)单元1 段落的高级设定 (3)单元2 制表位的设置 (3)单元3 主题 (4)单元4 新增样式 (4)单元5 套用样式 (5)CH1实力测评 (5)二、图片的高级设定 (6)单元6 裁剪图片 (6)单元7 图像控制 (6)单元8 设定图片位置 (6)单元9 文字环绕方式 (7)单元10 水印 (8)CH2实力测评 (8)三、表格的高级设定 (8)单元11 设定表格属性 (8)单元12 建立公式 (10)单元13 表格排序 (10)单元14 表格自动格式设定 (11)CH3实力测评 (11)四、编辑长文档 (11)单元15 插入脚注 (11)单元16 插入尾注 (12)单元17 书签 (13)单元18 制作目录 (13)单元19 制作索引◎ (14)单元20 页眉和页脚 (14)单元21 分栏设定 (15)单元22 分隔设定 (15)CH4实力测评 (16)五、审阅文档 (17)单元23 修订文档 (17)单元24 插入批注 (18)单元25 交叉引用 (18)单元26 设定权限◎ (19)单元27 保护文档 (19)单元28 建立不同文件版本 (20)单元29 文档引导模式 (20)单元30 阅读版式 (21)单元31 使用主控文档 (22)单元32 摘要 (23)CH5实力测评 (24)六、图表应用 (24)单元33 插入图表 (24)单元34 修改图表 (25)单元35 将数据导入图表 (26)单元36 插入Excel 工作表 (27)CH6实力测评 (27)七、建立窗体 (28)单元37 认识窗体 (28)单元38 创建文字型窗体域 (28)单元39 创建下拉窗体域 (29)单元40 创建复选框型窗体域(保护窗体) (30)CH7实力测评 (31)八、邮件合并 (32)单元41 邮件合并的基本概念 (32)单元42 邮件合并六大步骤 (32)单元43 创建主文档 (32)单元44 创建数据源 (33)单元45 插入合并域 (33)单元46 完成合并 (34)CH8实力测评 (34)九、运用宏 (34)单元47 创建新宏 (34)单元48 录制宏 (35)单元49 运行宏 (36)单元50 指定宏运行方式 (36)单元51 管理宏 (37)单元52 编辑宏 (38)CH9实力测评 (38)十、Web网页 (38)单元 53 创建框架网页 (38)单元54 设定框架属性 (40)单元55 使用XML数据 (40)CH10实力测评 (41)一、文档段落的高级设定单元1 段落的高级设定打开文档:02-01台东之旅_段落设置.doc,为了阅读方便,将段落的开头和段落在同一页。
用Subtitleworkshop制作字幕的基本步骤
用Subtitle workshop制作字幕的基本步骤(图解)
2010-05-1020:12
不知Subtitle是不是最好用的制作字幕软件,反正我就会用这一个。
有朋友问到使用步骤,我觉得贴图才能讲清楚,所以干脆写一篇文章来介绍。
其实简单得很,不怕麻烦的话,自己慢慢折腾就能折腾出来。
1、导入视频
视屏导入后的效果
2、创建字幕文件
此步骤后会出现第一行字幕格式,见下图蓝色行
3、保存字幕文件
在弹出的对话框中双击subrip(当然也可选择其他格式,只不过我习惯用.srt格式)
在弹出的对话框中输入文件名后点保存。
4、调整第一行字幕
(1)设置开始时间。
播放视频文件,当视频播放到需要加字幕的时间时,即可按下图方法操作。
(2)双击text输入框(下图红线划定区域),输入文本,也可采用复制粘贴方式输入。
注意因为软件版本问题,划蓝线的部分可能会出现乱码,不影响字幕效果。
(3)设置结束时间,方法如下图
5、拖动下图用红线圈起的滑块,可以检查第一行字幕的效果
此步骤注意下图用红线圈起处必须选定两个对勾
6、创建第二行字幕。
第二行字幕的处理方法同第一行。
也可以一次性创建多条字幕行,再一条条调整。
注意处理哪行字幕是必须用鼠标左键单击此行,变为蓝色后即可操作此行。
以此类推即可完成所有字幕。
这只是最基本的方法,其他方法自己摸索吧。
在这里提问也可以,不过我可不一定解答得出来。
字幕制作教程——时间轴制作
字幕需要做什么。
先是需要一个质量高的片源,一般是RAW的,也就是我们说所说的无字幕版。
通常的格式是AVI 或WAV。
然后就是翻译和校对。
除去前期的翻译和校对。
字幕制作的第一步,是从时间轴开始的分别是不过个人推崇前者,这样比较省时间特效是整个字幕过程中最难的一环,但也是最有乐趣的一环现在主流特效分为两种,一种是纯语言编写,也就是之前有提到过的SSA语言(或ASS语言)接下来第二种,就是利用一些辅助软件进行特效处理。
最有名的就是AE了AE最强大的功能就是可以把图片加入到特效中。
虽然SSA语言也可以在代码中写入图片的信息,不过非常复杂并且限制很多不过用了AE,不但可在插入图片,并且可以做出很多特效,比如:闪电、火烧等等(PS:我们国家可是还有AE的等级考试呢)AE的全称是:AFTEREFFECT*******************************************SUBCREATOR主要功能介绍!(一些不常用到的功能将会略过)file-->new新建时间轴文件open打开含有时间轴的文件(目前支持srt,smi,ssa,txt格式)openmostrecent...reload从新读取save储存savea*另存为**port输出(生成外挂字幕文件,里面还含有设置外挂字幕的颜色和出现位置等功能)processing处理exitredocutcopypastdeletefindsettimestamp设置时间点(可以用来设置字幕的开始点和结束点) increasetimestamp时间点提前decreasetimestamp时间点滞后increaseduration结束点提前decreaseduration结束点滞后deletetimestamp删除时间点enablesmarttimestampadding开启智能时间点添加movie-->open打开avi文件(注:和file中的open不要搞混,不然可能非法x作)close关闭playstop注意:突的.changeeditorfont变更编辑文档字体changesubtitlefont变更屏显字幕字体generalsetting设置videoenginesetting视频引擎设置(有时播放不流畅可以通过这个来换一个引擎来播放,或许会有意想不到的惊喜)OPTIONS--->generalsetting里的设置defaultsubtitle是默认显示字幕时间,设的大点可以保证字幕不会过早消失(推荐设置为30) MAXSUBTITLELINE是一屏最大显示字幕行数,设置2已经足够了SMALLSTEP:是用于设置视频步进幅度。
微软公司Word
Wicresoft
第三章 制作会议日程表
第六节 保存文档和文档安全控制
文件安全性
设置文件打开和修改密码 数字签名 演示
文档安全相关功能
文档的恢复功能 打开时修复 错误报告
Microsoft Learning Center
Microsoft Word 2002 教程
Wicresoft
第三章 制作会议日程表
Microsoft Word 2002 教程
Wicresoft
第一节 行文的基本规则和流程
正确选择行文用纸 文字内容的输入和校对 文章的编辑处理 文章的修饰处理 整体版面 保存输出
Microsoft Learning Center
Microsoft Word 2002 教程
Wicresoft
第五章 Word应用规则及扩展功能 应用规则及扩展功能
Microsoft Word 2002 教程
Wicresoft
第四章 制作邀请函
第二节 为邀请函添加背景图片
查找剪辑内容,插入剪贴画任务窗格— 查找剪辑内容,插入剪贴画任务窗格—演示 图形对象的版式 图形对象的编辑 图形对象的修饰—水印演示 图形对象的修饰—水印演示 图片压缩— 图片压缩—演示 剪辑管理器— 剪辑管理器—演示
Word在字、 Word在字、表、图编辑方面的能力 在字
编辑提示与智能标记 表格编辑与修饰功能
Word在文章修饰方面的能力 Word在文章修饰方面的能力 Word处理长文章的能力 Word处理长文章的能力 Word与Office联合应用的能力 Word与Office联合应用的能力 Word在工作组协同工作方面的能力 Word在工作组协同工作方面的能力
输入
微软拼音3.0使用技巧 微软拼音 使用技巧 手写板输入 语音输入 其他输入简介
- 1、下载文档前请自行甄别文档内容的完整性,平台不提供额外的编辑、内容补充、找答案等附加服务。
- 2、"仅部分预览"的文档,不可在线预览部分如存在完整性等问题,可反馈申请退款(可完整预览的文档不适用该条件!)。
- 3、如文档侵犯您的权益,请联系客服反馈,我们会尽快为您处理(人工客服工作时间:9:00-18:30)。
Subtitle Workshop使用教程
SUBTITLE WORKSHOP
1.软件简介
SUBTITLE WORKSHOP(以下简称SW)是由URUSOFT(/home.php?lang=1)公司推出的一款字幕软件,
最新版本为2.51版本(UNTIL 2005.06.17),功能强大,
集字幕制作、修改调整、合并/分割、格式转换、内容检查等功能于一身,
几乎支持所有常见的字幕格式(好像不支持vobsub格式,请先把sub转为srt格式先),支持自定义字幕格式,界面友好。
正如在其英文使用手册中说的:HAVE A TRY, AND YOU'LL FORGET THE REST!
下载:/download.php?lang=1&id=sw
安装:跟其他软件的安装无异,无需注册
SW默认状态下安装完后是英文界面,但是它提供了丰富的语言包,
可以调整为中文界面:SETTINGS>> LANGUAGE>> CHINESE SIMPLIFIED
介绍一下左面板:
A。
这里可以设定字幕是按时间显示还是按帧率(FPS)显示。
B.看到字幕显示区有部分乱码了吗?可以从在字符编码集中把ANSI改为GB2312就可以显示中文了
C.左面板可以按F4显示或隐藏
2.字幕制作
字幕文件格式多样,但是其组成不离主要两部分:
时间轴和字幕内容, 时间轴由开始时间和结束时间组成。
新字幕文件的制作就是不断的插入字幕的结果。
插入字幕:
“编辑>>插入字幕”,快捷键为INSERT键
本命令会在当前选中的字幕后面插入一句新的字幕,
默认状态下字幕开始时间为前一句字幕结束时间加1微妙,
时间跨度为1秒,字幕内容为空
如果想在当前字幕前插入新的字幕,比如在第一句前加入,
就要SHIFT+INS
删除字幕:
移除字幕”,快捷键为DEL键 “编辑
本命令会跳出对话框,询问是否真的要删除。
如果没有对话框弹出,选择“设置>>设置>>基本设置”,选中“删除字幕须确认”。
时间微调
有时插入的新字幕的默认时间可能与我们想要的不一样,就需要进行字幕的微调
A.可以在“时间控件”中直接输入字幕的起止时间或者跨度(需要按回车后更改才生效)
B.可以上下翻动输入框右边的调整按钮(按键盘上的上下箭头亦可)
C.ALT+C设定字幕起始时间为影片当前时间,ALT+V设定字幕结束时间为影片当前时间
D.另一种插入字幕的方法:ALT+Z设定影片当前时间为字幕开始时间,
ALT+X设定影片当前时间为字幕结束时间,
与上面C点不同的就是这个方法可以同时插入新的字幕。
字幕内容输入
在“字幕内容编辑区”输入的字幕内容可以立刻显示在“字幕显示区”和影视预览区
时间轴的制作真是一件费事费力的事情,为了把一句字幕显示的精确,需要反复的校对。
向为我们无私奉献听力作品的字幕组同学表示深深的敬意。
3.字幕调整
A.首尾两头调整:
预览电影,直至第一句字幕应该显示的地方,按ALT+F;
继续预览电影,直至最后一句字幕应该显示的地方,按ALT+L;
然后CTRL+B,这样,中间的字幕就可以自动调整了
B.所有选中字幕整体前移
选中字幕,按ALT+M,就可以把选中字幕平移到影片当前时间
C.与已调整好的字幕同步
比如你已经调整好了中文字幕,再调整英文字幕时可以用这个方法:打开英文字幕,按CTRL +SHIFT+B
4.字幕合并/分割
分割:“工具>>分割字幕”(CTRL+T)
可以按照行号、时间、帧、影片时长等分割,选中“重新计算时间”,会有意想不到的收获哦
合并:“工具>>并字幕”(CTRL+J)
可以把不同格式,不同帧率的字幕合在一起。
如果添加字幕时顺序有误,可以上下拖动到它应该的位置
5.字幕检查
(1)格式检查
SW提供了强大的格式检查对话框,对于时间轴的格式,时间轴跨度,内容长短等等等等进行设置。
(2)内容检查
手工输入字幕时,笔下误是难免的,尤其是输入英文的时候。
怎么办呢?SW的拼写检查可以帮忙。
“工具>>拼写检查”(或直接按F7),SW就会自动调用MS WORD的拼写检查。
所以,您至少要装有WORD97才能使用这项功能。
不过在我的烂机子上速度是极慢,不过您可以一试
6.FAQ
A. 我在手工输入字幕内容时,能否直接转到后一句(或前一句)而输入焦点不变?
可以,按SHIFT+ENTER可以直接转到后一句(CTRL+ENTER直接转到前一句),而输入焦点不变。
在时间控件内修改时间时,情况也是如此。
B.我怎么选中多句字幕?尤其是不相连的字幕?
选中多句字幕的方法与在WINDOWS中的操作无二,按住SHIFT可以选取相连的多句字幕,按住CTRL可以选取单个字幕
C.有些快捷键我用着不爽啊,能改么?
可以,在SW的安装目录中有个文件SHORTCUTS.KEY,用任意的字处理软件打开,修改它。
注意文件开始的说明。
D.怎么只有时间轴没有字幕内容的文件无法保存啊?
SW中是这样的。
只有某行字幕输入内容后这一行才能保存。
没有内容的行将被忽略。
E.我在播放.mpg(或.mpeg)文件时程序没反应了,没法播放?
首先确认安装了所有需要的插件
把扩展名.mpg(或.mpeg)改为.avi时时看
技巧:对于听译时只管做时间轴而不用输入内容的人有效
就是时间轴做好后,
(1)选中“编辑>>翻译>>翻译模式”,这时“字幕显示区”出来个“翻译”栏,其中所有行的内容都为“未翻译字幕”。
(2)选中“编辑>>翻译>>交换”,这样翻译栏内的字幕跑到前面那一栏来了。
(3)取消选中“编辑>>翻译>>翻译模式”,这样,所有的行就都输入内容了,保存时就不会漏掉某行了。
7.其他
其实,SW的功能太强大了,这些介绍只是一小部分而已。
他带有非常详细的使用说明,可惜是英文
如果大家使用中有什么心得或问题,请一并提出来,大家一起提高啦。
