帝斯曼OVN手册
MODES v1.1 用户手册说明书

----------------------- MODES v1.1 User Manual -----------------------ReferencesMining Coherent Dense Subgraphs Across Massive Biological Networks for Functional DiscoveryHaiyan Hu1, Xifeng Yan2, Yu Huang1, Jiawei Han2, and Xianghong Jasmine Zhou11 Program in Molecular and Computational Biology, University of Southern California, Los Angeles, CA 90089, USA2 Department of Computer Science, University of Illinois at Urbana-Champaign, Urbana, IL 61801IntroductionMODES stands for Mining Overlapping DENSE Subgraphs. The input graph for MODES is an unweighted graph Ĝ=(V, Ê) where an edge e(u,v) connects vertices u and v (u, v∈V). MODES is developed based on HCS (Mining Highly Connected Subgraphs) (Hartuv & Shamir, 2000), with two new features: (1) MODES is efficient in identifying dense subgraphs; and more importantly, (2) MODES can discover overlapping subgraphs. The algorithm behind it is described in the related paper (see REFERENCES).PlatformsMODES was developed and tested on Linux (Debian and Redhat) using gcc2.95, and should be able to run on most UNIX systems.Usagemodes [command-line options] <input-files>Command-Line Options-m k(run_mode)There are 2 running modes available for MODES. Valid k values are:(1) k=0, is to find all clusters(2) k=1 is to find all clusters containing gene x-i str(inputfile)The path and name of the input overlapped frequency graph file, which is in thematrix format currently.-n k(gene_num)This parameter specifies the gene number from the inputfile, i.e. the dimension of the input matrix file.-o str(outputfile_name_prefix)This is the prefix of the output clusters file. Thus the output file containing thefirst order clusters would be outputfile_name_prefixFO, while the final output file containing the second order clusters would be outputfile_name_prefixSO.-g k(min_graph_size)This parameter specifies the minimum node number requirement of the outputsubgraph. Default value is 5.-e k(bottom_edge_freq)This argument specifies the minimum edge weight required to be kept as an edge in the input graph. Default value is 6.-d f(density_cutoff_order1)This argument specifies the minimum density requirement for the dense subgraph generated. Default value is 0.5.-s k(the maximum node number to apply min-cut)This paprameter specifies the maximum number of nodes in a graph whenperforming min-cut algorithm instead of normal-cut algorithm. Default value is80.-c f(connect perc restoring the condensed cluster)This argument controls the connectivity percentage requirement for keeping anode when restore a subgraph from a condensed cluster node. Default value is 0.6. -x k(genex)This argument specifies the gene (index), the clusters containing which is to bediscovered when running modes with run_mode as 0.Note: The maximum gene num MODESv1.1 can handle is 65535.Input-FilesThe input graph could be in three formats: matrix format, edge format, and another is edge list format.Note: In the examples below, the symbol “|” represent a Tab separator, and “|_|” represents a space separator.(a) Matrix formatThe input graph prototype is an integer symmetric matrix with dimension asgenenumber × gene number. The intersection of ith gene row and jth genecolumn is the number of datasets in which this gene pair significant correlated in terms of Jackknife correlation. Or other interested relation frequency defined byuser. If your input summary graph prototype is in the matrix format, you need to specify –n gene number in the command line. The example of this file is in~/MODES/data/input/summaryG500.txt.(b) Edge formatThe input graph is a set of weighted edges. The format is:Node I1 | Node J1 | WeightNode I2 | Node J2 | WeightNode I3 | Node J3 | Weight….Since MODESv1.0 is applied on unweighted graph, the weight value is not really used in MODES. Or other interested relation frequency defined by user. If your input graph is in the edge format, you need to specify –y edge number in thecommand line.(c) Edge List formatThe input graph is a set of edges. The format is:Node I1 |_| Node J1Node I2 |_| Node J2Node I3 |_| Node J3….If your input graph is in the edge list format, you need to specify –y edge number in the command line.Output-FilesThe clustering results are in the output file user specified.The format is:Cluster index | node number n in this cluster | edge number m in this cluster | gene 1’s index | gene 2’s index | ...| gene n’s index.EXAMPLESmodes -m run_mode -i myinputfile -n genenum -o outputfile -g min_graph_size -e bottom_edge_freq -d density_cutoff_order1 -s the maximum node number of a first order subgraph -c connect perc restoring the condensedcluster -x genexThe initial try could be the following command:./modes -m 0 i ../data/input/g1.matrix -n 10 -o ../data/output/g1.matrix.out4 -g 4 -e 1 -d 0.9Example for running mode at 0:modes –m 0 –i myinputfile –n genenum –o myoutputfile –g 5 –e 6 –d 4 –s 80 –c 0.6This will set the minimum output graph size as 5, the edge support threshold as >=6, the dense subgraph cut off as 0.4, and the maximum number of nodes in a graph when performing min-cut algorithm instead of normal-cut algorithm is 80. This will generate the dense subgraph file as myoutputfile.Example for running mode at 1:modes –m 1 –i myinputfile -n genenum –o myoutputfileprefix –g 5 –e 6 –d 4 –s 80 –c 0.6 –x 21This will set the minimum output graph size as 5, the edge support threshold as >=6, the first order dense subgraph cut off as 0.4, and the maximum number of nodes in a graph when performing min-cut algorithm instead of normal-cut algorithm is 80. This will generate the subgraph file containing gene 21 as myoutputfile.NoteThis is MODES version 1.1. Testing hasn’t been exhaustive. Feedback and application description are always welcome. Contact ************** for bugs and questions about MODES.ContactsXianghong Jasmine ZhouAssistant ProfessorProgram in Molecular and Computational BiologyUniversity of Southern CaliforniaOffice: DRB291 Phone: 213-740-7055 Fax: 213-740-2437Email: **************。
帝斯曼 9 碳黑 化学品安全技术说明书

化学品安全技术说明书根据中国国务院591号令:危险化学品安全管理条例,应为危险物质或混合物编制安全技术说明书(S D S )。
本产品不符合危险化学品国标的分类标准。
因此,此产品不在危险化学品安全管理条例的管辖范围内,国标对安全技术说明书各部分的规定均不适用该产品.1. 化学品及企业标识产品名称产品名称::VULCAN Ò 9 Carbon Black 产品代码产品代码::V9同义词同义词::炭黑, 炉黑该S D S 对下列品种是有效的:炭黑品种系列 : B L A C K P E A R L S ®, E L F T E X ®, M O G U L ®, M O N A R C H ®, R E G A L ®,S P H E R O N ®, S T E R L I N G ®, V U L C A N ®, C S X ™, C R X ™, I R X ™, F C X Ô, SHOBLACK Ô,DL Ô, PROPEL Ò, LITX Ò, and PBX Ò carbon black. Oxidized grades include:BLACK PEARLS® / MOGUL® L, BLACK PEARLS® / MOGUL® E, MOGUL® H, and REGAL® 400/400R carbon black. *不包括 : B L A C K P E A R L S ® / M O N A R C H ®1000, 1300, 1400, 1500; BLACK PEARLS® 1300B1; Monarch® 4750; and Black P e a r l s ® 4350/4750 c a r b o n b l a c k ; 以及所有油性颗粒品种。
创新无止境,帝斯曼尚善APE背板获专家好评

创新无止境,帝斯曼尚善APE背板获专家好评葛晓敏【期刊名称】《太阳能》【年(卷),期】2017(000)004【总页数】3页(P63-65)【作者】葛晓敏【作者单位】【正文语种】中文据工业和信息化部数据显示,截至2016年底,我国光伏组件产量约为53 GW,同比增长20.7%;光伏发电新增并网装机量达34.5 GW,同比增长127%。
随着光伏组件产量与光伏发电装机量的不断增加,物美价廉、性能优异、绿色环保的光伏组件需求量也日益增加。
背板材料作为光伏组件的重要组成部分,其性能对组件的耐老化性、电气绝缘性、发电效率、功率衰减率及阻水性均有影响。
帝斯曼尚善的创新型APE背板,以杰出的耐候性、可靠的绝缘性、提升功率、降低衰减、绿色环保等众多优异性能,吸引了业界专家的目光。
2017年4月10日下午,“帝斯曼尚善APE背板媒体见面会”在北京举行。
中国可再生能源学会光伏专委会秘书长吕芳主持了本次见面会,来自帝斯曼尚善的技术人员,以及来自《太阳能》、《太阳能发电》、中国能源报、PV-Tech、Solarbe 等十几家专业媒体出席了此次会议。
2月16日,荷兰皇家帝斯曼集团在上海召开新闻发布会,宣布全资收购苏州尚善新材料科技有限公司。
此次会议中,帝斯曼先进太阳能亚太区总裁何飞向媒体解答了为何选择尚善作为集团的全资子公司。
荷兰皇家帝斯曼集团是一家拥有112年历史的集团,在全球范围内活跃于健康、营养和材料领域。
何飞表示:“对于尚善的收购,一方面基于技术与商业的协同效应,另一方面是基于环保领域的需求。
帝斯曼一直在寻找太阳能背板领域基于环保绿色的创新。
”2016年我国光伏发电新增装机并网容量和累计装机容量分别达到34.5 GW和77.4 GW,两项指标均居全球首位。
但对于达到使用寿命的光伏组件的回收是目前业界面临的问题,组件中的金属、玻璃已有较成熟的回收方案,但对于组件中的许多高分子材料,如EVA胶、含氟背板材料等的回收方式还存在巨大的问题。
EATON LifeSense 漩涡指南操作说明书
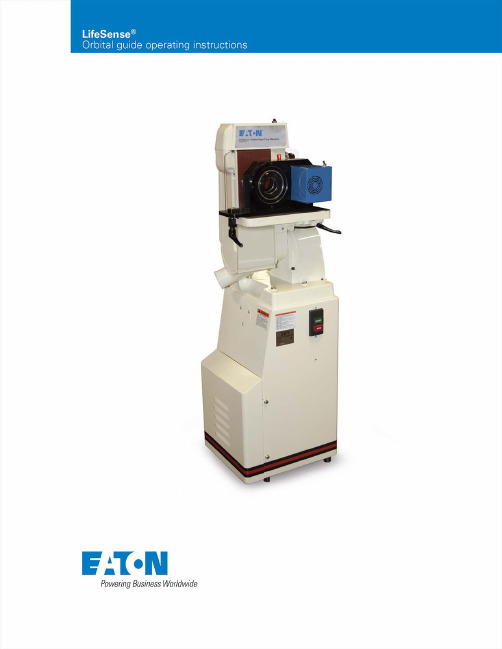
EATON LifeSense orbital guide operating instructions E-HOAS-CC001-E October 20152Table of contentsContentsGeneral information 3Safety instructions 3Electrical requirements 3Installation / environment 4Maintenance 4LifeSense hose clean up / preparation 4LifeSense isolation test 6Notes 7Contact information 81234563Image shown Eaton Part Number ET0100-005124563Orbital Guide Start / Stop SwitchOrbital GuideOrbital Guide Locking HandlesDebris ShroudVent* * S hop vacuums with spark arresters are required.Vertical Sander Start / Stop ButtonGeneral informationThe LifeSense orbital guide (ET0100-001) was designed with the specific intent to aid in, and expedite, the mandatory hose end cleanup process when producing a LifeSense hose assembly. The orbital guide was designed by Eaton and is a required piece of equipment in making a LifeSense hose assembly.The purpose of this manual is to present the basic operating, maintenance, and safety information for the Eaton LifeSense orbital guide and a JET J-4300A vertical belt sander (Eaton part number ET0100-005).Safety instructions -general safety precautionsRead and understand this manual beforeattempting to operate the equipment.Failure to follow operating instructions may lead todeath, severe injury, or property damage.PREVENT UNAUTHORIZED OPERATION:DO NOT permit anyone to operate this machine unlessthey have read and thoroughly understood this manual.WEAR SAFETY GLASSES:Risk of eye injury! Eye protection is required at alltimes during the installation, operation and maintenance of this machine. FAILURE TO FOLLOW THIS WARNING MAY LEAD TO DEATH, SEVERE INJURY, ORPROPERTY DAMAGE.KEEP WORK AREA CLEAN:Cluttered areas and benches invite accidents.W EAR SAFETY GLOVES:Safety gloves should be worn at all times during the operation of the orbital guide. FAILURE TO FOLLOW THIS WARNING MAY LEAD TO DEATH, SEVERE INJURY,OR PROPERTY DAMAGE.Only the hose mandrels specifically designed for use with the orbital guide should be inserted into the orbital guide. FAILURE TO FOLLOW THIS WARNING MAY LEAD TO DEATH, SEVERE INJURY, OR PROPERTY DAMAGE.EMERGENCY STOPS:To turn off the orbital guide push the toggle switch on top of the motor shroud. (See Figure 1). To turn the vertical belt sander off at any time, push the red E-Stopbutton located on the front of the machine.This deactivates the sander. (See Figure 2).Figure 1Figure 2Electrical requirementsThe orbital guide is supplied with an electrical enclosure and toggle on/off switch which requires a 120-volt, 15-amp power source. The JET J-4300A vertical belt sander also requires 120-volt, 20-amp service.EATON LifeSense orbital guide operating instructions E-HOAS-CC001-E October 20153EATON LifeSense orbital guide operating instructions E-HOAS-CC001-E October 20154Installation / environmentOnly qualified personnel should be utilized for installation of the unit. FAILURE TO FOLLOW THIS WARNING MAY LEAD TO DEATH, SEVERE INJURY , OR PROPERTY DAMAGE.When installing the orbital guide onto a vertical belt sander, align the guide bar on the bottom of the orbital guide with the guide bar slot on the sander table/platen. This will ensure the orbital guide is parallel with the sander belt. Finally, ensure that the bottom back ledge of the orbital guide overlaps the sander table next to the belt, while at the same staying with in the sander manufacturer's recommended min./max. distance from the belt. This will prevent debris from building up on the sander table top. Install a vent system with a spark arrester at the belt sander outlet.The JET J-4300A vertical belt sander, or any belt sander, must be installed indoors on a level surface, in a clean, dry environment and in a manner that meets consumer safety standards.MaintenanceKeep rubber debris from accumulating at the back of the orbital guide between the sanding belt and clear safety screen by removing it regularly. Excessive rubber debris accumulation from the sanding process can cause belt damage, begin to smoke, or catch fire. FAILURE TO FOLLOW THIS WARNING MAY LEAD TO DEATH, SEVERE INJURY , OR PROPERTY DAMAGE.As the belt wears down, the orbital guide will need to be shuttled to another section of the belt. Simply loosen the two black locking handles, slide the fixture, and re-tighten.(See Figure 3). Replacement belts should be 100 grit.Figure 3LifeSense hose end clean up Prepping or cleaning the end of a cut LifeSense hose is a mandatory step in the LifeSense hose assembly process. Utilize Eaton’s orbital guide (ET0100-001), mounted to a vertical belt sander and the proper mandrel for the given hose size. This clean-up step isolates the first and second deck of the wire reinforcement; avoiding continuity between the two decks.Step 1: Select mandrel Turn the power off on the orbital guide and sander. Then select the correct size mandrel insert for thehose size. (See Figure 4).Figure 4Step 2: Insert mandrel Slide the mandrel into the orbital housing until it bottomsout. (See Figure 5). Figure 5EATON LifeSense orbital guide operating instructions E-HOAS-CC001-E October 20155Step 3: T urn on powerTurn the orbital guide on by moving the toggle on/off switch to the “On” position. If you are using the JET sander, press the green power button to activatethe sander. (See Figures 6 & 7).Figure 6Figure 7Step 4: Hose end clean up Insert the hose into the mandrel until the hose makes contact with the sanding belt. Only light pressure needs to be applied to achieve a good bevel; CAUTION: DO NOT push the hose aggressively against the belt as the belt willwear prematurely or tear. (See Figure 8).Figure 8Hold the hose steady while applying light pressure. Allow the hose to turn 3-5 revolutions. CAUTION: DO NOTallow the hose to turn in your hands. (See Figure 9).Figure 9EATON LifeSense orbital guide operating instructions E-HOAS-CC001-E October 20156Figure 10Step 5: Visually inspectVisually inspect the hose end to ensure no wires are touching between the first and second layers. (See Figure 10).Step 6: Isolation testTo verify separation between hose layers an isolation test must be conducted. Y ou can do so by using the Eaton test gauge (ET0100-002) and plier gauge (ET0100-003) or a multimeter.Using Eaton gaugesIf using the Eaton test gauge, insert the positive and negative wires of the test pliers into the corresponding ports on the test gauge. Then insert the pliers into the hose and squeeze the handles firmly to pierce the inner and outer wire reinforcement layers. While maintaining pressure on the handles press the button on the test gauge. Both lights, hose and connection, should illuminate green. (See Figure 11).If one or both of the lights illuminate red, reposition pliers, apply firm pressure on the handles, and re-test. If a light(s) remain red examine both hose ends to verify the wire decks are truly separated. (See Figures 12 & 10).Using a multimeterIf using a multimeter, turn the multimeter on and locate the Ohm setting (Ω) on the dial. Place the tip of one probe on the outer wire reinforcement and the other on the inner layer. The resistance reading MUST be greater than5,000 ohms. (See Figure 13).Figure 11Figure 12Figure 13NotesEATON LifeSense orbital guide operating instructions E-HOAS-CC001-E October 20157© 2015 EatonAll Rights ReservedPrinted in USADocument No. E-HOAS-CC001-E October 2015Assembly EquipmentTechnical Support | Service | Spare Parts 1-888-AT-LOMAR(1-888-285-6627)(517-563-8800)EatonHydraulics Business USA 14615 Lone Oak Road Eden Prairie, MN 55344 USATel: 952-937-9800Fax: 952-294-7722 /hydraulics EatonHydraulics Business EuropeRoute de la Longeraie 71110 MorgesSwitzerlandTel: +41 (0) 21 811 4600Fax: +41 (0) 21 811 4601EatonHydraulics Group Asia PacificEaton BuildingNo.7 Lane 280 Linhong RoadChangning District,Shanghai 200335ChinaTel: (+86 21) 5200 0099Fax: (+86 21) 2230 7240。
蛋鸡配合饲料中维生素E不同添加量的目标功能定位

蛋鸡配合饲料中维生素E不同添加量的目标功能定位作者:党晓鹏来源:《江西饲料》 2015年第4期党晓鹏(陕西金冠牧业有限公司西安710018)摘要:蛋鸡配合饲料中维生素E的添加量在实际生产中差异较大,不同的添加量代表着配方师对蛋鸡饲料中维生素E目标功能的不同定位。
维生素E的目标功能主要包括:预防维生素E缺乏症,促进繁殖性能,抗应激、提高免疫力,抗氧化,强化蛋品品质等。
关键词:蛋鸡;维生素E;添加量;目标功能中图分类号:S816.31文献标识码:A文章编号:1008-6137(2015)04-0007-040 引言维生素E有天然和化工合成之分,天然维生素E主要用于医药化工、食品饮料及保健美容等领域,饲料工业多使用化工合成天维生素E,即DL-α-生育酚。
天然维生素E共有8种类似物,包括4种生育酚和4种生育三烯酚。
这八种类似物均含有6-色酮环及一个侧链。
色酮环上的甲基团越多,其生物活性越高。
科学家通过不同的实验,测定不同生育酚和生育三烯酚的维生素活性。
由于所关注的目标功能不同,结果观察到它们的相对活性也是不同的。
在目前所有的维生素E产品形式中,活性最高的是α-生育酚异构体,其次是β-生育酚,活性12%~40%。
而其它几种化合物的活性要低得多,如:γ-生育酚3%~20%,δ-生育酚0.3%~1%,α-生育三烯酚17%~29%,β-生育三烯酚1%~5%,γ、δ生育三烯酚基本无维生素活性[1]。
饲料工业中应用最为广泛的商品维生素E是含量为50%的DL-α-生育酚醋酸酯。
在蛋鸡养殖生产中,由于维生素E本身所具备的广泛功能和配方师对蛋鸡饲料中维生素E生理功能的不同目标定位,导致维生素E实际添加量差异较大。
蛋鸡对维生素E的营养需要量,不同国家、不同学者研究结果大不相同,这主要是因为研究蛋鸡维生素E需要量时,即使在同一实验室中,因选用的衡量指标不同,导致研究结果差异很大。
1 推荐添加量5~10 mg/kg,目标功能定位为预防蛋鸡维生素E缺乏症蛋鸡维生素E缺乏症临床主要表现为雏鸡脑软化症、渗出性素质和白肌病等。
IFUHU0030039 _v02_EN 产品说明书

INSTRUCTIONS FOR USESENSI Spec ELISA T-2 Toxin RAPID 96 Tests Enzyme Immunoassay for the Rapid QuantitativeDetermination of T-2 Toxin in Food(Cat.nr. HU0030089)Sensitivity 5 – 16 ppb Recovery (spiked samples) 92-105% Incubation Time 20 min 1. GENERAL INFORMATIONT-2 Toxin in addition to deoxynivalenol, zearalenone, the fumonisines and other trichothecenes belongs to the fusarium toxins. These toxins are already produced on the field in consequence of a contact of the cereals by fusarium species. Acute toxic dosages can result in gastroenteritis, damage of bone marrow up to necroses of skin and respiratory passages.T-2 toxin has a high stability against temperature and can therefore also be detected in bakery products. In Russia the legislator set limit values for T-2 Toxin in food between 50 and 100 ppb. The introduction of limit values in the European union is discussed since many years. Thus an observation of food and feed with re-spect to the concentration of T-2 Toxin is increasingly obligatory.The SENSI Spec T-2 Toxin RAPID ELISA represents a highly sensitive detection system and is particulary ca-pable of the rapid quantification of T-2 Toxin contami-nations in cereals, beer, milk and meat.2. PRINCIPLE OF THE TESTThe SENSI Spec T-2 Toxin RAPID quantitative test is based on the principle of the enzyme-linked immuno-sorbent assay. An antibody binding protein is coated on the surface of a microtiter plate. The standards and samples respectively are pipetted together with a T-2 Toxin-peroxidase conjugate and a rabbit-anti-T-2 Toxin antibody into the appropriate wells. The conjugate com-petes with the T-2 Toxin of samples/standards for the limited number of antibody sites. Simultaneously the anti-T-2 Toxin antibody is bound to the antibody-binding protein coated on the microtiter plate. After 10 min incu-bation at room temperature, the wells are washed with diluted washing solution to remove unbound material. A substrate solution is added and incubated for 10 minutes, resulting in the development of a blue col-our. The colour development is inhibited by the addition of a stop solution, and the colour turns yellow. The yel-low colour is measured photometrically at 450 nm. The concentration of T-2 Toxin is indirectly proportional to the colour intensity of the test sample.3. PRECAUTIONSFull compliance of the following good laboratory prac-tices (GLP) will determine the reliability of the results: 1) Prior to beginning the assay procedure, bring all re-agents to room temperature (20-25°C).2) All reagents should be mixed by gentle inversion orswirling prior to use. Do not induce foaming.3) Once the assay has been started, all subsequentsteps should be completed without interruption and within the recommended time limits.4) Replace caps in all the reagents immediately afteruse. Do not interchange vial stoppers.5) Use a separate disposable tip for each specimen toprevent cross-contamination.6) All specimens and standards should be run at thesame time, so that all conditions of testing are the same.7) Do not mix components from different batches.8) Do not use reagents after expiration date.9) Check both precision and accuracy of the laboratoryequipment used during the procedure (micropipets, ELISA reader etc.).4. HEALTH AND SAFETY INSTRUCTIONS1) Do not smoke or eat or drink or pipet by mouth in thelaboratory.2)Wear disposable gloves whenever handling patient specimens.3) Avoid contact of substrate and stop solution withskin and mucosa (possible irritation, burn or toxicity hazard). In case of contact, rinse the affected zone with plenty of water.4) Handling and disposal of chemical products must bedone according to good laboratory practices (GLP).5. REAGENTSThe kit contains reagents for 96 determinations. They have to be stored at 2-8°C. Expiry data are found on the labels of the bottles and the outer package.1) Microtiter plate consisting of 12 strips with 8 breaka-ble wells each, coated with antibody-binding protein.2) T-2 Toxin Standards (0; 17.5; 87.5; 350; 875;1750 ppb): 6 vials with 1 mL each, dyed red, ready-to-use. Because of the total dilution of 1:35 of the solid samples in the extraction step, the calibrators contain 1/35th of the stated value. Thus no further calculation after analysis is necessary.3) Anti-T-2 Toxin Antibody (rabbit): 6 mL, dyed blue,ready-to-use.4) Conjugate (T-2 Toxin-Peroxidase): 6 mL, dyed red,ready-to-use.5) Substrate Solution (TMB): 15 mL, ready-to-use.6) Stop Solution (0.5 M H2SO4): 15 mL, ready-to-use.7) Sample Diluent (PBS): 2 x 60 mL, dyed red, ready-to-use.8) Washing Solution (PBS + Tween 20): 60 mL as 10xconcentrate. Dilute 1+9 with distilled water. If during the cold storage crystals precipitate, the concentrate should be warmed up to 37°C for 15 minutes.9) Plastic bag to store unused microtiter strips.10) Instruction Manual.6. ADDITIONAL INSTRUMENTATION AND REA-GENTS (not provided)Instrumentation⏹50, 100, 500 and 1000 µL-micropipets⏹ELISA reader (450 nm)⏹Centrifuge⏹Ultra-Turrax, mixer, vortex Reagents⏹Double distilled water⏹Methanol7. SAMPLE PREPARATIONCereals / Meat⏹Grind sample to pass through a 20 mesh sieve andthoughly mix prior to sub-sampling.⏹Suspend 20 g of sample in 100 mL of 70% metha-nol.⏹Mix suspension for 5 minutes.⏹Filter through Whatman #1 filter or alternativelycentrifuge at a minimum of 3000 g for 5 minutes.⏹Dilute 100 µL of filtrate/supernatant with 600 µL ofsample diluent and test the sample in the ELISA.Beer / Gyle / Milk⏹Dilute an adequate volume of sample diluent with10% methanol.⏹Carbonized beer samples should be preliminarilydegassed by moderate heating.⏹Cloudy beers (such as beer brewed from wheat) /gyle should preliminarily be sterile-filtered.⏹Degrease whole milk samples by centrifugation⏹Dilute 100 µL of sample with 900 µL sample dilu-ent/methanol dilution.In case of too high concentrated samples, an ade-quate volume of sample diluent is diluted with 10% methanol. The sample extracts have to be further di-luted with this dilution.8. PROCEDURE1) Prepare samples as described above.2) Pipet 100 µL standards or prepared samples in du-plicate into the appropriate wells of the microtiter plate. Immediately add 50 µL T-2 Toxin-peroxidase conjugate and 50 µL anti-T-2 Toxin antibody into each well (consider sequence!).3) Incubate for 10 minutes at room temperature.4) Wash the plate three times as follows: Discard thecontents of the wells (dump or aspirate). Pipet 300 µL of diluted washing solu tion into each well.After the third repetition empty the wells again and remove residual liquid by striking the plate againsta paper towel. The wash procedure is critical. Insuf-ficient washing will result in poor precision and falsely elevated absorbencies.5) Pipet 100 µL of substrate solution into each well.6) Allow the reaction to develop in the dark (e.g. cup-board or drawer; the chromogen is light-sensitive) for 10 minutes at room temperature.7) Stop enzyme reaction by adding 100 µL of stop so-lution (0.5 M H2SO4) into each well. The blue colour will turn yellow upon addition.8) After thorough mixing, measure absorbance at 450nm (reference wavelength 620 nm), using an ELISA reader. The colour is stable for 30 minutes.9. CALCULATION OF RESULTSThe ready-to-use standards are prepared for a direct determination of the sample concentrations. The dilu-tion of samples in the extraction process as described in the above stated sample preparation procedure is al-ready considered. Additional dilution due to high sam-ple concentration has to be accounted for.1) Calculate the average optical density (OD 450 nm)for each set of reference standards or samples. 2) Construct a standard curve by plotting the mean op-tical density obtained for each reference standard against its concentration in ppm on semi-log graph paper with the optical density on the vertical (y) axis and the concentration on the horizontal (x) axis. Al-ternatively the evaluation can be carried out by soft-ware. In this case the 4-parameter method should be preferred.3) Using the mean optical density (OD) value for eachsample, determine the corresponding concentra-tion of fumonisin in ppm from the standard curve.Depending on experience and/or the availability of computer capability, other methods of data reduc-tion may be employed.4) Due to a deviating sample preparation process theresults for Beer / Gyle / Milk samples additionally have to be multiplied with 0.286 in order to get the real concentration of the sample.10. TYPICAL STANDARD VALUESThe following table contains an example for a typical standard curve. The binding is calculated as percent of the absorption of the 0 ppb standard. These values are only an example and should not be used instead of the standard curve which has to be measured in each new test.T-2 Toxin (ppb) (% binding of 0 ppb)0 10017.5 8587.5 62350 35875 201750 1311. PERFORMANCESensitivityThe limit of detection (LOD) of the SENSI Spec T-2 Toxin RAPID test is 13 ppb.Validation experiments with common matrices resulted in the following LODs [ppb].Wheat 10 Rye 11 Barley 16 Corn 14 Rice 11 Meat (pork) 8 Milk 5 Beer 5 The limit of quantification (LOQ) of the SENSI Spec T-2 Toxin RAPID test is 17.5 ppb.Due to the variety of sample matrices and their influ-ence on the blank, results less than the LOQ should be treated as negative.11.1. Cross-reactivityCross-reactivity relative to T-2 Toxin(=100%)HT-2 Toxin 3.0%T-2 Triol 0.35%T-2 Tetraol 0.07% 11.2. PrecisionIntra-assay Precision 3-4% Inter-assay Precision 3-6% 11.3. LinearityThe serial dilution of spiked samples (wheat, rice, corn, rye, barley, meat, beer, milk) resulted in a dilution line-arity of 84-111%.11.4. RecoveryWheat 100% Barley 96% Rye 103% Oats 97% Rice 95% Corn 92% Meat 97% Beer 105% Milk 95% 12. REFERENCES1) Schwake-Anduschus C, et al. (2010) – Occur-rence of Fusarium T-2 and HT-2 toxins in oatsfrom cultivar studies in Germany and degrada-tion of the toxins during grain cleaning treat-ment and food processing. Food Addit Con-tam, 27(9):1253-602) Kankkunen P, et al. (2009) – Trichothecenemycotoxins activate inflammatory response inhuman macrophages. J Immunol,182(10):6418-253) Yoshizawa T, et al. (2004) – A practicalmethod for measuring Deoxynivalenol, Niva-lenol, and T-2 + HT-2 Toxin in foods by an en-zyme-linke immunosorbent assay using mono-clonal antibodies. Biosc Biot Biochem,68(10):2076-854) Chu F S, et al. (1986) – Improved method forproduction of antibodies against t-2 toxin anddiacetoxyscirpenol in rabbits. Appl Env Mi-crob, 51(1):132-375) Ohtani K, et al. (1988) – Improved preparationof T-2 toxin-protein conjugates. Toxicon,26(11):1107-116) Katja Bernhardine (2008) – Entwicklung undValidierung von Enzymimmuntests zum Nach-weis von T-2 Toxin und HT-2 Toxin sowie Vor-kommen dieser Mykotoxine in Lebensmittelndes deutschen Marktes. Dissertation, Tierärzt-liche Fakultät München7) Suproniene S, et al. (2010) – Distribution oftrichothecene and zearalenone producingfusarium species in grain of different cerealspecies and cultivars grown under organicfarming conditions in Lithuania. Ann Agric En-viron Med, 17:79-868) Barthel J, et al. (2012) – Occurrence of type A,B and D trichothecenes in barley and barleyproducts from the Bavarian market. MycotoxinRes, 28(2):97-106。
帝斯曼公司维生素产品扩张模式研究(终版)

帝斯曼公司维生素产品扩张模式研究专业名称:高级管理人员工商管理硕士**人:***导师:陈功玉教授论文答辩委员会主席:成员:论文原创性声明本人郑重声明:所呈交的学位论文,是本人在导师的指导下,独立进行研究工作所取得的成果。
除文中已经注明引用的内容外,本论文不包含任何其他个人或集体已经发表或撰写过的作品成果。
对本文的研究作出重要贡献的个人和集体,均已在文中以明确方式标明。
本人完全意识到本声明的法律结果由本人承担。
学位论文作者签名:申伟贤日期:2010 年12 月18 日学位论文使用授权声明本人完全了解中山大学有关保留、使用学位论文的规定,即:学校有权保留学位论文并向国家主管部门或其指定机构送交论文的电子版和纸质版,有权将学位论文用于非赢利目的的少量复制并允许论文进入学校图书馆、院系资料室被查阅,有权将学位论文的内容编入有关数据库进行检索,可以采用复印、缩印或其他方法保存学位论文。
学位论文作者签名:申伟贤导师签名:陈功玉日期:2010 年12 月18 日日期:2010年12 月18 日帝斯曼公司维生素产品扩张模式研究专业:高级管理人员工商管理硕士硕士生:申伟贤指导教师:陈功玉教授摘要人类进入21世纪,快速变化的外部经济环境及企业内部各种要素复杂化,使企业的竞争压力越来越大,企业要想实现长期的发展战略目标及快速稳定发展,必须要构建持续的、有效的竞争和核心优势。
在全球近代经济发展历程中,企业参股合资、并购以及战略联盟一直是贯穿经济发展的管理活动,是企业战略实施的重要组成部分。
中国加入世界贸易组织后,随着全球经济一体化和市场一体化的到来,中国企业面临着更加激烈的竞争。
中国企业“以市场换技术”与跨国公司合作引起了合资企业技术水平的提升和绩效的改善,实现了社会资源的重新配置。
战略联盟作为一种新的合作竞争形式,成为现代企业提升竞争优势的重要手段,跨国公司配合它们国际国内市场上战略发展与竞争的一种新方向。
根据资料记载,在世界150多家不同行业不同类别的跨国公司中,以各种不同形式结成市场技术生产等战略联盟的达到90%以上,许多跨国公司已经视战略联盟为企业发展的全球战略最快捷、有效的方法。
Vorndo VFANA 产品说明书
2EnglishTABLE OF CONTENTSIMPORTANT INSTRUCTIONS (4)FEATURES AND BENEFITS (8)HOW TO USE YOUR VORNADO (9)CLEANING (10)TROUBLESHOOTING (13)WARRANTY (14)ESPAÑOL P. 15 FRANÇAIS P. 27English3READ AND SAVE THESE INSTRUCTIONSIMPORTANT SAFETY INSTRUCTIONSThis owner’s guide and any additional inserts are considered part of the product. They contain important information about safety, use and disposal. Before using the product, please familiarize yourself with all operating and safety instructions. Please keep all documents for future reference and pass these documents on, together with the product, to any future owner. See our website to view, download and print the most current version of this owner’s guide.INTENDED USE: This product is intended to circulate the air in indoor living spaces only in the United States and Canada. This product is not intended for commercial or industrial use. The manufacturer assumes no responsibility for damage or injury due to unauthorized use or product modification.Failure to follow these directions will voidthe product warranty.WARNING: RISK TO CHILDREN ANDIMPAIRED PERSONS• Supervision is required during the installation,operation, cleaning and maintenance ofthis product by children under age 12 andanyone with reduced physical, sensoryor mental capabilities. Children shouldbe supervised to ensure that they do notplay with the appliance, its parts andpackaging material.INSTALLATION WARNING—TO REDUCE RISKOF FIRE, ELECTRICAL SHOCK AND INJURYTO PERSONS, OBSERVE THE FOLLOWING:• Place this product away from curtains,draperies, tablecloths and other fabrics,since they may be drawn into the fan,damage the motor and/or cause a fire.• No part of this product (the appliance,power cord, plug, packaging, etc.) shouldbe placed near furnaces, fireplaces, stovesor other high temperature heat sources.Do not use this product in a window, on anuneven or unstable surface, or near water.• The appliance, power supply, power cordand plug cannot come into contact withwater. Do not use this product on wetsurfaces. Do not use this product in abathtub or shower or position productwhere it may fall into a bathtub, laundry,swimming pool or other water container.Do not use this product outdoors or exposeit weather or elements.• Do not run cord under carpeting. Donot cover cord with throw rugs, runners,or similar coverings. Do not route underfurniture or appliances. Arrange cordaway from traffic area and where it willnot be tripped over. The cord should nothang over edges of counters or be placedwhere it can be crimped or closed indoors. Place appliance near an easily4Englishaccessible outlet so the product can be unplugged quickly during an emergency. SAFE USE WARNING—TO REDUCE RISK OF FIRE, ELECTRICAL SHOCK AND INJURY TO PERSONS, OBSERVE THE FOLLOWING:• WARNING: To reduce likelihood of circuit overload, fire and electric shock, do not operate with a solid state speed device, such as a dimmer control switch.• Do not operate unit if the unit has been dropped or damaged. Do not use this product if it has a damaged power cord or plug. To avoid risk of electrical shock, do not attempt to repair or replace parts.Only original replacement parts may be used. If the power cord is damaged, it must be replaced by the manufacturer, its service agent, or similarly qualified persons in order to avoid a hazard. Contact Vornado Consumer Service at 1-800-234-0604 (phone) or consumerservice@ (email) for further instructionsabout replacement and repair.• Risk of fire. Your appliance may be equippedwith a detachable power supply or acord/plug with a safety device such asa fuse. Use only the power cord andplug provided.• Before plugging power cord into electricaloutlet, be sure that all electrical informationon the rating label, including voltage, iscompatible with your outlet’s power supply.• Never use the cord as a handle or otherwiseyank, strain or stretch the power cord.• While the product is plugged in, do notinsert or allow foreign objects to enterany input or output opening as this maycause risk of electric shock or fire, ordamage the product.• A loose fit between wall outlet (receptacle)and plug may cause overheating anddistortion of the plug. Discontinue useof the product in this outlet. Contact aqualified electrician to replace loose orworn outlets.• This appliance has a polarized plug (oneblade is wider than the other.) To reducethe risk of electrical shock, this plug isintended to fit in a polarized outlet onlyone way. If the plug does not fit fully inthe outlet, reverse the plug. If it still doesnot fit, contact a qualified electrician. Donot attempt to defeat this safety feature.• Before moving, repositioning, servicing,cleaning and when not in use, use theproduct controls to turn off the power andthen unplug. To disconnect from outlet,grasp and pull only the plug. Also, poweroff and unplug if the product will be leftunattended for an extended period oftime or during electrical storms.SERVICING WARNING—TO REDUCE RISKOF FIRE, ELECTRICAL SHOCK AND INJURYTO PERSONS, OBSERVE THE FOLLOWING:• Clean your product regularly, only as isinstructed in this manual. Prior to cleaning,turn off the power on your product and5Englishunplug. Do not use gasoline, thinners, solvents, ammonias or other chemicals for cleaning. Refer to the CLEANING instructions provided.• Do not open appliance housing while product is plugged in. To avoid risk of shock, all service and/or repairs must be done bya Vornado Authorized Service Center. • This product may have an overload protection (fuse) located in the plug. A blown fuse indicates an overload or short-circuit. If the fuse blows, follow these instructions to replace and reinstall the safety device:USER SERVICING INSTRUCTIONS1. Using the product controls, turn offthe appliance.2. Grasp the plug (not the cord) anddisconnect from the outlet.3. Risk of Fire. Replace fuse only with2.5 Amp, 125 Volt fuse as approvedby Vornado Consumer Service. For anauthorized replacement fuse, pleasecontact Vornado Consumer Service.4. Once the replacement is received,use a small flat-head screwdriver toslide open the fuse cover (locatedon the plug) (See Fig. A).5. Remove fuse by using the screwdriverto gently lift each end of the fuse(See Fig. B).6. Install the replacement fuse by usingthe screwdriver to gently push eachmetal end of the fuse into the receptacleone at a time. Do not push on thecenter of the fuse—it is fragile andmay break.7. Slide the fuse cover closed usingthe screwdriver. When closed, thecover should fit completely in theplug. No part of the cover shouldstick out (See Fig. C).8. Plug your appliance into the outletand turn the power on.9. If the replacement fuse blows, ashort-circuit may be present and theproduct should be discarded or returnedto an authorized service facility forexamination and/or repair.FCC CONSUMER ADVISEMENTThis equipment may generate, use and/orradiate radio frequency energy that may causeharmful interference to radio communications. Ifthis equipment does cause harmful interferenceto radio or television reception, which can bedetermined by turning the equipment off andon, the user is encouraged to contact VornadoConsumer Service. Changes or modificationsto this unit not expressly approved by theparty responsible for compliance could voidthe user’s authority to operate the product.Fig. A Fig. B Fig. C6English7English DISPOSAL WARNINGTO REDUCE WASTE AND ENVIRONMENTAL HARM, OBSERVE THE FOLLOWING:PACKAGE RECYCLING: The packaging protects the appliance from transport damage. The packaging materials are selected from the point of view of their environmental friendliness and disposal technology and are therefor recyclable. Dispose of all packaging materials in an environmentallyresponsible manner.WEEE RECYCLING• WASTE ELECTRICAL AND ELECTRONIC EQUIPMENT DISPOSAL: This marking indicates that this product should not be disposed with other household wastes throughout the EU. To prevent possibleharm to the environment or human health from uncontrolled waste disposal, recycle it responsibly to promote the sustainable reuse of material resources. To return your used device, please use the return and collection systems or contact the retailer where the product was purchased. They can take this product for environmental safe recycling.English TWIN AIR CONESInlet guide cones direct air to the most efficient parts of the propeller blades.DEEP-PITCHED PROPELLERDeep-pitched propeller blades “bite” off and circulates more air. VORTEX TORNADO ACTION BLADESDual injector cones and powerful blades cause the air leaving to spiral - allowing it to travel farther than typical fans.FIVE SPEEDSFor fully flexible performance, Vornado gives you as much or as little air as you desire.FULL ACTION PIVOT HEADDirect the airflow with the touch of your fingers with the easy-to-adjust head.SAFE AND QUIET DESIGNAll moving parts are enclosed for safety and silence.CIRCULATE ALL OVER THE ROOMA Vornado circulates all the air in the room so everyone is comfortable. Air in motion feels cooler than air that is stagnant. By providing whole room circulation, a Vornado allows you to turn the thermostat up without sacrificing comfort.FEATURES AND BENEFITS89English HOW TO USE YOUR VORNADO123KEEP IT CLEAN WITH THE VORNADO STORAGE BAG.SUMMER11English BLADE REMOVAL WARNING: To avoid risk of fire, electrical shock or injury to persons, make sure the air circulator is still unplugged before removing the blade. TIP: To prevent scratching, gently cover the tip of a flat screwdriver with a soft cloth.123Remove the blade cap by unscrewing the blade cap clockwise. Next, remove the fan blade by pulling the blade straight out from the shaft.To reinstall, push the blade all the way on the shaft until it bottoms out. The blade can only go on the shaft one way. Do not use a hammer as this could result in bearing damage. Replace the blade cap.12EnglishWARNING: To avoid risk of fire, electrical shock or injury to persons, unplug the Air Circulator before cleaning.TIP: The motor is permanently lubricated and requires no oiling.TO CLEAN MOTOR CAP AND INLET RIBS:Use a common household vacuum. Do not use water to clean these parts of the Air Circulator.TO CLEAN GRILL:Remove grill, (see grill removal instructions) and dust or wash with a mild dishwashing soap. Do not place grill in the dishwasher. The excessive heat can remove the plating.TO CLEAN BLADE:Wipe with a damp cloth. If your Air Circulator is used in a greasy environment, such as a kitchen, mild soap or a common household cleaner may be necessary. Do not use solvents.12313English Unit is not plugged in. Plug Power Cord into electrical outlet.Ensure unit fan speed setting is selected.Plug fuse has blown. Replace fuse. See user servicing instructions under important instructions.Unit is damaged or in need of repair. Cease usage and unplug. Contact Consumer Service for assistance.The outlet is worn or damaged. Try another outlet or contact a qualified electrician.Unit set to a low speed setting. Adjust to a higher speed setting.Airflow is blocked. Remove obstruction.Adjust direction of airflow towards the user.Under certain conditions, it is possible for a reset GFCI (Ground Fault Circuit Interrupter) outlet to trip when the user is changing speeds on a Vornado circulator. In this event, change to an outlet that is not connected to a GFCI device. It could also indicate a weak or defective GFCI outlet. Contact a qualified electrician to check the GFCI outlet.TROUBLESHOOTINGUNIT FAILS TO POWER ONAIRFLOW IS WEAK OR SLOWGFCI HAS TRIPPEDPOSSIBLE CAUSE AND SOLUTIONPROBLEMVornado Air LLC (“Vornado”) warrants to the original consumer or purchaser this Vornado®Whole Room Circulator (“Product”) is free from defects in material or workmanship for a period of five (5) years from the date of purchase. If any such defect is discovered within the warranty period, Vornado, at its discretion, will repair or replace the Product at no cost.FOR WARRANTY OR REPAIR SERVICE:*********************************************************************(“RA”) form. Please have or include your Product’s model number and serial number, as well as your name, address, city, state, Zip code and phone number when contacting Vornado for warranty service.AFTER RECEIVING THE RA FORM, SHIP YOUR PRODUCT TO:Vornado Air LLC Attn: Warranty & Repair 415 East 13th Street, Andover, KS 67002. For your convenience, please have your model number and serial number when contacting Vornado with service inquiries. To ensure proper handling, packages must be clearly marked with the RA number. Packages not clearly marked with the RA number may be refused at the receiving dock. Please allow 1-2 weeks for repair and return of your Product after the Product is received. Repairs not covered by the warranty or outside the warranty period will require a fee to cover the cost of materials, labor, handling and shipping.This warranty does not apply to defects resulting from abuse of the Product, modification, alteration, mishandling, improper maintenance, commercial use or repair or service of the Product by anyone other than Vornado; damages which occur in shipment or are attributed to acts of God. Improper product use, which includes using an external device that alters or converts the voltage or frequency of electricity, or shipping a Vornado product to a country not intended for use will void all warranties. Any unauthorized product modification, repair by unauthorized repair center or use of non-approved replacement parts is not recommended and any consequences will not be covered by support services or product warranties. The product warranty will be honored only on models that are being used in the country intended. REPAIR OR REPLACEMENT AS PROVIDED UNDER THIS WARRANTY IS THE EXCLUSIVE REMEDY OF THE CONSUMER. VORNADO SHALL NOT BE LIABLE FOR ANY INCIDENTAL OR CONSEQUENTIAL DAMAGES FOR BREACH OF ANY EXPRESS OR IMPLIED WARRANTY ON THIS PRODUCT. EXCEPT TO THE EXTENT PROHIBITED BY APPLICABLE LAW, ANY IMPLIED WARRANTY OF MERCHANTABILITY OR FITNESS FOR A PARTICULAR PURPOSE ON THIS PRODUCT IS LIMITED IN DURATION TO THE DURATION OF THIS WARRANTY. Some states do not allow the exclusion or limitation of incidental or consequential damages, or allow limitations on how long an implied warranty lasts, so the above limitations or exclusions may not apply to you. This warranty gives you specific legal rights, and you may have other rights that vary from state to state. The manufacturer assumes no responsibility for damage or injury caused by failure to follow these instructions, improper product use or unauthorized product modifications. Any such actions will invalidate the product warranty.All company names and product names are trademarks of their respective owners. ©All rights reserved. All technical information, data and instructions for the installation, connection and operation contained in these instructions for use correspond to the latest available information at time of printing. The contents of this manual may differ slightly from the actual product. Observe any additional supplements. U.S. Patent 7,530,783.AIR CIRCULATOR SATISFACTION GUARANTEE14English。