BT-S系列操作手册
BTEPS-DAS MS 软件说明书 V1.0

BTEPSBostex Enterprise Platform for Security SOFTWARE MANUAL软件操作手册Version 1.0对本手册所包含的所有信息,包括URL链接和其他网上资料,本公司有权未经通知,自行修改。
所举例引用的公司名称、组织机构、产品、人名以及事件,均与任何真实公司名称、组织机构、产品、人名和事件无关。
用户应遵守所有知识产权保护法律。
本手册任何部分在未经Ningbo Bostex Technology Co., Ltd书面同意的情况下,不得以任何形式(电子媒体、影印、记录或其他)再版、存储或引用手册中提到的所有其他产品,其知识产权均为其相关拥有者所具有。
© 2011 Ningbo Bostex Technology Co., Ltd版权所有目录1 软件安装 (1)1.1 计算机配置要求 (1)1.2 SQL 安装 (1)1.3 MSMQ 安装 (1)1.4 BTEPS 软件安装 (3)1.5 系统架构 (3)1.5.1 控制中心 (CC) (4)1.5.2 通讯服务器 (CS) (4)1.5.3 门禁系统 (DAS) (4)1.5.4 监控系统 (MS) (4)1.6 系统通讯 (5)1.7 运行软件 (5)2 系统管理 (5)2.1 设置自动登录 (6)2.2 系统设置 (6)2.2.1 设置用户自定义字段 (6)2.2.2 系统默认设置 (7)2.2.3 Wifi设置 (8)2.3 通讯服务器设置 (9)2.4 控制器设置 (9)2.4.1 添加控制器 (9)2.4.2 删除控制器 (11)2.4.3 控制器信息 (11)2.4.3.1 控制器名称 (12)2.4.3.2 设置报警优先等级 (12)2.4.3.3 设置安全密码 (12)2.4.3.4 停止收发数据 (12)2.4.3.5 修改控制器下的门名称 (12)2.4.4 控制器的连接方式 (12)2.4.5 控制器群组信息 (13)2.4.6 手动更新控制器信息 (13)2.5 区域设置 (14)2.5.1 添加区域 (14)2.5.2 删除区域 (15)2.5.3 添加门/控制器到区域 (16)2.5.4 删除区域中的门/楼层/控制器 (16)2.6 编辑门信息 (17)2.6.1 编辑门名称 (18)2.6.2 设置开门时间 (18)2.6.3 设置开门超时时间 (18)2.6.4 设置自动开门时区表 (18)2.6.5 设置密码取消时区表 (18)2.6.6 启用安全密码 (18)2.6.7 设置报警优先级 (18)2.6.8 设置工作模式 (18)2.6.9 修改所在区域 (19)2.6.10 启用反潜回 (19)2.7.1 编辑楼层名称 (19)2.7.2 设置开门时间 (19)2.7.3 设置自动开门时区表 (20)2.7.4 修改区域 (20)2.8 编辑设备 (20)2.8.1 添加设备 (20)2.8.2 编辑设备信息 (20)2.9 修改登陆密码 (21)2.10 设置操作员 (21)2.10.1 新增操作员 (21)2.10.2 删除操作员 (22)2.10.3 修改操作员权限 (23)2.11 离职管理 .............................................................................. 错误!未定义书签。
BT系巨型望远镜用户手册说明书

BT SeriesGiant BinocularsBT-70SF - BT-82SF - BT-100SF - BT-120SF Art. No. 0114200 / 0114210 / 0114220 / 0114230U-Mount with tripodArt. No. 0114300 INSTRUCTION MANUALGiant binoculars2x 62° LER eyepiece20mm ArTripodwith spacing plate and central screwU-Mountwith mounting plateand tripod head adapterTripodU-Mount11. F riction wheelsfor height adjustment 12. Movable height cradle 13. Fork arm14. Adapter plate for 15.15. 1/4" threaded screws 16. Dovetail rail 17. F ixing screws for 16.18. Turnable azimuthal axis 19. Fixing screw for 18.20. Mounting head21. Tripod head adapter1. Tripod head2. Tripod leg (upper part)3. Fixing screws for tripod leg4. Tripod leg (lower part)5. Spindle crank6. K nurled screw7. Central screw8. Spacing plate9. Washer 10. C-Clip21. Objective Lens 22. Dew/sun protection cap, extendable 23. Tube24. ¼" Connection thread 25. ⅜"-Connection thread* with unscrewable¼“ Connection thread adapter26. Transport handle27. Eyepiece, exchangeable 28. Eyepiece holder29. Eyepiece clamping ring 30. Focusing31. Interpupillary distance adjustmentGiant binoculars * for mounting on photo tripods with corresponding mounting head. ¼" connection thread can be unscrewed using a slotted screwdriver, thus exposing a "⅜"connection thread.When mounting the binoculars on a photo tripod with appropriate mounting head, make sure that the photo tripod and the mountinghead have sufficient load-bearing capacity!plate in the tripod head and fix it.adapter and the tripod. Tighten the tripod legs with the knurled screw.2. A ssemble spacing plate and central screw.6. F riction adjustment of the coupling for the height axis.them.tripod head. Place the U-Mount on the tripod head adapter.7. F riction adjustment of the coupling for the azimuth axis.bottom side of the binoculars.handle and tighten the fixing screws.guide of the U-Mount.12. B alance the binoculars at the centreof gravity.8. 2 x ¼" connection thread on the bottom side of the binocularsobservation. Possibly pull out theeyepiece holder.focusing.14. R emove the dust caps from theobjective lenses.Astronomical observations48Land observations48Tips on observationMoon*Star cluster M45 Pleiades*Orion nebula M42*Landscape*Birds*Ships** Sample images for illustration purposes. The actual image size and image quality depends on the selected eyepieces. Astronomical motifs are usually not visible in colour due to the long observation distance.EXPLORE SCIENTIFIC Eyepiece series EXPLORE SCIENTIFIC TELRADProjection viewfinder with baseEXPLORE SCIENTIFIC Nebula filters EXPLORE SCIENTIFIC Filter Set 2When using optional accessories, read separate instruction manual!Only use accessories authorized by the manufacturer!11Giant binoculars Product (Art. No.)Objective lens typeAperture (mm)Focal length (mm)Dimensions(LxWxH) (mm)Weight (kg)BT-70SF (0114200)achromatic (2 elem./1 gr.)70400370x213x122 3.4BT-82SF (0114210)achromatic (2 elem./1 gr.)82470445x226x122 4.3BT-100SF (0114220)achromatic (2 elem./1 gr.)100550520x270x155 6.8BT-120SF (0114230)achromatic (2 elem./1 gr.)120660654x290x1568.3Giant binoculars• C lean the lenses (eyepieces and/or objective lenses) only with a soft and lint-free cloth (e.g. microfibre cloth). To avoid scratching the lenses, use only gentle pressure with the cleaning cloth.• T o remove more stubborn dirt, moisten the cleaning cloth with an eyeglass-cleaning solution and wipe the lenses gently.• P rotect the device from dust and moisture! After use, particularly in high humidity, let the device acclimatise at room temperature for a short period of time, so that the residual moisture can dissipate. Put the dust caps on and store it in a dry and heated place.U-Mount and tripod• Clean the device only on the outside with a dry cloth.Bresser GmbHGutenbergstr. 2 · DE-46414 RhedeGermanywww.bresser.de·******************Errors and technical changes excepted.Manual_0114200-0114210-0114220-0114230-0114300_BT-Series-U-Mount_en_EXPSC_062021a。
BT-Pusher使用手册

广州联智蓝牙市场设备 BT-Pusher单机版用户使用手册版本1.0.0广州市联智电子科技有限公司GuangZhou DeviceGate Technology Co。
,Ltd地址:广州市天河区中山大道中77号时尚名苑1栋501,512室电子邮件:bt-pusher@ Service@电话:0086-20-82317785、82317786目录1 产品介绍 (3)1.1产品概述 (3)1.2功能简介 (3)1.3应用领域 (3)1.4产品特征 (4)1.5包装内容 (4)2 安装使用说明 (6)2.1 BT-Pusher 单机版接口说明 (6)2.2使用说明 (6)2.2.1系统上电 (6)2.2.2U盘管理 (8)2.3安装注意事项 (10)1.产品介绍1.1产品概述蓝牙广告机BT-Pusher是广州联智推出的一款近距离信息传播设备,BT-Pusher主动搜索附近的蓝牙终端设备,免费向其定向投放客户感兴趣的资讯。
理论上100米范围内的蓝牙终端设备可以选择接收由蓝牙广告机发送的各种形式的资讯。
1.2功能简介● 自动搜索工作范围内的移动蓝牙设备(PDA、手机、笔记本电脑等)● 支持多种广告发送策略● 支持手机黑名单功能,灵活的多种拒绝重发机制● 能够自动识别并建立与移动蓝牙设备的配对关系(主流常见机型)● 指示灯能显示系统的工作状态● 可发送所有手机能支持的文件格式:txt、gif、jpg、mp3、mp4、3gp、games 等● 最大能支持21个蓝牙终端设备同时下载● 支持定时发送● 下载速度最快可达100KB/S以上,根据手机蓝牙版本和接收环境而定● 传输距离:最远可达100米● 支持分时段发送不同的内容● 重复搜索时,能自动判断移动设备的反馈信息,避免重复询问、发送同样的文件● 系统能够自动记录用户下载的详细信息,供投放客户决策参考● u盘自动更新1.3应用领域购物中心 公共交通商场 休闲中心、电影院餐馆 博物馆户外广告 展览会候机厅、候车厅 公交站风景区 公司接待处1.4产品特征型号 BT-Pusher 单机版外观状态显示 LED 指示灯显示 尺寸 10cm(W)*14cm(L)*3cm(H)重量 300g电源 110-220v 市电(锂电可选)可用的存储 128M 或以上 蓝牙版本ClassII/Class I最大同时连接终端数21个USB 接口 有 管理方式USB 存储1.5 包装内容每套标准的蓝牙BT-Pusher 单机版含有以下配件:1, 一台BT-Pusher 单机版 主体2,一个电源适配器。
ABB低压断路器用户手册
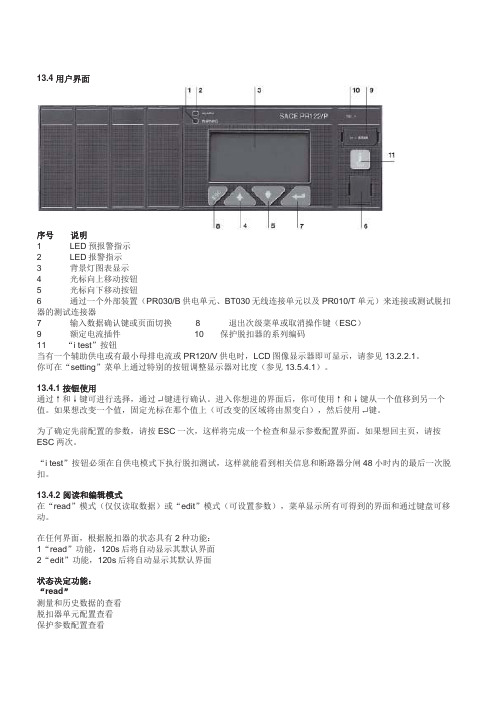
13.4 用户界面序号说明1 LED预报警指示2 LED报警指示3 背景灯图表显示4 光标向上移动按钮5 光标向下移动按钮6 通过一个外部装置(PR030/B供电单元、BT030无线连接单元以及PR010/T单元)来连接或测试脱扣器的测试连接器7 输入数据确认键或页面切换 8 退出次级菜单或取消操作键(ESC)9 额定电流插件 10 保护脱扣器的系列编码11 “i test”按钮当有一个辅助供电或有最小母排电流或PR120/V供电时,LCD图像显示器即可显示,请参见13.2.2.1。
你可在“setting”菜单上通过特别的按钮调整显示器对比度(参见13.5.4.1)。
13.4.1按钮使用通过↑和↓键可进行选择,通过键进行确认。
进入你想进的界面后,你可使用↑和↓键从一个值移到另一个值。
如果想改变一个值,固定光标在那个值上(可改变的区域将由黑变白),然后使用键。
为了确定先前配置的参数,请按ESC一次,这样将完成一个检查和显示参数配置界面。
如果想回主页,请按ESC两次。
“i test”按钮必须在自供电模式下执行脱扣测试,这样就能看到相关信息和断路器分闸48小时内的最后一次脱扣。
13.4.2 阅读和编辑模式在“read”模式(仅仅读取数据)或“edit”模式(可设置参数),菜单显示所有可得到的界面和通过键盘可移动。
在任何界面,根据脱扣器的状态具有2种功能:1“read”功能,120s后将自动显示其默认界面2“edit”功能,120s后将自动显示其默认界面状态决定功能:“read”测量和历史数据的查看脱扣器单元配置查看保护参数配置查看“edit”“read”模式下的任何事情脱扣器单元配置保护参数配置脱扣器单元测试功能在可编辑的界面按键可进入“edit”模式,当然需要输入密码。
键盘使用方法如下:键盘功能界面间移动,菜单间移动,改变参数值结束设置阶段和确认结果,选择菜单从默认界面进入菜单,可回前一个界面和回到默认界面,退出参数设置阶段和取消变化在自供电模式,断路器分闸48小时内可激活显示器。
WorkRite BT-ProSwitch 和 WorkRite App 操作指南说明书
User Guide: BT-PROSWITCH AND WORKRITE APPUP/DOWN ADJUSTMENT•The BT-Proswitch is manually operation by lifting the switch up to move up (see figure 1), or pressing down to move down (see figure 2)•To stop the desk adjustment , simply release the button and your desk will stop moving.SET MEMORY POSITIONSSet Memory Position 1Move your desk to the desired position , either as a sitting or standing position. Press the star button until the number 1 appears (see figure 3). Press and hold the star button until the switch goes from flashing to solid white. Memory Position 1 is now saved.Set memory Position 2, 3, and 4Move the desk to the next position. Press the star button to select the numbers 2, 3 or 4. Press and hold the star button for each number (2, 3, or 4) until the switch goes from flashing to solid white. Memory Position 2, 3, or 4 will be saved.OPERATION OF THE BT-PROSWITCH & WORKRITE APPLet's get started Manual OperationUser Guide:BLUETOOTH SWITCHBT-PROSWITCH & WORKRITE APPFigure 2Press the Switch down to move desk downFigure 1Lift the Switch up to move desk upADJUSTING TO A SAVED MEMORY POSITIONIf you simply press the button up or down, the desk will stop at each memory position that has been saved in the order of what height is stored going either up or down.DOUBLE TAP MOVEMENTOnce you have downloaded the Workrite App to your device and paired your desk, you can enable “Automatic Drive”. Once enabled you can double click the BT-PROSWITCH up to move up or down to move down and the desk will move without requiring constant contact with the switch (see figure 4). *To stop the “Automatic Drive”: simply tap the BT-PROSWITCH once and the desk will stop moving.ERASING ALL MEMORY POSITIONSPress and hold the star (*) button for 8 seconds (see figure 5). The switch will blink RED indicating all memory positions have been erased.SETTING REMINDER TIMERSThe reminder button is the Bell Symbol (seefigure 6) on the switch. Press this button to selectone of 3 standard setting s included in the switch.(The switch is set to “Setting 1” as the defaultsetting when you first use your desk)•Setting 1 : Reminder to stand up for 5 minutesafter sitting for 55 minutesFigure 4Double taptill the Switch blink RED•Setting 2 : Reminder to stand up for 10 minutes after sitting for 50 minutes•Setting 3 : Reminder to stand up for 15 minutes after sitting for 45 minutesHow Reminders work: The Switch will display a pulsing green light bar around the perimeter of the switch when it is not time to change position. The switch changes to pulsing red when it’s time to change position (Figure 7). Once you’ve changed your position, the switch will return to green until the next reminder.ADJUSTING DISPLAY HEIGHT*If you ha ve purchased a Fundamental LX Sit-Stand Desk you will need to change your display height.Set your display for the Fundamental LX.Lower the table to the lowest position. Press and hold the Reminder Button (Bell Symbol) and the Bluetooth Button (Bluetooth symbol) until the digital readout flashes. Lift up on the switch until the display reads 27.5”. Wait 10 seconds until the display quits flashing and the switch will save the new height setting.Set you display height for special height requirements (Example: You’ve added casters to your sit stand desk). Lower the table to the lowest position. Measure the distance from the floor to the top of your worksurface. Note your height. Press and hold the Reminder Button (Bell Symbol) and the Bluetooth Button (Bluetooth symbol) until the digital readout flashes. Lift up on the switch until the display reads the height you have measured. Wait 10 seconds until the display quits flashing and the switch will save the new height setting.Figure 6Figure 7Pulsing green light indicatesit is not time to change positionPulsing red light indicatesit is time to change positionBT-PROSWITCH FACTORY RESETT o return the BT-PROSWITCH to the original factory settings press and hold the Reminder Button (Bell Symbol) and the Memory Button (Star Symbol) buttons simultaneously for 8 seconds. This will erase all memory position and reset the BT-PROSWITCH back to the original factory settings (see figure 8).Error codesThe BT-PROSWITCH will also display error codes or faults that the table experiences. In many cases , error codes are only reporting normal functions like anti-collision sensing signals, temporary overload(someone sitting on desk when trying to move). Most of these error codes are self-clearing and simply go away on next use of the desk.If an error code persists and the desk quits functioning normally , contact us for trouble shooting (Workrite Ergonomics (800) 959-9672 “PRESS 2 FOR TECHNICAL SUPPORT”). Please make sure you note the error code before you call.A common error code is E01. This is a simple re-initialization code. To re-initialize your table , press and hold the down button until the table lowers fully. NOTE: If at any time the table becomes un -level due to one of the two or three legs of the table not moving , immediately stop and contact Workrite. Once the table lower fully again press and hold the down button for 10 seconds until the table jogs down and up and the digital display returns to show 22.5”. The digital readout displaying the height indicates the re-initialization is complete and your table should be back to operation normally.THE WORKRITE APP•Go to https:///us/app/workrite-bluetooth-pro-switch/id1483434040to download the Workrite App on your IOS, or search “Workrite Bluetooth Pro Switch”in the App Store•Go to https:///store/apps/details?id=com.workriteergo.btproswitch to download the Workrite App on your Android device, or search “Workrite Bluetooth Pro Switch” in the Google Play Store•Follow the prompts in the app to set up your table with blue tooth paring and the other features that areenabled by the app1500495 Rev A/1119。
贝特 潜水回流泵 操作手册说明书

贝特技术专注环保前言前言感谢您选用“贝特”产品,本手册仅适用于本公司生产的潜水回流泵。
该产品依据企业标准“Q/320116BTHB04-2015标准”进行生产。
在安装和使用之前,请仔细阅读本手册。
若您不遵守本手册的说明而造成的人身伤害、机器损坏及其他财物损失我们将不承担责任。
如有疑问,请与我们联系,我们将及时、热情地为您提供服务。
本手册主要对潜水回流泵的结构特征、工作原理、安装与调试、使用与维护等方面作出说明。
本手册适用于潜水回流泵系列产品以及用户特殊定制的其它规格的同类产品可参照使用。
本手册中出现的产品外观图或其他图例或菜单屏幕等若与实际产品有所不同,使用时以实际产品为准。
公司的产品技术会不断创新,产品手册也会随之更改。
以后的所有更改,均不另行通知。
1贝特技术专注环保2贝特技术专注环保目录目录1安全说明 (2)1.0概述 (2)1.1运输与储存 (3)1.2安装与调试 (3)1.3使用与维护保养 (3)2用途 (4)3型号表示示例 (4)4设备结构 (4)4.1主机 (4)4.2安装系统 (5)4.3电控 (6)4.4安装附件 (6)5设备安装 (6)6设备调试 (9)7维护与保养 (10)附表1、维修记录表 (11)附表2、顾客满意度调查表 (13)3贝特技术专注环保4贝特技术专注环保设备启动前注意事项1设备启动前注意事项1.在启动潜水回流泵前,应用0—500V 兆欧表检查定子绕组绝缘情况。
2.检查所用电源、电压频率是否与标牌所示相符合。
3.请勿将潜水回流泵电线接入无任何保护装置电源(会引起缺相、过载烧毁电机)请参照其接线方法。
4.检查叶桨运转方向,从叶桨向电机端看叶桨为逆时针方向转动。
如果转向不对,应调换三相中任意两相接线位置,以获得正确的运转方向。
注意安全,避免叶桨伤人。
5.检查接地线是否正确可靠的接地。
6.严禁无水运转。
7.严禁将潜水回流泵的电缆头浸入水中。
8.在运输安装过程中,严禁使用主机电缆起吊或悬挂主机。
Epson Moverio BT-40S用户手册说明书

Earphone jackUSB Type-C connectorTemplesLensNose padAmbient light sensorSensorsShadeClipUser's Guide (this document)Safety InstructionsIncluded Items and Headset Part NamesOptional ItemsThe following optional items are available. These optional items are available as of July 2020. Availability and part numbers vary by region and are subject to change without notice.• Intelligent Controller BO-IC400*• Shade Pack BO-SP400• Nose Pad Pack BO-NP350• Nose Pad Pack BO-NP300*Supplied with the BT-40S.• This product is powered using the battery in your smart device or the Intelligent Controller (hereinafter, these are collectively referred to as the "connected device"). While using the product, keep an eye on the battery level of your connected device.• The BT-40 does not come with an Intelligent Controller. You need to provide a smart device that supports USB Type-C DisplayPort Alternate Mode.While the image is displayed on your connected device, connect theheadset's USB Type-C connector to the connected device.Connect commercially available earphones to the earphone jack.• We recommend using earphones that comply with CTIA standards.Also, when using 3-pin earphones, the microphone functiondoes not work. You may hear some noise when connecting ordisconnecting the earphones or USB Type-C connector duringcontent playback, so be sure to take off your earphones first.• When using apps with a call function, phone calls may be audiblefrom the smart device even if earphones are connected. Werecommend checking in advance what happens when you receivea phone call while images are displayed.Put on the headset and earphones, and then adjust the position ofthe headset so that you can see the image.• Do not apply excessive force when opening the temples.• You can clip the earphone jack to your clothes using the clip. Notethat some clothes may be damaged by the clip.• Turn the screen of your connected device sideways to display theimage at full screen size.-Turn on the screen rotation feature for the connected device.• Check the following points if you cannot see the image.-The USB Type-C connector is connected correctly (make sureyou connect it securely to the connector).-The connected device is on, not in sleep mode.-Your smart device supports images output in USB Type-CDisplayPort Alternate Mode.If you are using an Android device, you can adjust the brightness of the headset's screen as well as other parameters by using the dedicated app.BT-40: Install the app "MOVERIO Link" on your smart device using Google Play.BT-40S: Use "MOVERIO Link Pro" from the app list screen of the Intelligent Controller BO-IC400.The following outlines the main features of the app.• Headset screen brightness adjustment• Power saving mode (on the connected device and the headset)• Screen lock for the connected devices (to prevent accidental operations)Adjust the volume on your connected device.BT-40/BT-40S Headset Specifications<For customers who have purchased the BT-40S>*1 Restrictions in operation may occur, such as buttons not operating, even when using a compliant plug.*2 The screen brightness was set to the default value of 12/20, and the evaluation movie with an average gradation of 98/255 was displayed continuously in an environment of 25°C. If the screen brightness (brightness setting and display gradation) is brighter than the evaluation conditions, the life span will be reduced.Notes on Water ResistanceThis product is IPX2-compliant with daily water resistance performance based on the IEC60529 standard. However, this does not include the USB Type-C connector. (This is not based on an evaluation by a third-party evaluator)<Water resistance level compliant with IPX2>If the product is subjected to a dripping water test at a rate of 3 mm/minute for up to 10 minutes while the product is at an angle of 15 degrees, water does not enter the product and it can be operated normally.• The water resistance feature does not guarantee protection against damage or malfunctions under all conditions. The warranty is invalid if mal-functions are determined to have occurred due to incorrect handling of the product by the user.• When connecting or disconnecting the product's USB Type-C connector with a connected device, do not touch it with wet hands and do not expose it to water or dust. If small debris such as hair or sand gets caught in the ports, the water resistance performance of the product will be compromised.• Do not allow other liquids (such as organic solvents, soapy water, hot spring water, and seawater) to splash onto the product.• Do not leave the product in locations subject to humidity such as bathrooms.• If rain or water splashes onto the product, wipe it with a dry cloth as soon as possible.Trademarks"EPSON" is a registered trademark of the Seiko Epson Corporation."EXCEED YOUR VISION" is a registered trademark or a trademark of the Seiko Epson Corporation.Windows is a registered trademark of the Microsoft Corporation in the USA and other countries.USB Type-C TM is a trademark of the USB Implementers Forum.Android and Google Play are trademarks of Google LLC.Other product names used herein are also for identification purposes only and may be trademarks of their respective owners. Epsondisclaims any and all rights in those marks.。
PreSonus Eris HD10BT 头phones 用户手册说明书
Eris® HD10BTStudiokopfhörer mit aktiver Rauschunterdrückung (ANC) und Bluetooth®Bedienungsanleitung®1 Übersicht — 11.1 Einleitung — 11.2 Im Lieferumfang enthalten — 11.3 Weitere Produkte von PreSonus — 22. Verkabelung — 32.1 Anschlüsse und Steuerung an der rechtenKopfhörermuschel — 32.1.1.Einschalten und Koppeln — 32.1.2.Titel- und Lautstärkensteuerung überBluetooth — 42.1.3. Anrufsteuerung — 42.1.4.K abelbetrieb — 52.2 Anschlüsse und Steuerung an der linkenKopfhörermuschel — 52.2.1.Aktive Rauschunterdrückung (ANC) — 52.2.2. Laden — 51 Übersicht 1.1 Einleitun gEris HD10BT Bedienungsanleitung11.1 EinleitungVielen Dank, dass Sie sich für den PreSonus® Eris™ HD10BT Studiokopfhörermit aktiver Rauschunterdrückung (ANC) und Bluetooth® Funktechnologieentschieden haben. Der PreSonus® Eris HD10BT Kopfhörer vereint einenhochwertigen Klang in Studioqualität mit der Mobilität und Bewegungsfreiheitder Bluetooth Verbindungstechnologie. Die aktive RauschunterdrückungANC (Active Noise Canceling) dämpft Umgebungsgeräusche um bis zu18 dB. So können Sie Ihre Lieblings-Musik, -Podcasts oder -Fernsehserienüberall in hochwertigem, lebendigen Sound genießen – egal, ob Sie an einervielbefahrenen Hauptstraße oder in der Mittelreihe im Flugzeug sitzen.Wir bei PreSonus Audio Electronics bemühen uns um eine stetige Weiterentwicklungunserer Produkte und schätzen unsere Kunden und Ihre kreativen Projektesehr. Wir freuen uns über Ihr Vertrauen in unsere Produkte und sind sicher,dass Ihnen Ihr Eris HD10BT Kopfhörer viele Jahre lang Freude bereiten wird!1.2 Im Lieferumfang enthaltenIhr Eris HD 10BT wird wie folgt ausgeliefert:PreSonus Eris HD10BT StudiokopfhörerKurzanleitung1 m 3,5 mm TRS-KlinkenkabelTRS-Klinkenadapter 3,5 mm auf 6,35 mm1 Übersicht 1.3 Weitere Produkte von PreSonusEris HD10BT Bedienungsanleitung1 m USB-LadekabelStabiler TragekofferHinweise zur Gesundheit, Sicherheit und Konformität von Kopfhörern von PreSonus1.3 Weitere Produkte von PreSonusVielen Dank, dass Sie sich für PreSonus entschieden haben! Wir verstehenuns als Anbieter von integrierten Lösungen und möchten unseren Kunden(ja, Sie sind gemeint) daher eine optimale Benutzererfahrung bieten – vomersten Ton bis zum fertigen Projekt. Um dieses Ziel zu erreichen, stand dienahtlose Integration von Anfang an und in allen Phasen der Entwicklung anerster Stelle. Das Ergebnis sind Systeme, die ohne Konfigurationsaufwanddirekt nach dem Auspacken optimal miteinander kommunizieren.Wir sind für Sie da. Weitere Informationen finden Sie unter .2.2.1 Anschlüsse und Steuerung an der rechten Kopfhörermuschel2.1.1. Einschalten und Koppeln…PreSonus HD10BT“.2.1.2. Titel- und Lautstärkensteuerung über BluetoothWährend der Audiowiedergabe von Ihrem Bluetooth-Gerätstehen die folgenden Bedienoptionen zur Verfügung:1. Lautstärke anheben / Nächster Titel. Drücken Sie die Tasteeinmal, um die Bluetooth-Lautstärke anzuheben. Halten Sie dieTaste gedrückt, um zum vorherigen Titel zu navigieren.2. Wiedergabe/Pause. Drücken Sie diese Taste, um die Wiedergabe aufIhrem Bluetooth-Gerät aus der Ferne zu starten und anzuhalten.3. Lautstärke absenken / Nächster Titel. Drücken Sie die Tasteeinmal, um die Bluetooth-Lautstärke abzusenken. Halten Sie dieTaste gedrückt, um zum nächsten Titel zu navigieren.2.1.3. AnrufsteuerungWenn Sie Ihr Telefon über Bluetooth mit Ihrem Eris HD10BT Kopfhörer gekoppelthaben, können Sie über die mittlere Taste Anrufe annehmen oder ablehnen.2.1.4. KabelbetriebSie können Ihren Eris HD10BT Kopfhörer auch über Kabel anschließen, wennbeispielsweise der Akku schwach ist oder Sie ein Gerät ohne Bluetooth-Funktionalität abhören möchten. Die 3,5 mm TRS-Klinkenbuchse befindetsich unten an der rechten Kopfhörermuschel. Nutzen Sie zum Anschlussdas beiliegende Kabel oder ein anderes 3,5 mm TRS-Klinkenkabel.2.2 Anschlüsse und Steuerung an der linken Kopfhörermuschel2.2.1. Aktive Rauschunterdrückung (ANC)2.2.2. LadenGuten Appetit!Das streng geheime PreSonus-Rezept für…Hühner- und Andouille-GumboZutaten:• 1 Tasse Haushaltsmehl•¾ Tasse Pflanzenöl• 1 große Zwiebel (gewürfelt)• 1 kleine Zwiebel (geviertelt)• 6 gewürfelte Selleriestangen• 1 große grüne Paprikaschote (gewürfelt)• 3 Knoblauchzehen (2 kleingehackt, 1 ganze)•500 g Andouille (Räucherwurst)• 4 Hühnerkeulen• 4 l Wasser• 4 Lorbeerblätter• 1 Teelöffel Thymian• 1 Teelöffel …Old Bay“-Gewürz•1-2 Tassen tiefgefrorene Okra, in Scheiben•¼ Tasse frische kleingehackte Petersilie• 6-8 Eier (optional)Zubereitung:1. Geben Sie die Hühnerkeulen, das Wasser, die geviertelte Zwiebel, das …Old Bay“-Gewürz, die 2 Lorbeerblätter und die ganzeKnoblauchzehe in den Topf. Legen Sie den Deckel auf den Topf und bringen Sie das Ganze zum Sieden. Lassen Sie das Ganze dann so lange köcheln, bis sich das Hühnerfleisch von den Knochen löst. Lösen Sie das Fleisch von den Knochen und legen Sie es beiseite. Holen Sie die Zwiebel, den Lorbeer und den Knoblauch aus dem Sud.2. Geben Sie 1 Teelöffel Öl in eine schwere Bratpfanne und bräunen Sie die Andouille-Räucherwurst darin: Sie muss richtigdurchgebraten sein. Legen Sie die Wurst beiseite.3. Geben Sie das verbleibende Öl in dieselbe Bratpfanne. Geben Sie das Mehl unter ständigem Rühren teelöffelweise in dasÖl. Lassen Sie die Mehlschwitze dunkelbraun werden (sie muss aussehen wie geschmolzene schwarze Schokolade). Das Öl darf auf keinen Fall zu heiß werden, sonst brennt das Mehl an und Sie müssen noch einmal von vorn anfangen.4. Wenn die Mehlschwitze dunkelbraun ist, geben Sie die gewürfelten Zwiebeln, den Sellerie, den Paprika und den feinge-hackten Knoblauch hinzu. Lassen Sie diese Mischung so lange köcheln, bis das Gemüse gar ist. Legen Sie keinen Deckel auf den Topf/die Pfanne.5. Geben Sie allmählich 1 Liter Hühnerbrühe hinzu und lassen Sie die Mischung unter ständigem Rühren aufkochen.6. Geben Sie die Mehlschwitze-Mischung in einen Suppentopf und bringen Sie sie zum Sieden. Lassen Sie den Deckel weg, weilsich die Mehlschwitze sonst auf dem Boden des Topfes ablagert und anbrennt.7. Geben Sie die verbleibende Hühnerbrühe, den Lorbeer und den Thymian hinzu. Lassen Sie das Ganze 30 Minuten köcheln.8. Schneiden Sie das Hühnerfleisch und die Andouille-Wurst in kleine Stücke.9. Geben Sie das Hühnerfleisch und die Andouille-Wurst in den …Gumbo“. Lassen Sie das Ganze 30 – 45 Minuten köcheln.10. Rühren Sie die tiefgekühlte Okra und Petersilie unter und lassen Sie den Gumbo kurz aufkochen.11. Optional: Geben Sie ein Ei in eine Teetasse und rühren Sie es zügig unter den siedenden Gumbo. Wiederholen Sie dasmit den übrigen Eiern. Achten Sie jedoch darauf, dass sich keine Klumpen bilden. Wenn die Eier wieder an der Oberfläche schwimmen, müssen Sie die Hitze reduzieren und den Gumbo köcheln lassen.12. Schmecken Sie ihn mit Salz und Pfeffer (rot, weiß und/oder schwarz) ab.13. An Reis und Kartoffelsalat servieren.Ergibt 12 Portionen©2021 PreSonus Audio Electronics, Inc. Alle Rechte vorbehalten. AudioBox USB, Capture, CoActual, EarMix, Eris, FaderPort, FireStudio, MixVerb, Notion, PreSonus, PreSonus AudioBox, QMix, RedLightDist, SampleOne, Sceptre, StudioLive, Temblor, Tricomp, WorxAudio, und das Wellen-Logo sind eingetragene Marken der PreSonus Software Ltd.Mac, macOS, iOS, and iPadOS sind eingetragene Marken von Apple, Inc. in den USA und anderen Ländern. Windows ist eine eingetragene Marke von Microsoft, Inc. in den USA und anderen Ländern.Bluetooth ist ein eingetragenes Warenzeichen von Bluetooth SIG.Andere genannte Produktnamen könnten Marken der respektiven Unternehmen sein. Alle Angaben sind ohne Gewähr und Änderungen sind vorbehalten...außer am Rezept, das ist ein Klassiker.Eris® HD10BTStudiokopfhörer mit aktiver Rauschunterdrückung (ANC) und Bluetooth®BedienungsanleitungBaton Rouge • USAPart# 70-52000141-A。
- 1、下载文档前请自行甄别文档内容的完整性,平台不提供额外的编辑、内容补充、找答案等附加服务。
- 2、"仅部分预览"的文档,不可在线预览部分如存在完整性等问题,可反馈申请退款(可完整预览的文档不适用该条件!)。
- 3、如文档侵犯您的权益,请联系客服反馈,我们会尽快为您处理(人工客服工作时间:9:00-18:30)。
保定雷弗流体科技有限公司
超强的抗干扰特性,宽电压设计,适用于复杂的供电环境 不锈钢外壳,易清洁,有效防止各种酸碱盐和有机溶剂的腐蚀 部件及接口
Mail:leifu@ WEB:
烧杯形状:简易分装键。停止状态下,按此键启动简易 分装功能;长按此键进入分装测试模式
5 电话:0312-3250677 3250877 3250977 传真:0312-3250877-804
保定雷弗流体科技有限公司
双箭头:全速键。按此键可在最高转速和原状态之间转 换。
箭头/方块:启停键。控制电机的启动和停止 指示灯
Mail:leifu@ WEB:
2
BT/S 系列流量智能型蠕动泵
简介 本系列蠕动泵除具有正反, 启停, 全速(清洗),调速等基本功能外,
还可通过“简易分装键”实现定量输送液体的功能。RS485 通讯中采用 MODBUS 协议,更易于与其他控制设备如计算机,人机界面,PLC 等连接。 本系列调速型蠕动泵包括: BT100S 流量范围 0.00016-575 毫升/分钟,工作转速 0.1-150 转/分钟 BT300S 流量范围 0.00016-1341 毫升/分钟,工作转速 0.1-350 转/分钟 BT600S 流量范围 0.00016-2300 毫升/分钟,工作转速 0.1-600 转/分钟 应用范围 适用于磨蚀性液体 泵体不接触液体 没有阀阻塞现象 内表面光滑,易清洁 液体只与软管接触 吸程最大可达 8 米水柱 低剪切力,可用于传输乳化液或含有泡沫的液体 适用于传输含有大量气体的液体 适用于精确计量和定量给料,可以达到很高的精度 适用于传输粘性液体 通过更换软管和材质,可用于食品和医疗 功能及特点 四位 LED 数码管转速显示和工作模式 LED 指示灯显示工作状态 面膜按键操作 具有正反,启停,全速,调速功能 简易分装控制,实现重复传输定量液体的功能 转速分辨率 0.1-100 转/分钟时为 0.1,100-600 转/分钟时为 1,精度 0.5% 外部模拟量调速,高低电平控制启停,正反,简易分装,带物理隔离 RS485 通讯,支持 MODBUS 通讯协议,方便与各种控制设备连接 电路板加喷三防漆工艺,达到防尘防潮效果
Int: 键盘控制模式,键盘控制操作,脚踏开关控制设备启停
Foot:脚踏分装模式,键盘控制操作,脚踏开关控制简易分装的启动
Ext: 外部控制模式,键盘不起作用,由外部信号控制
Int+ Ext: 电平模式,外部控制启停,内部控制方向;来自顺时针箭头:电机顺时针方向转动;
逆时针箭头:电机逆时针方向转动
Mail:leifu@ WEB:
1 电话:0312-3250677 3250877 3250977 传真:0312-3250877-804
保定雷弗流体科技有限公司
目录 简介 ......................................................................................................................... 3 应用范围 ................................................................................................................. 3 功能及特点 ............................................................................................................. 3 部件及接口 ............................................................................................................. 4 显示面板及操作按键 ............................................................................................. 5
6
数码管 显示当前的转速和工作模式。
215
BT/S 系列流量智能型蠕动泵
键盘 ................................................................................................................. 5 指示灯 ............................................................................................................. 6 数码管 ............................................................................................................. 7 外控接口说明 ......................................................................................................... 7 操作说明 ................................................................................................................. 8 准备工作 ......................................................................................................... 8 安装泵头及软管.............................................................................................. 8 电源连接 ......................................................................................................... 9 模式切换 ......................................................................................................... 9 内控模式 ......................................................................................................... 9 外控模式 ....................................................................................................... 10 简易分装模式 ............................................................................................... 11 电平模式 ....................................................................................................... 12 通讯模式 ....................................................................................................... 12 脚踏开关 ....................................................................................................... 13 故障及维修 ........................................................................................................... 14 保修及售后 ................................................................................................... 14 日常维护 ....................................................................................................... 14 故障处理 ....................................................................................................... 15 规格指标 ............................................................................................................... 16 产品命名规则 ....................................................................................................... 16 技术参数 ............................................................................................................... 17