友贝婴儿床说明书
婴儿床的安装方法

婴儿床的安装方法
婴儿床的安装方法如下:
1. 首先,将床架放置在要安装的位置上,并确保床架与墙壁或其他固定物相连,并且稳固牢固。
2. 将床板放置在床架上,并按照说明书上的指示使用螺丝或其他固定装置将床板固定在床架上。
3. 如果婴儿床有侧边栏,请将其插入床架的侧面插槽中,并确保固定牢固,以防止婴儿从床上滑落。
4. 如果婴儿床有床垫,则将床垫放在床板上,并确保床垫与床架之间没有间隙,以防止婴儿不慎陷入。
5. 最后,检查床架的所有连接处和固定物,确保床架稳固牢固,没有松动或危险的部分。
请注意,婴儿床的安装可能因不同的品牌和型号而有所不同,因此在安装之前请先阅读和遵循床的说明书。
如果不确定安装方法或有任何疑问,请咨询专业人士或婴儿床制造商。
互德拉儿童床安装说明书

互德拉儿童床安装说明书互德拉儿童床安装说明书互德拉儿童床是一款非常适合儿童房间的床,它的设计非常人性化,既可以保证孩子的安全性,又能够很好地满足孩子的舒适感受。
在这里,我们将带您详细地了解互德拉儿童床的安装方法和注意事项。
一、安装前的准备工作1.请先确认包装盒内的所有零件均已完好无损。
2.在组装前,请先检查床的大小和儿童房间的空间大小是否匹配。
3.请准备好所有需要的工具和辅助物品,如橡皮锤、扳手、螺丝刀等。
二、安装步骤1.首先要将床的板条组装好,将十字形的板条放于平面板条上,用六角螺丝紧固。
2.接着将床架调整到合适的角度,将两个脚架组装好,板条固定于脚架上。
3.在安装床头脚时,需要先将配件提前装好。
将床头脚拼装在床架两侧上,并用螺丝将其固定。
4.再进行整体组装,确认床头脚的位置与床架连接紧密,并使用螺丝将其固定。
5.最后安装床面板和床头板,床头板在床头顶部,床面板在床的底部。
将它们固定在床架上,并将硬木床夹插入床架。
三、注意事项1.在安装过程中,应该先安装床架再安装床头脚和床面板。
2.所有的螺丝和配件都必须按照产品说明书上的图示和要求进行安装,确保安装翻译正确。
3.组装过程中,如遇配件不齐或有损坏,请及时联系厂家或者售后服务。
不要另行自行修改或处理配件。
4.在安装完床后,必须检查一遍结构是否稳固,各个连接部位是否紧密。
使其保持平移状态。
5.在使用过程中,如床架移位或变形请及时调整整体结构。
以上就是互德拉儿童床的安装教程。
希望我们的说明书可以让您更加轻松地组装好床,让孩子们睡得舒适安全。
如果在安装过程中还有疑问,欢迎联系厂家或售后服务人员。
婴儿保健床使用说明书

高考某某市天基权科技股份某某婴儿保健床使用说明书一、产品介绍:2二、性能及作用:2三、清点包装配件:2四、面板控制功能介绍:31、“电源启动”(ON):32、“定时60分”功能:33、“左右启动运动”功能:34、“磁疗”:4五、工作环境需求说明:4六、规格及参数说明:4表(一)床的承受载荷与电压:5表(二)床主要尺寸及规格:6表(三)常见故障及排除方法:6 七、注意事项:6八、保修卡:7尊敬的用户:感谢您选择使用某某市天基权科技股份某某生产的“婴儿保健床”!为了方便您的使用,请仔细阅读使用说明书,并按说明书的步骤进行操作!一、产品介绍:由某某市天基权科技股份某某研究开发的“婴儿保健床”,此产品采用国际最先进磁动力驱动技术研制而成。
该床集运动磁疗于一体,并且在运动结构中,采用无噪音式设计。
该产品完全属于一种具有高质量、经久耐用、无噪音、低功耗、环保、节能,摇动时:温柔、舒适,摆幅自然、操作简单、使用方便等优点的保健型婴儿产品。
本产品在增加摇篮自动摆动功能的同时,充分考虑了床的安全性、专设有多方面的全自动保护功能。
于2007年元月荣获国家实用新型专利证书。
(专利号:ZL.2005 2 0127124.2)二、性能及作用:此床利用人体在睡眠状态下,运用磁力的作用改善人体微循环,促进人体新陈代谢,加速血液循环,净化血液,增强肌肉活力、加快细胞健康发育过程等等,由于睡觉能健身是人们最容易接受、而又最能长期坚持的锻炼方式,因此,本床可起到起到长期、稳定、有效的补磁与健身效果,增强食欲、平衡肌理、提高儿童的思维与记忆能力,促进儿童的身体的健康发育。
三、清点包装配件:请检查你的包装箱内是否具有以下物品:1)“婴儿保健床”婴儿床!一台(包括电源箱)2)电源线一根3)产品说明书一册4)工具包5)产品合格证及保修卡如你有缺少以上物品,请与购买之经销商联络。
四、面板控制功能介绍:1、“电源启动”(ON):当您将床的电源线插上电源后,旋转定时旋钮至ON时,表示床已接通电源,运动功能处于待命状态。
500XL 儿童产生床操作手册说明书

500XL Childbearing Bed OPERATIONS MANUALFor Parts or Technical Assistance1–800–327–0770Table of Contents. . . . . . . . . . . . . . . . . . . . . . . . . . . . . . . . . . . . . . . . . . . . . . . . . . . . . . . . . . . . . . . . . . . . . Introduction2 . . . . . . . . . . . . . . . . . . . . . . . . . . . . . . . . . . . . . . . . . . . . . . . . . . . . . . . . . . . . . . . . . . . . Specifications2. . . . . . . . . . . . . . . . . . . . . . . . . . . . . . . . . . . . . . . . . . . . . . . . . Warning / Caution / Note Definition2. . . . . . . . . . . . . . . . . . . . . . . . . . . . . . . . . . . . . . . . . . . Unpacking And Initial Set–up Instructions3 . . . . . . . . . . . . . . . . . . . . . . . . . . . . . . . . . . . . . . . . . . . . . . . . . . . . . . . . . . . . . . . . . . . Bed Illustration4 . . . . . . . . . . . . . . . . . . . . . . . . . . . . . . . . . . . . . . . . . . . . . . . . . . . . . . . . . . . . Base Pedal Operation5. . . . . . . . . . . . . . . . . . . . . . . . . . . . . . . . . . . . . . . . . . . . . . . . Operating The Foot Pans/Leg Rests5 . . . . . . . . . . . . . . . . . . . . . . . . . . . . . . . . . . . . . . . . . . . . . . . . . . . . . . . . . . . . . . . Operating Siderails6. . . . . . . . . . . . . . . . . . . . . . . . . . . . . . . . . . . . . . . . . . . . . . . . . . . . . . . . . . Using Grasping Handles6 . . . . . . . . . . . . . . . . . . . . . . . . . . . . . . . . . . . . . . . . . . . . . . . . . . . . . . . . . . . . . . . . . . . Using I.V. Pole6. . . . . . . . . . . . . . . . . . . . . . . . . . . . . . . . . . . . . . . . . . . . . . . . . . . . . . . . Using Manual Motor Crank6. . . . . . . . . . . . . . . . . . . . . . . . . . . . . . . . . . . . . . . . . . . . . . . . . . . . . . Using Hand Pendant Control7. . . . . . . . . . . . . . . . . . . . . . . . . . . . . . . . . . . . . . . . . . . . . . . . . . Installing/Removing the Labor Bar8 . . . . . . . . . . . . . . . . . . . . . . . . . . . . . . . . . . . . . . . . . . . . . . . . . . . . . . . . . . . . . . Using the Labor Bar8 Limited Warranty. . . . . . . . . . . . . . . . . . . . . . . . . . . . . . . . . . . . . . . . . . . . . . . . . . . . . . . Obtaining Parts and Service9. . . . . . . . . . . . . . . . . . . . . . . . . . . . . . . . . . . . . . . . . . . . . . . . . . Supplemental Warranty Coverage9 . . . . . . . . . . . . . . . . . . . . . . . . . . . . . . . . . . . . . . . . . . . . . . . . . . . . . . . . . . . . . . Return Authorization10. . . . . . . . . . . . . . . . . . . . . . . . . . . . . . . . . . . . . . . . . . . . . . . . . . . . . . . . . . . Freight Damage Claims10IntroductionINTRODUCTIONThis manual is designed to assist you with the operation of the 500XL Childbearing Bed. Read it thoroughly before using the equipment or beginning any maintenance on it.SPECIFICATIONSStryker reserves the right to change specifications without notice.WARNINGThe 500XL is equipped with a hospital grade plug for protection against shock hazard. It must be plugged directly into a properly grounded 3–prong receptacle. Beds manufactured for special voltages such as 220 volts are equipped with a step–down transformer, and the plug should be replaced with one compatible with your wall receptacle. Grounding reliability can be achieved only when a hospital grade receptacle is used. WARNING / CAUTION / NOTE DEFINITIONThe words WARNING, CAUTION and NOTE carry special meanings and should be carefully reviewed.WARNINGThe personal safety of the patient or user may be involved. Disregarding this information could result in injury to the patient or user.CAUTIONThese instructions point out special procedures or precautions that must be followed to avoid damaging the equipment.NOTEThis provides special information to make maintenance easier or important instructions clearer.WARNINGAlways apply the caster brakes when a patient is getting on or off the bed. Push on the bed to ensure the brakes are securely locked. Always engage the brakes unless the bed is being moved. Injury could result if the bed moves while a patient is getting on or off the bed.Unpacking and Initial Set–Up InstructionsUNPACKING INSTRUCTIONSRefer to unpacking instructions located on outside of marked crate.INITIAL SET–UP AND OPERATIONAL CHECKThe pendant controller has been disconnected from the electrical/pneumatic controller prior to shipment to ensure pressure equalization at various altitudes.To equalize the pneumatic subsystem and prepare for operation:1. Connect power cord to electrical receptacle. One pneumatic tube (white) has been left connected to oper-ate the head panel. Should the elevation be such that the pendant control for the head panel does not work, use the hand crank to elevate the head panel.CAUTIONIf the altitude is greater than 2,000 feet above sea level, the head panel may automatically rise to its full height.2. Disconnect power cord from electrical receptacle.3. The pneumatic manifold is located on the underside of the head panel. Disconnect the white tubing, thenreconnect the white tubing and all other tubes. Match colors (yellow/yellow, blue/blue, etc.). Be sure to fully insert and secure tubes to prevent air leaks and possible malfunctions.4. Connect power cord to electrical receptacle and check operation of pendant controller: BED UP andDOWN; HEAD UP and DOWN; FOOT UP and DOWN; CHAIR; TILT.Removable Foot End Mattress I.V. Pole Patient Grasping HandlesFoot Pan Latch Foot Pan Support BracketBrake/Steer PedalSiderail Release LeverI.V. Pole Storage ClipHand Pendant ControlBASE PEDAL OPERATIONThe Brake/Steer pedals are located on the base on both sides ofthe bed. The functions are clearly marked on the pedals.OPERATING THE FOOT PANS/LEG RESTS BAABCDD E1. T o remove foot end mattress assembly, grasp the handle on the front of the mattress assembly and push the mattress forward so it disengages from the brackets. The mattress assembly can then be lifted away from the bed.2. T o position the foot pan section (A), pull down on the knob under the pan (see illustration page 4), grasp the foot rest section (B) and rotate outward. There are holes in the foot pan for the knob to lock the pan into various positions.3. To position the foot rest section (B), lift upward by the front push bar and slide foot rest along slotted section of foot pan. Lower foot rest so it engages in desired slot on foot pan. Once the patient is positioned, the foot rests and pans can be adjusted for maximum access and for patient comfort.4. T o use the leg rests (C) instead of the foot pans, insert the rests into the receptacles and tighten the knobs(D) to hold them secure. T o position the leg rests, loosen knob (E) and rotate the leg support to the desired angle. Tighten the knob to hold the rest in place. The leg rests can be stored under the foot pans if the bed is equipped with the storage option.OPERATING SIDERAILSTo lower the siderail, pull out on the latch and guide the siderail down. T o raise the siderail, lift up on the rail until the latch locks to hold the siderail in place.USING GRASPING HANDLESThere are two patient grasping handles, one on each side of the litter(see bed illustration page 4).To use the patient grasping handles, pull the handle up until full height isreached.For storage, push the handle fully down.USING I.V. POLEThe I.V. pole is stored in a clip on the side of the litter. T o use the I.V. pole, insert it into the socket on the litter. Turn the upper tube to loosen it, raise or lower it to the desired height and turn the upper tube until it is tight and the pole is secure.USING MANUAL MOTOR CRANKIf there is loss of electricity to the bed, there is a manual motor crank stored in clips on the back of the head-board. Center the notch in the end of the crank on the roll pin on the motor assembly and crank to the desiredheight.BEDUP DOWNUSING HAND PENDANT CONTROLNOTEDual hand control pendants are optional.62HEADHEAD BED BED CHAIR TILT FOOT FOOT1. Press to raise bed height.2. Press to lower bed height.3. Press to raise Fowler.4. Press to lower Fowler.5. Press to activate the “Chair ” position.6. Press to activate the “Tilt ” position.7. Press to raise foot section.8. Press to lower foot section.INSTALLING/REMOVING THE LABOR BAR1.Grasp the labor bar on each side of the covered gripping area on the bar.2.Stand at the foot end of the bed facing the headboard and slide the labor bar into the labor bar socketsuntil the bar positions securely onto the socket locking pin. Verify the bar is securely installed. Refer to the label shown below for reference.3.Verify the bar is angled toward the foot end of the bed.4.To remove the labor bar from the bed, lift and pull the labor bar out smoothly and evenly to avoid binding.Store in a convenient location.USING THE LABOR BARWARNINGTo ensure patient safety and security, positioning the pregnant woman’s feet beyond the front edge of the foot pans is not recommended. Do not use the labor bar without the foot section mattress in place.To ensure product stability, use the Stryker Adel labor bar only on beds manufactured by Stryker.The labor bar should be used if the pregnant woman has been in the active phase of second stage labor for 20–30 minutes without making significant progress, or immediately upon reaching complete cervical dilation if it is desired for maternal comfort.With the bed in the chair position, have the pregnant woman grasp the bar and pull herself into a squatting position to practice, if possible, before her pushing stage begins so she will be comfortable with the usage of the bar.If the pregnant woman hasn’t practiced using the squatting position, use heel wedges to provide support for unstretched tendons, muscles, and ligaments while still allowing weight to be placed on the whole foot. Delivery may take place in the squatting position or the labor bar can be removed at crowning if the foot section is to be removed for delivery.WarrantyLimited Warranty:Stryker Medical Division warrants to the original purchaser that its products should be free from defects in material and workmanship for a period of one (1) year after date of delivery. Stryker’s obligation under this warranty is expressly limited to supplying replacement parts and labor for, or replacing, at its option, any prod-uct which is, in the sole discretion of Stryker, found to be defective. Stryker warrants to the original purchaser that the frame and welds on its beds will be free from structural defects for as long as the original purchaser owns the bed. If requested by Stryker, products or parts for which a warranty claim is made shall be returned prepaid to Stryker’s factory. Any improper use or any alteration or repair by others in such manner as in Stryk-er’s judgement affects the product materially and adversely shall void this warranty. No employee or repre-sentative of Stryker is authorized to change this warranty in any way.This statement constitutes Stryker’s entire warranty with respect to the aforesaid equipment. STRYKER MAKES NO OTHER WARRANTY OR REPRESENTATION, EITHER EXPRESSED OR IMPLIED, EXCEPT AS SET FORTH HEREIN. THERE IS NO WARRANTY OF MERCHANTABILITY AND THERE ARE NO WARRANTIES OF FITNESS FOR ANY PARTICULAR PURPOSE. IN NO EVENT SHALL STRYKER BE LIABLE HEREUNDER FOR INCIDENTAL OR CONSEQUENTIAL DAMAGES ARISING FROM OR IN ANY MANNER RELATED TO SALES OR USE OF ANY SUCH EQUIPMENT.To Obtain Parts and Service:Stryker products are supported by a nationwide network of dedicated Stryker Field Service Representatives. These representatives are factory trained, available locally, and carry a substantial spare parts inventory to minimize repair time. Simply call your local representative, or call Stryker Customer Service at (800) 327–0770.Supplemental Warranty Coverage:Stryker has developed a comprehensive program of extended warranty options designed to keep your equip-ment operating at peak performance at the same time it eliminates unexpected costs. We recommend that these programs be activated before the expiration of the new product warranty to eliminate the potential of additional equipment upgrade charges. Stryker offers the following Supplemental Warranties:Extended (Parts and Labor)S All replacement parts (excluding mattresses and consumable items)S Labor and travel for all scheduled and unscheduled callsS Annual Preventive Maintenance Inspections and repairsS JCAHO paperwork for preventive maintenanceS Priority Emergency ServiceStandard (Labor Only):S Labor and travel for all scheduled and unscheduled callsS Annual Preventive Maintenance Inspections and repairsS JCAHO paperwork for preventive maintenanceS Priority Emergency ServiceBasic (Parts Only):S All replacement parts (excluding mattresses and consumable items)S Priority Emergency ServicePlease call your local representative, or call (800) 327–0770 for further informationWarrantyReturn Authorization:Merchandise cannot be returned without approval from the Stryker Customer Service Department. An autho-rization number will be provided which must be printed on the returned merchandise. Stryker reserves the right to charge shipping and restocking fees on returned items.SPECIAL, MODIFIED, OR DISCONTINUED ITEMS NOT SUBJECT TO RETURN.Damaged Merchandise:ICC Regulations require that claims for damaged merchandise must be made with the carrier within fifteen (15) days of receipt of merchandise. DO NOT ACCEPT DAMAGED SHIPMENTS UNLESS SUCH DAMAGE IS NOTED ON THE DELIVERY RECEIPT AT THE TIME OF RECEIPT. Upon prompt notification, Stryker will file a freight claim with the appropriate carrier for damages incurred. Claim will be limited in amount to the actual replacement cost. In the event that this information is not received by Stryker within the fifteen (15) day period following the delivery of the merchandise, or the damage was not noted on the delivery receipt at the time of receipt, the customer will be responsible for payment of the original invoice in full.Claims for any short shipment must be made within thirty (30) days of invoice.International Warranty Clause:This warranty reflects U.S. domestic policy. Warranty outside the U.S. may vary by country. Please contact your local Stryker Medical representative for additional information.10DH 2/00 8805–961–000 REV E European RepresentativeStryker FranceBP 50040–Cedex –France 6300 Sprinkle Road, Kalamazoo, MI 49001。
婴儿床说明书
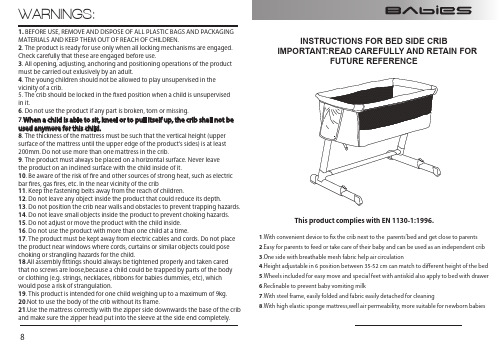
1.With convenient device to fix the crib next to the parents’bed and get close to parents2.Easy for parents to feed or take care of their baby and can be used as an independent crib3.One side with breathable mesh fabric help air circulation4.Height adjustable in 6 position between 35-52 cm can match to different height of the bed5.Wheels included for easy move and special feet with antiskid also apply to bed with drawer6.Reclinable to prevent baby vomiting milk7.With steel frame, easily folded and fabric easily detached for cleaning8.With high elastic sponge mattress,well air permeability, more suitable for newborn babiesThis product complies with EN 1130-1:1996.8WARNINGS:1. BEFORE USE, REMOVE AND DISPOSE OF ALL PLASTIC BAGS AND PACKAGING MATERIALS AND KEEP THEM OUT OF REACH OF CHILDREN.2. The product is ready for use only when all locking mechanisms are engaged. Check carefully that these are engaged before use.3. All opening, adjusting, anchoring and positioning operations of the product must be carried out exlusively by an adult.4. The young children should not be allowed to play unsupervised in the vicinity of a crib.5. The crib should be locked in the fixed position when a child is unsupervised in it.6. Do not use the product if any part is broken, torn or missing.7.When a child is able to sit, kneel or to pull itself up, the crib shall not beused anymore for this child.8. The thickness of the mattress must be such that the vertical height (upper surface of the mattress until the upper edge of the product's sides) is at least 200mm. Do not use more than one mattress in the crib.9. The product must always be placed on a horizontal surface. Never leave the product on an inclined surface with the child inside of it.10. Be aware of the risk of fire and other sources of strong heat, such as electric bar fires, gas fires, etc. In the near vicinity of the crib11. Keep the fastening belts away from the reach of children.12. Do not leave any object inside the product that could reduce its depth.13. Do not position the crib near walls and obstacles to prevent trapping hazards.14. Do not leave small objects inside the product to prevent choking hazards.15. Do not adjust or move the product with the child inside.16. Do not use the product with more than one child at a time.17. The product must be kept away from electric cables and cords. Do not place the product near windows where cords, curtains or similar objects could pose choking or strangling hazards for the child.18.All assembly fittings should always be tightened properly and taken cared that no screws are loose,because a child could be trapped by parts of the body or clothing (e.g. strings, necklaces, ribbons for babies dummies, etc), which would pose a risk of strangulation.19. This product is intended for one child weighing up to a maximum of 9kg.20.Not to use the body of the crib without its frame.e the mattress correctly with the zipper side downwards the base of the crib and make sure the zipper head put into the sleeve at the side end completely.Care Instruction2Plastic and metal parts may be sponged lightly using warm water and a mild detergent. Dry thorougly before storing.Never clean any part of the product with abrasive, ammonia based, bleach based or spirit type cleaners.Do not twist; do not spin-dry; do not iron.WARNING! During the removal and/ or application of the mattress cover, handle the fabric carefully in order to avoid accidental damage or tears.COMPONENTSfabric bagsupport bar side frame stand a pair of strap allen wrench screwx 4Instruction for Assembly31. Insert support bar “C” to left side frame stand “A”(fig 1) and secure with 2screws (fig 2). Use the allen wrench to tighten screws in clockwise direction (fig 3).2. fig3.44. Fasten the side of the crib with the mesh window using the side zips and close them completely. Close the flap cover using the velcro to hide the ziper.Your crib is now ready to be used as a stand alone crib(fig 8).5Instruction for Wheels, Leg & Height adjustment1. There are wheels located on the front of the frame legs for easy moving.To access wheels, hold the crib rear long handrail and lift up. Simultaneously push the crib forward or backwards (fig 9). There is an anti-slipper at the bottom of leg to stop the crib moving.It can be adjusted in 2 positions.3. The crib can be adjusted to 6 different height positions. In order to adjust the height, press the adjustment lever down and adjust the crib to the desiredposition (fig 11). Repeat this operation on the opposite side. The base of the crib can be inclined slightly by adjusting the two legs to different heights (fig 12).Instruction for fixing to parents' bed4. To secure the crib to the parents’ bed, pull the straps once again to make sure the crib is properly and firmly secured to the parents’ bed (fig 19).WARNING! The maximum distance between the crib and the parent’s bed should62. Move the crib close to the parents bed and check the height of the crib compared with the mattress of the bed (fig 16).WARNING! The mattress of parent's bed shall be aligned to or over the height of the drop side in the lowest position.WARNING! In co-sleeping mode the 2 legs of the crib should always be adjusted to the same height.fig 16.。
婴幼儿多功能摇摆床-设计说明书

婴幼儿多功能摇摆床设计说明书学院: 广西工学院机械工程系班级:机自092班组长: 姚木深组员: 姚木深潘永登周家俊指导教师: 高中庸日期: 2011年6月20日续30后才会自动摇摆,避免外界干扰而错误启动。
6)尿温测控报警功能:宝宝尿床时报警系统会感应并通过扩音器发音提醒宝宝尿床,避免长时间未更换尿布而给宝宝带来皮肤病。
4. 主模块选择1)MP3音乐播放模块此设计采用单片机的P0口的0、l、2、3引脚分别连接CD4066控制引脚4、6、12、13。
由于大多数MP3的按钮都是低电平触发的,所以将CD4066中的2、3、7、8、10脚都接地。
在温度、湿度,声音三个枪测模块中,当检测到其中一个模块有信号,马上有睢片机根据程序作出响应,给P0.0送一个1.5秒的高电平,这样给MP3开机,然后然后给P0.1一个短暂的高电平进行播放。
其它下一曲,七一曲都是类似的控制,还有一些组合控制由自己编程的设置而定。
控制MP3包括:MP3的选歌,下一曲,音量,以及录音。
2)定时器模块工作原理5.曲柄滑块摇杆机构模块 运动分析)cos 1()cos 1(1βθ-+-=b a x )( 式中θ为曲柄转角,β为连杆转角。
式(1)对时间求导得: (2)v1=dx/dt =asin θd θ/dt +bsin βd β/dt ; v1为齿条移动速度,也为半圈齿轮在分度圆处得线速度,因为(3)asin θ=bsin β ; 式子(3)对t 求导得 (4)d β/dt=acos θd θ/(bcos βdt);将式子(4)和ω=d θ/dt 代入式(2) 得(5)v1=a ωsin(βθ+)/cos β式子(5)对t 求导得直尺条加速度(6) j1=dv1/dt=a ω[cos(βθ+)/cos β+a ²cos ²θ/(bcos ²β)] ; (7)α=(x-a)/r ; 故 (8) s =Rsin α=Rsin(x-a)/r ; 式子α为摇篮直杆偏离铅垂位置的摆角,s 为摇篮直杆底部水平位移。
Hard Manufacturing 2020.1 家庭护理标准婴儿床说明书
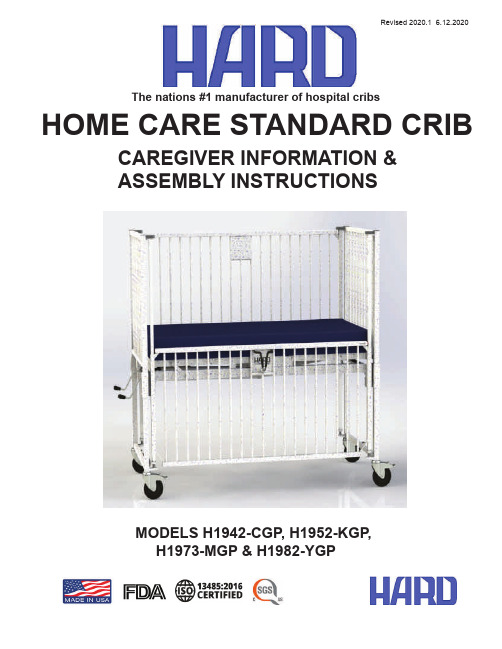
Revised 2020.1 6.12.2020MODELS H1942-CGP , H1952-KGP ,H1973-MGP & H1982-YGPHOME CARE STANDARD CRIBCAREGIVER INFORMATION &ASSEMBLY INSTRUCTIONSThe nations #1 manufacturer of hospital cribsGENERAL INFORMATION FOR CAREGIVERS⏹ Never leave the person in the bed unattended when the side rail is lowered, or when the head is elevated if there is any risk they will be able to get over the side rails and fall.⏹ The mattress and/or heavy duty bumper pads should be checked regularly andreplaced if there are any tears in the fabric.⏹ Never replace the mattress that Hard Manufacturing provides with another manufacturer's product. Our mattresses are a custom size and other mattresses not supplied byHard Manufacturing may not fi t properly and could potentially cause entrapment hazards.An improper mattress will also make the bed diffi cult to operate as they will most likely be too wide, and may cause damage to the bed components over time.⏹ The weight limit of any of the cribs or beds made by Hard Manufacturing is 150lbs. If the weight limit of the bed is exceeded, the additional weight could cause damage to the bed components that could lead to expensive repairs and/or make the bed unsafe for daily usefor the patient as a result. A parent/caregiver should not get into the bed with the patient.⏹ HARD Manufacturing will support parts on our cribs and beds for up to 12 years fromthe date of manufacture as long as we still make the part or can obtain it from our vendors.⏹ HARD Manufacturing cribs and beds can be cleaned with an anti-bacterial all purpose cleaner of the parent/caregiver choice but it must be a non-abrasive cleaner. Anything containing bleach, alcohol or ammonia must be avoided. The crib should be dried thoroughly with a soft cloth immediately following the cleaning, the crib should never be allowed to air dry. Failure to follow the proper cleaning instructions can result in premature rust and corrosion of the parts on your cribs.If the crib or bed for your child needs a part, new mattress, bumper pads, etc- please contact the durable medical equipment dealer who purchased the bed on behalf of your child or the patient.Please write the info here for your reference if needed at a later date:Dealer name:______________________________________________________________ Dealer phone number_______________________________________________________ Model # of the crib or bed purchased___________________________________________ Date the crib or bed was manufactured__________________________________________ The sticker with the model # and date of manufacture is on the crib or bed and will looklike the following example:Crib rails are raised and lowered with a Johns Hopkins Handle on models H1942-CGP ,H1952-KGP and H1973-MGP . On model H1982-YPG, the rails have fi ngertip releasemechansisms.The side rail or end rails have “trigger” mechanisms that must lock into place to hold up the rail safely. The red tips of the triggers must be securely seated in the notches of the sliderods on both ends, and you should barely be able to see the red tip if at all. Grasp the railand tug to be certain the rail is in place fi rmly and properly.**If the trigger mechanism for the side rail fails to lock into placeproperly, call the durable medical equipment provider who supplied your child with the crib and ask for service.**SIDE RAIL OPERATION & SAFETYTo prolong the life of the trigger assembly in the side rail, continue to squeeze thetrigger mechansim as you lower the rail to the desired height and not release until that time. Letting the red tips of the trigger mechanism drag up and down the slide rods by releasing the trigger mechanism too early will cause the trigger assembly to wear prematurely andbreak.Johns Hopkins handleFingertip releaseCRANK HANDLE USAGEStandard Cribs are equipped with a crank handle for head elevation and it is located on the left side of the foot end. The head crank handle when not in use should be tucked in. Thishelps to avoid damage from it hitting or getting caught on other objects when the crib isbeing moved.To use the head crank handle, pull it out from its tucked position and turn clockwise toelevate the head section of the crib.The head section on the Standard Crib will articulateto approximately 30 degrees, or 14 turns of the crank handle.The Tilt Indicator pictured above shows a crib with the head raised to its maximum height position of approximately 30 degrees.NOTE: The head section of the crib will not articulate higher than the stated 30degrees. The crank handle will continue to turn after 14 revolutions, however it willbecome noticeably more di ffi cult. Continued cranking will not raise the head of thecrib any further, it will only put stress on the crank handle components andeventually cause them to break.The Head Crank HandleThe foot crank handle is located on the right side of the foot end of your crib. The footcrank handle when not in use should be tucked in. This helps to avoid damage from it hit-ting or getting caught on other objects when the crib is being moved.To use the foot crank handle, pull it out from its tucked position and turn clockwise toelevate the foot/knee section of the crib.The foot section on the Standard Cribs willarticulate to approximately 15 degrees, or 7 turns of the crank handle.The Foot Crank HandleThe Tilt Indicator pictured above shows a Standard Crib crib with the foot/knee section raised to its maximum height position of approximately 15 degrees.NOTE: The foot section of the crib will not articulate higher than the stated 15degrees. The crank handle will continue to turn after 7 revolutions, however it willbecome noticeably more di ffi cult. Continued cranking will not raise the foot/kneesection of the crib any further, it will only put stress on the crank handle components and eventually cause them to break.HARDWARE IDENTIFICATION FOR CRIB ASSEMBLYOur home care Standard Cribs come packed in 3 large boxes on a pallet. One boxcontains the mattress, a second box contains the mattress platform, and the last boxcontains the crib ends, side rails, slide rods and all hardware. If the crib is ordered withan IV Pole, it will be in the box with the ends. If the order has an under crib shelf, theshelf will come in a 4th box.Remove all the components from the boxes and inspect closely to make sure nothing wasdamaged during transport. Locate the hardware bag that is packed in the box with the cribends & sides.Suggested tools for assembly:Philips ScrewdriverRubber Mallet Qty 4Part #11750 1/2” Plastic Spacer-To be used at the bottom of the slide rod.Qty 4Part #63838 1/4-20x7/8” Screw -To be used at the top of the slide rod for the rails.Qty 4Part #11531 Washer- To be used at the top of the slide rod for the rails.Qty 4Part# 63403 Bumper Spring- To be used at the bottom of the slide rod- fi ts on slide rod adaptor.Qty 8Part# 11545 Plastic Washer- To be used at the bottom of the slide rod- fi ts around bumper springon the slide rod adaptor.Qty 4Part# 11529 Crib Eye Cover- To be used at the top of the 4 corners of the bed to cover the upper crib eyeASSEMBLY INSTRUCTIONS1. First, attach the mattress platform to the end assemblies by anchoring it into the cornerlocks on the ends.To fi rmly seat the mattress platform into the corner locks, tap the four corners of theplatform with the rubber mallet, being careful not to bend or damage the platform or metalpans of the mattress surface.2. Next, Insert the slide rods into the two side rails. Squeeze the Johns Hopkins handles orthe fi ngertip trigger mechanism to allow the slide rod to go down into the rail on each sideand lock it into place in the top position as shown below.Mattress Platform Corner Locks End AssemblyEnd Assembly Pegs from the mattress platform arefully seated into the corner locks asshown Corner Lock3. Take one side assembly with the slide rods inserted making sure the Johns Hopkinshandle is facing outwards, and add a plastic spacer, nylon washer, bumper spring and asecond nylon washer to the bottom of the slide rods as shown. While holding the hardwarein place, lift the side assembly and place the slide rods onto the lower crib eyes as shown.4. Push down on both ends of the side rail assembly, and position the top of the slide rods& side rail under and up into the upper crib eye. Add the nylon washer and screw at the top of the rail on both ends but do not yet tighten all the way. First, raise and lower the railseveral times to allow the slide rods to align themselves in the crib eyes. Then fasten thescrew at the top of the slide rod firmly. Repeat this process on the other crib side.Plastic SpacerBumper SpringBumper Washer Lower Crib Eye ASSEMBLY INSTRUCTIONS CONTINUED5. Insert the crib eye covers into the top of the 4 corner posts of the crib to cover the uppercrib eye and screw. Add the mattress to the crib.Assembly iscomplete Upper Crib EyeScrewWasherThe nations #1 manufacturer of hospital cribsAll bolts and other fasteners must be securelytightened and maintained when crib is put in service.Before each usage or assembly, inspect crib for damaged hardware, loose joints, missing parts or sharp edges.CAUTION SHEETThe nations #1 manufacturer of hospital cribsHome Care WarrantyReturn PolicyAcceptance of returns on all new and unused equipment and parts is at the discretion of HARDManufacturing. The purchaser will be responsible for a restocking fee and the freight costs associated with returning the equipment or item.Replacement of any part under warranty is contingent upon the following:1. The customer is to provide the serial number of the crib or bed as well as the serial number of the defective or damaged part(s) if one exists. If the part is a mattress, the customer must supply the serial number of the mattress as well as photos of both tags on the mattress.2. The customer is to provide photos of the defective or damaged part.3. The customer must, if requested by HARD Manufacturing, return the defective or damaged item for inspection prepaid within 30 days of reporting the issue.MaintenancePlacing cribs and youth beds in cart washers and/or the use of steam spray guns for disinfecting is not recommended. Use a non-abrasive cleaning solution such as a mild detergent and thoroughly dry all components of crib or bed prior to replacing the mattress on the unit. Solvents containingalcohol, ammonia or other abrasives should be avoided. Failure to follow the suggested cleaning/dry-ing instructions could lead to premature corrosion and require replacement of the mattress.Expected Service Life of HARD Manufacturing Cribs or Beds is 9 years.Five (5) year warrantyHARD Manufacturing will replace at no cost to the purchaser any expendable component such as, but not limited, to mattresses, trigger assemblies, slide rods or slide rod components, crankhandles, Johns Hopkins handles, vinyl curtains, curtain rods, or IV components found to have a defect in materials or workmanship within one (1) year from the date of purchase at our discretion.One (1) year warrantyHARD Manufacturing will replace at no cost to the purchaser any motor, sta ff control or underbed control box found to be defective within two (2) years from the date of purchase.Electrical ComponentsTerms and Conditions of the Warranty PeriodThe warranty covers normal use of our cribs or youth beds. It does not cover damage or defects that occur due to any of the following:1. Abuse, misuse, mishandling and excessive wear by sta ff , patients or parents/caregivers.2. Modi fi cations of the equipment including the electrical equipment. The covers should never beremoved on the motors, transformers, control boxes, scale controls or sta ff controls. Doing any type of modi fi cation to our cribs or youth beds will void the warranty.E ff ective 6/1/2017Revised 2020.1 3.26.2020HARD Manufacturing will replace at no cost to the purchaser any non-expendable component such as the head and foot end assemblies, side assemblies or mattress platform found to have a defect in materials or workmanship within five (5) years from the date of purchase at our discretion.。
FDA-approved 轻便儿童床说明书
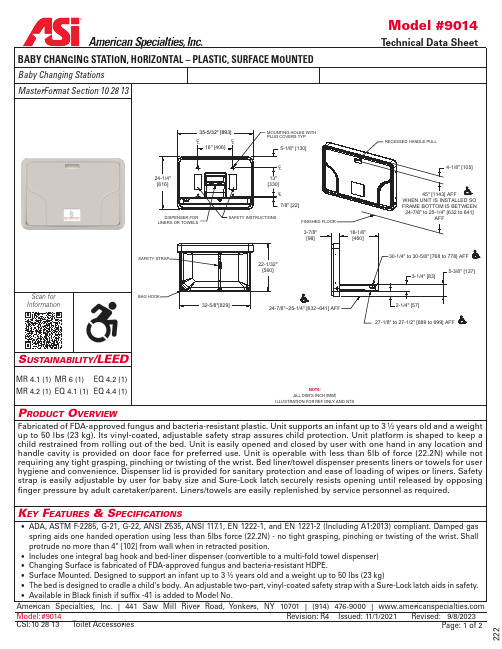
American Specialties, Inc. | 441 Saw Mill River Road, Yonkers, NY 10701 | (914) 476-9000 | Model:#9014Issued:11/1/2021Revised:9/8/2023Page:1 of 2Revision :R4/leedBABY CHANGING STATION, HORIZONTAL – PLASTIC, SURFACE MOUNTED222Toilet Accessories CSI:10 28 13o Peration & M aintenancet echnical i nForMation / P roduct P roPertiesi nstallationw arrantyInstallation instructions along with operation and maintenance manual are provided with each unit. Surface mount unit using hardware supplied through recessed mounting holes. Hardware kit supplied has fasteners suitable for metal or wood stud walls in dry locations and general hollow wall construction where adequate substrate strength is obtained. Fasteners and anchors for masonry walls are not provided. Wall reinforcement must be suit-able to sustain transfer of maximum unit loading. Mounting hole plug covers are supplied to conceal fasteners after installation.Installation instructions along with operation and maintenance manual are provided with each unit. Unit is surface mounted using hardware supplied through recessed mounting holes. Hardware kit supplied has fasteners suitable for metal or wood stud walls in dry locations and general hollow wall construction where adequate substrate strength is obtained. Fasteners and anchors for masonry walls are not provided. Wall reinforcement must be suit-able to sustain transfer of maximum unit loading. Mounting hole plug covers are supplied to conceal fasteners after installation.1. Locate wall studs at 16" [406] OC for fastening the station. If two (2) wall studs cannot be used, use two (2) screws into ONE stud and drill pilot holes and install toggle fasteners securely in the wall at non-stud location.2. Attach unit to wall studs with four (4) 1/4" x 3" long Phillips pan head self-threading screws through flat washers.3. Where wall studs are not available attach with four (4) 1/4" - 20 x 3" pan head bolts with flat washers into toggles or expansion nuts.For compliance with 2010 ADA Accessibility Standards install unit so that top edge of changing table is 30-1/4" [768] Above Finished Floor (AFF). See installations instructions packed with unit.Manufacturer reserves the right to make changes to the design, dimensions or functionality of the product without formal notice.Unit platform is shaped to keep a child restrained from rolling out of the bed. Unit is easily opened and closed by user with one hand in any location and handle cavity is provided on door face for preferred use. Unit is operable with less than 5 lbs (22.2N) while not requiring any tight grasping, pinching or twisting of the wrist. Bed liner/towel dispenser presents liners or towels for user hygiene and convenience. Dispenser lid is provided for sanitary protection and ease of loading of wipes or liners. Safety strap is easily adjustable by user for baby size and Sure-Lock latch securely resists opening until released by opposing finger pressure by adult caretaker/parent. Liners/towels are easily replenished by service personnel as required.Five (5) Y ears from date of InvoiceAmerican Specialties, Inc. | 441 Saw Mill River Road, Yonkers, NY 10701 | (914) 476-9000 | Model:CSI:#901410 28 13Toilet Accessories Issued:11/1/2021Revised:9/8/2023Page:Revision :Supports an infant up to 3 ½ years old and a weight up to 50 lbs (23 kg)PropertyValueDimensions Construction Surface Mounted2 of 2R4High-Density Polyethylene (HDPE)FDA-approved fungus and bacteria-resistant plastic bedClosed: 35-5/32" x 24-1/4" x 3-7/8" [893 x 616 x 98]Open: 35-5/32" x 24-1/4" x 22-1/32" [893 x 616 x 560]Mounting Capacity。
- 1、下载文档前请自行甄别文档内容的完整性,平台不提供额外的编辑、内容补充、找答案等附加服务。
- 2、"仅部分预览"的文档,不可在线预览部分如存在完整性等问题,可反馈申请退款(可完整预览的文档不适用该条件!)。
- 3、如文档侵犯您的权益,请联系客服反馈,我们会尽快为您处理(人工客服工作时间:9:00-18:30)。
友贝婴儿床说明书
友贝婴儿床是一款专为婴儿设计的床具,以下是该产品的说明书内容:
1. 产品外观:
- 友贝婴儿床采用优质的木材制造,颜色自然温和,宝宝使用舒适。
- 床的尺寸适中,能够容纳宝宝的身体并提供充足的活动空间。
- 设计简约美观,适合家庭装饰风格各异。
2. 安全性:
- 友贝婴儿床通过国家安全标准认证,无害物质,无异味,保证宝宝的安全和健康。
- 床的四个角部分设计为圆滑曲线,无锐利边角,确保宝宝在使用过程中不会受伤。
3. 调节功能:
- 友贝婴儿床配备了可调节的床底板,可以根据宝宝的成长阶段和需求,灵活调节床的高度。
- 床底板高度可以调整为两个或三个不同高度,以适应宝宝不同年龄的需求。
4. 便携性:
- 友贝婴儿床可折叠设计,便于携带和储存,方便家长在户外、旅行或外出时使用。
- 床的折叠结构牢固可靠,保证使用时的稳定性和安全性。
5. 维护和清洁:
- 在使用友贝婴儿床时,应注意保持床的干燥和清洁,避免水分和污渍对床造成损坏。
- 床垫面料可拆卸,方便清洗和更换。
请在使用友贝婴儿床前仔细阅读本说明书,并按照指示正确使用该产品,以确保宝宝的安全和舒适。
如有任何疑问或问题,请联系我们的客服人员。