依维柯空调系统维修手册
汽车空调维护指南说明书

Air ConditioningYour car's air conditioning is a sealed system. Any major maintenance,such as recharging, should be done by a qualified technician. There are a couple of things you can do to make sure the air conditioning works efficiently.Periodically check the engine's radiator and air conditioning con-densers (located in the openings below the parking lights) for leaves,insects, and dirt stuck to the front surface. These block the air flow and reduce cooling efficiency. Use a light spray from a hose or a soft brush to remove them.The condenser and radiator fins bend easily. Only use a low-pressure spray or soft-bristle brush to clean them.Run the air conditioning at least once a week during the cold weathermonths. Run it for at least ten minutes while you are driving at a steady speed with the engine at normal operating temperature. This circu-lates the lubricating oil, contained in the refrigerant.If the air conditioning does not get as cold as before, have your dealer check the system. Recharge the system with Refrigerant HFC-134a (R-134a).(See Specifications on page 216.)Whenever you have the air condition-ing system serviced, make sure the service facility uses a refrigerant recycling system. This system captures the refrigerant for reuse.Releasing refrigerant into the atmos-phere can damage the environment.NOTICEAIR CONDITIONING CONDENSERSNOTICEEngine Belts, TiresEngine BeltsYou should check the condition of the two engine belts every sixmonths. Examine the edges of each belt for cracks or fraying. Check the tension of each belt by pushing on it at the point shown in the diagram.The belts should have the following "play" or deflection.Alternator belt:12 — 14 mm (0.47 — 0.55 in)Compressor belt:10 —12 mm (0.39 — 0.47 in)If you see signs of wear or looseness,have your dealer adjust or replace the belts.TiresTo safely operate your car, your tires must be the proper type and size, in good condition with adequate tread,and correctly inflated. The following pages give more detailed information on how and when to check air pres-sure, how to inspect your tires for damage, and what to do when your tires need to be replaced.TiresInflationKeeping the tires properly inflated provides the best combination of handling, tread life and riding com-fort. Underinflated tires wear un-evenly, adversely affect handling and fuel economy, and are more likely to fail from being overheated. Overin-flated tires can make your car ride more harshly, are more prone todamage from road hazards, and wear unevenly.We recommend that you visually check your tires every day and use the pressure gauge that came with your car to measure the air pressure at least once a month. If you think a tire might be low, check it immedi-ately.Check the pressure in the tires when they are cold. This means the car has been parked for at least three hours.If you have to drive the car before checking the tire pressure, the tires can still be considered "cold" if you drive less than 1.6 km (1 mile).If you check the pressure when the tires are hot (the car has been driven several miles), you will see readings 28 to 41 kPa (0.3 to 0.4 kg/cm 2,4 to 6psi) higher than the cold reading.This is normal. Do not let air out to match the specified cold pressure.The tire will be underinflated.Recommended Tire Pressures for Normal DrivingThe following chart shows therecommended cold tire pressures for most normal driving conditions and speeds. Tire pressures for high speed driving are the same as for normal driving (see page 222).Rear:The pressures are also given on the tire information label on the driver's door jamb.CONTINUEDFront:TiresUse the pressure gauge that came with your car every time you check the tires. This will make it easier for you to tell if a pressure loss is due to a tire problem and not due to a variation between gauges.Tubeless tires have some ability to self-seal if they are punctured. How-ever, because leakage is often very slow, you should look closely for punctures if a tire starts losing pressure.InspectionEvery time you check inflation, you should also examine the tires for damage, foreign objects, and wear.You should look for:Bumps or bulges in the tread or side of the tire. Replace the tire ifyou find either of these conditions.Cuts, splits, or cracks in the side of the tire. Replace the tire if you cansee fabric or tread.Excessive tread wear.Your car's tires have wear indicators molded into the tread. When the tread wears down to that point, you will see a 12.7 mm (1/2 inch) wide band running across the tread. This shows there is less than 1.6 mm(1/16 inch) of tread left on the tire. A tire that is this worn gives very little traction on wet roads. You should replace the tire if you can see the tread wear indicator in three or more places around the tire.MaintenanceIn addition to proper inflation, correct wheel alignment helps to decrease tire wear. You should get your car's wheel alignment checked every 12months or 24,000 km (15,000 miles).INDICATOR LOCATIONMARKSTREAD WEARINDICATORSThe tires were properly balanced by the factory, They may need to be rebalanced at some time before they are worn out. Have your dealer check the tires if you feel a consistentvibration while driving. A tire should always be rebalanced if it is removed from the wheel for repair.Make sure the installer balances the wheels when you have new tires installed. This increases riding comfort and tire life. Your car'soriginal tires were dynamic or "spin"balanced at the factory. For best results, have the installer perform a dynamic balance.Improper wheel weights can damage your car's aluminum wheels. Use only genuine Acura wheel weights for balancing.Tire RotationYou should not rotate your NSX's tires. The front wheels are 16"diameter and the rear wheels are 17"so they cannot be rotated front-to-rear. The original-equipment tires on your NSX have a unidirectional tread pattern, so they cannot be rotated side-to-side.Replacing Tires and Wheels The tires that came with your car were selected to match the perfor-mance capabilities of the car while providing the best combination of handling, ride comfort, and long life.If a tire becomes damaged, you should replace it, not repair it. Arepaired tire will have lower perform-ance limits.You should replace them with radial tires of the same size, load range,speed rating, and maximum cold tire pressure rating (as shown on the tire's sidewall). Mixing radial and bias-ply tires on your car can reduce its braking ability, traction, and steering accuracy.CONTINUEDNOTICETiresIt is best to replace all four tires at the same time. If that is not possible or necessary, then replace the two front tires or the two rear tires as a pair. Replacing just one tire can seriously affect your car's handling.If you ever need to replace a wheel,make sure the wheel's specifications match those of the original wheel that came on your car. Replacement wheels are available at your Acura dealer.Wheels and Tires Wheels:Front - 16 x 7 JJ Rear- 17 x 8 1/2 JJ Tires:Front - 215/45ZR16Rear- 245/40ZR17See Tire Information on page 221 for additional information about tire and wheel size designations. See page 222 for information about DOT Tire Quality Grading.Winter TiresYou should mount winter tires on your NSX before winter starts (be-fore consistent sub-freezing tempera-tures). Change back to "summer"tires after winter weather has stopped.Use winter tires on all four wheels.The performance capabilities of the winter tires may not be the same as your car's original-equipment tires.Check with the tire dealer for maxi-mum speed recommendations.Tire ChainsMount snow chains on your car when warranted by driving conditions or required by local laws. Make sure the chains are the correct size for your tires. Use greater caution whendriving with snow chains on snow or ice. They may have less-predictable handling than good winter tires without chains. Some snow chains may damage the car's tires, wheels,suspension and body. Consult your Acura dealer before purchasing any type of chains for your NSX.。
维修手册电气空调系统

暖风装置与空调系统位置索引位置索引大体系统A6E0W011 鼓风机总成(参考U-14鼓风机拆卸/安装)(参考U-14鼓风机拆解/装配)2空气滤清器(参考U-15空气滤清器拆卸/安装)(参考U-15空气滤清器检查)3空调总成(参考U-15空调组件拆卸/安装)(参考U-18空调组件拆解/装配)4后加热管路(参考U-23后加热管路拆卸/安装)5空调压缩机(参考U-23空调压缩机拆卸/安装)6冷凝器(参考U-24冷凝器拆卸/安装)(参考U-24冷凝器检查)7暖风水管8制冷剂风道路(参考U-25制冷剂风道路拆卸/安装)U-3位置索引操纵系统A6E2W01手动空调全自动空调U-4位置索引U-5位置索引手动空调U-6位置索引1 进气调节器(内外循环调节)(参考U-30进气调节器(内外循环调节)拆卸/安装)(参考U-30进气调节器(内外循环调节)检查)2 空气混合调节器(参考U-31空气混合调节器拆卸/安装)(参考U-32空气混合调节器检查)全自动空调U-7制冷剂处置A6E9W01·在处置进程中,操作人员应该注意幸免吸入空调制冷剂或润滑剂汽化物。
长期暴露在空调环境下,操作人员的眼睛、鼻子和喉咙容易受到刺激,另外,从环境阻碍角度考虑,在从空调系统中排放R-134a 时,咱们建议利用能够回收、再循环、从头充用型设备。
若是发生突发性的系统故障,那么建议在进行设备维修效劳之前,将其放置于通风的处置地址。
·关于R-134a 效劳设备,或利用紧缩空气的汽车空调系统,由于某些空气和R-134a 的混合物在压力升高时,有可能发生燃烧,因此,建议不要进行加压检查或泄漏情形查验。
若是这些混合物燃烧,那么有可能造成严峻的人员损害或财产损失。
有关具体的健康和平安知识,能够参考制冷剂处置人员手册。
·注意不要使制冷剂泄漏在火花或其它热物体周围。
若是制冷剂气体接触到火花或类似的热源(例如:香烟或加热器),那么将产生有毒气体。
空调故障排查维修手册
空调故障排查维修手册一、引言空调作为现代家庭和办公场所不可或缺的设备之一,其正常运行对于人们的生活和工作至关重要。
然而,由于各种原因,空调设备可能会出现故障,影响其正常使用。
本手册旨在为用户提供一份简明扼要的空调故障排查维修指南,帮助用户在空调故障出现时迅速定位问题并采取正确有效的维修措施。
二、常见故障及排查方法1. 空调无法启动可能原因:- 电源问题:检查电源插座是否通电,排除电源故障。
- 开关问题:确保空调开关控制在正确的位置。
- 控制面板故障:检查空调控制面板是否正常,尝试重新设置控制面板。
- 保险丝损坏:查看保险丝是否断开,如有问题需要更换保险丝。
2. 空调制冷效果差可能原因:- 水箱问题:检查空调水箱是否注满水,如水量不足,需添加足够的水。
- 水泵故障:检查水泵工作状态,如发现异常,应及时更换水泵。
- 冷媒不足:请专业技术人员添加足够的冷媒。
- 冷凝器脏污:清洗空调冷凝器,确保其表面清洁。
3. 空调漏水可能原因:- 排水管堵塞:检查排水管是否有堵塞,清理堵塞物。
- 冷凝器漏水:检查冷凝器是否完好,如有损坏需要更换。
- 室内机安装不平稳:重新安装室内机,确保其平稳无晃动。
4. 空调异味可能原因:- 空气滤网积尘:清洗或更换空气滤网。
- 发霉、腐蚀等问题:检查空调内部是否存在发霉、腐蚀等问题,如有需要处理相应问题。
5. 空调噪音过大可能原因:- 风叶积尘:清洗风叶,确保其表面清洁。
- 风扇松动:检查风扇连接是否松动,如有需要进行紧固。
- 维修件老化:检查维修件是否老化,如有需要及时更换。
三、维修注意事项1. 安全第一:在进行空调排查和维修时,务必断开电源,并等待足够时间,确保电力线路中没有余电。
2. 专业技术:空调维修需要有相关的专业技术,如果您没有相关技术背景,请联系专业的空调维修人员进行处理,以免造成进一步的损坏。
3. 定期维护:为确保空调设备的长期稳定运行,请定期进行维护,包括清洁空调内部、检查冷凝器、更换滤网等。
【技术贴】依维柯空调系统维修手册_得意论坛_手机汽车之家
【技术贴】依维柯空调系统维修手册_得意论坛_手机汽车之家6.自动控制器自动控制器的功能是实现空调系统功能和系统控制。
6.1 控制器按键说明1 自动运行(AUTO)按键2 关闭空调(OFF)按键3 制冷(A/C)按键4 升高设置温度按键5 降低设置温度按键6 前出风大小指示7 自动控制(AUTO)指示8 进风模式指示9 制冷指示10 出风模式指示11 除霜/除雾指示12后出风大小指示13设置温度指示14出风模式切换按键15进风模式切换按键16风机调速按键功能切换17降低风速按键18提高风速按键7.制冷剂和润滑油7.1HFC134a制冷剂的管理——R-134a 制冷剂具有很强的挥发性.一滴制冷剂粘在皮肤上, 可能造成冻伤.因此,进行制冷剂工作时,必须戴上手套.——为了保护眼睛,进行制冷剂工作时,必须戴上护目镜.如果制冷剂进入眼睛,应立即用清水清洗.—— R-134a 储存容器为高压容器.因此,严禁储存在温度高的地方.随时检查制冷剂储存场所温度是否在52℃以下.——使用电子检漏仪检查制冷剂的渗漏状态。
R-134a制冷剂与检漏仪的火花接触会产生有害气体。
因此,进行检漏工作时,应小心谨慎。
——制冷剂必须使用R-134a。
如果使用其它制冷剂,会造成系统部件的损伤。
7.2压缩机润滑油的管理润滑油的作用是润滑压缩机。
当制冷系统工作时,润滑油与制冷剂一起在制冷系统中进行循环。
因此,更换了制冷系统部件或系统漏气量大时,要补充润滑油,保持系统中的润滑油的规定量。
——润滑油极易吸收大气中的水份,要防止润滑油中进入湿气、灰尘、及金属片等,使用后的润滑油瓶应马上拧紧密封盖。
——要使用规定型号的润滑油。
压缩机润滑油不能混淆使用。
7.3更换部件注意事项——制冷系统放出制冷剂之前严禁打开或拧松各连接接头。
——当拆下制冷系统部件后,应立即堵上各管口,防止湿气进入制冷系统。
——新品部件启封后,要立即堵上各管口进行密封,防止湿气和灰尘进入其内部。
杰狮空调维修手册_2014
.. ..杰狮系列汽车空调使用、维护、保修手册三电贝洱汽车空调Shanghai Sanden Behr Automotive Air Conditioning Co., Ltd.目录一、致用户书 (3)二、空调系统结构简介 (6)三、汽车空调器定期检查和维护 (10)四、主要故障模式维修说明 (15)五、易损件清单 (25)致用户书. . . .感您使用三电贝洱汽车空调的产品!在您维修本公司产品前,请仔细阅读本手册,如有疑问,请与本公司联系。
一、注意1、本手册仅适用于本公司制造的上汽依维柯红岩杰狮系列空调系统,维修时必须使用本厂正品配件。
2、杰狮空调系统使用的制冷剂为HFC134a,充注量为750±30克。
杜绝使用不合格的制冷剂。
3、非专业人员,请勿自行拆卸修理空调系统。
因不当维修而引起的直接或间接的损坏(包括车辆和人),本公司不承担任何责任。
4、系统中所需的冷冻油一般由压缩机里的冷冻油供应,不需再加。
但系统泄漏引起的冷冻油流失时,则应添加。
5、在不使用空调的季节,每月将空调制冷系统启动2-3次,每次10分钟左右,可避免对蒸发器、冷凝器、压缩机造成的重大损失。
. . . .6、在下列情况下,维修人员应与本公司联系:(1)该空调系统与本手册不一致时。
(2)本手册未说明的故障。
二、保修说明1、质量保证期以上汽依维柯红岩质量三包服务期为准。
2、对于符合保修条件的车辆,由于空调系统材料和制造原因而造成的损坏,给予免费的维修和更换。
3、不负责免费提供正常保养更换件:如干燥过滤器,“O”形密封圈。
4、对于非空调产品自身质量问题导致的冷冻油、制冷剂费用,本公司不承担。
5、保修期需要发新件替换时,用户应自收到新件起15天将旧件返回,否则将失去保修的权利。
6、对于已出保修期的车辆,我公司负责进行修理,但其所产生的费用由用户承担。
7、由于下述用户责任而导致失去质量索赔权,我公司将不再提供保修服务7.1、由于使用伪劣制冷剂而带来系统零部件损坏。
汽车冷气系统维护指南说明书
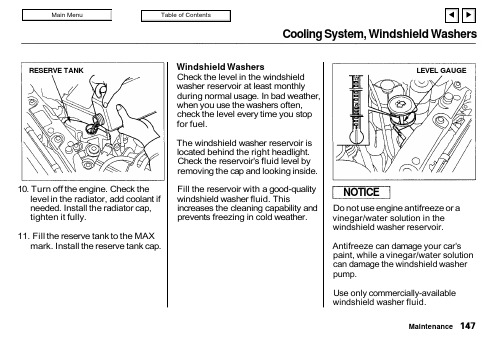
Cooling System, Windshield Washers10. Turn off the engine. Check the level in the radiator, add coolant if needed. Install the radiator cap,tighten it fully.11. Fill the reserve tank to the MAX mark. Install the reserve tank cap.Windshield WashersCheck the level in the windshield washer reservoir at least monthly during normal usage. In bad weather,when you use the washers often,check the level every time you stop for fuel.The windshield washer reservoir is located behind the right headlight.Check the reservoir's fluid level by removing the cap and looking inside.Fill the reservoir with a good-quality windshield washer fluid. Thisincreases the cleaning capability and prevents freezing in cold weather.Do not use engine antifreeze or a vinegar/water solution in the windshield washer reservoir.Antifreeze can damage your car's paint, while a vinegar/water solution can damage the windshield washer pump.Use only commercially-available windshield washer fluid.MaintenanceRESERVE TANKLEVEL GAUGENOTICETransmission OilAutomatic TransmissionCheck the fluid level with the engine at normal operating temperature.1. Park the car on level ground. Shut off the engine.2. Remove the dipstick (yellow loop)from the transmission and wipe it with a clean cloth.3. Insert the dipstick into the transmission.4. Remove the dipstick and check the fluid level. It should be between the upper and lower marks.5. If the level is below the lower mark, add fluid into the tube to bring it to the upper mark. Use Honda Premium Formula Auto-matic Transmission Fluid or an equivalent DEXRON ® II Auto-matic Transmission Fluid (ATF)only.6. Insert the dipstick back in thetransmission. Make sure the notch fits in the dipstick guide and the dipstick is down all the way.The transmission should be drained and refilled with new fluid every 24months or 48,000 km (30,000 miles),whichever comes first. Shorten this to every 12 months or 24,000 km (15,000 miles) under severe driving conditions (see page 134).MaintenanceDIPSTICKUPPER MARKLOWER MARKTransmission Oil, Brake and Clutch Fluid5-speed Manual TransmissionCheck the oil level a couple of mi-nutes after shutting off the engine.Make sure the car is on level ground.Remove the transmission filler bolt.The oil level should be up to the edge of the bolt hole. Feel inside the bolt hole with your finger. If you do not feel any oil, slowly add oil until it starts to run out of the hole. Reinstall the filler bolt and tighten it securely.Only use an API Service SF or SG grade motor oil with a viscosity of SAE10W-30 or 10W-40.The transmission should be drained and refilled with new oil every 24months or 48,000 km (30,000 miles),whichever comes first. Shorten the service interval to every 12 months or 24,000 km (15,000 miles) under severe driving conditions (see page 134).Brake and Clutch FluidCheck the fluid level in the reser-voirs monthly. There are three reser-voirs. They are:Brake fluid reservoirClutch fluid reservoir (manual transmission only)ABS reservoirThe brake fluid in the brake and Anti-lock brake systems should be replaced every 2 years or 48,000 km (30,000 miles), whichever comes first.MaintenanceFILLER BOLTCorrectlevelBrake and Clutch FluidBrake SystemThe fluid should be between the MIN and MAX marks on the side of the reservoir. If the level is at or below the MIN mark, it is anindication that your brake system needs attention. Have the brake system inspected for leaks or worn brake pads.If you add brake fluid to bring it up to the MAX mark, use Genuine Honda Brake Fluid or an equivalent from a sealed container that ismarked DOT3 or DOT4 only. Brake fluid marked DOT5 is not compatible with your car's braking system.Anti-lock Brake SystemThe fluid should be between the MIN and MAX marks on the side of the reservoir. If it is at or below the MIN mark, it indicates a possible problem in the ABS. Have the dealer inspect the system and add fluid.MaintenanceMAXMINMAXMINBrake and Clutch Fluid, Power SteeringClutch SystemThe fluid should be between the MIN and MAX marks on the side of the reservoir. If it is not, add brake fluid to bring it up to that level. Use the same DOT3 or DOT4 brake fluid from a sealed container specified for the brake system.Low fluid level can indicate a leak in the clutch system. Have this system inspected as soon as possible.Power SteeringYou should check the fluid level in the power steering reservoirmonthly. Check the level when the engine is cold. Look at the side of the reservoir. The fluid should be between the UPPER LEVEL and LOWER LEVEL. If it is below the LOWER LEVEL, add power steering fluid to the UPPER LEVEL.CONTINUEDMaintenanceMAX MINLOWER LEVELUPPER LEVEL。
汽车空调系统维修手册

汽车空调系统的维修空调系统主要部件包括压缩机、平行流冷凝器、双蒸(前蒸和顶蒸)、系统管路及控制电路等。
该系统采用对环保无害的R134a作为制冷剂。
为保证该空调系统的正常使用和制冷效果达到要求,须及时对空调系统进行维护、预防和排除各种可能或已经出现的问题。
一.检修工具及其使用方法1.岐管压力计岐管压力计是测定系统压力的重要工具,一般采用两表头的结构形式,其中一块表用在系统低压侧,另一块表用在系统高压侧。
表和系统的连接是通过岐管和压力软管,岐管上有两个表头接口和三个软管接口,岐管的两端有手轮,用来控制制冷剂流量。
在低压表下接低压软管,在高压表下接高压软管,中间接口是用来进行抽真空、充制冷剂或其它维修之用。
低压端和高压端分别装有手动截流阀,顺时针把阀拧到头,则岐管截流,表上的读数指出该孔的压力值。
当两个手阀都置在关断的位置,这时,软管与对应的表头还是相通的,可读出高、低压的数值。
如逆时针转动手轮,则阀被打开,系统就与岐管的中间孔相连通。
这时,只是在容许制冷剂充入或排出系统才这样做。
假使低压截流阀打开只有低压与中间孔相通,低压表仍然可指示低压侧状态。
高压侧的截流阀关闭着,高压表还是显示高压状态。
如果高压侧的截流阀打开,而低压侧仍关断,结果也是类似的。
如果两个截流阀都打开,则都与中间孔相通,那么表上读数就不反映真实的情况了,这种情况一般是对系统抽真空用。
压力软管可承受7.5Mpa的工作压力,其破坏压力超过14MPa。
高、低压软管和中间孔连接的软管颜色各不相同,高压软管为红色、低压软管为蓝色、中间软管为绿色,避免连接错误导致损坏表头。
岐管压力计有R134a和R12两种类型,二者不能混用,以免影响汽车空调系统正常工作和制冷效果及损坏岐管压力计。
2.检漏仪检漏是一项非常重要又频繁的基本操作技能。
在汽车空调系统中的检漏方法有肥皂水、卤素检漏灯和电子检漏仪等。
肥皂水检漏是最经济、最简单,也是最有效的方法。
当要检测定位小泄漏,如接头的缝隙和焊接点,卤素检漏灯或电子检漏仪的探头伸不进,无法定位出具体的泄漏处,而肥皂水检漏可发挥其效用。
中重卡车空调系统原理及使用维修手册
DKS-15 压缩机机体主要由前端盖、缸体、后端盖、主轴斜盘、活塞及 阀片组成(图 7),发动机驱动压缩机主轴,斜盘带动三个活塞作双向往复 运动, 每个活塞实现吸气及排气同时进行。
换气量:冬季为20—30m3/h/人;夏季为40—80 m3/h/人 一氧化碳含量:小于0.01mg/L 二氧化碳含量:小于1.5mg/L 粉尘质量浓度:小于3.0mg/m3 温、湿度及风速调节主要靠制冷装置及暖风装置来实现,在后面的章节 将对此作详尽的描述。 一般情况下,车内舒适性指标: 车内温度:冬季为15—18℃;夏季为22—27℃ 相对湿度:冬季为50—70%,夏季为60—75% 迎面风速:0.2—0.3m/s
(图5)
技术项目
技术参数
空调系统代号
PZND4E
制冷量
KW/(Kcal/h)
4/(3300)
8
制热量 制冷剂型号 制冷剂加注量 空调电量 空调功耗 送风量 膨胀阀 压缩机型号 压缩机排量 冷冻油型号 冷冻油量 冷凝器换热量 温度控制范围
KW/( Kcal/h)
Kg V/A KW m3/h RT
cc/rev
目录
1. 空调系统的工作原理 ------------------------------------ 4 1.1 车内舒适度的基本要求 ------------------------------ 4 1.2 制冷循环及制热循环 -------------------------------- 5 1.3 电气控制原理及操作 -------------------------------- 8 1.4 空调系统的参数表 ---------------------------------- 11
- 1、下载文档前请自行甄别文档内容的完整性,平台不提供额外的编辑、内容补充、找答案等附加服务。
- 2、"仅部分预览"的文档,不可在线预览部分如存在完整性等问题,可反馈申请退款(可完整预览的文档不适用该条件!)。
- 3、如文档侵犯您的权益,请联系客服反馈,我们会尽快为您处理(人工客服工作时间:9:00-18:30)。
1.概述汽车空调系统,通过调节车厢内的的空气温度、湿度、流速、清洁度,可有采暖、初霜、初雾、制冷、除湿、通风、进气过滤等功能,是提高车辆驾乘舒适性的重要工具。
2.空调暖气系统暖气系统利用发动机冷却液在暖风装置中循环,向车厢内散热,水管将暖风装置与发动机暖风出水口和回水口相连,循环动力由发动机水泵提供。
暖气系统由前暖风、后暖风组成,根据车辆不同,可以只装前暖风或前后暖风均安装。
前暖风位于发动机仓内,与前蒸发器装配在同一壳体内,共用送风风机和送风风道;后暖风安装在乘客座椅下,靠车身侧壁,有独立的送风风机。
主要部件有换热器、水阀、水管、控制器、管卡等。
h——前挡风玻璃除霜/除雾出风口i——前车窗玻璃除霜/除雾出风口j——方向可调式中央和侧出风口k——脚部出风口图2-1驾驶室供暖通风除霜2.1故障诊断(表1)2.2暖风加热器和暖风控制水阀的维修拆装——拆去前蒸发器芯体及膨胀阀、管路;——拆下连接在暖风上的进水管和出水管;——拧下螺钉,拆下暖风水管控制阀,然后从后壳体上拆下散热器;——检查暖风散热器是否有堵塞、碰伤、裂纹,若有近修复或更换芯体;——检查暖风控制法是否能正常工作,若有问题进行更换;——检查维修完毕,按照拆卸相反的顺序装配暖风散热器和控制水阀;——装配完成后,按照要求加发动机冷却液,并排去冷却液回路中的空气。
2.3冷却液回路中的空气排除——启动发动机,使其怠速运转;——调节控制面板,使其处于供暖除霜模式;——松开放气螺钉,直至完全排除冷却液回路中的气体,然后拧紧放气螺钉;——观察并按照实际情况,补充防冻液。
2.4风扇的更换——拆除风道调速模块连接线束,拆除风道;——拆除送风总成上的微电机连接线束及风机线束;——拆下空调进气室上的固定螺钉,更换风机。
3.空调冷气系统的组成和工作原理3.1冷气系统组成框图本空调系统为非独立式空调系统,动力由发动机提供,系统由压缩机,前冷凝器,前蒸发器带膨胀法总成,后蒸发器带膨胀法总成,管路和电气系统组成。
3.2冷气系统工作原理图本系统为蒸气压缩式制冷,整个循环分为四个工作过程。
(1)压缩过程在蒸发器中吸收热量后的低温低压制冷机气体被压缩机吸入后,经过绝热压缩,成为高压高温气体送入冷凝器。
(2)冷凝过程高温高压的制冷剂气体进入冷凝器后,与环境空气进行热交换,变为高温高压液体。
(3)节流过程高压的制冷剂液体由冷凝器中排除后,经储液器干燥和过滤,通过膨胀阀节流和降压,变为低温低压液体气体混合物进入蒸发器。
(4)蒸发过程节流后的低温低压制冷剂进入蒸发器气化,吸收车内空气的热量,变为低温低压蒸气,同时车内温度降低。
压缩机不停运转,以上四个过程就不停的循环。
1.压缩机2.前冷凝器3.侧冷凝器4.储液罐5.膨胀阀6.后蒸发器7.前蒸发器3.3MY08空调系统组成及主要部件3.3.2前蒸发器/加热器总成3.3.3风道3.3.4分发器总成3.3.5侧冷凝器4.系统技术参数5.空调系统电器控制原理及线束连接5.1空调系统电器原理及组成空调系统线束由前HVAC线束、空调控制线束、空调车架线束、侧冷凝器内部线束、后蒸发器内部线束、空调车架线束连接线等组成。
5.2电器原理图(见附件)6.自动控制器自动控制器的功能是实现空调系统功能和系统控制。
6.1控制器按键说明1自动运行(AUTO)按键2关闭空调(OFF)按键3制冷(A/C)按键4升高设置温度按键5降低设置温度按键6前出风大小指示7自动控制(AUTO)指示8进风模式指示9制冷指示10出风模式指示11除霜/除雾指示12后出风大小指示13设置温度指示14出风模式切换按键15进风模式切换按键16风机调速按键功能切换17降低风速按键18提高风速按键7.制冷剂和润滑油7.1HFC134a制冷剂的管理——R-134a制冷剂具有很强的挥发性.一滴制冷剂粘在皮肤上,可能造成冻伤.因此,进行制冷剂工作时,必须戴上手套.——为了保护眼睛,进行制冷剂工作时,必须戴上护目镜.如果制冷剂进入眼睛,应立即用清水清洗.——R-134a储存容器为高压容器.因此,严禁储存在温度高的地方.随时检查制冷剂储存场所温度是否在52℃以下.——使用电子检漏仪检查制冷剂的渗漏状态。
R-134a制冷剂与检漏仪的火花接触会产生有害气体。
因此,进行检漏工作时,应小心谨慎。
——制冷剂必须使用R-134a。
如果使用其它制冷剂,会造成系统部件的损伤。
7.2压缩机润滑油的管理润滑油的作用是润滑压缩机。
当制冷系统工作时,润滑油与制冷剂一起在制冷系统中进行循环。
因此,更换了制冷系统部件或系统漏气量大时,要补充润滑油,保持系统中的润滑油的规定量。
——润滑油极易吸收大气中的水份,要防止润滑油中进入湿气、灰尘、及金属片等,使用后的润滑油瓶应马上拧紧密封盖。
——要使用规定型号的润滑油。
压缩机润滑油不能混淆使用。
7.3更换部件注意事项——制冷系统放出制冷剂之前严禁打开或拧松各连接接头。
——当拆下制冷系统部件后,应立即堵上各管口,防止湿气进入制冷系统。
——新品部件启封后,要立即堵上各管口进行密封,防止湿气和灰尘进入其内部。
——部件安装准备工作就绪之前,禁止打开各管口封盖。
——各管口连接接头必须使用新品密封圈(使用规定产品),并检查密封圈有为损伤,密封圈安装之前,其表面涂上一层压缩机润滑油,并按规定扭距拧紧。
——当更换导管时,要使用同一规格的导管,严禁使用不同规格的导管。
——全部维修工具,包括歧管压力表和试用导管必须保持干燥和清洁。
——在更换安装新压缩机以前,应从充气阀(气门芯)缓慢排尽空调系统里的存气,排放太快,会将压缩机等管路内的润滑油一起带出。
另外,新的压缩机也需从充气阀将存气排出后,再拆卸塞子,防止压缩机里的润滑油与气体喷出流失。
7.4HFC134a空调系统维修工具维修HFC134a空调系统应该使用HFC134a专用表座、气体捡漏仪和真空泵等。
——HFC134a空调维修专用的表座,不能混用CFC-12维修用的表座,以防CFC-12制冷剂与压缩机润滑油污染HFC134a空调系统。
——使用HFC134a渗漏检测仪,用CFC-12渗漏检测仪代用效果较差。
——正确地选用真空泵,一般的真空泵能用于CFC-12与HFC134a制冷剂的空调系统。
真空泵内部有磁性单向阀,当完全抽空空调系统及真空泵开关转到“O F F”时,磁性阀打开,允许大气进入表座,以防真空泵里的油气回吸到空调系统。
注意:当空调系统完全抽空时,要仔细地先关掉表座上的高、低压阀门,然后关掉真空泵,如果这个程序颠倒了,将会有大气通过该管路回流进空调系统。
8.系统维护8.1歧管压力表的安装:连接歧管压力表的导管时,必须遵守安全预防措施:——关闭歧管压力表上两个开关手柄;——分别将高、低压软管、中间软管(有颜色区别)正确地连接到表座上,并用手拧紧螺母。
8.2放出制冷剂:——首先确认发动机处于停止状态,按照操作规程把歧管压力表的高、低压导管的快换接头分别接在制冷系统的高、低压检修阀座上;——在中间导管开放处放置擦布;慢慢打开高压阀边的手柄,自动放出制冷剂。
——随时检查压缩机润滑油是否带出;润滑油被带出时,关小高压阀开度;——当压力表降低至3.5kg/cm2以下时,慢慢打开低压阀;只至压力表指示为0kg/cm2。
注意:如果制冷剂排除速度过快,会带出压缩机的润滑油。
8.3制冷系统抽真空制冷系统进行维修工作后,必须进行抽真空;抽真空的目的是抽出系统中的空气和湿气,使系统内保持干燥。
更换制冷剂约15分钟,修理时拆装部件后约30分钟时间进行抽真空作业。
——把按照操作规程把歧管压力表的高、低压导管的快换接头分别接在制冷系统的高、低压检修阀座上;——确认制冷剂是否完全放出;——把歧管压力表的的中央导管与真空泵连接,启动真空泵,打开高、低阀。
——抽真空10分钟后,关闭真空泵和高、低压手动阀,检查低压表的指示是否在-0.96kg/cm2以下。
如果压力指示不是负压,或指针继续回升,说明系统管路不密封,应向系统充填一定量的制冷剂,用检漏仪进行检查,并修理堵漏;——继续抽真空20-25分钟,并重复第5项,抽至2个压力表指示为-0.96kg/cm2以下,如指针保持不动,说明系统无泄漏,可进行下一步工作;——关闭高、低压表的手动阀,停止抽真空,从真空泵的接口拆下中间注入软管,准备充填制冷剂。
注意:——要抽空制冷系统,先要连接好高压与低压快速简便的快速接头于空调系统的高压与低压管的充气阀(气门芯)。
如果只用一根连接,另外一根开放,就无法抽空空调系统。
——在抽空系统后,应先关掉表座上的高、低压阀开关,然后才能关掉真空泵。
8.4充入制冷剂——抽完真空后,将歧管压力表的的中央导管连接在制冷剂罐上;——将歧管压力表的的中央导管与表座相连处拧松,并将制冷剂罐上的阀门打开一点点,若看到雾状制冷剂外溢,或听到嘶嘶声,说明软管中的空气已排空,可拧紧该螺母;——旋开高压表侧手动阀,将制冷剂罐倒立,使制冷剂以液态充入制冷系统,在充注时不得启动发动机和打开空调,以防制冷剂倒灌;——旋开低压表侧手动阀,以气态形式向系统低压侧充入制冷剂。
此时要防止液态制冷剂注入系统,造成液击现象损坏压缩机;——向系统充入规定质量的制冷剂后,关闭高、低压表的两个手动阀和制冷剂灌上的注入阀,从制冷系统上拆除维修软管,并拧上系统维修阀上的塑料帽。
注:在制冷剂循环系统内充入制冷剂没有达到足够时,不要启动发动机带动压缩机工作。
如果制冷剂循环系统内没有足够的制冷剂,压缩机润滑油的润滑效果很差,压缩机可能会烧坏。
大量制冷剂液体进入工作的压缩机,会造成压缩机弹簧阀片(由于液体不可压缩的原理)冲坏。
当压缩机开动后,不要打开表座上高压阀,如果表座上的高压阀打开,制冷剂会从相反方向流动,甚至会将充气罐冲破,所以只能开关低压阀。
要仔细,在制冷系统内不要过量充灌,要根据有关的技术要求。
9.制冷系统常见故障及其诊断汽车空调系统的不正常工作的诊断,在很大程度上取决于技术人员阐明压力表读数的能力,一个不正常的压力表读数关系到一个具体的问题,而一个以上的问题又可能在一个压力表的读数上反映出来,对HFC134a制冷剂空调系统,正常工作的压力范围是:低压侧约在150~350KPa;高压侧约在1370~2100KPa。
各种车型的空调机组不同,上述数据会略有出入。
9.9.1列出表压力异常情况的故障诊断,供维修时参考。
10.汽车空调系统结构及检修10.1压缩机压缩机是整个制冷系统的“心脏”部件。
其功能是吸入来自蒸发器的低温低压制冷剂蒸汽,将其压缩至所需压力后,向冷凝器排入高温高压制冷剂蒸汽。
1.拔下压缩机电磁离合器导线的插头;2.放出制冷剂;3.从压缩机上拆下高、低压导管,并密封各部件管口;4.松下张紧轮,拆下皮带。
