电扒炉使用说明书
电扒炉使用说明书

SK-DPL电扒炉使用说明书兴锟商用设备制造—021 ******** 67691769欢迎购买本公司产品,为了使你更好地使用,请在使用前详细阅读本说明书。
合作!产品简介:WYD-852电半平半坑扒炉、WYD-853电平扒炉及GH-系列产品是吸收国外同类产品的优点改进设计而成。
款式新颖、结构合理、操作方便,是西餐厅、快餐店的必备设备。
一、技术参数二、运输与保管在运输过程中,本设备应小心轻放,防止剧烈震动。
包装好的电扒炉不应长期露天存放,应放在通风良好,无腐蚀性气体的仓库,不得倒置。
需临时露天存放时,应做好防雨措施。
三、安全注意事项和使用环境1、本设备应放在平稳的地方,左右侧离不燃物10cm以上,背面应离不燃物(砖墙等)20cm以上。
2、本设备所使用的电源电压必须与产品铭牌得供电电压相符,电源电压波动为±10%。
3、用户需在设备附件设有固定供电线路,并应配备有触点开距≥3mm的全极断开装置及漏电保护开关,设备周围不许对方杂物,以方便操作。
4、本设备等电位连接端子“”设在炉后面下方,应用不少于2.5mm2的铜芯与相邻等电位接线端子或符合安全规定的电线可靠连接。
警告:严禁将接地导线连接在自来水管、燃气管和暖气管等官道上,否则会造成安全事故!5、开机前应检查扒炉各电器组件连接部位有无松动,电源连接是否正确,安全接地是否可靠。
6、如果电源软线损坏,必须用相同截面积的YCW型YZW型耐油并带有黄绿双色地线的电缆来更换。
7、电气安装及电源线损坏,必须由持有电工证或有相关电气专业知识的专业人员安装和更换。
8、本器具不具备给体能弱、反应迟钝或有精神障碍的人(包括儿童)使用,除非他们在对其负有安全责任的人员的指导或帮助先安全使用。
儿童应该被监督以保证他们不玩耍器具。
9、如果器具放置在一个支座上,应采取措施以防止炉具从支座上滑落。
警告:工作时炉体温度升高,禁止触及,儿童应远离!一、使用方法及部件功能面板控制示意图1.温控器设在炉面,双控温炉具左右方各一个,可单独使用,亦可同时使用,左边温控器控制左边的锅面温度,邮编温控器控制右边锅面温度。
美国Remo品牌的560B电动披萨炉说明书
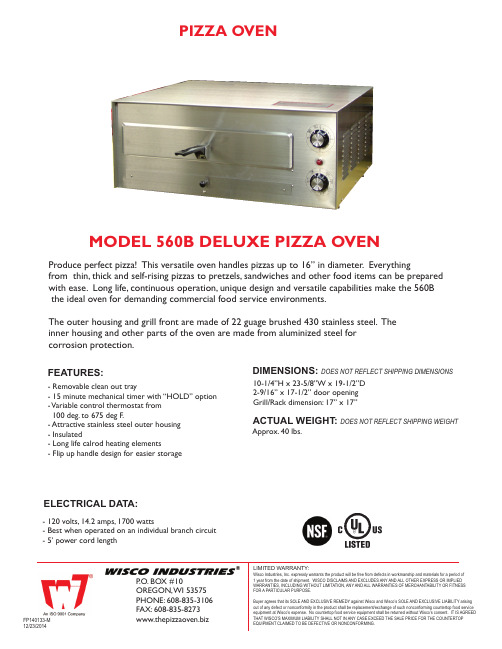
PIZZA OVENFEATURES:- Removable clean out tray- 15 minute mechanical timer with “HOLD” option - Variable control thermostat from100 deg. to 675 deg F.- Attractive stainless steel outer housing- Insulated- Long life calrod heating elements- Flip up handle design for easier storage ELECTRICAL DATA:DIMENSIONS: DOES NOT REFLECT SHIPPING DIMENSIONS ACTUAL WEIGHT: DOES NOT REFLECT SHIPPING WEIGHT- 120 volts, 14.2 amps, 1700 watts- Best when operated on an individual branch circuit - 5’ power cord length 10-1/4”H x 23-5/8”W x 19-1/2”D 2-9/16” x 17-1/2” door opening Grill/Rack dimension: 17” x 17”Approx. 40 lbs.MODEL 560B DELUXE PIZZA OVEN Produce perfect pizza! This versatile oven handles pizzas up to 16” in diameter. Everythingfrom thin, thick and self-rising pizzas to pretzels, sandwiches and other food items can be prepared with ease. Long life, continuous operation, unique design and versatile capabilities make the 560B the ideal oven for demanding commercial food service environments.The outer housing and grill front are made of 22 guage brushed 430 stainless steel. Theinner housing and other parts of the oven are made from aluminized steel forcorrosion protection.P.O. BOX #10FP140133-M12/23/2014IMPORTANT: Read the following safety and operation instructions to avoid injury and to avoid damage to equipment or property.ASSEMBLING COMPONENT PARTSIncluded with your oven is a plastic bag containing the grill handle, clean-out tray knob andappropriate screws and nuts. See the instruction sheet for assembling the flip up handle andclean-out tray.CLEANING INSTRUCTIONSUnplug oven and allow to cool before cleaning. T his oven is designed with a clean-out tray whichshould be pulled out and cleaned often with warm soapy water and then dried thoroughly. Most ofthe spillage will fall directly on this tray. If spillage is cleaned off and not allowed to accumulate, theinternal parts of the oven will stay relatively clean. A dditionally, proper cleaning prevents emergenceof smoke caused by a build up of carbon. T he outside of the oven may be cleaned with a soft ragand stainless steel cleaner. A s with all metals, there could be some sharp edges and caution shouldbe used when cleaning.- DO NOT USE ACIDS OR CAUSTIC PRODUCTS SUCH AS FOAMING OVEN CLEANERS.- AVOID USING ABRASIVE/SCOURING PADS AS SOME MAY CAUSE SCRATCH MARKS ON UNIT.HOW TO CONTACT US:If you have further questions in regards to this piece of equipment - please contact Wisco Industries, Inc. directly at: (608)835-3106 or (800)999-4726; fax (608)835-8273 for further information.*Please be sure to have the complete model # and serial # available.BAKING INSTRUCTIONS- Oven models 560 and 560B: Intended for par-baked pizza crusts.- Oven model 560-5: Intended for fresh dough pizza crusts.Oven can be turned on just prior to placing the pizza into the oven. A fter placing the pizza in the oven, set the timer dial to the desired bake time. NOTE: T he timer dial must always be turned past the 3 minute mark to activate the switch.Baking time varies depending upon the type of pizza crust, thickness of pizza crust, amount of toppings, personal preference to doneness, etc. Baking times will also vary based upon whether pizza is frozen or thawed. bake crust. SUGGESTED baking temperature: 400 F.*SUGGESTED baking temperature for par-baked thin crust pizza: 450 F.It is recommended that the drawer be opened halfway through baking time to check progress. It may be necessary to rotate pizza at this time.“HOLD” FEATUREThis oven has the ability to remain on for continuous operation. T o activate this feature turndial counterclockwise.CAUTION: W hen oven is not in use be sure to turn “hold” feature off and unplug the unit. NOTES:MODEL 560BPizza Oven Handle Assembly InstructionsSTEP 1With the grille laying flat, slide the grille front over the grille loop allowing it to lay flat. Place the handle bracket over the loop.FIG. 1.STEP 2Rotate the grille front and handle into the upright position.FIG. 2STEP 3Insert the screw through the grille loop,the handle bracket and the grille front.FIG. 3STEP 4Thread the thumb nut onto the screw and tighten. Rotate the handle down and slide the grille into the oven for use.FIG. 4FIG. 1FIG. 2FIG. 3FIG. 4FP140062Rev: 12-15-12AB C DEA CB D E Grille Thumb Nut Grille Front Flip Up Handle ScrewWISCO INDUSTRIES,INC.P .O.BOX 10OREGON,WI 53575TELEPHONE (608)835-3106/(800)999-4726FAX (608)835/8273WARRANTY INFORMATIONIf you should experience any mechanical difficulties with your Wisco Industries,Inc.manufactured unit during the 1year warranty time period please do the following:*Contact Wisco Industries,Inc.For repair/replacement by calling (608)835-3106or Toll Free (800)999-4726.*Please have your and available.These numbers can be found on a black decal located on the lower side of the unit.There is also a date of manufacturing that can be found on the bottom of the unit.*At that time,we can assist you in:-getting your unit replaced/exchanged-and/or obtaining repair parts-and/or authorizing a service agent**Please note that you contact Wisco Industries,Inc.and obtain an RMA#any warranty issues can be resolved.MODEL #SERIAL #MUST BEFORE Failure to do so may void the warranty/claim resulting in Wisco Industries,Inc.not being responsible for any incurred expenses and/or charges.Wisco Industries,Inc.expressly warrants the product will be free from defects inworkmanship and materials for a period of 1year from the date of shipment.WISCO DISCLAIMS AND EXCLUDES ANY AND ALL OTHER EXPRESS OR IMPLIED WARRANTIES,INCLUDING WITHOUT LIMITATION,ANY AND ALLWARRANTIES OF MERCHANTABILITY OR FITNESS FOR A PARTICULARPURPOSE.Buyer agrees that its SOLE AND EXCLUSIVE REMEDY against Wisco and Wisco’s SOLE AND EXCLUSIVE LIABILITY arising out of any defect or nonconformity in the product shall be replacement/exchange of such nonconforming countertop food service equipment at Wisco’s expense.No countertop food service equipment shall be returned without Wisco’s consent.IT IS AGREED THAT WISCO’S MAXIMUM LIABILITY SHALL NOT IN ANY CASE EXCEED THE SALE PRICE FOR THE COUNTERTOP EQUIPMENT CLAIMED TO BE DEFECTIVE OR NONCONFORMING.LIMITED WARRANTY:6-14-12/tmk/cdr/warranty *1YEAR REPLACEMENT/EXCHANGE*。
扒炉使用说明书

JZH-RG JZH-RGA JZH-TRG JZH-TRGA ZH-RG ZH-RGA ZH-TRG ZH-TRGA燃气扒炉使用说明书本厂管理体系符合ISO 9001:2000标准要求本企业系列产品均由中国人民保险公司承保使用目录:1、一般事宜 (1)2、安装说明2.1安装图 (2)2.2外型尺寸 (2)2.3安装 (3)2.4技术参数 (4)2.5控制旋钮 (4)2.6更换喷嘴 (5)2.7喷嘴一览表 (6)3、操作原理3.1点火 (6)3.2熄火 (6)4、使用与保养4.1使用注意事项 (7)4.2警告 (8)4.3用户说明 (8)5、故障排除 (9)6、保修卡 (10)1、一般的事宜◆该炉的安装,初次使用和维修都应该由专业人士或已取得安装操作证的人士,或生产商批准特许的人士来进行。
◆在操作安装与维修时,请注意仔细按照以下步骤去做以确保安全使用此机器。
◆保管好说明书,以使将来有疑问所用或留给下一个操作者使用。
◆去除外包装,保证机器的完整性,如有疑问,请不要使用机器,并请专家咨询,不要将包装材料,放在小孩可以拿到的地方,以免发生危险。
(材料是塑料袋,钉子等)◆该设备仅用于商用,必须由技术熟练的人员操作。
◆不使用机器时或操作人员不在时,必需要关掉机器,以免发生危险。
◆修理时请叫专业维修中心人员来维修,并使用原装配件,如不遵循以上要求,可能会危及机器的安全性能。
◆此机器是作为一种商业用途并不适用于其它用途,否则会引起危险。
◆机器的安装必须由专业人士按照制造商提供的说明书来进行。
◆不能用水直接冲洗。
◆适当地定期清洗不锈钢表面,防止表面氧化和化学作用破坏机器。
警告:!该设备只使用于低压燃气阀!任何改装、以及不正确的安装、调整、维修或维护都可能导致财产损失或人员伤亡,如需调整或维修应与供应商联络,并由经过训练的专业人士进行。
!为了您的安全,请不要在本产品附近存放或使用易燃易爆气体、液体或物品。
!此设备有温度控制,干烧久了将自动切断主气源。
电锅炉操作说明
电锅炉操作说明使用前的准备工作在电锅炉投入使用前,应先详细检查锅炉的各个零部件是否完好无损,以及锅炉的给水管路、回水管路、供热系统、电热管的电源和电控箱的接线是否良好。
电锅炉的启停1、电锅炉启动前,应先把电控箱上的转换开关打到手动档,然后启动锅炉给水泵,等水充满锅炉筒体后,再启动电热管开始加热;等锅炉运行稳定后,再把转换开关打到自动档,实行自动控制运行。
(电控箱的操作方法见电控箱的操作说明)2、电锅炉的停止。
先把电控箱上的转换开关打到手动档,接着关闭电热管的电源,再关闭锅炉给水泵,然后关闭锅炉的进出水口的阀门及锅炉给水泵的进出水口阀门。
经济运行方案为了达到节省运行费用的目的,本公司充分利用了城市电网的低谷电价格便宜这一特点,对锅炉系统进行了改进,在锅炉循环系统中增加了蓄热水箱。
当用电高峰时,电锅炉停止运行,完全依靠蓄热水箱中的热水进行供热;而在用电低谷时,电锅炉全负荷运行,一部分用来供热,另一部分用来补充蓄热水箱中的热水。
这样利用用电高峰和低谷的价格差就达到了节省运行费用的目的。
具体操作如下:在早上7:00到晚上23:00这一段时间中,电锅炉停止运行,全部用蓄热水箱中的热水进行供暖。
如果发现供暖温度太低,则可开启一组或两组电热管加热,用以保持供暖水温达到本地区的供暖水温要求。
在晚上23:00到第二天早上7:00这一段时间中,电锅炉全负荷运行;同时关闭教学楼、办公楼、车间等晚间无人场所的供水干管的阀门和回水干管的阀门,只给宿舍楼供暖。
这样就能补充蓄热水箱中的热量,以备第二天白天使用。
注意教学楼、办公楼、车间等场所要提前一个小时开始供暖。
比如教学楼7:00时学生开始上早自习,则6:00时就必须开始供暖。
电扒炉使用及保养

电扒炉安全注意事项和使用环境1、设备应放在平稳的地方,左右侧离不燃物10cm以上,背面应离不燃物(砖墙等)20cm以上。
2、设备所使用的电源电压必须与产品铭牌得供电电压相符,电源电压波动为±10%。
3、用户需在设备附件设有固定供电线路,并应配备有触点开距≥3mm的全极断开装置及漏电保护开关,设备周围不许对方杂物,以方便操作。
4、设备等电位连接端子“”设在炉后面下方,应用不少于 2.5mm2的铜芯与相邻等电位接线端子或符合安全规定的电线可靠连接。
警告:严禁将接地导线连接在自来水管、燃气管和暖气管等官道上,否则会造成安全事故!5、开机前应检查扒炉各电器组件连接部位有无松动,电源连接是否正确,安全接地是否可靠。
6、电气安装及电源线损坏,必须由持有电工证或有相关电气专业知识的专业人员安装和更换。
7、如果器具放置在一个支座上,应采取措施以防止炉具从支座上滑落。
警告:工作时炉体温度升高,禁止触及一、使用方法及部件功能1.温控器设在炉面,温度为0到250摄氏度,平时使用温度建议为200-230摄氏度。
2.合上电源,红色指示灯亮,此时电源已供至本炉,只要顺时针方向分别旋转温控器按钮、把所需的温度值对准红点位置,黄色指示灯亮,电热管加热,当温度升至所需温度时,温控器能自动切断电源,同时黄色指示灯熄。
电热管停止加热。
当温度略有下降,温控器自动接通电源,黄色指示灯亮,电热管又加热,温度上升,如此反复循环,以保证温度在设定范围内恒温。
3.设定所需温度值后,待加热指示灯熄,即可将食品放在扒锅上进行加工。
4.根据只做不同的食品,调节所需温度,可使制作的食品得到理想的效果。
5.使用完毕,请按逆时针方向旋转温控旋钮至限定位置,切断电源,确保安全。
警告:切勿将易燃物(如毛巾)放在炉面上,以免引起火警事故清洁与保养1.在清洁保养时,应切断电源,防止意外事故发生。
2.每天工作完毕后,应用湿毛巾沾上无腐蚀性的清洁剂稀释液来清洁设备及电源线表面,严禁用水直接冲洗电气箱表面,以免破坏电气的性能。
电刨机操作说明
电刨机操作说明一、前言电刨机是一种常见的木工工具,用于木材修整和平整表面。
本文将详细介绍电刨机的操作方法和注意事项,以确保您能正确、安全地使用电刨机。
二、安全准备在开始使用电刨机之前,请务必遵循以下安全准备措施:1. 佩戴个人防护装备,包括护目镜、耳塞和手套。
2. 确保工作区域通风良好,避免积聚的木屑和灰尘。
3. 检查电刨机的电源线,确保插头和线缆完好无损。
4. 确保工作台固定稳固,以避免刨削过程中的晃动和不稳定。
三、电刨机操作步骤1. 选择合适的刨刀。
根据需要刨削的木材硬度和厚度,选择合适的刨刀。
较硬的木材应使用较细的刨刀,而较厚的木材则需要较宽的刨刀。
2. 调整刨床高度。
使用刨床高度调节器,将刨床调整为所需的刨削深度。
请注意,刨床调整应在电刨机停止运转时进行。
3. 确保木材平稳支撑。
在工作台上放置木材时,确保它稳固地(而不是晃动)定位于电刨机刨床上。
如果需要,使用木夹固定木材。
4. 开始刨削。
握住电刨机的侧柄和前把手,将电刨机稳定地放置在木材上。
按下电源按钮,使电刨机开始工作。
平稳地将电刨机沿着木材的纹理方向推进,保持适当的刨削速度和压力。
5. 刨削细节。
如果需要进行特定细节的刨削,可以使用手动移动刨床,来调整电刨机的刨削位置。
请务必小心操作,以避免刨床和手指的接触。
6. 持续刨削直至完成。
根据需要,重复以上步骤,直至达到所需的刨削效果。
四、安全注意事项在操作电刨机时,务必遵守以下安全注意事项:1. 不要戴松散的衣物、首饰或长发。
确保衣物和头发远离电刨机的刨床和刨刀。
2. 不要将手指或手放在刨床的工作位置上。
在电刨机运转时,刨床以及刨刀可能有旋转和移动,可能会造成严重的伤害。
3. 不要强行过深地刨削。
过度深入的刨削可能导致电刨机失去平衡,并增加工作过程中的危险。
4. 注意电源线位置。
确保电源线不会被刨床刨削到,以免导致电线断裂或触电风险。
5. 在刨削过程中保持专注。
避免分心或受到干扰,以确保安全和高效的操作。
Bakers Pride 电子橱柜电池披萨炉操作手册说明书

Models:EP-1-2828, EB-1-2828EP-2-2828, EB-2-2828Bakers Pride Oven Company, LLC is a wholly owned subsidiary of Standex International Corporation.All gas operated Bakers Pride ® countertop deck ovens are intended for use with the type of gas specified on the rating plate and for installation will be in accordance with National Fuel Gas Code ANSI Z223.1 (latest edition).Please retain this manual for future references.This equipment is design engineered for commercial use only.BAKERS PRIDE OVEN COMPANY, LLC.1307 N. Watters Rd., Suite 180Allen, TX 75013Phone: 800.527.2100 | Fax: 914.576.0605 | TABLE OF CONTENTSDIMENSIONS & SPECIFICATIONS 1INSTALLATI N 3COUNTERTOP INSTALLATION 3FLOOR INSTALLATION 4OPTIONAL BASE FEATURE 4DOUBLE STACKED OVENS 5ELECTRICAL CONNECTIONS 5EXPLANATION OF CONTROLS 6USAGE RECOMMENDATIONS 7TR UBLESH TING 7CLEANING 8EXTERIOR CLEANING 8INTERIOR CLEANING 8MAINTENANCE 8REPLACEMENT PARTS 8WIRING DIAGRAMS 8PARTS LIST & EXPLODED VIEW 9WIRING DIAGRAMS 11WARRANTY 16DIMENSIONS & SPECIFICATIONSPeriodic inspections by your dealer or a qualified service agent is recommended. When corresponding with the factory or your service agreement regarding service problems or replacement parts, be sure to refer to the oven by the correct model number (including the prefix and suffix letters and numbers) and the warranty serial number. The rating plate affixed to the oven contains this information.IMPORTANT FOR FUTURE REFERENCEPlease complete this information and retain this manual for the life of the equipment. For Warranty Service and/or Parts, this information is required.Model Number Serial NumberDate PurchasedDIMENSIONS & SPECIFICATIONSDimensionsINSTALLATION INSTRUCTIONSIt is the responsibility of the purchaser to ensure the oven is properly installed in a manner that meets all applicable codes. In the absence of local codes refer to applicable national codes. In the case of any discrepancy between this document and any local codes it is recommended you consult your local inspector.Users are cautioned that maintenance and repairs shall be performed by authorized service agents or licensed professionals only. Bakers Pride will have no obligation with respect to products that are not properly installed, adjusted, operated or maintained.Countertop InstallationThe oven may be installed directly on a counter or stand manufactured of non-flammable materials. The oven must be installed on a surface that is at least as large as the outer dimensions of the oven. The oven must be installed with adequate clearance to combustible and non-combustible walls. If legs are not used the oven must be sealed to countertop with an NSF approvedsealant.Minimum Operating ClearancesClearances to combustible surface is 1 inch [25 mm]. It is recommended the oven he at least 1 inch from any adjacent cooking appliance. Each oven shall be installed with respect to building construction and other equipment to permit access to the oven. Such clearance may be necessary for servicing and cleaning. Bakes Pride ® recommends the mounting surface for a single oven be approximately 26 inches [660 mm] from the floor so the oven decks are at a convenient working height.NOTE: Refer to illustration for all three leg configurations A. Countertop – Short Legs – 4”B. Floor Model -30” C. Floor/Double Stack -16”INSTALLATION INSTRUCTIONSCountertop Legs1. Turn the oven over onto its left side so you caneasily reach the bolt mounting locations base.2. Using the four corner most holes in the bottom ofthe oven insert and tighten the four countertop legs.3. Carefully turn the oven upright. Insure the twolegs that touch the floor first when you raise theoven are blocked so they do not slip away.Floor Installation1. At the floor end of each leg install the bullet footinsert or caster as required. The fit of the insert to the leg is intended to be snug, you should expect to tap them lightly in place with a mallet or rubber hammer. Using your fingers screw the ends of the bullet feet into the leg clockwise until they areat their shortest length. Or Casters mount to thebottom of the caster plate with four each: 3/8-16 bolts inserted into a split ring lock washer and flat washer.2. Turn the oven over onto its left side so you can easilyreach the bolt mounting locations in the base.3. The three holes in the top of each leg will matchthe bolt locations at each corner of the oven base.4. You will need three 3/8-16 hex head bolts andthree 3/8” flat washers to mount each leg. Alignthe leg to one of the matching bolt holes on thebase and inset a bolt and washer. Install the other bolts and finger tighten into place before using awrench to fully tighten them all.5. Be sure to tighten all bolts for each leg. Wheninstalling casters, make sure the two casters with brakes are installed at the front of the oven andthe restraining plate is inserted between the right rear leg and the oven base as shown.6. Carefully stand up the oven. Insure the two legs/casters that touch the floor first when you raise the oven are blocked and chocked so they do not slip away.7. Attach the Warning label for the restraining deviceon the face of one of the front legs as shown.8. Provide a suitable restraining chain or cable tosecurely tether the appliance to the buildingstructure. The restraining chain or cable should be of such length, that it will stop movement of theappliance before there is any strain on the powersupply cable.Optional Open Base Feature:1. Install bottom shelf and rack guide brackets wheninstalling legs -while oven is on it’s side. Refer toleg instructions in Installation/Operation Manual.2. Attach two rack support brackets to base of ovenwith three screws each bracket.3. Install two legs to lower (left) side of oven. Alignand attach bottom shelf to these legs with a boltand locking nut -One each in the front and back.4.Attach last two legs.INSALLATION INSTRUCTIONS5. Attach bottom shelf to remaining two legs with twobolts and locking nuts - One each in the front and back.6. When the oven is stood up, before moving it toit’s final location, install four remaining bolts and locking nuts to the legs -Two on left side, two on right side. Tighten all.7. Install two rack guides. Align the bottom pegs toholes in the bottom shelf. Align top hooks to cut- outs in upper support bracket. Lower into position.8. Align oven racks (order separately) to the shelfheights desired and slide into place.Electrical ConnectionsDouble Stacked OvensYour EP/EB-1-2828 or EP/EB-2-2828 may be stacked two ovens on top of one another. In order to ensure the ovens do not slide or separate, there is a stacking bracket kit required for installation at the rear of the ovens. Two brackets are installed, one at each end of the oven securing the upper oven to the bottom oven. Refer to the adjacent illustration.1. Installation must be performed by licensedelectrician.2. A separate electrical connection to the mains mustbe provided for each oven. 3. An all pole disconnect must be provided by theinstaller.4. Connection to the electrical service must begrounded in accordance with local codes. In the absence of local codes refer to the National Electric Code, ANSI/NFPA 70 or the Canadian Electric Code, CSAC22.2 as applicable.5. Only bare copper conductors with a minimuminsulation temperature rating of 90°C to be used.6. The installer must supply a properly sized strainrelief bushing for the mains connection that meets 7. The oven shall be installed using flexible conduit.8. The restraint cord must be securely attached tothe rear of the oven and to the building structure to prevent transmitting unnecessary stress to the flexible conduit.INSTALLATION INSTRUCTIONSExplanation Of ControlsThe oven has a main power switch at the bottom portion of the control panel. This switch must be on for the oven to operate. When switched to the ON position the lamps in each cavity light.Each cavity has separate temperature controls. The thermostat dial may be adjusted from 200°F (100ºC) to 700°F (370ºC).Heat Selector Switches:To better control the ratio of Top and Bottom Heat, these ovens have two heat selector switches, one controlling the Top Heat, the other controlling the Bottom Heat. Each allows a setting from #1 (low = 20% on/80% off) through #9 (80% on/20% off) to #10 (high = 100% on). In order to maximize the potential of the oven and to get maximum power, both heat selector switches should be set to #10 (high). This will be the best setting most of the time for most of the products. However, if, after some experimenting, one of the two proves to be too hot, only that one should be reduced while the other one stays on high. There is no need to reduce both at the same time. If less heat is required, lower the thermostat setting.Each cavity has a timer that may be used when cooking product. The timer DOES NOT control the oven. Toset a cook time turn the dial clock-wise to the desired setting. The timer will count down until the time expires.A buzzer will sound continuously until the dial is turned to the “OFF” position slightly to the left of “0”.Ovens with Steam Option:Never activate the steam timer when the oven is cold, since the steam will immediately condense and turn to water.a) The steam timer can be adjusted from 1 to 60seconds and has been factory set for 3-5 seconds.To change this time, insert a small screw driverthrough the 1/4” diameter hole below the steamswitches and turn the timer shaft clock-wise toincrease or counter-clockwise to decrease thistime delay setting. b) Press both steam switches simultaneously. The redindicator lamp will illuminate, the solenoid coilwill be activated and the solenoid valve will openand allow steam to enter the baking chamberfor the duration of the selected time. After thatperiod, the power to the red indicator lamp andsolenoid coil will be cut off and the solenoid valve will shut down the flow of steam to the oven.Hook-UpControl Panel: E-1-2828Control Panel: E-2-2828INSTALLATION INSTRUCTIONSUsage Recomenations1. Pre-heat the oven thoroughly before use. Allow onehour and fifteen minutes for pre-heat. 2. Pre-heat ovens @ 75°F (24°C) BELOW desiredcook/bake temperature.3. Do not move baking location in the middle of abake, but spinning is okay. 4. Keep decks clean of flour, cheese, etc using a deck/scraper brush. 5. During idle periods, reduce heat by 75°F (24°C). 6. Minimize water content of products for faster cook/bake times. 7. For larger & thick products, reduce temperature &increase bake/cook time. 8. Cooking times and temperatures will vary dependingupon such factors as size of the load, temperature, mixture of products (particularly moisture) and density of products.9. Keep a record of the times, temperature and loadsizes you establish for various products. Once you have determined these, they will be similar for succeeding loads. 10. When practical, start cooking the lowesttemperature product first and gradually work up to the higher temperatures. 11. When loading the oven, work as quickly as possibleto prevent loss of heat. 12. Oven will continue to heat even though the timergoes off. Product should be removed from the oven as soon as possible to avoid overcooking. 13. When baking, weigh or measure the product in eachpan to assure even cooking. 14. Only bread and pizza may be placed directly on astone baking hearth.TroubleshootingThere are no user serviceable components behind the covers. Contact your service agent.OPERATING INSTRUCTIONSCleaningWhen the oven is new, operate it for at least one hourat a setting of at least 500°F (250ºC). Due to normal manufacturing processes, a small amount of steam and/ or smoke will exit the oven from moisture and oils on the oven components. Shut off and allow the oven to cool. After cooling wipe down the interior of the oven witha clean damp cloth. Brushing of the baking hearth is recommended.Exterior CleaningIt is recommended that a regular cleaning schedule be maintained to keep your oven operating and looking its best. Spills should be cleaned immediately.The oven should always be allowed to cool sufficiently before cleaning. Exterior surfaces should be wiped with a soft cloth and mild detergent. Stubborn stains may be cleaned with a light weight, non-metallic cleaning pad. Apply only light pressure and rub in the direction of the surface grain.The control panel surface is easily cleaned with a soft cloth and mild detergent. Do not use abrasives, solvent cleaners or metallic scouring pads on the control panel. They may scratch or damage the label surface.Never spray steam or water directly onto or into the oven. This could adversely affect the ceramic cooking hearth and/or electrical components.Interior CleaningInternal metallic surfaces should be allowed to cool before cleaning. Wipe interior surfaces with a wet cloth or light weight scouring pad.Food particles or spills that accumulate on the baking hearth may be brushed off with a normal oven brush. Stubborn spills should be heated to a maximum temperature for approximately one hour to burn the spill so it will crumble and easily brush out afterwards. Do not use oven cleaners, caustic solutions or mechanical means that may damage the interior of your oven.MaintenanceUsers are cautioned that maintenance and adjustments should only be performed by authorized service agents using Bakers Pride replacement parts.Minor periodic maintenance to your oven should provide many years of useful service to you. Any time the unit is serviced it is recommended all components be checked and their performance verified. At least once each year your oven should be inspected by a qualified service provider to insure your oven is operating at its peak performance.Replacement PartsEnclosed in this booklet are diagrams of likely replacement parts that may be required for normal maintenance. Specifications are subject to change without notice. Be sure to verify the current specification with your qualified service provider or Bakers Pride before ordering replacement parts.Wiring DiagramsThe current wiring diagram at the date of your oven’s manufacture was affixed to the unit for reference. Copies of the proper wiring diagrams effective on the date this booklet is printed are enclosed. Specifications are subject to change without notice. If there is any uncertainty or discrepancy between the wiring diagram and your oven refer to Bakers Pride Technical Service for clarification.OPERATING INSTRUCTIONS Exploded View & Parts ListOPERATING INSTRUCTIONSOPERATING INSTRUCTIONS Wiring DiagramsOPERATING INSTRUCTIONSOPERATING INSTRUCTIONSOPERATING INSTRUCTIONSOPERATING INSTRUCTIONSBAKERS PRIDE LIMITED WARRANTYWHAT IS COVERED This warranty covers defects in material and workmanship under normal use, and applies only to the original purchaser providing that:• The equipment has not been accidentally or intentionally damaged, altered or misused;• The equipment is properly installed, adjusted, operated and maintained in accordance with Nationaland local codes and in accordance with the installation instruction provided with the product;• The serial number rating plate affixed to the equipment has not been defaced or removed.WHO IS COVERED This warranty is extended to the original purchaser and applies only to equipment purchased for use in the U.S.A.COVERAGE PERIOD Cyclone Convection Ovens: BCO Models: One (1) Year limited parts and labor; (1) Year limited door warranty.GDCO Models: Two (2) Year limited parts and labor; (2) Year limited door warranty.CO11 Models: Two (2) Year limited parts and labor; (5) Year limited door warranty.All Other Products: One (1) Year limited parts and labor. Warranty period begins the date of dealer invoice to customeror ninety (90) days after shipment date from Bakers Pride - whichever comes first.WARRANTY This warranty covers on-site labor, parts and reasonable travel time and travel expenses of the authorized service COVERAGE Representative up to (100) miles, round trip, and (2) hours travel time. The purchaser, however, shall be responsible for all expenses related to travel, including time, mileage and shipping expenses on smaller counter models that may becarried into a Factory Authorized Service Center, including the following models: PX-14, PX-16, P18, P22S, P24S, PD-4,PDC, WS Series and BK-18.EXCEPTIONS All removable parts in Bakers Pride® cooking equipment, including but not limited to: Burners, Grates, Radiants, Stones and Valves, are covered for a period of SIX MONTHS. All Ceramic Baking Decks are covered for a period of THREEMONTHS. The installation of these replacement decks is the responsibility of the purchaser. The extended Cyclone doorwarranty years 3 through 5 is a parts only warranty and does not include labor, travel, mileage or any other charges.EXCLUSIONS• Negligence or acts of God,• Failures caused by erratic voltages or gas supplies,• Thermostat calibrations after (30) days fromequipment installation date,• Unauthorized repair by anyone other than a BakersPride Factory Authorized Service Center,• Air and Gas adjustments,• Damage in shipment,• Light bulbs,• Alteration, misuse or improper installation,• Glass doors and door adjustments,• Thermostats and safety valves with broken capillary tubes,• Fuses,• Char-broiler work decks and cutting boards,• Tightening of conveyor chains,• Adjustments to burner flames and cleaning of pilot burners,• Tightening of screws or fasteners,• Accessories — spatulas, forks, steak turners, grate lifters, oven brushes, scrapers, peels. etc.,• Freight — other than normal UPS charges,• Ordinary wear and tear.INSTALLATION Leveling and installation of decks as well as proper installation and check out of all new equipment —per appropriate installation and use materials — is the responsibility of the dealer or installer, not the manufacturer.REPLACEMENT PARTS Bakers Pride genuine Factory OEM parts receive a (90) day materials warranty effective from the date of installation by a Bakers Pride Factory Authorized Service Center.This Warranty is in lieu of all other warranties, expressed or implied, and all other obligations or liabilities on the manufacturer’s part. Bakers PrideIMPORTANT FOR FUTURE REFERENCEPlease complete this information and retain this manual for the life of the equipment. For Warranty Service and/or Parts, this information is required.Model Number Serial Number Date Purchased NOTESNOTESNOTES19Be sure to keep up with new product announcements and events on social media!。
电扒炉使用说明

SK-DPL电扒炉使用说明书上海兴锟商用设备制造有限公司电话—***********67691769欢迎购买本公司产品,为了使你更好地使用,请在使用前详细阅读本说明书。
谢谢合作!产品简介:WYD-852电半平半坑扒炉、WYD-853电平扒炉及GH-系列产品是吸收国内外同类产品的优点改进设计而成。
款式新颖、结构合理、操作方便,是西餐厅、快餐店的必备设备。
一、技术参数GH-820 电平扒炉220 4.4 50/60 730×500×235 GH-821 电坑扒炉220 3 50/60 550×430×235 GH-822 电半平坑扒炉220 4.4 50/60 730×500×235 GH-920 电平扒炉380 6 50/60 760×600×350 GH-922 电半平半坑扒炉220 6 50/60 760×600×350 GH-818A 电平扒炉220 3 50/60 530×400×220 GH-820A 电平扒炉220 4.4 50/60 730×440×220 GH-800-A 电平扒炉220 5.4 50/60 800×360×280 GH-800-B 电坑扒炉220 5.4 50/60 800×360×280 二、运输与保管在运输过程中,本设备应小心轻放,防止剧烈震动。
包装好的电扒炉不应长期露天存放,应放在通风良好,无腐蚀性气体的仓库内,不得倒置。
需临时露天存放时,应做好防雨措施。
三、安全注意事项和使用环境1、本设备应放在平稳的地方,左右侧离不燃物10cm以上,背面应离不燃物(砖墙等)20cm以上。
2、本设备所使用的电源电压必须与产品铭牌得供电电压相符,电源电压波动为±10%。
3、用户需在设备附件设有固定供电线路,并应配备有触点开距≥3mm的全极断开装置及漏电保护开关,设备周围不许对方杂物,以方便操作。
- 1、下载文档前请自行甄别文档内容的完整性,平台不提供额外的编辑、内容补充、找答案等附加服务。
- 2、"仅部分预览"的文档,不可在线预览部分如存在完整性等问题,可反馈申请退款(可完整预览的文档不适用该条件!)。
- 3、如文档侵犯您的权益,请联系客服反馈,我们会尽快为您处理(人工客服工作时间:9:00-18:30)。
SK-DPL
电扒炉
使用说明书
兴锟商用设备制造
—021 ******** 67691769
欢迎购买本公司产品,为了使你更好地使用,请在使用前详细阅读本说明书。
合作!
产品简介:
WYD-852电半平半坑扒炉、WYD-853电平扒炉及GH-系列产品是吸收国外同类产品的优点改进设计而成。
款式新颖、结构合理、操作方便,是西餐厅、快餐店的必备设备。
一、技术参数
GH-820 电平扒炉220 4.4 50/60 730×500×235 GH-821 电坑扒炉220 3 50/60 550×430×235 GH-822 电半平坑扒炉220 4.4 50/60 730×500×235 GH-920 电平扒炉380 6 50/60 760×600×350 GH-922 电半平半坑扒炉220 6 50/60 760×600×350 GH-818A 电平扒炉220 3 50/60 530×400×220 GH-820A 电平扒炉220 4.4 50/60 730×440×220 GH-800-A 电平扒炉220 5.4 50/60 800×360×280 GH-800-B 电坑扒炉220 5.4 50/60 800×360×280 二、运输与保管
在运输过程中,本设备应小心轻放,防止剧烈震动。
包装好的电扒炉不应长期露天存放,应放在通风良好,无腐蚀性气体的仓库,不得倒置。
需临时露天存放时,应做好防雨措施。
三、安全注意事项和使用环境
1、本设备应放在平稳的地方,左右侧离不燃物10cm以上,背面应离不燃物(砖
墙等)20cm以上。
2、本设备所使用的电源电压必须与产品铭牌得供电电压相符,电源电压
波动为±10%。
3、用户需在设备附件设有固定供电线路,并应配备有触点开距≥3mm的
全极断开装置及漏电保护开关,设备周围不许对方杂物,以方便操作。
4、本设备等电位连接端子“”设在炉后面下方,应用不少于2.5mm2
的铜芯与相邻等电位接线端子或符合安全规定的电线可靠连接。
警告:严禁将接地导线连接在自来水管、燃气管和暖气管等官道上,否则会造成安全事故!
5、开机前应检查扒炉各电器组件连接部位有无松动,电源连接是否正确,安全接地是否可靠。
6、如果电源软线损坏,必须用相同截面积的YCW型YZW型耐油并带有黄绿双色地线的电缆来更换。
7、电气安装及电源线损坏,必须由持有电工证或有相关电气专业知识的专业人员安装和更换。
8、本器具不具备给体能弱、反应迟钝或有精神障碍的人(包括儿童)使用,除非他们在对其负有安全责任的人员的指导或帮助先安全使用。
儿童应该被监督以保证他们不玩耍器具。
9、如果器具放置在一个支座上,应采取措施以防止炉具从支座上滑落。
警告:工作时炉体温度升高,禁止触及,儿童应远离!
一、使用方法及部件功能
面板控制示意图
1.温控器设在炉面,双控温炉具左右方各一个,可单独使用,
亦可同时使用,左边温控器控制左边的锅面温度,邮编温
控器控制右边锅面温度。
2.合上电源,红色指示灯亮,此时电源已供至本炉,只要顺
时针方向分别旋转温控器按钮、把所需的温度值对准红点
位置,黄色指示灯亮,电热管加热,当温度升至所需温度
时,温控器能自动切断电源,同时黄色指示灯熄。
电热管
停止加热。
当温度略有下降,温控器自动接通电源,黄色
指示灯亮,电热管又加热,温度上升,如此反复循环,以
保证温度在设定围恒温。
3.设定所需温度值后,待加热指示灯熄,即可将食品放在扒
锅上进行加工。
4.根据只做不同的食品,调节所需温度,可使制作的食品得
到理想的效果。
5.使用完毕,请按逆时针方向旋转温控旋钮至限定位置,切
断电源,确保安全。
警告:切勿将易燃物(如毛巾)放在炉面上,以免引起火警事故。
五、电气原理图
六、清洁与保养
1.在清洁保养时,应切断电源,防止意外事故发生。
2.每天工作完毕后,应用湿毛巾沾上无腐蚀性的清洁剂稀释液来清洁设备及电源线表面,严禁用水直接冲洗电气箱表面,以免破坏电气的性能。
警告:不能使用蒸汽清洁器清洗。
七、一般故障处理
上述故障项目只作参考,如有故障发生,应立即停止使用,并通知专业技术人员检
查及维修。
随机附件:1、本产品说明书一份;
2、保修卡一份;
3、合格证一份。
保用卡
地址:省海门市货隆镇货隆村二十六组邮编:226100。