H3C NaviData大数据一体机用户指南
H3C S6850系列数据中心交换机 用户手册说明书

H3C S6850 Series Data Center Switches Release Date: Nov, 2022New H3C Technologies Co., LimitedH3C S6850 Series Data Center SwitchesProduct overviewH3C S6850 high-density intelligent switch series is developed for data centers and cloud computing networks. It provides powerful hardware forwarding capacity and abundant data center features. It provides up to 48*25G ports and 8*100G ports. The switch supports modular power modules and fan trays. By using different fan trays, the switch can provide field-changeable airflows.The switch is an ideal product for high-density 25GE switching and aggregation at data centers and cloud computing networks. It can also operate as a TOR access switch on an overlay or integrated network.Product AppearanceThe S6850 series come in the following models.∙S6850-56HF: The switch provides 48 × 25G SFP28 ports, 8 × 100G QSFP28 ports, and 2 × 1G SFP portsS6850-56HF front panel S6850-56HF rear panel∙S6850-2C: The switch provides 2 service slots, 2 × 100G QSFP28 portsS6850-2C front panel S6850-2C rear panelFeatures and BenefitsHigh-Density 25GE Access∙The switch offers high-density 100G/40G/25G/10G ports and a wire-speed forwarding capacity as high as 4 Tbps. With standard 25G ports, it can provide high-density server access in high-end data centers.IRF2 (Second Generation Intelligent Resilience Architecture)∙Facing the application requirements of the unified switching architecture of the data center, the series switches support the IRF2 technology, which virtualizes multiple devices into one logical.∙The equipment has strong advantages in scalability, reliability, distributed and availability.∙ IRF2 not only can achieve a long-distance intelligent elastic architecture within a rack, across racks, and even across regions.Abundant Data Center FeaturesThe switch supports abundant data center features, including:∙H3C S6850 switch series supports VXLAN (Virtual Extensible LAN), which provides two major benefits, higher scalability of Layer 2 segmentation and better utilization of available network paths.∙H3C S6850 switch series supports MP-BGP EVPN (Multiprotocol Border Gateway Protocol Ethernet Virtual Private Network) which can run as VXLAN control plane to simplify VXLAN configuration,eliminate traffic flooding and reduce full mesh requirements between VTEPs via the introduction of BGP RR.∙H3C S6850 switch series support Fiber Channel over Ethernet (FCoE), which permits storage, data, and computing services to be transmitted on one network, reducing the costs of networkconstruction and maintenance.∙H3C S6850 switch series support Priority-based Flow Control (PFC), Enhanced Transmission Selection (ETS) and Data Center Bridging eXchange (DCBX). These features ensure low latency and zero packet loss for FC storage, RDMA applications and high-speed computing services.H3C Distributed Resilient Network Interconnection (DRNI)∙H3C S6850 switch series support DRNI(M-LAG), which enables links of multiple switches to aggregate into one to implement device-level link backup. DRNI is applicable to servers dual-homed to a pair of access devices for node redundancy.∙ Streamlined topology: DRNI simplifies the network topology and spanning tree configuration by virtualizing two physical devices into one logical device.∙Independent upgrading: The DR member devices can be upgraded independently one by one to minimize the impact on traffic forwarding.∙High availability: The DR system uses a keepalive link to detect multi-active collision to ensure that only one member device forwards traffic after a DR system splits.Powerful VisibilityWith the rapid development of data center, the scale of the data center expands rapidly; reliability, operation and maintenance become the bottleneck of data center for further expansion. H3C S6850 switch series conform to the trend of automated data operation and maintenance, and support visualization of data center.∙INT (Inband-Telemetry) is a network monitoring technology used to collect data from the device.Compared with the traditional network monitoring technology featuring one query, one reporting, INT requires only one-time configuration for continuous data reporting, thereby reducing therequest processing load of the device. INT can collect timestamp information, device ID, portinformation, and buffer information in real time. INT can be implemented in IP, EVPN, and VXLANnetworks.∙Provides a variety of traffic monitoring and analytic tools, including sFlow, NetStream, SPAN/RSPAN/ERSPAN mirroring, and port mirroring to help customers perform precise trafficanalysis and gain visibility into network application traffic. With these tools, customers can collectnetwork traffic data to evaluate network health status, create traffic analysis reports, perform traffic engineering, and optimize resource allocation.∙Supports realtime monitoring of buffer and port queues, allowing for visible and dynamic network optimization.∙Supports PTP (Precision Time Protocol) to achieve highly precise clock synchronization.RoCE (RDMA over Converged Ethernet)∙Remote Direct Memory Access (RDMA) directly transmits the user application data to the storage space of the servers, and uses the network to fast transmit the data from the local system to thestorage of the remote system. RDMA eliminates multiple data copying and context switchingoperations during the transmission process, and reduces the CPU load.∙RoCE supports RDMA on standard Ethernet infrastructures. H3C S6850 switch support RoCE and can be used to build a lossless Ethernet network to ensure zero packet loss.∙RoCE include the following key features,include PFC(Priority based Flow Control), ECN(Explicit Congestion Notification), DCBX(Data Center Bridging Capability Exchange Protocol), ETS(Enhanced Transmission Selection).Flexible programmability∙The switch uses industry-leading programmable switching chips that allow users to define the forwarding logic as needed.∙Users can develop new features that meet the evolving trend of their networks through simple software updates.Powerful SDN capacity∙ H3C S6850 switch series adopt the next-generation chip with more flexible Openflow FlowTable, more resources and accurate ACL matching, which greatly improves the software-defined network (SDN) capabilities and meet the demand of data center SDN network.∙ H3C S6850 switch series can interconnect with H3C SeerEngine-DC Controller through standard protocols such as OVSDB, Netconf and SNMP to implement network automatic deployment andconfiguration.Comprehensive security control policies∙H3C S6850 series switch supports AAA, RADIUS and user account based authentication, IP, MAC, VLAN, port-based user identification, dynamic and static binding; when working with the H3C iMC platform, it can conduct real time management, instant diagnosis and crackdown on illicit network behavior.∙H3C S6850 series switch supports enhanced ACL control logic, which enables an enormous amount of in-port and out-port ACL, and delegate VLAN based ACL. This simplifies user deployment process and avoids ACL resource wastage. S6850 series switch can also take advantage of Unicast ReversePath Forwarding (Unicast RFP). When the device receives a packet, it will perform the reverse check to verify the source address from which the packets are supposedly originated, and will drop thepacket if such path doesn’t exist. This can effectively prevent the source address spoofing in thenetwork.Multiple reliability protection∙The S6850 series switch provides multiple reliability protection at both switch and link levels. With over current, overvoltage, and overheat protection, all models have a redundant pluggable powermodule, which enables flexible configuration of AC or DC power modules based on actual needs.The entire switch supports fault detection and alarm for power supply and fan, allowing fan speed to change to suit different ambient temperatures.∙The switch supports diverse link redundancy technologies such as H3C proprietary RRPP, VRRPE, and Smart Link. These technologies ensure quick network convergence even when large amount of traffic of multiple services runs on the network.∙Flexible choice of airflow∙To cope with data center cooling aisle design, the H3C S6850 series switch comes with flexible airflow design, which features bi-cooling aisles in the front and back. Users may also choose thedirection of airflow (from front to back or vice versa) by selecting a different fan tray.Excellent manageabilityThe switch improves system management through the following ways:∙Provides multiple management interfaces, including the serial console port, mini USB console port, USB port, two out-of-band management ports, and two SFP ports. The SFP ports can be used as in-band management port through which encapsulated sampling packets are sent to the controller or other management devices for deep analysis.∙Supports multiple access methods, including SNMPv1/v2c/v3, Telnet, SSH 2.0, SSL, and FTP.∙Supports standard NETCONF APIs that allow users to configure and manage the switch, enhancing the compatibility with third-party applications.Hardware SpecificationItem S6850-56HF S6850-2CDimensions (H × W × D) 43.6 × 440 × 460 mm (1.72 × 17.32 × 18.11 in) 44.2 × 440 × 660 mm (1.74 × 17.32 × 18.11 in) Weight ≤ 15 kg (33.07 lb) ≤ 16 kg (35.27 lb)Serial console port 1 1Out-of-band management port One GE copper port and one GE fiber port One GE copper port and one GE fiber port Mini USB console port 1 1USB port 1 1QSFP28 port 8 2SFP28 port 48 -SFP port 2 -Expansion slot - 2CPU 2.2GHz@4Core 2.2GHz@4CoreFlash/SDRAM 4GB/8GB 4GB/8GBLatency <1μs <1μsSwitching capacity 4 Tbps 3.6TbpsForwarding capacity 2024 Mpps 2024 MppsBuffer(byte) 32M 32MAC-input voltage 90v AC to 264v AC 90v AC to 264v ACDC-input voltage –40v DC to –72v DC –40v DC to –72v DCPower module slot 2 2Fan tray slot 5 Hot-swappable fan, fan speed adjustable and wind invertibleAir flow direction From front to rear or from rear to front From front to rear or from rear to frontStatic power consumption Single AC: 167 WDual AC: 179 WSingle DC: 154 WDual DC: 174 WSingle AC: 136 WDual AC: 148 WSingle DC: 132 WDual DC: 146 WTypical power consumption Single AC: 201 WDual AC: 224 WSingle DC: 198 WDual DC: 210 WSingle AC: 273 W ( with LSWM18CQ)Dual AC: 282 W( with LSWM18CQ)Single DC: 268 W( with LSWM18CQ)Dual DC: 275 W( with LSWM18CQ)Maximum heat consumption (BTU/hour) Single AC: 686Dual AC: 765Single DC: 676Dual DC: 717Single AC:932 ( with LSWM18CQ)Dual AC:963( with LSWM18CQ)Single DC:915( with LSWM18CQ)Dual DC: 939( with LSWM18CQ)Operating temperature 0°C to 45°C (32°F to 113°F) Operating humidity 5% to 95%, noncondensingSoftware SpecificationItem Feature descriptionDevice Virtualization IRF2.0M-LAG(DRNI) S-MLAGNetwork Virtualization BGP-EVPN VxLAN EVPN ESVxLAN L2 VxLAN gatewayL3 VxLAN gateway Distributed VxLAN gateway Centralized VxLAN gateway EVPN VxLANmanual configured VxLAN IPv4 VxLAN tunnelIPv6 VxLAN tunnelQinQ VxLAN accessSDN H3C SeerEngine-DCLossless network PFC and ECNDCBXRDMA and ROCEPFC deadlock watchdog ECN overlayROCE stream analysisProgrammability Openflow1.3NetconfAnsiblePython//TCL/Restful API to realize DevOps automated operation and maintenanceTraffic analysis SflowNetstream, only S6850-2CVLAN Port-based VLANsMac-based VLAN ,Subnet-based VLAN and Protocol VLAN VLAN mappingQinQMVRP(Multiple VLAN Registration Protocol)Super VLANPVLANMAC address Dynamic learning and aging of mac address entries Dynamic,static and blackhole entriesMac address limiting on portsIPv4 routing RIP(Routing Information Protocol) v1/2OSPF (Open Shortest Path First) v1/v2ISIS(Intermediate System to Intermediate system) BGP (Border Gateway Protocol)Routing policyVRRPPBRItem SpecificationIPv6 routing RIPng OSPFv3IPv6 ISIS BGP4+ Routing policy VRRPPBRMPLS/VPLS Support L3 MPLS VPNSupport L2 VPN: VLL (Martini, Kompella) Support VPLS, VLLSupport hierarchical VPLS and QinQ+VPLS access Support P/PE functionSupport LDP protocolSupport MCESupport MPLS OAMMulticast IGMP snoopingMLD snoopingIPv4 and IPv6 multicast VLAN IPv4 and IPv6 PIM snooping IGMP and MLDPIM and IPv6 PIMMSDPMulticast VPNReliability LACPSTP/RSTP/MSTP protocol, PVST compatibleSTP Root Guard and BPDU GuardRRPP and ERPSEthernet OAMSmartlinkDLDPBFD for OSPF/OSPFv3, BGP/BGP4, IS-IS/IS-ISv6, PIM/IPM for IPv6 and Static route VRRP and VRRPEQOS Weighted Random Early Detection (WRED) and tail dropFlexible queue scheduling algorithms based on port and queue, including strict priority (SP), Weighted Deficit Round Robin (WDRR), Weighted Fair Queuing (WFQ), SP + WDRR, and SP + WFQ. Traffic shapingPacket filtering at L2 (Layer 2) through L4 (Layer 4); flow classification based on source MAC address, destination MAC address, source IP (IPv4/IPv6) address, destination IP (IPv4/IPv6) address, port, protocol, and VLAN to apply qos policy,including mirroring,redirection,priority remark etc. Committed access rate (CAR)Account by packet and byteCOPPFC/FOCE FC, FC subcard is supported on S6850-2C FCOETelemetry gRPC ERSPAN Mirror on dropItem SpecificationTelemetry Telemetry StreamINTiNQAPacket trace, Packet captureConfiguration and maintenance Console telnet and SSH terminalsSNMPv1/v2/v3ZTPSystem logFile upload and download via FTP/TFTP, BootRom update and remote update NQAping,tracertVxLAN ping and VxLAN tracertNTPPTP(1588v2)GIR Graceful Insertion and RemovalSecurity and management Macsec, Macsec subcard is supported on S6850-2C and only 100G macsec subcard can support 256-bit AES encryptionMicro-SegmentationHierarchical management and password protection of usersAuthentication methods,including AAA,RADIUS and HWTACACSSupport DDos, ARP attack and ICMP attack functionIP-MAC-port binding and IP Source GuardSSH 2.0HTTPSSSLPKIBoot ROM access control (password recovery)RMONEMC FCC Part 15 Subpart B CLASS A ICES-003 CLASS AVCCI CLASS ACISPR 32 CLASS AEN 55032 CLASS AAS/NZS CISPR32 CLASS A CISPR 24EN 55024EN 61000-3-2EN 61000-3-3ETSI EN 300 386GB/T 9254YD/T 993IEEE Standard 802.3x/802.3ad/802.3AH/802.1P/802.1Q/802.1X/802.1D/802.1w/802.1s/802.1AG 802.1x/802.1Qbb/802.1az/802.1QazSafety UL 60950-1CAN/CSA C22.2 No 60950-1 IEC 60950-1EN 60950-1AS/NZS 60950-1FDA 21 CFR Subchapter JPerformance and scalabilityPerformance and scalabilityDescriptionPerformance RIB 1MMSTP instance 64PVST instance 510PVST logical port number 2000VRRP VRID 255VRRP group 256NQA group 32Static table static mac-address 4000static multicast mac-address 1Kstatic ARP 1Kstatic ND 4Kstatic IPv4 routing table 2Kstatic IPv6 routing table 4000Data Center ApplicationThe typical data center application is an EVPN-VxLAN design,S12500G-AF or S12500X-AF switches work as spine or spine/border, S68XX series work as leaf and border or ED. From this design, the usres can get a non-blocking large L2 system.Order informationNew H3C Technologies Co., LimitedBeijing HeadquartersTower 1, LSH Center, 8 Guangshun South Street, Chaoyang District, Beijing, ChinaZip: 100102Hangzhou HeadquartersNo.466 Changhe Road, Binjiang District, Hangzhou, Zhejiang, ChinaZip: 310052Tel: +86-571-86760000 Copyright ©2022 New H3C Technologies Co., Limited Reserves all rightsDisclaimer: Though H3C strives to provide accurate information in this document, we cannot guarantee that details do not contain any technical error or printing error. Therefore, H3C cannot accept responsibility for any inaccuracy in this document. H3C reserves the right for the modification of the contents herein without prior notification。
H3C-iMC-用户手册

2.2.1 访问iMCiMC 采用 B/S 结构开发,用户访问时无需安装任何客户端,直接在Web 浏览器的地址栏中输入 iMC 服务器的URL 即可,URL 如下:•http://<IP 地址>:<端口>/imc iMC 的默认 HTTP 端口为 8080•https://<IP 地址>:<端口>/imc iMC 的默认 HTTPS 端口为 8443•HTTPS即安全超文本传输协议,采用这种方式登录iMC,可以更好的保证信息在交互过程中的安全性。
通过HTTPS方式访问iMC时,如果使用的是IE7.0 或以上版本的浏览器,可能会提示证书错误,请参考第五章常见问题解答进行处理。
•如需限制 iMC 只能通过 HTTPS 方式访问,在<iMC 安装目录>\client\conf\下找到 applicationContext.xml 文件,用文本编辑器将<property name="protocols" value="HTTP,HTTPS"/>修改为<property name="protocols" value="HTTPS"/>即可。
图2-1 登录页面在登录页面中,输入正确的操作员和密码后单击<登录>按钮,即可进入系统首页。
•首次登录系统时,可使用默认的操作员登录。
登录名和密码均为admin。
进入系统后请及时修改该密码。
修改方法请参见第五章常见问题解答。
•在 iMC 中可以根据需要增加不同权限的操作员。
具体配置方法请参见产品附带的联机帮助。
•iMC支持登录时输入验证码功能。
管理员可通过修改配置文件开启该功能。
关于如何开启验证码功能,请参见第五章常见问题解答。
iMC 对浏览器的基本要求如下:表2-1 对浏览器的基本要求条件详细说明iMC 支持哪些浏览器?推荐使用:•Internet Explorer 8.0•Firefox 3.6如果使用低版本浏览器访问iMC,可能会出现登录异常等情况,具体情况请参考第五章常见问题解答进行处理。
H3C使用说明

H3C使用说明登录方式:进入命令行方式,路由器1:telnet 192.168.0.209 2000路由器2:telnet 192.168.0.209 2001路由器3:telnet 192.168.0.209 2002路由器4:telnet 192.168.0.209 2003交换机1:telnet 192.168.0.209 2004交换机2:telnet 192.168.0.209 2004视图种类•用户登录设备后,直接进入用户视图。
此时屏幕显示的提示符是:<设备名>。
用户视图下可执行的操作主要包括查看操作、调试操作、文件管理操作、设置系统时间、重启设备、FTP和Telnet 操作等。
•从用户视图可以进入系统视图,此时屏幕显示的提示符是:[设备名]。
系统视图下能对设备运行参数以及部分功能进行配置。
•在系统视图下输入特定命令,可以进入相应的功能视图,完成相应功能的配置,比如:进入接口视图配置接口参数、进入VLAN 视图给VLAN 添加端口等。
想要了解某命令视图下支持哪些命令,请在该命令视图提示符后输入<?>。
进入系统视图system-view返回上一级视图当前视图下的功能配置完成,使用本命令可以退出当前视图返回到上一级视图。
需要注意的是:•用户视图下执行quit 命令会中断用户终端与设备之间的当前连接。
使用命令行在线帮助在命令行输入过程中,可以在命令行的任意位置输入<?>以获得详尽的在线帮助。
命令的undo形式命令的undo 形式一般用来恢复缺省情况、禁用某个功能或者删除某项设置。
快速输入命令行按<Tab>键由系统自动补全关键字的全部字符。
display 与show类似undo与no类似缺省情况下:•<Ctrl+G>对应命令display current-configuration(显示当前配置)•<Ctrl+L>对应命令display ip routing-table(显示IPv4 路由表信息)使用历史命令•使用上光标键↑并回车,可调用上一条历史命令•使用下光标键↓并回车,可调用下一条历史命令保存当前配置在设备上,可以输入save 命令,将当前配置保存到配置文件中。
新华三集团 刀片和高密度服务器产品手册说明书

Copyright © 2020 新华三集团免责声明:虽然新华三集团试图在本资料中提供准确的信息,但不保证本资料的内容不含有技术性误差或印刷性错误,为此新华三集团对本资料中信息的准确性不承担任何责任。
新华三集团保留在没有任何通知或提示的情况下对本资料的内容进行修改的权利。
CN-081730-20200401-BR-HZ-V1.0新华三集团刀片和高密度服务器产品手册新华三集团杭州总部杭州市滨江区长河路466号邮编:310052北京总部北京市朝阳区广顺南大街8号院 利星行中心1号楼邮编:10010272H3C UniServer 边缘计算服务器02服务器产品全家福04H3C UniServer 刀片服务器20HPE 刀片服务器28HPE 塑合型服务器 40HPE 高密度服务器55HPE 边缘计算服务器64HPE Moonshot服务器目录CONTENTSH3C UniServer刀片服务器服务器产品全家福H3C UniServer B7800 G3H3C UniServer B5600 G3H3C UniServer B5800 G3HPE 刀片服务器HPE ProLiant BL460c Gen10HPE BladeSystem c7000HPE 塑合型服务器HPE Synergy 660 Gen10 HPE Synergy D3940HPE Synergy 480 Gen10HPE Synergy 12000HPE 高密度服务器HPE Apollo 6000 Gen10HPE Apollo 6500 Gen10HPE Apollo 2000 Gen10HPE Apollo 70HPE 边缘计算服务器HPE Moonshot服务器HPE Edgeline EL1000HPE Edgeline EL300HPE Edgeline EL4000HPE Edgeline EL8000HPE MoonshotH3C UniServer B5700 G3H3C UniServer B10000H3C UniServer B16000H3C UniServer边缘计算服务器H3C UniServer E3200 G332 HPE Synergy 480 Gen10 计算模块35 HPE Synergy 660 Gen10 计算模块38 HPE Synergy D3940 硬盘笼H PE 高密度服务器41 HPE Apollo 70 系统43 HPE Apollo 2000 Gen10 系统48 HPE Apollo 6000 Gen10 系统52 HPE Apollo 6500 Gen10 系统H PE 边缘计算服务器56 HPE Edgeline EL300 系统58 HPE Edgeline EL1000系统60 HPE Edgeline EL4000 系统62 HPE Edgeline EL8000 系统H PE Moonshot服务器65 HPE Moonshot服务器H3C UniServer边缘计算服务器73 H3C UniServer E3200 G3 服务器服务器产品全家福03 服务器产品全家福H3C UniServer刀片服务器05 H3C UniServer B16000 塑合智能刀片服务器07 H3C UniServer B5700 G3 刀片服务器09 H3C UniServer B5800 G3 刀片服务器11 H3C UniServer B7800 G3 刀片服务器13 H3C UniServer B10000 机箱17 H3C UniServer B5600 G3 服务器H PE 刀片服务器21 HPE BladeSystem c7000 机箱25 HPE ProLiant BL460c Gen10刀片服务器HPE 塑合型服务器29 HPE Synergy 12000 机箱H3C UniServer B16000塑合智能刀片服务器,适合应用在动态需求更多的数据中心,可以支持多达16台刀片服务器和存储设备。
H3C iNode客户端使用标准手册
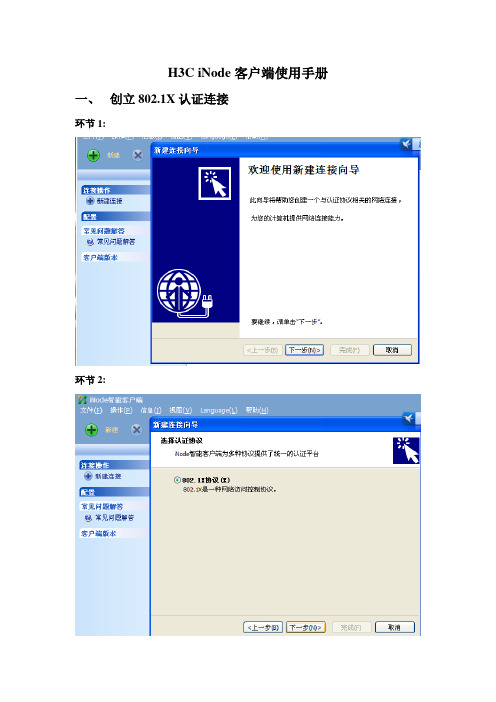
H3C iNode客户端使用手册一、创立802.1X认证连接
环节1:
环节2:
环节3: 环节4:
环节5:环节6:
二、启用认证连接
在管理窗口中选中连接,单击工具栏上旳图标或直接双击连接图标,连接前客户端会弹出一种登录窗口,如下图所示:
三、认证成功旳状态
如果通过了身份认证和安全检查,连接旳图标会变成(颜色变为蓝色同步在图标旳右上方会浮现一种绿色旳小钥匙),连接上线后系统任务栏右侧会增长一种该连接旳小图标,如下图所示:
四、查看认证信息
您也可以通过这个连接图标旳右键菜单来对连接进行操作(具体内容参见窗口操作)。
同步在认证信息窗口中会看到身份认证与否通过旳系统信息和安全检查成果,如下图所示:
五、修改密码环节1:
环节2:
环节3:
六、断开网络连接
如果您不再继续上网,就可以断开目前已经上线旳连接,措施是在管理窗口中选中连接,单击工具栏上旳图标或者是在系统任务栏中旳连接托盘图标旳右键菜单中选择“断开”。
连接断开后管理窗口中旳连接图标和系统任务栏旳连接托盘
图标都会变为刚创立时旳初始状态;
七、退出客户端
退出客户端旳措施有两种:
●在系统任务栏旳客户端托盘图标上单击鼠标右键,在右键菜单中
选择“退出”,如下图所示:
●打开管理窗口,在“文献”菜单中选择“退出”,如下图所示:。
H3C配置全面教程(

H3C中小企业无线解决方案在当今数字化时代,中小企业对于网络的需求越来越重要。
无线网络在中小企业中的应用越来越广泛,不仅可以提高员工的工作效率,还可以帮助企业更好地满足客户需求。
H3C作为一家专业的网络解决方案提供商,为中小企业提供了全面而可靠的无线解决方案,帮助企业建立稳定、高效的无线网络,提升企业竞争力。
首先,H3C中小企业无线解决方案具有高性能和稳定性。
H3C的无线解决方案采用了最先进的技术,能够实现高速数据传输和稳定的网络连接。
无论是在办公楼、工厂、零售店铺还是酒店等场所,都可以保证用户可以获得更好的网络体验。
H3C的无线解决方案还采用了智能信道管理和智能传输功率控制技术,可以自动调整网络信号的传输速率和覆盖范围,确保网络连接的稳定性和可靠性。
其次,H3C中小企业无线解决方案具有高度的安全性。
安全是企业建立无线网络时非常重要的考虑因素,H3C的无线解决方案支持多种安全协议,包括WPA/WPA2、802.1x认证、MAC地址过滤等,可以有效地保护企业的网络数据安全。
此外,H3C的无线解决方案还支持虚拟专用网络(VPN)技术,可以为企业提供安全的远程访问服务,确保网络数据的安全性。
再次,H3C中小企业无线解决方案具有良好的管理性。
对于中小企业来说,网络管理是非常重要的一环,H3C的无线解决方案提供了丰富的管理功能,可以帮助企业简化网络管理流程,提高管理员的工作效率。
H3C的无线解决方案支持统一管理平台,管理员可以通过Web界面轻松地对无线网络进行配置、监控和管理,还可以实现无线网络设备的集中管理,为企业提供更加可靠的网络服务。
最后,H3C中小企业无线解决方案具有良好的性价比。
作为中小企业,成本和性能是企业选购无线网络解决方案时的主要考虑因素,H3C的中小企业无线解决方案提供了良好的性价比,不仅可以满足企业的性能需求,还可以在控制成本的同时提供高质量的网络服务。
H3C的无线解决方案提供了多种规格和配置的无线接入点,并且可以根据企业的需求进行灵活的扩展,为企业提供定制化的解决方案。
华三集团网络产品手册无线版说明书

新华三集团杭州总部杭州市滨江区长河路466号邮编:Copyright © 2020新华三集团 保留一切权利CN-201030-20200508-BR-SD-V1.0免责声明:虽然新华三集团试图在本资料中提供准确的信息,但不保证本资料的内容不含有技术性误差或印刷性错误,为此新华三集团对本资料中信息的准确性不承担任何责任。
新华三集团保留在没有任何通知或提示的情况下对本资料的内容进行修改的权利。
新华三网络产品手册无线物联网H3C iBox580 G2物联网业务一体机H3C IG530物联网业务网关/业务板H3C IG4100-L室内型LoRa网关H3C IG4300-L-R室外型LoRa网关H3C IG4500-L基站型LoRa网关H3C IG4510-L基站型LoRa网关H3C IG4520-L基站型LoRa网关H3C IN4500-L物联网终端设备H3C T320系列室内型物联网网关/接入单元H3C T320系列工业级物联网接入单元H3C T300系列室内型物联网接入单元H3C T300系列室外型物联网接入单元 H3C WA5320X-L室外全融合物联网关0205081013151720222730333501WLANH3C WX5500H系列新一代企业级核心多业务无线控制器H3C WX3500H系列新一代企业级核心多业务无线控制器H3C WX2500H系列新一代企业级核心多业务无线控制器H3C WX2508H-PWR-LTE新一代企业级多业务无线控制器H3C WX1804H-PWR 新一代企业级多业务无线控制器H3C 新一代全系列无线控制业务插卡H3C WBC560多业务无线控制器H3C WBC580新一代多业务无线控制器H3C WA6600系列802.11ax无线接入设备6172 8393104114125137148H3CWA6500、6300系列802.11ax无线接入H3C WA5500系列802.11ac无线接入设备H3C WA5300系列802.11ac无线接入设备H3C UAP系列802.11ac无线接入设备H3C终结者系列无线接入设备H3C WA6600X系列室外802.11ax无线接入设备 H3C WA5600X系列室外802.11ac无线接入设备17 H3C WA5300X系列室外802.11ac无线接入设备17221423227429236837938460移动通信核心网系列H3C EPC3108演进型分组核心网H3C vEPC3200虚拟化演进型分组核心网基站系列H3C BBU3100分布式基带单元H3C BBU3120分布式基带单元H3C RRU3184分布式基带单元边缘分流网关H3C vMEGW3200移动边缘分流网关终端系列H3C CPE3200-18室外型用户终端设备4345 485053 55 5742智联接 绘未来G2物联网业务一体机是新华三技术有限公司(H3C)自主研发的集成物联网设备管理及业务应用的融合式设备。
H3C Mini产品手册说明书
产品手册客服热线:400-810-0504杭州总部杭州市滨江区长河路466号邮编:310052新华三集团北京总部北京市朝阳区广顺南大街8号院 利星行中心1号楼邮编:100102Copyright2021新华三集团 保留一切权利免责声明:虽然新华三集团试图在本资料中提供准确的信息,但不保证本资料的内容不含有技术性误差或印刷性错误,为此新华三集团对本资料中信息的准确性不承担任何责任。
新华三集团保留在没有任何通知或提示的情况下对本资料的内容进行修改的权利。
CONTENTS目录H3C Mini 产品概述01H3C Mini 产品介绍02H3C Mini 解决方案03H3C Mini 服务体系04H3C Mini 经典案例05H3C Mini产品手册H3C Mini是新华三旗下专注于中小微企业场景的网络产品系列,涵盖GR路由器、Mini交换机、Mini无线AC、Mini无线AP,随着在网络领域的深厚技术积累,2015年成立独立Mini品牌,产品全场景云端管理,致力于为商业客户提供“经济、高效、智能”的品质产品,持续提供中小企业、中小学、区县医疗、酒店、餐饮娱乐、工厂仓储等场景解决方案。
H3C Mini全家福H3C Mini产品概述Mini 应用场景商铺民宿/经济酒店小微企业别墅餐饮全千兆高性能路由器GR5200GR路由器美容美发KTV 中小学校S1008A-S S1208D-SH3C Mini系列路由器H3C Mini AP系列产品H3C Mini系列交换机H3C Mini 产品介绍Mini 吸顶AP产品规格智能无线◆无缝漫游◆黑/白名单无线客户端MAC地址接入控制◆M系列管理器和GR路由器都◆内置多路高增益全向天线◆快速二层漫游◆高通企业级无线芯片◆企业级无线信号放大电路PA和低噪功放接受电路LNA◆多SSID,SSID和VLAN绑定,安全灵活◆POE、DC电源供电广覆盖H3C Mini AP产品特点产品图片Mini室外无线产品规格H3C Mini 系列交换机是新华三推出的新一代绿色节能无管理以太网交换机产品,安装维护便利、业务特性丰富,可广泛应用于小微企业、商业连锁、酒店、校园等场景。
- 1、下载文档前请自行甄别文档内容的完整性,平台不提供额外的编辑、内容补充、找答案等附加服务。
- 2、"仅部分预览"的文档,不可在线预览部分如存在完整性等问题,可反馈申请退款(可完整预览的文档不适用该条件!)。
- 3、如文档侵犯您的权益,请联系客服反馈,我们会尽快为您处理(人工客服工作时间:9:00-18:30)。
H3C NaviData大数据一体机用户指南NaviData 5200 G2型号前言H3C NaviData 5200 G2 一体机用户指南各章节内容如下:∙第1 章安全。
介绍操作设备时的安全信息、注意事项、静电防护及设备上的安全标识。
∙第2 章认识NaviData 5200 G2。
介绍NaviData 5200 G2 的外观、特性规格、部件、面板、指示灯及各个接口。
∙第3 章安装和拆卸NaviData 5200 G2。
介绍如何安装和拆卸NaviData 5200 G2,包括安装流程、安装规划和最佳环境、工具准备及外部线缆连接。
∙第4 章上电和下电。
介绍NaviData 5200 G2 的上电和下电方法。
∙第5 章配置NaviData 5200 G2。
介绍NaviData 5200 G2 安装完毕并初次上电后,对其进行软件配置的过程。
∙第6 章日常维护指导。
介绍NaviData 5200 G2 日常维护方法。
∙第7 章安装扩展部件。
介绍NaviData 5200 G2 可能需要安装的部件及安装方法。
∙第8 章更换部件。
介绍NaviData 5200 G2 有哪些可更换的部件,以及如何进行部件更换的详细操作步骤。
∙第9 章布线。
介绍NaviData 5200 G2 部件的内部线缆连接方法。
∙附录。
介绍NaviData 5200 G2 的部件规格、常用软件操作、帮助信息、术语及缩略语。
前言部分包含如下内容:∙读者对象∙本书约定∙资料意见反馈读者对象本手册主要适用于如下工程师:∙网络规划人员∙现场技术支持与维护人员∙负责网络配置和维护的网络管理员本书约定1. 命令行格式约定2. 图形界面格式约定3. 各类标志本书还采用各种醒目标志来表示在操作过程中应该特别注意的地方,这些标志的意义如下:4. 图标约定本书使用的图标及其含义如下:TT5. 示例约定由于设备型号不同、配置不同、版本升级等原因,可能造成本手册中的内容与用户使用的设备显示信息不一致。
实际使用中请以设备显示的内容为准。
本手册中出现的端口编号仅作示例,并不代表设备上实际具有此编号的端口,实际使用中请以设备上存在的端口编号为准。
!目录1 安全········································1-11.1 安全信息······································1-11.1.1 运行安全···································1-11.1.2 电气安全···································1-11.1.3 电池安全···································1-11.2 安全注意事项····································1-11.3 静电防护······································1-21.3.1 防止静电释放·································1-21.3.2 防止静电释放的接地方法····························1-21.4 设备标识······································1-3 2认识NaviData 5200 G2 ·································································································· 2-12.1 简介········································2-12.2 规格参数······································2-12.2.1 产品规格···································2-12.2.2 技术参数···································2-32.3 部件········································2-32.4 前面板·······································2-52.4.1 前面板组件··································2-52.4.2 指示灯和按钮·································2-72.4.3 接口·····································2-82.5 诊断面板······································2-82.6 后面板······································2-102.6.1 后面板组件·································2-112.6.2 后面板指示灯································2-122.6.3 接口····································2-132.7 主板·······································2-132.7.1 主板布局··································2-142.7.2 系统维护开关································2-152.7.3 DIMM 插槽·································2-152.8 硬盘·······································2-162.8.1 硬盘编号··································2-162.8.2 硬盘指示灯·································2-202.9 风扇·······································2-212.10 Riser 卡·····································2-21 3安装和拆卸NaviData 5200 G2 ························································································· 3-13.1 安装流程······································3-13.2 安装规划······································3-23.3 安装最佳环境····································3-23.3.1 空间和通风要求································3-23.3.2 温度和湿度要求································3-23.3.3 高度要求···································3-23.3.4 洁净度要求··································3-23.3.5 接地要求···································3-33.4 工具准备······································3-33.5 安装NaviData 5200 G2 ·······························································································3-53.5.1 安装滑道···································3-53.5.2 安装NaviData 5200 G2 ·······················································································3-53.5.3 (可选)安装走线架······························3-63.6 连接外部线缆····································3-63.6.1 连接鼠标、键盘和VGA 接口线缆························3-73.6.2 连接网线···································3-83.6.3 连接USB 接口·································3-93.6.4 连接电源线缆································3-103.6.5 固定线缆··································3-123.6.6 布线指导··································3-143.7 拆卸NaviData 5200 G2 ····························································································· 3-14 4上电和下电·····································4-14.1 上电········································4-14.1.1 操作场景···································4-14.1.2 前提条件···································4-14.1.3 操作步骤···································4-14.2 下电········································4-24.2.1 操作场景···································4-24.2.2 前提条件···································4-24.2.3 操作步骤···································4-2 5配置NaviData 5200 G2 ·································································································· 5-15.1 上电启动······································5-15.2 RAID 卡······································5-15.3 操作系统和安装大数据软件······························5-25.3.1 安装操作系统·································5-25.3.2 安装大数据软件································5-2 6日常维护指导····································6-16.1 维护基本原则····································6-16.2 维护工具······································6-16.3 维护操作······································6-16.3.1 任务列表···································6-16.3.2 查看事件日志·································6-26.3.3 查看审计日志·································6-26.3.4 查看更新日志·································6-26.3.5 查看SDS 日志·································6-26.3.6 监测机房温度和湿度······························6-36.3.7 检查线缆···································6-3 7安装扩展部件····································7-17.1 可扩展部件·····································7-17.2 安装硬盘······································7-17.2.1 安装准则···································7-17.2.2 安装硬盘···································7-27.3 安装电源模块····································7-37.4 安装Riser 卡和PCIe 卡································7-47.4.1 Riser 卡与PCIe 卡适配关系···························7-57.4.2 安装Riser 卡和PCIe 卡·····························7-67.5 安装RAID 卡···································7-147.5.1 简介····································7-147.5.2 安装准则··································7-157.5.3 安装RAID 卡································7-157.6 安装GPU 卡···································7-217.6.1 安装准则··································7-217.6.2 安装GPU 卡································7-227.7 安装网卡·····································7-277.7.1 安装准则··································7-277.7.2 安装网卡··································7-277.8 安装Dual SD 卡扩展模块和SD 卡··························7-297.9 安装后部硬盘笼··································7-317.10 安装光驱····································7-347.12 安装串口····································7-387.13 安装风扇····································7-397.13.1 安装准则··································7-397.13.2 安装风扇··································7-407.14 安装DIMM ············································································································ 7-417.14.1 DIMM 简介·································7-417.14.2 安装准则··································7-467.14.3 安装DIMM ··································································································· 7-477.15 安装CPU ·············································································································· 7-497.15.1 安装准则··································7-497.15.2 安装CPU ····································································································· 7-49 8更换部件······································8-18.1 可更换部件·····································8-18.2 更换安全面板····································8-28.2.1 更换场景···································8-28.2.2 更换安全面板·································8-28.3 更换硬盘······································8-38.3.1 更换场景···································8-38.3.2 准备工作···································8-38.3.3 更换硬盘···································8-48.4 更换机箱盖·····································8-58.4.1 更换场景···································8-58.4.2 更换机箱盖··································8-58.5 更换电源模块····································8-78.5.1 更换场景···································8-78.5.2 更换电源模块·································8-78.6 更换导风罩·····································8-98.6.1 更换场景···································8-98.6.2 更换导风罩··································8-98.7 更换Riser 卡和PCIe 卡·······························8-108.7.1 更换场景··································8-108.7.2 更换Riser 卡和PCIe 卡····························8-108.8 更换RAID 卡···································8-158.8.1 更换场景··································8-158.8.2 更换RAID 卡································8-15。