Installing Preps 5.3.3 - Chinese
Softing Singapore Pte Ltd 产品安装指南说明书

INSTALLATION GUIDEDisclaimer of liabilityThe information contained in these instructions corresponds to the technical status at the time of printing of it and is passed on with the best of our knowledge. The information in these instructions is in no event a basis for warranty claims or contractual agreements concerning the described products and may especially not be deemed as warranty concerning the quality and durability. We reserve the right to make any alterations or improvements to these instructions without prior notice. The actual design of products may deviate from the information contained in the instructions if technical alterations and product improvements so require.It may not, in part or in its entirety, be reproduced, copied, or transferred into electronic media.Softing Singapore Pte Ltd73 Science Park Drive#02-12/13 Cintech ISingapore Science Park 1+ 65 6569 6019+ 65 6899 1016***********************************The latest version of this manual is available in the Softing download area at: /downloadsVersion: WireXpert4500_eXport_IT_EN_I_201904© 2019 Softing Singapore Pte Ltd. In line with our policy of continuous improvement and feature enhancement, product specifications are subject to change without notice. Subject to errors and alterations. All rights reserved. Softing and the Softing logo are trademarks of Softing AG. WireXpert and the WireXpert logo are trademarks of Softing IT Networks GmbH. All other cited trademarks, product and company names or logos are the sole property of their respective owners.Table of Contents1Introduction (4)1.1 About product (4)1.2 Safety precautions (4)1.3 Intended use (5)1.4 About this document (5)1.5 System requirements (6)1.6 Other Requirements (6)2Installing and Upgrading on the PC (7)2.1 New installation (7)2.2 Upgrading from a previous version (14)2.3 Cancelling the installation wizard (16)2.4 Installation Failure Conditions (17)3Updating the device software (firmware) (18)4Declarations (20)5Related documents (23)6Technical Support (24)1 Introduction1.1 About producteXport is a software programmed to work seamlessly with WireXpert. It is designed to generate reports from test results obtained from WireXpert units or the standard OTDR *.SOR file, and capable of exporting to the commonly used *.CSV and *.PDF format for data archiving. The software has undergone numerous qualitative and functional tests to ensure the latest version meets the latest industrial standards and trend requirements.Starting from v8.0, eXport PC software implemented a new feature to allow the software to connect to eXport Cloud, a cloud-based solution to upload hierarchical label list for technicians to download, and download project files technicians uploaded from site. The conventional way of travelling up and down office to transfer data can now be done on-the-go with any Wi-Fi or mobile hotspot connection. The time spent on travelling to the office to transfer files, can now be utilized to perform more work on other projects, thus improving work productivity.This manual will only contain information and instructions on how to install eXport software. Please refer to User Manual and Guides for WireXpert for device help.1.2 Safety precautionsRead this manual before starting For damages due to improper connection, implementation or operation Softing refuses any liability according to our existing warranty obligations.Note This symbol is used to call attention to notable information that should be followed during installation, use, or servicing of this device.HintThis symbol is used when providing you with helpful user hints.CAUTION Selection of option may cause all or partial of saved data and/or settings in the device to be erased or restored to non-reversible original factory state. Backing up of saved result(s) is recommended before executing option.CAUTIONCAUTION indicates a potentially hazardous situation which, if not avoided, may result in minor or moderate injury.WARNINGWARNINGindicates a potentially hazardous situation which, if not avoided, could result in death or serious injury.DANGERDANGER indicates an imminently hazardous situation which, if not avoided, will result in death or serious injury. This signal word is to be limited to the most extreme situations.1.3 Intended useWireXpert series has been designed for use in factory, process and building control. The unit must not be used in explosion hazard areas. The permissible ambient conditions given in the Technical Data must be complied with.The faultless and safe operation of the product requires proper transport, proper storage and installation, and expert operation and maintenance in accordance with the manual.1.4 About this documentRead this manual before starting For damages due to improper connection, implementation or operation Softing refuses any liability according to our existing warranty obligations.1.4.1 Document historyDocument version Modifications compared to previous version 201702 Firmware update to v7.3 201811 Firmware update to v8.0 201904Installation updates1.4.2Conventions usedThe following conventions are used throughout Softing customer documentation:Open StartèControl PanelèPrograms Keys, buttons, menu items, commands and otherelements involving user interaction are set in boldfont and menu sequences are separated by anarrowButtons from the user interface are enclosed inPress [Start] to start the application brackets and set to bold typefaceMaxDlsapAddressSupported=23 Coding samples, file extracts and screen outputare set in Courier font typeFilenames and directories are written in italic Device description files are located inC:\<product name>\delivery\software\DeviceDescription files1.5System requirementsHardwareq PCOperating systemq Windows 7, 8.x or 10 (32 bit or 64 bit)q Intel Core 2 Duo, 2GHzq 1 GB of RAMq500 MB of free space of installationq Microsoft .NET framework 4.0 or above1.6Other Requirements1Administrator RightsAdministrator rights are required for eXport Installation.2Antivirus SoftwareAny Antivirus software running on your computer must be disabled for the entire duration of theinstallation.2 Installing and Upgrading on the PC2.1 New installation1 Download the latest eXport PC software from 2 Run eXport_setup_v8.x_x64.exe or eXport_setup_v8.x_x86.exe depending on your OS.Note Select the _x86 version if you are running 32 bits operating system (OS) and _x64 version for a 64 bits OS.3 Installation will commence after the setup file is executed.Note: If you get an error at this stage during the installation process, please refer to section 2.4 in this document.4Installation prerequisitesa.eXport requires the below components to be already present on your computer before youstart the Installation process.1.Microsoft .Net Framework 4.0 or above2.Windows Mobile Device Center3.Microsoft SQL Server Compact 3.54.Microsoft Visual C++ 2005 SP1 Redistributable5.Microsoft Visual C++ 2005 SP1 Redistributable MFC Security updateStarting from Version 8.0, the eXport Installer will run a check on the target computer for the above components before starting the Installation. If all or any of the components are missing, the user will get a screen like the one below.5Click [Install >] to install the missing components.6Please ensure that you have administrative rights to run the eXport Installer.7Please note that some components may take longer time to complete the installation. 8Once the components are installed, you will see an Interface like the one below.9Click [Next >] to proceed.10Please read and understand the License Agreement before installing the software.a.Select ‘I accept the terms in the license agreement’ and click [Next >] to proceed ORb.Select ‘I do not accept the terms in the license agreement’ to exit the installation.11You will be prompted to enter your “User Name” and “Organization Name”.Complete and click [Next >] to proceed.12Click [Change…] to change the directory of where the program will be installed, otherwise click [Next >] to proceed with the default settings.13To begin Installation, select an option from one of the two choices as shown in the interface belowa.Anyone who uses this computer (all users)b.Only for me (Current user)14If you see an error like the one below, please ignore and continue with eXport Installation.15Click [Finish] to complete and exit the installation.16Install only the 32 bit version if you are running on 32 bit operating system (OS), and 64 bit on a 64bit OS to ensure proper functioning of the software.2.2 Upgrading from a previous version1 If this is an upgrade from an earlier version from 6.x and above, you may see a message likethe one below.User Manuals For more information on installation and using eXport PC software, please refer to “Installation Guide for eXport PC software” and “User Manual for eXport PC software”.Note Softing IT Networks has ceased support for ReportXpert v5.x and earlier. Please contact *****************************************************.Note eXport 7.x has upgraded its database structure and added new features such as the Re-certification function. You are recommended to perform a clean installation of the software by uninstalling the existing 6.x software before installing the 7.x version.2 Click [Next >] to proceed.3Choose from one of the two options belowa.Repair – This option will copy the updated files to the already installed eXport directory.b.Remove – This option will remove eXport from your computer.4Click [Finish] to complete and exit the installation.2.3Cancelling the installation wizard1Installation can be cancelled any time during the installation by clicking [Cancel].Click [Yes] to cancel the installation or [No] to continue the installation.2Installation will be incomplete and eXport may cease to work or malfunction.2.4Installation Failure Conditions1.Low Disk Spacea.You will get an error message like the one below, when the available disk space on your C:\ isless than 200MB. This error will be displayed as soon as the user executes the Installer.2.Low Disk Spacea.You will get an error message like the one below, when the available disk space on your C:\ isless than the required space. This error will be displayed during the installation process.3Updating the device software (firmware)1Go to Tools èUpdate Device Firmware2Click [OK] and select USB drive from “Export to USB” window.3Click [Export] and [OK] to proceed.4Please wait while exporting takes place. This process may take a while.5Remove USB flash drive from workstation and connect to WireXpert.6 Select [Upgrade Firmware] from prompt and click [OK] button to continue.7If prompt did not appear, check thatUSB icon is present on the status bar, and press theSETUPbutton è Settings 2 è Storage è USB .8 Please wait while upgrading takes place. This process may take a while.9 Upgrade process is complete.CAUTIONSaved test results and settings may be erased during upgrading. You are recommended to save all test results before upgrading the firmware.Note – Upgrading from eXport <7.3eXport 7.x has upgraded its database structure and added new features such as the Re-certification function. You are recommended to perform a clean installation of the software by uninstalling the existing 6.x software before installing the 7.x version.Declarations 4DeclarationsThis device complies with the requirements of the EC directive 2004/108/EG "Electromagnetic Compatibility" (EMC directive). It meets the following requirements:NoteA Declaration of Conformity in compliance with the above standards has been made and can be requested from Softing Singapore Pte Ltd.China ROHSThe WireXpert device and its test components are China ROHS compliant.WEEEElectrical and electronic equipment must be disposed of separately from normal waste at the end of its operational lifetime.Please dispose of this product according to the respective national regulations or contractual agreements. If there are any further questions concerning the disposal of this product, contact Softing IT Networks.CAUTIONThis is a Class A product. In a domestic environment this product may cause radio interference. In that case the user may be required to take adequate measures!ROHSThe WireXpert device and its test components are ROHS compliant.ETL Intertek VerifiedWireXpert device is ETL verified to ANSI/TIA IIIe, IEC 61935-1 levels IIIe & IV and currently proposed Level V draft, with the applicable measurement accuracy.Class 1 Laser ProductThe light source transmitted from the following fiber test modules – Single Mode (SM), Multi-Mode (MM) and Encircled Flux compliant Multi-Mode (MMEF) are classified as Class 1 lasers and are very low risk and "safe under reasonably foreseeable use", including the use of optical instruments for intrabeam viewing.Class 1m Laser ProductThe light source transmitted from the following fiber test modules – MPO Remote are classified as Class 1m lasers and have wavelengths between302.5 nm and 4000 nm, and are safe except when used with optical aids.Related documents 5Related documentsApplication Note – E2E Link TestApplication Note – MPTLQuick Start Guide – Copper Certification TestingQuick Start Guide – Fiber Certification TestingQuick Start Guide – Encircled Flux Compliant Multimode Fiber Certification TestingQuick Start Guide – MPO Certification TestingQuick Start Guide – Digital Fiber Inspection KitUser Manual – Fiber Certification TestingUser Manual – MPO CertificationUser Manual – eXportUser Guide – List Based TestingUser Guide – Installing eXport PC SoftwareUser Guide – License UpgradeUser Guide – eXport CloudUser Guide – Custom LimitsTechnical Support 6Technical SupportSofting’s global presence ensures our customers receives sales and technical support anywhere around theworld. For more information:The AmericasSofting Inc.7209 Chapman HighwayKnoxville, TN 37920Phone: +1 865 251 5252E-mail:****************Asia / PacificSofting Singapore Pte. Ltd.73 Science Park Drive#02-12/13, Cintech ISingapore Science Park 1Singapore 118254Phone: +65-6569-6019E-mail: ********************************Softing ShanghaiRoom 416, 4/F, Mytech Intelligence Park, No.1999 East Jinxiu Road, Pudong District, 201206, Shanghai, ChinaPhone: +86 (21) 61063031E-mail: *********************************Europe/Middle East/Africa Softing IT Networks GmbH Richard-Reitzner-Alle 6D-85540 HaarPhone: +49 89 45 656 660E-mail:***************************Softing SRL87 Rue du Général Leclerc Creteil, Île-de-France 94000 ParisPhone: +33 1451 72805E-mail: ***********************Softing Italia Srl.Via M. Kolbe, 620090 Cesano Boscone (MI) Phone: +39 02 4505171E-mail:*********************AustriaBuxbaum Automation GmbH EisenstadtPhone: +43 2682 7045 60E-Mail: **********************。
Moxa NPort Express DE-311快速安装指南(第五版)说明书
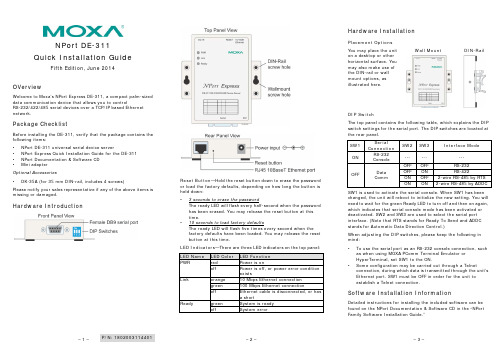
– 1 –– 2 – – 3 –P/N: 1802003114401NPort DE-311 Quick Installation GuideFifth Edition, June 2014OVerviewWelcome to Moxa’s NPort Express DE-311, a compact palm-sized data communication device that allows you to controlRS-232/422/485 serial devices over a TCP/IP based Ethernet network.Package ChecklistBefore installing the DE-311, verify that the package contains the following items: • NPort DE-311 universal serial device server• NPort Express Quick Installation Guide for the DE-311 • NPort Documentation & Software CD •Mini adapterOptional Accessories •DK-35A (for 35 mm DIN-rail, includes 4 screws)Please notify your sales representative if any of the above items is missing or damaged.Hardware IntroductionReset Button —Hold the reset button down to erase the password or load the factory defaults, depending on how long the button is held down: •3 seconds to erase the passwordThe ready LED will flash every half-second when the password has been erased. You may release the reset button at this time.•10 seconds to load factory defaultsThe ready LED will flash five times every second when the factory defaults have been loaded. You may release the reset button at this time.LED Indicators —There are three LED indicators on the top panel: LED Name LED Color LED Function PWRred Power is onoff Power is off, or power error condition existsLinkorange 10 Mbps Ethernet connection green 100 Mbps Ethernet connectionoff Ethernet cable is disconnected, or has a shortReady green System is ready offSystem errorHardware InstallationPlacement Options You may place the unit on a desktop or other horizontal surface. You may also make use of the DIN-rail or wall mount options, as illustrated here.Wall MountDIN-RailDIP SwitchThe top panel contains the following table, which explains the DIP switch settings for the serial port. The DIP switches are located at the rear panel. SW1 Serial Connection SW2 SW3 Interface ModeONRS-232Console------ ---OFFData CommOFF OFF RS-232 OFF ON RS-422ON OFF 2-wire RS-485 by RTS ONON2-wire RS-485 by ADDCSW1 is used to activate the serial console. When SW1 has been changed, the unit will reboot to initialize the new setting. You will need to wait for the green Ready LED to turn off and then on again, which indicates that serial console mode has been activated or deactivated. SW2 and SW3 are used to select the serial port interface. (Note that RTS stands for Ready To Send and ADDC stands for Automatic Data Direction Control.)When adjusting the DIP switches, please keep the following in mind: •To use the serial port as an RS-232 console connection, such as when using MOXA PComm Terminal Emulator or HyperTerminal, set SW1 to the ON.•Some configuration may be carried out through a Telnetconnection, during which data is transmitted through the unit’s Ethernet port. SW1 must be OFF in order for the unit to establish a Telnet connection.Software Installation InformationDetailed instructions for installing the included software can be found on the NPort Documentation & Software CD in the “NPort Family Software Installation Guide.”– 4 –– 5 –– 6 –/supportThe Americas: +1-714-528-6777 (toll-free: 1-888-669-2872)Europe: +49-89-3 70 03 99-0 Asia-Pacific: +886-2-8919-1230China: +86-21-5258-9955 (toll-free: 800-820-5036)2014 Moxa Inc. All rights reserved.Pin Assignments and Cable WiringFemale DB9 Connector Pin AssignmentsRS-232 WiringRS-422 WiringRS-485 WiringMini AdapterThe NPort Express DE-311 accepts deviceswith both male and female connectors. AD-shell female serial connector is built-in, and a DB9 male null-modem adapter is included as a standard accessory.If you wish to make your own DB9 to DB9 null-modem (or cross-over) cable, the pinouts are as follows:Environmental SpecificationsPower requirements DC 9V to 30V, 300 mA at 9V Operating temp. 0 to 55◦C Operating humidity 5 to 95% RHDimensions (W×D×H)90 × 100.4 × 22 mm 3.54 × 3.95 × 0.87 inch (including ears) 67 × 100.4 × 22 mm 2.64 × 3.95 × 0.87 inch (without ears) Surge protection 15 KV ESD for serial port Magnetic isolation 1.5 KV for EthernetRegulatory approvals FCC B, CE B, UL, CUL, TUV。
Installing Preps 5.3.3 - Chinese

安装 Preps软件版本 5.3.3安装指南732-00148B-ZH 修订版BCopyright© Kodak,2008。
保留所有权利。
Kodak、克里奥、eCentral、潘多拉盒型拼版软件、Preps、印能捷、印能捷演化版、SmartMarks 和 UpFront是 Kodak 的商标。
Acrobat、Adobe、Distiller、Illustrator、PageMaker、Photoshop 和 PostScript 是 Adobe Systems Incorporated的商标。
Apple、AppleShare、AppleT alk、iMac、ImageWriter、LaserWriter、Mac OS、Power Macintosh 和 TrueT ype 是Apple Computer, Inc. 的注册商标。
Macintosh 是 Apple Computer, Inc. 在美国和其他国家或地区注册的商标。
Hexachrome、PANTONE、PANTONE Hexachrome 和 PANTONE MATCHING SYSTEM 归 Pantone, Inc. 所有。
PEARL、PEARLdry、PEARLgold、PEARLhdp 和 PEARLsetter 是 Presstek, Inc. 的注册商标。
XEROX 是 XEROX CORPORATION 的商标。
/内部编号:732-00148B-ZH 修订版B修订日期:2008 年12月安装 Preps 5.3.3此版本的 Kodak® Preps®数字拼版软件提供更新程序或完整的安装程序:•使用更新程序可对现有的 Preps 5.3.x 安装程序进行升级。
如果以后希望仅卸载软件中的升级部分,可以使用此文档中的操作步骤卸载更新。
•使用完整安装程序可将完整的更新软件安装到新文件夹中。
许可Preps 5.3.2 是现有、经许可的 Preps 5.x 安装程序的免费升级程序。
Step7 v5.3安装步骤

Step7 v5.3安装步骤相信有很多人都知道了,但是为了满足大部分入门者的要求,转一份贴子Step7 v5.3 Professional 安装步骤1 安装Windows 2000 SP42 安装IE6\IE6b2800\ie6setup.exe3 设置Windows 2000 默认语言为"英语(美国)"控制面板->区域选择->设置默认值, 选择"英语(美国)"4 安装Step7 v5.3\ STEP7_PROFESSIONAL_2004\Setup.exe注: 源文件的路径不能有汉字, 否则Setup.exe不能执行选择: Step7 v5.3S7-SCL v5.3S7-GRAPH v5.3 (Graph 7 )S7-PLCSIM v5.3 (PLC仿真)Aotomation License Manager v1.1选择语言:English提示: Transfer License KeysYes, Transfer should take place during installationNo, Transfer license keys later选择: No, Transfer license keys later5 恢复Windows 2000 默认语言为"中文(中国)"6 安装Step7 v5.3 和Graph v5.3授权将"\Step7 v5.3+graph5.3授权"目录拷贝到硬盘执行STEP7V53key.exe安装Step7 v5.3授权A1710453执行s7graph53.exe安装Graph v5.3授权A1S7GR53注: 我并没有先装Step7 v52有些朋友将WIN2000的"当前用户的设置/您的区域设置"设为英语,这是没有用的, 应将"系统的语言设置/设置默认值"设为英语才有效。
Sublimetext3汉化教程,官方汉化包方式

Sublimetext3汉 化 教 程 , 官 方 汉 化 包 方 式
官网下载sublime text3,这里我下载最新版进行安装,安装后启动软件 1、选择菜单栏Tools下的 CommandPalette... 2、然后在弹出框中输入install,选择跳出的Install Package Control,选中后要等一会这个过程稍微慢一点 3、 安装成功后会跳出成功界面,确定 4、重复第2步进入Install Package Control 5、载入后搜索chinese,选中第一个ChineseLocalizations,这个过程也会相对慢一些,坐等即可 6、安装成功后会自动跳出界面,等着会自动变为中文版,如果出现汉化成功提示后菜单栏还没有成为中文别急,等一会就好,汉化完成
CentOS下安装及配置中文输入法步骤
CentOS下安装及配置中文输入法详细步骤
1.用root登录CentOS系统或登录后再终端命令切换用户su root
2.使用yum命令安装中文输入法:yum install "@Chinese Support"
3.命令exit 退出命令终端。
4.回到桌面,system->preferences->input method
5.如果没有,先注销一下。
6.到里面add输入法到列表里。
7.最后再注销、登录。
注销登录之后,配置过程如下图所示:
安装完成之后在System 》Preferences》中会出现Input Method 选项,点击进入
出现以下弹出框,选择USE IBUS (recommended),点击Input Method Preferences 选项进入
出现以下弹出框,General 选项包含快捷键等设置,Input Method 中选择常用输入法,在Select an input method中选择Chinese,会出现右边的中文输入法列表,这里选择Pinyin,然后点击add,关闭窗口,即设置成功
在CentOS 6.4下面测试无误。
IBM SPSS Modeler - Essentials for R:安装指示信息说明书
mkdir ~/Rsource 2. 下载用于构建 R 的源代码(例如,R-3.3.3.tar.gz),并将其保存到临时目录。 3. 切换至临时目录。例如,在命令提示符处输入:
cd ~/Rsource 4. 将 R 源解压缩并解包至临时目录。例如,在命令提示符处输入:
v 对于使用 apt-get 的 Linux 分发版,请使用以下命令安装 X11 客户机和服务器软件: apt-get install xorg xterm apt-get install xsever-xorg xserver-xorg-core xserver-xorg-dev apt-get install xvfb
除了 X11 之外,还建议确保在安装 R 之前安装 tcl/tk。
通过软件包管理器安装 R
发行版的存储库可能包括 R。如果是这样,您可以使用发行版的标准程序包管理器(例如,RPM Package Manager 或 Synaptic Package Manager)来安装 R。 v 对于使用 yum 的 Linux 分发版,您可以使用 yum install R 安装 R。 v 对于使用 apt-get 的 Linux 分发版,您可以通过以下命令安装 R:
1
先决条件
您将安装 Essentials for R 的目标计算机必须安装 X11。如果目标计算机有物理显示器,那么它很可能安装了 X11。后续步骤描述了安装 X11 的过程(如有必要)。 1. 安装 X11 客户机和服务器
Dragon 专业个人客户端安装指南说明书
Installation guide GuideDragon speech recognition Enterprise solutionFor v15 of:Dragon Professional Individual Client Installation GuideCopyrightDragon Professional Individual, Dragon Legal Individual, v15.2019 Nuance Communications, Inc.This material may not include some last-minute technical changes and/or revisions to the software. Changes are periodicallymade to the information provided here. Future versions of this material will incorporate these changes.No part of this manual or software may be reproduced in any form or by any means, including, without limitation, electronic ormechanical, such as photocopying or recording, or by any information storage and retrieval systems, without the express written consent of Nuance Communications, Inc. Specifications are subject to change without notice.End-of-life: Third-party environmentsSupport for third-party environments is only valid as long as they are supported by the corresponding vendor and might besubject to other restrictions. Contact Nuance Technical Support for details. For more information, see the documentationdelivered with the third-party product and supporting Nuance documentation.When standard support by the vendor has stopped, Nuance will continue support if an issue is specific to the Nuance solution,within the limitations of the vendor’s standard end-of-life and Nuance's policy. This means that issues that are a combination of the vendor’s component and the Nuance solution cannot be supported.Copyright © 2019 Nuance Communications, Inc. All rights reserved.Nuance, ScanSoft, the Nuance logo, the Dragon logo, Dragon, DragonBar, NaturallySpeaking, NaturallyMobile, RealSpeak,Nothing But Speech (NBS), Natural Language Technology, Select-and-Say, MouseGrid, and Vocabulary Editor are registered trademarks or trademarks of Nuance Communications, Inc. in the United States or other countries. A ll other names andtrademarks referenced herein are trademarks of Nuance Communications or their respective owners. Designations used bythird-party manufacturers and sellers to distinguish their products may be claimed as trademarks by those third-parties.DisclaimerNuance makes no warranty, express or implied, with respect to the quality, reliability, currency, accuracy, or freedom from error of this document or the product or products referred to herein and specifically disclaims any implied warranties, including, without limitation, any implied warranty of merchantability, fitness for any particular purpose, or non-infringement.Nuance disclaims all liability for any direct, indirect, incidental, consequential, special, or exemplary damages resulting from the use of the information in this document. Mention of any product not manufactured by Nuance does not constitute anendorsement by Nuance of that product.NoticeNuance Communications, Inc. is strongly committed to creating high quality voice and data management products that, whenused in conjunction with your own company’s security policies and practices, deliver an efficient and secure means of managing confidential information.Nuance believes that data security is best maintained by limiting access to various types of information to authorized users only.Although no software product can completely guarantee against security failure, Dragon s oftware contains configurablepassword features that, when used properly, provide a high degree of protection.We strongly urge current owners of Nuance products that include optional system password features to verify that these features are enabled! You can call our support line if you need assistance in setting up passwords correctly or in verifying your existingsecurity settings.Published by Nuance Communications, Inc., Burlington, Massachusetts, USAVisit us on the Web at . Links to our international web sites are shown there.1/17/20192Dragon Individual Installation Guide ContentsDragon Individual Installation Guide1 Copyright2Contents3 Chapter 1: About this guide4 About Dragon Professional Individual5Additional resources6Documentation6Interactive tutorial6Training6Support6 Chapter 2: Preparing to install Dragon7 Preparing for an installation8Storage space considerations9Dragon system requirements10 Chapter 3: Initial Installation of Dragon Professional Individual11 Install Dragon and choose the default settings12Installing Dragon on a single computer12Dragon file structure15Windows 7, Windows 8.1, and Windows 1015Accessing program files163Dragon Professional Individual Client Installation GuideChapter 1: About this guideAbout Dragon Professional Individual5Additional resources6 4Chapter1:About this guide About Dragon Professional IndividualDragon Professional Individual allows users to create reports, spreadsheets, presentations and otherdocumentation more efficiently with fast, accurate dictation and transcription. Dragon ProfessionalIndividual also includes voice commands that allow users to perform everyday tasks without using themouse or keyboard. For example, use voice commands to:l Correct and format text.l Launch applications.l Navigate in applications.l Access buttons and menus in supported programs, including Microsoft Word, CorelWordPerfect, WordPad, and moreDragon Professional Individual can be installed on each client computer manually .5Dragon Professional Individual Client Installation GuideAdditional resourcesThe following resources are available in addition to this guide to help you manage your Dragoninstallation.Documentationclick the Help icon () on theInteractive tutorialDragon Professional Individual includes an interactive tutorial with progressive simulations that help you learn Dragon skills.When you are connected to the internet, Dragon connects to a web-based interactive tutorial. If youdon't have an internet connection, the tutorial runs locally.TrainingNuance provides several Dragon training offerings, like webinars, demos, and Nuance University online training courses. For more information, s ee the Dragon Support web site.SupportThe Dragon Support web site provides many resources to assist you with your Dragon installation. For more information on Support offerings, see the Dragon Support web site at:https:///support.html6Chapter2:Preparing to install Dragon Chapter 2: Preparing to installDragonPreparing for an installation8Storage space considerations9Dragon system requirements107Dragon Professional Individual Client Installation GuidePreparing for an installationBefore installing, modifying, or upgrading Dragon Professional Individual:l Install any pending Windows updates, and then restart the computer.l Turn off or disable any antivirus software until installation is complete. Installation can sometimes trigger a false virus report.l Close all open applications.l Ensure your system meets the requirements before attempting to install Dragon Professional Individual.For more information, see “Dragon system requirements” on page 10.Installation considerationsl Administrator rights are not required to create a user profile or use the software afterinstallation. Note that if an administrator creates a user profile while logged in as anadministrator, that profile is not accessible to users with restricted privileges.l Users are permitted to create multiple profiles, provided each profile is for one person.Additional users must purchase a separate license for Dragon Professional Individual. Volumelicense agreements are available.8Chapter2:Preparing to install Dragon Storage space considerationsEach Dragon user must have his or her own user profile. This is a set of files in which Dragon storesinformation about each user’s voice, frequently-used words and phrases, optional settings, andcustom commands (if applicable). Each computer on which Dragon is installed must have enough freespace for the required user profile(s).Use the following guidelines for allocating disk space on your system. The actual amount of diskspace varies from site to site.To set the amount of data to store:1. From the DragonBar, select Tools>Administrative Settings.The Administrative Settings dialog box opens.2. Select the Disk space reserved for network archive option.For each u ser profile:l127 MB of hard disk spaceDragon periodically creates a backup copy of a u ser profile and stores the copy on the local computer.9Dragon Professional Individual Client Installation GuideDragon system requirementsDuring the installation process, the software checks that your system meets the following requirements. If they are not met, Dragon Professional Individual is not installed.10Chapter 3: Initial Installation of Dragon Professional IndividualInstall Dragon and choose the default settings12 Installing Dragon on a single computer12 Dragon file structure15 Windows 7, Windows 8.1, and Windows 1015 Accessing program files16Install Dragon and choose the default settingsInstall Dragon Professional Individual on the client computer using the downloaded installer file orinstallation DVD. If you plan to install Dragon on multiple computers, run through an initial installationbefore attempting to install Dragon from a server. Use the initial client installation to set default values for Administrative and Auto-Formatting options. You can then install Dragon Professional Individual on other computers using the same options.Notes:l You must have Windows Administrator rights to install or uninstall Dragon Professional Individual.l If you have more than one language, the installation process uses your operating system’s language, if supported. If Dragon does not support your operating system language, theinstaller runs in English. You cannot install Dragon using a language other than the primarylanguage. For example, if you install the German software on a French operating system,the installation interface is in French. If you install the German software on a Chineseoperating system, the installation interface is in English.l The installation process does not present the QuickStart option. You can enable this option in the Options dialog box after Dragon is installed. For more information, see the onlineDragon Professional Individual help.Installing Dragon on a single computer1. Run the Dragon installation file you downloaded.OrInsert the product DVD. If the installation does not start automatically, run setup.exe from theDVD.The Dragon InstallShield Wizard opens.2. Click Next to proceed to the License Agreement screen.3. Read the text of the agreement, select I accept…, and then click Next.The Customer Information screen appears.4. Enter your User Name, Organization, and the Serial Number supplied with your DVD ordownload of Dragon, and then click Next.The Region Selection screen appears.5. Select a region to install, or select All English regions to install more than one region.The region determines the accents and vocabularies available on this installation. Selecting a single region saves disk space, but users cannot create user profiles with an accent that is not included with the selected region.6. Optional: To change the installation directory, select Advanced, then click Next.The Advanced screen appears.1. Click Change…A Browse For Folder dialog box opens.2. Navigate to the folder where you want to install Dragon (or create a new folder byclicking the Make New Folder button) and then click OK.Note: By default, Dragon is installed in:C:\Program Files(x86)\Nuance\NaturallySpeaking157. Click Next to proceed to the Ready to Install the Program screen.8. Click Install.The installation process begins. It may take several minutes to install Dragon ProfessionalIndividual. At times, the progress bar may not appear to be advancing, but the installation is still proceeding internally.9. When installation of Dragon is complete, the installer displays the completion screen. ClickFinish.The Product Registration window appears.10. Choose whether to register Dragon online now or to have Dragon remind you to register inseven days, and then click OK. Registering the product provides faster access to NuanceTechnical Support.You can open Dragon using the desktop shortcut, or find Dragon in the Start menu:l Windows 7: Select Start > All Programs > Dragon.l Windows 8.1: From the Start screen, select the down arrow to show all applications, and then scroll to the right to view the Dragon applications.l Windows 10: Select Start > All apps > Dragon.Activating DragonThe first time you start Dragon, you are prompted to activate your copy of Dragon. If you do not activate, Dragon stops working after you start it five times.Dragon file structureDuring installation, Dragon creates the following default folders for application and data file storage.Note: Upgrading Dragon from an earlier version automatically relocates some directories andfiles.Windows 7, Windows 8.1, and Windows 10Dragon setup log (dgnsetup.log)C:\ProgramData\Nuance\NaturallySpeaking15\logsDragon logC:\ProgramData\Nuance\NaturallySpeaking15\logs\<Windows_User_Name> User profilesC:\ProgramData\Nuance\NaturallySpeaking15\UsersUpgrade logC:\Users\<Windows_User_Name>\AppData\Roaming\Nuance\NaturallySpeaking15 Vocabularies and acoustic modelsC:\ProgramData\Nuance\NaturallySpeaking15\DataCustom words and commandsC:\ProgramData\Nuance\NaturallySpeaking15\custom\<language>\Program filesHelpInteractive TutorialAccessing program filesYou can access the Dragon client and many associated utilities through the Start menu. Their location varies by operating system:l Windows 7: Select Start > All Programs > Dragon.l Some utilities are located inside the Dragon Tools subfolder.l Windows 8.1: From the Start screen, click the down arrow to show all applications. Scroll to find Dragon.l Windows 10: Select Start > All apps > Dragon.。
- 1、下载文档前请自行甄别文档内容的完整性,平台不提供额外的编辑、内容补充、找答案等附加服务。
- 2、"仅部分预览"的文档,不可在线预览部分如存在完整性等问题,可反馈申请退款(可完整预览的文档不适用该条件!)。
- 3、如文档侵犯您的权益,请联系客服反馈,我们会尽快为您处理(人工客服工作时间:9:00-18:30)。
安装 Preps
软件
版本 5.3.3
安装指南732-00148B-ZH 修订版B
Copyright
© Kodak,2008。
保留所有权利。
Kodak、克里奥、eCentral、潘多拉盒型拼版软件、Preps、印能捷、印能捷演化版、SmartMarks 和 UpFront
是 Kodak 的商标。
Acrobat、Adobe、Distiller、Illustrator、PageMaker、Photoshop 和 PostScript 是 Adobe Systems Incorporated
的商标。
Apple、AppleShare、AppleT alk、iMac、ImageWriter、LaserWriter、Mac OS、Power Macintosh 和 TrueT ype 是
Apple Computer, Inc. 的注册商标。
Macintosh 是 Apple Computer, Inc. 在美国和其他国家或地区注册的商标。
Hexachrome、PANTONE、PANTONE Hexachrome 和 PANTONE MATCHING SYSTEM 归 Pantone, Inc. 所有。
PEARL、PEARLdry、PEARLgold、PEARLhdp 和 PEARLsetter 是 Presstek, Inc. 的注册商标。
XEROX 是 XEROX CORPORATION 的商标。
/
内部编号:732-00148B-ZH 修订版B
修订日期:2008 年12月
安装 Preps 5.3.3
此版本的 Kodak® Preps®数字拼版软件提供更新程序或完整的安装程序:
•使用更新程序可对现有的 Preps 5.3.x 安装程序进行升级。
如果以后希望仅卸
载软件中的升级部分,可以使用此文档中的操作步骤卸载更新。
•使用完整安装程序可将完整的更新软件安装到新文件夹中。
许可
Preps 5.3.2 是现有、经许可的 Preps 5.x 安装程序的免费升级程序。
如果没有
Preps 5.x 许可证,必须购买新的许可证密钥(也称为密码),许可证密钥必须
通过安装在同一计算机上的支持的 Preps 解密器进行验证,或者通过 Kodak
印能捷®或 Kodak 印能捷演化版™服务器发布的浮动许可证进行验证。
注意:要在生产模式下运行 Preps Ganging,需要当前的 Preps Pro 许可证。
如果您没有Preps Pro许可证,可在演示模式下使用Preps Ganging。
准备安装 Preps
必须登录到管理员级别的计算机,才能安装该软件。
如果使用与印能捷集成的 Preps:要点:为了防止发生严重故障,请勿在印能捷服务器的 AraxiPreps 卷上更新或安装 Preps 软件。
一定要先用印能捷更新安装最新、兼容的 Preps 更新。
如果需要,可在工作站上更新 Preps - 千万不要在服务器上更新。
如果已安装以前的版本:如果要在先前安装了 Preps 的计算机上进行安装,请执行以下步骤以免丢失现有的配置数据:
1.备份旧的 Preps 文件夹并储存到其他位置。
2.开始安装时确保现有的 Preps 软件未在运行。
3.安装 Preps 后,用 Preps 迁移实用程序将备份的 Preps 文件夹中的标记、
模板和其他文件复制到新的 Preps 文件夹。
获取并扩展正确的安装程序:Preps 5.3.2 安装程序和更新程序可在 DVD 上找到,或从 Kodak 网站/的 Preps 产品页面下载。
•在 Mac 操作系统中安装:Preps_5-3-2_Mac_Installer.dmg
•在 Windows 中安装:Preps_5-3-2_Win_Installer.exe
•在 Mac 操作系统中更新:Preps_5-3-2_Mac_Updater.zip
•在 Windows 中更新:Preps_5-3-2_Win_Updater.exe
2
安装Preps的完整副本
默认情况下,Preps 安装程序将 Preps 软件及其实用程序和任何可选功能
(包括 Preps Ganging 工具)均放在Preps 5.3文件夹中。
要在 Mac 操作系统中安
装 Preps:
要在 Windows 中安装
Preps:
安装 Preps 更新
只有当计算机上已经安装以前的 5.3.2版本时,才能使用 Preps 5.3.3更新程序。
如果您有旧的版本,则必须安装 Preps 的完整副本。
要在 Mac 操作系统中更新 Preps:1.将Preps_5-3-3_Mac_Updater.zip文件解压到您的计算机。
2.双击Preps 5.
3.3更新程序图标,然后遵循屏幕上的指示进行操作。
提示您
指定一个目标时,选择现有的Preps 5.3文件夹。
要在 Windows 中更新Preps:1.双击Preps_5-3-3_Win_Updater.exe启动安装程序。
2.遵循出现的指示进行操作。
卸载 Preps 更新程序
如果希望恢复到安装当前更新前在计算机上运行的最新 Preps 版本,请遵循此
过程。
要在 Mac 操作系统中卸载 Preps 更新:注意:Preps更新程序将安装接收文件放置在Library 文件夹中。
如果跳过以下步骤,试图以后重新安装更新,则会有错误消息通知您此更新已安装。
1.从Applications/Preps 5.3文件夹中,切换到图标视图(按COMMAND+1)。
2.双击RollbackTo5.
3.2图标,然后单击是确认此操作。
3.等到消息显示恢复成功为止。
要在 Windows 中卸载Preps 更新:1.在Preps 5.3文件夹中,找到Restore5.3.2.xxx.bat文件。
2.要卸载更新,请根据 Windows 版本选择相应步骤:
Windows 2000、XP 或 2003:双击.bat文件。
Windows Vista:右击.bat文件并选择作为管理员运行。
3.删除Restore5.3.2.xxx.bat文件。
3查找关于 Preps 的信息
有关信息:查找位置
新功能和增强功能发行说明描述了新功能如何影响用户与软件进行交互的方式。
Preps DVD 发行说
明文件夹包含最新的版本,包括可用的翻译。
最新的发行说明张贴在http://
/ Kodak站点的Preps页面上,“下载”和“最近更新”页面
的每个安装程序和更新程序旁边。
同时在网站和帮助中还提供了新功能摘要。
已解决及已知问题的更新信息各类发行说明文档均会说明当前软件存在的问题:
•针对主版本的主发行说明对以前存在的但撰写文档时已解决的问题进行说明。
•主发行说明的更新文档说明自上一发行说明发布以来已确定或解决的问题。
这类更新在软件发行前“最后一分钟”写成,通常只提供英语。
更新发行说明可以联机获得,也会添加到为产品系列汇编的发行说明中。
疑难解答项目使用 Preps 网站上的知识库链接执行关键字搜索。
系统要求每个主版本的发行说明均包含此信息。
安装或升级本指南说明了安装或升级的操作步骤。
对于旧版本,请参阅相应的发行说明。
许可和解密在 Preps 站点或 Preps DVD 上的产品文档中搜索:
•退回 Preps、潘多拉盒型拼版软件或 UpFront 解密器:说明您为何必须将解密
器退回 Kodak 并替换为新解密器或浮动许可证
•解密器退货包装卡
•Preps 解密器兼容性
•有关针对印能捷的 Preps 浮动许可证版本
附加软件在 Preps DVD 上搜索实用程序和用户指南,例如 Preps Migration Utility、Job File Collector Utility 和 Preps PXT for QuarkXPress® 扩展件。
还可以在 Preps 站点的
“下载”页面搜索其他附加软件,如用于安装或切换文本标记字体的 Preps 配置
文件编辑器。
设置或使用新功能更新每个主版本的联机帮助,包含一个新功能部分,从该部分可链接到适用的
主题。
有些重要新功能的信息可能先在技术公告中发布,并添加到稍后发行的
帮助中。
了解并使用软件在 Preps 站点或 Preps DVD 上的产品文档中搜索:
•学习指南:支持各种语言,是一组共享的活动文件。
•创建文件文档,提供准备输入文件的指导。
•联机帮助,可通过 Preps 或 Preps Ganging 帮助菜单访问。
也可下载 CHM
格式的帮助文件,以便在 Windows 上脱机浏览和搜索。
•发行说明,关于新功能的基本信息
•用户文档的可用翻译
Eastman Kodak Company
343 State Street
Rochester, NY 14650 U.S.A.
© Kodak, 2008。
保留所有权利。
TM: Kodak
要了解 Kodak 解决方案的更多信息,请访问/。
如有技术变更,恕不通知。