SP使用说明书_001(mini-11MB)
自行车PDS1中英文说明书
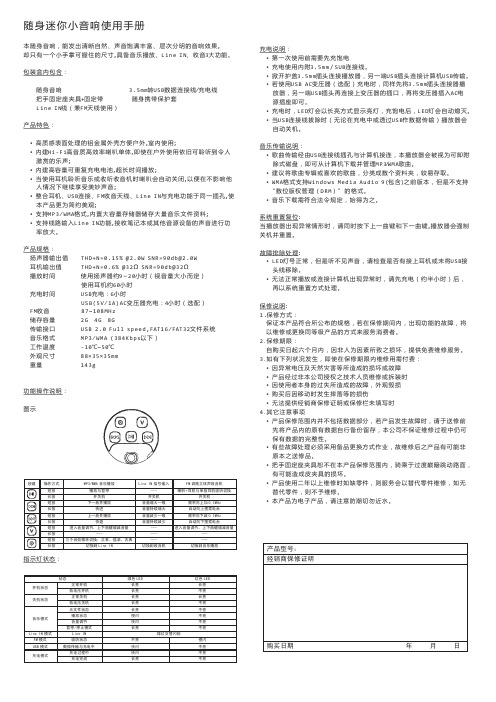
随身迷你小音响使用手册本随身音响,能发出清晰自然声音饱满丰富层次分明的音响效果,却只有一个小手掌可握住的尺寸,具备音乐播放、、收音3大功能。
、、Line INMini sound box user manualMini sound box is personal stereo with clear, nature sound.It could be hold by a small palm and have music play, Line in, FM function.Accessaries :3.5mm convert to USB line+Charge line Bag Line in line Handle Holder fixture + Fixed Belt Features :·High-textured aluminum metal surface facilitate outdoor, indoor use;·Built-in Hi-Fi high-quality and high-efficiency speaker monomer, youcan still hear heavenly music even outdoors.·Built-in high-capacity rechargeable battery, support long play.·You can continue to enjoy the heavenly music when using headphones to listen to music or listen to the radio ,it will automatically turn off the loudspeaker, not accessible to anyone else.·Headset, USB connector, FM radio antenna, Line IN and charging are use the same jack wich make the product more beautiful and simple·Support MP3/WMA format, building in large capacity memory to store number of music files.·Support Line IN function, receiving notebook or other audio source to amplify the power. Product Specification :Loudspeaker output: THD+N=0.15% @ 1.5W SNR=94db @ 1.5W Earphone output: THD+N=0.6% @ 32Ω SNR = 92 db @ 32Ω Play time: 9~20 hours with loudspeaker (depend on the volume) ;70 hours with earphoneCharge time: USB charge :7 hours USB(5V/1A)AC transformer charge :4 hours (Optional) FM: 87~108MHz Storage: 2G 、4G 、8GInterface transfer: USB 2.0 Full speed, FAT16/FAT32 file system Audio format : MP3 / WMAWork temperature: -10°C ~ 50°C Dimension : 88 x 35 x 35 mm Weight : 143 g Instructions :Indicator light :Charge I ndicatio n:• The batt ery shou ld be cha rged fully befo re using at first ti me • 3.5mm /USB line with cha rge• Opened cover, C onnect 3.5mm plug to the player and the other end of USB plug to compute r USB interface• If you us e USB A C adapte r (option al) charg ing, Con nect 3.5mm plug to player , connect the other end of USB plug to socket of the transform er , and then insert the AC power transform er When chargin g, LED li ght will long time bri ght, whe n the pow er is full, LED wil l crush o ut.• When th e USB ca ble is ex tracted, the playe r will pow er off au tomatica lly.Music tra nsmissio n:• Down lo ad the m usic file with MP3/WMA fo rmat, an d transfe r to the p lay via U SB line.• Classifie d the mu sic into s everal fo lders .• WMA format support Window s Media Audio 9 including the edition before but not support “DRM ” format .System reset:When th e player could'n w ork norm ally, plea se press forward and nex t button together , the play er will po wer off a nd reset .Troubles hooting :• When LE D bright, but can't hear vo ice, plea se check whether theearp hone have been connect ed normally or USB line have been removed . • If the pla yer does n 't work no rmally or it shows error when connect with the compute r , please charge about half pass one hour and then reset the system .Warrant y Descri ption :1.Warra nty type:Make sure the products meet publishe d specifica tions . We will repair orreplace the product when the function have trouble during the warranty period .2. Warrant y period :Supply the mainten ance service for free within six months from the date of purchas e withou t human element destroy .3. You nee d to pay for the m aintenan ce charge for the followingconditio n : • The abn ormal vo ltage an d natura l disaste rs cause the dam age.• The prod uct have been ma intained or dismo unted by the pers on who h ave not b e author ized by o ur techn ical staff .• User cau se the da mage or the failure of the appeara nce . • Fall dam age• Can not provide the deal er's warr anty or t he warra nty is no t filled .4. Other notesWarrant y is not i nclude th e data. W hen the p roduct w ork abys sal, plea se copy you r data fir st. We a re not su re to kee p the inte grity of the dataWe need to repla ce the sp are parts sometim es when ma intenanc e, so it is possible that som e parts a re not or iginal.Handle h older fix ture in n ot includ e in the w arranty.We will r eplace th e part if i t is avail able or e lse witho ut maint enance a fter the prod uct have been us ed more than 2 y ears.It is e lectronic product , please keep aw ay from t he water .。
Pellicon Mini和MiniX 保持器用户指南说明书

Pellicon® Mini and MiniX HoldersUser GuideThe life science business of MerckKGaA, Darmstadt, Germany operates asMilliporeSigma in the U.S. and Canada.2 Pellicon® Mini and MiniX Holders User Guide 3 ContentsIntroduction (5)Unpacking (6)Plumbing and Instrumentation (8)Assembling the Holders (9)Feed and Retentate Fitting Connections (9)Permeate Fitting Connections (9)Connecting Pressure Gauge AdapterFittings to FEED and RETENTATE Fittings (10)Connecting the Pressure Gauge (12)Connect the Permeate Fittings (13)Inserting the Pellicon® Cassettes (13)Attaching the End Plate (15)Autoclave Setup (17)Ordering Information (18)Spare Parts and Accessories (18)4 Pellicon® Mini and MiniX Holders User Guide 5 IntroductionThe Pellicon® Mini and MiniX holders are for use with 0.1 m2 Pellicon®2 cassettes and 88 cm2 and 0.11 m2 Pellicon® 3 cassettes.The Pellicon® Mini Holder is recommended for 1 to 3 cassettes in parallel.The Pellicon® MiniX holder is recommended for 3 to 5 cassettes in parallel or 2 to 4 cassettes in series with diverter plates.6 UnpackingMini and MiniX Holders include the following:The Pellicon®2. Remove the FEED and RETENTATE fittings from the holder.3. Loosen and remove the two nuts on the tie rods.4. Remove the washers, spacers, and end plate from the holder.Remove the shipping insert located between the holder manifold and end plate.5. Place the holder base on a level surface.Pellicon® Miniand MiniX HolderTie Rod FilterPellicon ®Tie Rod FilterPellicon ®Pellicon ® Mini and MiniX Holders User Guide 78 Plumbing and InstrumentationThe concentration mode is the most commonly used mode forthe concentration of proteins and viruses and is shown below without the diafiltrate. During this mode, material retained bythe membrane (retentate) flows out of the retentate fitting and is recirculated to the original product container. The material passing through the membrane (permeate) flows out of the permeate outlet fitting onto the permeate collection container.The constant volume diafiltration mode, shown below, is used for washing product that is retained by the membrane or for recovering additional product that is passed through the membrane. The mode involves the addition of water or buffer to the feed container at the same rate as permeate is being removed from the process.Plumbing and Instrumentation DiagramAssembling the HoldersFeed and Retentate Fitting ConnectionsConfigurations for connecting fittings to the FEED and the RETENTATE fittings include:1. Connecting a pressure and sanitary diaphragm valve to theRETENTATE fitting, and a pressure gauge to the FEED fitting.2. Connecting separate tubing to the FEED and the RETENTATEfittings.Feed and Retentate Fitting ConnectionsPermeate Fitting ConnectionsConfigurations for connecting fittings to the PERMEATE fittings include:1. Connecting the two PERMEATE fittings together with tubing usinga tee or Y connection.2. Connecting separate tubing to the two PERMEATE fittings.Pellicon ® Mini and MiniX Holders User Guide 9Permeate Fitting ConnectionsConnecting Pressure Gauge Adapter Fittings to FEED and RETENTATE FittingsThe Pellicon ® Mini and MiniX Holder Pressure Gauge Adapter Fittings are short-leg tees to keep the working fluid volume low and avoid non-sanitary low-flow areas in the piping. Two ¾-inch sanitary gaskets and twosanitary fitting clamps are supplied with each pressure gauge adapter fitting.1. Seat a 3/4-inchsanitary gasket in the groove on the FEED fitting.Installing the Gasket and Positioning the Pressure Gauge Adapter Fittings10 Pellicon® Mini and MiniX Holders User Guide 112. Hold the sanitary gasket in place and press the pressure gaugeadapter fittings flange against the FEED fitting flange so thefitting branch is parallel to the holder case and oriented asshown above.Note The gasket moves easily if not held in place whenpressing the pressure gauge adapter fittings flangeagainst the holder fitting flange.3. Secure the Pressure Gauge Adapter Fittings to the FEED fittingwith the sanitary clamp, as shown below.4. Open the sanitary clamp by moving the swing bolt out of theclamp slot.5. Place the sanitaryclamp over the FEEDfitting connection andclose the sanitaryclamp by moving theswing bolt into theclamp slot.6. Hand tighten thesanitary clampclosure.7. Repeat steps 1-3 toconnect a pressuregauge adapter fittingsto the RETENTATEfitting.Clamping the Pressure Gauge Adapter Fittings to theMini Holder Fitting12 Connecting the Pressure GaugeAnalog and digital pressure gauges are available from your local representative.1. Seat the ¾-inch sanitary gasket in the groove on the pressuregauge adapter fittings.2. Hold the gasket in place and press the pressure gaugediaphragm against the ¾-inch side branch of the pressure gauge adapter fittings.3. Secure the pressure gauge to the Pressure Gauge Adapter Fittingswith the sanitary clamp.4. Open the sanitaryclamp by moving theswing bolt out of theclamp slot.5. Place the sanitaryclamp over the PressureGauge Adapter Fittings-PRESSURE GAUGEconnection and closethe sanitary clamp bymoving the swing boltinto the clamp slot.6. Hand tighten thesanitary clamp closure.7. Repeat steps 1-3 toconnect a PressureGauge Adapter Fittingsto the RETENTATEfitting.Attaching the Pressure Gauge to the Pressure GaugeAdapter FittingsPellicon® Mini and MiniX Holders User Guide 13 Connect the Permeate FittingsTwo gaskets and two clamps are supplied for attaching fittings to the two PERMEATE fittings located on the sides of the manifold plate. The PERMEATE fittings accommodate standard ½-inch or¾-inch sanitary fittings and adapters.Inserting the Pellicon® CassettesInstall the required number of cassettes. Permeate flow rate increases as filter area increases.1. Inspect the tie rods and nuts for signs of burrs or strippedthreads. Nuts should turn freely on the tie rods for propertightening of the holder.2. Holding the manifold with one hand, slide the filter gasket (Pellicon®2 Cassettes only) tabs over the tie rods and press the filter gasketagainst the manifold, as shown below.Note Pellicon® 2 Cassettes ONLYThe large feed and retentate holes on the filter gasketmust align to the large feed and retentate holes onthe manifold. Two filter gaskets are supplied witheach filter. One filter gasket must be installed betweeneach pair of filters, and one gasket must be installedbetween each end of the filter and the adjacentstainless steel plate.Inserting the Filter Gaskets and Filter3. Align the filter cut-outs with the tie rods, and insert the filter soit is parallel with the manifold as shown.NoteThe filter will extend beyond the edges of the manifold and end plate if the filter does not properly align to the feed, retentate, and permeate holes.4. Holding the manifold with one hand, slide the filter gasket(Pellicon ® 2 Cassettes only) tabs over the tie rods and press the filter gasket (Pellicon ® 2 Cassettes only) against the filter , as shown.5. Repeat steps 3–5 for additional cassettes.14 Attaching the End Plate1. Holding the manifold gaskets (Pellicon ® 2 Cassettes only) andfilter(s) in place with one hand, slide the end plate holes over the tie rods and press the end plate against the filter.Attaching the end plate2. Place an equal number of spacers on each tie rod depending onthe number of filters in use.3. Place one washer and one nut on each tie rod, as shown above,and hand tighten.4. Tighten the holder with the torque wrench and socket. Thetorque wrench setting for 180-200 inch-pounds (20.3-22.6 Newton-meters). Check the torque wrench (not supplied with the holder) setting for 180-200 inch-pounds (20.3-22.6 Newton-meters) prior to use. Refer to the next section to set the torque wrench.5. Attach the deep socket to the torque wrench by firmly pressingPellicon ® Mini and MiniX Holders User Guide 1516 the deep socket onto the torque wrench drive. Attaching thedeep socket may require force.6. Hand tighten the nuts evenly by alternating from one nut to theother.7. Brace the holder with one hand. With a continuous motion, turneach nut ¼ turn with the torque wrench, alternating from onenut to the other until torque wrench “clicks” when it reaches180-200 inch-pounds (20.3-22.6 Newton-meters).8. Wait 5-10 minutes; re-torque to 180-200 inch-pounds (20.3-22.6 Newton-meters).Waiting allows gasket(s) to relax before re-torquing.9. Re-torque to a maximum of 200 inch-pounds (22.6 Newton-meters) as needed to create a liquid-tight seal. The torquewrench may have a fixed head or a ratchet-style head. If yourwrench has a ratchet-style head, move lever to the right lockposition to tighten nuts and move the lever to the left lockposition to loosen the nuts.Note Non-uniform tightening of the nuts can damage the filter.Non-parallel plates or compression of the filter(s) at oneend can cause leakage.Setting the Torque Wrench1. Pull down the spring-loaded lock collar to unlock the torquewrench.2. Hold down the spring-loaded lock collar while turning the handleuntil the 180-200 inch-pound (20.3-22.6 Newton-meters) mark on the wrench handle aligns with the zero mark on the sleevedie.Note One side of the torque wrench handle displays units as inch-pounds and the other side displays units asNewton-meters.3. Rotate the handle slightly so the lock collar springs back andlocks into place. When the lock collar locks into place the handle will not rotate.Setting the Torque WrenchAutoclave Setup1. Remove all filters and filter gaskets from the Pellicon ® Mini andMiniX Holder before autoclaving.2. Rest the holder FEED and RETENTATE fittings and the end plateon a soft material to protect the fitting faces and end plate from being scratched in the autoclave.Do not autoclave with the holder in an upright position, because the feet will compress and become loose.3. Autoclave the Pellicon ® Mini and MiniX Holder at 121º C to 125º Cfor 30 minutes per cycle.Pellicon ® Mini and MiniX Holders User Guide 1718 Spare Parts and AccessoriesStandard Product WarrantyThe applicable warranty for the products listed in this publication may be found at /terms (within the “Terms and Conditions of Sale” applicable to your purchase transaction).Pellicon ® Mini and MiniX Holders User Guide 19The vibrant M and Pellicon ® are trade-marks of Merck, KGaA, Germanyor its affiliates. All other trademarks are the property of their respective owners. De-tailed information on trademarks is avail-able via publicly accessible resources.MK_UG3586EN Rev 1.0 02/2019 Previ-ously published as document number P35447. © 2015, 2019 Merck KGaA,Darmstadt, Germany and/or its affiliates. All Rights Reserved.For technical assistanceand worlwide contact informationplease visit: .For additional information and documentation please contact: Merck KGaA, Darmstadt, Germany Corporation with General Partners Frankfurter Str . 25064293 Darmstadt, Germany Phone: + 49 6151-72 0We provide information and advice to our customers on application technologies and regulatory matters to the best of our knowledge and ability, but without obligation or liability. Existing laws and regulations are to be observed in all cases by our customers. This also applies in respect to any rights of third parties. Our information and advice do not relieve our customers of their own responsibility for checking the suitability of our products for the envisaged purpose.。
mgsp 用户手册说明书

MG5000MG5050SP65SP4000SP5500SP6000SP7000Always Armed, Never Disarmed 用户手册目录用户设置 (1)防区设置 (2)用户密码 (3)增加/修改用户 (3)删除用户 (3)设置时间和日期 (4)设置门铃防区 (4)故障显示 (5)键盘 (5)声音反馈 (5)可视化反馈 (6)键盘静音 (6)键盘背光 (6)节电模式(只对K32RF/K37) (7)键盘简要说明 (7)遥控器 (10)遥控器反馈(REM2) (10)在StayD模式下布防与撤防 (10)打开/关闭StayD模式 (11)改变布防模式 (11)高级的StayD设置 (11)布防与撤防 (12)常规布防 (12)睡眠布防 (12)留守布防 (12)旁路防区 (13)单键布防 (13)自动布防 (14)显示模式 (15)报警 (15)报警显示 (15)撤防与取消报警 (15)紧急报警 (15)火警 (16)测试和维护 (16)通过因特网通讯(IP100) (16)短信通讯(PCS200) (17)电话通讯 (19)(带语音向导的VDMP3) (19)高级系统特性 (21)可编程输出(PGM) (21)分区 (21)快速功能键 (21)系统笔记 (22)快速编程 (23)管理员快速菜单 (23)用户设置出于安全性考虑,在以下只填写用户名称而不要填用户密码.用户号和名称分区1 分区2 旁路*留守*强制*只布防*只控制PGM*挟持* 01:系统管理员 □ □ □ □ □ □ □ □02:管理员1 □ □ □ □ □ □ □ □ 03:管理员2 □ □ □ □ □ □ □ □ 04: □ □ □ □ □ □ □ □ 05: □ □ □ □ □ □ □ □ 06: □ □ □ □ □ □ □ □ 07: □ □ □ □ □ □ □ □ 08: □ □ □ □ □ □ □ □ 09: □ □ □ □ □ □ □ □ 10: □ □ □ □ □ □ □ □ 11: □ □ □ □ □ □ □ □ 12: □ □ □ □ □ □ □ □ 13: □ □ □ □ □ □ □ □ 14: □ □ □ □ □ □ □ □ 15: □ □ □ □ □ □ □ □ 16: □ □ □ □ □ □ □ □ 17: □ □ □ □ □ □ □ □ 18: □ □ □ □ □ □ □ □ 19: □ □ □ □ □ □ □ □ 20: □ □ □ □ □ □ □ □ 21: □ □ □ □ □ □ □ □ 22: □ □ □ □ □ □ □ □ 23: □ □ □ □ □ □ □ □ 24: □ □ □ □ □ □ □ □ 25: □ □ □ □ □ □ □ □ 26: □ □ □ □ □ □ □ □ 27: □ □ □ □ □ □ □ □ 28: □ □ □ □ □ □ □ □ 29: □ □ □ □ □ □ □ □ 30: □ □ □ □ □ □ □ □ 31: □ □ □ □ □ □ □ □ 32: □ □ □ □ □ □ □ □ *由安装者设置防区设置记录设备类型(移动探测器、门磁等)和安装位置防区编号及描述分区旁路留守睡眠强制24小时进入延时火警防区火警延时001: □ □ □ □ □ □ □ □ 002: □ □ □ □ □ □ □ □ 003: □ □ □ □ □ □ □ □ 004: □ □ □ □ □ □ □ □ 005: □ □ □ □ □ □ □ □ 006: □ □ □ □ □ □ □ □ 007: □ □ □ □ □ □ □ □ 008: □ □ □ □ □ □ □ □ 009: □ □ □ □ □ □ □ □ 010: □ □ □ □ □ □ □ □ 011: □ □ □ □ □ □ □ □ 012: □ □ □ □ □ □ □ □ 013: □ □ □ □ □ □ □ □ 014: □ □ □ □ □ □ □ □ 015: □ □ □ □ □ □ □ □ 016: □ □ □ □ □ □ □ □ 017: □ □ □ □ □ □ □ □ 018: □ □ □ □ □ □ □ □ 019: □ □ □ □ □ □ □ □ 020: □ □ □ □ □ □ □ □ 021: □ □ □ □ □ □ □ □ 022: □ □ □ □ □ □ □ □ 023: □ □ □ □ □ □ □ □ 024: □ □ □ □ □ □ □ □ 025: □ □ □ □ □ □ □ □ 026: □ □ □ □ □ □ □ □ 027: □ □ □ □ □ □ □ □ 028: □ □ □ □ □ □ □ □ 029: □ □ □ □ □ □ □ □ 030: □ □ □ □ □ □ □ □ 031: □ □ □ □ □ □ □ □ 032: □ □ □ □ □ □ □ □用户密码用户密码是每个用户的身份识别码,允许进入部分编程模式,对系统进行布撤防,也可以用来激活或关闭PGM. 系统支持以下几种用户密码:z1个系统管理员密码z2个管理员密码z29个普通用户密码系统管理员密码(默认:1234)系统管理员密码可以对任何分区进行布撤防,可以创建、修改和删除任何一个用户密码管理员密码管理员密码1对分区1有权限,可以用来创建、修改和删除分配给分区1的用户密码,管理员2只对分区2有权限(例外:当系统没有分区时,管理员2将自动分配给分区1),可以用来创建、修改和删除分配给分区2的用户密码注意:管理员密码不能修改和删除具有两个分区权限的用户密码,只有系统管理员才能权限进行这样的操作挟持密码如果您是被强迫对您的系统进行布防或撤防,此时您可以输入带挟持功能的用户密码对系统进行布防或撤防,与此同时系统会秘密地往监控中心发送一条挟持事件. 挟持密码必须通过安装者密码来设定用户密码长度用户密码可以设置为4位或6位,每位为0至9的数字. 6位密码更难被破解因此安全性更高. 应尽量避免设置比较简单或显而易见的用户密码,如您的电话号码,地址或如1234的用户密码增加/修改用户如何增加/修改用户键盘反馈1 按[]键2 输入[管理员密码][]和[1]闪烁,如果键盘上的某个数字键常亮,表示对应的用户已被编程3 输入两位用户编号(01至32)选择用户“Arm”闪烁4 输入4位或6位[用户密码]“Sleep”闪烁5 再输一次[用户密码]“Stay”闪烁“off”闪烁6 学习遥控器,按住遥控器上任意一个按键3秒钟,然后松开,再按住任意一个按键3秒钟. 如果不使用遥控器,则此步骤直接按[ENTER]键7 要编另外一个用户,则转到第3步骤退出则按[CLEAR]键如果系统已分区,则继续到第8步进行设置8 按[1]或[2]将用户分配给相应的分区,然后按[ENTER]键保存9 要编另外一个用户,转到第3步按[CLEAR]键退出删除用户如何删除用户1 按[]键2 输入管理员密码3 输入2位用户编号选择用户4 按住[SLEEP]键直到听到确认音为止设置时间和日期如何设置时间和日期1 按[]键2 输入[管理员密码]3 按[TBL]键4 按[5]键5 输入当前的时间[HH.MM],如果HH大于13,则直接跳到第7步6 选择时间格式. [1]=24小时制;[2]=AM; [3]=PM7 输入日期,格式为[YYYY/MM/DD],最后按[CLEAR]键退出设置门铃防区门铃防区在每次被触发之后键盘会发出Beep声提醒您,每个键盘的门钟防区都要单独设置如何设置门铃防区z K32和K32RF键盘:按住[]键,Arm1,Arm2,Stay1和Stay2灯将会闪烁,然后输入您想要编为门铃防区的防区编号,此时对应的LED灯将会亮起,最后按[ENTER]键退出z K35和K37键盘:按住[]键(K35)或[]键(K37),键盘屏幕上将会显示“Chime”,然后输入您想要编为门铃防区的防区编号,此时对应的LED灯将会亮起,按[ENTER]键退出. 注意:K37键盘只有在用AC供电时或显示启动时才有效z K10V、K10H和K636键盘:按住防区键([1]至[0(10)]),确认音=门铃防区功能打开z K32LCD键盘:按住[]键,按[1]键选择要编为门铃防区的防区,按[ENTER]键保存如何取消门铃防区K32、K32RF、K35、K37和K32LCD键盘:要取消门铃防区,按住[]或[]键,然后输入要去取消门铃防区功能的防区编号K10V,K10H和K636键盘:按住防区键([1]至[0(10)]),拒绝音=门铃防区功能关闭注意:关于确认音和拒绝音的描述,请参考第5页的键盘反馈故障显示报警系统持续不断地在检测故障,当有故障发生时,[TBL]键会亮起,按[TBL]键,键盘上代表相应系统故障的数字灯将亮起. 除时间丢失故障外,请联系您的监控中心或安装方人员解决故障问题注意:如果在有新故障产生时键盘每隔5秒钟响一下,按[TBL]键停止故障提示音故障显示表按[TBL]键点亮的键/LED故障类型故障描述[1] 无线防区低电量系统某一无线设备的电池需要更换[2] 电源故障控制主机电源故障[3] 警号故障控制主机警铃未接或超载[4] 通讯故障如果您的报警系统有设置联网,但是与监控中心无法通讯[5] 防拆/防区线路故障一个或多个设备发生线路故障[6] 模块防拆故障模块的的防拆开关被触发[7] 火警回路故障某个防区处于火警回路故障[8] 时间丢失故障报警系统的时间必须重新编程,请参考第5页设置您系统的时间和日期[9] 无线防区监测丢失一个或多个无线防区不再与系统通讯[0(10)] 模块监测丢失一个或多个模块不再与系统通讯[16]/[SLEEP]键盘故障系统的键盘有故障键盘声音反馈当您往键盘输入信息时,此功能可以通过声音告诉您的输入时被接受还是被拒绝,您应该熟悉这两种键盘提示音确认音:当在键盘上进行操作(如布防/撤防)成功时或者系统切换到新的状态/模式,键盘会发出断断续续的提示音(“BEEP-BEEP-BEEP-BEEP”)拒绝音:当系统回到前一状态或在键盘上输入的操作不正确,则键盘会发出一声长音(“BEEEEEEEEP”)以下是其他类型的声音反馈,结合布防键或LED灯([ARM],[STAY],[SLEEP])一起显示:z持续提示音=报警z变化的提示音=火警z断断续续的提示音=退出延时开始z快速断续的提示音=退出延时最后10秒钟可视化反馈键盘上有带颜色的指示灯,可以指示系统当前的状态,每个灯的状态代表系统特有的一个状态注意:系统很多特性都要通过安装着密码激活.如果相应的特性没有编程,则键盘会发出拒绝音并且操作会被取消. 详细请参考第2页的防区设置键盘静音如果静音功能有效,则键盘只能发出确认音、拒绝音和按键音.因此,当键盘静音,键盘在报警时不会有声音提示,并且在门铃防区有效地情况下触发门铃防区也不会有声音提示.每个键盘的静音功能都要单独设置的如何设置键盘静音z K32、K32RF、K35、K37、K636、K10V和K10H键盘:按住[CLEAR]键6秒钟激活和关闭键盘静音功能,如果键盘发出确认音,则表示键盘静音功能有效,如果键盘发出拒绝音,则表示静音功能无效32 LCD键盘:按住[]键进入键盘设置,按[4]键进行静音控制,最后按[arm]键激活和关闭键盘静音功能键盘背光按键后面的背光亮度可以根据您的需要进行调整如何调整背景灯亮度z K32和K32RF键盘:按住[]键,然后按[]键想要的背光亮度,按[CLEAR]和[ENTER]键退出K35键盘:按住[S]键4秒钟,按键1,2,3,5和6将会闪烁,按[CLEAR]键不保存信息而退出菜单或按[ENTER]键退出菜单并保存信息,按相应的按键或按[S]和[T]键进行调整[1]调整滑动速度[2]调整背景灯(0=off,1=最低亮度/7=最高亮度)[3] 调整对比度(0=最低对比度,4=最低亮度)[5] 背景灯自动转暗亮度调整(0=off,1=最低背景灯,(…)7=最高背景光亮度)[6] 调整背景灯自动转暗延时(0=off,1=1秒,2=5秒,3=10秒,4=20秒,5=1分钟,6=2分钟,7=4分钟)K37键盘:按住[S]键4秒钟,按键1和2将会闪烁,按[CLEAR]键不保存信息而退出菜单或按[ENTER]键退出菜单并保存信息,按相应的按键并且使用[S]和[T]进行调整[1]调整背景光[2]调整背景灯自动转暗延时(5=5秒/15=15秒)K10V、K10H和K636键盘:按住[MEM]键,[MEM]键会亮起,按[MEM]设置想要的背光亮度,最后按[CLEAR]或[ENTER]退出K32LCD键盘:按住[]键,然后按[2]键进入背景光调整选项,再使用[S]和[T]进行调整,最后按[ENTER]保存节电模式(只对K32RF/K37)如果无线键盘没有DC电源供电,键盘的显示将会关闭并且在1分钟(K37为20秒)后进入节电模式. 按[]键激活显示键盘简要说明K636键盘简要说明[TBL]故障显示[ARM](见第12页)ON=有故障(参考第6页)[SLEEP] (见第12页)[STAY] (见第12页)[MEM]报警记忆显示ON=系统布防ON=发生报警(见第15页)OFF=系统撤防[BYP]旁路编程闪烁=退出延时ON=被旁路的防区(见第15页)快速闪烁=退出延时(最后10秒)/防区报警防区显示:OFF键: StayD灯:按键[1]至[0(10)]分别对应ON =撤防ON=StayD开启于1防区至10防区:OFF=系统布防OFF=Stay关闭按键亮起=开路或进入延迟灯(AC):(参考第12页按键闪烁=报警中ON= 通电StayD模式)OFF=断电=按一下+[管理员密码]进入快速菜单编程(请参考第24页的管理员快速编程菜单)K10V 键盘简要说明[TBL]故障显示[ARM](见第12页)ON=有故障(参考第6页)[SLEEP] (见第12页)[STAY] (见第12页)[MEM]报警记忆显示ON=系统布防ON=发生报警(见第15页)分区1状态分区2状态OFF=系统撤防[BYP]旁路编程闪烁=退出延时ON=被旁路的防区(见第15页)快速闪烁=退出延时(最后10秒)/防区报警防区显示:OFF键: StayD灯:按键[1]至[0(10)]分别对应ON =撤防ON=StayD开启于1防区至10防区:OFF=系统布防OFF=Stay关闭按键亮起=开路或进入延迟灯(AC):(参考第12页按键闪烁=报警中ON=通电StayD模式)OFF=断电=按一下+[管理员密码]进入快速菜单编程(请参考第21页的管理员快速编程菜单)K35和K37键盘简要说明=按一下+[管理员密码] 进入快速菜单编程(参考第21页的管理员快速编程菜单=按住此键进入键盘设置=按住此键进入门铃防区编程K35和K37图标显示和描述K35 K35图标描述图标描述StayD On = StayD模式有效闪烁 =系统处于快速菜单模式指示分区1 和分区 2 EXIT DELAY 闪烁 =在退出延时结束前输入密码OFF On = 系统撤防ENTRYDELAY闪烁 =在进入延时结束前输入密码STAY On = 系统处于留守布防状态ENTERCODEOn = 输入用户密码SLEEP On = 系统处于睡眠布防状态MEMORY On = 发生报警ARM On = 分区布防BYPASS On = 防区旁路ALARM 闪烁= 系统报警中CHIME On = 在门铃防区编程模式显示门铃防区PRE-ALARM DELAY On = 预报警防区报警倒计时TROUBLE Trouble灯闪烁亮起的数字灯对应相应的故障(参考第6页的故障显示表)ZONE OPEN On = 亮灯的防区为开路防区AC On =主机有交流电供应ZONE IN ALARM On = 亮灯的防区为报警防区NO AC On =主机只有后备电池供电TX (K37 only) 闪烁= 与主机通讯中K32和K32RF键盘简要说明分区1状态分区2状态分区1状态分区2状态[TBL]故障显示防区显示:OFF键:StayD灯:ON=有故障(参考第6页)按键[1]至[0(10)]分别ON =撤防ON=StayD开启对应于1防区至10防区:OFF=系统布防OFF=Stay关闭[MEM]报警记忆显示按键亮=开路或进入延迟灯(AC):(参考第12页ON=发生报警(见第15页)按键闪烁=报警中ON=通电StayD模式)OFF=断电[BYP]旁路编程=按一下+[管理员密码]进ON=被旁路的防区(见第15页)入快速菜单编程(参考第电源和RX/TX灯(只对K32RF)24页管理员快速菜单)On =通电[ARM](见第12页)=按住改变背景光OFF= 断电[SLEEP] (见第12页)(见第6页)快闪 =发射/接收[STAY] (见第12页)慢闪 =键盘交流电丢失ON=系统布防信息键(只对K32RF)OFF=系统撤防刷新显示查看所有开路防区(参考第6页)慢闪=退出延时快闪=退出延时(最后10秒)/防区报警K32LCD键盘简要说明[TBL]故障显示off键:StayD灯:ON=有故障(参考第6页)ON =撤防ON=StayD开启OFF=系统布防OFF=Stay关闭[MEM]报警记忆显示灯(AC):(参考第12页ON=发生报警(见第15页)ON=通电StayD模式)=按一下+[管理员密码]进入快速菜单编程(参考第24页管理员快速菜单)=按住改变背景光(见第6页)= 按住进入门铃防区编程(见第4页)遥控器您所使用的系统支持4种遥控器,分别是REM1、REM2、REM3和REM15. REM1和REM15是最基本的遥控器,可以执行5个功能(如布防、撤防、紧急报警、激活PGM等). REM2比较高级,它最多可以执行6种功能,而且提供可视听反馈(见下表). REM3是所有要遥控器中最高级的遥控器,它具有键盘的所有功能(更多信息请参考REM3用户手册). 以下表格式关于REM2遥控器可视听反馈的说明遥控器反馈(REM2)全区布防/强制布防反馈状态可视反馈声音反馈撤防绿灯亮两声提示音退出延迟红灯/绿灯慢闪确认音布防/进入延迟红灯亮确认音报警红灯快闪报警声留守/睡眠布防反馈状态可视反馈声音反馈撤防绿灯亮两声提示音退出延迟黄灯/绿灯慢闪确认音布防/进入延迟黄灯亮确认音报警红灯快闪报警声其他反馈状态可视反馈声音反馈PGM打开/关闭黄灯亮确认音在StayD模式下布防与撤防StayD给您的生活带来便捷,系统不需要撤防而可以每周7天每天24小时保护您的安全,甚至进入布防区域. 如果开启StayD功能则系统可以一直全方位保护您,并且可以自动对系统重新布防,所以你无须惦记对系统进行重新布防当进入/离开一个地点,系统会局部撤防以让您通过:可通过遥控器告知您的系统然后再您通过设计好的路径,此路径的防区在您通过后会自动布防. 其他所有防区都将保持布防状态.因此可以达到的效果是系统将一直保护状态,您无须担心系统是否已布防StayD的其他功能包括获知您的小孩是否正在通过可能存在危险的区域,如阳台、泳池或前门. 至此您可以真正地体会到您一直是出于被保护的状态中. 更多信息请咨询您的安装者.打开/关闭StayD模式打开StayD模式:[STAY]+[密码]+[STAY]→StayD灯亮按[STAY]键后输入系统管理员密码,然后在10秒内按[STAY]键. StayD灯将亮起以确定StayD已经开启,系统将进入留守状态关闭StayD模式:[OFF]+[密码]+[OFF]→Off灯亮按[OFF]键后输入系统管理员密码,然后在10秒内按[OFF]键,StayD灯将熄灭同时Off灯亮起以确认StayD已经关闭. 在StayD关闭后,系统的更能就变为标准的安全系统改变布防模式(请参考第12页的“布防与撤防”)改变安全等级-留守→睡眠:按住[SLEEP]键2秒钟→延时→Sleep灯亮按住键盘上的[SLEEP]键,所有以睡眠模式布防的防区将进入退出延迟,此时允许您走到卧室. 当退出延迟结束后您位于卧室中,则室内的其他区域将处于布防状态,此时系统为睡眠布防的状态.改变安全等级-睡眠→留守:按住[STAY]键2秒钟→Stay灯亮按住卧室里键盘上的[STAY]键,系统将立即从睡眠模式转换为留守模式,这种模式允许您离开卧室并且可在屋内自由移动. 如果偶尔在没有转换到留守模式的情况下离开卧室,则所有以睡眠模式布防的防区将进入延迟状态,您有足够的时间转换到留守模式离家布防-留守→全区布防:键盘:按住[ARM]键2秒钟→延时→Arm灯亮按住已经指定退出路径的键盘上的[ARM]键,退出路径上的所有防区将进入退出延时的状态. 当您离开家后,退出路径上的所有防区将重新布防.系统此时处于全区布防的状态到家布防-全区布防→留守:键盘:[密码] →Stay灯亮当通过进入路径进入住宅时,所有分配给进入路径的防区将进入延迟状态,允许您进入住宅.在进入路径的键盘上输入一个有效的密码终止进入延迟并将系统转换到留守布防模式,进入路径上面的防区将重新布防.此时系统处于留守布防模式.在不改变布防模式的情况下离开指定地点:按住[OFF]键2秒钟在键盘上按住[OFF]键2秒钟离开指定地点而不改变布防模式.高级的StayD设置窗户模式和重新布防延迟在留守布防系统里:这种模式允许您打开一个户外防区而不会触发报警. 要进入窗户模式,按[OFF]键然后输入[用户密码]. 所有可以打开的防区将会在键盘上闪烁. 系统将开始进入退出延迟状态,允许您打开一个户外防区,如窗户或门. 系统只允许您在退出延时期间打开相应的防区. 当您关闭打开的防区(窗、门等)防区将重新被布防.实时查看模式:在报警期间,按[CLEAR]键可以查看移动情况,键盘上的防区灯将显示防区的开路和闭路.布防与撤防熟悉所有的布防方式将有助于您更好地使用您的系统,如果系统没有分区(见第21页的“分区”),则所有东西将属于分区1.注意:如果因为有防区开路而不能布防,则系统将进入旁路编程,输入要旁路的两位防区编号然后按[ENTER]键,或者直接按[ENTER]键旁路所有防区.常规布防这种方式将对所选分区的所有防区布防,请注意自动布防(见第14页“自动布防”)或单键布防(见第15页的“单键布防”)也可以以常规布防的方式进行如何进行常规布防?1 确保要布防的分区里的所有防区都处于闭合状态2 按[ARM]键+[用户密码]3 如果您有两个分区的权限(见第21页的“分区”):按对应于所要布防分区的按键([1]或[2]),如果要布防两个分区,则在确认音之后直接按其他按键.睡眠布防与留守布防相似,睡眠布防使用户也处于被保护的区域,但是睡眠布防比留守布防的安全等级更高. 例如,在两层楼的住房里,周边以留守布防方式保护,如果在睡眠布防状态,周边和一层被保护(移动探测器等),您可以在二楼和卧室区域自由走动. 睡眠防区是在睡眠布防时被旁路的防区. 例如,当您在夜间去睡觉时,则除了您的卧室其他区域都处于布防状态. 自动布防(见第14页“自动布防”)或单键布防(见第13页的“单键布防”)也可以以睡眠布防的方式进行如何进行睡眠布防?1 确保要布防的分区里的所有防区都处于闭合状态2 按[SLEEP]键3 输入[用户密码]4 如果您有两个分区的权限(见第21页的“分区”):按对应于所要布防分区的按键([1]或[2]),如果要布防两个分区,则在确认音之后直接按其他按键.留守布防当周边处于全部布防则这种布防方式允许您在周边以内自由活走动. 留守防区是在留守布防时被旁路的防区. 例如,比如晚上您打算呆在屋里,则您只要对门和窗布防而不对其他防区如移动探测器进行布防. 自动布防(见第14页“自动布防”)或单键布防(见第13页的“单键布防”)也可以以留守布防的方式进行如何进行留守布防?1 确保要布防的分区里的所有防区都处于闭合状态(除留守防区外)2 按[STAY]键3 输入[用户密码]4 如果您有两个分区的权限(见第21页的“分区”):按对应于所要布防分区的按键([1]或[2]),如果要布防两个分区,则在确认音之后直接按其他按键.旁路防区旁路防区允许您在系统下一次布防时忽略(屏蔽)特定的防区. 例如,当您家在装修,您可以旁路某些防区以方便装修工人通过. 一旦系统撤防,所有被旁路将自动取消. 当防区被旁路,[BYP]键会亮起. 防区旁路也可以使用单键旁路编程(见第14页)来完成,如果单键布防编程功能有效,则按[BYP]键3秒钟进入旁路编程. 如果要取消对防区的旁路,在第3步再输入防区编号或按[CLEAR]取消当前被旁路的所有防区,按[CLEAR]+[ENTER]解除被旁路的防区.如何旁路防区?1 按[BYP]键2 输入[用户密码],[BYP]键会闪烁,按[ENTER]键旁路所有开路的防区或者进入步骤33 输入你要旁路的防区编号则对应的防区灯会亮起来常亮=防区开路,闪烁=防区旁路,灭=防区闭合,没有被旁路4 按[ENTER]键保存并退出,按两次[CLEAR]键直接退出而不保存旁路记忆功能在系统撤防后,所有旁路输入将被清除. 旁路记忆功能可以恢复之前保存在缓存里面的旁路输入信息,这个可以避免您每次对系统布防都要手动对旁路重新编程的麻烦如何启动旁路记忆1 按[BYP]键2 输入您的[用户密码]3 按[BYP]键4 按[ENTER]键单键布防单键布防允许您不用输入密码而对系统进行布防,这个功能必须由您的安装者激活. 如果单键布防被设置有效,则您可以不用输入密码直接提高系统的安全等级(撤防→留守布防→睡眠布防→全区布防). 请参考下面图1单键常规布防按住[ARM]键布防所有的防区. 如果分区有效,则按键[1]和[2]会闪烁. 使用这个功能您可以让个别人(如清洁工)去布防而不用授给他们关于报警系统其他任何操作权限. 请参考第14页的“常规布防”单键留守布防按住[STAY]键对周边防区(非留守防区)进行布防,请参考第14页的“留守布防”单键睡眠布防按住[SLEEP]键对所有没有被定义为睡眠防区的防区进行布防,请参考第14页的“睡眠布防”单键旁路编程按住[BYP]键进入旁路编程模式,请参考第13页的“防区旁路”快速退出当系统已经处于留守或睡眠布防状态:这个功能允许您退出已经布防的区域而保持系统处于布防状态. 按住[OFF]键2秒钟进入退出延迟,在退出延迟结束之后系统将切换到之前的布防模式.自动布防定时自动布防报警系统可以在每天特定的时间自动布防,当布防方式为常规布防(参考第12页的“常规布防”)时,系统将自动旁路所有开路的防区如何设置自动布防时间?1 按住[]键2 输入[系统管理员密码]3 按[BYP]键,[BYP]键将会闪烁4 按[1]键设置分区1,按[2]设置分区25 输入所想要的自动布防的时间(24小时制,如18:30)6 按[1]键布防方式设置为常规布防,按[2]键布防方式设置为睡眠布防,按[3]键布防方式为留守布防如何临时取消自动布防计时1 按住[]键2 输入[系统管理员密码]3 按[BYP]键,[BYP]键将会闪烁4 按[1]键设置分区1,按[2]设置分区25 按住[SLEEP]键可临时取消自动布防计时无移动自动布防可以通过编程设置使得报警系统在防区持续预先编好的一段计时未被触发的情况下而自动布防,同时也可以发送报告到监控中心. 这个功能对于那些长期由于健康问题导致行动不便的人或独立生活的人来说是非常有用的. 系统在无移动自动布防时将旁路所有开路的防区.显示模式K32RF有两种显示模式,默认情况下键盘将实时显示所有的事件(例如报警的防区、被旁路的防区等). 通过安装者编程可以使键盘只显示正在报警或出于进入延迟的防区. 如果您想查看所有防区的状态,则按[]键. 开路而没有报警的防区只有在按[]键之后才能显示,信息显示30秒(K37键盘为20秒),按[]键后所有防区的状态将被显示. 防区显示在30秒后会自动关闭(K37为20秒).关于两种显示模式的更多信息,请联系您的安装者.报警报警显示如果某一防区发生报警,则对应的防区键会闪烁,[MEM]键亮起,报警的防区将保存在缓存里. 即使相应的防区被保存对应的按键也会继续闪烁直到撤防. 要退出这种模式并在撤防之前转换到实时显示模式,则按[CLEAR]即可. 当系统被撤防,则对应的防区键会熄灭,[MEM]键保持常亮. 按[MEM]键查看报警记忆. 在下一次报警发生时、输入有效密码后或对系统进行全区布防时报警记忆会自动被清除.撤防与取消报警要撤防已布防的系统或警报,则按[OFF]键并输入[用户密码]. 进入点,如前门,将被定义为进入延迟1防区或进入延迟2防区. 当进入点防区开路,键盘将会发出蜂鸣声直到您撤防系统. 系统在进入延迟计时之内不会发生报警。
迷你使用说明指导书修正版系统时间可修改

Mini DV使用手册(时间设定已经做过测试对的)一、总览1. 核心部件阐明1、挂绳孔2、电源开关3、模式开关4、背夹5、Micro SD6、挂套7、Mini USB接口8、摄像头9、操作按钮 10、状态批示灯 11、麦克风孔2. 重要配件阐明:11、固定底座 12、固定背夹 13、底座与背夹组合 14、底座与背夹组合二、产品简介本产品是首款超Mini声控摄像机,可以摄制高清视频,录制靓丽声音,支持大容量Micro SD(TF)存储卡,可以通过声控触发录像,它操作简便,小巧精致,美观实用,便于携带,是商务、教诲、安防、媒体、司法、旅游、医疗、生活等领域必备实用工具,深受广大消费者青睐。
二.操作指南1.充电:本机内置可充电锂电池,初次使用本机时,请先进行充电,MINI DV 可以通过如下方式充电:1),连接电脑充电,使用USB数据线与电脑连接,即可充电2),用充电器充电,用USB数据线与充电器座连接,再把充电器插市电插座,即可充电。
充电时,淡绿灯与红灯同样亮,均在静止状态。
注意:当电池电量局限性时,D001会直接进入保护状态,无法开机。
此时,请对本机进行充电。
2.开机并录像轻按Power键,黄色批示灯亮,本机处在开机准备状态,且及时转换为待机状态。
轻按顶部Record / Stop键,黄灯常亮,红灯开始慢闪,本机开始摄像,摄录文献解晰度为:720*480,帧数为29~30fps/S。
再短按Record / Stop键,停止录像,并自动保存文献,保存完后红灯保持常亮,如需继续录像,请再次轻按Record / Stop键。
注意:a.请务必确认D001中已插入T-flash (Micro SD)卡,如未插卡,D001将在30秒后自动关机b.T-flash (Micro SD)最大使用容量为16Gc.文献保存保存需要一定期间,请勿在保存时持续按操作键等,这样会导致录制文献无法顺利保存,并使生成文献不完整。
SP使用手册
Guangdong Telecom Vnet互联星空2002年8月V N E T互联星空SP使用手册目录前言 (2)1服务门户功能 (3)1.1SP注册 (3)1.2SP登录 (3)1.3SP信息查询 (3)1.4密码修改 (4)1.5价格制订 (4)1.6产品发布 (5)1.7查询、报表 (6)2VNET为内容供应商提供的功能 (7)2.1用户群的拓展 (7)2.2可靠的支付手段 (7)2.3运营模式的转变 (7)3VNET与内容供应商的接口 (8)3.1名词解释 (8)3.2SP和B ETWEENNER之间的认证令牌转发和接受接口 (8)3.3SP和B ETWEENNER之间的产品使用授权查询接口 (8)3.4SP和B ETWEENNER之间的消费确认信息发送接口 (9)3.5应用服务的请求筛子(R EQUEST B OUT)的接口 (9)前言本手册为Vnet 互联星空SP 使用手册。
请用户根据需要,选择性阅读。
大量图例讲解是本手册的特点,便于用户理解并尽快掌握基本操作方法。
左边这些标志用在手册中,起加注或提示作用,帮助您区分信息类别。
请您在阅读过程中注意加标志的地方,这样不仅可以防止误操作,还可以节省您阅读的宝贵时间。
如您尚有操作手册中未及祥述的问题,或者对我们的产品有好的提议跟更高的要求,请与我们联系:公司主页:电子邮件:公司地址:公司全称联系电话:传真电话:注意事项在进行相关操作的时候需要特别留意的地方解释说明对某些部分的详细说明1 服务门户功能本章概述SP自服务系统基本功能。
1.1 SP注册SP注册是由广东电信完成的,SP注册之前需要提供以下信息:供应商名称供应商主页 URL供应商logo运营许可证银行帐号联系人名称联系人电话移动电话传真号码电子信箱所属省所属城市邮政编码1.2 SP登录ISP为每个SP分配唯一的操作员,每次在进入SP自服务管理系统时,系统会要求输入操作员名/密码,验证通过方可进行以下的各种操作。
SP系列微型打印机说明书

印机停止走纸。在走纸方式下,按 SEL 键打印机直接进入在线运行。
3.3 打印机初始化
5
Байду номын сангаас
FS DC4 CR LF
解除汉字倍宽 打印并回车换行 打印并回车换行
(2) 退出汉字打印命令 格式: ASCII: FS . 十进制: 28 46 十六进制: 1C 2E 打印机接收以上命令后,将从汉字打印状态切换到 5×7 点阵 ASCII 字符打印状态。可实现 16×16 点阵汉字与 5× 7 点阵 ASCII 字符同行混合打印。
3.4 命令集选择
SP 系列普通并行接口打印机有两套命令集,一套是 ESC/P 控制命令,另一套是 uP 01H-0FH 简易命令。通过机内短路块 W6 实 现选择。短路块插于“1”(白点)位置,选 ESC/P 控制命令。
SP 系列汉字打印机和串行接口打印机均只有 ESC/P 控制命令。
第四章 打 印 命 令
DATA STB BUSY ACK
T1 T2 T3 T4 T5
T1>20 毫微秒 T2>30 毫微秒 T3<40 毫微秒 T4<5 毫微秒 T5 约 4 微秒
图 3-2 并行接口控制时序图
3.1.2 串行接口的连接 SP 系列打印机的串行接口与 RS-232C 标准兼容或 TTL 电平。其接口插座为方形 5 线单排插座。引脚信号定义见 表 3-2。
25 23 21 19 17 15 13 11 9 7 5 3 1 26 24 22 20 18 16 14 12 10 8 6 4 2
SPP-01超级编程器使用说明书
按钮即可。 参数数据导入导出操作 如 需 备 份 PC 软 件 中 所 设 置 的 所 有 参 数 值 , 则 点 击 按钮即可将设置参数保存为扩展名为 .TXT 的文 本文件; 如需导入之前备份 的设置参数文 件,则点击 加载对应.TXT 备份文件即可更新至软件对应的 参数页面。 控制参数界面
5
4 软件操作
通过 PC 机专用设置软件向高速参数设置编程器进行参数设置 操作。
4.1 软件运行环境
硬件环境 推荐硬件配置内存 ---512M 以上; CPU---Intel Pentium 4 +2.0G 以上;硬盘---程序安装空间需 55M。 软件环境 运行本软件建议安装的操作系统: Windows XP (32bit) / Win7 (32bit/64bit) /Win8 (32bit/64bit) 安装控件:Windows Installer3_1、DotNetFX40。
RJ11
RJ45
电池座
电池仓 USB 接口
4
名称 RJ11 接口 RJ45 接口 USB 接口 电池座 电池仓
说明 使用 CC-TTL-TTL-150U 通讯线与 设备连接进行设置操作 使用 CC-RS485- RS485-150U 通讯 线与设备连接进行设置操作 使用 CC-USB-USB-150U 通讯线 连接至 PC 机 USB 接口 用于安装 SPP-01 实时时钟供电 电池 可安装 3 节 7 号电池为 SPP-01 供电
10
蓄电池类型选择 蓄电池类型 铅酸免维护蓄电池(默认) 胶体铅酸蓄电池 铅酸液体蓄电池 User(自定义) 充电方式 充电方式 电压补偿 SOC 其它控制参数 参数 蓄电池容量 温度补偿系数 额定电压等级 蓄电池充电(%) 蓄电池放电(%) 默认值 200Ah -3mV/℃/2V Auto 100 30 修改范围 1~9999Ah -9~0mV Auto/12V/24V/36V/48V 20~100 (SOC充电方式) 10~80 (SOC充电方式) 备注 电压控制充电方式(默认) SOC充电方式是通过设置充、放电SOC目标值 实现蓄电池充放电控制 备注 固定控制电压、无法修改 固定控制电压、无法修改 固定控制电压、无法修改 用户可修改电压控制点
深圳市易驱变频技术 MINI 系列高性能矢量变频器说明书

MINI系列变频器使用说明书(V1.0)深圳市易驱变频技术有限公司地址:深圳市福田区八卦三路光纤工业小区3栋8楼前言感谢您使用深圳市易驱变频技术有限公司生产的MINI系列高性能矢量控制变频器。
MINI系列变频器是深圳市易驱变频技术有限公司在ED3100系列的基础上开发的一款小体积变频器。
具有电机参数自辩识、模拟量电流输出、开关量输出、RS485通讯等一系列实用、先进的功能。
为设备制造商和终端客户提供了集成度高的一体化解决方案,对降低系统的采购和运营成本、缩小设备体积具有极大的帮助。
在使用变频器之前,请仔细阅读使用说明书,以确保能正确安装和操作、使变频器发挥其最佳性能,本说明书描述不够详细的地方可参阅我公司ED3100系列说明书。
本说明书如有改动,请以新版为准,恕不另行通知。
读者对象本使用说明书适合以下人员阅读变频器安装人员、工程技术人员(电气工程师、电气操作工等),设计人员本书约定符号约定注意由于没有按要求操作,可能造成中等程度伤害或轻伤的场合。
危险由于没有按要求操作,可能造成死亡或重伤的场合。
-目录-第一章概要1.1 产品确认-------------------------------------------------(5)1.2 安全注意事项-------------------------------------------(6)1.3 使用注意事项-------------------------------------------(8)第二章产品安装及配线2.1 变频器系列型号----------------------------------------(9)2.2 产品技术规范-------------------------------------------(9)2.3 外型尺寸-------------------------------------------------(10)2.4 变频器的安装环境-------------------------------------(10)2.5 变频器配线的注意事项-------------------------------(11)2.6 基本运行配线图----------------------------------------(12)2.7 端子功能说明-------------------------------------------(14)2.8 键盘的使用说明----------------------------------------(15)第三章功能参数表3.1 表中符号说明-----------------------------------------(17)3.2 功能参数表--------------------------------------------(17)第四章参数使用详细说明4.1 基本运行参数组(P0.00-P0.23)------------------(30)4.2 电机与矢量控制参数组(P1.00-P1.15)---------(37)4.3 辅助运行参数组(P2.00-P2.43)------------------(39)4.4 用户管理界面参数组(P3.00-P3.09)------------(46)4.5 开关量输入输出参数组(P4.00-P4.16)---------(47)4.6 模拟输入输出参数组(P5.00-P5.16---------------(55)4.7 过程PID控制参数组(P6.00-P6.14)--------------(59)4.8 可编程运行参数组(P7.00-P7.18)-----------------(63)4.9 通讯参数组(P8.00-P8.04)--------------------------(68)4.10保护参数(P9.00-P9.03)----------------------------(69)4.11高级功能参数(PA.00-PA.06)---------------------(71)第五章故障诊断及处理5.1 故障现象及对策-------------------------------------------(73)故障代码以及对策-----------------------------------------(73)第六章保养和维护6.1 日常保养及维护--------------------------------------------(75)6.2 定期保养及维护--------------------------------------------(75)6.3 变频器的保修-----------------------------------------------(75)第一章概要1.1 产品确认开箱时,请认真确认:在运输中是否有破损或刮伤损坏现象,本机铭牌的额定值是否与您的订货要求一致。