vb TreeView 控件应用实例
第15讲 TreeView控件应用

14
三、从XML文件读取节点数据(4/5) 文件读取节点数据
这个XML文档中只允许有一个根标签 <TREENODES></TREENODES>,所有的节点标签都必 须放在这个根标签之内,标签标记TREENODES必须大写。 每个节点标签<TreeNode ></TreeNode>中定义一个节 点,节点标签可以嵌套,嵌套层次表明了节点的结构关系。 (三)指定 (三)指定TreeView控件的TreeNodeSrc属性 指定TreeView控件的 控件的TreeNodeSrc属性 需要指定TreeView控件的TreeNodeSrc属性,以指示 TreeView控件的节点数据和结构来自文件。注打开 TreeView控件的属性窗口,在TreeNodeSrc属性上指定其 值为刚编写的那个文件“XMLTreeViewNode.xml”。
程序设计
李德奇主编
15
三、从XML文件读取节点数据(5/5) 文件读取节点数据
(四)控件效果 四 控件效果
运行程序,效果如下图。
程序设计
李德奇主编
16
四、TreeView控件应用举例(1/10) 控件应用举例
(一)获取用户选择的节点 一 获取用户选择的节点 程序运行后,用户会在TreeView控件上操作,或者展开节 点,或者折叠节点,或者选择(打开)某一个节点。当用户选 择(打开)了某个节点之后,程序必然需要有所动作来对用户 的选择作出响应。例如在Windows资源管理器中,当用户在左 边的资源结构树上选择某个节点后,需要在右边的资源内容区 显示出该节点的所有资源。在Web应用程序的页面上使用 TreeView控件时,一般也会参照这个习惯。为此,获取用户对 节点的选择信息就显得必要了。 (二)两种获得用户选择节点信息的方法 二 两种获得用户选择节点信息的方法 ①TreeView控件的SelectedNodeIndex属性保存了用户 选择节点的索引号,该属性的文本是形如”x.y.z..”的结构。例 如当TreeView1. SelectedNodeIndex.Text的值为“0.2.1”时, 用户选择的节点在第一层的索引号为0,第二层的索引号为2, 第三层的索引号为1,根据这个索引号可以确定用户选择了哪 个节点。 17 程序设计 李德奇主编
VB控件-treeview用法详解

VB TreeView控件使用详解(2012-06-16 15:08:16)转载▼分类:VB编程笔记标签:it第一小时:学习直接用代码将数据填充到树控件中。
为什么要先学习直接用代码将数据填充到树控件中?因为这种方法是最简单的,代码也最容易理解,学习树控件,先将这个学会,已经掌握了一半,所以先不要急着想怎么将表中的数据填充到树控件中,在第一小时里,树控件和表完全没有关系。
目的:我们要在树控件中建立如下的一个3层级关系水果||__苹果| |__红富士| |__国光||__葡萄|__红提子|__青提子解释:水果包含2种,一种是苹果,一种是葡萄,苹果又包含2种,一种是红富士,一种是国光,葡萄也如此。
在这里:“爷”是水果,“父”是苹果,葡萄,“子”是红富士,国光,红提子,青提子。
概括如下:爷(只能有一个):水果父(这里有2个):父1:苹果;父2:葡萄子(这里有4个):子1:红富士(父1苹果的子);子2:国光(父1苹果的子);子3:红提子(父2葡萄的子);子4:青提子(父2葡萄的子)1、新建一个窗体,在窗体上放置两个控件,一个是Treeview,一个是Imagelist如何找到这两个控件?Treeview控件在“工具箱”的榔头加扳手图标(其他控件)中选“Microsoft Treeview Control,Version 6.0"Imagelist控件在“工具箱”的榔头加扳手图标(其他控件)中选“Microsoft Imagelist Control,Version 6.0"Treeview控件大家都明白干什么用的,Imagelist控件是干什么用呢?原来这个控件是放图标用的,如果你想在树控件中显示图标的,这个图标都将储存在ImageList控件中。
2、设置这两个控件的属性首先要讲清楚控件的属性设置有2种,一种是设置这个控件在ACCESS中的属性,比如名称等。
一种是设置这个控件本身的属性。
VBtreeview使用示例代码(从数据库中读入)_天之蓝

VBtreeview使用示例代码(从数据库中读入)_天之蓝数据库连接参数设置'*****定义数据库连接参数Dim rs As New ADODB.ConnectionDim bs As New ADODB.RecordsetDim sql As String '查询字符串Dim filename As String '数据库名称Dim ctrFi '连接字符串Dim nodX As Node '树形控件节点类型定义连接并打开数据库:'******连接并打开数据库**********Public Sub connectdata()filename = App.Path + "\" + "123.mdb"ctrFi = "Provider=Microsoft.Jet.OLEDB.3.51;Persist Security Info=False;Data Source=" & filenamers.Open ctrFiEnd Sub数据库中表与字段设置:数据库名称:123.mdb表一:名称:usere字段:user(字符型),type(字符型)表二:名称:typer字段:usertype(字符型)窗口上加入一个Imagelist控件,加入3个图标,再加入一个treeview控件,treeview控件图标属性与imagelis关联(即在treeview 控件上点右键,选择图像列表里的imagelist1,必须先添加imagelist1控件才有显示)添加节点代码:TreeView1.LineStyle = tvwRootLinesCall connectdatasql = "select * from typer" '添加根节点bs.Open sql, rs, 1If bs.RecordCount <> 0 Thenbs.MoveFirstDo While bs.EOF = FalseSet nodX = TreeView1.Nodes.Add(, , bs.Fields("usertype").Value, bs.Fields("usertype").Value, 3) bs.MoveNextLoopEnd Ifbs.Closers.Close'***添加子节点***Call connectdatasql = "select * from usere"bs.Open sql, rs, 1If bs.RecordCount <> 0 Thenbs.MoveFirstDo While bs.EOF = FalseSet nodX = TreeView1.Nodes.Add(bs.Fields("type").Value, tvwChild, bs.Fields("user").Value, bs.Fields("user").Value, 2) bs.MoveNextLoopEnd Ifbs.Closers.Close。
VB控件 treeview用法详解

VB TreeView控件使用详解(2012-06-16 15:08:16)标签:分类:第一小时:学习直接用代码将数据填充到树控件中。
为什么要先学习直接用代码将数据填充到树控件中因为这种方法是最简单的,代码也最容易理解,学习树控件,先将这个学会,已经掌握了一半,所以先不要急着想怎么将表中的数据填充到树控件中,在第一小时里,树控件和表完全没有关系。
目的:我们要在树控件中建立如下的一个3层级关系水果||__苹果| |__红富士| |__国光||__葡萄|__红提子|__青提子解释:水果包含2种,一种是苹果,一种是葡萄,苹果又包含2种,一种是红富士,一种是国光,葡萄也如此。
在这里:“爷”是水果,“父”是苹果,葡萄,“子”是红富士,国光,红提子,青提子。
概括如下:爷(只能有一个):水果父(这里有2个):父1:苹果;父2:葡萄子(这里有4个):子1:红富士(父1苹果的子);子2:国光(父1苹果的子);子3:红提子(父2葡萄的子);子4:青提子(父2葡萄的子)1、新建一个窗体,在窗体上放置两个控件,一个是Treeview,一个是Imagelist如何找到这两个控件Treeview控件在“工具箱”的榔头加扳手图标(其他控件)中选“Microsoft Treeview Control,Version "Imagelist控件在“工具箱”的榔头加扳手图标(其他控件)中选“Microsoft Imagelist Control,Version "Treeview控件大家都明白干什么用的,Imagelist控件是干什么用呢原来这个控件是放图标用的,如果你想在树控件中显示图标的,这个图标都将储存在ImageList控件中。
2、设置这两个控件的属性首先要讲清楚控件的属性设置有2种,一种是设置这个控件在ACCESS中的属性,比如名称等。
一种是设置这个控件本身的属性。
要设置这个控件在ACCESS中的属性,选中控件后按鼠标右键选“属性”就可以了。
duilib treeview 用法总结

duilib treeview 用法总结下载温馨提示:该文档是我店铺精心编制而成,希望大家下载以后,能够帮助大家解决实际的问题。
文档下载后可定制随意修改,请根据实际需要进行相应的调整和使用,谢谢!并且,本店铺为大家提供各种各样类型的实用资料,如教育随笔、日记赏析、句子摘抄、古诗大全、经典美文、话题作文、工作总结、词语解析、文案摘录、其他资料等等,如想了解不同资料格式和写法,敬请关注!Download tips: This document is carefully compiled by the editor. I hope that after you download them, they can help you solve practical problems. The document can be customized and modified after downloading, please adjust and use it according to actual needs, thank you!In addition, our shop provides you with various types of practical materials, such as educational essays, diary appreciation, sentence excerpts, ancient poems, classic articles, topic composition, work summary, word parsing, copy excerpts, other materials and so on, want to know different data formats and writing methods, please pay attention!当今社会,随着信息化的发展,人们对于数据的展示和管理需求日益增加。
VB 6.0 treeview 运用
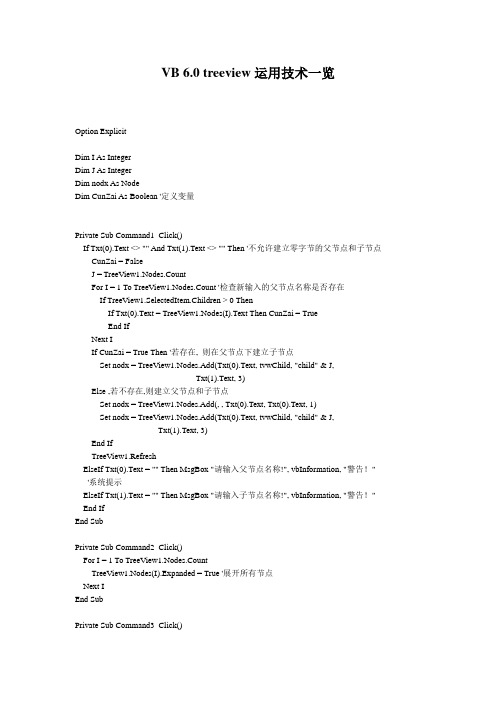
VB 6.0 treeview运用技术一览Option ExplicitDim I As IntegerDim J As IntegerDim nodx As NodeDim CunZai As Boolean '定义变量Private Sub Command1_Click()If Txt(0).Text <> "" And Txt(1).Text <> "" Then '不允许建立零字节的父节点和子节点CunZai = FalseJ = TreeView1.Nodes.CountFor I = 1 To TreeView1.Nodes.Count '检查新输入的父节点名称是否存在If TreeView1.SelectedItem.Children > 0 ThenIf Txt(0).Text = TreeView1.Nodes(I).Text Then CunZai = TrueEnd IfNext IIf CunZai = True Then '若存在, 则在父节点下建立子节点Set nodx = TreeView1.Nodes.Add(Txt(0).Text, tvwChild, "child" & J,Txt(1).Text, 3)Else ,若不存在,则建立父节点和子节点Set nodx = TreeView1.Nodes.Add(, , Txt(0).Text, Txt(0).Text, 1)Set nodx = TreeView1.Nodes.Add(Txt(0).Text, tvwChild, "child" & J,_Txt(1).Text, 3)End IfTreeView1.RefreshElseIf Txt(0).Text = "" Then MsgBox "请输入父节点名称!", vbInformation, "警告!"'系统提示ElseIf Txt(1).Text = "" Then MsgBox "请输入子节点名称!", vbInformation, "警告!"End IfEnd SubPrivate Sub Command2_Click()For I = 1 To TreeView1.Nodes.CountTreeView1.Nodes(I).Expanded = True '展开所有节点Next IEnd SubPrivate Sub Command3_Click()For I = 1 To TreeView1.Nodes.CountTreeView1.Nodes(I).Expanded = False '收起所有节点Next IEnd SubPrivate Sub Command4_Click()TreeView1.Sorted = True '排列顺序End SubPrivate Sub Command5_Click()If TreeView1.SelectedItem.Index <> 1 ThenTreeView1.Nodes.Remove TreeView1.SelectedItem.Index '删除选定的节点End IfEnd SubPrivate Sub Command6_Click()End '退出程序End SubPrivate Sub Form_Load()TreeView1.LineStyle =TvwTreeLines '在兄弟节点和父节点之间显示线TreeView1.ImageList = ImageList1 '链接图像列TreeView1.Style = tvwTreelinesPlusMinusPictureText'树状外观包含全部元素Set nodx = TreeView1.Nodes.Add(, , "蒲子明", "蒲子明", 1)'建立名称为"蒲子明"的父节点,选择索引为1的图像Set nodx = TreeView1.Nodes.Add("蒲子明", tvwChild, "child01", "收件箱", 3) '在"蒲子明"父节点下建立"收件箱"子节点,选择索引为3的图像Set nodx = TreeView1.Nodes.Add("蒲子明", tvwChild, "child02", "发件箱", 3) '在"蒲子明"父节点下建立"发件箱"子节点,选择索引为3的图像CunZai = FalseEnd SubPrivate Sub TreeView1_Expand(ByVal Node As MSComctlLib.Node) Node.ExpandedImage = 2 '节点被展开时,选择索引为2的图像End SubPrivate Sub TreeView1_NodeClick(ByVal Node As MSComctlLib.Node) If TreeView1.SelectedItem.Children = 0 Then '检查是否有子节点,0为无For I = 1 To TreeView1.Nodes.CountIf TreeView1.Nodes(I).Selected ThenMsgBox "您选择的是:“" & TreeView1.Nodes(I).FullPath & "”子节点!"'系统提示End IfNext IEnd If End Sub。
VFP6.0中ActiveX控件TreeView使用实例

VFP6.0中ActiveX控件TreeView 使用实例ActiveX control TreeView using instances in VFP6.0ActiveX controls have long been used as an important tool for most program developers. Since it has nothing to do with the development language, you can use ActiveX controls on any software platform that supports ActiveX controls. Just as freely as using WINDOWS controls. However, many problems met ActiveX in specific to a certain development tools to use, this in a lot of publication of the article have often been discussed, but most are for Vc, Delphi, VB, PB and other development platform under the ActiveX control. In fact, the use of ActiveX controls in the above platform can basically help in its function, developers in accordance with their example, and ultimately can find the ActiveX control properties, methods, the use of events instructions. Even some development tools have made it convenient for developers to use some ActiveX controls as their common form controls.But in the VFP development platform, to use the ActiveX control as the development tool that lucky, because the VFP was not related to the grammatical descriptions and examples, the VFP developers feel embarrassed and confused. Because there are very few articles on this subject. Therefore, the author is in the development of "real estate sales software" as an example to introduce the specific use of TreeView controls in VFP, for the sake of the author of the same VFP colleagues reference.First, introduce the TreeView controlThe TreeView control displays a hierarchical list of Nodeobjects, each of which consists of a tag and an optional bitmap Node. TreeView is typically used to display document titles, index entries, files and directories on disk, or other kinds of information that can be effectively layered.The Node object is an item in the TreeView control that contains images and text. The Nodes collection contains one or more Node objects. Syntax: treeview.Nodes, treeview.Nodes.Item (index). You can use standard collection methods (such as Add and Remove methods) to operate Node objects. You can access each element in the collection by its index or the unique key stored in the Key property. To select the specified Node object, you must refer to it through its Index attribute or the value of the Key property.Add a Node object in the Nodes collection of the Treeview control: object.Add (relative, relationship, key, text, image, selectedimage). The Nodes collection is a collection based on 1. When a Node object is added, it is assigned an index number that is stored in the Index attribute of the Node object. The Index attribute value of this latest member is the value of the Count property of the Node collection. Because the Add method returns a reference to the newly created Node object, it is very convenient to use this reference to set the properties of the new Node. Here are a few properties of the node:Relative is optional. That represents the index number or key value of the existing Node object. The relationship between the new node and the existing node can be found in the next parameter, relationship.Relationship is optional. That represents the relative position of the specified Node object, as in the settings value. The setting value for relationship is:TvwFirst is a constant, and 0 is a value. It represents the node of the head. The Node and the nodes named in the relative are on the same floor and are located before all the same layer nodes.TvwLast is a constant, and 1 is a value. That represents the last node. The Node and the nodes named in the relative are on the same floor and are located behind all the same layer nodes. Any successive addition of nodes may be at the end of the last added nodeTvwNext is a constant, and 2 is the default. It represents the next node. The Node is located after the named node in relative.TvwPrevious is a constant, and 3 is a value. That represents the previous node. The Node is located before the named node in relative.TvwChild is a constant, and 4 is the default. It represents a child node. The Node becomes the child node of the node named in relative.Note that if the Node object is not named in the relative, the new node is placed at the last position of the top level of the node.Key is optional. It represents the only string in the node thatcan be used to retrieve Node using the Item method.Text is required. That represents the string that appears in Node, that is, the name of the node.Index is an integer or string that uniquely identifies a member of the Nodes collection. The integer is the value of the Index property, and the string is the value of the Key property.The FullPath property, which returns the full qualified path of the Node object referenced in the TreeView control. When given to the property as a string variable, the string is set to the FullPath node with the specified index.The Indentation property returns or sets the indent width of the object in the control.The LabelEdit property returns or sets a value that determines whether the label of the Node object in the TreeView control can be edited.Two, source code exampleIn this program, the TreeView control can implement the four layers of relations including the project, the building, the unit and the floor. Users simply click each layer of nodes "+" / "-", you can intuitively observe a project contains several buildings, a building contains several units, a unit and how many floors. By using the table GRID of each page in the page frame PAGEFRAME, you can add records in the corresponding tables and display the corresponding details in the GRID as longas you double-click each layer of nodes. It is worth noting that the program can realize the display of a number of projects, the project node and the project node is a parallel relationship between the same level, only second projects, the first node after the first row. The building node is the sub node of the project node, and the unit node is the sub node of the building node, and the floor node is the child node of the unit node.Source 1, TreeView control initialization work, that is, the form of the Olecontrol1.init event, fill in the source code 1, all the code.Source 2 implementation and page frame, show the corresponding details of the node, that is, the form of theOlecontrol1.NodeClick event, fill in the source code 2 all the code.Source code 1, as follows:LOCAL, M.L_XMCOUNT, I, J, K, L, M.L_NODES, M.L_LYCOUNT,M.L_DYCOUNT, M.L_LCCOUNTTHIS.NODES.CLEAR and remove all nodesBELEDIT=1 can edit node labelTHIS.Indentation=10 and indentation width of 10 pixelsSELECT SF_XMXXSet Dele onM.L_XMCOUNT=RECCOUNT ()FOR I=1 TO M.L_XMCOUNTSELECT SF_XMXXGO IIf! Delete ()(M.L_NODES=THIS.NODES.ADD,'XM'+XM_BH, and XM_MC) to join the first set of nodes and node KEY=XM, TEXT= project.M.L_NODES.EXPANDED=.T. and all the nodes can be foldedM.L_NODES.FORECOLOR=RGB (0,0255) and all nodes set the foreground colorM.P_XMBH=XM_BH=REQUERY ('VIEW_XMLY')M.L_LYCOUNT=RECCOUNT ('VIEW_XMLY')IF M.L_LYCOUNT>0FOR J=1 TO M.L_LYCOUNTSELECT VIEW_XMLYGO JIf! Delete ()And to the 'projects' parent node join node''KEY=LY TEXT= building, the actual number of buildingsTHIS.NODES.ADD ('XM'+SF_XMXX.XM_BH, 4,'LY'+VIEW_XMLY.LY_BH, VIEW_XMLY.LY_SJBH)M.P_LYBH=VIEW_XMLY.LY_BH=REQUERY ('VIEW_XMDY')M.L_DYCOUNT=RECCOUNT ('VIEW_XMDY')IF M.L_DYCOUNT>0FOR K=1 TO M.L_DYCOUNTSELECT VIEW_XMDYGO KIf! Delete ()To the 'building' parent node and child nodes' join unit'KEY=DY, TEXT= unit numberTHIS.NODES.ADD ('LY'+VIEW_XMLY.LY_BH, 4,'DY'+VIEW_XMDY.DY_BH, ALLTRIM (STR (VIEW_XMDY.DY_SJBH)) + 'unit')M.P_DYBH=VIEW_XMDY.DY_BH=REQUERY ('VIEW_XMLC')M.L_LCCOUNT=RECCOUNT ('VIEW_XMLC')IF M.L_LCCOUNT>0FOR L=1 TO M.L_LCCOUNTSELECT VIEW_XMLCGO LIf! Delete ()To the 'unit' parent node and child nodes join ''KEY=LC TEXT= floor, the actual floor numberTHIS.NODES.ADD ('DY'+VIEW_XMDY.DY_BH, 4,'LC'+VIEW_XMLC.LC_BH, ALLTRIM (STR (VIEW_XMLC.LC_SJCH)) + 'layer')EndifENDFORENDIFEndifENDFORENDIFEndifENDFORENDIFEndifENDFORSource code 2 is as follows:* * * ActiveX control event * * *LPARAMETERS node* * * ActiveX, Contro1l, Event * * *LOCAL, M.L_NODES, M.l_selected,l_indexm.l_selected = thisform.olecontrol1.selecteditem.index m.l_nodes =上。
vb.net treeview tooltiptext 用法案例
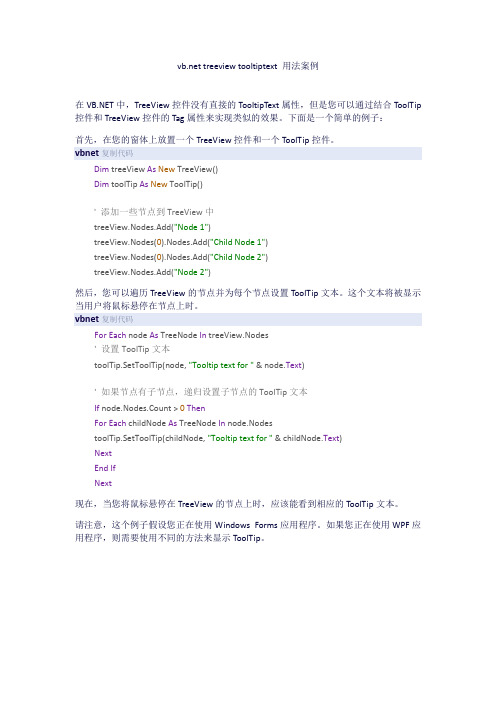
treeview tooltiptext 用法案例在中,TreeView控件没有直接的TooltipText属性,但是您可以通过结合ToolTip 控件和TreeView控件的Tag属性来实现类似的效果。
下面是一个简单的例子:首先,在您的窗体上放置一个TreeView控件和一个ToolTip控件。
vbnet复制代码Dim treeView As New TreeView()Dim toolTip As New ToolTip()' 添加一些节点到TreeView中treeView.Nodes.Add("Node 1")treeView.Nodes(0).Nodes.Add("Child Node 1")treeView.Nodes(0).Nodes.Add("Child Node 2")treeView.Nodes.Add("Node 2")然后,您可以遍历TreeView的节点并为每个节点设置ToolTip文本。
这个文本将被显示当用户将鼠标悬停在节点上时。
vbnet复制代码For Each node As TreeNode In treeView.Nodes' 设置ToolTip文本toolTip.SetToolTip(node, "Tooltip text for " & node.Text)' 如果节点有子节点,递归设置子节点的ToolTip文本If node.Nodes.Count > 0ThenFor Each childNode As TreeNode In node.NodestoolTip.SetToolTip(childNode, "Tooltip text for " & childNode.Text)NextEnd IfNext现在,当您将鼠标悬停在TreeView的节点上时,应该能看到相应的ToolTip文本。
- 1、下载文档前请自行甄别文档内容的完整性,平台不提供额外的编辑、内容补充、找答案等附加服务。
- 2、"仅部分预览"的文档,不可在线预览部分如存在完整性等问题,可反馈申请退款(可完整预览的文档不适用该条件!)。
- 3、如文档侵犯您的权益,请联系客服反馈,我们会尽快为您处理(人工客服工作时间:9:00-18:30)。
vb TreeView 控件应用实例2009-11-14 20:52TreeView 控件应用实例:将 TreeView 绑定到 Biblio.mdb 数据库应用示例:DataTree.vbp本章的代码示例是从应用示例 DataTree.vbp which is listed in the Samples directory 中得到的。
可将数据库中的数据绑定到 TreeView 控件。
下面的示例将 TreeView 控件绑定到 Biblio 数据库,该数据库可以在 Visual Basic CD 中找到。
该应用实例将 Publishers 表作为树节点的第一层。
如果一个出版商对应于一个或多个书名,则这些书名将作为该出版商的子节点加入树中。
图 2.42 与数据绑定的 TreeVew 控件下面的代码用到了如下对象:Data Access Object Library(3.5)名为“frmDataTree”的 Form 对象名为“tvwDB”的 TreeView 控件名为“cmdLoad”的 CommandButton 控件将 Biblio.mdb 数据库绑定到 TreeView 控件在工程中添加对数据访问对象(DAO 3.0)的引用。
为 Database 和 Node 对象创建模块级的变量。
在 Form Load 事件中,用 OpenDatabase 语句将 Database 对象变量设置为 Biblio 数据库。
用 Nodes 集合的 Add 方法创建顶层的节点对象。
在 CommandButton 的 Click 事件中,创建两个 Recordset 变量,并将它们设置为Publishers 和 Titles 表。
用“Do Until”语句为表中的每个出版商创建一个 Node 对象。
对每个出版商,在 Titles 记录集中检查匹配的 PubID 字段;为每个匹配项添加一个子节点。
在工程中添加对数据访问对象(DAO 3.5)的引用要将数据库绑定到 TreeView 控件,必须先添加对当前版本的数据访问对象(DAO)的引用。
为 Database 对象和 Node 对象创建模块级的变量由于需要在一个会话中多次访问 Biblio.mdb 数据库,如果创建一个模块级的 Database 对象,保持一个打开数据库,将有助于提高效率。
此后,不需要打开数据库即可访问它。
在窗体的声明部分,键入如下内容:Private mDbBiblio As Database如果希望该数据库还可被其它模块使用,可以用 Public 语句,并重命名该变量,以表明它是全局的,例如 gDbBiblio。
在创建 Node 对象时,在 Set 语句中(如下所示)使用 Node 类型的变量。
Dim TempNode As NodeSet TempNode = tvwDB.Nodes.Add()虽然可以在添加 Node 对象时创建变量,更有效的方式是声明一个模块级的 Node 对象变量,并用它创建所有的 Node 对象。
在上述声明部分再键入:Private mNode As Node用 OpenDatabase 语句将 Database 对象变量设置为 Biblio 数据库Form 对象的 Load 事件中可以初始化 Database 变量。
代码如下:Set mDbBiblio = DBEngine.OpenDatabase("BIBLIO.MDB")在成功地初始化 Database 对象变量后,就可以在该模块的代码中的任何位置自由地访问它了。
Form Load 事件:用 Nodes 集合的 Add 方法创建顶层的 Node 对象至此,Database 对象变量已经被初始化为 Biblio 数据库,现在可以创建树中的第一个节点,并将打开的数据库的名称赋予它。
首先必须用 Node 集合的 Add 方法创建第一个 Node 对象。
还要使用 Set 语句将其赋给 mNode 对象变量,如下所示:Set mNode = tvwDB.Nodes.Add() ' 创建第一个节点。
mNode.Text = 注意,在上面的代码中,在创建 Node 的同时用 Set 语句将其赋给了 mNode 对象变量。
由于 mNode 变量现在包含了新创建的 Node 对象,可以对该 Node 对象的属性进行赋值。
在上述情况下,Database 的名称(即 Database 对象的 Name 属性)已经被赋给了新节点的Text 属性。
CommandButton Click 事件:创建两个 Recordset 变量,并将它们分别设置为 Publishers 和 Titles 表本应用实例假定存在名为“cmdLoad”的按钮,并且当用户单击它时,置入 Biblio 数据库中的两个表到 TreeView 控件中。
为此,必须首先在该按钮的 Click 事件中声明两个 DAO 对象变量。
第一个变量 rsPublishers 用来包含 Publishers 表。
第二个变量 rsTitles 用来包含 Titles 表。
下面的代码声明了这两个变量,并用 OpenRecordSet 方法将表赋给变量:Dim rsPublishers As RecordsetDim rsTitles As RecordsetSet rsPublishers = mDbBiblio. _OpenRecordset("Publishers", dbOpenDynaset)Set rsTitles = mDbBiblio. _OpenRecordset("titles", dbOpenDynaset)用 Do Until 语句为表中的每个出版商创建一个 Node 对象现在有两个打开的记录集,可以遍历每个记录集,创建 Node 对象,并为该对象的 Text 属性赋予合适的值。
首先,必须遍历 Publishers 表,并为该表中的每个出版商创建一个 Node 对象。
下列简化了的代码可以用一句话概括为,“逐个处理每个记录,直到记录集的末尾:创建Node 变量,并将 Title 字段的值赋给其 Text 属性,移到下一记录并重复”:Do Until rsPublishers.EOFSet mNode = tvwDB.Nodes.Add(1, tvwChild)mNode.Text = rsPublishers!NamersPublishers.MoveNextLoop注意,在上面的 Add 方法中用了两个参数。
第一个参数(1)是我们希望添加入节点的 Node 的 Index 属性。
也就是说,希望所有的出版商节点成为第一个(根)节点(在 Form 的 Load 事件中创建的)的子节点。
第二个参数使用了常数 (tvwChild),该常数指定新的 Node 将成为编号为“1”的 Node 的子节点。
对每个出版商,在 Titles 记录集中检查匹配的 PubID 字段;为每个匹配项添加一个子节点上面的代码将 Publishers 表的内容作为第一层填入 TreeView 中。
然而,我们还希望能够进入更深一层,为每个出版商节点增加子节点。
每个子节点代表该出版商印刷的一本书。
为了做到这一点,如果有了对新创建的出版商节点 (mNode) 的引用,只要遍历 Titles 记录集,并检查每条记录的 PubID 字段即可。
如果该字段与 Publishers 记录集中的 PubID 字段相匹配,则该书是由当前的出版商出版的。
但是,在能够为 mNode 添加节点之前,还必须先将 mNode 的 Index 属性赋给一个变量 (intIndex),如下所示:intIndex = mNode.Index然后就可以在 Add 方法中使用该变量了,Add 方法需要用来加入子节点的 Node 对象的Index 属性:Set mNode = tvwDB.Nodes.Add(intIndex, tvwChild)如下简化的代码可被表述为“直到 Recordset 的结尾:创建子 Node 对象,并将 Title 字段的值赋给它的 Text 属性;移动到下一记录并重复上述操作”:Do Until rsTitles.EOFIf rsPublishers!PubID = rsTitles!PubID ThenSet mNode = tvwDB.Nodes.Add(intIndex, tvwChild)mNode.Text = rsTitles!Title 'Text 属性。
End IfLoop完成代码上面的代码显示了用两个相关的表填成一个表的基本策略。
全部代码如下:'必须设置对 DAO 3.5 的引用。
'在声明部分,声明模块级的对象变量:Private mDbBiblio As DatabasePrivate mNode As NodePrivate Sub Form_Load()'在 Form_Load 事件中,设置对象变量,'并创建 TreeView 控件的第一个 Node 对象。
Set mDbBiblio = DBEngine.Workspaces(0). _OpenDatabase("BIBLIO.MDB")tvwDB.Sorted = TrueSet mNode = tvwDB.Nodes.Add()mNode.Text = "Publishers"mNode.Tag = '设置 Tag 属性。
mNode.Image = "closed" '设置 Image'属性End SubPrivate Sub cmdLoad_Click()'声明 DAO 对象变量,'并将记录集赋予它们。
Dim rsPublishers As RecordsetDim rsTitles As RecordsetSet rsPublishers = mDbBiblio. _OpenRecordset("Publishers", dbOpenDynaset)Set rsTitles = mDbBiblio. _OpenRecordset("titles", dbOpenDynaset)'移到第一条记录。
rsPublishers.MoveFirstDim intIndex As Integer '用于索引的变量。
'直到最后一条记录 (EOF):添加一个 Node 对象,'并用 Name 字段作为新'Node 对象的文本。