WebLogic类加载过程简述
Tomcat-JBoss-Weblogic-Jetty的区别和介绍

一.Jetty 的基本架构Jetty 目前的是一个比较被看好的 Servlet 引擎,它的架构比较简单,也是一个可扩展性和非常灵活的应用服务器,它有一个基本数据模型,这个数据模型就是 Handler,所有可以被扩展的组件都可以作为一个 Handler,添加到 Server 中,Jetty 就是帮你管理这些Handler。
整个 Jetty 的核心组件由 Server 和 Connector 两个组件构成,整个 Server 组件是基于Handler 容器工作的,它类似与 Tomcat 的 Container 容器,Jetty 与 Tomcat 的比较在后面详细介绍。
Jetty 中另外一个比不可少的组件是 Connector,它负责接受客户端的连接请求,并将请求分配给一个处理队列去执行。
它的所有组件都是基于 Handler 来实现Jetty 中还有一些可有可无的组件,我们可以在它上做扩展。
如 JMX,我们可以定义一些Mbean 把它加到 Server 中,当 Server 启动的时候,这些 Bean 就会一起工作。
Jetty 可以基于 AJP 协议工作,在正常的企业级应用中,Jetty 作为一个 Servlet 引擎都是基于 AJP 协议工作的,所以它前面必然有一个服务器,通常情况下与 Jboss 集成的可能性非常大Tomcat 和 Jetty 都是作为一个 Servlet 引擎应用的比较广泛,可以将它们比作为中国与美国的关系,虽然 Jetty 正常成长为一个优秀的 Servlet 引擎,但是目前的 Tomcat 的地位仍然难以撼动。
相比较来看,它们都有各自的优点与缺点。
Tomcat 经过长时间的发展,它已经广泛的被市场接受和认可,相对 Jetty 来说 Tomcat 还是比较稳定和成熟,尤其在企业级应用方面,Tomcat 仍然是第一选择。
但是随着 Jetty 的发展,Jetty 的市场份额也在不断提高,至于原因就要归功与 Jetty 的很多优点了,而这些优点也是因为 Jetty 在技术上的优势体现出来的。
WEBLOGIC的安装、配置和启动
WEBLOGIC的安装、配置和启动WEBLOGIC的安装、配置和启动⼀、软件安装1. 安装前的准备⼯作1.1 ⾸先请确认您要安装的WebLogic版本所在的平台已通过了BEA的认证,完整的认证平台列表请参考1.2 确定⼀个安装⽬录,建议该⽬录下⾄少有1个G的空间,可单独创建个逻辑卷和⽂件系统1.3 创建⼀个BEA⽤户组帐号1.4 创建⼀个weblogic⽤户帐号2. 安装步骤WebLogic在AIX平台下的安装⽅法⼀般有三种:图形窗⼝模式,控制台模式,⽆⼈守护安装模式。
由于控制台模式的使⽤最为⼴泛且不受任何其它硬件条件的限制(所以我们这⾥只介绍控制台安装模式。
2.1 安装JRE环境WebLogic安装程序需要JRE的⽀持,根据安装平台的不同,WebLogic的安装介质也分为两类,⼀种⾃带了JRE(后缀名为.bin),⼀种需要下载平台⼚商所提供的JRE环境(后缀名为.jar),以WebLogic Server 8.1 with SP2为例,⽬前所⽀持的UNIX/LINUX平台如下所⽰(截⽌2004.2.23) WebLogic Server 8.1 with SP2⽀持平台是否⾃带JDKHP-UX (11.0,11.i, PA-RISC) YESSun Solaris (8, 9, SPARC) YESRed Hat Enterprise Linux (2.1, Pentium) YESRed Hat Enterprise Linux (2.1, Itanium) YESSuSE SLES (8, Pentium) YESUnited Linux (1.0, Pentium) YESIBM AIX (5.1, 5.2) NO⾸先要下载和操作系统以及WEBLOGIC相匹配JDK版本,最好是经过BEA认证的版本。
可查询以下链接;在AIX上安装JDK要注意以下步骤:安装后要修改环境变量/etc/environment⽂件,将PATH中Java部分更改为新安装的Java版本(Java131或Java14),并重新Login后⽣效!否则系统会使⽤原有的Java130环境,在安装weblogic7.0以上版本时会⾃动退回到提⽰符下。
类加载的三种方式

类加载的三种⽅式类加载分为动态加载和静态加载。
动态加载是从外存储器中加载类,⼀般类加载机制分析的也是动态加载。
⽽静态加载本质上是从内存中创建类的实例对象,此时类已经被加载到内存中。
⼀.静态加载通过new关键字来创建Test的实例对象。
⼆.动态加载1.通过Class.forName()来加载类,然后调⽤类的newInstance()⽅法实例化对象。
2.通过类加载器的loadClass()⽅法来加载类,然后调⽤类的newInstance()⽅法实例化对象。
这⾥有⼏个需要⽐较的地⽅:1.通过new关键字实例化类的对象和通过Class.forName()加载类是当前类加载器,即this.getClass.getClassLoader,只能在当前类路径或者导⼊的类路径下寻找类。
⽽⽤指定的classLoader来加载类可以从当前路径外寻找类,这⾥的classLoader甚⾄可以⽤户⾃定义。
2.我们知道类加载机制的三个过程主要是加载-->连接-->初始化。
Class.forName()实际调⽤的是Class.forName(className,true,this.getClass.getClassLoader),第⼆个参数表⽰加载完后是否⽴即初始化,第三个参数即前⽂提到的表⽰是当前类加载器。
classLoader.loadClass()实际调⽤的是classLoader.loadClass(className,false),第⼆个参数表⽰加载完成后是否连接,即⽤此⽅法加载类,加载完成后不会去初始化,⽽⽤Class.forName()加载类加载完成后可以被初始化。
所以有些类如果加载完成后需要⽴即被初始化则必须使⽤Class.forName()。
例如在加载数据库驱动时,⼀般⽤Class.forName("com.mysql.jdbc.Driver")。
这是因为该驱动有⼀个在静态代码块中注册驱动的过程,所以需要被初始化。
OracleWeblogic11g基础知识

主要特点
支持多种编程语 言和框架
WebLogic Server 11g 支持 Java EE 和 SOA 标准,以及多种流行的 编程语言和框架,如 Java、JSP、Servlets、 EJB、JMS、JAX-WS 等。
集成开发环境 (IDE)
高可用性和可伸 缩性
WebLogic Server 11g 提供了一个集成的开发 环境(IDE),支持从设 计到部署的全过程开发, 包括代码编辑、调试、 测试和部署等。
WebLogic Server 11g 支持高可用性和可伸缩 性,通过集群和负载均 衡技术,提供对关键业 务应用的保护,确保应 用程序的可靠性和性能 。
指导用户如何配置审计和日志功能,以便于监控和安全分析。
安全策略配置
指导用户如何配置安全策略,包括 IP 限制、URL 过滤等。
安全漏洞与防护
1 2
常见安全漏洞
介绍 WebLogic Server 11g 中常见的安全漏洞, 如跨站脚本攻击(XSS)、SQL 注入等。
安全补丁
及时发布安全补丁,修复已知的安全漏洞,提高 系统的安全性。
ABCD
VisualVM:用于监控 Java应用程序的内存、线 程和CPU使用情况。
AWR报告:Oracle自动 工作负载仓库报告,提供 数据库性能的详细分析和 诊断。
性能优化案例
案例一
某银行核心业务系统在高峰期出现性 能瓶颈,通过调整JVM参数和 WebLogic参数,成功提高了系统响 应速度和吞吐量。
3
安全加固
通过配置安全策略、限制访问权限等措施,加固 系统的安全性,防止潜在的安全威胁。
jvm 打印类加载 参数
jvm 打印类加载参数JVM(Java虚拟机)是Java程序的运行环境,它扮演着将Java字节码转换为机器码并执行的关键角色。
在Java应用程序启动时,JVM会负责加载类并执行相应的操作。
本文将深入探讨JVM的类加载过程,并分析其中的参数。
一、类加载概述在Java中,类是代码的基本组织单元,它被封装在Java源文件中,并经过编译为字节码文件(.class)。
类加载是将字节码文件加载到JVM中并转换为可执行代码的过程。
JVM的类加载机制具有懒加载的特点,即在需要使用某个类时才会加载它。
二、类加载过程1.加载(Loading):将字节码文件加载到JVM中,它可以通过文件系统、网络等方式获取字节码文件。
加载后的类会被存放在方法区(Method Area)中,并被分配一个唯一的类加载器实例。
2.链接(Linking):链接分为三个阶段,包括验证(Verification)、准备(Preparation)和解析(Resolution)。
- 验证:确保字节码文件符合JVM规范,不包含安全漏洞。
- 准备:为类的静态变量分配内存,并设置默认初值。
- 解析:将符号引用转换为直接引用,以便JVM能够快速访问到类、方法和字段。
3.初始化(Initialization):执行类的初始化代码,包括静态变量赋值和静态块的执行。
初始化是类加载过程中的最后一步,只有当类被使用时才会触发。
三、类加载参数1.-verbose:class该参数用于打印类加载的详细信息,包括类的加载、链接和初始化过程。
通过查看该输出信息,可以了解到类加载器的工作情况,以及类加载的顺序和时间等。
2.-Xbootclasspath/a:path该参数用于指定引导类加载器搜索类的路径。
在Java应用程序启动时,引导类加载器会先搜索这个路径下的类,如果找到了对应的类,则直接加载,不再使用默认的搜索路径。
这个参数可以用来加载自定义的类或者覆盖JDK中的类。
3.-Xms<size>和-Xmx<size>这两个参数用于指定JVM的初始堆大小和最大堆大小。
Weblogic详解

Weblogic详解⼀、简介WebLogic是美国公司出品的⼀个application server,确切的说是⼀个基于JAVAEE的中间件,WebLogic是⽤于开发、集成、部署和管理⼤型分布式Web应⽤、⽹络应⽤和应⽤的应⽤服务器。
将Java的动态功能和Enterprise标准的安全性引⼊⼤型⽹络应⽤的开发、集成、部署和管理之中。
WebLogic是美商的主要产品之⼀,系并购BEA得来。
是商业市场上主要的Java(J2EE)应⽤服务器软件(application server)之⼀,是世界上第⼀个成功商业化的J2EE应⽤服务器, 已推出到12c(12.1.3) 版。
⽽此产品也延伸出WebLogic Portal,WebLogic Integration等企业⽤的中间件(但当下Oracle主要以Fusion Middleware融合中间件来取代这些WebLogic Server之外的企业包),以及OEPE(Oracle Enterprise Pack for Eclipse)开发⼯具。
(来⾃百度百科)⼆、优点WebLogic Server具有开发和部署关键任务电⼦商务Web应⽤系统所需的多种特⾊和优势。
标准对业内多种标准的全⾯⽀持,包括EJB、JSP、Servlet、JMS、JDBC、XML(标准通⽤标记语⾔的⼦集)和WML,使Web应⽤系统的实施更为简单,并且保护了投资,同时也使基于标准的解决⽅案的开发更加简便。
可扩展性WebLogic Server以其⾼扩展的架构体系闻名于业内,包括客户机连接的共享、资源pooling以及动态⽹页和EJB组件群集。
快速开发凭借对EJB和JSP的⽀持,以及WebLogic Server 的Servlet组件架构体系,可加速投放市场速度。
这些开放性标准与WebGain Studio 配合时,可简化开发,并可发挥已有的技能,迅速部署应⽤系统。
三、和其他服务器区别tomcat (免费)Tomcat只能算Web Container,是官⽅指定的JSP&Servlet容器。
Weblogic中间件运维经验汇总

Weblogic中间件运维经验汇总目录关于Weblogic参数调优的运维经验 (2)Weblogic性能调优的处理方法 (5)关于输电项目Weblogic安装的运维经验 (8)Weblogic回收数据库连接数配置的方法 (14)在Apache和Weblogic中分别部署静态页面的方法 (17)Weblogic Server性能调优经验 (20)WeblogicJVM堆参数设置方法 (24)关于Weblogic参数调优的运维经验报送单位:北京公司审核人:类型:业务应用关键字:GC垃圾回收1、引言为了提高维护人员运维水平,以集中与分享日常运行维护经验为目的,现进行典型经验的编制。
2、现象描述部分应用服务器出现宕机现象,在F5上查看时已经掉出集群状态。
3、处理过程停止宕机应用服务器上的Weblogic进程。
/home/weblogic/bea/user_projects/domains/pms/bin/setDomainEn v.sh文件中的启动内存大小并添加垃圾回收机制,修改后如下:MEM_ARGS="-Xms5248m -Xmx5248m -Xmn1536m-XX:SurvivorRatio=6-XX:+UseParNewGC-XX:+UseConcMarkSweepGC-XX:CMSFullGCsBeforeCompaction=20-XX:+UseFastAccessorMethods-XX:+AggressiveOpts"3、修改完成后重启Weblogic服务。
4、原因分析在收到报警信息后,对后台日志进行查看,报错信息如下:Exception in thread "CBM_正常处理任务线程" ng.OutOfMemoryError: Java heap spaceatoracle.jdbc.driver.OracleStatement.prepareAccessors(OracleStatement.ja va:868)atoracle.jdbc.driver.OracleStatement.executeMaybeDescribe(OracleStatem ent.java:1045)atoracle.jdbc.driver.T4CPreparedStatement.executeMaybeDescribe(T4CPre paredStatement.java:839)atoracle.jdbc.driver.OracleStatement.doExecuteWithTimeout(OracleStatem ent.java:1132)atoracle.jdbc.driver.OraclePreparedStatement.executeInternal(OraclePrepa redStatement.java:3316)atoracle.jdbc.driver.OraclePreparedStatement.executeQuery(OraclePreparedStatement.java:3361)经过对报错日志分析,状态检修的CBM处理进程内存溢出报错,导致服务器宕机。
关于在Eclipse中启动Weblogic和通过命令窗口直接启动Weblogic时加载jar包的区别(胡永可20090722)
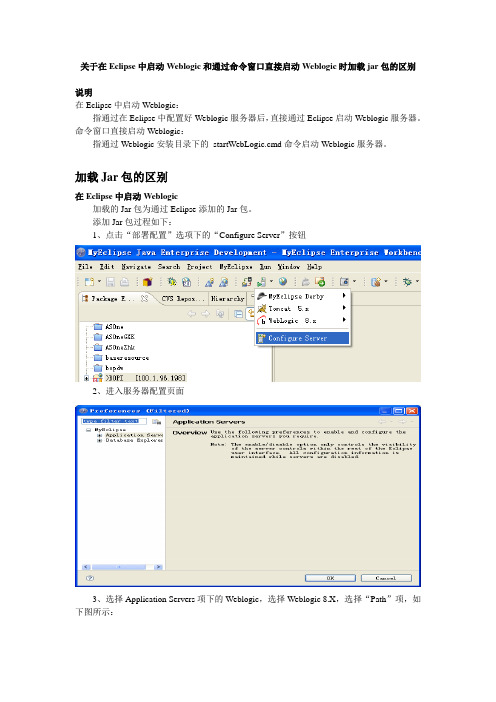
关于在Eclipse中启动W eblogic和通过命令窗口直接启动W eblogic时加载jar包的区别说明在Eclipse中启动Weblogic:指通过在Eclipse中配置好Weblogic服务器后,直接通过Eclipse启动Weblogic服务器。
命令窗口直接启动Weblogic:指通过Weblogic安装目录下的startWebLogic.cmd命令启动Weblogic服务器。
加载Jar包的区别在Eclipse中启动W eblogic加载的Jar包为通过Eclipse添加的Jar包。
添加Jar包过程如下:1、点击“部署配置”选项下的“Configure Server”按钮2、进入服务器配置页面3、选择Application Servers项下的Weblogic,选择Weblogic 8.X,选择“Path”项,如下图所示:4、在Prepend to classpath 项中通过“Add JAR/ZIP”添加要增加的Jar包。
通过命令窗口直接启动Weblogic需额外加载的Jar包需在startWebLogic.cmd中CLASSPA TH中引入,或在Common.cmd 中的CLASSPA TH中引入。
startWebLogic.cmd中引入的Jar包的作用范围为“域”的范围;在Common.cmd中引入的Jar包的作用范围为WebLogic服务器范围,使用与所有“域”。
注:为避免冲突,一般在域范围中引入。
推荐的处理方法:在域下建一个专门供域使用的lib文件夹,将要添加的jar包放到lib中,在StartWebLogic.cmd中加入引入的描述,如下图所示:包时路径写成“./lib/db2jcc.jar:./lib/db2jcc_license_cu.jar”教训总结:在startWebLogic.cmd中引入jar包后,通过Ecllipse启动Weblogic时是不起作用的。
切记!。
- 1、下载文档前请自行甄别文档内容的完整性,平台不提供额外的编辑、内容补充、找答案等附加服务。
- 2、"仅部分预览"的文档,不可在线预览部分如存在完整性等问题,可反馈申请退款(可完整预览的文档不适用该条件!)。
- 3、如文档侵犯您的权益,请联系客服反馈,我们会尽快为您处理(人工客服工作时间:9:00-18:30)。
WebLogic类加载过程王明杰20061012 19:28-21:59英文水平有限,翻译的肯定有不对的地方,欢迎指正。
希望能够各位同事在使用weblogic的过程中带来帮助。
小注:2006-10-12 下午,在weblogic中部署一个启动类,部署了近2个小时,weblogic总是提示“找不到类的异常”。
心情很是郁闷。
“大事问老婆,小事问goole”,一个字“搜”。
终于找到了WebLogic的官方文档,摘录下来,进行了翻译,终于对WebLogic的类的加载过程有了比较系统的了解。
希望该文档能够帮助和我有同样疑惑的人走出困境,共同进步!!!V ersion 0.1msn:wangmingjie_2002@官方原版(19:30开始)20061012开始WebLogic Server Application ClassloadingThe following sections provide an overview of Java classloaders, followed by details about WebLogic Server J2EE application classloading.下面的部分概况的介绍了java的类装载器,接着详细的介绍了WebLogicJ2EE应用服务器(WebLogic Server J2EE application )的类装载过程。
▪Java Classloader Overview java类转载器综述▪WebLogic Server Application Classloader Overview WebLogic 应用服务器类装载器介绍。
▪Resolving Class References Between Modules and ApplicationsJava Classloader OverviewClassloaders are a fundamental module of the Java language. A classloader is a part of the Java virtual machine (JVM) that loads classes into memory;a classloader is responsible for finding and loading class files at run time. Every successful Java programmer needs to understand classloaders and their behavior. This section provides an overview of Java classloaders.类装载器是java语言的一个基本模块,类装载器是java虚拟机的一部分,把相应的类装载到内存中,类装载器负责在运行期间找到类并载入类。
每个成功的java程序员都需要理解java类装载器及其行为。
本部分综述了java类装载器。
Java Classloader Hierarchy java类装载器的层次Classloaders contain a hierarchy with parent classloaders and child classloaders. The relationship between parent and child classloaders is analogous to the object relationship of super classes and subclasses. The bootstrap classloader is the root of the Java classloader hierarchy. The Java virtual machine (JVM) creates the bootstrap classloader, which loads the Java development kit (JDK) internal classes and java.* packages included in the JVM. (For example, the bootstrap classloader loads ng.String.)类装载器有层次,包含了父装载器和子装载器。
父装载器和子装载器直接的关系和java中的父类和子类的关系是相似的。
启动类装载器是根类装载器,它将jdk 的内部类和包含在java.*包中的类装载到java虚拟机。
(例如:启动类装载器载入ng.String类。
)The extensions classloader is a child of the bootstrap classloader. The extensions classloader loads any JAR files placed in the extensions directory of the JDK. This is a convenient means to extending the JDK without adding entries to the classpath. However, anything in the extensions directory must be self-contained and can only refer to classes in the extensions directory or JDK classes.(C:\j2sdk1.4.2_08\jre\lib\ext)扩这的类装载器是启动类装载器的子类装载器。
扩展类装载器会自动加载放在jdk扩展文件夹中的jar包。
这很方便,意味着扩展JDK不需要向classpath中增加信息。
然而扩展文件夹中的任何包都必须独立,只能参照扩展文件夹中的类或者JDK的类。
(最后这句翻译的不好。
)The system classpath classloader extends the JDK extensions classloader. The system classpath classloader loads the classes from the classpath of the JVM. Application-specific classloaders (including WebLogic Server classloaders) are children of the system classpath classloader.系统classpath类装载器继承了JDK扩展类装载器。
系统类装载器从JVM指定的应用类装载器(系统装载器的子类装载器)的classpth来加载类。
Note: What BEA refers to as a "system classpath classloader" is often referred to as the "application classloader" in contexts outside of WebLogic Server. When discussing classloaders in WebLogic Server, BEA uses the term "system" to differentiate from classloaders related to J2EE applications (which BEA refers to as "application classloaders").注意:在WebLogic应用服务器之外,BEA中说的“系统classpth类装载器”也称为“应用类装载器”。
在weblogic中讨论类装载器的时候,BEA使用的术语“系统”和J2EE应用服务器的类装载器(BEA称之为“应用类装载器”)是有区别的。
Loading a ClassClassloaders use a delegation model when loading a class. The classloader implementation first checks its cache to see if the requested class has already been loaded. This class verification improves performance in that its cached memory copy is used instead of repeated loading of a class from disk. If the class is not found in its cache, the current classloader asks its parent for the class. Only if the parent cannot load the class does the classloader attempt to load the class. If a class exists in both the parent and child classloaders, the parent version is loaded. This delegation model is followed to avoid multiple copies of the same form being loaded. Multiple copies of the same class can lead to a ClassCastException.类装载器使用代理模式来装载一个类。
子类装载器时候从它的缓存中检查被请求的类是否已经装载。
类被缓存在内存中而不是重复的从硬盘上读取,这样可以提高类的校验效率。
如果被请求的类不在它的缓存中,那么当前的类装载器就请求它的父类来装载这个类。
当父类装载器无法找到请求的类,那么子类装载器才试图去装载这个类。
如果一个类既在父类装载器中又在子类装载器中,那么父类装载器中的类会被加载。
代理模式可以防止同样的类被多次装载。
多次装载相同的类会产生ClassCastException异常。
Classloaders ask their parent classloader to load a class before attempting to load the class themselves. Classloaders in WebLogic Server that are associated with Web applications can be configured to check locally first before asking their parent for the class. This allows Web applications to use their own versions of third-party classes, which might also be used as part of the WebLogic Server product. Theprefer-web-inf-classes Element section discusses this in more detail.类装载器在自己装载请求类之前,先请求他们的父类装载器来装载此类。