LCDG-ZJ1-62610 WIFI智能插座使用说明书V1.01
多功能插座说明书

多功能插座说明书篇一:多功能节电插座使用说明书科技发明制作B类作品使用说明书作品名称:多功能节电插座学院全称:机械电子工程学院团队名称:翼梦科技团队团队成员:吴继胜(负责人)、龙云、廖越、王石羊、相婉迪、张雪萍、潘炎金指导老师:汪用瑜负责人联系方式:目录一、产品说明 (1)1、产品背景 (1)2、制作产品原因 (1)二、产品介绍 (2)1、产品功能 (3)2、产品特3、普通插座与多功能插座对比 (4)4、作品先进性和科学性 (4)三、技术规格 (5)四、外观图解及说明 (5)五、技术说明 (6)六、基本操作说明 (8)七、故障分析 (8)1.插座无显示 (8)2.定时器不工作 (8)3.显示屏不工作 (9)4.火花干5.无线电干扰 (9)八、注意事项 (9)九、作品实际应用价值与现实意义 (10)多功能节电插座作品使用说明书一、产品说明1、产品背景如今插座已经越来越多的为人们所使用,自从有了电的发明,尤其是电器的使用,一系列经常用电的设施得到了巨大的不便,于是人们为了保障人民的生活安全,减少用电所带来的危害,制造出了插座与插头这一供电桥梁,如今插座普遍繁多,有民用插座、供电插座、防水插座、移动插座等一系列的插座,然而,目前,市场上的插座也大多是是普遍单一的,由此,人们不得不为了供电而去买多个插座以此来满足自身的需求。
当前的插座市场也逐渐的广阔起来,为人民购选插座提供了广阔的空间,但是普通插座由于形式单一,功能不全,有些时候不能为消费者提供最方便的服务,因此在一定程度上也阻碍了消费者市场的进一步发展。
2、制作产品原因在实际生活中,我们发现市场的插座普遍,很多都是根据以往的插座在外表上进行创新,而普通的插座依然存在的某些不足,经过我们团队的调查与分析,我们发现市场上的插座存在以下几点缺陷:无智能保护电路的功能。
当电路中用电器发生短路时,分支开关处保险丝自动熔断或者空气开关自动断开,进而影响到该支路其他用电器的正常使用。
智能Wi-Fi插座HS100与HS110用户手册说明书
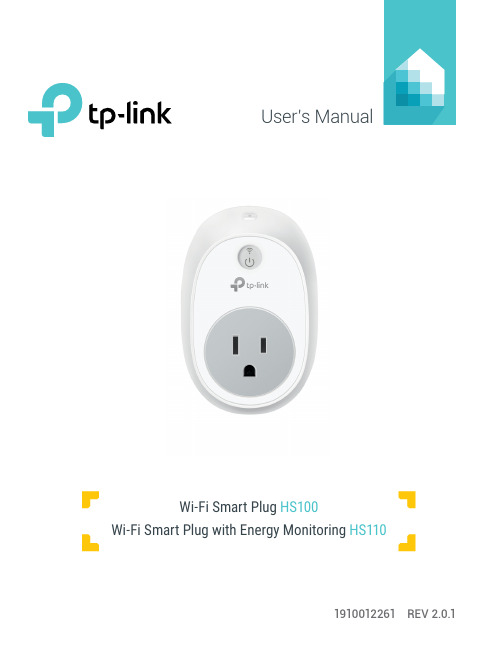
User’s Manual1910012261 REV 2.0.1Wi-Fi Smart Plug HS100Wi-Fi Smart Plug with Energy MonitoringHS110Copyright & TrademarksSpecifications are subject to change without notice. TP-Link is a registered trademark of TP-Link Technologies Co., Ltd. Other brands and product names are trademarks or registered trademarks of their respective holders.No part of the specifications may be reproduced in any form or by any means or used to make any derivative such as translation, transformation, or adaptation without permission from TP-Link Technologies Co., Ltd.© 2017 TP-Link. All rights reserved.CONTENTS4 Chapter 1. Introduction4 1.1 Product Overview4 1.2 Main Features5 1.3 Panel Layout7 Chapter 2. Quick Start8 Troubleshooting8 Frequently Asked Questions8 SupportChapter 1. Introduction1.1 Product OverviewWhat This Product DoesThe Wi-Fi Smart Plugs make it easy to control your lights or household electronic devices anywhere in the world with the TP-Link Kasa app on your smartphones or tablets.Schedule and Away ModeWith the Kasa’s Schedule and Away Mode, you can automate your lights or plugged-in appliances to turn on and off according to specific schedules, to simulate occupancy when you’re away from home. In addition, the countdown timer enhances safety by automatically switching off the running household appliances after a preset time.Compatible with Amazon EchoYou can pair the Smart Plugs with Amazon Echo for voice control. Compatible with Android, iOSThe free Kasa app lets you run them from any Android (5.0 and higher) or iOS (iOS 8 and higher) smartphone.Energy Conservation (for HS110 only)You can efficiently conserve energy and save money while using the Smart Plugs to control your space heaters and fans. The Smart Plug tracks your device’s power consumption in real-time, and has weekly and monthly summaries.1.2 Main Features•Control devices connected to the Smart Plug wherever you have Internet using the free Kasa app on yoursmartphone.•Schedule the Smart Plug to automatically power electronics on and off as needed, like setting lights to come on at dusk or turn off at sunrise.•Analyze your plugged-in device’s real-time and historical power* Image may differ from actual product due to different regional power specifications. Here we use the U.S. version as an example.Sta-tus Description(Settings /Press this button for 5 seconds or until the Wi-Fi LED blinks amber and green to initiate the app-config process.Press and hold for 10 seconds or until the Wi-Fi LED blinks amber rapidly to factory reset.Chapter 2. Quick Start1. Download Kasa for Mobile from the App Store or Google Play.ORscan QRcode2. Connect your mobile device to a 2.4GHz Wi-Fi network. Note: The Smart Plug only supports 2.4GHz networks.3. Launch Kasa and follow the app instructions to connect theSmart Plug to your network.TroubleshootingFrequently Asked Questions1. What devices can I control with the Smart Plug?You can control lights, electronics and small appliances such ashumidifiers, air purifiers, portable heaters and fans.2. What should I do when I can’t control the connected device?• Check that the connected device is switched to ON.• Make sure your mobile device and the Smart Plug are on the same Wi-Fi network.• Enable Remote Control to control the connected device from outside your home.3. What should I do when the Wi-Fi LED is lit red?A red LED light indicates no network connection.• Check your network connectivity.• Relocate the Smart Plug. Avoid placing the Smart Plug near potential sources of radio signal interference.• Repeat the app configuring process.• Factory reset the Smart Plug and try to add it again.4. How do I pair the Smart Plug with Amazon Echo?Visit /en/faq-944.html or within the Kasa Help section for pairing instructions.Support• Specifications can be found on the product page at • Our Technical Support and troubleshooting information can be found at /support.FCC StatementThis equipment has been tested and found to comply with the limits for a Class B digital device, pursuant to part 15 of the FCC Rules. These limits are designed to provide reasonable protection against harmful interference in a residential installation. This equipment generates, uses and can radiate radio frequency energy and, if not installed and used in accordance with the instructions, may cause harmful interference to radio communications. However, there is no guarantee that interference will not occur in a particular installation. If this equipment does cause harmful interference to radio or television reception, which can be determined by turning the equipment off and on, the user is encouraged to try to correct the interference by one or more of the following measures:• Reorient or relocate the receiving antenna.• Increase the separation between the equipment and receiver.• Connect the equipment into an outlet on a circuit different from that to which the receiver is connected.• Consult the dealer or an experienced radio / TV technician for help.This device complies with part 15 of the FCC Rules. Operation is subject to the following two conditions:1) This device may not cause harmful interference.2) This device must accept any interference received, including interference that may causeundesired operation.Any changes or modifications not expressly approved by the party responsible for compliance could void the user’s authority to operate the equipment.Note: The manufacturer is not responsible for any radio or TV interference caused by unauthorized modifications to this equipment. Such modifications could void the user’s authority to operate the equipment.FCC RF Radiation Exposure StatementThis equipment complies with FCC RF radiation exposure limits set forth for an uncontrolled environment. This device and its antenna must not be co-located or operating in conjunction with any other antenna or transmitter.“To comply with FCC RF exposure compliance requirements, this grant is applicable to only Mobile Configurations. The antennas used for this transmitter must be installed to provide a separation distance of at least 20 cm from all persons and must not be co-located or operating in conjunction with any other antenna or transmitter.”CE Mark WarningThis is a class B product. In a domestic environment, this product may cause radio interference, in which case the user may be required to take adequate measures.OPERATING FREQUENCY(the maximum transmitted power)2412MHz—2472MHz(20dBm)No restrictions exist in the use of radio frequencies or frequency bands in all EU member states and EFTA countries.EU declaration of conformityTP-Link hereby declares that the device is in compliance with the essential requirements and other relevant provisions of directives 2014/53/EU, 2009/125/EC and 2011/65/EU.The original EU declaration of conformity may be found at /en/ce.RF Exposure InformationThis device meets the EU requirements (2014/53/EU Article 3.1a) on the limitation of exposure of the general public to electromagnetic fields by way of health protection.The device complies with RF specifications when the device used at 20 cm from your body. Canadian Compliance StatementThis device complies with Industry Canada license-exempt RSSs. Operation is subject to the following two conditions:1) This device may not cause interference, and2) This device must accept any interference, including interference that may cause undesiredoperation of the device.Le présent appareil est conforme aux CNR d’Industrie Canada applicables aux appareils radio exempts de licence. L’exploitation est autorisée aux deux conditions suivantes :1) l’appareil ne doit pas produire de brouillage;2) l’utilisateur de l’appareil doit accepter tout brouillage radioélectrique subi, meme si lebrouillage est susceptible d’en compromettre le fonctionnement.Radiation Exposure StatementThis equipment complies with IC radiation exposure limits set forth for an uncontrolled environment. This equipment should be installed and operated with minimum distance 20cm between the radiator and your body.Déclaration d’exposition aux radiationsCet équipement est conforme aux limites d’exposition aux rayonnements IC établies pour un environnement non contrôlé. Cet équipement doit être installé et utilisé avec un minimum de 20 cm de distance entre la source de rayonnement et votre corps.Industry Canada StatementCAN ICES-3 (B)/NMB-3(B)Korea Warning Statements당해 무선설비는 운용중 전파혼신 가능성이 있음.NCC Notice注意! 依據 低功率電波輻射性電機管理辦法第十二條 經型式認證合格之低功率射頻電機,非經許可,公司、商號或使用者均不得擅自變更頻率、加大功率或變更原設計之特性或功能。
智能家居智能插座设置指南

智能家居智能插座设置指南随着科技的不断进步,智能家居正逐渐融入我们的生活。
作为智能家居的一个重要组成部分,智能插座的应用也越来越普及。
在本指南中,我们将为您介绍智能插座的设置步骤,以确保您能够充分利用智能插座带来的便利。
步骤一:选择适合的智能插座在进行智能插座设置之前,首先要确保选择适合您需求的产品。
智能插座主要分为两大类:Wi-Fi智能插座和蓝牙智能插座。
Wi-Fi智能插座需要通过Wi-Fi网络连接,可通过手机APP进行远程控制;而蓝牙智能插座则是通过蓝牙连接,控制范围相对较小。
根据您的具体需求和使用场景选择适合的智能插座。
步骤二:准备工作在设置智能插座之前,您需要准备以下物品:智能插座、手机或平板电脑、家庭Wi-Fi网络以及插座附近的电源。
步骤三:连接智能插座1. 将智能插座插入您选择的电源插座中,并确保开关处于关闭状态。
2. 打开您的手机或平板电脑,下载并安装智能插座厂商提供的APP。
3. 在手机或平板电脑上打开APP,并按照说明进行注册和登录。
4. 在APP中选择添加设备或连接新设备的选项。
5. 按下智能插座的设置键,使其进入配对状态。
6. 在APP中选择连接新设备,并按照提示操作,将智能插座与您的家庭Wi-Fi网络进行连接。
步骤四:设置智能插座1. 连接成功后,您可以为智能插座设置一个易于识别的名称,例如"客厅插座"或"卧室插座"。
2. 对于支持定时开关的智能插座,您可以设置定时开关机的时间。
例如,您可以在晚上临睡前将插座自动关闭,早上起床后将其自动打开。
3. 对于支持能量监测的智能插座,您可以查看家电的能耗情况,并进行必要的调整,以节约能源。
4. 对于支持远程控制的智能插座,您可以使用手机APP远程操控插座的开关状态,实现远程操作的便利。
步骤五:使用智能插座设置完成后,您可以开始使用智能插座了。
通过手机APP,您可以随时随地远程操控插座开关,实现家电的智能控制。
智能遥控插座说明书
智能遥控插座使用说明书一. 品图示及接线图、装配图二.安全提示考虑到电子器件的安全性,本插座严禁安装使用于洗漱间、浴室等潮湿环境。
三.遥控器对智能插座的对码“对码”就是指完成遥控器的按键与智能插座的相互确认过程,经过相应的对码操作,遥控器就可对插座进行有效控制。
1.数字键对码(每个智能插座最多只能和遥控器对4次不同的编码),具体对码步骤如下:○1长按住智能插座的开关键,直到插座上的LED灯亮时松开按键.○2在插座上的LED灯亮着的状态下及时点按一下遥控器上1-6中的任一数字键.○3若插座上的LED灯闪烁2下,表示对码成功,用户可通过按该数字键控制智能插座的开关。
说明:在步骤○3中,若插座上的LED灯闪烁4下,表示此插座与此遥控器上的该数字键已经完成过数字键对码,现在重对一次后把控制码清掉了,用户如想使遥控器上的该数字键可继续控制该插座,必须要再对一次码;若插座上的LED灯较慢地闪烁1下,表示该插座已经对满了4次码,若想插座能与遥控器完成对码,可以采取如下操作,再进行对码:方法一(推荐)必须先清掉原来此插座已对过的4个码中的任1个(或N个),方法与数字键对码相似,只是在步骤○2中必须按下所要清除编码所对应的遥控器数字按键,此时插座上的LED灯闪烁4下,表示该编码清码操作成功。
方法二清除该插座所有的数字和情景键控制码使开关回到初始状态,请参见三.3的全清操作。
2.情景键对码(每个智能插座最多只能对4个不同遥控器的情景码),具体对码步骤如下:○1长按住智能插座的开关键,直到插座上的LED灯亮时松开按键.○2在插座上的LED灯亮着的状态下及时点按一下遥控器上的任意一个情景键。
(每个插座只需要和遥控器上任何一个情景键进行对码,而不需要和每一个情景键进行对码操作。
)○3若插座上的LED指示灯闪烁2下,表示情景键对码成功,只有在情景键对码成功以后,用户才可反复对插座进行后面所介绍的情景模式设置。
说明:在步骤○3中,若插座上的LED灯闪烁4下,表示此插座与遥控器已经完成过情景对码,现在重对一次后把情景码清掉了,必须要再对一次情景码;若插座上的LED灯较慢地闪烁1下,表示该插座已经对满了4个不同的情景码,若想插座能与遥控器完成对码,可以采取如下操作,再进行情景对码:方法一(推荐)必须先清掉原来此插座已对过的4个遥控器的情景码中的任1个(或N个),方法情景键对码相似,只是在步骤○2中必须按下所要清除情景码所对应的那个遥控器上的任意一个情景按键,此时插座上的LED灯闪烁4下,表示该情景码清码操作成功。
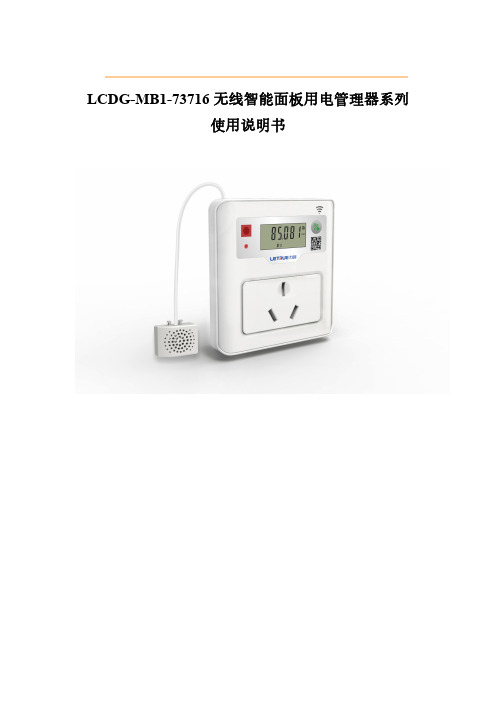
LCDG-MB1-73716无线智能面板用电管理器系列使用说明书V1.2-技术支持版
【优质文档】智能开关面板说明书-推荐word版 (11页)

本文部分内容来自网络整理,本司不为其真实性负责,如有异议或侵权请及时联系,本司将立即删除!== 本文为word格式,下载后可方便编辑和修改! ==智能开关面板说明书篇一:通用智能开关使用说明书智能开关使用说明书————一/二/三位暗装智能开关尊敬的用户:首先感谢您选择了我公司的智能产品,智能科技有限公司全体同仁祝您全家生活愉快!我们的产品将给您的生活带来舒适和便捷,为了让您能更好的安装和使用该产品,在这里我们提醒您认真阅读此说明书。
如有疑问请登联系我们,我们竭诚为您服务。
一、产品说明NT-JJ3309型一位暗装智能开关,NT-JJ3310型二位暗装智能开关,NT-JJ3311型三位暗装智能开关是尼特智能开关系列产品之一,它主要用于控制灯具及电器的开关。
其外型尺寸为86×86×45,可与普通86型开关互换安装,不仅可直接取代传统的墙壁开关,保留原有手动功能,而且增加了射频遥控、远程电话遥控、远程网络遥控等具有现代意识的数字化功能,是现代家居智能化的理想选择。
二、产品图示及接线图、安装图、拆卸图一位暗装智能开关二位暗装智能开关三位暗装智能开关N(零线)灯泡1N(零线)灯泡1N(零线)灯泡1一位暗装智能开关三位暗装智能开关二位暗装智能开关接线图接线图接线图三、安全警示拆卸图1、为了您的安全,在使用本产品之前必须详读此说明书。
2、聘请专业电工为您安装或拆卸开关,安装或拆卸开关时,必须先切断电源。
3、本开关安装在洗漱间、浴室等潮湿的地方时应装防溅盒或采取防潮措施。
4、配接负载时应严格控制在负载功率之内。
5、安装开关时严禁锤打、过力紧固以防面板变形,同时严禁金属物掉入开关外壳内。
四、概念解释:1、学习状态:此时可以把遥控器的某一指令代码,存储于开关(插座、单路控制器)的记忆芯片中,从而实现两者之间的相互确认2、对码:实现遥控器和开关(插座、单路控制器)的相互确认。
如果不进行对码,遥控器则不能控制该开关(插座、单路控制器)3、数字对码:实现遥控器数字键和开关(插座、单路控制器)的相互确认。
LCDG-MB2-72710Z无线智能照明开关使用说明书

①
④
⑤ ①:参数名称区分别显示“用电时间”、“电量”、“功率”当此区域无显示时 为版本号信息。 ②:产品组网ID显示区:
“ID:xxx”闪烁时检索本机ID “ID:- ”“ID: - ”“ID: -”循环显示代表正在与主站握手 “ID:---”与主站握手失败 ③:信号强度显示区:显示当前的信号强度默认2min刷新,分三段显示信号 的强、中、弱、无四种情况,无、弱、中、强信号段轮显为组网失败 ④:符号显示区:当时钟符号亮起时表示为时控模式(自动模式)
此产品是基于 Zigbee 技术研发的一款新型的产品,产品是在山东力创之前 zigbee 无线 智能面板插座的基础上,开发的一款灯控开关。产品最多有 3 路继电器输出,实现了灯的用 电总计量与分路控制。三路继电器均可实现远程遥控、手动控制、时段控制。
产品具有三个触摸按键,分别实现 L1、L2、L3 三路继电器的控制,方便灵活。产品具 有无线终端设备支持与无线网络,可以无线传输插座的电参数与远程控制用电设备。
打开上盖,工程键与用户键同时长按1S,进入指定ID注册界面,当前ID的最 后一位会闪烁,然后短按用户键光标会在ID的个、十、百位之间移动,当光标移 动到某个位置时,再按工程键,每按一下工程键数字会加一。调到合适的ID,再 次同时长按工程键与用户键,ID“- ”“ - ”“ -”轮显,15s内短按主站按键 可完成注册。若注册不成功,可重复上述过程。
0051H
0052H 0053H 0054H 0055H 0056H
0057H
0084H 0085H 0086H 0087H 0088H
0089H
008AH 008BH
signal intensity
总用电时间 当前电能
当前用电时间
海尔电子保护插座说明书

INTRODUCTIONThis Product features high quality surge protection, noise filtering, and a simple way to automatically reduce the standby power consumed by TV and PC peripherals.INSTALLATION REQUIREMENTSPower Connections The Product must only beplugged into a groundedreceptacle.All connected devices should beplugged directly into the Product.Use of an extension cord, adaptoror other powerstrip in conjunctionwith the Product will void allwarranties.Phone/Fax/Modem You must connect the telephone / Surge Protection fax / modem cable through theprotected connectors on theProduct.Failure to do so will void theConnectedDeviceWarrantyAntenna/TV You must connect the antenna Surge Protection cable through the protectedconnectors on the Product.Failure to do so will void theConnectedDeviceWarranty PRODUCT OVERVIEWPC / TV On Peripherals OnPC / TV Off Peripherals OffGround LED When illuminated, it indicates thatthe Product is correctly grounded.If this is not illuminated, there is agrounding problem and you shouldcontact an electrician to properlyground the receptacle. Connectinga Product to an improperlygrounded outlet will void allwarranties.Surge LED When not illuminated, it indicatesthat the surge protection isfunctioningnormally.If this LED illuminates red at anytime, the Product was sacrificed toprotect your devices and must be replaced.Resettable Circuit Provides protection for all Outlets Breaker on the product. If no devices arepowered or LEDs lit, press thecircuit breaker to reactivate power. Always On Outlets Outlets remain On all the time.Switched Outlets Outlets switch On and Off inconjunction with the deviceplugged into the ‘Control Outlet’.Switching Adjusts the Threshold at which the Threshold Switched outlets switch On/Off.10W - Low - Notebook22W - Medium- PC42W - High - TVSwitched Outlets When lit, it indicates that theLED Outlets are powered.PRODUCT WARRANTYThe Lifetime of the Product is 10 years (hereafter referred to as Product Lifetime).TrickleStar warrants to the original purchaser that for the Product Lifetime, it shall be free of defects in design, assembly, material, or workmanship, and will repair or replace, at its option, any defective product free of charge.CONNECTED DEVICE WARRANTYTrickleStar will repair or replace, at its option, any devices which are damaged by a transient voltage surge/spike or lightning strike, (an “Occurrence”), while properly connected through the Product to a properly wired AC power line with protective earth.If applicable; the telephone line, and/or network line must be properly connected and installed, and the antenna cable line must also be properly connected and installed, as determined by TrickleStar at its sole discretion.This Connected Device Warranty is a Limited Warranty, subject to the limitations and exclusions set forth herein. TrickleStar will repair or replace the damaged connected devices, at TrickleStar’s option, an amount equal to the fair market value of the damaged devices or the original purchase price of the devices, whichever is less, up to the maximum of: 181SS-US-12** models US$20,000180SS-US-12** models US$400,000The fair market value of the devices shall be the current value of the devices specified in the most recent edition of the Orion Blue Book by Orion Research Corporation, Roger Rohrs Publisher.TrickleStar reserves the right to review the damaged Product, the damaged devices, and the site where the damage occurred. All costs of shipping the Product and the damaged devices to TrickleStar for inspection shall be borne solely by the purchaser. TrickleStar reserves the right to negotiate the cost of repairs. If TrickleStar determines, in its solediscretion, that it is impractical to ship the damaged devices to TrickleStar, TrickleStar may designate, in its sole discretion, a repair facility to inspect and estimate the cost to repair such devices. The cost, if any, of shipping the devices to and from such repair facility and of such estimate shall be borne solely by the purchaser.Damaged devices must remain available for inspection until the claim is finalized. Whenever claims are settled, TrickleStar reserves the right to be subrogated under any existing insurance policies the claimant may have. All above warranties are null and void if:• The Product in use during the o ccurrence is not provided to TrickleStar for inspection upon TrickleStar ’s request atthe sole expense of the purchaser.• TrickleStar determines that the Product has not been installed in accordance with the Installation Requirements,altered in any way or tampered with.• TrickleStar determines that the damage did not result from the occurrence or that no occurrence in fact took place, the repair or replacement of the damaged devices is coveredunder a manufacturer’s warranty.• TrickleStar determines that the connected devices were not used under normal operating conditions or inaccordance with any labels or instructions.• The Product is not plugged directly into a grounded receptacle.• The Product is “daisy-chained” together in serial fashion with other power boards, UPS’, other surge protectors or extension cords.• A three-to two-prong adapter is used.• The Product is not used indoors. This Product is not for use with aquariums and all other water-related products.Use only indoors and in dry locations.The Connected Device Warranty only protects against damage to properly connected devices where TrickleStar has determined, in its sole discretion, that the damage resulted from an occurrence, and does not protect against acts of God (other than lightning) such as flood, earthquake, war, vandalism, theft, normal-use wear and tear, erosion, depletion, obsolescence, abuse, damage due to low voltage disturbances (i.e. brownouts or sags), non-authorized program, or system devices modification or alteration.This warranty contains the sole warranty of TrickleStar, there are no other warranties, expressed or, except as required by law, implied, including the implied warranty or condition of quality, merchantability or fitness for a particular purpose, and such implied warranties, if any, are limited in duration to the term of this warranty. Some states do not allow limitations on how long an implied warranty lasts, so the above limitations may not apply to you.In no event shall TrickleStar be liable for incidental, special, direct, indirect, consequential or multiple damages such as, but not limited to, lost business or profits arising out of the sale or use of any Product, even if advised of the possibility of such damages. This warranty gives you specific legal rights, and you may also have other rights, which may vary from state to state. Some states do not allow the exclusion or limitation of incidental or consequential damage, so the above limitations may not apply to you.This warranty is valid only for the original purchaser of the product. All damage claims against the product must be made within 15 days from the date of the occurrence and must be accompanied by a receipt for the damaged devices or the warranty is void.Warranty is valid in USA and Canada.MAKING A WARRANTY CLAIMGo to: and print our claim form and email it **************************Provide the following information:• Product part number of the Product.• A list of the devices that was connected to the Product at the time of the occurrence.• A list of the devices that were damaged during the occurrence and the extent of the damage.• The date of the occurrence.• Where you purchased the Product.• When you purchased the Product.• A copy of original receipt.A Customer Service Representative will then instruct you on how to forward your devices, receipt and Product in use during the “occurrence” and how to proceed with your claim. COPYRIGHT & DISCLAIMER© Copyright TrickleStar Ltd. All rights reserved.TrickleStar® is a registered trademark of TrickleStar.Any typographical, clerical or other error or omission in this document or other documents or information issued by TrickleStar shall be subject to correction without any liability on the part of TrickleStar without notice.Plug in always on devices eg. Tivo to the “always on” outletsTV setupPC setupPlug in TV Plug in devices toswitched outlets (amp, subwoofer, games console, dvd player)Adjust switching threshold, typically “high” for TV applicationsAdjust switching threshold typically “low” or “medium” for notebooks or desktop PC’s.Connect antenna to “in” and connect “out” to Tivo or Sattelite ReceiverPlug in always on device eg. a router and modem to the “always on” outletsPlug in devices toswitched outlet (printer,scanner, speakers,chargers)Step 3Connect - telephone / modem / router / fax to secondary surge protectionStep 4Plug in PC always oncontrolOUTOUTINcontrolalways onPlug in powerstrip to a grounded receptaclePlug in powerstrip to a grounded receptacleFOR UNITS WITHSECONDARY PROTECTIONFOR UNITS WITHSECONDARY PROTECTIONHOW IT WORKSProvides state-of-the art, high quality, FIREPROOF surge protection and stops standby power consumed by PC and TV peripherals (printer, speakers, charger, modem, scanner, sub-woofer, DVD player etc). Current sensing circuitry senses when a PC / TV is Off and then automatically switches off selected peripherals to save energy. Simple to install and easy to use.STATE OF THE ART, FIREPROOF SURGE PROTECTIONIncorporates fireproof metal oxide varistors (M OV). TrickleStar M OV’s are encased in a ceramic casing and are capable of suppressing more energy and dissipating heat faster than traditional M OV’s. M ore importantly the ceramic casing is fireproof and can prevent a fire during abnormal surge conditions.SAVINGS*Typical savings are $38-50 / year with a product lifetime of at least 10 years . Savings can be higher or lower depending on the type of devices connected, hours of use and the price of power. For a more accurate calculation please visit: ReettableCircuit BreakerState Of The Art,Premium Quality FIREPROOF Surge ProtectionLED IndicatorsAdjustableSwitching ThresholdsAngled Space Saver PlugHeavy Duty CableRear Mounting Holes(Bottom)Switched OutletsControl OutletAlways On OutletsTel / Fax Surge ProtectionTV Antenna Surge Protection (on selected models)The Best Way To Save EnergyIs To Stop Wasting It™e he T Th Is T LP RO D U C T™。
- 1、下载文档前请自行甄别文档内容的完整性,平台不提供额外的编辑、内容补充、找答案等附加服务。
- 2、"仅部分预览"的文档,不可在线预览部分如存在完整性等问题,可反馈申请退款(可完整预览的文档不适用该条件!)。
- 3、如文档侵犯您的权益,请联系客服反馈,我们会尽快为您处理(人工客服工作时间:9:00-18:30)。
LCDG-ZJ1-62610 WIFI 智能插座使用说明书
一、产品简介
LCDG-ZJ1-62610 WIFI 智能插座能够实现常规的电气转接功能,能够测量用电器(负载) 的电压、电流、功率、功率因数及计量负载的用电量和 CO 2 排量等参数,本产品具有 wifi 通讯接口,可以非常便捷的实现远程查询控制,方便直观地掌握电器的工作状态及耗电量。
请用户严格按照本说明书说明安装和使用本产品,以获得最佳使用效果。
安全须知
在试图安装、操作或维护此设备之前,请仔细阅读本手册,拿到它并逐步熟悉这种 仪表。以下特殊信息可能贯穿出现在本手册中或在设备上,用来。
附有这种安全标志示意周围存在着电力危险,假若未遵照一定的指令将会导致人身 伤害。
LCDG-ZJ1-62610 WIFI 智能插座 使用说明书
编制: bzf 校对: 批准:
序言
感谢您选用山东力创科技股份有限公司的 LCDG-ZJ1-62610 WIFI 智能插座。我们建议在 安装、操作或维护此设备之前,请仔细阅读本手册,并逐步熟悉这种插座。以下特殊信息可 能贯穿出现在本手册中或在设备上,用来警示潜在的危险或用于阐释和规定操作规程,请注 意。
© 2016 Shandong Lichuang Science & Technology Co.,Ltd 版权所有
本出版物中所包含的信息仅为所显示的目的而制作。 没有本公司的书面同意,本手册及随同 LCDG-ZJ1-62610 WIFI 智能插座设备一起提供的 其他文件不得被复制,不管是部分或全部。 用于描述设备的图纸及图片仅作为一般参考作用,而不能确保每个细节的完整性与准确 性.。 本手册对应的相关内容如有更改,恕不另行通知。订货前,请垂询本公司或当地经销商 以获悉本产品的最新规格。
版本 V1.00 V1.01
编制 bzf Bzf
修改原因 文件创建 改进格式
LCDG-ZJ1-62610 WIFI 智能插座使用说明书
目录
一、产品简介..................................................................................................................................... 5 二、产品功能..................................................................................................................................... 5 三、技术参数..................................................................................................................................... 5 四、功能介绍..................................................................................................................................... 6
1.液晶显示屏..............................................................................................................................6 2.按键.......................................................................................................................................... 6 3.LED 指示................................................................................................................................. 6 4.基本功能介绍..........................................................................................................................7 五、插座操作指南.............................................................................................................................7 1.电测界面操作..........................................................................................................................7 2.时钟显示界面........................................................................................................................10 3.强制开关操作........................................................................................................................10 4.工作模式切换........................................................................................................................10 六、APP 操作指南.......................................................................................................................... 10 1、配置插座.............................................................................................................................10 2、正常操控插座.....................................................................................................................11 七、应用实例...................................................................................................................................12 八、包装........................................................................................................................................... 13 九、注意事项...................................................................................................................................13
安全警告
按照说明书指示的使用方法正确使用可以避免产品出现不必要的故障或损坏,并可保证 使用者的安全。
1、使用过程中对操作者造成危险的安全注意事项。 (1)为确保正确、安全使用本产品,需专业电工安装或拆卸; (2)安装或拆卸操作时,必须断开主电源;
2、个人维护、调整或更换易损件时,可能对操作者造成人身伤害。 (1)请勿擅自拆开产品,更不可带电拆机。
4.基本功能介绍
1)安全电气转接功能:本产品插在现有插座上,用电器再插在本产品上,实现电气转 接和计量与控制功能。
2)电能测量功能:检测用电器(负载)的电流、电压、功率、功率因数、电量、CO2 排量的计量信息,并通过液晶屏数字化显示,方便直观掌握用电器的工作状态及耗电量。 停电后本产品仍能保留原有的电能值。
表 1 产品功能
LCDG-ZJ1-62610
三、技术参数
◆ 额定电压:市电 220VAC/50Hz ◆ 额定电流:10A ◆ 尺寸:120mm × 56mm ×55mm ◆ 计量精度:1级/2级 ◆ 工作温度:-10℃~55℃
第 5 页 共 15 页
2.按键
序号 按键
说明
当插座处于正常工作模式时,可以通过长按该按键将插座切换到配置模
1
模式
式;
2
开关 长按该按键可以切换继电器的通断;
短按该按键可以切换当前的显示界面,液晶依次显示电压、电流、功率、
3
查询 功率因数、电量、二氧化碳和实时时钟;在电量界面下长按该按键可以清
除当前电量及插座的历史数据。
表 2 按键说明 注意:当超过 30 秒没有按键按下时,插座自动显示实时时钟;
LCDG-ZJ1-62610 WIFI 智能插座使用说明书 ◆ 湿度:<75% ◆ 外壳采用进口防火阻燃材料,具有优良的电绝缘性 ◆ 国标孔
四、功能介绍
1.液晶显示屏
图 4.1 本产品液晶显示屏具有两个主显界面:电测界面、时钟显示界面; 各界面显示信息如下: 1) 电测界面:当前系统工作模式及电压、电流、功率、功率因数、电量、CO2 等 2) 时钟显示界面:当前系统时间——星期、小时、分钟等