YE5872功率放大器使用说明书
双路音频放大器产品说明书

Stereo Power Amplifiers Models: PLA300, PLA500 & PLA900Safety InformationThe lightning bolt within a triangle is intended to alert the user to the presence of un insulated dangerous voltage levels within the product’s enclosure. This voltage may be of sufficient magnitude to constitute an electric shock risk. To reduce the risk of electricshock, do not remove coverof this device. There are nouser serviceable partsinside. Refer servicing onlyto qualified servicepersonnel.The exclamation pointwithin a triangle isintended to alert theuser to importantoperating andmaintenance(servicing)instructions in theliteratureaccompanying theappliance.Safety Precautions• Read and retain these instructions• Follow all instructions and heed warnings• Do not use this device near water• If the surface becomes dirty, clean only with dry cloth, do not use solvents or thinners• Install in accordance with the manufacturer’s instructions• Do not block ventilation openings• Do not install near heat sources such as radiators, heat registers, stoves, or other devices that produce heat• Do not defeat the safety purpose of the grounded plug. This plug has twoblades and a third ground prong. The wide blade or third prong are provided for your safety. If the provided plug does not fit into your outlet, consult anelectrician for replacement of the obsolete outlet• Protect the power cord from being stressed at the plugs, conveniencereceptacles, and where they exit the amplifier• Only use accessories specified by the manufacturer• Unplug the device during lightning storms or when unused for an extended time• Refer all servicing to qualified personnel• This device must not be exposed to water in any way. No object filled withliquids should be placed on apparatusCongratulations on your purchase of thisPulse PLA Series Stereo Power AmplifierThis amplifier was designed specifically for use in permanent audio installations or mobile sound reinforcement scenarios, where high reliability and premium sound quality are a must. Highly rugged construction and high efficiency design make this amplifier perfect for continuous duty applications in situations were power will be left on for indefinite periods of time.This amplifier is warranted from defects for one year from the date of purchase. Should your amplifier require service, either within or beyond that warranty period, please contact your Pulse **************************************************.uk.This unit includes a host of features, along with an impressive list of specifications, which are detailed over the next pages. Please take the time to read this document completely prior to installation of this product. Should you have questions regarding installation or operation of this unit, please contact the Pulse Technical Support Department.Features∙240W, 460W & 760W versions∙Class AB amplifiers∙Detented rotary volume controls∙Signal, clip, protect & power LED indicators∙LED VU meter for signal level monitoring∙Delayed switch on to help prevent speaker/amplifier damage∙Over temperature and neutral DC protection∙Rugged steel enclosures with front 19” rack mount ears∙Signal Inputs: 2x 6.35mm (1/4”) unbalanced jack sockets∙Speaker Outputs: 2x Locking speaker socketsSpecificationsApplications∙Live Music, DJ or Installation∙Ideal for powering large speaker cabinets or multiple cabinets in high level sound reinforcement∙This product is designed for professional or commercial use only and is not designed to be used in a domestic environment.Connections / Controls1)Channel 2 speaker output via locking speaker socket. (Use terminals 1+1-only, minimum speaker impedance 4Ω)2)Signal input for Channel 2, via unbalanced 6.35mm (1/4”) jack.3)Air ventilation port – DO NOT BLOCK.4)Channel 1 speaker output via locking speaker socket. (Use terminals 1+1-for Channel 1, and terminals 2+2- for Channel 2, minimum speakerimpedance 4Ω per channel)5)Signal input for Channel 1, via unbalanced 6.35mm (1/4”) jack.6)IEC Mains Inlet – Use only the supplied power cord or suitablereplacement with the correct fuse rating.7)Mains Voltage Switch – This product features a dual voltage power supply.For use within Europe this must be set to the 220-240Vac position.Incorrect selection of mains voltage input will cause the amplifier to failand will not be covered by the standard warranty.Operation:∙All connections to the amplifier should be made while the power is turned off and the attenuators/volume controls are set to the “0” or minimum position.∙As with all amplifiers the connected devices should be powered on in the correct order. When powering up, the amplifier should be the last to beswitched on, when powering down, please ensure the amplifier is switched off first.∙The Pulse PLA series features Signal Clip LED’s to indicate when the amplifier is within 3dB of “clipping”. This indicates the amplifier is receiving itsmaximum input signal and the gain at source should now be reduced.∙Clipped signals are harmful to speakers and amplifiers, they will also sound “distorted” to the ear. Care should be taken to avoid clipping the signal at any point during the signal flow.∙The amplifier features a PROTECT mode indicated by the LED on the front panel. Should the amplifier enter PROTECT mode at any point please switchoff the amplifier immediately. Once powered down the input signal should be turned down to the minimum and the load (speakers) disconnected. At thisstage the speakers and output cabling should be checked for faults/damageand if they are in good working order may be reconnected. The amplifier canthen be powered up again and the input signal increased. Should the amplifier remain in PROTECT mode permanently this indicates a fault and the amplifier will require servicing or repair by an engineer.∙The input connectors on the Pulse PLA series are standard 2-pole unbalanced6.35mm (1/4”) jack sockets.∙Choose speaker cables carefully – please use cables with cores of minimum1.5mm2 and under 10m in length to prevent power loss.∙Check all cables (speaker, signal and mains) for damage, loose terminals or potential short circuits on regular occasions.∙Speaker wires carry high voltages; care should be taken to ensure no bare wires can be touched as this may result in electric shock.∙The Pulse PLA Series features a dual use locking speaker connector on OutputA – this allows both amplifier channels to be accessed using one standardlocking speaker connector. Pins 1+1- are connected to Channel A, pins 2+2- are connected to Channel B.∙Do not use these amplifiers in damp or high humidity environments. Do not use outdoors or anywhere where liquids could fall or splash onto the amplifier. ∙Ensure the amp is adequately ventilated, with free airflow around the front and rear panels. Keep away from other heat sources. If the amps aremounted in a rack with other amps, ensure there is adequate cool air flowfront and rear. Note that air is drawn in through the front panel, andexhausted through the rear panel.∙NEVER cover the amplifiers, as they may overheat.∙PULSE power amplifiers are designed to fit standard 19” racks, with a 2U height and 14.5” depth (not including space for connectors & cables)∙Ensure that the AC power supply is correct for your amplifier. The required AC supply is stated on the rear panel next to the AC power input.∙Ensure that you use the correct type of mains lead for your equipment and country. This must be free from damage and easily accessible during use.∙Keep away from magnetic recording media (tape, mini disc, hard drive etc).Power amplifiers produce an electromagnetic field, which could affect stored files.∙Sound reinforcement systems can produce levels of sound that have the potential to damage a person’s hearing. Please operate this equipment with due care and diligence. If you are in any doubt of the correct operatingvolume for any speaker/amplifier system, please seek advice from a audio industry professional of suitable qualification to advise on Sound Levels. We also advise the use of good quality decibel meters to ensure sound levels are maintained. In the UK the Health & Safety Executive will be able to offeradvise regarding Noise in the Workplace.ComplianceWhen this product reaches the end of its life, do not dispose with household waste. Please dispose of PULSE products in an environmentally sound fashion, or contact PULSE directly via WarrantyPulse products are warranted, by Pulse, against manufacturer defects for a period of one year from the original date of purchase. This warranty is limited to manufacturer defects, in either materials or workmanship. Pulse, or any other worldwide divisions of Premier Farnell PLC, are not responsible for any consequential or inconsequential damage to any other component, structure or the cost of installation or removal of said items.This warranty will not cover damage due to improper use such as (and not limited to) damaged cones, mounting frames, voice coils or items damaged by weather or moisture ingress/exposure.For questions or specific information regarding warranty replacement or repair, contact:PULSE。
航空发动机构造及强度课程实验指导书

航空发动机构造及强度课程实验指导书艾延廷赵永健编沈阳航空工业学院2006 年 6 月前言航空发动机构造及强度是飞行器动力工程专业的骨干专业课程,主要讲授航空发动机主要部件及典型结构,讲授整机及叶片、轮盘等部件的强度振动分析和计算方法,最后讲授航空发动机转子临界转速,航空发动机结构完整性等方面的内容。
轮盘和叶片是航空发动机中的典型部件和零件,研究轮盘应力分布规律、叶片振动振型及固有频率等参数的测量和分析,是航空发动机设计、研制中的关键技术,因此本课程开设“旋转圆盘应力实验”和“叶片振动应力测试实验”两个实验具有代表性,对有关课程的学习具有较好的支撑作用。
本实验指导书是配合该课程实验而编写的。
“旋转圆盘应力实验”是必做实验。
实验的目的是测出等厚、等温、空心、无外载的圆盘旋转时的径向及周向应力沿半径的分布规律,并与计算结果对比分析。
通过实验使学生掌握旋转件应力测试及分析方法;学会使用旋转圆盘应力实验的设备及仪器。
“叶片振动应力测试实验”是综合型、必做实验。
内容为测量并分析等截面叶片弯曲振动及扭转振动的自振频率、振型;验证固有频率计算理论。
该实验的目的是使学生加强对叶片振动理论的理解;掌握叶片振动实验的激振和拾振方法,学会使用李沙育图形法判断叶片共振状态的方法。
通过该实验可使学生进一步理解叶片振动理论,掌握叶片振动的实验研究方法。
本课程实验要求学生进行实验预习,预先掌握INV306D(M)智能信号采集处理分析仪的使用方法,认真回答实验思考题。
目录实验1 旋转圆盘应力实验 (1)1. 实验目的 ............................................................................................................................ 1`2. 实验原理 (1)3. 实验仪器设备 (3)4. 实验步骤 (4)5. 思考题 (4)6. 实验报告要求 (4)实验2 叶片振动应力测试实验 (7)1. 实验目的 (7)2. 实验原理 (7)3. 实验仪器设备 (10)4. 实验步骤 (11)5. 思考题 (13)6. 实验报告要求 (13)实验1 旋转圆盘应力实验1. 实验目的(1) 了解旋转圆盘应力实验的设备和方法,掌握应用电阻应变片测量旋转圆盘离心应力的实验原理和实验技术。
富满电子集团TC8871 5W单通道F类音频功率放大器说明书
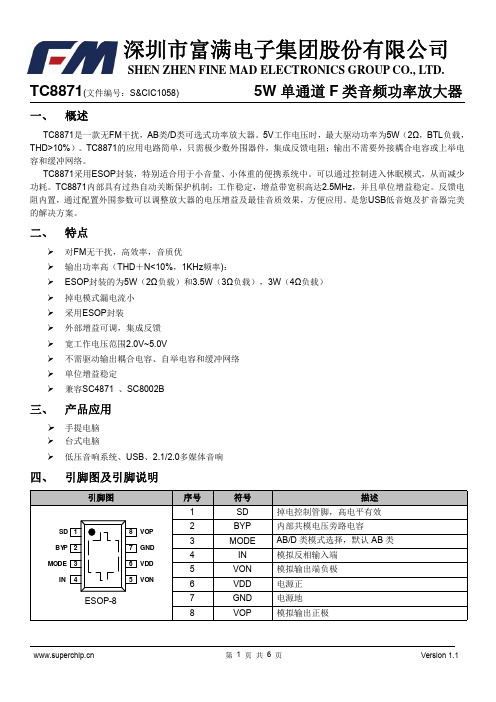
TC8871(文件编号:S&CIC1058)5W 单通道F 类音频功率放大器一、概述TC8871是一款无FM 干扰,AB 类/D 类可选式功率放大器。
5V 工作电压时,最大驱动功率为5W (2Ω,BTL 负载,THD>10%)。
TC8871的应用电路简单,只需极少数外围器件,集成反馈电阻;输出不需要外接耦合电容或上举电容和缓冲网络。
TC8871采用ESOP 封装,特别适合用于小音量、小体重的便携系统中。
可以通过控制进入休眠模式,从而减少功耗。
TC8871内部具有过热自动关断保护机制;工作稳定,增益带宽积高达2.5MHz ,并且单位增益稳定。
反馈电阻内置,通过配置外围参数可以调整放大器的电压增益及最佳音质效果,方便应用。
是您USB 低音炮及扩音器完美的解决方案。
二、特点对FM 无干扰,高效率,音质优输出功率高(THD +N<10%,1KHz 频率):ESOP 封装的为5W (2Ω负载)和3.5W (3Ω负载),3W (4Ω负载) 掉电模式漏电流小 采用ESOP 封装外部增益可调,集成反馈 宽工作电压范围2.0V~5.0V不需驱动输出耦合电容、自举电容和缓冲网络 单位增益稳定兼容SC4871、SC8002B三、产品应用手提电脑台式电脑低压音响系统、USB 、2.1/2.0多媒体音响四、引脚图及引脚说明TC8871(文件编号:S&CIC1058)5W 单通道F 类音频功率放大器七、电气参数八、TC8871D 类模式应用说明MODE 功能TC8871是一款AB 类/D类可选的音频功率放大器,通过MODE 功能键可对功放进行AB类D类的选择。
MODE 芯片功能模式高电平D 类功率放大器低电平AB 类功率放大器输入电阻(Ri )通过选择输入电阻的参数值可以配置放大器的增益:阻抗匹配对于放大器来说很重要,输出与反馈的平衡取决于电路的阻抗匹配情况,CMRR ,PSRR 和二次谐波失真的消除也可以得到优化。
UK A5.PM6.5 CM电源放大器流量阀系列ET102安装手册说明书

Bulletin HY11-5715-484/UKPower Amplifier for Flow ValvesInstallation Manual Series ET102Parker Hannifin GmbH Hydraulic Controls Division Gutenbergstr. 3841564 Kaarst, Germany Tel.:+49-181 99 44 43 0Fax:+49-2131-513-230E-mail:******************Copyright2002, Parker Hannifin GmbH2IA ET102 UK A5.PM6.5 CMPower Amplifier for Flow Valves Series ET102Installation ManualParker Hannifin GmbH Hydraulic Controls DivisionNoteThis document and other information from Parker Hannifin GmbH, its subsidiaries, sales offices and authorized distributors provide product or system options for further investigation by users having technical expertise. Before you select or use any product or system it is important that you analyse all aspects of your application and review the information concerning the product or system in the current product catalogue. Due to the variety of operating conditions and applications for these products or systems, the user, through his own analysis and testing, is solely responsible for making the final selection of the products and systems and assuring that all performance and safety requirements of the application are met. The products are subject to change by Parker Hannifin GmbH at any time without notice.Power Amplifier for Flow Valves Series ET102Installation Manual3IA ET102 UK A5.PM6.5 CMParker Hannifin GmbH Hydraulic Controls DivisionElectronic module for the control of proportional throttle valves. The valve opening and its changes are determined by externally applied command signals. The measured value (Volts) on the mod-ule is indirectly proportional with the throttle opening or alternatively the resulting volume flow Q (l/min).Features •Processing and amplification of the externally supplied positive commands into output sig-nals for the control solenoid.•Can be combined with EZ150 or external pro-grammable control.•Pulsed amplifier power stage with constant current control.•Dither generator with applied frequency to improve static characteristics.•Diagnosis by means of diagnostic sockets as well as light diodes for indicating working con-ditions.Ordering CodeDesign SeriesModule Type Amplifier for command signal inputElectronic Module Flow ValveValve SizeCode ValveSolenoid F E16 to E 5035mm F E16 to E 5035mm F E63 to E10060mm 99F E63 to E10060mmConnection 31 pole male connector, DIN 41617Power supplyfiltered: 22–38V, unfiltered: 18–26V Command voltage 0 to +10 DC Input select voltage 5 to 30VDC Power required 40VAReference outputs+10VDC 10mAMax. solenoid output current 1.3A with 10V command Ambient temperature 0 to 70°C Rampsnot availableShield. cable connection Supply connections+valve: AWG15Commands: AWG20Fuse2A medium lag, DIN 41571/5x20mmCharacteristics4Power Amplifier for Flow Valves Series ET102Installation ManualParker Hannifin GmbH Hydraulic Controls DivisionPower Amplifier for Flow Valves Series ET102Installation Manual5IA ET102 UK A5.PM6.5 CMParker Hannifin GmbH Hydraulic Controls DivisionDimensions (Eurocard)A Operating and Diagnostic Elements (Elevation A)Notes:Turn off the electrical power to this board whenever the hydraulic supply to the valve is not on.Always turn off the power to this board before removing it from the card holder.Only potential-free measuringequipment to be usedGreen grip strip with reference information for measured valuesRed socket for current diagnostic Red LED forindicating function of control solenoid Black socket for current diagnostic6IA ET102 UK A5.PM6.5 CMPower Amplifier for Flow Valves Series ET102Installation ManualParker Hannifin GmbH Hydraulic Controls DivisionInstallation guide to electronic modules to provision of electromagnetic compatibility Power SupplyThe utilized power supply has to comply with the EMC-standards (CE-sign, certificate of confor-mity).Relais and solenoids operating from the same supply circuit as the valve electronics have to be fitted by surge protection elements.Wiring CableThe wires between the installation site of the module and the peripheral units, as power supply,valve solenoids, command signal source have to be shielded. The following wire sizes must be reached: power supply AWG 16, other connec-tions AWG 20. The capacity should not exceed a value of approx. 130 pF/m (wire/wire). The maxi-mum cable length is 50 m. No power current lines may be placed within the wired shielded cables to the electronic module. The cable shield has to be connected to ground at both ends (see also chapter “Grounding“). Please be aware of ground loops.InstallationThe module has to be mounted within a conduc-tive, shielded enclosure. Usable is i.e. an EMC-approved control cabinet. A perfect grounding of the enclosure is mandatory (see also chapter “Grounding“).GroundingThe mounting plate of the valve has to be con-nected to the grounded metal machine frame. The cable shields must be tied to ground at the control cabinet. A low-ohmic potential compensation wire has to be provided between the control cabinet and the machine frame (cable wire >AWG 7 cross section) to prevent ground loops.。
RB-1581 Bridged Mono Power Amplifier 单声道后置放大器 使用说明

OwnerÊs Manual 使用说明书RB-1581Bridged Mono Power Amplifier单声道后置放大器WARNING: There are no user serviceable parts inside. Refer allservicing to qualified service personnel.WARNING: To reduce the risk of fire or electric shock, do not expose the unit to moisture or water. Do not expose the unit to dripping or splashing. Do not place objects filled with liquids, such as vases, on the unit. Do not allow foreign objects to get into the enclosure. If the unit is exposed to moisture, or a foreign object gets into the enclosure, immediately disconnect the power cord from the wall. Take the unit to a qualified service person for inspection and necessary repairs.Read all the instructions before connecting or operating the component.Keep this manual so you can refer to these safety instructions.Heed all warnings and safety information in these instructions and on the product itself. Follow all operating instructions.Clean the enclosure only with a dry cloth or a vacuum cleaner.Do not use this unit near water.You must allow a minimum 10 cm or 4 inches of unobstructedDo not place the unit on a bed, sofa, rug, or similar surface that could block the ventilation openings. If the unit is placed in a bookcase or cabinet, there must be ventilation of the cabinet to allow proper cooling.Keep the component away from radiators, heat registers, stoves, orany other appliance that produces heat.Rotel products are designed to comply with international directives on the Restriction of Hazardous Substances (RoHS) in electrical and electronic equipment and the disposal of Waste Electrical and Electronic Equipment (WEEE). The crossed wheelie bin symbol indicates compliance and that the products must be appropriately recycled or processed in accordance with these directives.Important Safety InstructionsWARNING: The rear panel power cord connector is the mains power disconnect device. The apparatus must be located in an open area that allows access to the cord connector.The unit must be connected to a power supply only of the type and voltage specified on the rear panel. (USA: 120 V/60Hz, EC: 230V/50Hz)Connect the component to the power outlet only with the supplied power supply cable or an exact equivalent. Do not modify the supplied cable. A polarized plug has two blades, with one wider than the other. A grounding plug has two blades plus a third grounding prong. These are provided for your safety. Do not defeat grounding and/or polarization safety provisions. If the supplied plug does not fit your outlet, please consult an electrician for replacement of the obsolete outlet. Do not use extension cords.The main plug of the power cordset is a disconnect device of the apparatus. In order to completely disconnect the apparatus from the supply mains, the main plug of the power cordset should be unplugged from the mains (AC) outlet. The stand-by LED indicator will not be lit up to show the power cord is unplugged. The disconnect device shall remain readily operable.Do not route the power cord where it will be crushed, pinched, bent, exposed to heat, or damaged in any way. Pay particular attention to the power cord at the plug and where the cord exits the back of the unit.The power cord should be unplugged from the wall outlet during a lightning storm or if the unit is to be left unused for a long period of time.This apparatus shall be connected to a main socket outlet with a protective earth connection.Use only accessories specified by the e only with a cart, stand, rack, bracket or shelf system recommended by Rotel. Use caution when moving the unit in a stand or rack to avoid injury from a tip-over.Use Class 2 wiring for speaker connections to ensure proper insulation and minimize the risk of electric shock.Immediately stop using the component and have it inspected and/or serviced by a qualified service agency if:Ć The power supply cord or plug has been damagedĆ Objects have fallen or liquid has been spilled into the unit Ć The unit has been exposed to rainĆ The unit shows signs of improper operationĆ The unit has been dropped or damaged in any wayPin AssignmentsBalanced Audio (3 pole XLR):Pin 1: Ground / Screen Pin 2: In phase / +ve / Hot Pin 3: Out of phase / -ve / ColdFigure 1: Controls and ConnectionsFigure 2: Hook-up Illustration3UHDPSImportant NotesWhen making connections be sure to:Turn off all the components in the system before hooking up any components, including loudspeakers.Turn off all components in the system before changing any of the connections to the system.It is also recommended that you:Turn the volume control of the amplifier all the way down before the amplifier is turned on or off.Remarques importantesPendant les branchements, assurez-vous que :Tous les maillons sont éteints avant leur branchement, quels quÊils soient, y compris les enceintes acoustiques.Éteignez tous les maillons avant de modifier quoi que ce soit au niveau de leurs branchements, quels quÊils soient.Il est également recommandé de :Toujours baissez le niveau sonore via le contrôle de volume, avant dÊallumer ou dÊéteindre lÊamplificateur.Wichtige HinweiseAchten Sie beim Herstellen der Verbindungen auf Folgendes:Schalten Sie alle Komponenten im System ab, bevor Sie Geräte (einschließlich Lautsprecher) anschließen.Schalten Sie alle Komponenten im System ab, bevor Sie Anschlüsse im System verändern.Ferner empfehlen wir, dassSie die Lautstärke herunterdrehen, bevor Sie den Verstärker ein- oder ab schalten.Notas ImportantesCuando realice las conexiones, asegúrese de que:Desactiva todos los componentes del equipo, cajas acústicas incluidas, antes de conectar cualquier nuevo componente en el mismo. Desactiva todos los componentes del equipo antes de cambiar cualquier conexión del mismo.También le recomendamos que:Reduzca el nivel de volumen de su amplificador a cero antes de activarlo o desactivarlo.Héél belangrijkBij het maken van de verbindingen:Zorg dat niet alleen de RB-1581, maar de gehele installatie uitstaat, als nog niet alle verbindingen gemaakt zijn.Zorg dat niet alleen de RB-1581, maar de gehele installatie ook uitstaat, als u verbindingen gaat wijzigen.Wij raden u ook aan omde volumeregelaar van de (voor)versterker geheel dicht te draaien (volkomen linksom) wanneer u uw eindversterker aan- of uitzet. Note importantiQuando effettuate i collegamenti assicuratevi di:Spegnere tutti i componenti del sistema prima di collegare qualsiasi componente, inclusi i diffusori.Spegnere tutti i componenti del sistema prima di modificare qualsiasi connessione nel sistema.Vi raccomandiamo inoltre di:Portare il volume a zero prima di accendere o spegnere lÊamplificatore.ViktigtTänk på följande när du gör anslutningar:Stäng av alla apparater i anläggningen innan du ansluter nya komponenter eller högtalare.Stäng av alla apparater i anläggningen innan du ändrar någon anslutning.Du rekommenderas också:Vrida ner volymen på förförstärkaren helt och hållet innan förstärkaren slås på eller av.è ‰ ÔÓ‰ÒÓ‰ËÌÂÌËÂÏ:Ç˚Íβ˜ËÚ ‚Ò ÍÓÏÔÓÌÂÌÚ˚, ‚Íβ˜‡fl ÍÓÎÓÌÍË.Ç˚Íβ˜ËÚ ‚Ò ÍÓÏÔÓÌÂÌÚ˚ ‚ ‚‡¯ÂÈ ÒËÒÚÂÏÂ, Ô Âʉ ˜ÂÏ ˜ÚÓ-ÚÓ ‚ ÌÂÈ ÏÂÌflÚ¸.êÂÍÓÏẨÛÂÚÒfl Ú‡ÍÊÂ:Ç˚‚ÂÒÚË … ÓÏÍÓÒÚ¸ ÛÒËÎËÚÂÎfl ̇ ÏËÌËÏÛÏ, Ô ‰ ÚÂÏ Í‡Í ‚Íβ˜‡Ú¸ ËÎË ‚˚Íβ˜‡Ú¸ Â…Ó.(not digital) amplifiers are up to five times more efficient than our legacy designs and still deliver power and performance. These products run cool, give minimum wasted energy, are good for the environment and give better sound too.Finally, we have printed this brochure on recycled paper stock.While we understand that these are small first steps, they are still important ones. And we continue to pursue new methods and materials for a cleaner and greener manufacturing process.All of us at Rotel thank you for buying this product. We are sure it will bring you many years of enjoyment.A Word About WattsThe RB-1581 power output is quoted as 500 watts in 8 ohms load, when it is operating at full power.Rotel has chosen to specify the power output in this way because, in RotelÊs experience, it gives the truest value of the receiver or amplifierÊs power capability.When comparing specifications for different products, you should be aware that power output is often specified in other ways, so you may not be comparing like with like.For example, the power output may be quoted with only one channel operating, giving a higher maximum figure. The highly regulated power supplies of the Rotel amplifiers ensures that they will produce the full specified power output to one or all channels.A loudspeakerÊs impedance rating indicates the electrical resistance or load it offers when connected to the amplifier, usually 8 ohms or 4 ohms. The lower the impedance, the more power the speaker will need. In effect, a 4 ohm speaker will require twice as much power as an 8 ohm speaker.However, Rotel amplifiers are designed to work into any speaker impedance between 8 and 4 ohms, and with all the channels working up to their full power. Because the Rotel design is optimized for use with all channels operating together, Rotel is able to specify the true power output for all channels.Getting StartedThank you for purchasing the Rotel RB-1581 Bridged Mono Power Amplifier. When used in a high-quality music or home theater system, your Rotel product will provide years of musical enjoyment.The RB-1581 is a high-power amplifer, providing the highest level of audio performance. A massive power supply, premium components, and RotelÊs Balanced Design ensure superb sound quality. High current capability allows the RB-1581 to drive the most demanding loudspeakers.A Few PrecautionsWARNING: To avoid potential damage to your system, turn off ALL the components in the system when connecting or disconnecting the loudspeakers or any associated components. Do not turn the system components back onContentsImportant Safety Instructions . . . . . . . . . . . . . . . . . . . . . . . . . . . . . . . . . . . . . . . . . . 2Figure 1: Controls and Connections 3Figure 2: Hook-up Illustration 4Important Notes 5About Rotel . . . . . . . . . . . . . . . . . . . . . . . . . . . . . . . . . . . . . . . . . . . . . . . . . . . . . . . 6A Word About Watts . . . . . . . . . . . . . . . . . . . . . . . . . . . . . . . . . . . . . . . . . . . . . . . . 6Getting Started . . . . . . . . . . . . . . . . . . . . . . . . . . . . . . . . . . . . . . . . . . . . . . . . . . . . 6A Few Precautions 6Placement 7AC Power and Control . . . . . . . . . . . . . . . . . . . . . . . . . . . . . . . . . . . . . . . . . . . . . . . 7AC Power Input 8 7Power Switch and Power Indicator 1 7Protection Indicator 2 7Trigger On/Off Mode Selector 5 712V Trigger Input and Output 4 7Input Signal Connections 3 . . . . . . . . . . . . . . . . . . . . . . . . . . . . . . . . . . . . . . . . . . . 8Input Selector Switch 8Speaker Outputs . . . . . . . . . . . . . . . . . . . . . . . . . . . . . . . . . . . . . . . . . . . . . . . . . . . 8Speaker Selection 8Speaker Wire Selection 8Polarity and Phasing 8Speaker Connection 6 8Troubleshooting . . . . . . . . . . . . . . . . . . . . . . . . . . . . . . . . . . . . . . . . . . . . . . . . . . . . 9Power Indicator Is Not Illuminated 9Fuse Replacement 7 9No Sound 9Protection Indicator Is Illuminated 9Specifications . . . . . . . . . . . . . . . . . . . . . . . . . . . . . . . . . . . . . . . . . . . . . . . . . . . . . 9About RotelOur story began over 50 years ago. Over the decades, we have received hundreds of awards for our products and satisfied hundreds of thousands of people who take their entertainment seriously- like you!Rotel was founded by a family whose passionate interest in music led them to manufacture high-fidelity components of uncompromising quality. Through the years, that passion has remained undiminished and the family goal of providing exceptional value for audiophiles and music lovers, regardless of their budget, is shared by all Rotel employees.RotelÊs engineers work as a close team, listening to, and fine tuning, each new product until it reaches their exacting musical standards. They are free to choose components from around the world in order to make that product the best they can. You are likely to find capacitors from the United Kingdom and Germany, semiconductors from Japan or the United States, while toroidal power transformers are manufactured in RotelÊs own factory.We all have concerns about our environment. And, as more and more electronics are produced and later discarded, it is especially important for a manufacturer to do all it can to engineer products that have a minimum negative impact on landfill sites and water tables.At Rotel, we are proud to do our part. We have reduced the lead content in our electronics by using special ROHS solder, while our new Class Duntil you are sure all the connections are correct and secure. Pay particular attention to the speaker wires. There must be no loose strands that could contact the other speaker wires, or the chassis of the amplifier.Please read this manual carefully. In addition to basic installation and operating instructions, it provides valuable information on various RB-1581 system configurations as well as general information that will help you get optimum performance from your system. Please contact your authorized Rotel dealer for answers to any questions you might have. In addition, all of us at Rotel welcome your questions and commentsSave the RB-1581 shipping carton and all enclosed packing material for future use. Shipping or moving the RB-1581 in anything other than the original packing material may result in severe damage to your amplifier.If included in the box please fill out and send in the owner`s registration card. Also be sure to keep the original sales receipt. It is your best record of the date of purchase, which you will need in the event warranty service is ever required.PlacementLike all audio components that handle low-level signals, the RB-1581 can be affected by its environment. Avoid placing the RB-1581 on top of other components. Also avoid routing audio signal cables near power cords. This will minimize the chance it will pick up hum or interference.The RB-1581 generates heat as part of its normal operation. The heat sinks and ventilation openings in the amplifier are designed to dissipate this heat. The ventilation slots in the top cover must be open. There should be 10 cm (4 inches) of clearance around the chassis, and reasonable airflow through the installation location, to prevent the amplifier from overheating.Remember the weight of the amplifier when you select an installation location. Make sure that the shelf or cabinet can support it. We recommend installing the RB-1581 in furniture designed to house audio components. Such furniture is designed to reduce or suppress vibration which can adversely affect sound quality. Ask your authorized Rotel dealer for advice about component furniture and proper installation of audio components.AC Power and ControlAC Power Input 8Your RB-1581 is configured at the factory for the proper AC line voltage in the country where you purchased it (USA: 120 volts/60 Hz, Europe: 230 volts/50 Hz). The AC line configuration is noted on a label on the back panel.NOTE: Should you move your unit to another country, it may be possible to reconfigure it for use on a different line voltage. Do not attempt to perform this conversion yourself. Opening the enclosure of the unit exposes you to dangerous voltages. Consult a qualified service person or the Rotel factory service department for information.NOTE: Some products are intended for sale in more than one country and as such are supplied with more than one AC cord. Please use only the cord appropriate for your country/region.Because of its relatively high power rating, the RB-1581 can draw considerable current. Therefore, it should be plugged directly into a 3-pin polarized wall outlet. Do not use an extension cord. A heavy duty multi-tap power outlet strip may be used if it (and the wall outlet) is rated to handle the current demanded by the RB-1581 and all the other components connected to it.Be sure the power switch on the front panel of the RB-1581 is turned off (in the …out… position). Then, connect the supplied power cord to the Power Connector 8 on the rear of the unit and the AC power outlet.If you are going to be away from home for an extended period of time such as a month-long vacation, it is a sensible precaution to unplug the RB-1581 (as well as other audio and video components) while you are away.Power Switch and Power Indicator 1Press the front panel Power Switch button, to turn the unit on (or to activate the 12V trigger). The Power Indicator light is illuminated when the unit is on. Press the Power Switch button again to turn the unit off.Protection Indicator 2The RB-1581 features thermal and over-current protection circuits that protect against potential damage in the event of extreme or faulty operating conditions. Unlike many designs, the RB-1581Ês protection circuit is independent of the audio signal and has no impact on sonic performance. Instead, the protection circuit monitors the temperature of the output devices and shuts down the amplifier if temperatures exceed safe limits.Most likely, you will never see this protection circuitry in action. However, should a faulty condition arise, the amplifier will stop playing and the PROTECTION LED on the front panel will light.If this happens, turn the amplifier off, let it cool down for several minutes, and attempt to identify and correct the problem. When you turn the amplifier back on, the protection circuit will automatically reset and the PROTECTION LED should go out.In most cases, the protection circuitry activates because of a fault condition such as shorted speaker wires, or inadequate ventilation causing an overheating condition. In very rare cases, highly reactive or extremely low impedance speaker loads could cause the protection circuit to engage.If the protection circuitry triggers repeatedly and you are unable to isolate and correct the faulty condition, contact your authorized Rotel dealer for assistance in troubleshooting.Trigger On/Off Mode Selector 5The amplifier provides the option for manual or automatic power on/off operation. These modes are selectable using a toggle switch on the back panel.With the switch in the +12V TRIGGER ON position, the amplifier is turned on automatically when a 12V trigger signal is present at the 3.5 mm Jack of TRIGGER IN on the rear panel. The amplifier will go into standby mode if the +12V signal is not present. The front panel POWER SWITCH overrides this function. It must be ON for the +12V trigger to work. Turning the switch OFF cuts power to the amplifier, regardless of whether or not a trigger signal is present.12V Trigger Input and Output 4The jack labeled IN is for connecting the 3.5mm Plug/Cable carrying a +12 volt trigger signal to turn the amplifier on and off. To use this feature the toggle switch must be set to the ON position. This input accepts any control signal (AC or DC) ranging from 3 volts to 30 volts.The jack labeled OUT is for connecting another 3.5mm plug/cable to provide a 12V trigger signal to other components. The 12V output signal is available whenever a +12 volt trigger signal is applied to the IN connector.Input Signal Connections 3See figure 2NOTE: To prevent loud noises that neither you nor your speakers will appreciate, make sure the system is turned off when you make any signal connections.The RB-1581 provides two types of input connections · unbalanced RCA type connections as found on nearly all audio equipment as well as balanced XLR connections.Select high quality audio interconnect cables. Connect each of the outputs from the preamplifier or signal processor to the corresponding input of the amplifier.Input Selector SwitchA toggle switch in the rear panel selects the type of input signal to use. Select the correct inputs to use with this flip switch.NOTE:You should choose only one method of analog connection from a source component to RB-1581. Do not connect both the RCA and XLR outputs of a source component to the RB-1581 at the same time. Speaker OutputsSee Figure 2Speaker SelectionThe nominal impedance of the loudspeaker(s) connected to the RB-1581 should be a minimum of 4 ohms. When driving multiple pairs of speakers connected in parallel, the effective impedance the amplifier sees is cut in half. For example, when driving two pair of 8 ohm speakers, the amplifier sees a 4 ohm load. When driving multiple speakers in parallel, select speakers with a nominal impedance of 8 ohms or higher.Speaker Wire SelectionUse insulated two-conductor stranded wire to connect the RB-1581 to the speakers. The size and quality of the wire can have an audible effect on the performance of the system. Standard speaker wire will work, but can result in lower output or diminished bass response, particularly over longer distances. In general, heavier wire will improve the sound. For best performance, you may want to consider special high-quality speaker cables. Your authorized Rotel dealer can help in the selection of cables for your system.Polarity and PhasingThe polarity --- the positive/negative orientation of the connections --- for every speaker and amplifier connection must be consistent so all the speakers will be in phase. If the polarity of one connection is mistakenly reversed, bass output will be very weak and stereo imaging degraded. All wire is marked so you can identify the two conductors. There may be ribs or a stripe on the insulation of one conductor. The wire may have clear insulation with different color conductors (copper and silver). There may be polarity indications printed on the insulation. Identify the positive and negative conductors and be consistent with every speaker and amplifier connection.Speaker Connection 6See Figure 2Turn off all the components in the system before connecting the speakers. The RB-1581 has two pairs of color-coded binding posts on the back panel. These connectors accept bare wire, connector lugs, or dual banana type connectors (except in European Community countries where their use is not permitted).Route the wires from the RB-1581 to the speakers. Give yourself enough slack so you can move the components to allow access to the speaker connectors.If you are using dual banana plugs, connect them to the wires and then plug into the backs of the binding posts. The binding posts should be screwed in all the way (clockwise).If you are using terminal lugs, connect them to the wires. If you are attaching bare wires directly to the binding posts, separate the wire conductors and strip back the insulation from the end of each conductor. Be careful not to cut into the wire strands. Unscrew (turn counterclockwise) the binding post. Place the connector lug or wire around the binding post shaft. Turn the binding post clockwise to clamp the connector lug or wire firmly in place.NOTE: Be sure there are no loose wire strands that could touch adjacent wires or connectors.TroubleshootingMost difficulties in audio systems are the result of poor or wrong connections, or improper control settings. If you encounter problems, isolate the area of the difficulty, check the control settings, determine the cause of the fault and make the necessary changes. If you are unable to get sound from the RB-1581, refer to the suggestions for the following conditions:Power Indicator Is Not IlluminatedNo main power to the RB-1581. Check AC power connections at the amplifier and the AC outlet. Check the front panel power switch. Make sure that it is set to the ON position.Fuse Replacement 7If everything checks out correctly and you still cannot get the amplifier to turn on, check for a blown fuse. Disconnect the AC from the wall and remove the fuse holder 7 on the back panel. If the fuse is blown, replace with a new fuse and try again.Note: Make sure that the power cord is disconnected from the wall before checking or replacing the fuse. Replace only with the identical size and type fuse (3AG 125V 12A for U.S. version or 5ST6.3 for European version). No SoundIf the amp is getting AC power, but is producing no sound, check the PROTECTION INDICATOR on the front panel. If lit, see below. If not, check all of your connections and control settings on associated components. Protection Indicator Is IlluminatedThe front panel PROTECTION INDICATOR lights when the RB-1581protection circuits have shut off the amplifier. Typically, this occurs only when the ventilation openings are blocked, when there is faulty speaker wiring, or after a period of extreme use. Turn off the system and wait for the amp to cool. Then push the front panel power switch in and out to reset the protection devices. If the problem is not corrected or reoccurs, there is a problem with the system or the amplifier itself.SpecificationsContinuous Power Output 500 watts(20-20k Hz, <0.09%, 8 ohms)Total Harmonic DistortionTotal Harmonic Distortion (20Hz - 20kHz, 8 ohms) <0.03% Intermodulation DistortionIntermodulation Distortion (60Hz:7kHz, 4:1) <0.03% Damping FactorDamping Factor (20Hz-20kHz, 8ohms) 800Input Impedance/SensitivityUnbalanced 12k ohms/ 1.6 volts Balanced 100k ohms/ 2.5 volts Amplifier GainAmplifier GainUnbalanced 32dBBalanced 28 dBFrequency Response (μ1db)10 Hz - 100k Hz Speaker ImpedanceSpeaker Impedance 4 ohms minimum Power RequirementsUSA: 120 volts, 60 HzEurope: 230 volts, 50 Hz Power ConsumptionPower Consumption 550 watts Dimensions (W x H x D)431 x 144 x 407 mm17x57/8 x 16ins Front Panel HeightFront Panel Height 3U/132.6mm/5 1/4ins Weight (net)17.1 kgs, 37.62 lbsAll specifications are accurate at the time of printing.Rotel reserves the right to make improvements without notice.Rotel and the Rotel HiFi logo are registered trademarks of The Rotel Co., Ltd.,T okyo, Japan.警告:机内无客户可以维修的部件。
液体晃动有限元模态分析及试验研究_李松
(1)按照图 2 组装试验设备和仪器,调试激振 装置和激光测振仪器,保证其准确和完好性。
(2)调整激光测振系统的摄像头,确定试验界 面,并对液面进行布点。
(3)打开激振器、功率放大器、信号发生器和 激光测振仪,按照充液比 0.1、0.2、0.3、0.4、0.5、 0.6、0.7、0.8、0.9 的顺序,分别采用正弦快速扫 频、瞬态快速扫频、白噪声等信号进行扫描激励。
2 有限元模态分析
本文采用了 Ansys 软件中的 Fluid80 单元[3], 该单元是一种三维结构单元 Solid45 的修正形式, 是专门用来模拟容器内流体结构,较适合计算和 模拟流体静压力、流体固体相互作用情况和流体 晃动情况等。该单元含 8 个节点,每个节点考虑 3 个坐标轴方向的自由度。采用缩减法对该单元 进行模态分析。根据文献[1,2],取流体的弹性 模量为一般结构弹性模量的 1%,取水的弹性模 量 E=1.97×10⁹Pa,考虑实际流体中存在着较小剪
3.2 试验仪器 3.2.1 激振系统 采用顶杆式电激振器对模型 进行横向激振,其激振频率和振幅可由功率放大 器和信号发生器产生和控制。所用设备为:①JZK20 激振器:激振力 20 kg,振幅±5 mm;②YE5872 功率放大器;③PSV300 内置函数发生器。
试验用激振信号包括正弦快速扫频、瞬态快 速扫频、白噪声和定频正弦信号 4 类。前 3 类主 要用于测定结构的频谱曲线和频率,单频正弦激 振用于测定结构的振型。 3.2.2 数据采集及分析系统 数据采集及分析 系统采用 PSV300 激光扫描测振系统,系统主要 由以下几部分组成:①OFV-056 扫描头;②PSVZ-040-F 联接箱;③OFV-3001S 控制器(包括 OVD04 速度解码器);④PSV-PC-H 工作站;⑤PSV Software7.1 测试分析软件。
直流电能电源驱动型音频放大器说明书

Amplification›Channels: 7›Amplification Type: Direct Energy›170 W/ch (6 ohms, 1 kHz, THD 0.9 %, 1ch Driven FTC)›100 W/ch (8 ohms, 20 Hz-20 kHz, THD 0.08 %, 2ch Driven FTC) Audio Features›Dolby Atmos/Dolby Surround›DTS:X*1/DTS Neural:X*1›Dolby® TrueHD/Dolby Digital Plus›DTS-HD Master Audio/DTS-HD High Resolution Audio/DTS 96/24/DTS-ES/ DTS-HD Express›DSD Playback via Network/USB (5.6 MHz/2ch 2.8 MHz/2ch)›DSD Disc (SACD) Playback via HDMI (2.8 MHz/5.1ch, 2ch)›Digital Core Engine with Cirrus Logic (Quad Core) x1›384 kHz/32-bit DAC (AK4458)›HDMI Audio Return Channel (ARC)›MCACC Auto Room Tuning (Microphone included)• Phase Control (Compensates the delayed bass to improvesound synchronization)• Subwoofer EQ (4 Band)• Reflex Optimizer (Layers MCACC for more accuratemeasurement when using Dolby-enabled speakers)›Advanced Sound Retriever (2ch)›Advanced Surround Modes• Classical, Unplugged, Entertainment Show, Drama, AdvancedGame, Action, Rock/Pop, Sports, Extended Stereo, Extended Mono,Front Stage Surround, Auto SurroundVideo Features›Ultra HD Pass-through with HDCP 2.2 (4K/60p/4:4:4/24-bit,4K/24p/4:4:4/36-bit, 4K/60p/4:2:0/36-bit)›HDR and BT.2020 Support›Ultra HD Upscaling (1080p 4K)›3D Ready (Blu-ray Disc™, Broadcast, and Games)›Deep Color (36-bit), “x.v.Color”Home Network Features›Google Cast*1*2›Apple® AirPlay® Certified›Pandora®*3›Spotify® Digital Music-Streaming Service Ready*4›Internet radio with TuneIn®›TIDAL Music Streaming Service Ready*1›DEEZER*1*5›FireConnect powered by Blackfire Research*1*6 (Wireless protocol that mirrors audio sources connected to FireConnect enabled receivers with future firmware update)›Hi-Res Audio File Playback via USB/Wired Network• Up to 192 kHz/24-bit ALAC, AIFF, FLAC, WAV• 5.6/2.8 MHz DSD Playback• Dolby® TrueHD Playback (USB only)Convenience Features›Built-in Wi-Fi® (Dual Band 5 GHz/2.4 GHz)›Built-in Bluetooth® Wireless Technology (Version: 4.1, Profile: A2DP/AVRCP, Codec: SBC/AAC)›iControlAV5 Remote Control App Ready (iOS/Android™)*7›New GUI with System/Network Setup Menu›Auto Power Off in HDMI Standby Through›AM/FM Tuner 40 Presets›Sleep Timer›New User-Friendly Simple Remote ControlThe VSX-1131 is fully-equipped for the latest multi-dimensional surround sound formats, DTS:X® Ready*1 and Dolby Atmos®, featuring the Reflex Optimizer for Dolby-enabled speakers. With Ultra HD (4K/60p/4:4:4) upscaling and pass-through and support for the latest video standards HDR and BT.2020, images are ever more impressive. In addition to internet radio and various network streaming services, with Google Cast™*1*2 built-in you can use your mobile device to cast your favorite music to your receiver.*1 Available with future firmware update *2 Compatible apps required *3 Service only available in the U.S., Australia, and New Zealand*4 For service availability in your country, check *5 Service available in Canada, not available in the U.S. *6Optional future FireConnect compatible Speaker required*7Available for free download from the App Store™/Google Play™Integrated TechnologiesFront Terminals›HDMI 1 In›USB 1 In for USB Drive ›MCACC Setup MIC In›Audio 1 In (Mini Stereo Jack)›Phones 1 OutRear Terminals›HDMI 6 In (4 Assignable)›HDMI 2 Out (1 for MAIN, 1 for SUB) ›Ethernet 1 In›AV (Component) 1 In (Assignable) ›AV (Composite) 2 In (Assignable) ›Audio 1 In (Assignable) ›Phono (MM) 1 In›Digital Coaxial 1 In (Assignable) ›Digital Optical 2 In (Assignable)›Subwoofer 2 Pre Out›Zone 2 Line Out›Speaker 9 ch Out (FRONT, CENTER, SURROUND, SURROUND BACK/ZONE 2/ Bi-AMP, HEIGHT/SP B) ›FM/AM AntennaSpecifications›Power Requirements: AC 120 V, 60 Hz›Power Consumption/Standby: 580 W/0.1 W ›Dimensions (W x H x D): 17-1/8 x 6-13/16 x 14-9/16 inches (435 x 173 x 370.5 mm) ›Weight: 22 lbs. (10 kg)UPC›889951000075© 2016 Onkyo & Pioneer Corporation. All rights reserved.Note: Specifications and design subject to change without notice.• “PIONEER”, “MCACC”, “Phase Control” and “Advanced Sound Retriever” are trademarks of Pioneer Corporation, and are used under license. •The terms HDMI and HDMI High-Definition Multimedia Inter-face, and the HDMI Logo are trademarks or registered trademarks of HDMI Licensing LLC in the United States and other countries. •Dolby, Dolby Atmos, and the double-D symbol are registered trademarks of Dolby Laboratories. • For DTS patents, see . Manufactured under license from DTS, Inc. DTS, the Symbol, DTS in combination with the Symbol, DTS:X, and the DTS:X logo are registered trademarks or trademarks of DTS, Inc. in the United States and/or other countries. © DTS, Inc. All Rights Reserved. •“Made for iPod”, “Made for iPhone” and “Made for iPad” mean that an electronic accessory has been designed to connect specifically to iPod, iPhone, or iPad, respectively, and has been certified by the developer to meet Apple performance standards. Apple is not responsible for the operation of this device or its compliance with safety and regulatory standards. Please note that the use of this accessory with iPod, iPhone, or iPad may affect wireless performance. •AirPlay works with iPhone, iPad, and iPod touch with iOS 4.3.3 or later, Mac with OS X Mountain Lion, and Mac and PC with iTunes 10.2.2 or later. The AirPlay logo is a trademark of Apple Inc. App Store is a service mark of Apple Inc. •iOS is a trademark on which Cisco holds the trademark right in the US and certain other countries. •Wi-Fi is a registered trademark of the Wi-Fi Alliance. The Wi-Fi CERTIFIED Logo is a certification mark of the Wi-Fi Alliance. •The Bluetooth word mark and logos are registered trademarks owned by Bluetooth SIG, Inc. •”x.v.Color” is a trademark of Sony Corporation. •Pandora, the Pandora logo, and the Pandora trade dress are trademarks or registered trademarks of Pandora Media, Inc. used with permission. •Spotify and the Spotify logo are trademarks of the Spotify Group, registered in the U.S. and other countries. • FireConnect is a technology of Blackfire Research Corp, USA. •The product with the Hi-Res Audio logo is conformed to Hi-Res Audio standard defined by Japan Audio Society. The logo is used under license from Japan Audio Society. •Android, Google Play, Google Cast and the Google Cast badge are trademarks of Google Inc. •Blu-ray Disc™, Blu-ray™, Ultra HD Blu-ray™ and the logos are trademarks of theBlu-ray Disc Association.All other trademarks and registered trademarks are the property of their respective holders.。
功放使用说明书

功放使用说明书该说明书为东莞市奇声电子实业有限公司版权所有目录一.面板按键功能说明---------------------------------- 1二.功能特性 ------------------------------------------3 三.设置--------------------------------------------- 2 四.播放----------------------------------------------3 五.连接----------------------------------------------3六. 配置----------------------------------------------4七. 附录----------------------------------------------5八.使用注意事项---------------------------------------5一.面板按键功能说明1102-U二:功能特性尺寸:420×138×340mm输出水平/阻抗:前级输出:2.2V/2.2K 欧姆低音输出:2.2V/2.2K 欧姆录音输出:300mV/2.2K 欧姆音乐输出:2.2V/2.2K 欧姆功率输出:120W/8欧-180W/4欧输入灵敏度/阻抗:4欧姆-8欧姆总谐波失真率:1KHz, 8欧姆DVD, TAPE, AUX 300 mV /47K 欧姆BGM 300 mV /47K 欧姆传声器: 6mV/3.3K 欧姆频率响应:Mic:20-20KHz, 3dBMusic: 20-20KHz, 3dB供应电压:220v-50Hz欢迎您的下载,资料仅供参考!致力为企业和个人提供合同协议,策划案计划书,学习资料等等打造全网一站式需求。
- 1、下载文档前请自行甄别文档内容的完整性,平台不提供额外的编辑、内容补充、找答案等附加服务。
- 2、"仅部分预览"的文档,不可在线预览部分如存在完整性等问题,可反馈申请退款(可完整预览的文档不适用该条件!)。
- 3、如文档侵犯您的权益,请联系客服反馈,我们会尽快为您处理(人工客服工作时间:9:00-18:30)。
1、概述
YE5872/5873功率放大器是用来推动激振器,作为振动试验和振动测量的大功率激振源。
可以广泛地应用于航空、航天、机械、建筑和交通部门的振动研究和振动实验。
本仪器具有以下特点:
△电路由晶体管和集成运算放大器组成
△可调节的3A至15A/35A输出电流限制保护
△输出晶体管、散热器温度保护
△输出晶体管失效指示
△输出信号削波指示
△低阻输出高阻输出两种工作方法。
2、技术指示
2.1最大输出功率:210VA/500VA
2.2最大输出电压:14Vrms/16Vrms
2.3最大输出电流:10Arms/25Arms;5HZ
15 Arms 20Hz-10kHz/35Arms 20Hz-10kHz
2.4频率范围:满功率 20Hz-10kHz
降额功率 DC-50kHz(减半)
2.5频率响应:(低阻抗模式,输出3V时的小信号特性)
直流输入 DC-15kHz ±0.5dB
DC-100kHz ±3.0dB
交流输入 20Hz-50kHz ±1.0dB
2.6 增益(1KHz):低阻抗5V/V ±2dB
高阻抗8A/V ±2dB
2.7 输入阻抗: >10KΩ
2.8 非线性失真:<1%,5Hz -10kHz(低阻抗)
2.9 信比:低阻抗≥80dB
高阻抗≤60dB
2.10 供电电源:220V+5%;220V-10%;50Hz
2.11 体积:166×440×320
2.12 重量:约15Kg
3、工作原理
本机功放电路由差动前置放大级、推动级和全对称互补功率输出级组成,输入信号经过一个场效应晶体管门电路进入功率放大器,功率放大器的输出驱动激
振器负载。
本机保护包含功率放大器和与之相配接的激振器,设置有可调驱动电流极限保护,预调的电流限制范围可在3A-15A/35A之间分档调整,当保护电路被触发时,截断输入信号。
在高的环境温度或者异常载荷情况下都将导致输出晶体管的温度超过设计限制,结果使晶体管损坏,为了防止这种情况,温度保护电路在温度过高时会阻断放大器的输入信号。
每只功率输出晶体管都由一根快速作用的保险丝保护。
导致功率发射极一集电极短路的故障会保险丝熔断,同时晶体管报警灯亮,截断输入信号。
当输入信号电平过高时,输出波形削波,此时前面板上的削波灯亮,在削波时间内仪器照常工作。
YE5872原理框图
4、面板排列及其功能
4.1前面板
YE5872前面板图
4.1.1放大器增益调节
这是一个近似对数特性的带开关电位器,用来调节功放输出电压、电流的幅度,开关作仪器的“复位”用。
4.1.2电流极限调节
用来预调输出电流有效值,预调的电流限制范围可在3A-15A/35A之间调节。
4.1.3输出阻抗
用来选择放大器的负反馈方式。
“低阻”档选择的是电压负反馈,此时为定电压输出。
“高阻”档选择的是电流负反馈,此时为定电流输出。
4.1.4电源开关
220V50Hz电源开关,功放接通电源后开关内的灯亮。
4.1.5电表指示
对被测信号进行平均值检波,表头刻度为有效值,对于正弦信号将给出正确的读数,左侧为输出电压表,右侧为输出电流表。
4.1.6故障指示灯
电流:对应驱动电流极限档,输出过流时,电流灯触发,同时截断输入信号。
温度:只要散热器温度高于75℃±5℃,温度灯触发;功放工作时(未置于复位档),改变输出阻抗模式,温度灯亮,5Hz时,当输出电流增加到10A/25A 以上时,温度灯亮,当温度灯被触发时同时截断输入信号。
晶体管:功率输出晶体管保险丝熔断,输出晶体管损坏,晶体管灯亮,同时截断输入信号。
削波:功放输出过电压产生输出波形削波,此时削波灯亮,必须减少输入信
号电平,使放大器恢复正常工作。
4.1.7电压、电流监视插孔
提供外接示波器或者外接电压表的接出点,电压监视(1V/V),电流监视(20mV/A)。
4.2后面板
YE5872后面板图
4.2.1输入插孔
有交直流两种输入方式,信号由此输入,输入阻抗大于10KΩ.输入2-3VRMS 的信号,就可产生满功率输出。
4.2.2电源插座
三芯电源插座,用来输入220V50Hz单相交流电.
4.2.3保险丝盒
内装4A熔丝,是交流电源输入回路中的保险丝.
4.2.4输出插座
用输出电缆连接功放和激振器负载.
4.2.5风机
用来降低输出级晶体管温度。
5、使用方法
5.1用输出电缆将激振器与功放连接好。
5.2用电源电缆将220V50Hz电源接入功放。
5.3将增益调节电位器反时针方向旋转至“复位”位置。
5.4把输入信号加到功放的输入插孔上。
5.5根据所需的输出阻抗工作方式,将阻抗开关置“低阻”或“高阻”。
5.6如需监视输出电压、电流波形,将外接示波器用测量电缆接至相应的电压、
电流监视插孔。
5.7接通电源,电源指示灯亮,风机运行。
5.8待功放预热几分钟后,顺时针方向缓慢调节增益电位器,直到在激振器负
载上得到所要求的输出功率为止。
5.9如果前面板上任一只报警灯亮。
必须将增益电位器反时针方向旋转到“复
位”位
置。
找出原因,排除故障后再重新起动。
5.11 削波灯亮,必须降低输入信号电平,到该灯熄灭。
5.12 工作结束后,应先将增益电位器反时针方向旋到“复位”位置,再关断电源。
6、故障改正
6.1 本机工作频率在20Hz-10KHz时能向额定负载(阻抗1Ω)传递最大输出功率210VA/500VA。
在频率低于20Hz时,最大允许电流变小。
这是因为在频率很低时功率晶体管的芯片温度远高于散热片温度。
为此,本功放设置了模拟晶体管温度保护。
频率在5Hz时,当输出电流增到大于10A/25A时“温度”灯亮,反时针方向旋转“放大器增益”至复位,被触发的灯熄灭。
当需要重新工作,将“放大器增益”顺时针方向旋离复位,功放恢复工作。
在10kHz-100kHz输出功率随频率升高而减小,此时输出信号非线性失真应满足小于1%,否则应降低输出功率。
6.2 功放接通电源后,不允许改变输出阻抗模式。
否则激振器负载和功率放大器将受到强大的可能是破坏性的冲击,在“放大器增益”不在复位档时,同时“温度”灯亮,输入信号自动断开。
将“放大器增益”至复位。
若需重新工作,应稍等几分钟电路工作稳定后,将“放大器增益”旋离复位,功放恢复工作。
6.3 工作一段时间后“温度”灯亮,调节“放大器增益”旋钮至复位,温度灯熄灭。
检查环境温度是否过高,风机排风不畅,连续工作时间过长,若要恢复正常工作需要等几分钟后再恢复原来的驱动信号。
6.4 每只功率输出晶体管都由一根快速作用的保险丝保护,导致了发射极一集电极短路的功率管故障会使保险丝熔断。
“输出管”报警灯亮输入信号自动断开,将“放大器增益”调至复位。
打开功放的上下盖板,看到安装在散热器上的印刷电路板上的发光二极管亮,检查靠近的一只功率管是否击穿,若未击穿换上同样规格的保险丝,恢复正常工作。
6.5 当预置的负载电流被超过,“电流”灯亮,同时门电路动作切断输入到放大器的信号,将“放大器增益”调至复位,调节输出电流限制旋钮,加大预置的负载电流,当需重新工作,将“放大器增益”旋离复位,功放恢复工作。
6.6 更换保险丝请按要求换上同样规格的保险丝。
7、产品的成套
YE5872功率放大器1台输出电缆1根输入电缆1根电源电缆1根测量电缆1根1.5A保险丝2只4A保险丝2只6A速熔保险丝3只使用说明书1份产品合格证1份功放的输出插座1.2头至激振器动圈线圈。