DS-3200II+ 操作手册
DS3200存储配置双机完整资料
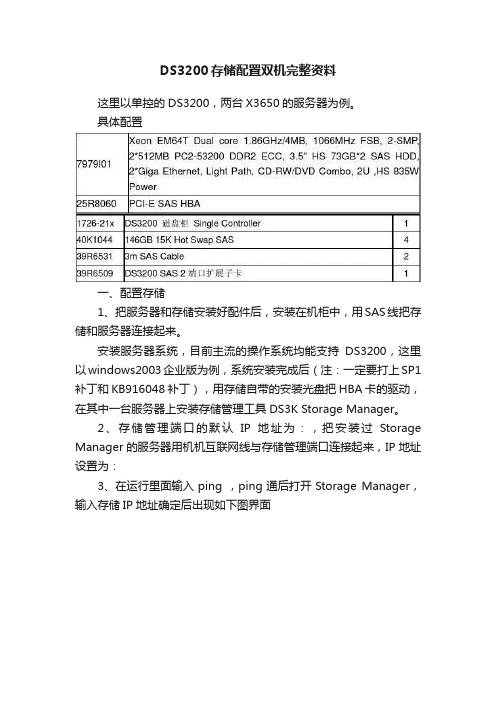
DS3200存储配置双机完整资料这里以单控的DS3200,两台X3650的服务器为例。
具体配置一、配置存储1、把服务器和存储安装好配件后,安装在机柜中,用SAS线把存储和服务器连接起来。
安装服务器系统,目前主流的操作系统均能支持DS3200,这里以windows2003企业版为例,系统安装完成后(注:一定要打上SP1补丁和KB916048补丁),用存储自带的安装光盘把HBA卡的驱动,在其中一台服务器上安装存储管理工具DS3K Storage Manager。
2、存储管理端口的默认IP地址为:,把安装过Storage Manager的服务器用机机互联网线与存储管理端口连接起来,IP地址设置为:3、在运行里面输入ping ,ping通后打开Storage Manager,输入存储IP地址确定后出现如下图界面4、双机红色箭头标识的Storage Subsystem Unnamed,会弹出如下存储配置窗口,如下图:5、点击configure,如下图:5.1 点击Create host group 创建一个主机用户组,如下图:5.2 点击configure host access(manual)手动方式添加主机,如下图:此处的主机名为服务器的机器名,host type选择为windows2003 cluster,并且加入先前建立的host组中,如下图:6、创建逻辑盘,点击creat logical drivers,选择手动模式添加硬盘根据需要的逻辑盘大小选择硬盘的数量,可以建立多个逻辑盘,如果超过4个需要购买分区许可协议硬盘选择完成后,点击calculate capacity,再继续下一步编辑逻辑盘名字,其它均可以默认逻辑盘划分完成。
7、指定逻辑盘归属,点击modify,选择最下面的edit host-to -logical driver mapping点中存在的逻辑盘,选择change选择主机组,确认后,存储的工作就完成了。
配置DS3200具体步骤
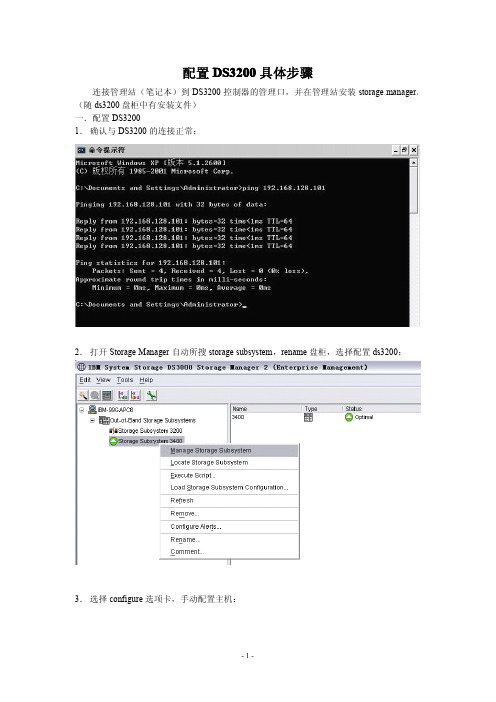
配置DS3200具体步骤连接管理站(笔记本)到DS3200控制器的管理口,并在管理站安装storage manager。
(随ds3200盘柜中有安装文件)一.配置DS32001.确认与DS3200的连接正常:2.打开Storage Manager自动所搜storage subsystem,rename盘柜,选择配置ds3200:3.选择configure选项卡,手动配置主机:4.配置host1类型和名称:选择操作系统类型为clustered版本5.选择主机所安装的FC HBA卡:6.创建双机所在的主机组(host group):7.完成第一台主机配置:8.配置host2:9.主机2的配置和主机1相同:10.将另外一块HBA卡分配给主机2:11.选择已存在的host group,将主机2加入到该主机组:12.主机2配置结束:13.Configure选项卡中创建逻辑盘:14.选择手动配置:15.创建3块盘的RAID5:16.创建仲裁盘,容量500MB即可17.将第一个lun映射到开始创建的主机组(3200cluster)中:18.选择“yes”创建lun2:19.从RAID5中未划分的空间中创建lun2:20.使用剩余的所有容量创建lun2:21.将lun2映射到主机组(3200cluster)上,lun自动变为1(第一个lun号为0):22.Configure选项卡中选择手动创建热备份盘:23.24.选中剩余的一块盘作为全局热备份:25.配置后的ds3200状态,确认lun正在初始化,创建了一个partition,以及映射关系另:如果您是双控的ds3200要确保创建的lun同时属于一个控制器!ds3200配置结束后,重启两台服务器后在“磁盘管理”中既可以看到2块未初始化的硬盘。
IBM-DS3200存储连接及配置方法
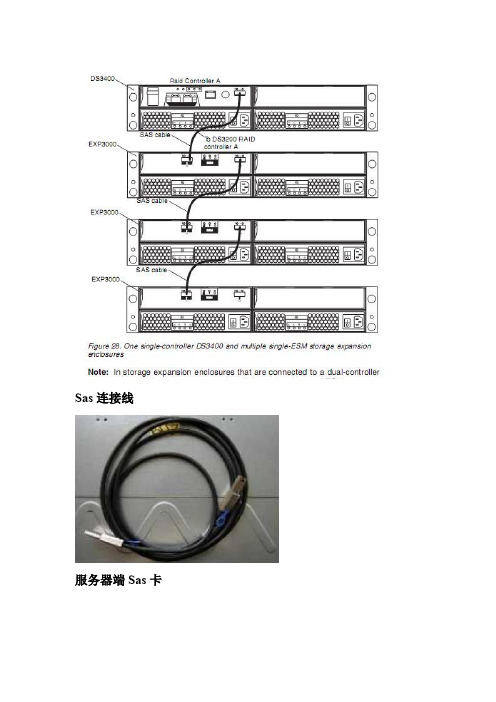
Sas连接线服务器端Sas卡一、环境参数:IBM DS3200控制器A管理端口IP地址:192.168.128.101/24控制器B管理端口IP地址:192.168.128.102/24二、DS3200磁盘阵列设置:1、如上图所示,把所有的线缆连接完成。
2、网络连接测试把管理PC的IP设置为192.168.128.0/24网段内任IP地址,通过交换机把管理PC及DS3400的控制器A和B管理端口连接。
分别测试DS3200控制器A及控制器B与终端PC的连接性:在终端PC执行以下命令C:\Ping 192.168.128.101C:\Ping 192.168.128.102如下图,即表示DS3200与PC网络连接没有问题,可继续操作。
如有问题请检查网线、IP设置、交换机等网络故障。
3、DS3200连接需要在管理PC安装Storage Manager。
如果没有安装,请下载相应版本并安装,以下地址为Windows2003 X86 32位下载链接:/ibmdl/pub/systems/support/system_x/ib m_sw_ds3k_02703515_w2k3_i386.zipIBM DS3200配置步骤1.打开Storage Manager 2 Client.2.Storage Manager会自动查找已经连接好的存储,也可以选择菜单Tools AutomaticDiscovery来查找.3.在查找到的存储子系统上右键选择Manage Storage Subsystem(或者直接双击),弹出存储子系统管理界面如下图:4.选择第二项Configure.5.先建立服务器组,选择第三项Create Host Group,输入组名,确定为Windows 2000/server 2003/server 2008 Clustered(Supports DMP),点击next7.在出现的页面中左边选择两台主机,点击Add8.点Next,在出现的页面中选择Yes,选择Select existing host group为创建的组名,Next9.点Finish10.在出现的页面中选择no,返回配置页面热备盘可选择倒数第2项,选择一块硬盘作为热备盘即可)12.Next13.选第2项,Next硬盘,点Add,然后点右下角的Calculate Capacity,最后Next,system, Next16.在出现的页面中选择map now,再选中hostgroup,17.点Finish,完成,选择NO,18.重启两台主机.19.在我的电脑图标上右键,选择管理20.选择磁盘管理21.弹出磁盘初始化和转换向导,按照提示点下一步,直到完成22.在新的磁盘1上右键,选择新建卷23.弹出新建卷向导,按照提示一步步操作直到完成24.可看到新加卷26.配置完成。
CP-3200II用户手册
用户手册CP-3200Ⅱ点阵打印机安全指引安全指引请在使用本产品前仔细阅读本手册,不要执行本手册中没有明确说明的操作。
未经授权的操作会导致错误或意外。
制造商对因错误操作而导致打印机出现的任何问题均不负责。
请严格遵守标示在打印机上的所有警告和指导。
如果您刚使用过打印机,打印头可能很热,请不要马上去碰它。
安装连续纸的时候不要把手指放在拖纸器链齿盖的下面。
请勿带电或用酒精等化学用品清洁打印机。
如需清洁,请先把电源插头拔下,用微湿的柔软布料擦拭。
请勿在容易被液体溅到的地方使用打印机。
请勿堵塞机壳上的小槽或开孔。
不要把打印机放在睡床、沙发、地毯或其它类似物品的表面,以防堵塞通风孔。
如果打印机被置于比较拥挤的环境中工作,应采取相应的通风措施。
打开包装之前,应考虑好放置打印机的位置。
应选择一个平稳的台面或坚固的打印机台架,并要确保打印机周围有足够的空间,以便纸张容易进出。
避免与其他大功率电器或容易引起电压波动的电器设备使用同一交流电源插座。
将整个计算机系统远离可能引起电磁干扰的器件,例如扬声器或无线电元件。
请勿把电源线放在容易被踩到的地方。
如果电源线或电源插头已破损或断裂,请马上停止使用并更换新部件。
避免把打印机放在温度和湿度变化较大的地方,如:阳光直射、靠近热源、多尘或多油烟的地方。
为防止触电或引起短路,请勿把任何物体从打印机通风孔推入机体内。
请勿自行检修打印机,或打开打印机的外壳,以免触电或产生其它危险。
如需检修应找专业维修人员。
在不用打印机时,应拔掉打印机电源线。
外接插座应安装在接近打印机的地方。
出现以下情况时,请拔掉打印机电源线,并与专业维修人员联系:A:当电缆或插头损坏、磨损时。
B:当有液体溅入机内时。
C:当打印机被雨淋湿或进水时。
D:当遵从操作手册操作,机器却不能正常工作时。
E:当机器被摔落,造成机壳损坏时。
F:当打印机特性明显变坏,需要维修时。
i目录i i 目录安全指引 (i)目录 (ii)第一章安装打印机 (1)1.1 打印机拆封 (1)1.1.1 包装箱内的组件 (1)1.1.2 识别打印机的主要部件 (1)1.1.3 选择打印机的安放位置 (2)1.2 安装色带 (2)1.3 安装导纸器 (4)1.4 安装拖纸器 (4)1.4.1 安装后推动式拖纸器 (4)1.4.2 安装前推动式拖纸器 (5)1.4.3 安装牵引式拖纸器 (5)1.5 改变拖纸器安装位置 (6)1.6 连接电源 (6)1.7 连接计算机 (6)1.8 安装驱动程序 (7)第二章控制面板的说明 (8)2.1 控制面板的说明 (8)2.1.1 指示灯 (8)2.1.2 操作键 (9)2.2 过纸控制杆 (9)2.3 纸厚调节杆 (10)第三章装纸 (11)3.1 使用单页纸打印 (11)3.2 调节TOF位置 (12)3.3 使用连续纸打印 (12)3.3.1 使用前推动式拖纸器进纸 (13)3.3.2 使用后推动式拖纸器进纸 (14)3.3.3 使用牵引式拖纸器进纸 (15)3.4 使用撕纸功能 (16)3.4.1 调节撕纸位置 (16)3.5 在连续纸和单页纸之间转换 (16)3.5.1 由连续纸切换成单页纸 (16)3.5.2 由单页纸切换成连续纸 (16)3.6 打印特殊纸 (17)3.6.1 多联拷贝纸 (17)3.6.2 标签 (17)目录3.6.3 信封 (17)第四章打印机的设定 (18)4.1 字体及字间距的设定 (18)4.2 打印机的菜单设置 (18)4.3 设置项目释义 (20)第五章技术规格 (21)5.1 打印机规格 (21)5.1.1 打印 (21)5.1.2 打印纸 (22)5.1.3 机械部分 (23)5.1.4 电气部分 (23)5.2 接口规格 (24)5.2.1 并行接口 (24)第六章故障处理 (26)6.1 电源问题 (26)6.2 打印问题 (26)6.3 纸张处理 (30)附录A 打印机的维护 (31)清洁 (31)运行自检测试 (31)自检测试(Self Test) (31)十六进制代码打印(Hex Dump) (31)成列度(BID)调整 (32)iii第一章 安装打印机1 第一章 安装打印机1.1 打印机拆封拆封打印机之后,应保存好所有包装材料,以用于再次搬运打印机时重新包装,方便搬运。
YAMAHA D3200 数字录音室操作指南说明书

D3200 - Digital Recording Studio FAQsHow do I export audio data to .WAV format on the D3200? How do I use and record with Session Drums on the D3200? How do I import audio from a CD into the D3200?How do I create an audio CD on the D3200?Exporting Audio Data to .WAV – D3200If you’d like to perform further edits or mastering to your recorded data via your computer/audio editing software, you will need to convert your tracks to the standard .wav format. Here’s how:1.Rewind the selected song to the beginning, either by pressing the rewind button, or by using the ClickPoint toselect the on-screen position locator and then rotating the value dial counterclockwise until the positionlocator shows “000.000.00”2.Press the STORE button3.Press the LOC1/IN button4.Play the song through to the end, or, use the ClickPoint to select the on-screen position locator and thenrotating the value dial clockwise until you’ve reached the end of the songNote: You can press the PLAY button to check your position from time to time. If you haven’t reached the end of the song yet, simply press the STOP button and keep scrolling through the song until you reach the end.5.Press the STORE button once again6.Press the LOC2/OUT buttonNow that you’ve supplied the “range” for what you would like to export (The points between the In location and the Out location). We can start the exportation process:7.Press the TRACK buttoning the ClickPoint, select the “Track Edit” tab on the bottom of the screenOn this screen, you will notice several parameters. The first, at the top of the screen, should indicate “CopyTrk (overwrite)”. You can leave this alone, since this is the function we’re going to use. The other settings are as follows:ing the ClickPoint, click the first location under “CopyTrk” to the left (source for the copy)ing the value dial, select the track(s) you’d like to exporting the ClickPoint click the second location, under “CopyTrk” to the right (destination for the copy)ing the value dial, select “Clip” (clipboard)ing the ClickPoint, click the “Exec” (execute) buttoning the ClickPoint, click on the “Export” tab at the bottom on the screening the ClickPoint, click “Drive”Here, you would choose to export the data to a CD, or, to the USB partition of the drive, which can be viewed over the USB connection. After you’ve selected and clicked “Yes” to confirm:ing the ClickPoint, click the “Exec” (execute) button17.When asked “Are you sure?” click “Yes”, and the export process will begin!Back to TopUsing and Recording the Session Drums – D3200The D3200 provides a pattern-based drum machine section named “Session Drums”. This can be a useful tool, as it provides backbeats to record to, as opposed to a standard metronome. Also, the patterns can be recorded and used as part of your song!To get the patterns to play:1.Press the SESSION DRUMS buttoning the ClickPoint, click “Run” on the screenAt this point, you can change things like variation, pattern and such to your liking. You can also chain patterns together to create an arrangement of patterns in other screens within the mode. While this gets into variants not easily covered in FAQ format, feel free to check the Session Drum section of the manual to see about all of the edits you can make!To record the patterns:1.Press the MIXER buttoning the ClickPoint, click on “CH Input/Sub-mixer”e the ClickPoint to choose the odd-numbers track that you want to designate as the left channel for thedrums (1, 3, 5, 7, etc.)ing the value dial set the track to the Drums Left icon. It will look like a small drum kit with “L” printed onthe kick drume the ClickPoint to choose the next even-numbered track that you want to designate as the right channel forthe drums (2, 4, 6, 8, etc.)ing the value dial set the track to the Drums Right icon. It will look like a small drum kit with “R” printedon the kick drum.7.Press the METER button8.Press the status buttons above the faders of the two tracks you previously dedicated to drums, so that theindicators are lit red9.Press the button above the “Drums” fader, so that the indicator is lit green10.Press the “REC” button, which will blink11.Press the “PLAY” buttonThe patterns will now be recorded and made into editable audio.Back to TopImporting From an Audio CD – D3200The D3200 can record from a standard audio CD onto desired channels. Here’s how it’s done:1.Insert the CD you wish to import track(s) from2.Press the CD buttoning the ClickPoint, select the CD Player Icon on the bottom right-hand side of the screening the ClickPoint, select the “>>” arrows to select the track you wish to recording the ClickPoint, select “CD IMPORT” at the top of the screenYou will be brought to a new window, which informs you that you should “Obey Copyright Rules” (... and of course you are – right?)ing the ClickPoint, select “YES”7.When the importation has been completed, using the ClickPoint, select “OK”You have now recorded the song as a Clip. Next, place it in a song:1.Press the TRACK buttoning the ClickPoint, select the “Edit Track” tab3.If not already selected on the screen, using the ClickPoint, make sure to select “CopyTrack” as the editoperationing the ClickPoint, click on the box above “Source”.ing the value dial, select “Clip2”, which accesses the audio CD data that has been importeding the ClickPoint, click on the box above “Destination”.ing the value dial, select “1-2”, which represents channels 1 and 2ing the click-point, on “EXEC” (Execute)You now have the tracks on the CD copied to channels 1 and 2 of the current song.Back to TopCreating an Audio CD – D3200This is a two part process. The first involves mixing your song down to the stereo Master Track. The second takes that mix on the Master Track and puts it onto the CD in such a way that it becomes a standard audio CD. Once your song sounds the way you want it to:1.Go to the beginning of the Song (000)2.Press the STORE button3.Press the LOC 1/IN button4.Go to the end of the song5.Press the STORE button.6.Press the LOC 2/OUT buttonYou’ve now set the range for the mix down. Now we’ll mix down:7.Go to the beginning of the Song once again8.Press the MASTER button until it is red in color9.Press the REC button10.Press the PLAY buttonLet the song play through, and the stereo mix of it will be on the Master Track. Now onto CD writing:11.Press the CD buttoning the click point, select “Album CD”ing the click point, select “Add”ing the click point, select the song on your list that you wish to burn to a CDing the click point, click on “OK”ing the click point, select “Write to CD”If you have more than one song mixed down, you can repeat steps 13 – 15 to add those songs, in order, to the CD prior to burning it.Back to Top。
DS-3200II+操作手册
注:只有当产品无任何外接输入电源时,才能实现零能耗。 3. 如果用户需对产品性能升级或更换模块, 请来电咨询, 我们将给您 详细解答。 4. 当您弃置达到使用寿命年限的针式打印机产品时, 我们建议您将废 弃产品返还给本公司或全国各地得实服务网点, 由得实集团作统一 处理,以保护生态环境。 5. 本产品能使用含 50%回收纤维的打印纸进行打印。
送纸旋钮:手动送纸(仅在断电情况下使用)。 打 印 头:24 根打印针及其驱动部分组成。 控制面板:显示打印机状态,可对打印机功能进行多种简易操作。 电源开关:电源接通或断开。 链 轮:控制链式纸的传动、左右调整位置、锁定。
并行接口:连接计算机与打印机,标准配置为并行接口,可选配置为 USB 接口。 锁 杆:锁住链轮,使其位置固定。
8、转动色带盒上的旋钮,来回移动打印头,确保色带已被拉紧。 9、将间隙调杆拨回原来的位置,以使打印头和滚筒之间的间隙恢复到 原始状态。 10、小心盖好顶盖。打印机正常工作时,盖上顶盖可以隔离灰尘,同 时降低打印时产生的噪音,取下顶盖仅是为了更换色带及进行调 整。 安装打印机 1-6
色带盒的拆卸
1、关闭打印机电源。请勿在接通电源的状态下更换色带盒,以免造成 打印机的损坏及人员受伤。 2、将间隙调杆向上拨至最大位置,使打印头和滚筒之间的间隙处于最 大值,即“换色带”的位置。 3、小心把打印头移到中间位置。注意:在刚打印结束时,打印头温度 很高,请注意并避免烫伤。 4、先把色带导架从打印头罩上卸下,再用手捏住色带盒中间的把手, 往上方拉出。
使用单页纸 ...................................... 2-9 控制面板 ..................................... 3-1 按钮及其指示灯 .................................. 3-1 开机功能 ........................................ 3-4 组合功能 ........................................ 3-7 纸灰度检测模式 ................................. 3-10 参数设置 ..................................... 4-1 如何进行参数设置 ................................ 4-2 系统设置 ........................................ 4-3 纸张设置 ........................................ 4-7 接口设置 ....................................... 4-11 ESC/P 和 LQ 仿真参数设置......................... 4-12 OKI 仿真参数设置项 ............................. 4-15 双向测试及纵向校正 ............................. 4-16 打印针自动调整设置 ............................. 4-20 打印针补偿设置 ................................. 4-21 恢复出厂设置 ................................... 4-23 1
IBM System Storage DS3200 说明书
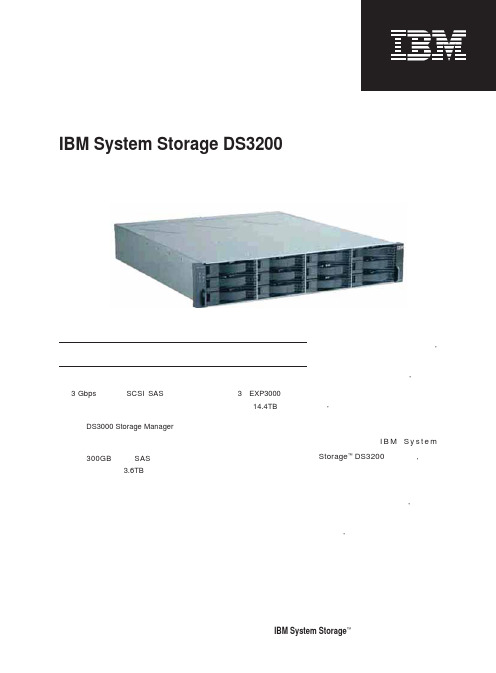
要点■3 Gbps 串行连接SCSI (SAS ) 接口技术■配备DS3000 Storage Manager ,便于部署和管理■采用300GB 热插拔SAS 磁盘,存储容量可扩展到3.6TB面向中小企业的简便、可扩展、灵活、经济的外置存储解决方案IBM System Storage DS3200中小企业明确传达的一条讯息是,数据对于企业的价值丝毫不亚于对大企业客户的价值。
实际上, 小型企业甚至正在经历更加迅猛的数据增长, 并且发现他们的数据存储和保护需求与大型企业可谓大同小异。
利用灵活经济的I B M S y s t e m Storage ™ DS3200存储系统, 小型企业可将过载的内部存储基础设施提高到一个新的水平。
通过将存储系统转移到服务器外部, 小型企业可提高数据解决方案的容量与可靠性, 使其远远超出最初投资的存储水平。
■最多可连接3个EXP3000,使总存储容量可扩展到14.4TB■中小企业预算可承受的价格IBM System Storage ™|您身边的系统存储专家便于部署和管理鉴于许多小型企业的IT部门只有一个管理员, 甚至只有兼职管理员, 他们仅有有限的时间用于数据管理, DS3200安装简便, 不需要精深的知识, 也不需要投入大量精力。
即使缺乏经验的管理员也可轻松安装DS3000 Storage Manager软件。
DS3000 Storage Manager面向任务的管理界面首先向管理员提交任务, 然后询问将由哪个对象执行任务。
而一般系统的面向对象的界面恰好相反, 在此类系统中, 首先选择对象, 然后选择任务, 这需要管理员掌握精湛的存储网络技术。
而对于DS3000 Storage Manager, 即使非Storage管理员也可快速安装和部署存储解决方案。
这一管理应用程序的面向任务的界面消除了许多企业因内部技能有限而造成的障碍。
可利用多个EXP3000进行扩展DS3200的可扩展性使IT管理员能够响应不断变化的存储环境。
道努尔2200系列、3200系列和LPZ传输器90°调节转移器设置、操作和维护手册说明书

For other service manuals visit our website at:/service_manuals.aspDORNER MFG. CORP .INSIDE THE USA OUTSIDE THE USA P .O. Box 20 • 975 Cottonwood Ave.TEL: 1-800-397-8664TEL: 262-367-7600Hartland, WI 53029-0020 USA FAX: 1-800-369-2440FAX: 262-367-5827851-335 Rev. D90° Adjustable Transfers for 2200 Series, 3200 Series &LPZ ConveyorsSet-up, Operation & Maintenance ManualDorner Mfg. Corp.2851-335 Rev. D90° Adjustable Transfers for 2200 Series, 3200 Series & LPZ ConveyorsTable of ContentsIntroduction......................................................................... 2Warnings - General Safety.................................................. 3Specifications...................................................................... 4Installation........................................................................... 4Required Tools.. (4)Kit Mounting.................................................................... 4Service Parts......................................................................... 7Return Policy (8)IntroductionUpon receipt of shipment:•Compare shipment with packing slip. Contact factory regarding discrepancies.•Inspect packages for shipping damage. Contact carrier regarding damage.•Accessories may be shipped loose. See accessory instruc-tions for installation.Dorner conveyors are covered by the following patentnumbers: 5131529, 5156260, 5156261, 5174435, 5203447, 5265714, 5875883, and corresponding patents and patent applications in other countries.Dorner’s Limited Warranty applies.Dorner reserves the right to make changes at any time without notice or obligation.IMPORTANTSome illustrations may show guards removed. DO NOT operate equipment without guards.851-335 Rev. D3Dorner Mfg. Corp.90° Adjustable Transfers for 2200 Series, 3200 Series & LPZ ConveyorsWarnings - General SafetyA WARNINGThe safety alert symbol, black triangle with white exclamation, is used to alert you to potential personal injury hazards.Climbing, sitting, walking or riding on conveyor will cause severe injury.KEEP OFF CONVEYORS.DO NOT OPERATE CONVEYORS IN AN EXPLOSIVE ENVIRONMENT.A WARNINGExposed moving parts can cause severe injury.LOCK OUT POWER before removing guards or performing maintenance.A WARNINGA Transfer Plate and guiding MUST be installed on discharge end of InfeedConveyor.AWARNINGLoosening stand height or angle adjustment screws may cause conveyor sections to drop down, causing severe injury.SUPPORT CONVEYOR SECTIONS PRIOR TO LOOSENING STAND HEIGHT OR ANGLE ADJUSTMENT SCREWS.A WARNINGDorner cannot control the physicalinstallation and application of conveyors. Taking protective measures is the responsibility of the user.When conveyors are used in conjunction with other equipment or as part of a multiple conveyor system, CHECK FOR POTENTIAL PINCH POINTS and other mechanical hazards before system start-up.A WARNINGExposed moving parts can cause severe injury.DO NOT ATTEMPT ADJUSTMENTS WITH CONVEYOR RUNNING.Dorner Mfg. Corp.4851-335 Rev. D90° Adjustable Transfers for 2200 Series, 3200 Series & LPZ ConveyorsSpecifications•Requires low side conveyors•Maximum recommended part weight is 20 lb (9 Kg) at 50ft/minute (15 M/minute) belt speed •For conveyors up to 12¨ (610 mm) wide •1/4¨ (6 mm) minimum part thickness•Minimum product size:-3/4¨ (19 mm) for 2100 Series conveyor or 3100 Series conveyor with transfer tail option-1-1/4¨ (32 mm) for 3100 Series or LPZ conveyors with standard 3¨ (76 mm) diameter tailInstallationRequired Tools•Hex key wrenches 4 mm & 5 mm •17 mm wrench •Torque wrenchKit MountingIllustration References: 1.Parts as shipped (Figure 1)Figure 12.Identify infeed conveyor (Figure 2,item A) and outfeed conveyor (C). Install pulley transfer plate (B) ondischarge end of infeed conveyor (A). See instructions in your Pulley Transfer Plates Set-up, Operation & Maintenance Manual.Figure 2A WARNINGExposed moving parts can cause severe injury.LOCK OUT POWER before removing guards or performing maintenance.A WARNINGA Transfer Plate and guiding MUST be installed on discharge end of Infeed Conveyor.A Infeed ConveyorB Transfer PlateC Outfeed ConveyorD Outside Turn Guide, 4-ft (1219 mm) LengthE Guide Mounts with 4-1/2¨ (114 mm) Long Shaft (2x)F Guide Mounts with 12¨ (305 mm) Long Shaft (2x)G M6 x 12 mm Low Head Cap Screws (4x)H T-bars (5x)I M6 x 12 mm Socket Head Screws (10x)J Guide Wheel AssemblyK Guide Mounts Angle Bracket LGuide Wheel Angle BracketNOTEThe 90° Transfer Kit is a universal guide kit. The following is an example of a typical installation.DEFGHJE FIKLACB851-335 Rev. D5Dorner Mfg. Corp.90° Adjustable Transfers for 2200 Series, 3200 Series & LPZ ConveyorsInstallation3.Install T-bars (Figure 3,item H) in both infeed conveyor (A) and outfeed conveyor (C) T-slots. See Figure 4 for attaching guide mounts.Figure 34.Loosely attach guide mounts with 4-1/2¨ (114 mm) long shafts (Figure 4,item E) to T-bars (Figure 1,item H) with screws (I).Figure 45.Attach outside turn guide (Figure 5,item D) to shaft of each guide mount (E) with screw (G). Tighten screws to 30 in-lb (3 Nm).Figure 56.Determine arc of guide (Figure 6,item D) and position of guide mounts (E). Adjust guide mounts to create desired guide position.Figure 67.Secure fasteners:•Tighten screws (Figure 1,item I) to 73 in-lb (8 Nm)•Tighten guide mount nuts (Figure 1,item K) to 146 in-lb (16 Nm)8.To stabilize guide (Figure 7,item D), repeat steps 3through 7 to install additional guide mount(s) (F), as required.Figure 79.Trim excess guide (D) as required.10.Install T-bar (Figure 8,item H) in T-slot of outfeedconveyor (C). Loosely attach guide wheel assembly (J) to T-bar with screws (I).Figure 8A WARNINGExposed moving parts can cause severe injury.DO NOT ATTEMPT ADJUSTMENTS WITH CONVEYOR RUNNING.HEEACGEDDEEFDJC HLIDorner Mfg. Corp.6851-335 Rev. D90° Adjustable Transfers for 2200 Series, 3200 Series & LPZ ConveyorsInstallation11.Adjust guide wheel assembly position, as required(Figure 8).12.Secure fasteners:•Tighten screws (Figure 8,item I) to 73 in-lb (8 Nm)•Tighten screw (L) 146 in-lb (16 Nm)13.On the discharge end of the infeed conveyor (Figure9,item A):•Install guiding (M) within 1/4¨ (6 mm) of the guide wheel assembly (J). See instructions provided with guiding.•Install guiding (N) against the outside turn guide (D). See instructions provided with guiding.Figure 9A WARNINGExposed moving parts can cause severe injury.DO NOT ATTEMPT ADJUSTMENTS WITH CONVEYOR RUNNING.A WARNINGTransfer Plate (Figure 1,item B) and guiding (M & N) MUST be installed on discharge end of Infeed Conveyor to eliminate pinch points.DJMNB A851-335 Rev. D7Dorner Mfg. Corp.90° Adjustable Transfers for 2200 Series, 3200 Series & LPZ ConveyorsService Parts111429875361012161415171813Item Part No. Part Description1234014Guide, 4-ft (cut to length required)2920692M Socket Low Head Screw, M6-1.00 x 12mm 3807-1056Guide Rail Clamp Knob 4234009M Horizontal Shaft (short)5807-948Cap 6234010M Spacer T ube7961045MSS Hex Head Cap Screw, M10-1.50 x 45mm 8234012M Angle Bracket9920614M Socket Head Screw, M6-1.00 x 14mm 10200830M Drop-In T -Bar 11234013M Horizontal Shaft (long)12234006UHMW Guide Wheel 13234003M Angle Bracket 14915-218Retaining Ring 15234005M Vertical Shaft 16234007M Spacer T ube 17605279P Washer18920616MSocket Head Screw, M6-1.00 x 16mmDorner Mfg. Corp. reserves the right to change or discontinue products without notice. Allproducts and services are covered in accordance with our standard warranty. All rights reserved. © Dorner Mfg. Corp. 2010DORNER MFG. CORP.975 Cottonwood Ave., PO Box 20Hartland, WI 53029-0020 USATEL 1-800-397-8664 (USA)FAX 1-800-369-2440 (USA)Internet: Outside the USA:TEL 1-262-367-7600FAX 1-262-367-5827Return PolicyReturns must have prior written factory authorization or they will not be accepted. Items that are returned to Dorner without authorization will not be credited nor returned to the original sender. When calling for authorization, please have the following information ready for the Dorner factory representative or your local distributor:1. Name and address of customer.2. Dorner part number(s) of item(s) being returned.3. Reason for return.4. Customer's original order number used when ordering the item(s).5. Dorner or distributor invoice number (if available, part serial number).A representative will discuss action to be taken on the returned items and provide a Returned Goods Authorization (RMA)number for reference. RMA will automatically close 30 days after being issued. To get credit, items must be new and undamaged. There will be a return charge on all items returned for credit, where Dorner was not at fault. It is the customer’s responsibility to prevent damage during return shipping. Damaged or modified items will not be accepted. The customer is responsible for return freight.Conveyors and conveyor accessoriesStandard catalog conveyors 30%MPB, 7200, 7300 Series, cleated and specialty belt50%AquaGard & AquaPruf Series conveyors non-returnable itemsEngineered to order products case by caseDrives and accessories30%Sanitary stand supports non-returnable itemsPartsStandard stock parts30%Plastic chain, cleated and specialty belts non-returnable itemsReturns will not be accepted after 60 days from original invoice date. The return charge covers inspection, cleaning, disassembly, disposal and reissuing of components to inventory. If a replacement is needed prior to evaluation of returned item, a purchase order must be issued. Credit (if any) is issued only after return and evaluation is complete.Dorner has representatives throughout the world. Contact Dorner for the name of your local representative. Our Customer Service Team will gladly help with your questions on Dorner products.For a copy of Dorner's Warranty, contact factory, distributor, service center or visit our website at .For replacement parts, contact an authorized Dorner Service Center or the factory.851-335 Rev. D Printed in U.S.A.。
- 1、下载文档前请自行甄别文档内容的完整性,平台不提供额外的编辑、内容补充、找答案等附加服务。
- 2、"仅部分预览"的文档,不可在线预览部分如存在完整性等问题,可反馈申请退款(可完整预览的文档不适用该条件!)。
- 3、如文档侵犯您的权益,请联系客服反馈,我们会尽快为您处理(人工客服工作时间:9:00-18:30)。
绪 言承蒙惠顾,购得DS-3200II+打印机。
在使用本机前,请细阅操作手册,以便正确使用。
操作过程中有不明白的地方,或出现故障时,此手册会带给您很大的帮助。
DS-3200II+打印机是得实集团与日本西铁城公司合作开发、生产的超高速24针宽行通用打印机。
DS-3200II+采用最新设计的超高速打印头,打印速度高达234汉字/秒,打印针寿命4亿次,打印宽度136列,1000万字符长寿命耐用大色带,GB18030中文大字符集硬字库及多款防改写数字、半角英数字及八款条形码打印,使DS-3200II+在硬件方面别具特色。
在软件方面,DS-3200II+秉承了得实系列打印机的高性能、高兼容性,可兼容所有STAR、EPSON和OKI 打印机,方便的自动撕纸功能、参数设置功能是得实打印机的特色。
打印机针调整和断针自动补偿功能是得实打印机的专利技术。
DS-3200II+是大企业成熟用户和行业用户的极佳选择。
本产品信息如有更改,恕不另行通知。
本资料仅供参考。
除中国现行法律法规规定,得实集团不承担任何由于使用本资料而造成的直接或间接损失的责任。
得实集团保留最终解释权。
目录第1章安装打印机...................................1-11.1开箱和检查......................................1-11.2放置打印机......................................1-21.3打印机部件......................................1-31.4安装和拆卸色带盒................................1-51.5打印机和主机连接................................1-81.6连接电源.......................................1-101.7安装打印驱动程序...............................1-11第2章纸的安装和使用...............................2-12.1选纸............................................2-12.2调校打印头间隙..................................2-22.3 安装导纸板......................................2-42.4使用链式纸......................................2-52.5使用单页纸......................................2-9第3章控制面板.....................................3-13.1按钮及其指示灯..................................3-13.2开机功能........................................3-43.3组合功能........................................3-73.4纸灰度检测模式.................................3-10第4章参数设置.....................................4-14.1如何进行参数设置................................4-24.2系统设置........................................4-34.3纸张设置........................................4-74.4接口设置.......................................4-114.5ESC/P和LQ仿真参数设置..........................4-124.6OKI仿真参数设置项..............................4-154.7双向测试及纵向校正.............................4-164.8打印针自动调整设置.............................4-204.9打印针补偿设置.................................4-214.10恢复出厂设置...................................4-23第5章用户调整设置.................................5-15.1 链式装纸页首调整................................5-15.2 摩擦装纸页首调整................................5-25.3 撕纸位置调整....................................5-3第6章故障和保养...................................6-16.1 故障处理........................................6-16.2 保养与维护......................................6-7第7章规格.........................................7-17.1 打印机规格......................................7-17.2 接口接头引脚....................................7-47.3 字符集..........................................7-57.4 ESC/P和LQ仿真控制码表(按功能分类)............7-117.5 ESC/P和LQ仿真控制码摘要表......................7-17附录1:电子信息产品污染控制的说明.....................8-1安全规范使 用 注 意 事 项为了避免受到电击和伤害及防止损坏打印机,在接上电源之前,务请注意以下重要事项:仔细阅读操作手册等说明文件。
打印机必须平放在固定的台面上。
避免震动、碰撞、高温和阳光直射、灰尘等。
请勿将打印机置于潮湿的环境中,请勿让雨水等任何液体沾湿打印机。
打印机应安放在接近插座的地方,方便操作者进行电源插头的拔插操作。
确保电源的电压值与打印机所规定的电压值一致,避免与电冰箱等大功率或有干扰的电器同一电源。
为保证安全操作,三脚插头必须插进三孔交流电源插座中,其中地线必须有效接地。
电源延长线必须为三芯并正确连接,以提供接地。
若交流电源插座与打印机插头不匹配,请更换合适的交流电源插座,以保证人员、设备的安全使用。
连接打印机通讯电缆时,请先关闭打印机和计算机的电源,选用适合的联机电缆将打印机和计算机连接起来,并锁定卡口和旋紧螺丝。
请勿接触打印头外壳,以防止高温伤害。
清洁打印机前,先关闭电源开关,从电源插座拔掉电源插头。
用软棉绒布沾少量中性清洁剂或酒精,轻抺打印机外部。
如遇打印机发生故障,除认可的合格技术员外,不可擅自进行维修工作。
企业公开信息:1.售后服务请致电全国各地得实服务网点电话,或拨打:400-810-9998(手机)800-810-9998(免费)2.产品工作、待机、休眠及关闭状态的最大及最小能耗如下:产品使用状态最大能耗最小能耗工作时85W 10W待机7W 5W休眠6W 5W关闭小于0.1W 0注:只有当产品无任何外接输入电源时,才能实现零能耗。
3.如果用户需对产品性能升级或更换模块,请来电咨询,我们将给您详细解答。
4.当您弃置达到使用寿命年限的针式打印机产品时,我们建议您将废弃产品返还给本公司或全国各地得实服务网点,由得实集团作统一处理,以保护生态环境。
5.本产品能使用含50%回收纤维的打印纸进行打印。
第1章安装打印机1.1 开箱和检查打开纸箱,对照下图检查箱内部件和附件是否齐全。
如果有任何部件遗失,请与卖方联系。
注意:使用之前,请先取出打印头固定板,保留原包装箱及缓冲材料,以备以后使用。
*机器出厂时,送纸旋钮未安装于机器上,请从缓冲材料上取出并安装。
1.2 放置打印机在开箱和安装打印机之前,首先要确定一个合适的地方放置打印机。
这里“合适的地方”是指:请将打印机平放在工作台上。
避免将打印机置于过热、过度潮湿和灰尘过多的地方。
接上稳定电源,避免与电冰箱之类大功率或有干扰的电器同一电源。
关闭打印机电源开关后,才能拔插电源线,打印机应尽可能放置在接近插座的地方,便于使用。
打印机必须放置在走纸空间足够的地方。
如果用打印机并行接口连接,必须确保电缆长度在2米范围内。
1.3 打印机部件要熟悉打印机部件及功能,请参阅下一页。
顶盖:保护打印头及其它内部部件并降低噪音。
色带导架:固定色带芯。
色 带 盒:内装打印色带。
间隙调杆:控制打印色度,调校打印头和滚筒之间的间隙,以配合纸张厚度。
送纸调杆:该调杆有两个位置, 为链式纸, 为单页纸。
送纸旋钮:手动送纸(仅在断电情况下使用)。
打 印 头:24根打印针及其驱动部分组成。
控制面板:显示打印机状态,可对打印机功能进行多种简易操作。
电源开关:电源接通或断开。
链 轮:控制链式纸的传动、左右调整位置、锁定。
并行接口:连接计算机与打印机,标准配置为并行接口,可选配置为USB接口。
锁 杆:锁住链轮,使其位置固定。
导纸挡板:调整前摩擦式进纸(单页纸)的边缘位置,导向纸张正确送入。
1.4 安装和拆卸色带盒先将打印机放在将要使用的地方,清除打印机所有包装物件(这些包装物件用于保证打印机运输时不受损坏),并妥善保存包装物件及纸箱,以备后用。
色带盒的安装1、关掉打印机电源。
2、取开顶盖,如下图:3、将间隙调杆向前拨至最大档,以便打印头和滚筒的间隙处于最大宽度的位置。
4、用手小心地将打印头移至中央位置处。
5、更换新色带盒之前,请先拿开旧色带盒。
(当第一次安装新色带盒时,应跳过此步骤,直接进行下一步骤)6、沿顺时针方向转动色带盒上的旋钮,确保色带已被拉紧:7、按下图所示安装色带盒,轻轻地按下色带盒,使色带盒两侧的卡扣卡紧在机架两侧的凹槽中。
将色带芯上的色带导架往打印头罩上安装,安装时注意色带芯应先导入打印头下侧,然后再把色带导架上的卡位安装到打印头罩的对应卡位上。
8、转动色带盒上的旋钮,来回移动打印头,确保色带已被拉紧。
9、将间隙调杆拨回原来的位置,以使打印头和滚筒之间的间隙恢复到原始状态。