创高无线键盘KP-700说明书
无线键盘怎么用

无线键盘怎么用无线键盘怎么用无线键盘的用法设备充电如果设备是新的Bluetooth设备,确保在进行连接或打开前已充电。
尤其是Bluetooth耳机,使用前必须充电。
设备开机打开需要配对设备的电源。
对于某些设备,如Bluetooth无线耳机,设备开机的同时即启动配对过程。
开启Bluetooth功能在您收到设备时,该设备的Bluetooth功能可能已经开启,也可能尚未开启。
对于多数计算机,用户需要从控制面板或系统首选项中开启Bluetooth射频功能。
将设备设置为可见作为安全措施,某些设备可将Bluetooth功能设置为关闭、隐藏或可见。
尝试连接设备时,用户应将设备设置为可见,这样才能为彼此所发现。
完成设备配对后,如果用户担心设备会被其它设备发现,可以将设备设置为隐藏。
将两个设备设为连接模式两个设备都充好电后,打开设备电源并开启Bluetooth功能,每个设备都需要初始化通信会话。
通常,在两个设备之间连接时,一个设备会作为“主机”,而另一个设备则作为“访客”。
主机设备是具有用户界面的设备,多数连接设置都将从此进行。
一个设备可以是另一个设备的主机,也可以作为其它设备的访客。
例如,手机与无线耳机配对时,该手机就是主机。
但是,手机与膝上型计算机配对时,膝上型计算机就是主机。
输入密码设备彼此发现对方后,用户将被要求在一个或两个设备中输入密码。
某些情况下,如连接无线耳机时,密码是由制造商为耳机指定的固定密码。
此时,用户需要在主机设备中输入此指定的密码。
用户可在用户手册中找到此密码。
在其它情况下,用户可输入他/她自己的密码。
在这些情况下,用户将在两个设备中输入密码各一次。
强烈建议用户为一次配对过程设定8位字母数字字符密码。
输入密码后,设备将彼此验证并完成建立信任连接。
删除或断开与信任设备的连接用户应何时删除或断开与信任设备的连接?如果您的其中一个Bluetooth设备丢失或被偷,您应取消以前与该设备配对的所有设备的配对设置。
详细使用手册

详细使用手册酷手机,新玩法让你的手机立即变为电脑无线手写板、无线鼠标、无线键盘、无线遥控、无线关机!!!性能特点:∙无线连接,蓝牙传输∙免驱,即插即用∙蓝牙版本:2.1∙无线距离5-10米∙USB: USB2.0全速功能:∙无线手写板∙无线鼠标∙无线键盘∙娱乐遥控∙无线关电脑使用说明:一、原理:用手机遥控电脑是利用手机的蓝牙功能,通过蓝牙SPP协议把文字信息、鼠标信息、遥控信息等传输到手机飞鼠接收器,通过标准的USB鼠标键盘接口传送到电脑。
二、基本要求1 要把手机飞鼠插入到电脑的USB口2 手机装一个探索果手机飞鼠的APP三、手机软件使用1 安装在手机打开360手机助手,触摸箭头位置输入“探索果”,点击搜索出现探索果手机飞鼠,点击打开,下载安装在应用程序列表里就能看到探索果手机飞鼠的APP2 蓝牙配对1 进入手机系统设置,点击蓝牙。
2 搜索蓝牙设备,出现Tasogo蓝牙设备3 点击Tasogo蓝牙设备,输入PIN码:0000,完成配对3 使用1在应用程序列表里就找到探索果手机飞鼠的APP,点击运行2 第一次运行时,会出现请选择设备,要是正确配对了的话出现Tasogo,点击就可以了,在随后的选择中将此设备设为默认设备。
3 按手机系统菜单键,会出现子菜单:分别是连接,默认设备,断开连接,检查更新,关于,退出。
连接:在断开状态时,点击连接使手机重新连接上默认设备:设置下次开机时自动连接的设备断开连接:断开手机与手机飞鼠的蓝牙连接。
检查更新:软件版本升级关于:公司信息和软件版本退出:退出应用4 APP主菜单的第一个功能是手写板,在主菜单的下方是输入框,点击在输入框就可以写入您想输入的信息了,在输入框中满12个字符就会自己输入到电脑,不满12字需要点击“完成输入”。
APP主菜单的第二个功能是娱乐,听音乐,看电视时可以调节音量等功能,还可以实现一键盘关机。
APP主菜单的第三个功能是鼠标和键盘,上方是键盘区域,下是白色的是鼠标区域,在鼠标区域移动,电脑上的鼠标随之移动。
通用控制键盘 说明书

通用控制键盘说明书为标准网络接口,该接口主要用于短距离(距离小于7.6米)连接矩阵。
具体请参照“2.3连接矩阵”。
6位连接座电源端口图2-1.1图2-1.22.1键盘接口说明2.键盘连接2键盘接口在键盘的背面,该键盘配备了多种通讯接口:RS422、RS485、RJ45,便于与连接与控制多种外部设备。
键盘连接2.1.1RS422与RS485接口RS422与RS485接口在键盘6位连接座上,键盘直接控制模式下,RS485(A+,B-)连接球机;在矩阵控制模式下,RS485(A+,B-)可连接其它键盘。
RS422(T+,T-)为信号发送端,RS422(R+,R-)为信号接收端,可连接矩阵。
2.1.2RJ45接口32.2连接矩阵该键盘可以对PELCO CM6700、CM6800矩阵进行控制。
下面以键盘连接P ELCO 的CM6700矩阵为例,说明键盘与矩阵的连接。
CM6700矩阵后盖板上有两种连接键盘接口,一种是本地键盘接口RJ45(“LOCAL KEYBOARD"),可以连接距离在7.6米内的单个键盘;另一种是键盘远程接口RS422(“REMOTE KEYBOARD(s)”),连接到键盘RS422接口上,最大距离为1200M 。
将RJ45连接线一端的水晶头插键盘的RJ45接口,另一端水晶头插CM6700矩阵的RJ45接口(“LOCAL KEYBOARD ”)。
2.2.1RJ45本地连接RS422连接线,一端连接CM6700后盖板上的RS422接口(REMOTE KEYBOARD(s)),另一端连接键盘的RS422接口,键盘接口Rs22(R+R-)对应矩阵接口RS422(T+T-),键盘接口RS422(T+T-)对应矩阵接口RS422(R+R-)。
2.2.2Rs422远程连接图2-2.1键盘连接2.3直接连接球机键盘通过RS485接口连接球机。
球机的RS485接口在球机上罩内悬挂吊架的转接板上。
《键盘使用说明》课件

目录
键盘简介键盘操作基础常用快捷键特殊功能键的使用键盘维护与保养
01
CHAPTER
键盘简介
1
2
3
采用机械轴体,手感独特,适合游戏和打字。
机械键盘
按键由薄膜材料构成,价格实惠,常见于普通电脑键盘。
薄膜键盘
设计用于降低按键噪音,适合在安静环境下使用。
静音键盘
主键区
包括字母、数字和符号键。
外壳损坏
THANKS
感谢您的观看。
Ctrl+Y:恢复
Ctrl+Z:撤销
01
02
03
01
02
03
Command+C:复制
Command+X:剪切
Command+V:粘贴
01
Command+N:新建
02
Command+O:打开
03
Command+S:保存
Ctrl+W:关闭当前标签页
Ctrl+Shift+Tab:切换到上一个标签页
05
CHAPTER
键盘维护与保养
定期清洁
键盘表面和缝隙容易积累灰尘和污垢,应定期使用软布或细毛刷进行清洁。
如果按键失灵,可以尝试拆下键帽,清理按键下方的灰尘和杂物,或更换按键。
按键失灵
如果键盘出现电路故障,如按键无反应或乱码等,可能需要更换电路板或整个键盘。
电路故障
如果键盘外壳损坏,如外壳破裂或变形等,可以尝试修复或更换外壳。
功能键
包括F1-F12键,常用于快捷键操作。
控制键
包括Ctrl、Alt、Shift等,与其他键组合使用可实现特定功能。
PHILIPS WACS700 快速说明书 (英文)

Center’s remote control 4xAAA batteries
Mut e
Server
Tuner /Aux
Menu
OK V iew
Scrol l
Program Repeat
1
3 de f
RDS/News Dim
Sleep
VOL
4
6
名创优品键盘说明书

名创优品键盘说明书
无线键盘使用说明书,将无线键盘的信号发射装置先插入USB接口。
直至蓝色LED灯开始闪烁,进入配对状态在手机中开启蓝牙功能。
在Miniso,长按蓝牙键,指示灯闪烁,就是进入配对模式,笔记本电脑开蓝牙,平板开蓝牙,设置里面找到蓝牙,把其调成开启就可以了,这时平板便自动搜索蓝牙键盘设备。
点击看到的蓝牙键盘设备试一下按f键5次。
或者esc键两次,或者控制面板中鼠标键盘设置为不休眠状态。
估计应该有专用的驱动程序,驱动精灵,更新一下驱动试试进入设备管理器。
双模键盘说明书

cProduct Functions
chCheck if the keyboard is switched to the right mode (Windows / ccmacOS mode) depending on the system of your device.
chRed colored light indicator will blink when keyboard is in low ccpower. Please charge.
USB Charging Port Function Keys
US 1-3 Power Switch
c
Hardware Installation
cRF2.4G Connection (Connect to one device) c1. Power on the computer and plug USB receiver into a USB port on ccyour computer. c2. Turn on the power of keyboard and make sure battery has ccenough power. c3. Press Fn+1 to switch to RF 2.4G connection mode. c4. Your computer will automatically detect the receiver and connect ccwith the keyboard. c5. Switch the keyboard to specific mode depending on your system. ccPress Fn+S for Windows and Fn+A for macOS.
TOUCHLOCK K和KP系列指纹识别器说明书
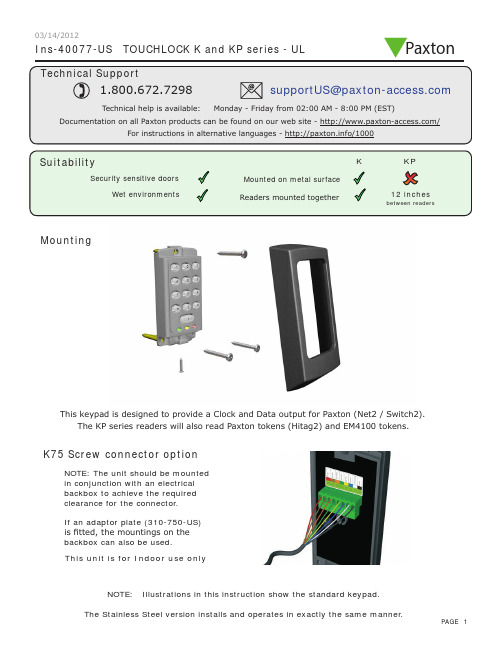
Ins-40077-US TOUCHLOCK K and KP series - ULMountingK75 Screw connector optionNOTE: The unit should be mounted in conjunction with an electrical backbox to achieve the required clearance for the connector .If an adaptor plate (310-750-US) is fitted, the mountings on the backbox can also be used.This keypad is designed to provide a Clock and Data output for Paxton (Net2 / Switch2).This unit is for Indoor use onlyNOTE: Illustrations in this instruction show the standard keypad.The KP series readers will also read Paxton tokens (Hitag2) and EM4100 tokens.Paxton03/14/2012Cable extensionsWiringNet2 control unitSwitch2 control unitStandard Unit - Drill a hole in the surface for the rear data cable. Secure the unit to the surface with three screws as per fitting diagram on page 1. 3 suitable screws and fixings are provided for fitting the unit to a wall. Ensure the data cable has free access at the rear .A choice of black and white covers are also provided. Hook the required cover over the top of the reader , press home at the bottom and secure with the single fixing screw.Screw Terminal Unit - The adapter (310-750-US) is mounted to a standard backbox using the fixing screws provided. The 75mm reader is then mounted onto the adapter using the fitting kit provided with the reader .KP series - When chosing a location for the reader , ensure that it is a least 12 inches from other readers. This will include readers mounted on the other side of the same wall as the radio signal will cause interference and reduce the read range. The reader should not be used on metal surfaces as the reflected signal will also reduce the range.Powering up the keypad will cause all the LEDs to come on. Once the control unit has been configured to accept keypad input (see controller instructions) pressing any key will make the keypad sound a bleep. Check the following FAQ section for assssistance if any problems are encountered.FCC ComplianceClass B digital devices.This equipment has been tested and found to comply with the limits for a Class B digital device, pursuant to Part 15 of theFCC Rules. These limits are designed to provide reasonable protection against harmful interference in a residential installation. This equipment generates, uses and can radiate radio frequency energy and, if not installed and used in accordance with the instructions, may cause harmful interference to radio communications. However , there is no guarantee that interference will not occur in a particular installation. If this equipment does cause harmful interference to radio or television reception, which can be determined by turning the equipment off and on, the user is encouraged to try to correct the interference by one or more of the following measures:-- Reorient or relocate the receiving antenna.-- Increase the separation between the equipment and receiver .-- Connect the equipment into an outlet on a circuit different from that to which the receiver is connected.-- Consult the dealer or an experienced radio/TV technician for help.Class A digital devices.This equipment has been tested and found to comply with the limits for a Class A digital device, pursuant to part 15 of the FCC Rules. These limits are designed to provide reasonable protection against harmful interference when the equipment is operated in a commercial environment. This equipment generates, uses, and can radiate radio energy and, if not installed and used in accordance with the instruction manual, may cause harmful interference to radio communications. Operation of this equipment in a residential area is likely to cause harmful interference in which case the user will be required to correct the interference at his own expense.This device complies with Part 15 of the FCC Rules. Operation is subject to the following two conditions:(1) this device may not cause harmful interference, and (2) this device must accept any interference received, including interference that may cause undesired operation. Changes or modifications not expressly approved by the party responsible for compliance could void the user's authority to operate the equipment.This unit is for Indoor use onlyFollowing the completed installation of this equipment, no further maintenance or testing is required.It is advisable to ensure that any third party backup power supplies or recovery procedures are checked regularly to ensure that the operation of the Paxton system is not compromised.Unit installation / test Maintenance/The use of any add-on, expansion, memory or other module manufactured or supplied by the manufacturer's representative will invalidate the CAN/ULC-S319 certification.For CAN/ULC-S319 installations, terminals, leads and wiring methods must comply with CSA, C22.1, Canadian electrical code, Part 1, safety standards for electrical installations.Product compliance and limitationsTo comply as a UL listed installation, the following conditions must apply:-Server based functions (Antipassback, Time and Attendance, etc) have not been evaluated by UL and cannot be used for UL 294 installations.The use of Wiegand readers and the configuration software has not been evaluated by 'UL' Wiring: - Where an equivalent cable / wire is used it must be ' UL Listed ' All interconnecting devices must be UL Listed.Wiring methods shall be in accordance with the National Electrical Code (ANSI/NFPA70), local codes, and the authorities having jurisdiction.This device complies with Industry Canada licence-exempt RSS standard(s). Operation is subject to the following two conditions: (1) this device may not cause interference, and (2) this device must accept any interference, including interference that may cause undesired operation of the device.。