计算机图形学四连通区域种子填充算法实验
种子填充算法
一、实验目标1.了解基于种子填充算法的基本思想;2.掌握基于种子填充算法的算法实现;3.掌握栈的使用。
二、实验内容本次实验主要是实现递归种子填充算法、简单种子填充算法、扫描线种子填充算法以及区域图案填充算法。
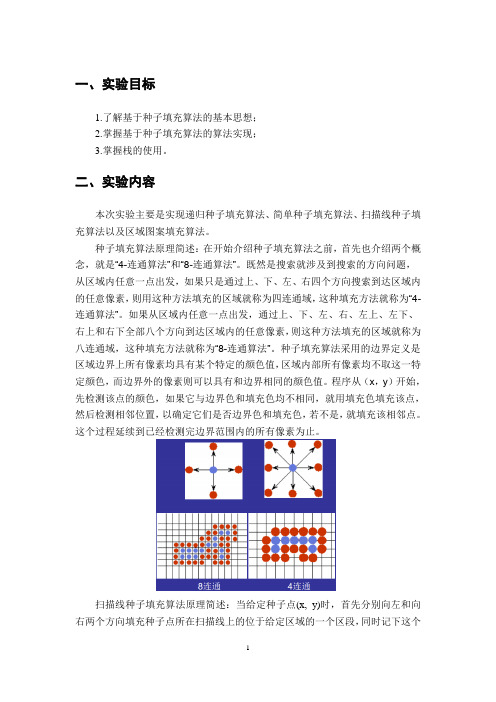
种子填充算法原理简述:在开始介绍种子填充算法之前,首先也介绍两个概念,就是“4-连通算法”和“8-连通算法”。
既然是搜索就涉及到搜索的方向问题,从区域内任意一点出发,如果只是通过上、下、左、右四个方向搜索到达区域内的任意像素,则用这种方法填充的区域就称为四连通域,这种填充方法就称为“4-连通算法”。
如果从区域内任意一点出发,通过上、下、左、右、左上、左下、右上和右下全部八个方向到达区域内的任意像素,则这种方法填充的区域就称为八连通域,这种填充方法就称为“8-连通算法”。
种子填充算法采用的边界定义是区域边界上所有像素均具有某个特定的颜色值,区域内部所有像素均不取这一特定颜色,而边界外的像素则可以具有和边界相同的颜色值。
程序从(x,y)开始,先检测该点的颜色,如果它与边界色和填充色均不相同,就用填充色填充该点,然后检测相邻位置,以确定它们是否边界色和填充色,若不是,就填充该相邻点。
这个过程延续到已经检测完边界范围内的所有像素为止。
扫描线种子填充算法原理简述:当给定种子点(x, y)时,首先分别向左和向右两个方向填充种子点所在扫描线上的位于给定区域的一个区段,同时记下这个区段的范围[xLeft, xRight],然后确定与这一区段相连通的上、下两条扫描线上位于给定区域内的区段,并依次保存下来。
反复这个过程,直到填充结束。
扫描线种子填充算法可由下列四个步骤实现:(1)初始化一个空的栈用于存放种子点,将种子点(x, y)入栈;(2)判断栈是否为空,如果栈为空则结束算法,否则取出栈顶元素作为当前扫描线的种子点(x, y),y是当前的扫描线;(3)从种子点(x, y)出发,沿当前扫描线向左、右两个方向填充,直到边界。
实验三 区域填充算法的实现

实验三区域填充算法的实现一、实验目的和要求:1、掌握区域填充算法基本知识2、理解区域的表示和类型,能正确区分四连通和八连通的区域3、了解区域填充的实现原理,利用Microsoft Visual C++ 6.0或win-TC实现区域种子填充的递归算法。
二、实验内容:1、编程完成区域填色2、利用画线函数,在屏幕上定义一个封闭区域。
3、利用以下两种种子填充算法,填充上述步骤中定义的区域(1)边界表示的四连通区域种子填充的实现(2)内点表示的四连通区域种子填充的实现4、将上述算法作部分改动应用于八连通区域,构成八连通区域种子填充算法,并编程实现。
三、实验结果分析四连通图的实现:程序代码:#include<graphics.h>#include <conio.h>#include<math.h>#include<time.h>void BoundaryFill4(int x,int y,int Boundarycolor,int newcolor){if(getpixel(x,y) != newcolor && getpixel(x,y) !=Boundarycolor){putpixel(x,y,newcolor);Sleep(1);BoundaryFill4(x-1,y,Boundarycolor,newcolor);BoundaryFill4(x,y+1,Boundarycolor,newcolor);BoundaryFill4(x+1,y,Boundarycolor,newcolor);BoundaryFill4(x,y-1,Boundarycolor,newcolor);}}void polygon(int x0,int y0,int a,int n,float af){int x,y,i;double dtheta,theta;if(n<3)return;dtheta=6.28318/n;theta=af*0.0174533;moveto(x0,y0);x=x0;y=y0;for(i=1;i<n;i++){x=x+a*cos(theta);y=y+a*sin(theta);lineto(x,y);theta=theta+dtheta;}lineto(x0,y0);}void main(){int x=50,y=75;int a,b,c,d,i,j;int graphdriver=DETECT;int graphmode=0;initgraph(&graphdriver,&graphmode," ");cleardevice();setcolor(RGB(0,255,0));setfillstyle(WHITE);polygon(x,y,60,5,0.);a=100;b=100;c=RGB(0,255,0);d=RGB(255,0,255);BoundaryFill4(a,b,c,d);getch();closegraph();}实验结果八连通的实现程序代码:#include<graphics.h>#include<conio.h>#include<time.h>#include <malloc.h>#include <windows.h>#define MaxSize 100typedef struct{int x;int y;}Seed,ElemType;typedef struct{ElemType data[MaxSize];int top; //栈顶指针} SqStack;void InitStack(SqStack *&s){s=(SqStack *)malloc(sizeof(SqStack));s->top=-1;}int StackEmpty(SqStack *s){return(s->top==-1);}int Push(SqStack *&s,ElemType e){if (s->top==MaxSize-1)return 0;s->top++;s->data[s->top]=e;return 1;}int Pop(SqStack *&s,ElemType &e){if (s->top==-1)return 0;e=s->data[s->top];s->top--;return 1;}void floodfill8(int x,int y,int oldcolor,int newcolor) {if(getpixel(x,y)==oldcolor){putpixel(x,y,newcolor);Sleep(2);floodfill8(x,y+1,oldcolor,newcolor);floodfill8(x,y-1,oldcolor,newcolor);floodfill8(x-1,y,oldcolor,newcolor);floodfill8(x+1,y,oldcolor,newcolor);floodfill8(x+1,y+1,oldcolor,newcolor);floodfill8(x+1,y-1,oldcolor,newcolor);floodfill8(x-1,y+1,oldcolor,newcolor);floodfill8(x-1,y-1,oldcolor,newcolor);}}void main(){int a,b,c,d,i,j;int graphdriver=DETECT;int graphmode=0;initgraph(&graphdriver,&graphmode," "); cleardevice();setfillstyle(RGB(255,255,255));setcolor(GREEN);int points[]={320,200,270,290,370,290}; fillpoly(3,points);rectangle(500,420,100,100);a=RGB(255,255,255);b=RGB(255,0,0);floodfill8(320,240,a,b);c=RGB(0,0,0);d=RGB(0,0,255);floodfill8(320,180,c,d);getch();closegraph();}实验结果:2、结果分析:通过以上各算法运行结果分析与对比可知:1.四连通算法的缺点是有时不能通过狭窄区域,因而不能填满多边形。
计算机图形学图形区域填充效果
// Fill.cpp : implementation file
#include "stdafx.h"
#include "FloodFill.h"
#include "Fill.h"
#ifdef _DEBUG
#define new DEBUG_NEW
#undef THIS_FILE
(1)种子填充算法原理
在多边形内部找到一个已知的象素点作为种子点,由此开始,利用区域的连通性找到多边形内部的 其它所有象素点进行填充。
(i)四向连通区域
①四向连通区域概念:从区域上任一点出发,在不超出区域边界的前提下,可通过4个方向:上、下、左、右的移动组合到达区域中的任意象素点,称此区域为四向连通区域。
{
//有需要填充的区域
if(spanNeedFill==FALSE)
{
spanNeedFill = TRUE;
}
x++;
}
if(spanNeedFill)
{
CPoint rightp(x-1,y);
stack.Push(x-1);
stack.Push(y);
spanNeedFill = FALSE;
virtual ~CStack();
};
#endif // !defined(AFX_STACK_H__D198F788_4ED1_4C09_98E5_433BAB24D864__INCLUDED_)
CStack.cpp参考代码:
// Stack.cpp: implementation of the CStack class.
#if !defined(AFX_STACK_H__D198F788_4ED1_4C09_98E5_433BAB24D864__INCLUDED_) #define AFX_STACK_H__D198F788_4ED1_4C09_98E5_433BAB24D864__INCLUDED_
图形学实验报告四 多边形填充算法

扫描线种子填充:
public void FillField(int x, int y, Color newColor, uint oldColor, Graphics g) {
if ("".Equals(txtx.Text) || "".Equals(txty.Text)) { return; } else { x = Convert.ToInt32(txtx.Text); y = Convert.ToInt32(txty.Text); } int xl, xr; bool spanNeedFill; myStack.Clear();
个交点。如右图,对 y=8 的扫描线排序 x 坐标得到的表是(2,4,9,13),然后对交点 2 与 4 之间、9 与 13 之间 的所有象素点进行填充。 边界上的象素:“左闭右开”,“下闭上开”(将左边界和下边界的点算为内部,而将右边界和上边界 算为外部) 顶点:“上开下闭”。
几种特殊情况: 1.扫描线交于一顶点,共享的两条边分另处于扫描线的两边,这时交点只取一个,如扫描线 y=3,该点被填 充一次。2.共享交点的两条边处于扫描线的上方,这时交点取二个,如扫描线 y=1,该点被填充一次。 3.共享交点的两条边处于扫描线的下方,这时交点取 0 个,如扫描线 y=9,无交点,不填充。 4.水平边在算法中不起任何作用,可不考虑。 活性边表(提高效率): 为了减少求交的计算量,要利用一条边与相继的两条扫描线的交点的连贯性。在处理一条扫描线时只对活 性边(与它相交的多边形的边)进行求交运算。把交点按 x 增加方向存在一个链表(活性边表)中。活性边: 与当前扫描线相交的边。 活性边表(AEL) :按交点 x 的增量顺序存放在一个链表中,该链表称作活性边表(AEL) 。
实验三 区域填充原理

实验三区域填充原理实验目的掌握二维区域填充的填充算法;实验环境计算机、Turbo C、C++等其他语言程序设计环境实验学时2学时,必做实验。
实验内容1.二维封闭区域的种子填充算法和扫描线种子填充算法;2.熟悉多边形扫描线填充算法;内点表示四连通种子填充算法(漫水法)参考代码:#include<graphics.h>void floodfill4(int x,int y,int oldcolor,int newcolor){if(getpixel(x,y)==oldcolor){putpixel(x,y,newcolor);delay(20000);floodfill4(x,y+1,oldcolor,newcolor);floodfill4(x,y-1,oldcolor,newcolor);floodfill4(x-1,y,oldcolor,newcolor);floodfill4(x+1,y,oldcolor,newcolor);}}main(){int a,b,c,d,i,j;int graphdriver=DETECT, graphmode=0;initgraph(&graphdriver,&graphmode," ");cleardevice();setcolor(14);rectangle(100,100,150,150);for(i=101;i<150;i++)for(j=101;j<150;j++){ putpixel(i,j,4);delay(1000);}a=120; b=110; c=4; d=2;floodfill4(a,b,c,d);getch();closegraph();}边界表示的4连通区域的种子填充算法:#include<stdio.h>;#include<graphics.h>;void BoundaryFill4(int x,int y,int boundarycolor,int newcolor) {if(getpixel(x,y)!=boundarycolor&getpixel(x,y)!=newcolor) {putpixel(x,y,newcolor);delay(20000);BoundaryFill4(x,y+1,boundarycolor,newcolor);BoundaryFill4(x,y-1,boundarycolor,newcolor);BoundaryFill4(x-1,y,boundarycolor,newcolor);BoundaryFill4(x+1,y,boundarycolor,newcolor);}}main() {int a,b,c=14,d,i,j;int graphdriver=DETECT,graphmode=0;initgraph(&graphdriver,&graphmode," ");cleardevice();setcolor(c);rectangle(100,100,150,150);for(i=101;i<150;i++)for(j=101;j<150;j++) { putpixel(i,j,4); delay(1000); } a=120; b=130; d=2;BoundaryFill4(a,b,c,d);getch();closegraph();}扫描线种子填充算法参考代码:#include<graphics.h>#include<stdio.h>#include<stdlib.h>#define bordercolor 15#define backcolor 0#define seedcolor 4#define fillcolor 10typedef struct Point{int x;int y;}point;typedef struct Stack{point *base;point *top;}*stack;void initstack(stack s){(*s).base=(point*)malloc(sizeof(point));if(!(*s).base)exit(1);(*s).top=(*s).base;}void push(stack s,point p){*((*s).top)=p;(*s).top++;}int stackempty(stack s){if((*s).top==(*s).base)return(1);else return(0);}point pop(stack s){(*s).top--;return(*((*s).top));}void drawgraphics(){int a[10]={100,140,260,80,300,200,160,240,100,140}; drawpoly(5, a);/*circle(200,200,150);*/}point produceseed(){point p;p.x=200;p.y=200;return(p);}void intostack(stack s,int y0,int xl,int xr){int x,y;point tm;for(x=xl,y=y0;x<=xr&&x<getmaxx();x++){if((x!=xr&&getpixel(x,y)==backcolor&&getpixel(x+1,y)!=backcolor)||(x==xr&&getpixel(x,y)==backcolor)){tm.x=x;tm.y=y;push(s,tm);putpixel(x,y,seedcolor);}if(x==xr&&getpixel(x,y)==backcolor)break;}}void fillgraphics(){int xl=0,xr=getmaxx(),x,y;point seed;stack s=NULL;seed=produceseed();putpixel(seed.x,seed.y,seedcolor);getch();initstack(s);push(s,seed);while(!stackempty(s)){seed=pop(s);for(x=seed.x,y=seed.y;getpixel(x,y)==backcolor||getpixel(x,y)==seedcolor;x++) {putpixel(x,y,fillcolor);}xr=x-1;for(x=seed.x-1,y=seed.y;getpixel(x,y)==backcolor||getpixel(x,y)==seedcolor;x--) {putpixel(x,y,fillcolor);}xl=x+1;intostack(s,seed.y+1,xl,xr);intostack(s,seed.y-1,xl,xr);getch();}}void main(){int gdriver ,gmode ;gdriver = DETECT;initgraph(&gdriver , &gmode ,"" );drawgraphics();fillgraphics();outtextxy(180,20,"Scan line filling graphics finished!"); getch();closegraph();}多边形扫描线填充算法参考代码:/* Note:扫描线填充算法*/#include <graphics.h>#include <conio.h>#include <math.h>#define MAXPOINT 20typedef struct {int y_top;float x_int;int delta_y;float x_cps;}E_ENTRY;void putin_sl(int entry,int x1,int y1,int x2,int y2,int next_y); void sortonby(int n);void updatefl(int count,int scan);void swap(E_ENTRY *x,E_ENTRY *y);void sortonx(int entry,int first_s);void processx(int first_s,int last_s);void drawline(int scan,int x_int_c,int index);void updatesl();E_ENTRY sides[MAXPOINT];int x[MAXPOINT]={0,210,240,230,350,380,340,200,180,150}; int y[MAXPOINT]={0,410,370,200,410,340,140,180,120,300}; int s_count,first_s,last_s,scan,bottom_s,x_int_c;main(){int driver,mode;int v_count=9;driver=DETECT;initgraph(&driver,&mode,"");setcolor(3);fillarea(v_count,x,y);getch();closegraph();}fillarea(int count){sortonby(count);first_s=1;last_s=1;for(scan=sides[1].y_top;scan>bottom_s;scan--){updatefl(count,scan);processx(first_s,last_s);drawline(scan,x_int_c,first_s);updatesl();}}void putin_sl(int entry,int x1,int y1,int x2,int y2,int next_y) {int maxy;float x2_temp,xch_temp;xch_temp=(float)(x2-x1)/(float)(y2-y1);x2_temp=x2;if((y2>y1)&&(y2<next_y)){y2--;x2_temp-=xch_temp;}else{if((y2<y1)&&(y2>next_y)){y2++;x2_temp+=xch_temp;}}maxy=(y1>y2)?y1:y2;while((entry>1)&&(maxy>sides[entry-1].y_top)){sides[entry]=sides[entry-1];entry--;}sides[entry].y_top=maxy;sides[entry].delta_y=abs(y2-y1)+1;if(y1>y2)sides[entry].x_int=x1;elsesides[entry].x_int=x2_temp;sides[entry].x_cps=xch_temp;}void sortonby(int n){int k,x1,y1;s_count=0;y1=y[n];x1=x[n];bottom_s=y[n];for(k=1;k<n+1;k++){if(y1!=y[k]){s_count++;putin_sl(s_count,x1,y1,x[k],y[k],y[k+1]);}else{/* line((short)x1,480-(short)y1,(short)x[k],480-(short)y1);*/moveto((short)x1,480-(short)y1);lineto((short)x[k],480-(short)y1);}if(y[k]<bottom_s) bottom_s=y[k];y1=y[k];x1=x[k];}}void updatefl(int count,int scan){while((sides[last_s+1].y_top>scan)&&(last_s<count))last_s++;while(sides[first_s].delta_y==0) first_s++;}void swap(E_ENTRY *x,E_ENTRY *y){int i_temp;float f_temp;i_temp=x->y_top;x->y_top=y->y_top;y->y_top=i_temp;f_temp=x->x_int;x->x_int=y->x_int;y->x_int=f_temp;i_temp=x->delta_y;x->delta_y=y->delta_y;y->delta_y=i_temp;f_temp=x->x_cps;x->x_cps=y->x_cps;y->x_cps=f_temp;}void sortonx(int entry,int first_s){while((entry>first_s)&&(sides[entry].x_int<sides[entry-1].x_int)) {swap(&sides[entry],&sides[entry-1]);entry--;}}void processx(int first_s,int last_s){int k;x_int_c=0;for(k=first_s;k<last_s+1;k++){if(sides[k].delta_y>0){x_int_c++;sortonx(k,first_s);}}}void drawline(int scan,int x_int_c,int index){int k,x,x1,x2;for(k=1;k<(int)(x_int_c/2+1.5);k++){while(sides[index].delta_y==0)index++;x1=(int)(sides[index].x_int+0.5);index++;while(sides[index].delta_y==0)index++;x2=(int)(sides[index].x_int+0.5);/*line((short)x1,480-(short)scan,(short)x2,480-(short)scan);*/ moveto((short)x1,480-(short)scan);lineto((short)x2,480-(short)scan);index++;}}void updatesl(){int k;for(k=first_s;k<last_s+1;k++){if(sides[k].delta_y>0){sides[k].delta_y--;sides[k].x_int-=sides[k].x_cps;}}}。
案例8 四邻接点种子填充算法

案例8 四邻接点种子填充算法
孔令德 太原工业学院计算机工程系 2017.1.10
知识点
四邻接点种子填充算法。 判断种子像素位于多边形之内的方法。 种子像素四邻接点的访问方法。 堆栈操作函数。
案例描述
请使用四邻接点种子算法填充示例多边形。在1024×768的显
总结
本案例设计了CStackNode类用于执行堆栈操作。种子填 充算法一般要求填充色与边界色不同。 种子算法将太多的像素入栈,当图形较大时,栈内的数 据量庞大,填充效率很低。改进方法是使用扫描线种子填充
算法,这样入到明显改善。
pTop=pHead->pNext;
pHead->pNext=pTop->pNext; point=pTop->PixelPoint; delete pTop; } }
程序代码
(4)填充函数 void CTestView::FillPolygon(CDC *pDC) { COLORREF BoundaryClr=RGB(0,0,0); //边界色 COLORREF PixelClr; //当前像素的颜色 pHead=new CStackNode; //建立栈头结点 pHead->pNext=NULL; //栈头结点的指针域总为空 Push(Seed); //种子像素入栈 CP2 PopPoint; Pop(PopPoint); pDC->SetPixelV(Round(PopPoint->PixelPoint.x),Round(PopPoint>PixelPoint.y),SeedClr); PointLeft.x=PopPoint->PixelPoint.x-1; //搜索出栈结点的左方像素 PointLeft.y=PopPoint->PixelPoint.y; PixelClr=pDC->GetPixel(Round(PointLeft.x),Round(PointLeft.y)); if(BoundaryClr!=PixelClr && SeedClr!=PixelClr) Push(PointLeft); //左方像素入栈
计算机图形学实验扫描线种子填充算法
实验二4-10一、实验题目扫描线种子填充算法是通过扫描线来填充多边形内的水平像素段,处理每条扫描线时仅需将其最右端像素入栈,可以有效提高填充效率。
请使用MFC编程填充图4-60所示的空心体汉字(四连通),填充效果如图4-61所示。
二、实验思想扫描线种子填充算法:先将种子像素入栈,种子像素为栈底像素,如果栈不为空,执行如下4步操作。
(1)栈顶像素出栈。
(2)沿扫描线对出栈像素的左右像素进行填充,直至遇到边界像素为止。
即每出栈一个像素,就对区域内包含该像素的整个连续区间进行填充。
(3)同时记录该区间,将区间最左端像素记为x left,最右端像素记为x right。
(4)在区间〔x left,x right〕中检查与当前扫描线相邻的上下两条扫描线的有关像素是否全为边界像素或已填充像素,若存在非边界且未填充的像素,则把未填充区间的最右端像素取作种子像素入栈。
三、实验代码void CTestView::OnLButtonDown(UINT nFlags, CPoint point)//左键按下函数{// TODO: Add your message handler code here and/or call defaultSeed=point;//选择种子位置CharFill();//进行填充CView::OnLButtonDown(nFlags, point);}void CTestView::CharFill()//文字填充函数{CRect Rect;GetClientRect(&Rect);CClientDC dc(this);COLORREF BoundColor;//边界色int Width=Rect.right-Rect.left;int Hight=Rect.bottom-Rect.top ;int Flag;int x0,y0,x,y;CPoint Point;std::vector<CPoint> FillBuffle;//定义CPoint类型的数组序列对象FillBuffle.reserve(10);//定义数组序列的大小FillBuffle.push_back(CPoint(Seed)); //把种子结点压入数组序列BoundColor=RGB(0,0,0);//定义边界色为黑色while(!FillBuffle.empty())//如果数组序列非空{Point=FillBuffle.front();//弹出数组序列头元素x=Point.x;y=Point.y;FillBuffle.erase(FillBuffle.begin());//清除数组序列内的元素dc.SetPixel(Point,Fillcolor);//绘制像素//判断像素的位置是否在图形内部x0=x+1;//右方判断while(dc.GetPixel(x0,y)!=BoundColor&&dc.GetPixel(x0,y)!=Fillcolor) {x0=x0+1;if(x0>=Width)//到达屏幕最右端{MessageBox("种子超出范围","警告");RedrawWindow();return;}}y0=y+1;//下方判断while(dc.GetPixel(x,y0)!=BoundColor&&dc.GetPixel(x,y0)!=Fillcolor) {y0=y0+1;if(y0>=Hight)//到达屏幕最下端{MessageBox("种子超出范围","警告");RedrawWindow();return;}}RightPoint.x=x0;//右边界内的左邻点x0=x-1;while(dc.GetPixel(x0,y)!=Fillcolor&&dc.GetPixel(x0,y)!=BoundColor){dc.SetPixel(x0,y,Fillcolor);x0=x0-1;if(x0<=0)//到达屏幕最左端{MessageBox("种子超出范围","警告");RedrawWindow();return;}}y0=y-1;while(dc.GetPixel(x,y0)!=BoundColor&&dc.GetPixel(x,y0)!=Fillcolor){y0=y0-1;if(y0<=0)//到达屏幕最上端{MessageBox("种子超出范围","警告");RedrawWindow();return;}}LeftPoint.x=x0+1;//左边界内的右邻点x0=LeftPoint.x;y=y+1;//下一条扫描线while(x0<RightPoint.x){Flag=0;while((dc.GetPixel(x0,y)!=Fillcolor)&&(dc.GetPixel(x0,y)!=BoundColor)) {if(Flag==0)Flag=1;x0++ ;}if(Flag==1){if((x0==RightPoint.x)&&(dc.GetPixel(x0,y)!=Fillcolor)&&(dc.GetPixel(x0,y)!=BoundColor))FillBuffle.push_back(CPoint(x0,y));//进入数组序列else{FillBuffle.push_back(CPoint(x0-1,y));}Flag=0;}PointNext.x=x0;while(((dc.GetPixel(x0,y)==Fillcolor)&&(x0<RightPoint.x))||((dc.GetPixel(x0,y)==BoundColor) &&(x0<RightPoint.x))){x0 ++;}}x0=LeftPoint.x;y=y-2;while(x0<RightPoint.x){Flag=0;while((dc.GetPixel(x0,y)!=Fillcolor)&&(dc.GetPixel(x0,y)!=BoundColor)&&(x0<RightPoint.x)) {if(Flag==0)Flag=1;x0++ ;}if(Flag==1){if((x0==RightPoint.x)&&(dc.GetPixel(x0,y)!=Fillcolor)&&(dc.GetPixel(x0,y)!=BoundColor))FillBuffle.push_back(CPoint(x0,y));else{FillBuffle.push_back(CPoint(x0-1,y));}Flag=0;}PointNext.x=x0;while((dc.GetPixel(x0,y)==Fillcolor&&x0<RightPoint.x)||(dc.GetPixel(x0,y)==BoundColor&&x 0<RightPoint.x)){x0++;}}}FillBuffle.clear();return;}void CTestView::OnMENUFill(){// TODO: Add your command handler code hereRedrawWindow();MessageBox("请在空心字体内部单击鼠标左键!","提示");}四、实验结果截图。
计算机图形学实验四 区域填充算法的实现
实验四区域填充算法的实现班级 08信计2班学号 20080502082 姓名分数一、实验目的和要求:1、理解区域的表示和类型。
2、能正确区分四连通和八连通的区域3、了解区域填充的实验原理。
4、利用C++实现区域填充的递归算法。
二、实验内容:1假设在多边形内有一像素已知,由此出发利用连通性找到区域内所有像素。
2 取(x,y)为种子点将整个区域填充为新的颜色。
3 进行递归填充。
三、实验结果分析区域填充属性包括填充样式,填充颜色和填充图案的类型。
C语言中定义了某种图形后,即可调用-floodfill函数,对指定区域进行填充. 程序代码#define pi 3.141592#define MAX(a,b) (a>b)? a:b#define MIN(a,b) (a<b)? a:b#include "graphics.h"#include "math.h"struct edge {int ymax;float x;float delat;struct edge * pedge; };struct point{int x;int y;} ;struct et { struct edge * pedge;int n;};struct edge g_aet[10];struct edge dge[10];struct et g_et[10];struct point point1,point2;int ZUO(float x){ if((int)x==x)return (int)x;return (int)x+1;}int YOU(float x){ if((int)x==x)return (int)x-1;return (int)x;}int k=400,l=0;void draw1(){int i,t,j,a,c,p,z; float b;struct edge temp;for(i=k;i<=l;i++){a=0;for(t=0;t<=9;t++){ if(g_et[t].n==i) break;}for(j=0;j<=9;j++){ if(g_aet[j].ymax==0) break;}if(t!=10){ g_aet[j].ymax=g_et[t].pedge->ymax;g_aet[j].x=g_et[t].pedge->x;g_aet[j].delat=g_et[t].pedge->delat;if(g_et[t].pedge->pedge!=0){g_aet[j+1].ymax=g_et[t].pedge->pedge->ymax;g_aet[j+1].x=g_et[t].pedge->pedge->x;g_aet[j+1].delat=g_et[t].pedge->pedge->delat; }}for(j=0;j<=9;j++){ if(g_aet[j].ymax==0) break; }j--;for(t=0;t<=j;t++){ for(z=0;z<=j-1;z++){if(g_aet[z].x>g_aet[z+1].x){ temp.ymax=g_aet[z].ymax;temp.x=g_aet[z].x;temp.delat=g_aet[z].delat;g_aet[z].ymax=g_aet[z+1].ymax;g_aet[z].x=g_aet[z+1].x;g_aet[z].delat=g_aet[z+1].delat;g_aet[z+1].ymax=temp.ymax;g_aet[z+1].x=temp.x;g_aet[z+1].delat=temp.delat;}}}for(j=0;j<=9;j++){ if(g_aet[j].ymax==0) break; }j--;for(p=0;p<=j;p++){ a++;if(a%2!=0)b=g_aet[p].x;else{for(c=ZUO(b);c<=YOU(g_aet[p].x);c++)putpixel(c,i,2);}}for(t=0;t<=j;t++){ if(g_aet[t].ymax==(i+1)){ g_aet[t].ymax=0;g_aet[t].x=0;g_aet[t].delat=0;}g_aet[t].x+=g_aet[t].delat;}for(t=0;t<=j;t++){ for(z=0;z<=j-1;z++){if(g_aet[z].x<g_aet[z+1].x){ temp.ymax=g_aet[z].ymax;temp.x=g_aet[z].x;temp.delat=g_aet[z].delat;g_aet[z].ymax=g_aet[z+1].ymax;g_aet[z].x=g_aet[z+1].x;g_aet[z].delat=g_aet[z+1].delat;g_aet[z+1].ymax=temp.ymax;g_aet[z+1].x=temp.x;g_aet[z+1].delat=temp.delat;}}}}}void generate(){int i,y,n=1,m,q,p;float x;for(i=0;i<=9;i++){if(n==1){ point2.x=point1.x=300;point2.y=point1.y=200;n++;}else{ if(n%2==0){ x=40*cos(i*pi/5)+200;y=40*sin(i*pi/5)+200;}else{ x=100*cos(i*pi/5)+200;y=100*sin(i*pi/5)+200;}if(point1.y==y) { n++; continue;}m=MIN(point1.y,y);if(x==point1.x){ dge[i-1].delat=0;dge[i-1].ymax=MAX(point1.y,y);dge[i-1].x=x;dge[i-1].pedge=0;for(q=0;q<=9;q++){ if(g_et[q].n==m) break;}if(q==10){g_et[i-1].pedge=&dge[i-1];g_et[i-1].n=m;}else{g_et[q].pedge->pedge=&dge[i-1];g_et[i-1].n=0;}}else{dge[i-1].delat=(float)(x-point1.x)/(y-point1.y);dge[i-1].ymax=MAX(point1.y,y);if(point1.y>y) dge[i-1].x=x;else {dge[i-1].x=point1.x; }dge[i-1].pedge=0;for(q=0;q<=9;q++){ if(g_et[q].n==m) break;}if(q==10){ g_et[i-1].pedge=&dge[i-1];g_et[i-1].n=m;}else{g_et[q].pedge->pedge=&dge[i-1];g_et[i-1].n=0;}}p=MAX(point1.y,y);k=MIN(k,m);l=MAX(l,p);point1.x=x;point1.y=y;n++;}}if(point1.y==point2.y) return;else{if(point2.x==point1.x){dge[i-1].delat=0;dge[i-1].ymax=MAX(point1.y,point2.y);dge[i-1].x=point2.x;}else{ dge[i-1].ymax=MAX(point1.y,point2.y);if(point1.y>point2.y) dge[i-1].x=point2.x;else {dge[i-1].x=point1.x;}dge[i-1].delat=(float)(point2.x-point1.x)/(point2.y-point1.y);}}m=MIN(point1.y,point2.y);k=MIN(k,m);l=MAX(l,dge[i-1].ymax);g_et[i-1].n=m;g_et[i-1].pedge=&dge[i-1];}void main(){ int driver=DETECT,mode; int i; registerbgidriver(EGA VGA_driver);initgraph(&driver,&mode,"\\tc");initgraph(&driver,&mode,"\\tc");for(i=0;i<=9;i++){ g_aet[i].ymax=0; g_aet[i].x=0; g_aet[i].delat=0;g_et[i].pedge=0;}generate();draw1();circle(200,200,100); circle(200,200,40);getch();closegraph();}。
- 1、下载文档前请自行甄别文档内容的完整性,平台不提供额外的编辑、内容补充、找答案等附加服务。
- 2、"仅部分预览"的文档,不可在线预览部分如存在完整性等问题,可反馈申请退款(可完整预览的文档不适用该条件!)。
- 3、如文档侵犯您的权益,请联系客服反馈,我们会尽快为您处理(人工客服工作时间:9:00-18:30)。
计算机图形学四连通区域种子填充算法实验
————————————————————————————————作者: ————————————————————————————————日期:
ﻩ
《计算机图形学实验》报告
任课教师:钱文华
2016年春季学期
实验:四连通区域种子填充算法
实验时间:2016年12月8日
实验地点:信息学院2204
实验目的:掌握种子填充算法的原理,并会用种子填充算法和ope
ngl并结合使用c++语言编写程序绘制多边形。
实验原理:种子填充算法又称为边界填充算法。
其基本思想是:从多边形区域的一个内点开始,由内向外用给定的颜色画点直到边界为止。
如果边界是以一种颜色指定的,则种子填充算法可逐个像素地处理直到遇到边界颜色为止。
内点的检测条件:if(interiorColor!=bo rderColor&&interiorColor!=fillColor)。
种子填充算法常用四连通域和八连通域技术进行填充操作。
从区域内任意一点出发,通过上、下、左、右四个方向到达区域内的任意像素。
用这种方法填充的区域就称为四连通域;这种填充方法称为四向连通算法。
从区域内任意一点出发,通过上、下、左、右、左上、左下、右上和右下八个方向到达区域内的任意像素。
用这种方法填充的区域就称为八连通域;这种填充方法称为八向连通算法。
一般来说,八向连通算法可以填充四向连通区域,而四向连通算法有时不能填充八向连通区域。
四向连通填充算法:
a)种子像素压入栈中;
b)如果栈为空,则转e);否则转c);
c) 弹出一个像素,并将该像素置成填充色;并判断该像素相邻的四连通像素是否为边界色或已经置成多边形的填充色,若不是,则将该像素压入栈;
d)转b);
e)结束。
四连通填充算法利用到了递归的思想。
本实验只包括四连通填充算法
程序代码:#include<glut.h>
#include<stdlib.h>
#include<math.h>
#include<windows.h>
voidinit(void){ glClearColor(1.0,1.0,1.0,0.0);glMatrixMode(GL_PROJECTION);
gluOrtho2D(0.0,300.0,0.0,300.0);
}
void setPixel(intx,inty,longfillColor){ glColor3f(fillColor<<16,fillColor<<8,fillColor);
glBegin(GL_POINTS);
glVertex2i(x,y);glEnd();
}
voidboundaryFill4(int x,inty,long fillColor,long borderColor)
{ unsignedchar params[3];
long interiorColor;
glReadPixels(x,y,1,1,GL_RGB,GL_UNSIGNED_BYTE,par ams);
interiorColor=RGB(params[0],params[1],params[2]);
if(interiorColor!=borderColor&&interiorColor!=fillColor)
{ setPixel(x,y,fillColor);
boundaryFill4(x+1,y,fillColor,borderColor);
boundaryFill4(x-1,y,fillColor,borderColor); boundaryFill4(x,y+1,fillColor,borderColor);
boundaryFill4(x,y-1,fillColor,borderColor);
} }
voidlineSegment(void) {long borderColor=RGB(255,0,0);
longfillColor=RGB(0,0,255);
glClear(GL_COLOR_BUFFER_BIT); glColor3f(255,0,0); glBegin(GL_LINE_LOOP);
glVertex2i(0,40);
glVertex2i(20,0);
glVertex2i(60,0);
glVertex2i(80,40);
glVertex2i(60,80);
glVertex2i(20,80);
glEnd();
boundaryFill4(60,60,fillColor,borderColor);
glFlush();}
voidmain(int argc,char**argv){glutInit(&ar gc,argv);
glutInitDisplayMode(GLUT_SINGLE|GLUT_RGB); glutInitWindowPosition(150,100);
glutInitWindowSize(300,300);
glutCreateWindow("种子填充");
init();
glutDisplayFunc(lineSegment);
glutMainLoop();
}
上实验课时机房的实验结果:
后来的实验结果:
glVertex2i(0,40);
glVertex2i(20,0);
glVertex2i(60,0);
glVertex2i(80,40);
glVertex2i(60,80);
glVertex2i(20,80);
glEnd();
boundaryFill4(60,60,fillColor,borderColor);以上这段程序改成如下
glVertex2i(90,40);
glVertex2i(120, 100);
glVertex2i(90,160);
glVertex2i(60, 160);
glVertex2i(60, 40);
glEnd();
boundaryFill4(70,60,fillColor,borderColor); 改变参数后:
再把glVertex2i(90,40);
glVertex2i(120, 100);
glVertex2i(90,160);
glVertex2i(60, 160);
glVertex2i(60, 40);
glEnd();
boundaryFill4(70,60,fillColor,borderColor);改成glVertex2i(100, 100);
glVertex2i(200, 100);
glVertex2i(150,150);
//glVertex2i(60, 160);
//glVertex2i(60, 40);
glEnd();
boundaryFill4(150,120,fillColor,borderColor);
后的结果如下图:
实验总结:通过多组数据的测试,知道了上面算法的正确,普适性。
种子填充的递归算法的优点是原理非常简单,容易理解,缺点是由于多次递归,费时,费内存,效率不高,需要大量栈空间来存储相邻的点,太大的区域会由于递归太深而无法运行。
为了减少递归次数,可采用扫描线种子算法。
扫描线填充算法就是它的改进的方法。
它是通过沿扫描线填充水平像素段,来处理四连通或八连通相邻点,这样就仅仅只需要将每个水平像素段的起始位置压入栈,而不需要将当前位置周围尚未处理的相邻像素都压入栈,从而可以节省大量的栈空间。