HellFire.V1.0-Kindle.Fire-Android4.0.4刷机教程及rom下载
NOAHlink软件更新说明说明书

Release NoteNOAHlink v.1.56.05Includes NOAHlink Kernel 1.55.03HIMSA 01-07-2013Thank you for purchasing NOAHlink software. This document includes last minute information on NOAHlink, including sections on:•compatibility issues•user documentation•known problems and issues•getting supportPlease read the NOAHlink Users guide before you install NOAHlink.Changes from v.1.56.04 to v.1.56.05The search for available NOAHlinks in the NOAHlink properties program are now only searching on COM ports with Bluetooth devices. This functionality can be turned off under the NOAHlink properties => Advanced features.During upgrade the NOAHlink properties program could set the COMport high to “9” – with the result that an available NOAHlink was not found by the fitting program. This is corrected to “99”.All NOAHlink files are signed from HIMSA.Changes from v.1.56.03a to v.1.56.04The version number cannot contain a letter and had to be changed.The functionality is the same and the user can still be logged in as a normal Windows user. Changes from v.1.56.03 to v.1.56.03aNOAHlink 1.56.03 could not be used as a “normal windows user” due to the placement of a NOAHlink log file. This is resolved with NOAHlink 1.56.03a.There are no changes to any compiled files or firmware files compared to NOAHlink 01.56.03 Changes from v.01.56.02 to v.1.56.03NOAHlink 1.56.03 still includes kernel 1.55.03 and boot loader 8.•Timers in the Noahlink detection program have been changed and optimized•One specific timer where NOAHlink was waiting 60 seconds has been removed•One NOAHlink error message (when the NOAHlink was not turned on) has been correctedThe NOAHlink 1.56.03 will detect the NOAHlink some seconds slower than previous versions (1.55.06 and before). This is because the program is now compiled with Visual Studio 2010 and it has been necessary to make smaller changes to the NOAHlink detection program.Changes from v.01.55.06 to v.01.56.02NOAHlink 1.56.02 includes kernel 1.55.03 and boot loader 8.•Boot loader 8 contains various improvements to test that the kernel image will load successfully.•The NOAHlink properties 1.56.02 is compiled with Visual Studio 2010. This will not be visible for the end user – but will ensure that the NOAHlink can communicate on newer MS platforms.Changes from v.01.55.05 to v.01.55.06NOAHlink 1.55.06 includes the kernel 1.55.03•Kernel 1.55.03 will reduce the number of returned units due to firmware problems.Changes from v.01.55.04 to v.01.55.05NOAHlink 1.55.05 contains identical components as in 1.55.04. The only difference is the writing routine for updating the new boot loader 7 to the NOAHlink. This is now more secure and will happen without errors.Changes from v.01.55.03 to v.01.55.04NOAHlink:•The NOAHlink properties program will under installation set the registry key – NOAHLinkBootTimeMS – to 10000 (10 seconds). It was previously 7 seconds.•The PWM protocol has been updated.Changes from v.01.54.01 to v.01.55.03NOAHlink Kernel 01.55.02: This new Kernel include several new features•Ability to communicate using the Toshiba bluetooth stack•Updated security routines to avoid un-wanted writing in the flash memoryo Please note that this also requires upgrade to boot loader 7 – which comesautomatically with the Kernel update.NOAHlink installation: The installation program will now detect the Operating System and choose which bluetooth stack should be used for the bluetooth communication (The end user will not be presented with the option of installing the Ezurio drivers if the Operating System is XP SP 2 or later)NOAHlink pairing wizard: The pairing wizard will detect which Bluetooth driver is used on the PC. If the Toshiba stack is detected the end user will be required to do the pairing manually using the “Toshiba Bluetooth Manager”. A relevant link to the HIMSA support site will be offered to the end user.Changes from v.01.54.00 to v.01.54.01NOAHlink Kernel: With kernel 1.52.00 installed it is possible to downgrade to older kernels.NOAHlink Kernel: Kernel 1.52.00 is compatible with the Mitsumi Bluetooth modules (C29 og C46)NOAHlink Kernel: Some older kernels did not support the features ‘HI Power Status’ and‘Power on when leaving cradle’, and would cause NOAHlink to lose connection when these kernels were upgraded. This issue no longer occurs with an upgrade to Kernel 1.52.00. Changes from v.01.53.01 to v.01.54.00NOAHlink Kernel: Correction made to the Release-Protocol-Resources where some resources were not released properly.NOAHlink Kernel: The initialization of NOAHlink Bluetooth module changed to allow the use of a new generation of Mitsumi module.Changes from v.01.52.03 to v.01.53.01NOAHlink: NOAHlink is now Vista compatible.NOAHlinkdrv: The user no longer receives a "time out" when trying to connect to a NOAHlinkNOAHlink Properties: A pairing wizard has been included to help the user pair with their NOAHlink devices. It is compatible with the Widcomm and the Microsoft Bluetooth stack. NOAHlink Properties: The installation has been rewritten, and the pairing has been moved from the installation to the Pairing Wizard. Thus, the installation no longer reboots several times during pairing.Changes from v.01.52.02 to v.01.52.03NOAHlink Properties: Due to an issue with the .Net assemblies and the .Net 2.0 framework, the interop files are no longer installed to the GACChanges from v.01.52.01 to v.01.52.02NOAHlink Properties: The .Net interop files are now again a part of the installationChanges from v.01.51.01 to v.01.52.01NOAHlinkdrv: The NOAHlink no longer crashes and silently logs out when it is moved out of rangeIDigitalAudio2 Inserted SetupDigitalFormat method that was accidently removed in buildv.01.51.01.Compatibility IssuesImportant: NOAH 2 is not compatible with NOAHlink. NOAHlink is designed and tested to work best with NOAH 3..NOAHlink DocumentationHIMSA provides electronic copies of the NOAHlink User manual in all available languages. You will also receive a hard copy of this manual in your NOAHlink package.Known Problems and IssuesPlease visit NOAHlinks web-site at to access the latest support issues.Getting SupportIf you have a support question concerning the installation or operation of NOAHlink, please check through your documentation first.If your problem persists, visit HIMSA’s website (English and German only) at .If you still cannot find the answers you need, contact your NOAHlink supplier. Your supplier is specially trained to answer NOAHlink-related questions.。
KINDLE安卓系统安装步骤
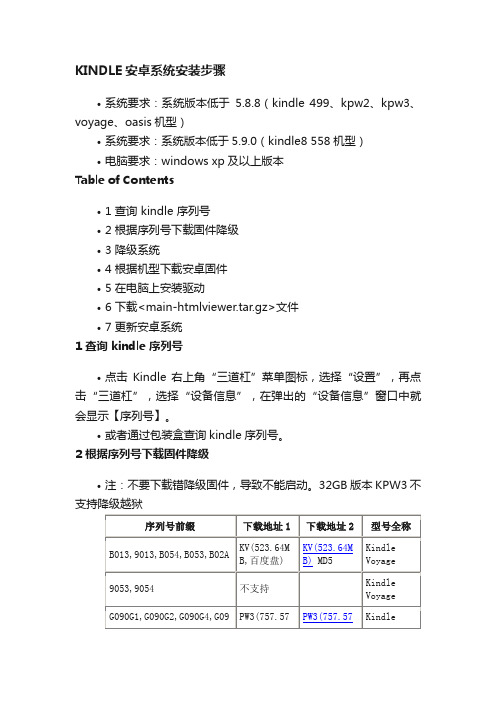
KINDLE安卓系统安装步骤•系统要求:系统版本低于5.8.8(kindle 499、kpw2、kpw3、voyage、oasis机型)•系统要求:系统版本低于5.9.0(kindle8 558机型)•电脑要求:windows xp及以上版本Table of Contents•1 查询 kindle 序列号•2 根据序列号下载固件降级•3 降级系统•4 根据机型下载安卓固件•5 在电脑上安装驱动•6 下载<main-htmlviewer.tar.gz>文件•7 更新安卓系统1 查询 kindle 序列号•点击Kindle 右上角“三道杠”菜单图标,选择“设置”,再点击“三道杠”,选择“设备信息”,在弹出的“设备信息”窗口中就会显示【序列号】。
•或者通过包装盒查询kindle序列号。
2 根据序列号下载固件降级•注:不要下载错降级固件,导致不能启动。
32GB版本KPW3不支持降级越狱3 降级系统•本越狱方法仅适用于KO、KV、KPW2、KPW3、499 入门版Kindle;不支持KPW3漫画版;•确认 Kindle 电量处于充足;用 USB 数据线把 Kindle 连接到电脑,直到出现 Kindle 磁盘。
•把下载好的固件降级文件(如update_PW2_5.4.3.2_initial.bin)拷贝到 Kindle 的根目录(和 documents 文件夹同级);•弹出 Kindle 磁盘回到 Kindle 界面,依次点击“菜单 -> 设置 -> 菜单 -> 更新您的Kindle”。
•然后耐心等待 Kindle 降级,直到降级成功后再次进入 Kindle 再进行下面操作。
•提示:•提示1:请注意,降级过程耗时较长!不要还没多长时间就认为卡大树!请稍安勿躁耐心等待!•提示2:如果超过两三个小时仍卡在大树界面,请参考“解决KPW3 卡大树、循环重启的问题”。
•提示3:如果确认序列号前缀没问题却降级失败,请重置一下Kindle 系统再重试。
Kindle无法开机提示waiting for device
Kindle无法开机提示waiting for device问题补充:我的Kindle Fire现在开不了机了,长按10s关机后,然后再开启,一直是:< waiting for device >,试了很多次都这样。
adb shell能连上,idme bootmode 4002 转换运行模式,出现Operation not permitted,权限不够。
尝试重新root,还是不成功。
下载了Kindle Fire Utility 工具root,转换fastboot模式,都无效,几近绝望。
问题产生时间:2012-03-08问题最新答案这种情况是的Kindle就是俗称的变砖了,不过是可以修复的,修复之前,要注意Kindle fire 的两种工作模式:Normal boot和fastbooot,这两种模式下kindle fire需要装不同的驱动,用设备管理器查看,两种模式下kindle fire设备名称不同:normal boot -> android composite adb interfacefastboot -> android adb interface切记要充满电再修砖,不然电脑可能不能识别下面是Kindle Fire修砖的方法和步骤:第一步、搭建ADB环境,可以参考:Kindle Fire ADB环境搭建第二步、切换到fastboot模式,下载:fbmode.zip (大小261KB),将这个解压包里的文件解压到上面第一步中adb工具文件夹,并执行如下命令:adb push fbmode /data/local/tmpadb shell chmod 755 /data/local/tmp/fbmodeadb shell /data/local/tmp/fbmodeadb reboot第三步、安装fastboot模式的驱动1. 下载:Kindle_Fire_Utility_v0.9.3.part1.rar (大小5MB)Kindle_Fire_Utility_v0.9.3.part2.rar (大小5MB)Kindle_Fire_Utility_v0.9.3.part3.rar (大小2MB)2. 解压文件,进入'drivers'文件夹,用记事本打开adb_usb.ini 在"0x1949"一行下添加"0x18D1" (去掉引号)3. 打开设备管理器找到kindle,选择刚才用的‘drivers’文件夹更新驱动,现在就已经是fastboot模式的驱动了第四步:进入TWRP修复权限1、安装TWRP这个备份和修复工具,刷机和修砖都很有用,可以参考:Kindle Fire安装TWRP2、在TWRP模式中运行如下命令:fastboot -i 0x1949 oem idme bootmode 5001fastboot -i 0x1949 reboot3、输完命令后,kindle fire重启后,进入黄色三角形画面,然后绿灯变成橙色灯,现在你看到的就是亲切的TWRP画面了。
NiPad版Kindle fire中文ROM刷机说明

特殊情况:请注意,一般情况下,
擦除设备的进度条不会超过 5 条;烧
写系统的进度不会超过 4 条;如果以
上二者有异常,并且刷机时间超过 12
分钟,设备出现假死状态。
解决办法:
1、 此时请不要关闭刷机工具及断开
数据线,只需长按 kindle 设备电
源键,等其断电关机后,再重按
电源键让其供电开机,刷机过程
Kindle Fire 中文 ROM(1 拖 3)刷机说明
特别说明: 1、 本 ROM 系统仅供学习和交流使用,使用本 ROM 系统完全出于您的自愿,作者不对使用
过程中造成的各种伤害和损失承担任何责任! 2、 NiPad 刷机工具,支持 nipad 所开发的中文 4.0、中文 2.3 以及 kindle 原系统 3 个 ROM 版
本的刷机(即 1 拖 3) 3、 亚马逊对 kindle 系统版本的升级可能会造成本工具无法使用或刷机不成功 注意事项: 1、 刷机电脑必须是 WIN7 操作系统 2、 电池电量需 50%以上才能进行刷机 3、 刷机需要在开机状态下进行 4、 刷机过程中禁止终端 USB 连接 5、 刷机需要约 8 分钟时间,请耐心等待,中途禁止任何操作 烧机步骤: 1、 将需要刷机的 ROM 解压后放到磁盘的根目录,并且不可以文件夹里面再套一个文件夹 2、 连接 KindleFire 设备,根据 ROM 包里面的《Kindle Fire USB 驱动程序安装指导.pdf》安装
驱动 3、 双击 PadTool.exe 程序打开烧机工具,点击左上角的“文件”菜单选项,选择选择 ROM
所在的路径
4、 驱动如果成功安装,操作界面会显示“正在检测设备,设备已连接”,如下图所示。此 时可以点击 “执行”按钮,进行烧机。
kindle fire升级Android 4.0 教程
kindle fire 4.0 刷机包Rom终于出现了,下载地址在文末。
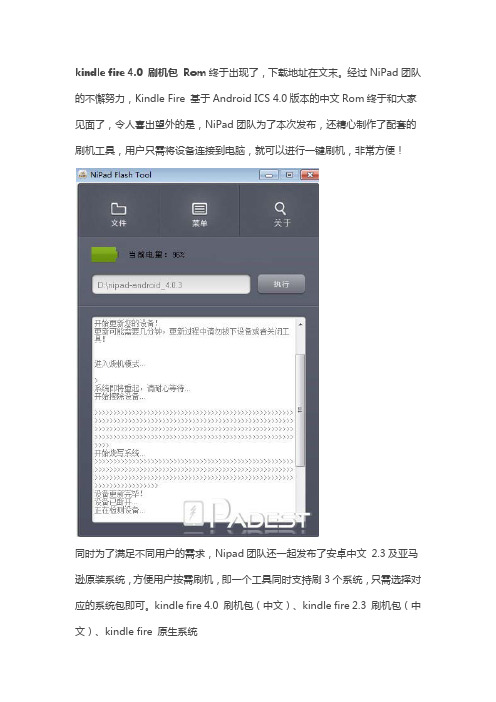
经过NiPad团队的不懈努力,Kindle Fire 基于Android ICS 4.0版本的中文Rom终于和大家见面了,令人喜出望外的是,NiPad团队为了本次发布,还精心制作了配套的刷机工具,用户只需将设备连接到电脑,就可以进行一键刷机,非常方便!同时为了满足不同用户的需求,Nipad团队还一起发布了安卓中文2.3及亚马逊原装系统,方便用户按需刷机,即一个工具同时支持刷3个系统,只需选择对应的系统包即可。
kindle fire 4.0 刷机包(中文)、kindle fire 2.3 刷机包(中文)、kindle fire 原生系统三个系统版本除了系统本身不同外,应用细节上还有如下区别系统版本支持亚马逊服务安卓中文4.0未集成(nipad-android-4.0.3)安卓中文2.3集成(nipad-android-2.3)亚马逊原装系统自带(nipad-kindle-fire)所以,如果你既想使用中文系统,又想使用亚马逊书店,请选择中文2.3版本下面我们来介绍下KindleFire 中文4.0 ROM的新特性:1. Android 4.0 全新的UI!2. 全新的通知栏。
3. 设置菜单栏4. 系统集成我搜平板市场,海豚浏览器,360平板卫士、酷我音乐、快手看片、开卷有益等优质APP应用,以满足用户对app下载、系统安全、音乐、视频、读书等的使用需求。
同时了解到Nipad团队后续可能会开放kindle的中文4.0系统代码,供爱好者及玩家研究使用,并且鼓励用户进行二次开发,好的改进及新增将可以通过“系统更新”在线更新到kindle设备中。
感谢Nipad团队的付出,为广大kindle爱好者提供了如此令人振奋的ROM及工具,希望你们能再接再厉,除了亚马逊kindle fire外,还能扩大其它产品线,同时尽量做到开源。
刷机包及下载工具下载地址: /thread-22871-1-1.html。
Kindle工具大集合啦:17种Kindle用户必备的软件工具要点
17种Kindle用户必备的软件工具2011-09-05 00:22:0148476浏览|10评论Kindle用户要在茫茫资源海中找到真正实用的工具并非易事,这篇文章就为你收集了17个Kindle必备软件,从电子书格式转换到网页投递,只有你想不到,没有它做不到。
这些软件中有许多不是专门为Kindle开发的,如果你使用的是其他电子阅读设备,一样会发现它们非常有用,比如PDF页面裁剪,电子书格式转换,等等。
软件分类包括:阅读工具,通用格式转换工具,PDF优化工具,Kindle文件管理工具和网页投递工具。
阅读工具:1. Kindle云阅读: 走到哪读到哪2. Kindle Reader for PC and Mac: 在电脑上看电子书3. Kindle Previewer: 预览转换后的电子书在Kindle上的版式通用格式转换工具:4. 亚马逊Kindle邮件转换服务: 免费的在线转换服务5. Calibre: 电子书转换和管理6. Hamster Free eBook Converter: 轻便但强大的电子书转换工具7. Auto Kindle eBook Converter: 将PDF, Lit, and HTML 格式文件转为MOBI 格式PDF优化工具:8. Briss: 可视化PDF页面调整工具9. K2PDFopt: 将版式复杂的PDF文件变的易于在Kindle上阅读Kindle文件管理工具:10. Koll3ction: 使用文件夹结构来管理你的Kindle文件网页投递工具:11. SENDtoREADER: 书签工具,发送任意网页和Google Reader中的内容到你的Kindle12. Kindle It: 浏览器扩展,发送网页到Kindle13. KindleFeeder: 通过whispernet(亚马逊3G网络服务,收费)投递最多12条RSS订阅到Kindle14. Greader2Kindle: 在Kindle上看Google Reader订阅内容15. Instapaper:自动投递Instapaper中未阅读的文章到Kindle16. ReadItLater: 自动投递ReadItLater中未阅读的文章到Kindle17. Readability:自动投递Readability的阅读清单到Kindle其他工具:一看就会用,不用写简介了1. Kindle云阅读: 走到哪读到哪这个web应用程序与你的亚马逊Kindle账户相关联,你可以在任意电脑或阅读设备上查看你的电子书选集。
Kindle fire HDX7 刷机教程
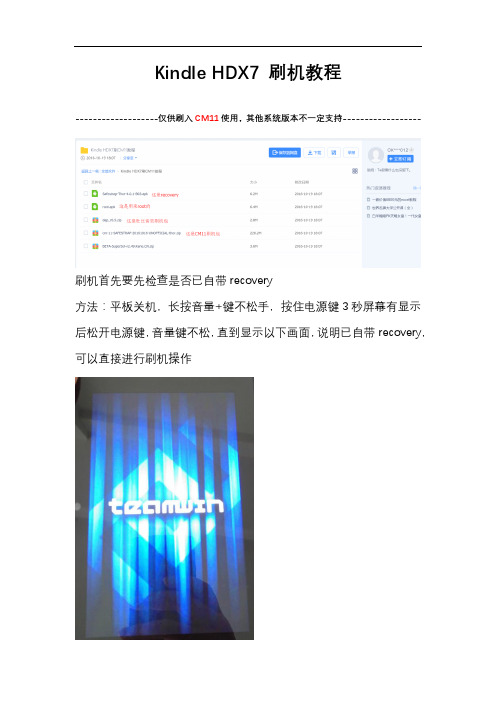
Kindle HDX7 刷机教程-------------------仅供刷入CM11使用,其他系统版本不一定支持------------------刷机首先要先检查是否已自带recovery方法:平板关机,长按音量+键不松手,按住电源键3秒屏幕有显示后松开电源键,音量键不松,直到显示以下画面,说明已自带recovery,可以直接进行刷机操作如果没有该蓝色界面,并出现以下界面时,就必须进行安装recovery 操作之后才能刷入CM11请跳过以下步骤,直接按住电脑键盘Ctrl键点这里跳转到第二教程====================================================================================以下是已自带recovery的HDX7刷入CM11的详细步骤,没有自带recovery的请不要轻易尝试,下图是recovery菜单刷入CM11前需wipe,点按以下按钮进入如下菜单显示拖动下图滑块到最右显示如下点按以下按钮两次,回到主界面然后点按以下按钮进入如下菜单此时用数据线连接电脑和HDX7平板点按两次以下按钮电脑会识别HDX7内置存储此时拷贝CM11刷机包cm-11-SAFESTRAP-20161016-UNOFFICIAL-thor.zip到HDX7内置存储根目录即可现在可以拔掉数据线,回到HDX7端操作,屏幕黑的时候按电源键就能再点亮,滑动最底部滑块就能解锁继续点按一次右下角小箭头回到主界面,再点按以下按钮进入如下界面,如图,蓝色长条可以上下滚动,红圈里是刚拷贝的CM11刷机包,点击它会进入如下界面滑动底部滑块进行刷入操作即可,稍等大概40秒,显示如下图点按以下按钮重启平板,成功刷入CM11以下是开机界面,等待30秒左右进入系统,至此刷机结束========================================================以下是没有可用recovery的刷机方法1.正常开机进系统后,用USB线连接HDX7和电脑,将网盘内的Safestrap-Thor-4.0.1-B03.apkRoot.apkcm-11-SAFESTRAP-20161016-UNOFFICIAL-thor.zip三个文件拷贝到内置存储的根目录2.拔掉数据线,平板打开文件管理器软件,图标如下3.依次安装Safestrap-Thor-4.0.1-B03.apk 和Root.apk点击安装可能会有如下提示点按以下按钮进入设置选项如下图所示,给箭头所示选项打钩,同时取消下一个选项的打钩!即可返回文件管理器继续安装两个apk安装完后回到主界面,打开KingRoot软件如下图,点击蓝色按钮跳转到如下设置界面此时设置连接上WIFI,确定已经联网后点最下方虚拟按键左边的返回键,回到KingRoot软件,点击蓝色按钮,注意文字有变化。
kindle fire 如何第三方方式安装输入法
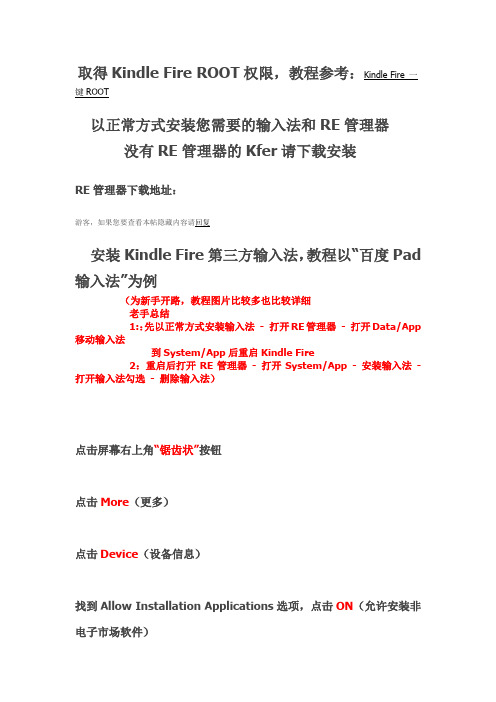
以正常方式安装您需要的输入法和RE管理器没有RE管理器的Kfer请下载安装RE管理器下载地址:安装Kindle Fire第三方输入法,教程以“百度Pad 输入法”为例(为新手开路,教程图片比较多也比较详细老手总结1::先以正常方式安装输入法- 打开RE管理器- 打开Data/App 移动输入法到System/App后重启Kindle Fire2:重启后打开RE管理器- 打开System/App - 安装输入法- 打开输入法勾选- 删除输入法)点击屏幕右上角“锯齿状”按钮点击More(更多)点击Device(设备信息)找到Allow Installation Applications选项,点击ON(允许安装非电子市场软件)回到主界面,点击RE管理器点击Allow,授权RE管理器点击data文件夹点击app文件夹按住“百度Pad输入法”选择移动,一定要选择移动哦!!点击返回键两下找到System文件夹,点击TA点击App文件夹点击读写,RE管理器装载为“读写”状态点击黏贴重启您的Kindle Fire继续以下操作重启后打开RE管理器,点击System - 点击App - 点击读写,RE管理器装载为“读写”状态点击“百度Pad输入法”点击安装点击OK点击Install点击Open点击打开输入法切换菜单,选择“百度Pad输入法”选择完成后,向下滑动- 点击退出向导重新点击System - 点击App - 点击读写,RE管理器装载为“读写”状态按住“百度Pad输入法”点击删除,一定要选择删除哦!!点击右下角房子键点击搜索框点击设置设置你喜欢输入方式,教程结束!!。
- 1、下载文档前请自行甄别文档内容的完整性,平台不提供额外的编辑、内容补充、找答案等附加服务。
- 2、"仅部分预览"的文档,不可在线预览部分如存在完整性等问题,可反馈申请退款(可完整预览的文档不适用该条件!)。
- 3、如文档侵犯您的权益,请联系客服反馈,我们会尽快为您处理(人工客服工作时间:9:00-18:30)。
平板地带出品:HellFire.V1.0-Kindle.Fire-Android4.0.4刷机包(2012.04.07全球首发)
【简单说明】北京时间3月30日,Google推出官方Android 4.0.4更新。
4月7日,HellFire就推出了Kindle Fire版的刷机Rom。
对于Kindle Frie Android 4.0.4刷机包,此刷机包算是全球首发了!
【刷机说明】
①Android 4.0.4电池续航能力得到加强、屏幕旋转的效果更快;
②可以正常关机;
③可以搬家程序到SD卡;
④暂不支持高清视频、在线直播;
⑤据国外板友反馈,存在偶尔死机的情况,只需用安兔兔CPU大师,将CPU 最小值调到600MHz即可。
不过,笔者目前没碰到死机状况。
【Rom下载】
/thread-34211-1-1.html
【刷机步骤】
!!!刷机前,请用豌豆荚备份系统应用软件!
!!!刷机前,请用TWRP备份系统!
②将下载的刷机包放入SD卡;
③进入TWRP,进入Wipe,点击Factory Reset,然后Wipe System,Cache,Dalvik Cache返回。
④进入Install,选择刷机包
Padest.Android.4.0.4.HFKS_V1.0(2012.04.07).zip,然后Flash。
几分钟后,提示成功。
点击Wipe Cache/Dalvik,返回。
⑤重启Reboot System,片刻后,即可进入HellFire Android4.0.4系统。
(备注:据国外板友反馈存在一次刷机不成功的可能,只需重复刷机即可解决。
)
附上适用截图:。