CompressorLimiterCLA-2A压缩器
Daking Compressor-Limiter V.1 用户手册说明书

Comp II Compressor-Limiter User Manual V.1/Safety Considerations• Read, follow and keep these instructions.• Heed all warnings. Install in accordance with the manufacturer’s instructions. • Protect device from liquids and spills.• Clean only with a soft, dry cloth• Do not block any ventilation openings.• Do not install near any heat sources such as radiators, heat registers, stoves or other devices (including amplifiers) that produce heat.• Do not defeat the safety purpose of the grounding-type plug. A grounding-type plug has two blades and a third grounding prong. The third prong is provided for your safety. If the provided plug does not fit into your outlet, consult an electrician for replacement of the obsolete outlet.• Protect the power cord and all connecting cables from being walked on or pinched, particularly at plugs, receptacles, and the point where they exit from the device.• Only use attachments or accessories specified by the manufacturer.• Unplug this device when unused for long periods of time.• Refer all servicing to qualified service personnel. There are no user-serviceable parts inside. Servicing is required when the apparatus has been damaged, such as when a power-supply cord or plug is damaged, objects have fallen into the apparatus, the apparatus has been exposed to moisture, does not operate normally, or has been dropped.• Do not overload wall outlets and extension cords as this can result in a risk of fire or electric shock.1.0 About Daking AudioCongratulations! You’ve purchased a Comp II, a very high-end piece of gear! The Comp II uses discrete transistor Class A circuits, VCAs, THAT Corporation differential amps and printed circuit board-mounted switches. Signal capacitors are precision polypropylene or ultra low-leakage electrolytic types. Our boards are assembled on a mil-spec assembly line. The chassis are stainless steel for maximum RF and hum rejection and a long-lasting finish. Every unit is hand-finished, tested, burned in, and tested again in a second facility.Also, we just couldn’t stand to use plastic knobs, so we designed our own anodized, engraved aluminum knobs that give a much more precise and quality feel. We designed our gear to be gear you’ll own for life, not some passing fancy you’ll leave in the dust once you figure out what the good stuff sounds like. This IS the good stuff.-Geoff Daking1.1 In The Box•Daking Audio Comp II 19” rack-mount single-space Compressor-Limiter •Outboard power supply with attached connecting cable•Power cable•.050” hex wrench for knob set screws1.2 What Is a Compressor-Limiter?A compressor is a device that helps control the dynamic range of a track you’re recording or mixing. Example: if you’re recording a vocal and the singer is going from very soft to very loud, a compressor can make the loud parts not quite as loud. Then you can turn up the overall level of the vocal to hear the soft parts better. As a result your vocal will have a more consistent level in your mix, while still retaining its expressiveness. Compressors are also frequently used on guitars, bass, piano, and other instruments for the same reason - to record a consistent level that will hold its place better in your mix. Used sparingly a compressor is transparent - the listener can’t hear it working. Used poorly it can suck all the life out of whatever you’re recording, and that can’t be undone by any amount of later processing. Some people will use compression aggressively as an effect, and that’s perfectly valid if it’s what you want. Always listen and keep an eye on the gain reduction meter. Try aiming for -3dB to -5dB of compression as a starting place when recording a vocal. Remember: you can add more compression later, but you can’t take it away.When mixing many engineers use a stereo compressor to run the entire mix through. It can make your mix more aggressive and more alive sounding, more integrated. “Glue” is a term many engineers use for mix compression. Again, too much compression can ruin your mix, so use your ears.A limiter is a compressor with a higher ratio (greater than 10:1) that literally puts a limit on how loud you can make something. It comes from the days of radio when there was a legal limit to how loud a broadcast could be, but radio stations still wanted to seem as loud or louder than their competitors. A limiter raises the average level of a track or mix while not letting the peaks go beyond a fixed level - into the red, for instance. Like compression, limiting can make your mix more exciting or ruin it completely. Listen!There are four basic types of compressors: Tube, Optical, FET and VCA. You may be familiar with our popular FET Compressor, the FET III. VCA compressors don’t have a great reputation among professional engineers for good reason - they are mostly feed-forward designs utilizing cheap RMS detector chips and low-quality monolithic current-to-voltage convertors. The Comp II is a very different, more complex VCA design that uses feedback, a peak detector and an all-discrete Class A follower. We use the VCA like a FET to get the sound we all love without the thermal instability and other problems associated with FETS.1.3 Front PanelCompression KnobThe Compression knob controls how much you compress the signal, from Less to More. What is happening is that as you turn the control towards More you are lowering the threshold at which compression begins. The lower the threshold the more you compress a given signal. If the meter in the Comp position shows too much compression with the Compression knob fully down then the level coming into the compressor is too high and should be turned down at the stage before. For instance, at the output of the mic preamp before the Comp II when recording vocals.Output KnobThe Output knob controls the amount of gain added to the signal after compression. It goes from ~, no output, to 11. Since a compressor lowers the peaks, the Output control raises the average level of the signal to compensate. This is called “gain make-up”.AttackAttack controls the speed at which the Comp II responds to peaks in the signal. Slow allows transients to go through uncompressed but reduces the gain of what follows. Fast grabs the transients as well as the sustain of the signal. Slow can be more subtle, fast more aggressive.ReleaseRelease is the speed at which the compressor, having compressed a peak, gets ready to catch the next peak. Fast is fast release, obviously, and is generally more aggressive. Auto adjusts the release time automatically depending on the gain and the timing of the peaks in the signal you feed in. Which one you use is a matter of taste - use whichever sounds better to you when applied to the particular signal you’re compressing.Ratio determines how aggressively the compressor responds to the signal you put in. Comp is a lower ratio and therefore compresses less. The signal will maintain a greater dynamic range while still having peaks controlled. Limit is a higher ratio that compresses more. Your input signal will have a smaller dynamic range but higher average level. See Appendix I for a graph showing how various compression ratios effect the signal output.BypassBypass turns compression off. Use it to compare the uncompressed and compressed signal while setting up the compressor to record a track.Meter and Meter buttonThe meter does double duty depending on the position of the Meter switch. In the Comp position the meter shows you how much the peaks are being reduced by the compressor. The needle sits at zero and moves to the left to show gain reduction in negative numbers: -3 means the signal is being reduced by 3dB, -5 means 5dB of gain reduction and so on. This will tell you if you’re compressing too much or not enough. No matter how well you think you can hear a compressor working, you should always monitor the gain reduction meter to be sure.With the switch in the Output position the meter is a normal VU meter that shows you the output level of the compressor. If the level is too high or too low you can adjust the level with the Output knob. With practice you will learn how to set levels for all of the gear in your input chain. This is called “gain-staging” and is key to getting quiet, distortion-free tracks.Note that the Compression and Output controls are interactive - if you add more compression the output level will go down, if you reduce the amount of compression the output level will go up. It is usual for engineers to switch the meter control back and forth between Comp and Output several times while getting sounds to make sure the meter shows you have the amount of compression you want as well as the output level you want. Also it’s wise to keep in mind that singers tend to get excited and will sing harder when you hit record than when you were getting sounds. Leave some room for that, and pay close attention to make sure their levels aren’t out of control.In the Mono position the Comp II is two completely independent compressors that can be used at the same time on different signals. In Link mode the compressor listens to both sides of a stereo signal. Whichever channel has the higher input gain from moment to moment will determine how much you compress the stereo signal. In Link mode you must still set the front panel controls for both channels - in most cases they would be set the same. This is how you would use the Comp II on a stereo mix, for instance.1.4 Back Pa nelAudio Inputs and OutputsThe back panel contains balanced XLR inputs and outputs for each channel, as well as a balanced 1/4” TRS output connector for each channel which is wired in parallel to the XLR output. If you want an unbalanced output you can use a 1/4” TS cable (a guitar cable) in the TRS jack. If you use both an XLR cable and a 1/4” TS cable at the same time keep in mind you will be making the XLR output unbalanced because they are in parallel. Always use high-quality connectors and cables to wire your Comp II into your system. Wiring is not the place to skimp.Power InletThere is a power inlet on the back panel for connection to the power supply included with the unit. Please run power cables away from foot traffic, in a place where they’re not likely to be kicked out or tripped over.1.5 Specifications• Differential input and output amps• Class "A" amplifier for Gain Make-Up• All-metal construction with stainless steel chassis for noise immunity• Custom aluminum knobs• Power supply included• Frequency response: 20Hz - 65kHz• Inputs: 2 x XLR, Outputs: 2 x XLR, 2 X TRS• THD at +4dBu input and no compression at 1kHz: Typical 0.02%, Max 0.035% (22-22kHz, Un-Wtd)• THD at +4dBu input and 2dB of compression at 1kHz: Typical 0.02%, Max0.035% (22-22kHz, Un-Wtd)• Noise: less than -80dBu, 22-22kHz• 1U 19” rack-mount case: 17” (43.18cm) width, 8.375” (21.27cm) depth, 1.625 (4.13cm) height.• Unit weight: 5.35 lbs. (2.45 kg)• Box weight: 8.70 lbs. (3.95 kg)• Box dimensions: L: 29” (73.66cm) (736.6mm)W: 14” (35.56cm) (355.6mm)H: 6” (15.24cm) (152.4mm)Specifications are subject to change without notice.Appendix IGraph showing Comp II ratio response in Comp mode, Limit mode, and Bypass:。
Empire Compressor MKII 压缩器说明书

USER MANUALIntroductionWhen we released our original Compressor back in 2011, it quickly became a favourite among guitar and bass players alike who were searching for something more than the typical oversimplified controls found on most compressor pedals. Now, based on our users’ valuable feedback, we’ve taken everything great about our original Compressor and made it even better.On top of the full range of features and controls normally only seen in high end studio equipment, such as input and gain reduction metering, independent attack and release controls, a mix knob for parallel compression, and an external sidechain insert, we’venow added a ‘tilt’ tone eq control, and a selectable sidechain high pass filter built into the Compressor’s detection circuit. Oh, and the whole package is now half the size. Who doesn’t love a small package?!We hope the Compressor MKII becomes a favourite of yours as well, and sincerely thank you for choosing Empress Effects.- Steve BraggQuickstartAdded Control: Here’sa good starting pointfor adding consistencyand sustain to yourplaying whileretaining dynamics.Adjust the input levelso the gain reductionmeter shows 8dB ofgain reduction whenplaying your loudest.Chicken Pickin’: Thisone provides a nicecompressed countrysound. Adjust theinput for 10dB ofgain reduction whenplaying your loudest.TransparentCompression: Thiswill give you nicedynamic controlto level out yourplaying. The 2:1 ratiois very transparent.It won’t really soundcompressed as muchas just sweeteroverall.Limiter: This settingwill eat up your pickattacks and createa smoother sound.You’ll also get lots ofsustain out of this.LevelThe Basics of CompressionCompression can add consistency and sustain to your playing or it can be used to add notedefinition and other effects. It essentiallynarrows the difference between high and low audio levels by reducing the gain of any signalover the threshold.The ratio determines how much gainreduction will be applied to the signal once it crosses above the threshold. At a 4:1 ratio, for every 4dB of input signal above the threshold, there will be 1dB of output signal. A 10:1 ratio would output 1dB for every 10dB of inputsignal, etc.input: sets the level entering the compressor circuit. Higher levels result in more compression.attack: controls how quickly the compressor will reduce the gain when an incoming signal exceeds the threshold. Attack time increases as you turn the knob clockwise. Range: 50μs - 50msControls atrelease: controls how quickly theor as a boost for soloing.t a GlanceAttack controls how quickly the gain reduction will begin after a signal has crossed over the threshold. Release controls how long it takes for the Compressor’s gain to return to its initial level after the signal drops below the threshold.SidechainThe sidechain is the Compressor’s level detection circuitry. Based on the signal sent to it, it will determine how much gain reduction is applied. Typically that signal is a copy of the input signal, taken from some point in the audio path. In our case it’s taken after the gain reduction has occurred, which is known as ‘feedback’ style compression. It can be very useful to alter the sidechain signal in order to tailor how the compressor reacts.Sidechain High Pass FilterThe sidechain hpf (high pass filter) switch can be engaged to avoid triggering the compression with high energy notes inthe lowest octave, which helps avoid over-compressing and keeps the low frequencies sounding full while still controlling errant high notes that pop out.Sidechain connector jackThe sidechain connector jack on the back of the pedal allows you to alter the sidechain signal by inserting an external device, such as an EQ. You can also have an external audio source trigger the compression by sending audio in through the ring of the sidechain jack.The sidechain connector accepts a 1/8” TRS plug: Tip = send, Ring = return, Sleeve = ground.Parallel CompressionThe mix knob on the Compressor MKII allows for parallel compression. Parallel compression is achieved by blending a compressed audioSetting the bypass state on startup To change whether the Compressor starts up in the engaged or bypassed state, hold down the stompswitch while powering on the Compressor. The first red gain reduction led will flash to let you know you are in the advanced configuration mode. Press the stompswitch to toggle between states:gain reduction led 1 = bypassed at startup gain reduction led 2 = engaged at startup When finished, press and hold the stompswitch for 2 seconds to confirm and save your selection, and exit advanced configuration.signal with the uncompressed version of itself. It opens up a ton of possibilities. A great use of parallel compression is to really squash the compressed signal (so it sounds way too over compressed), then use the mix knob to blend in some of the uncompressed signal. The result is very natural sounding, but feels a lot more exciting, with more sustain and retaining a good attack. Try experimenting with it!SpecificationsInput Impedance:1MΩOutput Impedance: 2.2kΩFrequency Response(-3dB):20Hz - 20kHz Distortion:<0.1% Noise:-101dB Headroom:+15dBu Input Voltage:9VDC Required Current:100mAPower Input Connector:2.1mm Barrel ConnectorHeight (enclosureonly): 1.5”Height (includingcontrols): 2.5”Length: 4.8”Width: 2.6”Weight:1lbsPowering the Compressor MKIIGo to /power for a full list of compatible power supplies. Please note: The Empress Compressor MKII requires at least 100mA of current to function properly. Any power supply rated at 9V DC, supplying negative tip polarity and at least 100mA of current should work.Legal StuffFCC ComplianceNote: This equipment has been tested and found to comply with the limits for a Class B digital device, pursuant to part 15 of the FCC Rules. These limits are designed to provide reasonable protection against harmful interference in a residential installation. This equipment generates, uses and can radiate radio frequency energy and, if not installed and used in accordance with the instructions, may cause harmful interference to radio communications. However, there is no guarantee that interference will not occur in a particular installation. If this equipment does cause harmful interference to radio or television reception, which can be determined by turning the equipment off and on, the user is encouraged to try to correct the interference by one or more of the following measures:- Reorient or relocate the receiving antenna.- Increase the separation between the equipment and receiver.- Connect the equipment into an outlet on a circuit different from that to which the receiver is connected.- Consult the dealer or an experienced radio/TV technician for help. Modifications not expressly approved by the manufacturer could void the user’s authority to operate the equipment under FCC rules。
亚特兰蒂斯科普科滚压缩器产品说明书

SCROLL COMPRESSORSSF 1-6 (1.5-5.5 kW/2-7.5 hp) / SF+ 2-22 (2.2-22 kW/3-30 hp)PURE OIL-FREE AIRAs there is no metal-to-metal contact between the compression scrolls, there is no need for oil lubrication in the compression chamber. T herefore, the scroll compression principle guarantees high-quality, oil-free air. As a result, the SF compressor isoil-free in every way.ENERGY EFFICIENCYThe SF scroll compressors, standard equipped with IE3 Premium efficiency motors, are suited for sensitive applications which require flexibility and energy efficiency. Unloaded power consumption is eliminated thanks to the simple start/stop control. Advanced scroll technology guarantees an optimalfree air delivery and low duty cycle applications.EXTREMEL Y LOW NOISE LEVELThe slow speed of the scroll compression elements ensures that the SF scroll compressors are extremely quiet. Sound levels are as low as 53 dB(a), making the SF the perfect choice for your sensitive working environment.SIMPLICITY AND RELIABILITYThe SF scroll compressors stand for simplicity and reliability. The compressor has a minimal number of moving parts, ensuring a long operating life with limited service interventions. With their integrated design, Atlas Copco’s SF scroll compressors have a minimal footprint and offereasy serviceability.PROVEN PEACE OF MINDFor over sixty years, Atlas Copco has been leading the industry in oil-free compressed air technology, drawing on vast experience and continuous technological innovations.You can rest assured at all times: severe certification and testing procedures are conducted to ensure air is suppliedto the highest standards of quality control.110438296Integrated receiverPlug and play solution, lower installation costs with 30l, 270l and 500ltank-mounted options.7Elektronikon® (SF+)Monitoring features include warning indications, maintenance schedulingand online visualization of running conditions.8Innovative designThe new compact vertical setup enables easy access for maintenance,improves cooling allowing lower working temperatures and providesvibration damping.9SF-Skid/T win• Suitable for installation at the point of useor for integration into an existing airnetwork: designed with simplicity in mind.Cooler & piping• An oversized cooler improves theperformance of the unit.• The use of aluminum pipes and thevertically oversized check valve improvereliability over lifetime and assure thehigh quality of your compressed air.10Air inlet filterHigh efficiency paper cartridge air inlet filter, eliminating dust andparticles down to 1 µm.1Automatic regulationAutomatic stop when the required working pressure is reached,avoiding unnecessary energy costs.2High efficiency scroll elementAir-cooled scroll compressor element offeringproven durability and reliability in operation,in addition to solid efficiency.IP55 Class F/IE3 motorTotally enclosed air-cooled IP55 Class F motor,complying with IE3 & Nema Premiumefficiency standards.Refrigerant dryerCompact & optimized integrated refrigerant dryer,ensuring the delivery of dry air, preventing rust andcorrosion in your compressed air network.5Silent canopyA sound insulated canopy makes extremely low noise levels as low as53 dB(A) possible, allowing to install the unit closer to the point of use.6452381® Mk5 High efficiency scroll elementAir-cooled scroll compressor elements with 8 and 10 bar variants, offering proven durability and reliability in operation, in addition to superior efficiency.3Optimized cooler & pipingThe air cooler is finetuned for improved performance, while the use of aluminum & stainless steel pipes improve reliability over lifetime and assure the high quality of compressed air.7motors, complying with IE3 Premium efficiency standards.Smart designOutstanding user-friendly design, with safety in operation & ease of serviceability in mind.8Refrigerant dryerCompact & optimized integrated refrigerant dryer ensuring the delivery of dry air, preventing rust and corrosion in the installed compressed air network.4SF Duplex• Duplex set-up with two cubicles, one/two main modules and one/two modules as back-up.• Elektronikon ® regulates each set of compressor modules via an integrated central control system.• Enclosed in sound-insulated bodywork.Silent canopyThanks to the low-noise scroll element, optimized super-silent fan and sound-insulated canopy, best in class noise levels possible are achieved.512345678ADVANCED SCROLL TECHNOLOGYAir compression is achieved by the interaction of a fixed and orbiting scroll. Air at inlet pressure enters the compression chamber at the exterior side of the scroll element. Once air is drawn in, the orbiting scroll seals off the inlet port. As the scroll continues to orbit, the air is progressively compressed into an increasingly smaller ‘pocket’. A continuous flow of compressed air leaves the scroll element through a discharge port in the center of the fixed scroll. This process is continuously repeated, resulting in the delivery of pulse-free compressed air.Variable flow technology (VFT)All SF + 8-22 multi-scroll compressors areequipped with the unique VFT control system. The VFT system, included in the Elektronikon ® controller, automatically starts and stops the scroll elements to exactly match the demands of your compressed air system. T heElektronikon ® control algorithm ensures that the system pressure is kept within a very narrow pressure band.WorkPlace Air System™ compressors: the sound of silenceA low noise level enables the compressor to be installed close to the compressed air application, minimizing the size of the air distribution system and reducing pressure loss and the potential for leakage. As the air treatment is completely integrated, the installation costs are substantially reduced, making multiple compressor installations practical and financially viable. T o ensure maximum energy efficiency, Atlas Copco offers both traditional on/off regulating systems where the air demand is constant.Cooling fan Suction chamber Suction opening Delivery opening Fixed scroll Orbiting scrollFail-safe temperature sensor for unit protection Compression chamber12345678Current ISO 8573-1 (2010) classes (the five main classes and the associated maximum concentration in total oil content).CLASS ZERO: THEINDUSTRY STANDARDOil-free air is used in all kinds of industries where air quality is paramount. These applications include food and beverage processing, pharmaceutical manufacturing, petrochemical processing, wastewater treatment, and many more. I n these critical environments, contamination by even the smallest quantities of oil can result in costly production downtime and product spoilage.First in oil-free air technologyOver the past 60 years Atlas Copco has pioneered the development of oil-free air technology, resulting in a range of air compressors that provide 100% pure, oil-free air. T hrough continuous research and development, Atlas Copco achieved a new milestone, setting the standard for air purity as the first manufacturer to be awarded ISO 8573-1 Class 0 certification.Eliminating any riskAs industry leader committed to meeting the needs of the most demanding customers, Atlas Copco requested the renowned T ÜV institute to type-test its range of oil-free compressors. Using the most rigorous testing methodologies available, all possible oil forms were measured across a range of temperatures andpressures. T he T ÜV found no traces of oil at all in the output air stream. T hus Atlas Copco is the first compressor manufacturer to receive Class 0 certification, according to ISO 8573-1 Class 0 Ed. 3 2010 specifications.® controller, while the SF +Elektronikon ® Graphic.Improved user-friendliness• 3.5-inch high-definition color display with clear pictograms and extra 4th LED indicator for service.• Graphical display of key parameters (day, week, month) and 32 language settings.• Internet-based compressor visualization using a simple Ethernet connection.• Graphical indication Serviceplan, remote control and connectivity functions.• Software upgrade available to control up to 6 compressors by installing the optional integrated compressor controller.4 modules61218183 modules2 modules1 moduleTECHNICAL SPECIFICATIONS* Free Air Delivery measured according ISO 1217 ed. 4 2009, Annex C.** Mean sound pressure level measured according to ISO 2151, with an uncertainty of 3 dB(A).Weights of the pack & floor-mounted units are shown in the chart.DIMENSIONSLWHL WHL WHL WH•: Optional- : Not availableCOMMITTED TO SUSTAINABLE PRODUCTIVITYWe stand by our responsibilities towards our customers, towards the environment and the people around us. We make performance stand the test of time. T his is what we call – Sustainable Productivity./sf2935 0844 48 © 2014, A t l a s C o p c o A i r p o w e r N V , B e l g i u m . A l l r i g h t s r e s。
卡尔·马丁(Carl Martin) guitar 压缩器 限制器 说明书
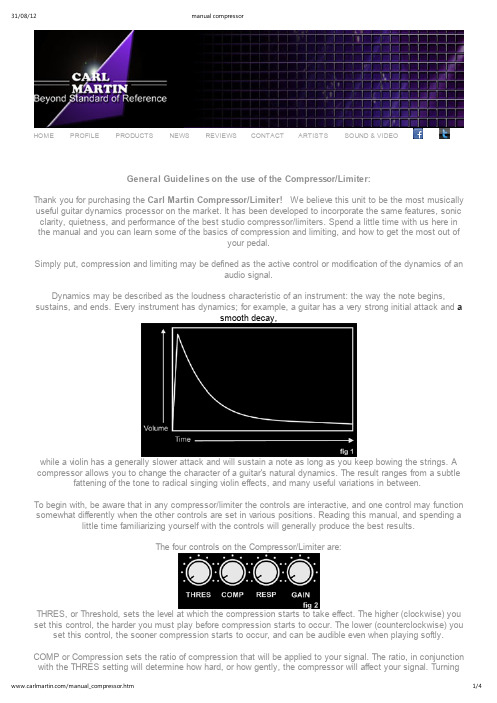
HOME PROFILE PRODUCTS NEWS REVIEWS CONTACT ARTISTS SOUND & VIDEOGeneral Guidelines on the use of the Compressor/Limiter:Thank you for purchasing the Carl Martin Compressor/Limiter! We believe this unit to be the most musically useful guitar dynamics processor on the market. It has been developed to incorporate the same features, sonic clarity, quietness, and performance of the best studio compressor/limiters. Spend a little time with us here in the manual and you can learn some of the basics of compression and limiting, and how to get the most out ofyour pedal.Simply put, compression and limiting may be defined as the active control or modification of the dynamics of anaudio signal.Dynamics may be described as the loudness characteristic of an instrument: the way the note begins, sustains, and ends. Every instrument has dynamics; for example, a guitar has a very strong initial attack and asmooth decay,while a violin has a generally slower attack and will sustain a note as long as you keep bowing the strings. A compressor allows you to change the character of a guitar's natural dynamics. The result ranges from a subtle fattening of the tone to radical singing violin effects, and many useful variations in between.To begin with, be aware that in any compressor/limiter the controls are interactive, and one control may function somewhat differently when the other controls are set in various positions. Reading this manual, and spending a little time familiarizing yourself with the controls will generally produce the best results.The four controls on the Compressor/Limiter are:THRES, or Threshold, sets the level at which the compression starts to take effect. The higher (clockwise) you set this control, the harder you must play before compression starts to occur. The lower (counterclockwise) you set this control, the sooner compression starts to occur, and can be audible even when playing softly. COMP or Compression sets the ratio of compression that will be applied to your signal. The ratio, in conjunction with the THRES setting will determine how hard, or how gently, the compressor will affect your signal. Turningthe COMP knob clockwise increases the ratio, giving you more compression, while turning it counterclockwise lowers the ratio, giving you a softer effect. There are no right or wrong settings for the ratio, or any other control on a compressor for that matter. It is entirely an artistic choice, based upon what you want to hear. RESP or Response determines the way the compressor responds to your playing. In full clockwise position the unit acts as a peak-limiter, providing a simple "brick wall" attenuation (reduction of the signal) when the signal reaches the point you have set on the THRES knob. The more you turn the RESP knob counter clockwise, the more the unit acts as a modern compressor with signal-dependant attack and release times. In simple terms, If you like a more effected sound, where you can clearly hear the compressor actively shaping your sound, you want more of a compressor response (RESP more counter-clockwise), if you want a limiting function you wantthe RESP knob more clockwise.Try setting the pedal like this:This is set for a very active, signal-dependant compressor function. As you play, turn the THRES knob counter-clockwise, and you will see how quickly the compression starts to occur, and how strongly it interacts with yourplaying.Now, try setting the pedal like this:This is more of a fixed-point limiting function. As you play, turn the THRES knob counter clockwise, (you will have to turn it further than with the RESP knob set as in figure 3) and you will hear the unit start to effect thesignal.Spend some time playing with the THRES and RESP knobs in various places, leaving the other knobs alone for now, and you will see the different kinds of responsiveness available to you. As you become familiar with the pedal, you will find just the settings you are looking for. Of course, the COMP settings will make a difference in all cases, but to keep things simple, it's good to start with the COMP set as in figures 3 & 4.GAIN is also called "make-up gain", and that is because the more you compress the levels, the softer the signal becomes and this control allows you to compensate for this. By the way, "Gain" is simply a more precise, scientific-term for "volume" or "level" so there is nothing mysterious about this control. Switch the pedal in and out with the footswitch and adjust this knob as needed. You can also use it to get a bit of boost for a solo. If you use single-coil pickups, you will notice that extreme compression settings will accentuate the hum and noise from these pickups. That is simply the nature of compression and single coil pickups, not a function of the pedal, and all compressors exhibit this trait. If you have humbuckers, or you stand where there isn't much hum pickup, you will quickly notice the extreme quietness of this pedal. It really does perform very much like ahigh-end studio unit.The "Busy Light" simply tells you how much compression is being applied to your signal. The brighter it gets,the more compression.Ok, to start out, let's try a good, basic "fattening" sort of compression. This is what engineers often do to your signal in the studio, so you will generally find this a familiar and musically useful sound. To begin with, usethese settings:Adjust the THRES control counterclockwise until you start to hear the compression effect and the Busy lightstarts lighting up. Adjust the gain as needed.Now, leaving the THRES control where you can hear the effect, start adjusting the COMP control:You will notice that the compression becomes harder and more abrupt, giving you more of a "squashed" sound.Now, leaving the COMP control about here, and the RESP control here:and the threshold set where you can hear the compression working, start adjusting the RESP control. Here iswhere the long, singing, sustain sounds may be found.By the time you have modified your dynamics to this extent, a plot of your signal would look something likethis:Remember, the more counter-clockwise the RESP setting is, the more active and compressor-like the dynamics control will be, so you may need to adjust the THRES a bit to get "out of the compressor" a little.With appropriate THRES settings, and the RESP set close to counter clockwise, some really nice funk andclean country "chicken-pickin" sounds may be found.With all of these sounds, remember to keep trying different THRES settings, as this will make a big difference inhow the effect works.As you can see, this pedal is capable of many useful sounds. Now that you have the basics, experiment andsee what other sounds you may find.Remember, its all about making great music. We hope that this Carl Martin pedal will assist you in yourmusical goals!SPECIFICATIONS:Power:Power consumption:S/N ratio:Input impedance:Output impedance:100 or 115 or 230 VAC 50-60Hz2,4 Watts105dB (clean out)1M Ohm200 OhmTHD distortion: Threshold range: Compression range: Responce range: Gain range: Dimension: Weight:0,05%60 dBfrom 1:1 to 1:00from 125 mS to 12,5 mS +-20 dB120(D) 95(W) 77(H)0,625Kg。
Drawmer DRAWMER S2 双通道真空管压缩器操作手册说明书

DRAWMERS2Dual ChannelVacuum Tube CompressorOPERATOR’S MANUALCONTENTSWarranty Safety Consideration Chapter 1 - IntroductionIntroduction Installation Audio ConnectionsPower Connection Chapter 2 - Control DescriptionControl Description Quick Setup Procedure Chapter 3 - General InformationIf a fault developsContacting DrawmerSpecification Block Diagram Session Recall Sheet . . . . . . . . . . . . . . . . . . . . . . . . . . . . . . . . . . . . . . . . . . . . . . . . . . . . . . . . . . . 2. . . . . . . . . . . . . . . . . . . . . . . . . . . . . . . . . . . . . . . . . . . . . . . . 2 . . . . . . . . . . . . . . . . . . . . . . . . . . . . . . . . . . . . . . . . . . . . . . . . . . . . . . . 3 . . . . . . . . . . . . . . . . . . . . . . . . . . . . . . . . . . . . . . . . . . . . . . . . . . . . . . . . 4. . . . . . . . . . . . . . . . . . . . . . . . . . . . . . . . . . . . . . . . . . . . . . . . . 5 . . . . . . . . . . . . . . . . . . . . . . . . . . . . . . . . . . . . . . . . . . . . . . . . . 5. . . . . . . . . . . . . . . . . . . . . . . . . . . . . . . . . . . . . . . . . . . . . . . . . 6. . . . . . . . . . . . . . . . . . . . . . . . . . . . . . . . . . . . . . . . . . . . . 9 . . . . . . . . . . . . . . . . . . . . . . . . . . . . . . . . . . . . . . . . . . . . . . . . . 10 . . . . . . . . . . . . . . . . . . . . . . . . . . . . . . . . . . . . . . . . . . . . . . . .10 . . . . . . . . . . . . . . . . . . . . . . . . . . . . . . . . . . . . . . . . . . . . . . . . . . . . .10 . . . . . . . . . . . . . . . . . . . . . . . . . . . . . . . . . . . . . . . . . . . . . . . . . . . 11. . . . . . . . . . . . . . . . . . . . . . . . . . . . . . . . . . . . . . . . . . . . . 132DRAWMER S2 O PERATOR’S M ANUALCHAPTER 1DRAWMERS2DUAL CHANNEL VACUUM TUBE COMPRESSOR ArrayINTRODUCTIONThe new S2 Signature Series Dual Channel Tube Compressor is the latest product to emerge from Ivor Drawmer’s high end designs and offers an ‘all tube - no technical compromise’ circuit using only the highest grade components. The S2 features a host of new creative processing possibilities never before found in an all analogue dynamics package.BIG- Retains bass frequencies and minimizes undesirable ‘pumping’ by rolling off the detection signal at 75, 125 or 250Hz (user switchable). A fully variable level control allows for the desired amount of Big processing and an in/out switch provides the option to remove from the signal path for A/B comparison.BRIGHT- A dynamic high frequency enhancer to keep compressed audio sounding fresh and bright with continuously variable frequency control (500Hz to 20kHz) and amount of dynamic enhancement.DRY- Mixes user defined amount of ‘uncompressed’ signal with the compressed signal to create ‘parallel compression effect’ without the need for external mixing devices.• 2 CHANNEL SOFT-KNEE TUBE COMPRESSOR• FULLY BALANCED INTERNAL SIGNAL PATH• CLASS A DESIGN• ISOLATION TRANSFORMERS IN AND OUT• ‘ALLTUBE’ CIRCUIT DESIGN• VARIABLE ATTACK AND RELEASE WITH OPTIONAL ‘PROGRAMMEDEPENDENT’ AUTO RELEASE OPERATION• DUAL MONO OR STEREO LINK OPERATION• SWITCHABLE ‘PEAK’ OR ‘VU’ METERING TO DISPLAY TRANSIENTS• SWITCHABLE +10dB OR +20dB METER RE-SCALE MODES• 8 SEGMENT GAIN REDUCTION METERING• ‘VARIABLE-BIG’ MODE FOR RETAINING LOW FREQUENCIES• ‘VARIABLE-AIR’ MODE FOR ENHANCING HIGH FREQUENCIES• ‘DRY’ MIX MODE FOR ‘PARALLEL COMPRESSION EFFECT’• BALANCED XLR INPUTS/OUTPUTS3DRAWMER S2 O PERATOR’S M ANUAL4DRAWMER S2 O PERATOR’S MANUALThe S2 is designed for standard 19" rack mounting and occupies 3U of rack space. Fibre or plastic washers may be used to prevent the front panel becoming marked by the mounting bolts. Always connect the mains earth to the unit.Because the S2 contains six valves it will generate more heat than a simple solid state unit. Avoid mounting theunit directly above power amplifiers or power supplies that radiate significant amounts of heat. In addition it is advised that you leave at least 1U of space above to allow heat to dissipate. Alternatively, a fan should be fitted somewhere near to the rear of the unit to circulate cooler air and help expel any excess heat. (see fig. 1)INSTALLATIONfig.2 TYPICAL S2 SETUPfig.1 RACK MOUNT POSITIONING5DRAWMER S2 O PERATOR’S M ANUALThe unit will have been supplied with a power cable suitable for domestic power outlets in your country.For your own safety it is important that you use thiscable. The unit should alwaysbe connected to themains supply earth using this cable, and no other.If for some reason the unit is to be used at a mains input operating voltage which is different to that as supplied, the following procedure must be carried out.1: Disconnect the unit from the mains.2: Remove the two screws holding the voltage selection cover-plate.3: Remove the cover plate and slide the switch fully to its opposite end.4: Rotate the cover plate one half turn (180 degrees)and refit the two screws.5: Replace with a correctly rated fuse for the selected operation voltage in the IEC socket:230V-T500mA and 115V-T1Amp6: Re-connect to mains power source.Never disconnect the earth from the mains supplyAUDIO CONNECTIONSThe inputs and outputs are electronically balanced on conventionally wired XLRs (pin 1 screen, pin 2 hot, pin 3cold and XLR shell is connected to chassis). The operating level is nominally +4dBu. Balanced use is recommended.• Interference:If the S2 is to be used where it maybe exposed to high levels of disturbance such as found close to a TV or radio transmitter, we advise that it is operated in a balanced configuration. The screens of the signal cables should be connected to the chassis connection on the XLR connector as opposed to connecting to pin1. The S2 conforms to the EMC standards.• Ground Loops:If ground loop problems are encountered, never disconnect the mains earth, but instead, try disconnecting the signal screen on one end of each of the cables connecting the outputs of the S2 to the patchbay. If such measures are necessary, balanced operation is recommended.POWER CONNECTIONfig.4 Altering the Voltagefig.3 XLR WIRING6DRAWMER S2 O PERATOR’S M ANUALCONTROL DESCRIPTIONCHAPTER 21 MAIN COMPRESSOR CONTROLSThreshold:+20dB - -26dBDetermines the input level above which gain reduction will be applied.In order to provide as transparent processing as possible Soft knee compression takes place for signals exceeding the threshold level by a few decibels, above which level conventional ‘ratio’ compression is applied.Gain Reduction Meter:Eight Leds at 0,-1,-3,-5,-7,-10,-15,-20dBRatio: 1.4:1 - 10:1Sets the final compression ratio that will be applied once the 'soft-knee' region of the threshold control is exceeded.A ratio of 1:1 provides no compression, whereas approaching 10:1corresponds to more of a limiter.Attack:0.2mS - 100mSControls the speed that the compressor responds to signals that exceed the level set by threshold. For most musical uses, an initial attack setting of between 1 and 20 mS is typical and least obtrusive, with slower settings allowing the start of a percussive or transient signal to pass unaltered, before the compressor reacts. However, bringing the level under control quickly, using a very fast attack time, generally gives more natural results on vocals and mixes.Auto Release:Off - 1 - 2When selected, Auto disables the Release control and continually optimises the release times to suit the dynamics of the material being processed - with 1 having a slightly quicker release than 2 to further suit the varied signals. In general, this setting will produce the least obtrusive level control on signals with widely varying dynamics such as complete mixes.Release:0.05S - 2.0SecondsSets the time taken for the signal to return to normal after the input level has fallen below threshold. For most signals setting the realease at around 0.2 to 0.6 seconds is a good starting point. Be careful with very long release settings, the Compressor might never have enough time for a total recovery between the signal peaks. However, if set too fast, the signal may “pump”, which can be used creatively, but is generally undesirable.2 V-BIGUnlike previous Drawmer compressors the S2 V-Big control is fully variable allowing complete and subtle adjustments to the perceived level of bass, and the control of ‘pumping’ and ducking that occurs.Frequency:75, 125, 250 HzSets the frequency that the ‘V-Big’ control operates at, enabling the engineer to target a specific bass frequency.Level:-10 - +10With the control set in a positive position the side chain's sensitivity to low frequencies is reduced, with the result that less gain reduction is applied to those frequencies, creating the effect that the bass is louder or 'bigger'. It also has the benefit of reducing the ducking and pumping effect that occurs by high frequencies being 'pulled down' in sync with the bass, helping to make mix compression much more affable.If set in a negative position the opposite occurs i.e. with bass frequencies being quieter and pumping increased.At the 0 position the ‘V-Big’ control is effectively off.Active:Off - OnSwitches the ‘Big’ control on and off.3 V-AIRV(ariable)-Air is used to manipulate the high end of an audio signal so that it sounds more intimate, detailed and transparent, but without making it sound harsh or introducing any noticeably unnatural artefacts. Cymbals are more vibrant without becoming splashy, and vocals sound more open but without becoming sibilant.On the S2 the ‘V-Air’ section is not just an everyday side chain E.Q. that most compressor’s would incorporate, replacing any dulling of high frequency detail by simply adding gain, but a fully variable dynamic process that works in conjunction with the compressor, giving more ‘brightness’ as and when it’s required. Being full range the S2 will compress quiet high frequencies whenever the low frequencies are being brought under control, resulting ina dulling of these high levels, and in the worst cases, pumping - it is here where the V-Air controls are at their mosteffective. As shown previously, the ‘Big’ section can also improve things.Frequency:500Hz - 12kHzSets the frequency at which the ‘V-Air’ control operates, enabling the engineer to target a specific frequency.Level:-10 - +10At the 0 position the ‘V-Air’ control is off. In a positive position higher frequencies are enhanced, to add definition, particularly to the human voice and accoustic instruments - a negative position has the opposite effect, and may be used to bring back the balance to a mix whose cymbols are too conspicuous, for example.Active:Off - OnSwitches the ‘V-Air’ control on and off.4 DRYDry works by adding the original signal coming into the unit to the compressed signal that has been processed by the S2, effectively reducing the percieved amount of compression taking place. It is easiest to think of it as being similar to a parallel compressor, but with the advantage of being one simple knob. It provides completely variable control over the whole amount of compression taking place without having to alter numerous settings in order to do so.Level:0 - 10At the 0 setting a fully wet (compressed) signal is passed through to the output. As the control is turned up to 10 the dry signal (no compression) is added, thus lowering the percieved amount of compression. Unlike conventional wet/dry mixes the signal is never completely dry, even at 10 there is still a little compression taking place - use the ‘unit bypass’ (section 7) switch for a completely dry signal.Active:Off - OnSwitches the ‘Dry’ control on and off. When ‘off’ the signal is fully ‘wet’ i.e. compressed.7DRAWMER S2 O PERATOR’S M ANUAL5 GAINGain:-10dB - +20dBDuring compression the signal is attenuated, gain may be required to produce the required output level. The amount of gain required in order to bring the signal level to the same is at input is displayed on the G.R. meter.6 STEREO LINKStereo Link:Off - MasterWhen processing stereo signals, the compression settings of both channels should be the same, otherwise the stereo image will wander if one channel receives more compression than the other. When ‘Stereo Link’ is in the side chain follows both channels and forces the compressor to react to whichever of the channels is at the highest level at any given time, processing both signals according to the settings of Channel 1 (Master). The only exception to this are the ‘Gain’ controls, these remain independant - this is in order to provide a level balance between the two channels.7 METERING AND POWERVU Meters:Two moving coil VU meters monitor the level of the output signal of each channel.Pad:Vu - +10dB - +20dBA three-position switch adjusts the meters to show either normal output level, (and for those working at ‘hot’ outputlevels) VU +10dB or VU +20dB modes. i.e. with the switch at VU +10dB - when the VU meter reads 0dB the actual level is +10dB.Response:Peak VU - VUOn smooth, gentle pieces of music the “VU” (average level) setting would be sufficient, however, on fast dynamic signals the “Peak VU” setting provides more accurate readings.Bypass:Off - OnA fully balanced hard-wire unit bypass connects the input directly to the output, enabling an instant wet/dry comparison.Note: in bypass the VU meters display the levels as though the unit is still compressing. This has been implemented to provide the user with optimum control of the meters.Temperature LedThe S2 is at optimum temperature when the front panel LED indicator is lit, i.e. after the soft start and when the valves have reached optimum temperature - this may take a few seconds.Power:Off - On8DRAWMER S2 O PERATOR’S M ANUAL9DRAWMER S2 O PERATOR’S M ANUALQUICK SETUP PROCEDUREPlease note that the following procedure is only a guide. All audio is different, requiring numerous settings, however,this should give a good staring point:For single channel use, each channel may be considered as being completely independent and set upaccordingly. For use with stereo signals such as complete mixes or submixes, the S2 should be switched to Stereo Link mode and all setting up done using the left hand channel controls.To begin set the compressor controls as above - Threshold fully anti-clockwise, Ratio set to 2:1, the Attack in a mid position (around 20mS) and the Auto Release switch to 1, with Gain at 0dB.V-Big , V-Air and Dry can be bypassed for the time being.Keeping an eye on the Gain Reduction Meters alter the Threshold control for each channel to a level that ‘triggers’ the compressor, and then adjust the the Ratio until the desired compression level is achieved - as a rule,higher ratios provide a higher degree of control but also tend to be more audible in operation when high levels of gain reduction are required - a G.R. level up to -10dB is pensate for the overall drop in output caused by the compression by adjusting the Gain control until 0dB is reached on the Output VU meter (more if in +10dB VU or +20dB modes).Set the Attack knob according to the speed of the audio being processed. It is recommended that the Auto Rel.switch remains on, as it adapts dynamically to the audio, however, if manual release is preferred set the Auto Rel.switch to off, and adjust the Release control. Bear in mind that too short a release time will result in pumping.At this point the Bypass switches can be toggled to listen to the affect that the S2 is having on the audio. Repeat steps 2,3 and 4 to suit.V-Big can now be introduced - set the switch to your target frequency , and rotate the level control until the desired amount of bass is reached.To improve the audio at higher frequencies use the V-Air section, setting the controls in much the same way as V-Big - adjust to suit your taste.The S2 is now basically set up, however, further control is provided via the Dry section. With the switch active,rotating the level control clockwise adds the original, uncompressed signal to the compressed, effectively reducing the percieved amount of compression taking place. Using Dry can bring even the most severely compressed audio under control - again, adjust to suit your own taste. The Gain control may need to be adjusted to bring the output to a suitable level.1)2)3)4)5)6)7)8)9)OPFo use setSe the con hig pro ratIf t co red red coCo qu higAt lon is o attTh occCo exa cau sou to d inc ga us miAt ob thr po an theBe res thr coFin ou On pe enIf r ha effclo10DRAWMER S2 O PERATOR’S M ANUALCHAPTER 3IF A FAULT DEVELOPSFor warranty service please call Drawmer Electronics Ltd. or their nearest authorised service facility, giving full details of the difficulty.A list of all main dealers can be found on the Drawmer webpages.On receipt of this information, service or shipping instructions will be forwarded to you.No equipment should be returned under the warranty without prior consent from Drawmer or their authorised representative.For service claims under the warranty agreement a service Returns Authorisation (RA) number will be issued.Write this RA number in large letters in a prominent position on the shipping box. Enclose your name, address, telephone number, copy of the original sales invoice and a detailed description of the problem.Authorised returns should be prepaid and must be insured.All Drawmer products are packaged in specially designed containers for protection. If the unit is to be returned, the original container must be used. If this container is not available, then the equipment should be packaged in substantial shock-proof material, capable of withstanding the handling for the transit.CONTACTING DRAWMERDrawmer Electronics Ltd., will be pleased to answer all application questions to enhance your usage of this equipment. Please address correspondence to:Drawmer (Technical Help line)Coleman Street Parkgate Rotherham S62 6EL UKAlternatively contact us by E-mail on :forsalesenquiries:*****************orfortechnicalissues:****************Further information on all Drawmer dealers, Authorised service departments and other contact information can be obtained from our web pages on:GENERAL INFORMATIONINPUTInput Impedance 600 Ohms or greater Maximum Input Level+30dBuOUTPUTOutput Impedance 600 OhmsMaximum Output Level+30dBu @ 10k Ohms Load +26dBu @ 600 Ohms LoadFREQUENCY RESPONSE<24Hz to 38kHz -1dB <10Hz to 60kHz -3dBCROSSTALK< -80dB @ 10kHz < -74dB @ 20kHzNOISE AT UNITY GAINwith flat EQ response switched in circuitWideband 22Hz - 22kHz A V-79dB -84dB -87dB-94dBS2 DUAL CHANNEL VACUUM TUBE COMPRESSORDATA SPECIFICATION% DISTORTION (THD & NOISE) @ 1kHz0dB (ref +4)0.03%10dB (ref +4)0.1%20dB (ref +4)0.4%POWER REQUIREMENTS230Volt or 115V at 50-60hZ, 60VAFUSE RATINGT500mA for 230Volt, T1A for 115Volt Conforming to IEC 127-2FUSE TYPE20mm x 5mm, Class 3 Timed-Blo, 250Volt workingCASE SIZE482mm (W) x 132mm (H) x 315mm (D)WEIGHT9.3KgsBLOCK DIAGRAMS2 ver 01 B 26/03/09。
Waves超实用插件推荐(二)

Waves超实用插件推荐(二)压缩类CLA-76建模自最著名的模拟压缩器,录音棚中的传奇设备。
处理主唱、吉他、贝斯、鼓等等,可谓是无所不能。
这一个插件更包含Blacky和Bluey两个版本。
CLA-2ACLA-2A重现了传奇硬件原型的频率响应和平滑的声音特性,能增添平滑的谐波染色,作用于人声、吉他、贝斯都恰如其分。
以上两款压缩插件都包含于CLA Classic Compressors套装中。
API 2500API 2500是功能全面的压缩器,尤其在鼓声上的力度表现出众,通透塑形能力超强。
它本为总线压缩设计,但绝对可以为任何轨道增添质感。
混响与延迟类H-Reverb功能多样的混响插件,如果你只能选一个混响,那必须就是H-Reverb!基于开创性的有限脉冲响应混响技术,它内置均衡、压缩、调制处理、BPM同步,可以轻松制作创新的尾混响。
H-Delay老式模拟延迟的声音,以简单易用的形态呈现,即插即用,受全世界音乐人和音频工程师青睐。
它的调制和低保真功能更能带来个性音色。
Abbey Road Reverb Plates板式混响是流行乐人声等等需要闪亮质感声音的必备。
建模自Abbey Road录音棚的经典设备,无论是细微应用还是戏剧化效果,它的音色辨识度都极高。
Abbey Road Chambers这款混响的声音世界上绝无仅有,建模自Abbey Road录音棚的混响室,完全重现了Abbey Road录音棚原汁原味的S.T.E.E.D.设置,开启了回归经典声学效果的大门。
以上两款Abbey Road混响插件包含于Abbey Road Collection 套装中。
通道条类SSL E-Channel这款通道条建模自Solid State Logic 4000系列调音台,拥有极富音乐性的均衡声音和紧致有力的压缩和门限,能从容处理大多数混音工程。
包含于SSL 4000 Collection套装中。
Scheps Omni Channel多功能合一的通道条,由格莱美奖得主混音大师Andrew Scheps 钦定打造。
阿古拉TLC压缩器说明书

TLC COMPRESSOR™Aguilar’s TLC Compressor is an innovative analog Compressor that is designed to give musicians the ability to control their dynamics in a flexible and musical way, making it an invaluable musical tool for both recording and live use. Our proprietary Trans Linear Control (TLC) circuit enables us to achieve unprecedented levels of performance in a small package.The TLC Compressor features a four-knob layout to provide a full set of important features. Using a wide range of attack times and variable threshold and slope levels, you’ll be able to dial in just the right sound. Aguilar’s TLC Compressor gives you a range of control usually found only in expensive studio compressors.Features:• Threshold control: variable from -30 to -10 dBu• Slope control: variable from 2:1 to infinity• Attack control: variable from 10ms to 100ms• Level control: -infinity to -3dBu• Low Distortion: (<0.2 %)• Power: Nine-volt battery or optional universal power supply• Heavy Duty steel construction• Battery life >100 hoursOwner’s ManualManual Version 1.0I. FunctionsA. Top Panel Controls:LEVEL:Controls the volume of the output. Used for setting loudness and make-up gain.THRESHOLD:Sets the input level at which compression begins. Turning the knob clockwise causes compression to begin at lower input levels.ATTACK: Sets the amount of time before compression begins after a note is played. Turning the knob clockwise causes the attack time to become longer, allowing the leading edge of the note to be heard without compression.SLOPE: Controls the compression ratio, or slope. As you turn the knob clockwise the dynamic range is compressed more.ENGAGE: Toggles between on and off. The blue LED indicates that the effect is on.B. Side Panel Connections:IN: ¼” inputDC IN: This is a standard 2.1mm DC jack. The center terminal polarity is negative. OUT: ¼” outputC. Specifications:Current consumption…………………………...5mANoise Level: ...................................................-95 dBu ‘A’ weighted *Input impedance: ................................................1MΩ (Effect On)Output impedance: ............................................. 1 KΩDistortion: ……………………………………..< 0.2% *+Maximum Output:……. ………………………. +6dBu (1.6VRMS)Battery Life…………………..: …………….…~150hoursExternal DC Power:………………………….…9-10VDC, 20mA min, center terminal negative* = all knobs set to 12 o'clock+ = nominal input of -20dBuII. Sample SettingsPlease visit our website, , for sample settings.III. “How To”sHow to change the battery:This operation can be done quickly and easily and requires no tools!The battery is easily accessible by loosening the thumbscrew on the bottom of the unit. The battery compartment will slide forward and you will be able to see the padded area to insert the battery and attach the battery clips.Once the battery has been replaced, simply slide the compartment back in and hand tighten the thumbscrew.How to attach the unit to a pedal board:We have included two neoprene spacers to help attach the unit to a pedal board. These pieces can be attached as shown to the bottom of the unit.Once the neoprene spacers are secured to the bottom of the pedal, you can then affix a piece of Velcro to them – you are now ready to mount the Octamizer to your pedal board! We have included an additional screw that can be used to replace the thumbscrew if it's in the way of your board.IV. Warranty InformationThe TLC Compressor is covered under limited warranty against defects in materials and workmanship for a period of 3 years. This warranty is non-transferable.The warranty period starts from the date of purchase from an authorized Aguilar dealer. Please retain your sales receipt, as it is necessary to obtain warranty service.Before sending your unit to Aguilar for repair, you must receive a return authorization numberfromus.Pleasecontactusviaemail(**************************).Donotsend any products to us without first receiving a return authorization from Aguilar.You are responsible for all shipping charges. You must ship the unit to us freight prepaid. We will return the unit to you freight collect. Aguilar Amplification LLC is not responsible for shipping damage, either to or from our service center. Claims must be filed with the carrier.The only company in the US authorized to perform work under this warranty is Aguilar Amplification LLC of New York, NY.Warranty service outside the USA: Warranty Service may be different in your country. Please contact the Aguilar distributor in your country for terms and procedures.Aguilar Amplification LLC599 Broadway, 7th fl.NY, NY 10012。
限制器和压缩器的区别?

限制器(Limiter)和压缩器(Compressor)是音频信号处理中常用的两种效果器,它们在控制音频动态范围和音量方面有不同的功能和应用。
1. 限制器(Limiter):
限制器主要用于限制音频信号的最大幅度,使其不会超过事先设定的阈值。
其主要特点包括:
- 阈值控制:限制器设置一个阈值,当信号的幅度超过该阈值时,限制器会自动调整信号的增益,使其保持在阈值以下。
- 快速反应:限制器具备快速的响应速度,可以在瞬间对音频信号进行控制,防止信号超过阈值。
- 保护音频信号:限制器能够防止音频信号超过设定的阈值,以避免音频信号失真和过载。
2. 压缩器(Compressor):
压缩器主要用于压缩音频信号的动态范围,使其在更一致的水平范围内运行。
其主要特点包括:
- 动态范围控制:压缩器通过设置阈值、比率、攻击时间和释放时间等参数,以实现对音频信号动态范围的控制和压缩。
- 平滑反应:压缩器在响应上相对较平滑,允许在一定时间内音频信号超过阈值,然后缓慢恢复到正常范围内,以保持更自然的音频感觉。
- 调音和增强:压缩器还可以用于音频调音和增强,通过调整参数来改变信号的音色和感觉。
总的来说,限制器主要用于防止音频信号超过设定的最大幅度,保护音频设备或避免失真,而压缩器则更多地用于动态范围的调节和平衡,使音频信号在一定的范围内保持平稳和一致。
两者常常结合使用,以实现更精细和全面的音频动态处理。
- 1、下载文档前请自行甄别文档内容的完整性,平台不提供额外的编辑、内容补充、找答案等附加服务。
- 2、"仅部分预览"的文档,不可在线预览部分如存在完整性等问题,可反馈申请退款(可完整预览的文档不适用该条件!)。
- 3、如文档侵犯您的权益,请联系客服反馈,我们会尽快为您处理(人工客服工作时间:9:00-18:30)。
Waves 插件CLA-3A Compressor/LimiterCLA-2A压缩器
雪帝数字音频
CLA-2A建模于传奇的电子光学电子管压缩器,重现了其硬件原型的频率响应和平滑的声音特性,这些特点使其成为了世界各地音频工程师的最爱。
与60年代中期的经典之作一样,CLA-2A使得吉他和贝斯的声音更加动听,尤其能够让人声大放异彩。
Chris Lord-Alge的个人预设更为它锦上添花,提供了无穷可能性的实例,让你从中获得灵感继而超越灵感。
特点:
•建模的压缩器插件
•基于传奇的电子光学电子管压缩器
•可选压缩器及限制器模式
•在吉他、贝斯和人声上表现优异
•侧链频率滤波器
•零延迟。