军用领航鱼ATR机箱热设计
SilverStone RVZ03-ARGB 优雅迷你机械箱说明书
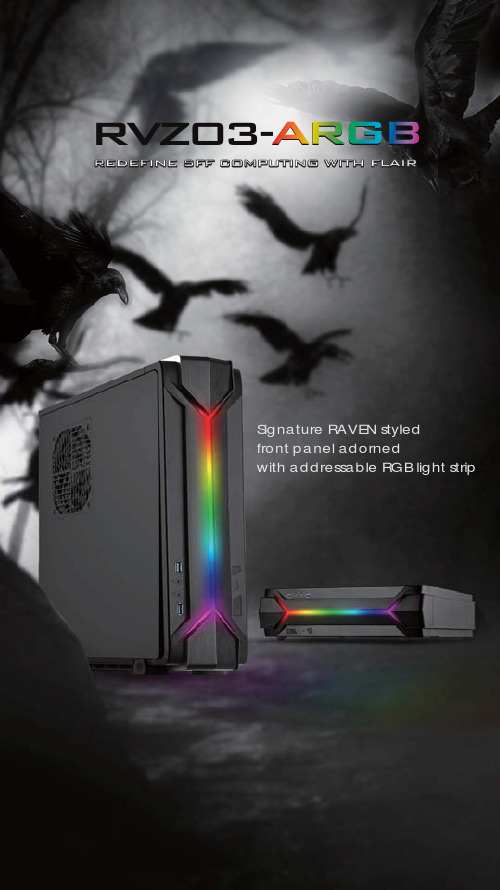
Signature RAVEN styled front panel adornedwith addressable RGB light stripSFFRE R V Z 03-A R G BS ilverStone RVZ03 is a further evolution of the highly rated RAVEN Z RVZ01-E, a slim form factor case with tremendous capability. It has the same optimized interior that has room for a standard ATX (PS2) power supply and support for some the biggest consumer graphics cards on the market with superb air cooling performance. Designed for use in either vertical or horizontal orientation, it can be placed comfortably in any space-constrained environment that requires a powerful PC. For those looking to build a slim form factor PC with extra flair, the RVZ03’s inclusion of addressable RGB lighting and controller bring about another exciting chapter to the famed RAVEN series of computer cases.Signature RAVEN styled front panel adorned with addressable RGB light stripMini-ITX motherboard & ATX PSU compatible for wide array of building possibilitiesSupport cards up to 13 inches (330mm) to fit most high-end GPUs for compute power far exceeding consolesMaximum performance in slim form factor with support for AIO liquid coolingPositive air pressure design for excellent cooling/quietness and dust-preventionFits in nearly any environment with horizontal or vertical orientationSST-RVZ03B-ARGB (black), SST-RVZ03W-ARGB (white)Reinforced plastic outer shell, steel body Mini-DTX, Mini-ITX Internal Top Bottom2USB3.0 x 2, Audio x 1, MIC x 1 Optional PS2 (ATX)Compatible up to 13" (330mm) long, width restriction-5.88" (149mm)83mm150mm*4.05kg 382mm (W) X 105mm (H) X 364mm (D) , 14.6 liters 2.5" x 31 x 120mm fan, 1500rpm, 18dBA 1 x 120mm fan, 1500rpm, 18dBA 1 x 120mm fan slotSupport Kensington lock, PCI Express riser card set x 1ARGB control PCB x 12.5" HDD X12.5" HDD X212015 FAN X112015 FAN X1MINI-ITX (OPTION)USB 3.0 + SPK + MICPOWER BUTTONPOWER LEDHDD LEDRESET BUTTONFAN FILTER X1TOP COVER POWER CAGEATX PSU (OPTION)ARGB CAGE FAN FILTER X2Unscrew the screws from the rear of the chassis then remove the top coverHave all components collected.Check that all components do not have compatibility problems with each other or with the case.If possible, assemble the components outside the case first to make sure they are working.Keep the motherboard manual ready for reference during installation.Prepare a Philips screwdriver.Be careful not to strike on glass side panel when removing it from the case.B efore you begin, please make sure that you132Unscrew the screws from PSU bracket then remove itUnscrew the screws from the graphics card supportbracket then remove it54If you want to use SilverStone NT06-PRO or other similar CPU cooler, please relocate the top panel 120mm fan to the bottom vent near the graphics card areaInsert the I/O shield included with your motherboard theninstall the motherboard into the chassis6We recommend at this point connecting all the necessary cables including the SATA cables to the motherboardSecure the PSU into the PSU bracket798Place the PSU bracket on top of the chassis then connect the power cord to the PSUInsert the PSU bracket into its original position and securewith screws10Remove expansion slot cover and install graphics card into the graphics card support bracket11Depending on the design of your graphics cards, install and adjust the graphics card holder to a proper position to support your card. Adhere included rubber padding according to the height of graphics card’s backside, one (for 3mm thick backplate) or two (for no backside components)12Install 2.5" HDD/SSD onto the graphics card support bracket13Connect addressable RGB (ARGB) connector. Please refer to ARGB LED connector guide in later pages for more details14Install graphics card support bracket into the chassis and connect the power cord to the graphics card if needed15Make sure all the cables are properly connected16Place the top cover back onto the chassis and secure with screws17Depending on requirement or preference, adhere four rubber stands for horizontal use or install the rubber pads for vertical use. Corresponding RAVEN logo for each orientation are included for installationPower switch and reset switch installation guidePlease refer to the motherboard manuals for the motherboard’s “Front Panel Connector” or “System Panel Connector” pin definition Power switch and reset switch have no polarity, so they can be connected in any orientation(1) Front Panel Connectors GuidePower Switch Reset SwitchPlease refer to the motherboard manuals for the motherboard’s “Front Panel Connector ” or “System Panel Connector” pin definition; the white/black wires are negative while other colors are positive wiresLED indicators installation guideHDD LED+HDD LED-HDD LED(2) ARGB LED connector guideRVZ03-ARGB includes custom ARGB controller. It has dual modes that enables you to control lighting effect either via software (provided by motherboard) or hardware.Software control :A. To control lighting via motherboard, make sure it supports addressable RGB (+5V, D, G) signals on its RGB header.B. If you have other ARGB devices such as SilverStone’s own LS03 light strip or FG122 ARGB fan frame, you may also connect them to RVZ03’s ARGB controller, below are installation steps:1. Flip the controller switch to “MB” mode2. Connect motherboard ARGB signal cable to motherboard3. If needed, use included extension cable4. When connecting non-SilverStone ARGB products, make sure pin definition and connector orientation are compatibleHardware control:Utilizing the case’s reset button to change lighting effects1. Flip the controller switch to “IC” mode2. Connect other ARGB devices to RVZ03’s ARGB controller3. When connecting non-SilverStone ARGB products, make sure pin definition and connector orientation are compatible4. Connect the controller to power supply5. Be sure not to connect case’s reset connector to motherboard as you are going to use reset button for changing ARGB colors and effects from now on6. When PC is powered, press reset button on the case to change ARGB lighting effects(3) Front I/O connector guideBelow are the front I/O connectors pin definition, please also check your motherboard manual to cross reference with motherboard’s front I/O pin headers. SilverStone’s I/O connectors are in block type to simplify installation(1) CPU cooler height limitationA. Height limitation: The RVZ03 has 83mm height limitation for CPU coolerB. Upper boundary: the cooler can protrude 11mm over the motherboard’s top edgeC. Front boundary: The clearance toward the front of the chassis is 4.2mmRVZ03’s maximum depth for a standard PS/2 (ATX) power supply is 150mm, but installation of a 150mm deep power supply will require sacrificing a 2.5" drive space and no room for cable connection after installation. So if using a 150mm deep modular power supply, make sure to connect all cables prior to installing it into the case. Power supplies with depth of 140mm or less may have enough room to allow for cable connection after installation so we recommend using 140mm deep modular power supply with flat cables, such as SilverStone’s own ST75F-PT(2) PSU limitationC. Thickness limitation(i) Calculated from the bottom of the graphics card PCB to the top, the total thickness limitation is 68mm(ii) With the standard 34.8mm-thick dual slot graphics card installed, the maximum thickness of the fans is 32mm(iii) The thickness of the components on the back of the graphics card is limited to 3mm in the area supported by the graphics card holder; the thickness limitation for the rest of the components is 10mmi iiiii A. Length limitationRVZ03 can support 13" (330mm) consumer level graphics cards. Please contact us if you find a card that does not fitB. Width limitation(i) The standard width for graphics card is 4.38" (111mm)(ii) With the graphics card holder installed, the maximum allowable width for graphics card is 5.16" (131mm)(iii) Without the graphics card holder, the maximum allowable width for graphics card is up to 5.88" (149mm)(3) Graphics card/expansion card length limitationA. Because most vents are situated on the bottom, placing the RVZ03 vertically will result in better temperature than in horizontal positionB. When using the case horizontally, please be sure of adhering rubber stands to the bottom I f you use graphics card with omni-direction or open air cooler, we recommend having two case fans on the bottom ventsS ilverStone TD03-SLIM is compatible with RVZ03 as an option if an all-in-one (AIO) liquid cooler is needed Cable routingThere is some space between the front panel and the side of the graphics card reserved for the cable routingT he RVZ03’s positive air pressure design is an effective configuration that will reduce dust buildup inside the case. Small air particles or lint will accumulate over time on intake filters instead of on the components inside the case. To maintain excellent cooling performance for years to come, we recommend cleaning all fan filters regularly every three months or half a year (depending on your environment).The RVZ03 includes ultra-fine magnetic filters (model: FF123) which can be easily removed. If you accidentally loose/damage filters or need additional ones for backup, please contact your local SilverStone retailers or distributors for purchasing information: https:///wheretobuy_all.phphttps:///wheretobuy_all.phpThe graphics card holder needs to be removed beforedismounting the fans on the bottom vents We recommend removing the filters before dismounting the fans 2The fan on the top cover can be dismounted afterremoving the top cover1K ensington Security SlotNote: Cable security lock is not included with RVZ03A lock and cable can be purchased on the market for use with the Kensington security slot located on rear of RVZ03 to prevent removal of the entire computer or top coverCaution: Please check for compatibility before purchasing the lock and cable for use with RVZ03’s Kensington security slotQ: Does RVZ03 fit in the Sugo Pack?A: Yes, it does, with room to spare!Q: Can the NT06-PRO be used without fan in RVZ03?A: We do not recommend itQ: Everything is properly installed; why does it not start up?A: If your PSU has an AC switch, make sure the switch is at the “ON” positionT his product has a limited 1 year warranty in North America and Australia. For information on warranty periods in other regions, please contact your reseller or SilverStone authorized distributor.1. Product component defects or damages resulted from defective production is covered under warranty.Defects or damages with the following conditions will be fixed or replaced under SilverStone T echnology’s jurisdiction.a) Usage in accordance with instructions provided in this manual, with no misuse, overuse, or other inappropriate actions.b) Damage not caused by natural disaster (thunder, fire, earthquake, flood, salt, wind, insect, animals, etc…)c) Product is not disassembled, modified, or fixed. Components not disassembled or replaced.d) Warranty mark/stickers are not removed or broken. Loss or damages resulted from conditions other than ones listed above are not covered under warranty.2.Under warranty, SilverStone T echnology’s maximum liability is limited to the current market value for the product (depreciated value, excluding shipping, handling, and other fees). SilverStone Technology is not responsible for other damages or loss associated with the use of product.3. Under warranty, SilverStone T echnology is obligated to repair or replace its defective products. Under no circumstances will SilverStone Technology be liable for damages in connection with the sale, purchase, or use including but not limited to loss of data, loss of business, loss of profits, loss of use of the product or incidental or consequential damage whether or not foreseeable and whether or not based on breach of warranty, contract or negligence, even if SilverStone T echnology has been advised of the possibility of such damages.4.Warranty covers only the original purchaser through authorized SilverStone distributors and resellers and is not transferable to a second hand purchaser.5. You must provide sales receipt or invoice with clear indication of purchase date to determine warranty eligibility.6.If a problem develops during the warranty period, please contact your retailer/reseller/SilverStone authorized distributors or SilverStone . Please note that: (i) You must provide proof of original purchase of the product by a dated itemized receipt(ii) Y ou shall bear the cost of shipping (or otherwise transporting) the product to SilverStone authorized distributors. SilverStone authorized distributors will bear the cost of shipping (or otherwise transporting) the product back to you after completing the warranty service(iii) Before you send the product, you must be issued a Return Merchandise Authorization (“RMA”) number from SilverStone. Updated warranty information will be posted on SilverStone’s official website. Please visit for the latest updates.ForNorthAmerica(*****************************) SilverStone Technology in North America may repair or replace defective product with refurbished product that is not new but has been functionally tested. Replacement product will be warranted for remainder of the warranty period or thirty days, whichever is longer. All products should be sent back to the place of purchase if it is within 30 days of purchase, after 30 days, customers need to initiate RMA procedure with SilverStone T echnology in USA by first downloading the “USA RMA form for end-users” form from the below link and follow its instructions./contactus.phpForAustraliaonly(**************************) Our goods come with guarantees that cannot be excluded under the Australian Consumer Law. You are entitled to a replacement or refund for a major failure and for compensation for any other reasonably foreseeable loss or damage. You are also entitled to have the goods repaired or replaced if the goods fail to be of acceptable quality and the failure does not amount to a major failure. Please refer to above “Warranty terms & conditions” for further warranty details.SilverStone Technology Co., Ltd. 12F No. 168 Jiankang Rd., Zhonghe Dist., New T aipei City 235 T aiwan R.O.C.+ 886-2-8228-1238 (standard international call charges apply) ForEurope(****************************) ForChina(**************************.cn) Forallotherregions(**************************)©2018 SilverStone Technology Co., Ltd. All Rights Reserved ALL trademarks are registered to their respective owners。
可靠性仿真在鱼雷产品上的应用
可靠性仿真在鱼雷产品上的应用王斗辉 1, 陈 欢 2, 郭 君 2, 吴 斌 2(1. 工业和信息化部 电子第五研究所, 广东 广州, 615123; 2. 中国船舶集团有限公司 第705研究所, 陕西 西安, 710077)摘 要: 针对传统可靠性试验耗时长、成本高的问题, 给出了可靠性仿真的基本内容和工作流程, 针对鱼雷产品中的典型电子组件开展可靠性仿真建模、热应力和振动应力仿真分析、故障预计和可靠性评估, 以得到产品设计薄弱环节、潜在故障信息和平均首发故障时间等。
分析结果表明, 可靠性仿真能够确保在鱼雷产品设计早期消除故障源, 从而提高鱼雷产品的鲁棒性和故障预测能力。
关键词: 鱼雷; 可靠性; 电子组件; 仿真建模; 应力分析中图分类号: TJ630 文献标识码: A 文章编号: 2096-3920(2024)01-0166-08DOI: 10.11993/j.issn.2096-3920.2023-0030Application of Reliability Simulation in Torpedo ProductsWANG Douhui1, CHEN Huan2, GUO Jun2, WU Bin2(1. CEPRI, Guangzhou 615123, China; 2. The 705 Research Institute, China State Shipbuilding Corporation Limited, Xi’an 710077, China)Abstract: The traditional reliability test is time-consuming and requires high cost. Therefore, this article provided the basic content and workflow of reliability simulation and conducted reliability simulation modeling, thermal stress simulation analysis, vibration stress simulation analysis, fault prediction, and reliability evaluation for typical electronic components in a certain torpedo product, so as to obtain weak links in product design, potential fault information, and average first failure time. The analysis results show that the reliability simulation can ensure the elimination of fault sources in the early stage of torpedo product design and thus improve torpedo product robustness and fault prediction ability.Keywords: torpedo; reliability; electronic components; simulation modeling; stress analysis0 引言随着技术的发展, 对装备可靠性水平的要求越来越高, 但对研制和生产周期的要求则越来越短,完全按传统的典型环境仿真方法对装备进行可靠性试验, 对于可靠性指标要求较高的产品, 无论是时间还是试验费用等都难以保证, 为此需要找到一种在研制初期即可针对仿真模型, 在开展建模仿真的基础上进行可靠性设计及评价的新途径。
SID-40A中文技术说明书V1.43
(V1.43 版) 2011 年 7 月
本公司保留对产品更改的权利,说明书内容如有改动恕不另行通知,以装置为准。详情请至电本公司
或当地代理商。
我们致力推动世界电力技术的科技进步!
SID-40A 无扰动备用电源替续控制装置
1. 概述
1.1 适用范围 电力供应的不间断是国民经济各领域正常运作的重要保证,电力系统的发展和技术进步正是沿着这一
--------------------------1-------------------------- Tel:(0755)83416189 ,83663989 Fax:(0755)83663603 Website:
我们致力推动世界电力技术的科技进步!
SID-40A /-*-*-*
目录
1.概述 .................................................................................. 1 2.主要功能 .............................................................................. 2 3.控制原理 .............................................................................. 7 4.技术指标 ............................................................................. 14 5.结构与面板定义 ....................................................................... 17
Razer Tomahawk Mini-ITX 游戏机箱说明书
.高级用户指南为每个PC搭建者精心打造的梦幻机箱,Razer隆重推出雷蛇战斧 Mini-ITX游戏机箱,具备绝佳的流动风道,便与布线管理,还有充足的硬件拓展空间和强大的雷蛇幻彩灯效支持。
目录1. 内含物品 (3)2. 简要介绍 (5)3. 技术规格 (6)4. 驱动程序安装 (7)5. 配置 TOMAHAWK MINI-ITX (8)7. 安全与维护 (15)8. 法律声明 (16)1. 内含物品▪Razer Tomahawk Mini-ITX 游戏机箱型号 RZ21-014USB Type C 端口(最高 3.2 Gen 2)3.5 毫米麦克风插孔3.5 毫米音频组合插孔电源按钮重启按钮USB Type A 端口(最高 3.2 Gen 1)可拆卸式顶部面板可拆卸式玻璃旋转门可拆卸式前面板采用 Razer Chroma 雷蛇幻彩 RGB 技术的炫酷底光效果▪其他附件*主板安装螺钉 x6用于固定 2.5 英寸固态硬盘/3.5 英寸硬盘驱动器的防振环 x12 用于固定电源 (PSU) 的螺钉 x4用于固定 2.5 英寸固态硬盘的螺钉 x12用于固定 3.5 英寸硬盘驱动器的指旋螺钉用于固定风扇的螺钉 x24钩环带 x6* 作为备件随附的其他品项2. 简要介绍你现在拥有了一台很棒的笔记本电脑,并且附带一年有限制造商保修*和一年的有限电池保修。
即刻通过/cn-zh在线注册,充分发挥设备的所有功能,并获得 Razer 雷蛇的独家福利。
产品的序列号位于此处。
*保修可能因地区而异,并受当地适用法律的约束。
如果遇到问题,请通过/cn向 Razer 雷蛇支持团队提出问题。
3. 技术规格4. 驱动程序安装通过 Razer Synapse 雷云,你可以为 Tomahawk Mini-ITX 和其他支持的 Razer 雷蛇外围设备下载驱动程序或固件更新。
此外,你还可以自定义 Razer 雷蛇设备的所有高级设置和灯光效果。
PSP642技术使用说明书V2.06

PS 640 系列产品采用防水、防尘、抗振动设计,适合安装于开关柜等环境条件较为恶劣 的现场运行。机箱面板采用先进的工业美学设计,使用方便,倍感亲切。
(idt IEC 60255-21-1:1988) 碰撞和地震试验 第一章:振动试验(正弦波)
GB/T 16836-1997
量度继电器和保护装置安全设计的一般要求
GB/T 17626.2-1998 电磁兼容 试验和测量技术 静电放电抗扰度试验
GB/T 17626.3-1998 电磁兼容 试验和测量技术 射频电磁场辐射抗扰度试验
·声 明·
声明
国电南京自动化股份有限公司的所有 PS 系列数字式保护及自动化产品符合严格的技术 标准,经得起恶劣的现场工作环境的考验,综合技术指标处于国内领先水平。
公司拥有一大批具有丰富的数字式保护及自动化产品开发经验的科技人才,承诺对用户 常年 24 小时的技术支持,您尽可以信赖国电南京自动化股份有限公司的产品。
6 定值及整定说明 ...........................................................................................................................27 6.1 PSP 642 数字式备用电源自投装置整定值清单及说明..........................................................27 6.2 PSP 642 数字式备用电源自投装置软压板清单及说明..........................................................29
领航鱼MCU机箱设计相关标准
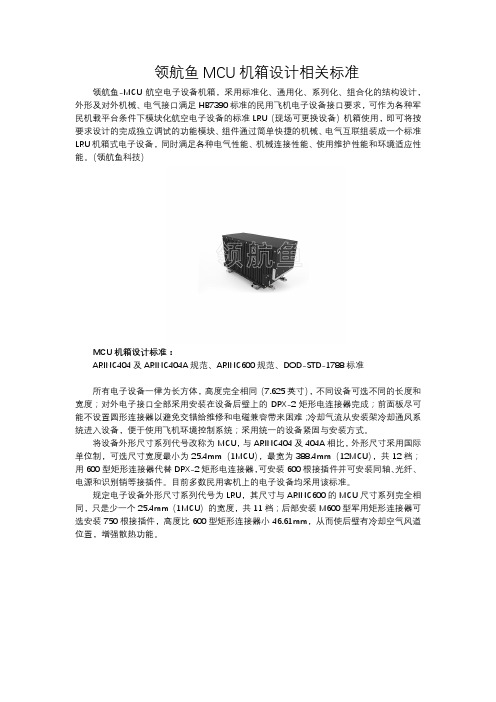
领航鱼MCU机箱设计相关标准领航鱼-MCU航空电子设备机箱,采用标准化、通用化、系列化、组合化的结构设计,外形及对外机械、电气接口满足HB7390标准的民用飞机电子设备接口要求,可作为各种军民机载平台条件下模块化航空电子设备的标准LRU(现场可更换设备)机箱使用,即可将按要求设计的完成独立调试的功能模块、组件通过简单快捷的机械、电气互联组装成一个标准LRU机箱式电子设备,同时满足各种电气性能、机械连接性能、使用维护性能和环境适应性能。
(领航鱼科技)
MCU机箱设计标准:
ARINC404及ARINC404A规范、ARINC600规范、DOD-STD-1788标准
所有电子设备一律为长方体,高度完全相同(7.625英寸),不同设备可选不同的长度和宽度;对外电子接口全部采用安装在设备后壁上的DPX-2矩形电连接器完成;前面板尽可能不设置圆形连接器以避免交错给维修和电磁兼容带来困难;冷却气流从安装架冷却通风系统进入设备,便于使用飞机环境控制系统;采用统一的设备紧固与安装方式。
将设备外形尺寸系列代号改称为MCU,与ARINC404及404A相比,外形尺寸采用国际单位制,可选尺寸宽度最小为25.4mm(1MCU),最宽为388.4mm(12MCU),共12档;用600型矩形连接器代替DPX-2矩形电连接器,可安装600根接插件并可安装同轴、光纤、电源和识别销等接插件。
目前多数民用客机上的电子设备均采用该标准。
规定电子设备外形尺寸系列代号为LRU,其尺寸与ARINC600的MCU尺寸系列完全相同,只是少一个25.4mm(1MCU)的宽度,共11档;后部安装M600型军用矩形连接器可选安装750根接插件,高度比600型矩形连接器小46.61mm,从而使后壁有冷却空气风道位置,增强散热功能。
联力发布游艇造型创意机箱PC-Y6

4GB显存的Nvidia GeForce GTX 950M或尽管是台一体机,但是Gaming 24出色。
其提供了2条DDR4 SO-DIMM内存插槽,最高支持外设连接方面,技嘉为它们装配上了英特尔的Alpine Ridge USB 3.1控制器,支持10Gbps的Type-C和Type-A连接。
尽管官方未声明,但它不久后肯定会解除雷电支持的封印。
网络方面,X150M-PRO(以及疑似X150-PRO)搭载了一颗英特尔千兆以太网控制器,而更高端的X170-Extreme则选用了Killer E2400。
目前技嘉暂未透露产品的售价和上市日期信息。
上亮相,6月正式发布,售价未知应该不菲。
造型设计很抢眼,个头不大,测量尺寸 (W)764mm(H)293mm(D)259mm,尼博:责任编辑ChinaEA_box4@ : E-mail69电子竞技杂志China Electronic AthleicsLIANLI PC-Y6参数规格如下:产品型号 PC-Y6 A/ W机箱样式 Special Chassis 特别定制版本机箱尺寸 (W)764mm(H)293mm(D)259mm 适用主板 Mini-ITX 可选颜色: 银色/白色机身材质: 铝合金机身重量: 4.9kg 外置5.25英寸空间:-外置3.5英寸空间: -硬盘空间: 3.5英寸硬盘 x22.5英寸硬盘仓位: x2PCIE 扩充卡: 2槽适用主板 Mini-ITX 系统风扇: 120mm Fan x1安装空间:显卡最长可支持: 300mm CPU 散热器支持高度:60mm 可支持电源:SFX 紧凑型Acer 掠夺者Z35曲面电竞显示器亮相CES 大展去年12月宏碁(Acer)将触角伸至游戏设备领域,推出主打高端游戏市场的35英寸掠夺者Z35全高清(2560*1080)LED 电竞曲面液晶显示器,目前产品已经在国内发售,产品售价为12999元。
在本届CES 大展的Acer 展区中我们再次看到了这款非常霸气的电竞显示器,充分利用了多重的三角形元素,未来既视感十足。
机载领航鱼ATR机箱设计
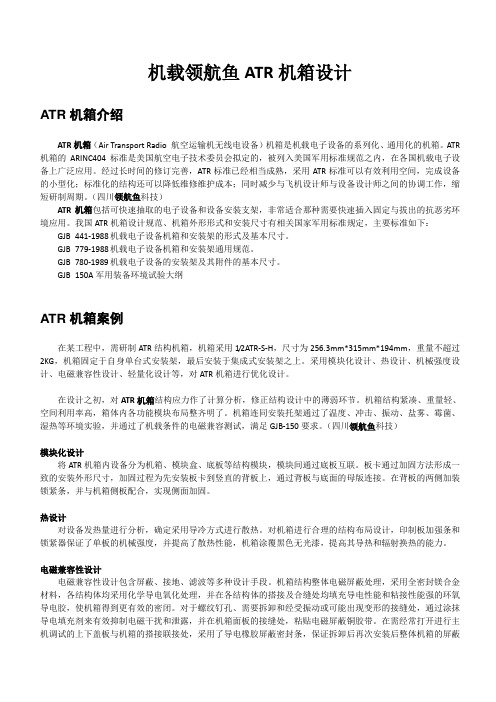
机载领航鱼ATR机箱设计ATR机箱介绍ATR机箱(Air Transport Radio 航空运输机无线电设备)机箱是机载电子设备的系列化、通用化的机箱。
ATR 机箱的ARINC404标准是美国航空电子技术委员会拟定的,被列入美国军用标准规范之内,在各国机载电子设备上广泛应用。
经过长时间的修订完善,ATR标准已经相当成熟,采用ATR标准可以有效利用空间,完成设备的小型化;标准化的结构还可以降低维修维护成本;同时减少与飞机设计师与设备设计师之间的协调工作,缩短研制周期。
(四川领航鱼科技)ATR机箱包括可快速抽取的电子设备和设备安装支架,非常适合那种需要快速插入固定与拔出的抗恶劣环境应用。
我国ATR机箱设计规范、机箱外形形式和安装尺寸有相关国家军用标准规定,主要标准如下:GJB 441-1988 机载电子设备机箱和安装架的形式及基本尺寸。
GJB 779-1988 机载电子设备机箱和安装架通用规范。
GJB 780-1989 机载电子设备的安装架及其附件的基本尺寸。
GJB 150A军用装备环境试验大纲ATR机箱案例在某工程中,需研制ATR结构机箱,机箱采用1/2ATR-S-H,尺寸为256.3mm*315mm*194mm,重量不超过2KG,机箱固定于自身单台式安装架,最后安装于集成式安装架之上。
采用模块化设计、热设计、机械强度设计、电磁兼容性设计、轻量化设计等,对ATR机箱进行优化设计。
在设计之初,对ATR机箱结构应力作了计算分析,修正结构设计中的薄弱环节。
机箱结构紧凑、重量轻、空间利用率高,箱体内各功能模块布局整齐明了。
机箱连同安装托架通过了温度、冲击、振动、盐雾、霉菌、湿热等环境实验,并通过了机载条件的电磁兼容测试,满足GJB-150要求。
(四川领航鱼科技)模块化设计将ATR机箱内设备分为机箱、模块盒、底板等结构模块,模块间通过底板互联。
板卡通过加固方法形成一致的安装外形尺寸,加固过程为先安装板卡到竖直的背板上,通过背板与底面的母版连接。
- 1、下载文档前请自行甄别文档内容的完整性,平台不提供额外的编辑、内容补充、找答案等附加服务。
- 2、"仅部分预览"的文档,不可在线预览部分如存在完整性等问题,可反馈申请退款(可完整预览的文档不适用该条件!)。
- 3、如文档侵犯您的权益,请联系客服反馈,我们会尽快为您处理(人工客服工作时间:9:00-18:30)。
军用领航鱼ATR机箱热设计
军用机载电子设备热设计的基本理论和计算方法以及热可靠性分析与鉴定的方法在GJB/Z 27、QJ 1474均有详述。
机载通信设备内部的高密度集成电路和功率放大部位热密度很高,散热设计往往是结构设计的关键技术。
(领航鱼ATR机箱)
设备机箱在方案阶段的设计方法,多数借助数值传热学仿真技术模拟热环境辅设计。
最常用的热分析软件有FLOTHERM和ICEPAK,它们利用计算流体动力学(CFD:Computational Fluid Dynamic)和数值传热学仿真技术来模拟电子设备中的流体流动、热传输以及热辐射(边界条件),并以此计算电子设备周围的流场、温度场、压力场。
热分析软件的瞬态分析计算量非常大,因此绝大多采用稳态的分析的方法,而且允许有较大(30%左右)的误差。
军用机载通信设备的工作环境温度,以技术协议为依据,温度范围可达-50℃~+75℃。
不少设备考虑占空比的因素后,平均热功率仍不少于200W,机箱强迫风冷散热方式被普遍采用。
机箱的热设计设计时要注意以下几点:
(1)冷却空气的入口应远离其他设备热空气的出口。
(2)机箱结构设计时应考虑机箱内的热耗分布,为机箱内部单元设计传热、散热的途径,必要时采用热绝缘或热屏蔽措施。
功放管等器件热耗突出,在机箱热设计中要着重分析。
(3)选择风机时,应具备合适的风机尺寸和风量,还要考虑到风机的噪声(转速)、电磁干扰、振动、振幅等因素对机箱内的影响,要充分考虑风机的可靠性。
鼓风产生的风压大、风量集中,很适用于局部冷却,应尽量使风机保持良好的工作点;抽风产生的风量大、负压分布均匀,对流道结构的要求比鼓风低,但要避免气流“短路”。
通过风机的特性曲线找出合适的工作点,作为仿真结果的对比。
风机有工作温度范围,不能超限值工作,有时必要配置风机的控制电路。
(领航鱼ATR机箱)
(4)强迫风冷若不满足要求,则首先应优化散热器的几何参数。
增加肋片高度和肋片数,可以增加散热表面积。
但当肋片增加到一定数量时,肋片间距变小,导致流过肋片的风量变小,同时肋片间的温度会相互影响,所以,增加表面积须考虑流动阻力。
(5)热设计与其他设计(电气设计、结构性设计、可靠性设计)要同时进行,当出现矛盾时应权衡解决,但不得损害电气性能。
(四川领航鱼科技)
一站式定制
ATR机箱技术方案、图纸设计、仿真分析
ATR机箱加工、表处、喷漆、装配
ATR机箱安装附件:锁紧条、助拔器、前锁紧装置及配套使用附件、接地柱、隔振器等。
四川领航鱼科技一站式设计、加工、仿真、制造及附件选型。
您做功能,我做结构,领航鱼以高品质、高效率、低成本交付产品!。