折叠椅产品设计说明书
产品设计说明书(组合桌椅)

组合套装(滚动轮桌椅)--设计说明书一.设计题目及其说明设计理念:追求自由化,个性化的舒适体验效果设计目的:1.进一步认识组合套装的社会需求状况,同时为即将进入设计行业的自己积累设计作品的实践经验;2.加强对犀牛三维设计软件的熟练程度;3.增强产品设计的理念知识;4.考虑到组合套装的机动性以及搭配组合的多样性,我想营造出多种多样的氛围,期待良好的作品效果。
设计主题:滚动式套装桌椅组合,适用范围室内和户外都可以的,而且便于携带和移动。
二.调研与分析1.调研人在与产品的情感交流中,要想增强他们对产品的拥有欲望,在实用的同时,我们还要注意它的外表的创新性。
随着现代人们观念不断个性化,家具将成为人们表情达意的重要方式,家具既要体现共同需求,又要反映人的不同个性。
当今的套装家具行业面临着前所未有的竞争,消费者主导的时代已经来临,对于任何设计工作者来说,要想在未来激烈的市场竞争中占据有利地位,很大程度上要依赖产品的个性化创新。
其次,当代全球文化的格式下,作为东方文化形态的中国现代家居设计在西方强势文化的肆虐下以及以西方艺术形态为标准的状态下,东西方文化设计已经很难构成一个平等的对话平台,这使得中国现代家具一直处于被动的局面中。
一些设计师试图摆脱自己原有的文化体系,有意无意的将自己融入到西方的文化体系中,以迎合西方人的审美标准。
从而失去了设计的意味。
当今的家具市场之兴旺,完全可以用红红火火来形容,品种之多样,造型之多变,色彩之绚丽,一扫过去那种千篇一律的设计作品,再看一看现在家具城的兴起,以及现代人们的观念和追求的改变现状,让人不得不感慨设计的魅力!2.分析现在的家具设计更偏向于个性化,自由化,但是也不会太脱离主流方向(追求对称美,结构美的美学标准)。
对于桌椅套装组合的设计则更加需要考虑到传统元素与流行元素的有机结合。
当今社会的主流思想是追求精神享受,即追求自由,追求个性的解放,所以桌椅套装设计很好的联系了主流思潮。
多功能折叠椅说明书
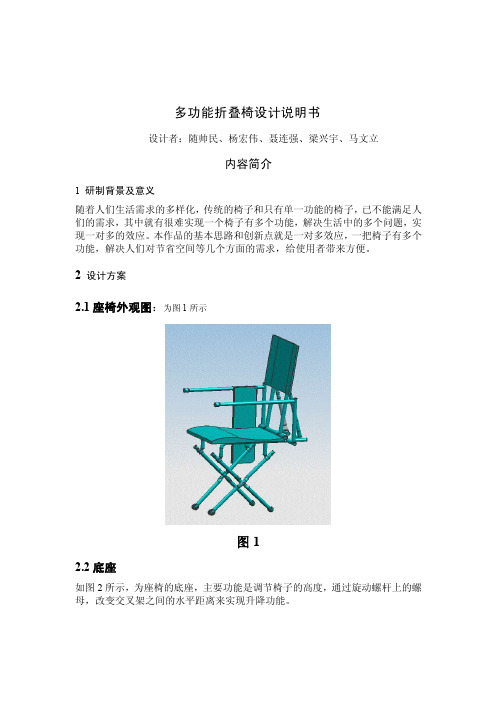
多功能折叠椅设计说明书设计者:随帅民、杨宏伟、聂连强、梁兴宇、马文立内容简介1 研制背景及意义随着人们生活需求的多样化,传统的椅子和只有单一功能的椅子,已不能满足人们的需求,其中就有很难实现一个椅子有多个功能,解决生活中的多个问题,实现一对多的效应。
本作品的基本思路和创新点就是一对多效应,一把椅子有多个功能,解决人们对节省空间等几个方面的需求,给使用者带来方便。
2设计方案2.1座椅外观图:为图1所示图12.2底座如图2所示,为座椅的底座,主要功能是调节椅子的高度,通过旋动螺杆上的螺母,改变交叉架之间的水平距离来实现升降功能。
图2如图3所示,桌子不用时,通过可动套筒挂在椅子的侧面(如图3(1))。
使用时,将桌子移至把手前端,并从外侧将桌子旋转270度至图3(2),并把桌子折叠部分打开(如图3(3))。
(1) (2) (3)图32.4可调节角度减震靠背装置如图4所示,当两边紧固螺丝拧紧的的时候,靠背被固定,当需要调节靠背角度时,可将靠背调成适宜角度,然后拧紧两边的螺丝,当两边的螺丝都拧松时,可作为减震靠背,增加舒适度。
图4如图5所示,此椅子可实现部分折叠功能,椅子的底座可以降到一定位置,靠背可向座板翻折,弹簧减震处的减震杆可拔出,形成折叠。
小桌子可以转到扶手上面节省空间。
图53理论设计计算椅子总体尺寸长约60cm,宽约45cm,高约120cm(正常情况下)。
理论升降范围约40cm。
迷你折叠桌(展开状态)长约40cm,宽约30cm。
靠背宽约40cm,长约65cm,靠背板后约1cm。
座板宽约40cm ,长约50 cm,平均厚度2cm。
椅子主架结构采用外径2.5cm,内径2.3cm的钢管材料。
Zippie X’CAPE 轻量级折叠椅子说明书

Crossbrace with Patented XLOCK TECHNOLOGYX’CAPE offers a level of performance and durabilitycomparable to a rigid frame wheelchair. Its lockout featureand fewer moving parts reduce weight, frame play, andmaintenance, ensuring more propulsion energy goesdirectly to the wheels. This allows your child to access all of their environments while experiencing less fatigue.ZIPPIE BELIEVES PROPER SEATINGAND POSITIONINGARE KEY TO HEALTHY GROWTH AND DEVELOPMENTApproved for use as an occupant’s seat in a motor vehicle when used with an approved Wheelchair Tiedown and Occupant Restraint System inaccordance with SAE (J2249).WC-19 Transit Approved The X'CAPE's setup – including seat widths, frameproportions, center-of-gravity settings, wheel sizes, andwheel angles (or camber) – can be fine-tuned to providethe best possible access to the wheels for each child.As they grow, 2" of width growth in the crossbraceand 3” of depth growth in the seat rail keep your childpositioned properly for maximum independence.TRUE Pediatric DesignFolding Push HandleTuck away behind the back upholstery or backrest while your child is self-propelling,or raise to your height so youcan give an extra push.One-step Pull-to-Fold One-step pull-to-fold strap collapses theframe effortlessly.One-step Push-to-LockOne-step push-to-locktab locks out the frame Weighing only 19 lbs, the X’CAPE is one of the lightestpediatric folding wheelchairs available. This meansenergy that would have been spent on propulsioncan be spent on playing, exploring and being a kid!ULTRA Lightweight FrameEVERY DETAILOF THE X’CAPEWAS DESIGNED FROMTHE GROUND UPTO HELP CHILDRENTRANSITION TOTHEIR NEXT LEVEL OFINDEPENDENCE®Seating Optionsmakes ordering simple Dynamic Back Option Allows controlled movementof the backrest to helpmaintain proper userpositioning and reducewheelchair damage.VersaRail ™Seat RailPediatric wheelchairs with short seat rails often don’tprovide enough space for multiple components –custom seating, armrests, wheel locks, side guards, etc.– leaving you in the tough spot of choosing what is mostimportant. VersaRail’s unique design accepts both bolt-onmounts and mounting clamps, and allows for sharedplacement of these components, so your child hasaccess to all the options they need–no compromises.Z-finity ™System As your child grows and his/her needs change, the Z-finity System can be adjusted between .5" above the seat pan to 21" below the seat pan to provide proper support of the legs and feet at all times. Its rotating hardware allows infinite adjustment of the footrest’s angle and placement to achieve optimal positioning of the feet, ankles, and knees.Swing-In/Swing-Out & Fixed Hanger Options Choose Swing-in/Swing-out hangers for aid in transfers and pulling up close to cabinets and counters. Choose Fixed hangers for the lightest weight configuration and an active look.HCPCS Code: E1238 Transit Option: Yes* Chair Weight: 19 lbs8x8" fixed front frame, 20" lite spoke wheels. Excludes armrests, push handles & anti-tips. Actual weight may vary according to chair configuration & accessories. Weight Capacity165 lbs (w/o seating) Overall Width14.8" to 26.5"Seat Widths8" to 16" (grows to 18")Seat Depths8" to 18" (grows to 20")Tubing DiameterBottom Tube: 7/8"VersaRail: accommodates1" clampsBack Angle AdjustmentFore (-) 8° toAft (+) 24°Front Seat-to-Floor Heights13" to 19"Rear Seat-to-Floor Heights11" to 18.5"Footrest/Frame Angle80° (Z-finity™may beadjusted to achieve a widerange of footrest angles)Back TypesStandard (adjustable) andDynamicBack Heights9" to 24"Back Post OptionsStraight (no push handle),Integral Push Handle,Folding Stroller HandleCenter of Gravity Adjust.3" (-0.5" to 2.5")Vertical Axle Plate Adj.: 4"Rear Wheel Sizes12", 16", 20", 22", 24"Armrest OptionsT-Post w/Sideguard,Flip-up, Adjust. LockingFlip-up, Length Adjust.Locking Flip-up, SinglePost Height AdjustableCaster Sizes3", 4", 5", 6"True Fit or One-Time FreeGrowth Kit: YesWarranty: Limited/Lifetime(Refer to Owner’s Manual for details)Color OptionsChoose from 24 standard frame colors and threespecial order frame colors. The crossbrace coloris chosen separately at no extra charge to createover600 custom color combinations!Spoke GuardsGlowStars and Stripes•IMPORTANT NOTE: Print processes cannot accurately represent paint finishes. Actual colors may vary.•Kolorfusion notavailable on thecrossbrace。
兽杯舒适轻便的折叠椅子说明书

TMUser ManualITEM# 62009900UMJOG05-23LITUS(Optional Liners Shown)1Table of ContentsIntended Use (3)Environment of Use (3)List of Parts Included and Optional Accessories (3)Important Warning Information (3)Cleaning & Maintenance (4)Dimensions (5)Assembly & Fitting ...........................................................• Front Wheel Installation (6)• Front Wheel In-line Locking (7)• Rear Wheel Installation (7)• Safety Harness (7)• Rear Wheel Parking Brake (8)• Reclining Seat (9)• Removing Seat Fabric (9)• Shopping Basket (10)• Canopy Installation (10)• Handle Height (11)• Folding (11)• Attendant Strap (12)Optional Accessories• Seat & Back Liners (12)• Head Rest (13)Washing (13)Lifting (14)Limited Warranty (14)23The Special T omato Jogger Pushchair is a jogger that provides mild to moderate positioning support for children with special needs. Its large wheels and sturdy frame make it ideal for both smooth indoor surfaces and rugged outdoor trails. It offers typical features for a lightweight jogger, including several adjustment options, accessories, a brake mechanism, user safety tether and the ability to fold for easy transport. The EU version features a front wheel cable operated disk brake.The Jogger Pushchair is intended for both indoor and outdoor use, in the home and community. If used in the rain, wipe off excess water with a soft cloth. If the chair is splashed with mud or corrosive substances like road salt, the chair should be washed clean with water, wiped dry, and a hypoallergenic and biodegradable lubricant reapplied to the moving parts. Contact with seawater should be avoided, as it will corrode areas that cannot be washed clean. When going from outside to inside, clean any excess dirt or mud from the wheels to prevent soiling of inside environment.Warning : Avoid open flames* and prolonged exposure to extreme heat or cold, including direct sunlight and saunas.Check temperature of chair before use.Environment of UseImportant Warning InformationWARNING: Avoid serious injury from falling or sliding out. Always use the seat harness. Never leave child unattended.IMPORTANT: Keep these instructions for future reference and folllow all instructions carefully. A child's safety is yourresponsibility. This jogger is suitable for one child. Always use the attendant strap while jogger is occupied by a child.Maximum weight for this jogger is 110lbs or 50 kg.■ Front wheel must be kept in-line for exercise.■ Children should be harnessed in at all times and should never be left unattended. The harness and seat belt are not a substitute for proper adult supervision■ It is important for your child’s safety that the harness be correctly fitted and adjusted. If not adjusted correctly in accordance with the instructions, the stability of the Jogger will be compromised.■ Never leave child in the Jogger when ascending or descending stairs or escalators or when travelling on other forms of transport.■ Apply brake when parking the Jogger.■ Do not carry additional children, goods or accessories in or on this Pushchair except as permitted in this manual. They may cause the Joggerto become unstable or place unneeded stress on the Jogger that could lead to breakage.■ Overloading, incorrect folding and the use of accessories, e.g. child seats, bag hooks, rain covers, buggy boards, etc., other than those approved by themanufacturer may damage or break this Jogger.■ Any damage caused by the use of accessories not supplied by manufacturer will not be covered by the terms of our warranty.■ Never allow children to stand on thefootrest.■ The Jogger should always open andfold easily. Do not force it. It may be necessary to re-read the instructions.■ Negotiate curbs and rough ground carefully. Repeated impact will causedamage to the Pushchair.■ Do not place items on the top of thehood as it may cause damage to the canopy.■ The child should be clear of movingparts while making adjustments. It is important that care is taken to ensure that children are kept clear of the Joggerwhen folding or unfolding. Pinch points and scissoring actions are unavoidableduring these operations List of Parts Included and Optional AccessoriesParts Included • 1 Folded Jogger Pushchair (pre-assembled)• 1 Jogger Front Wheel, 2 Jogger Rear Wheels •1 Attendant T ether StrapOptional Accessories • Jogger Rain Cover•Soft-T ouch Seat and Back Liners• Soft-T ouch Sitter• Medical Necessities Bag •Jogger Head Support* Resistance to ignition of upholstered parts complies to BS-EN 1021-1 and -24Maintenance ChartWeeklyEvery 3 months Every 6 months As necessaryRims, tires, and tire pressure •Wheel locks and hand brakes •Accessories•Front and rear wheel axles•Cleaning/lubricating all moving parts 1•Belts, zippers, and hook-and-loop closures •Seat/back upholstery 2 and tautness •Armrests & foam •Frame•Contacting a Special T omato dealer for service or repair 3•1Note: Do NOT use WD-40 or other silicone-based spray as a lubricant. 2Follow cleaning instructions for appropriate user hygiene3Note: Repair or replacement of non-removable, worn, or broken parts must be performed by a qualified service facility.Cleaning & MaintenanceMaintenanceThis Wheelchair requires regular maintenance by the user. Before each use, check all rivets and connecting devices for tight-ness and security. Inspect all brakes, wheels, and tires and replace or repair if necessary. Check all safety devices for correct operation. Never continue to use a product that is not structurally sound. The following maintenance procedures should be conducted on a regular basis:• Tire air pressure should be checked weekly , since low air pressure may affect brake ability.•Axles and moving parts should be wiped off weekly with a slightly moist cloth to remove dust, dirt and mud. Sparingly apply a high quality T eflon spray after each cleaning. DO NOT USE WD-40, silicone sprays or other lubricant sprays as they will attract dust and dirt.•In the event of a flat tire, remove wheel from frame, remove tire & inner tube from rim and patch hole using standard bicycle repair kit.•Repair or replace loose, worn, bent, missing or dam-aged parts before using the chair. Only manufacturer replacement parts should be used. It may be unsafe to use parts not supplied by manufacturer.• Clean frame with a damp cloth and a mild detergent and dry thoroughly.•The canopy may be sponged lightly using a damp cloth and a mild detergent. The seat cover, head cushion, lateral pads and harness pads may be washed. Line dry thoroughly before reuse. Gray Harness can be placed in a mesh bag and machine washed on gentle cycle only.•Do not fold or store the product while wet and never store in a damp environment; this can cause mildew to form.•You can machine wash the Jogger seat fabric in cold wa-ter with a mild detergent. T o minimize shrinkage, simply reattach the seat fabric to the frame to dry. (DO NOT put seat in the dryer)•Be sure to unzip and remove all three rigid board from the seat before washing.CleaningDimensionsJogger Sizing Chart DimensionsMaximum Weight Capacity110 lbs. (50 kg)Seat Width14 (35 cm)Seat Depth12” (30 cm) Crotch Strap Depth from Seat Back7.5 or 11.5” (19 or 29.2 cm)Seat Back Height25” (62.5 cm)Shoulder Strap Height11, 14 or 17” (28 35.6 or 43.2 cm) Seat to Footwell15” (37.5 cm)Handle Height to Floor35” - 43” (87.5 - 107.5 cm)Seat Recline Range100-140°Overall Dimensions (width x length x height)26” x 42” x 43” (65 x 105 x 107.5cm)Weight of Jogger27 lbs. (12 kg) Folded Dimensions (w/o rear wheels)33” x 21” x 16” (82.5 x 52.5 x 40cm)Manufacture Date CodeNote: Serial # located on inner metal frame near rear tire.561. Push foot plate of Jogger away from handle by pushing curved crossbar up and out. 3. Flip Jogger to upright position and clip lower belting around frame to secure seat fabric.2. Audible click will beheard when Jogger frame is completely unfolded.23Front Wheel Installation4Lay Jogger on its back with handle and rear axle are touching the floor.5. Place red Safety Retainers onto each side of the wheel axle as shown, then slide the front-wheel into the front-fork slots.6c. Close the skewer lever making sure that it is flush with the tubing. Be sure not to over tighten.6a. Install M5 bolt and washerthrough fork into the threaded hole on red Safety Retainer as shown. Repeat on opposite side with second M5 bolt and washer.6b. Insert skewer through wheel and install black skewer nut. Tighten by turning the skewer lever.55a 5b5b6c6(Unpack Jogger from Box and set wheels aside)Note: Check our YouTube channel for instructive and informative videos!Assembly & Fitting79. To install, gently slide the rear wheel’s axle into the frame’s supporting axle hole until you hear it click into place.10. To remove, simply push down the spring lock tab while pulling out on the wheel.11a. To adjust Safety Harness, uncliphooks.11b. Remove fleece lining by lifting Velcro tabs as shown.Front Wheel In-line Locking8. Image now shows the wheel locked in-line. Pull and rotate mechanism to unlock.7. The in-line locking mechanism is located behind the front wheel pivot point. Pull and rotate knob to lock and unlock. Image shows unlocked.Front wheel must be kept in-line for exercise78Rear Wheel InstallationSafety Harness1111b11a812. Unthread harness straps from fleece lining.12Safety Harness (continued)13a. Insert shoulder straps through loops for desired shoulder height.13b. Fine tune strap length for secure fit.1313a13b14a. Clip shoulder strap buckle to chest harness. 14b. To adjust the length of the center strap, move the plastic guide up anddown.1414bRear Wheel Parking Brake15. T o apply the parking brake, press down on the foot bar.1516. To disengage the brake, pull up on the foot bar.16For additionalinstruction, refer to video guide found at this link: bit.ly/JP6X482NOTE:Once fitting is complete, reassemble the fleece lining.917. Simply adjust the recline strap length to desired degree of recline. 18. Unlock the buckle shown in Figure 17 for maximum recline.Reclining Seat1819. Using a Phillips head screw driver unscrew hardware from the frame.Removing Seat Fabric1920. Unsnap fasteners on both sides of jogger.20a. Unlock seat strap from frame,buckle is suspended across the back of the jogger.2021. Unloop Velcro Strap through the D-ring, underneath the foot well.21NOTE: REMOVE A LL RIGID PARTS BEFORE WASHING Joggers are shipped with Seat pre-assembled.Assembly/Removal instructions are given if any pre-assembly items are removed for cleaning or replacement, refer to page 8 for additional information.1023. Wrap rear basket straps around the frame and loop back through the D-ring. Secure the Velcro strap.NOTE: The D-ring loops are at the rear of the basket.24a. Fasten the canopy to the portion of the upper frame that is not covered by fabric. Small holes in the crest of the frame tubing accept the canopy. Be sure there are NO obstructions between the canopy clip and the frame. There is a small plastic nipple on the canopy mechanism that fits into the hole in theframe.22. Secure front basket flap by snapping around the lower foot-well crossbar.22a. Detail of front shopping basket snaps.Shopping Basket23Canopy Installation24a24b. Hook the wire on the back side of the canopy mechanism and then close the lever by pressing it to the frame. DO NOT FORCE TO CLOSE! Double check for obstructions and be sure nipple is inserted into frame. 24b24(optional)Handle Height25. Adjust handle height, then re-lock.26. Squeeze folding mechanism locatedbelow the handle.26b. Secure Jogger in folded position with recline strap.FoldingTo ease Jogger Folding:• Fully recline seat back• Disengage Velcro Between Canopy & Seat Back• Push handle all the way up • Unlock front wheel swivel lock• Undo 5 point harness 262526a. Fold jogger back.25a. Adjust handle height, then re-lock.NOTE: Folding mechanism appears on both sides.27. Make sure safety wrist strap is secured properly around your wristwhenever your child is in the jogger.Attendant StrapOptional Accessories: Seat & Back Liners2828a28b28c28. Using the provided straps with the Seat & Back Liners, feed the straps through the slots in Jogger seat & back.28a. Place the Back Liner Straps into the slot at the height where you want the laterals will provide support.28b. The Seat Liner Straps will go through the lowest slots.28c. Clip the straps for both the Seat &Back Liners to each other on the back side of the jogger and tighten until secure.NOTE: The Jogger Chest Harness shouldlay over the top of the Back Liner forcorrect positioning. The Jogger 3-Pointlap belt can be fed through the 3 holes of the Seat Liner for optional positioning.29a. Use the strap provided with the Optional Head Rest to secure it to the Jogger.29cOptional Accessories: Head Rest29b. Thread the straps through the slots on the Jogger. 29c. Clip the straps together on the back side of the Joggerand tighten to secure it.30. You can machine wash your Jogger seat in cold water with a mild detergent. To minimize shrinkage, simply reattach the seat to the frame to dry. Be sure to remove all THREE (3) the rigid boards from the upholstery before washing. Unzip all THREE (3) zippers to remove the rigid boards.30a Rigid Board #130b Rigid Board #230c Rigid Board #3NOTE: Do NOT put seat in the dryer. You may clean the Jogger frame using a soft, dry cloth.Washing303030a30bLiftingWARNING:Never lift the Pushchair with a child in it.T o lift the Pushchair, firmly grasp the plastic portion of the front tube frame beneath cross section on both sides of Jogger.Your Pushchair is guaranteed to be free from any manufacturing defects for a period of 2 years from the date of purchase under normal use and provided it is used in compliance with the operating instructions. This warranty extends only to the original retail purchaser and is only valid when supplied with proof of purchase. Please retain proof of purchase with this Limited Warranty.Should a repair be needed please contact the retailer from whom the product was purchased. Please note that the warranty will not be applicable if:Limited Warranty■ A fault is caused by misuse or poor maintenance.■ Repairs are carried out by a third party.■ The Jogger is faulty due to general wear andtear which is the result of everyday use.■ The Jogger is damaged as a result of an accident.■The manufacturer is not satisfied that the statedwarranty terms and conditions have been met.。
折叠轮椅创新设计说明书

摘要根据所收集的各类文献及市场出售的各种轮椅显示,目前绝大多数轮椅可分为折叠式和固定式其中包括电动式等,折叠式轮椅收折之后所占的体积仍是非常庞大,如此将造成搬运困难,且施力不易,携带相当不方便,对于必须经常外出而行动不方便者,是个很大负担。
目前市面上亦有两三种可收折成手提箱大小的折叠式轮椅,称为组合式轮椅,但其最大的缺点是组装程序相当的复杂和费时,在每一次的使用前与收复过程中,必须经过相当繁琐的步骤,对于使用时间短而使用次数多的患者而言,是一个非常困扰的问题。
而电动式轮椅造价和价格比较贵不适合大众消费,而普通固定式的又占面积,不灵活。
本设计所要研究的仿生叠轮椅仅以连杆机构所组成,从经过设计和设计要求的限制,及各类参考文献中得出了最适合此类机构的是Watt I型六连杆机构,并且进行了应用材料的确定、杆件的力学分析和整体的结构设计,最后完成了实体3D模型的制作。
所以本设计所研究的手推型折叠轮椅是由单一自由度收折,并且没有分离的零件,不需使用任何拆卸工具即可以达到收折后体积小、重量轻、操作简便,像行李箱拖行及站立收藏等特性,适用于下肢瘫痪、年老体弱多病和行动不方便者,是一种非常理想的代步工具。
关键词:手推型折叠轮椅; 连杆机构; Watt I六联杆机构AbstractAccording to the literatures collected in this research, most of the folding wheelchair can only be folded in lateral direction and the folded volume is still too big to carry or to transport and it becomes a terrible burden for active wheelchair users. There are two or three folding wheelchairs selling in the market, which can be folded into the size of a suitcase and is called "assembly wheelchair." Their major defect is lengthy and complicated assembling procedures. Every time the user folds or unfolds the wheelchair, a tedious process must be conducted, which causes severe problems to daily wheelchair users. This research developed a linkage-type portable wheelchair. An optimal Watt-I six-bar mechanism was found according to the designrequirements and design constraints. A full-size mockup was built after the dimensional analysis was accomplished. The portable wheelchair developed in this research has one-DOF with no separated parts. It requires no tools to operate. The new design has compact folded volume and light weight. It is easy to operate and can be dragged like luggage case. Therefore, it is an ideal mobile tool for elders and handicapped persons.Keywords :hand-push; wheelchair; linkage; Watt-I six-bar目录摘要1Abstract1目录2第1章折叠轮椅设计的研究现状3第2章折叠轮椅设计的关键点32.1、折叠轮椅的结构设计32.2、折叠轮椅的材料和力学分析42.3、新型材料的简介42.4、折叠轮椅的创新设计52.5、基于Pro-e建立折叠轮椅的3D模型7第3章折叠轮椅设计的前景7结束语8主要参考文献9第1章折叠轮椅设计的研究现状由于现代医学的发展和进步,人类的寿命正逐渐的往上提升,致使各国老年人口将不断增加,然而高龄化的社会结构已然成为世界各国的重大挑战。
多功能超折叠纯手工实木婴儿椅设计说明书
多功能超折叠纯手工实木婴儿椅设计说明书一、背景国内外研究现状及发展动态分析现在市场上有众多的婴幼儿用品,与此课题相关的用品有婴儿车、宝宝转椅、儿童木马车及幼儿转椅等。
众多产品各有各自的特点,每个产品都有其竞争优势。
但没有一款是专们为四到十六个月的婴幼儿设计的转椅。
且市场上婴幼儿的转椅大都是设计为大人控制转动。
而有婴幼儿自我控制的转椅都是大龄幼儿,不满足适用对象要求。
国外有很多品牌的婴儿转移,如欧洲的“消保皇冠信誉”品牌,原单多功能豪华儿童餐椅,产品为出口原单,质量和工艺都非国内产品可比。
现实意义现在社会生活节奏越来越快,人们的工作生活节奏也越来越忙碌,当婴儿长大到四个月大以上是时,大人希望婴儿醒着的时候,一定的时间段内可以自娱自乐,这样不但可以培养其自理能力和独立意识此,而且可以腾出大人照看的时间。
另外,随着人们经济状况越来越好,现在人们对健康越来越重视,对婴幼儿的健康成长也越来越关注。
中国有4~16个月大的婴幼儿约1800万,每年的新生儿大约是五万个,也就是说每年都有五万个婴儿进入四个月大,所以此产品有一定的市场容量。
综上,此婴幼儿转椅符合消费者的消费需求,是一款适合开发,适合生产的产品。
【关键词】概儿童家具创新意识、手动能力、思维、想象力。
参考文献[1] 梁国强《多功能婴幼儿椅篓》[2]濮良贵纪明刚主编.《机械设计》.[3]高等教育出版社.2001[4] 郑甲红朱儒刘喜平主编.《机械原理》.[5] 机械工业出版社.2006[6] 朱辉等编著.《画法几何及工程制图》.[7]上海科学技术出版社.2003[8]周开勤主编.《机械零件手册》.高等教育出版社. 2001二、多功能超折叠纯手工实木婴儿椅的材料主要是由新西兰松制作而成。
新西兰松具有天然·坚固·用途广泛·永续生产·适应性强的特点。
新西兰松树干高,枝节少,出产的木材坚固、色浅、有优异的粘结性能、尺寸稳定性并可以着色以及净材均匀,是诸如家具、组件和细木家具等理想用材。
休闲椅设计报告

休闲椅设计报告一、设计意义据相关调查研究证明:在人的一生中,站着:30年,睡着:23年,坐着:17年,因此得出坐着在我们生命中占了很大的比例,所以,一把符合人体工程学需要的椅子能让我们坐得更舒适,生活更健康。
时下,舒适、体贴已成为家具的一个新的发展方向,所谓休闲家具正是对温情脉脉的人性化诉求的呼应。
休闲家具的主体是休闲椅。
俗话说:"好吃不过饺子,舒服不过躺着",忙碌奔波了一天,回到家里,最舒服的就是放倒疲惫的身体,把自己扔进喜欢的"坐骑"里彻底放松一下。
在美国,摇椅常常是喂乳妈妈的坐具,女人们几乎都在孕妇阶段加入摇椅族,因为摇椅可以缓解孕期渐次明显的背痛。
其实摇椅的坐姿,美国人爱,欧洲人并不苟同,或者说这种坐姿不存在以优雅出名的欧洲文化中。
然而,有缓慢的律动摇晃我们劳累的身心入梦,一天中有这一刻的散淡闲逸,谁还理睬老欧洲苛刻的优雅呢。
椅子的局部形态和尺度对使用有很大影响。
如:由它决定靠背和扶手的高度。
从人体解剖特点考虑,人的臀部肌肉丰厚坚实,是人体最能耐压的部位之一。
所以合适的坐具应当设计成使人体的重心落在臀部的骨骼上。
小孩子都喜欢赖在妈妈的怀里,或是坐在爸爸的腿上,这些都是人天生的本能,父母对小孩子趴在身上或坐到腿上的感觉作出相应的调整,使孩子得到最为温软舒适的怀抱,再轻轻地摇摇晃晃,孩子一会儿就进入了梦乡。
休闲椅就是对这种人生的温暖怀抱的模仿。
时下,舒适、体贴已成为家具的一个新的发展方向,所谓休闲家具正是对温情脉脉的人性化诉求的呼应。
休闲椅所表现出的极度的舒适感,就像是父母给予孩子的温软怀抱。
从很多休闲椅的设计和造型上我们可以体会到,它的中心和重心是:体现产品对人无微不至的关怀,让产品主动地去适应人,不要人去适应产品。
二、休闲椅设计研究的目的人们对城市户外活动热情的增加,一方面要求更多的户外活动空间,另一方面也要求有较高的户外活动质量,向户外空间提供更多休闲设施,可以供人们在劳累时得到暂时的休闲与交流。
折叠椅毕业设计说明书

《机械创新设计》设计说明书设计题目: 折叠椅专业: 班级: 设计成员:2021年 4月30日目录摘要 (3)第1章绪论 (4)1.1 设计背景 (4)1.1.1 折叠椅用途 (4)1.1.2 折叠椅的发展 (5)1.1.3 座椅的分类及优缺点 (6)1.2 课题的目的和意义 (7)1.3 课题研究的主要内容 (7)第2章座椅的折叠设计 (9)2.1 折叠椅的原始结构 (9)2.2折叠椅展开过程 (10)2.2.1 全部的展开 (10)2.2.2 展开背部图 (11)第3章创新设计.........................................................产品作原理 (12)3.2 创新点 (12)3.2.1创新点一 (12)3.2.2 创新点二 (13)3.3产品结构 (13)3.4产品优势 (13)第4章团队介绍 (14)4.1 团队成员 (15)4.2团队分工 (15)总结 (16)摘要折叠椅也可称作沙滩椅,或是休闲椅,它的主要特点就是能够折叠,携带方便,所以成为外出旅行者必不可少的装备之一。
第1章绪论1.1 设计背景为了方便人们夏季在沙滩更好的沐浴阳光,设计出这款多功能折叠椅,方便人们出行!方便人们在休息时更加好利用间隔时间。
1.1.1 折叠椅用途夏天的时候,很多人都喜欢去海边、泳池等清凉的地方,在水中畅泳嬉戏,在水边晒晒日光浴。
要晒日光浴,不能少的就是折叠椅了,躺在折叠椅上,感受一下海涛声,海风的抚摸,多么写意啊。
折叠椅也可称作沙滩椅,或是休闲椅,它的主要特点就是能够折叠,携带方便,所以成为外出旅行者必不可少的装备之一。
折叠椅,是休闲椅中的一类。
折叠椅可分为布制折叠椅,休闲折叠椅,户外折叠椅,折叠折叠椅,有皮质、不锈钢、塑料等材质,是户外休闲和室内休息的舒适椅子。
现在折叠椅笨重,不方便携带,而且还要带一把遮阳伞,非常的不方便。
图1-1 普通折叠椅1.1.2 折叠椅的发展2019年中国折叠椅市场规模达到了40亿元,预计2026年可以达到70亿元,未来几年年复合增长率(CAGR)为15%。
- 1、下载文档前请自行甄别文档内容的完整性,平台不提供额外的编辑、内容补充、找答案等附加服务。
- 2、"仅部分预览"的文档,不可在线预览部分如存在完整性等问题,可反馈申请退款(可完整预览的文档不适用该条件!)。
- 3、如文档侵犯您的权益,请联系客服反馈,我们会尽快为您处理(人工客服工作时间:9:00-18:30)。
便携式杆状折叠椅
产
品
设
计
说
明
书
设计者:胡豹王绍堂陈建强王昌省
山东大学机械工程学院
2011年11月6日
目录:
1 封面
2 目录
3 产品设计的目的和意义
4 同类产品概况简介
5 设计方案
6 设计尺寸
7 组装过程
8 参考文献
3.产品设计的目的和意义
许多世纪以来,折叠椅一直被认为是最重要的家具之一,是社会地位的象征。
在古文明中,折叠椅不只是为了供人就座,还用在了各种正式场合和仪式中。
它轻便、可叠放功能的座椅,既方便搬动,又节省空间。
座面板与背面板一般用原PP塑料在模具内一体注塑成型;椅架与椅脚用静电银色粉末喷塑的方形钢管,方形钢管比圆形钢管更为牢固耐用;一般椅架底部,即与地面接触的位置会加脚垫,起到防滑,防止划伤地板的作用。
使用场合:各类培训机构、各级学校、公共场所、医院、餐厅、酒店、公司、家庭等场所。
随着时代的发展人们对家具的要求不单纯是功能需要,更是装饰美观的需要、更是彰现个性的需要。
随着国内经济发展,人民的生活发生了根本性的变化,人们对折叠椅的需要也必然朝着健康、环保、品牌方向发展。
未来的折叠椅将要结合更多的功能,会将更多的结构简化,省去笨重的结构,更容易操作和节省空间,简洁,朴素。
而面对当前折叠椅笨重、者的后仍将占用大量空间的问题,设计了本产品。
本产品仍将沿用普遍的“X”形增加其牢固性,折叠后可称为一杆状,在登山、旅游等情况下可用作拐杖,将拐杖和折叠椅的功能集于一体,将为生活提供加大的便利。
图一:折叠椅发展史
4.同类产品概况简介
折叠椅1折叠椅2折叠椅3折叠椅4分
类
实
物
照
片
折叠前
折叠后
特点利用简单的原理解决生
活中的问题,该款折叠椅
用于家里来客人或者家
里人坐,节省空间,折叠
方便。
该折叠椅可以调节座椅
的靠背的位置,可以调
节到适合人们的位置,
使人感到舒适,折叠起
来所占的空间比较小,
适合晒太阳,休息。
该折叠椅简单,体积小,
非常节省空间,座椅的
面是用帆布制成,结实
耐用,而且人坐着舒适,
不会感觉硬,而是柔软。
该折叠椅简洁大方,
适用于会客洽谈,折
叠起来节省空间,不
占地方,方便收藏
虽然由前期数据查找中找到的椅子都能折叠成面,比较节省空间,但是都比较沉重,且功能单一,与人
们日益发展的生活需求有一定差距。
5.设计方案
5.1 整体方案构想
如前所述,在现在市场上,传统的折叠椅可折叠成面,但仍占用一定空间,且较为笨重,在户外野足登山过程中难于携带,且可携带的折叠椅功能又较为单一。
故我们将折叠椅与拐杖的功能结合在一起,在使用折叠椅时,可方便的组装成椅子状,达到椅子的功能。
而在不使用的时候,可恢复成杆状,即达到了节省空间的目的,又能在野外登山等活动中充当拐杖,从而达到一物多用的目的。
5.2各部分机构原理阐述
5.2.1 椅子杆1
功能:
该椅子杆是构成椅子面的重要部分,
内部存有帆布,可从中抽出连在另外
一个椅子杆2上,从而构成了椅子面
杆上的螺纹可连接其他椅子杆,
从而构成拐杖
椅子杆1全貌
椅子杆1局部图
该椅子杆1上的滑动槽连接另外一个杆(用来储存椅子腿)。
5.2.2 椅子杆2
功能
1.可以连接帆布的另外一端从而构成椅子面。
2.储存椅子腿,将椅子腿保存在杆的沟槽内,节省
空间。
3.带有螺纹,连接其他杆。
椅子杆2全貌
椅子杆2局部
5.2.3椅子腿
功能:
椅子腿的构造比较简单,共有四条,形成
两个“X”结构,利用连接杆连接起来。
平时椅
子腿保存在椅子杆2中,使用时放出。
5.2.4销钉
功能:
固定两个椅子腿,从而形成两个“X”交叉的结构,比较稳定。
销钉图
5.2.5连接杆
功能:
该连接杆平时储存在椅子腿的沟槽里,共有两根,分别储存在左右两侧的凹槽,组装椅子的时候,两个杆扣在一起,从而达到固定的作用
连接杆1全貌图
连接杆2全貌图
6.设计尺寸
经过基本设计,现将折叠椅的尺寸定为如下:
长:350mm 宽:280mm 高:300mm
7.组装过程图片
组装1.伸出椅子腿
组装2.固定连接杆
组装3.椅子成型图
组装4.闲置时可连接成一杆,作为拐杖用(分散)
组装5.闲置时可连接成一杆,作为拐杖用(整体)8.参考文献
1. 机械设计手册3.机械工业出版社,2007.12。