柯达 M341 说明书
柯达照相机说明书02
KODAK EASYSHARE M381Digital CameraExtended user guideFor interactive tutorials:/go/howtoFor help with your camera:/go/m381supportEastman Kodak CompanyRochester, New York 14650© Kodak, 2009All screen images are simulated.Kodak, EasyShare, and Perfect Touch are trademarks of Eastman Kodak Company. 4H6510_enProduct featuresFront viewShutter buttonMode dialPower button Flash button Self-timer lightLens/CoverMicro-phoneFlashProduct featuresBack viewlight(Telephoto/Wide Angle) buttonUSB/AV Out DC-In (5V)Strap postOK button SD/SDHC Card/Battery compartmentShare button Tripod socketReview buttonTable of contents1 Setting up your camera (1)Attaching the strap (1)Loading the KLIC-7003 battery (1)Charging the battery (2)Turning on the camera (3)Setting the language and date/time (3)Storing pictures on an optional SD or SDHC Card (4)2 Taking pictures/videos (5)Taking a picture (5)Using optical and digital zoom (6)Using the flash (7)Using different modes (8)Taking a video (10)Using shortcuts (10)Using the self-timer (11)Taking panoramic pictures (12)Understanding the picture-taking icons (13)3 Working with pictures/videos (14)Reviewing pictures/videos (14)Deleting pictures/videos (15)Viewing pictures/videos in different ways (16)Selecting multiple pictures/videos (16)Making a multimedia slide show (17)Using the menu button in review (19)Cropping pictures (20)Using KODAK PERFECT TOUCH Technology (20)Copying pictures/videos (21)Editing videos (21)Understanding the review icons (24)Table of contents4 Using the Menu button (25)Using the Capture tab (25)Using the Setup tab (29)5 Transferring, printing, tagging (32)Installing the software (32)Transferring pictures/videos (33)Printing pictures (34)Tagging/marking your pictures (36)6 Getting help (40)Getting help from your camera (40)Getting help on the Web (41)Troubleshooting (42)7 Appendix (46)Camera specifications (46)Care and maintenance (48)Upgrading your software and firmware (48)Storage capacities (49)Important safety instructions (49)Battery replacement, battery life (50)Limited warranty (51)Regulatory compliance (53)1Setting up your cameraIMPORTANT: For package contents, see your product package.Attaching the strapLoading the KLIC-7003 batteryFor information on replacing the battery and extending battery life, see page 50.Notched cornerSetting up your cameraCharging the batteryOther charging optionsPurchase accessories /go/m381accessoriesBattery Charging light:• Blinking: charging • Steady: finishedTurn off the camera.1Connect the KODAK USB Cable,Model U-8.2frequently, even if power remains.KODAK 5V AC Adapter (May be sold separately)Setting up your cameraTurning on the cameraSetting the language and date/timeNOTE: To change language and date/time in the future, use the Setup tab (see page29).to change current field.for previous/next field.OK to accept.At the prompt, press OK.to change.OK to accept.Language:Date/Time:Setting up your cameraStoring pictures on an optional SD or SDHC CardYour camera has internal memory. You can purchase an SD or SDHC Card to conveniently store more pictures/videos.CAUTION:A card can only be inserted one way; forcing it may causedamage. Inserting or removing a card while the camera is on may damage the pictures, the card, or the camera.Purchase accessories /go/m381accessories1Turn off the camera.2Insert or remove the optional card.3Turn on the camera.2Taking pictures/videos Taking a picture1Turn the Mode dial to Smart Capture . Thenpress the Power button to turn on the camera.2Compose the picture.3Press the Shutter button halfway to focus andset exposure. When the framing marks turn green,press the Shutter button completely down.Using the framing marks to take picturesFraming marks indicate the camera focus area. In Smart Capture mode (and in SCN modes designed for pictures of people), the camera attempts to focus on faces.halfway.completely down toTaking pictures/videosReviewing the picture/video just takenAfter you take a picture/video, the LCD briefly displays a quickview. (To exit the quickview sooner, press the Shutter button halfway.) To review pictures/videos anytime, seepage 14.Using optical and digital zoom1To zoom in, press Telephoto (T).To zoom out, press Wide Angle (W).2Take the picture.NOTE: For focus distances, see Camera Specifications starting onpage 46.To use the 5X digital zoom:■In video mode, press the Telephoto (T) button.■In picture-taking mode, press the Telephoto (T) button until the slider on the LCD is at themaximum optical zoom range. ReleaseTelephoto (T), then press it again.NOTE: Optical zoom is not available in Video mode. Digital zoom is not available in Smart Capture mode.You may notice decreased image quality when using digital zoom. The slider pauses and turns red when the picture quality reaches the limit for an acceptable 4 x 6-in. (10 x 15 cm) print.Delete the current picture/videoOK Play/pause a videoAdjust volumeTaking pictures/videosUsing the flashFlash modesFlash fires AutoWhen the lighting conditions require it.Fill (Flash On)Every time you take a picture, regardless of the lightingconditions. Use when the subject is in shadow or is“backlit” (when the light is behind the subject). In lowlight, hold the camera steady or use a tripod.NOTE: (Not available in Smart Capture mode.)Red Eye Your camera can correctred-eye using 2methods. To choose a red eye setting, see Red Eye Reduction, page 29.PreflashA preflash fires, shrinking the eye pupil, before the picture is taken.Digital Correction A preflash does not fire; the camera corrects red eye.Off NeverPress the flash button repeatedlyto scroll through flash modes.The current flash mode is shown inthe LCD status area.Taking pictures/videosUsing different modesTurn the Mode dial to the mode that best suits your subjects and surroundings.Use this mode ForSmartCapture General picture taking—it offers excellent image quality and ease of use.■Faces are detected.■The scene is analyzed for other content and for lighting.You can choose the best picture size and aspect ratio for your needs—just press the Menu button and choose Picture Size.■3:2 (the best choice when making 4 x 6 prints)■16:9 (wide screen)■4:3 (the default setting)Program Advanced picture taking—allows access to manual settings.BlurReductionReducing blur caused by camera shake or subject motion.Sport Action pictures.Panorama“Stitching” up to 3 pictures into a panoramic scene. (See page12.)Scene Point-and-shoot simplicity when taking pictures in practically anysituation. (See page9.)Video Capturing video with sound. (See page10.)Taking pictures/videosUsing Scene (SCN) modesChoose a Scene mode—for great pictures in practically any situation!1Turn the Mode dial to SCN.2Press to view scene mode descriptions.If the mode description turns off before you finish reading it, press OK.3Press OK to choose a Scene mode.SCN mode ForPortrait Full-frame portraits of people.Landscape Distant scenes.Close-up Close range. Use available light instead of flash, if possible.Flower Close-ups of flowers or other small subjects in bright light.Sunset Subjects at dusk.Backlight Subjects that are in shadow or “backlit” (when light is behind thesubject).Candle Light Subjects illuminated by candle light.Children Action pictures of children in bright light.Manner/ Museum Quiet occasions, like a wedding or lecture. Flash and sound are disabled. Place the camera on a steady surface or tripod.Text Documents. Place the camera on a steady surface or tripod. Beach Bright beach scenes.Snow Bright snow scenes.Fireworks Fireworks. Place the camera on a steady surface or tripod.Self-PortraitClose-ups of yourself. Assures proper focus and minimizes red eye. Night Portrait Reduction of red eye in night scenes or low-light conditions. Night Landscape Distant scenery at night. Flash does not fire.Panning Emphasizing horizontal motion, keeping the foreground sharp. High-ISO Low-light pictures (such as people on a stage).Taking pictures/videosTaking a video1Turn the Mode dial to Video.2Press the Shutter button completely down,then release it. To stop recording, press and releasethe Shutter button again.To review and work with videos, see page14.Using shortcutsFor quick access to the most popular functions:1Press the Info button.The shortcuts appear.2Press to access functions like Exposure Compensation, Self-timer, and Auto focus. (You’ll see different functions in different modes.)3Press to choose a setting.4To hide the shortcuts again, press .ShortcutsTaking pictures/videosUsing the self-timer Use the self-timer when you want to be included in a picture, or to ensure a steadyShutter button press. Place the camera on a tripod or flat surface.1In any picture-taking mode, press the Infobutton to show shortcuts.2Pressto highlight the self-timer icon. Pressto choose a setting:10 seconds— A picture is taken after a 10-second delay (so you have time to get into the scene). 2 seconds— A picture is taken after a 2-second delay (for a steady, shutter release on a tripod).2 shot—The first picture is taken after a 10-second delay. A second picture is taken 8 seconds later.3Compose the scene. Press the Shutter button halfway , then completely down .The camera takes the picture/pictures after the delay.NOTE: In Panoramic modes (page 12), only the 2- and 10-second options are available.Use the same procedure to take a 2- or 10-second self-timer video, but press the Shutter button completely down .1022xTaking pictures/videosTaking panoramic picturesUse panorama to “stitch” up to 3 pictures into a panoramic scene.NOTE: For best results, use a tripod. Only the panoramic picture is saved; individual pictures are not. (Exposure and white balance are set with the first picture. The flash is set to Off.)1Turn the Mode dial to .2Press to highlight Panorama Left-Right or Panorama Right-Left (dependingon the direction you want to pan), then press OK.3Take the first picture.After a quickview, the LCD displays the liveview and an “overlay” from the first picture.4Compose the second picture. Make the overlay from the first picture cover the same portion in the new picture. (You can press the Delete button to re-take a picture.)5If you are taking only 2 pictures, press OK to stitch them together.After you take 3 pictures, the pictures are automatically stitched together.NOTE: To use the self-timer 10-second or 2-second setting, see page 11.Take 2 or 3pictures.Get 1panoramicpicture.Taking pictures/videosUnderstanding the picture-taking icons Battery levelCapturemode Pictures/time remaining Zoom slider Tag name Self timer Flash modeExposure compensation FPO3Working with pictures/videosReviewing pictures/videos 1Press the Review button.2Press for previous/next picture/video.■Press the Shutter button halfway down to returnto Capture mode.■To view pictures/videos as thumbnails, see page 16.Magnifying a picture 1Press T to magnify 1X–8X.2Pressto view other parts of a picture.■Press OK to return to 1X.Playing a videoPress OK to play a video. Press OK to pause/resume.During playback:■Press to adjust the volume.■Press to play at 2X speed; press again for 4X.■Press to reverse at 2X speed; press again for 4X.4X 4X 1X 2X 2XForwardReverse Playback speedDeleting pictures/videos1Press the Review button.2Press for previous/next picture/video.3Press the Delete button.4Follow the screen prompts.NOTE: To delete protected pictures/videos, remove protection before deleting. (See Protecting pictures/videos from deletion.)Using the undo delete featureIf you accidentally delete a picture, you may be able to use Undo Delete to retrieve it. This feature is only available immediately after you delete a picture.Protecting pictures/videos from deletion1Press the Review button.picture/video.previous/next2Press for3Press the Menu button.4Press to highlight Protect, then press OK.The picture/video is protected and cannot be deleted. The Protect icon appearswith the protected picture/video.■Press the Shutter button halfway down to return to Capture mode. IMPORTANT: Your camera offers a built-in Help system. See page40.CAUTION:Formatting internal memory or an SD or SDHC Card deletes all(including protected) pictures/videos. (Formatting internalmemory also deletes email addresses and tag names. To restorethem, see EASYSHARE Software Help.)Viewing pictures/videos in different waysViewing as thumbnails (multi-up)1Press the Review button.The camera shows the last picture that was taken.2Press the Wide Angle (W) button to view pictures/videos as thumbnails. (Press it again to see more, smaller thumbnails.) To view all pictures/videos, highlight the All tab. To sort by favorites, date, or tagged pictures/videos, press and highlight theappropriate tab.3To see a single picture/video, pressto highlight it. Then press the Telephoto (T) button.■To select multiple pictures/videos, see Selecting multiple pictures/videos .■Press the Shutter button halfway down to return to Capture mode.Selecting multiple pictures/videosUse the multi-select feature when you have two or more pictures to print, transfer, delete, etc. Multi-select is used most effectively in Multi-Up mode, page 16.1Press the Review button, thenandto find a picture/video.2Press OK to select pictures/videos.A check mark appears on the picture. You can nowprint, transfer, delete, etc. the selected pictures. You can press OK a second time to remove a check mark.SelectedpicturesMaking a multimedia slide showUse Multimedia Slide Show to display your pictures/videos on the LCD. You can play all pictures/videos, or select pictures to include in the slide show. You can even save a slide show.Make a multimedia slide show that you can save1Press the Review button. Select 2-100 pictures (see page16).2Press the Menu button, then to highlight the Review tab. HighlightMultimedia Slide Show, then press OK.3Press to highlight Preview Show, then press OK.Each picture/video is displayed once. To interrupt the slide show, press OK. After the slide show plays, you may save or modify it.IMPORTANT: Your camera offers a built-in Help system. See page40.Play a multimedia slide show loopWhen you turn on Loop, the slide show is continuously repeated.1On the Multimedia Slide Show menu, press to highlight Loop, then press OK.2Press to highlight On, then press OK.3Press to highlight Preview Show, then press OK.The slide show repeats until you press OK or until the battery is exhausted.Displaying pictures/videos on a televisionYou can display pictures/videos on a television, computer monitor, or any device equipped with a video input. To connect the camera directly to a television, use an A/V cable (may be sold separately).NOTE: Ensure that the Video Out setting (NTSC or PAL) is correct (see page 30). The slide show stops if youconnect or disconnect the cable while the slide show is running. (Image quality on a television screen may not be as good as on a computer monitor or when printed.) Purchase accessories/go/m381accessoriesUsing the menu button in reviewTo use the Menu button in review:1Press the Review button, then the Menu button.2Press to highlight a tab:■Review to view and share pictures/videos■Edit to edit pictures/videos■Setup to control how your camera operates3Press to highlight a setting, then press OK.4Highlight an option, then press OK.IMPORTANT: Your camera offers a built-in Help system. See page40.Cropping picturesYou can crop a picture so that only the desired portion of the picture remains.1Press the Review button, then to find a picture to crop. 2Press the Menu button, thento highlightthe Edit tab. Highlight Crop, then press OK.3Press Telephoto (T) to zoom in, orto move the crop box. Press OK.4Follow the screen prompts.The picture is cropped. (The original is saved.) Cropped pictures cannot be cropped again on the camera. ■Press the Shutter button halfway down to return to Capture mode.IMPORTANT: Your camera offers a built-in Help system. See page 40.Using KODAK PERFECT TOUCH Technology KODAK PERFECT TOUCH Technology helps ensure better, brighter pictures. PERFECT TOUCH Technology is automatically applied to pictures taken in Smart Capture mode. (You cannot apply PERFECT TOUCH Technology to videos, panoramic pictures, orpictures to which PERFECT TOUCH Technology is already applied.)1Press the Review button, then for previous/next picture.2Press the Menu button, then to highlight the Edit tab. Highlight PERFECT TOUCH Tech, then press OK.The enhancement is previewed. Press to view other parts of the picture.3Press OK. Follow the screen prompts to replace the original picture or to save the enhanced picture as a new one.■Press the Shutter button halfway down to return to Capture mode.Picture Cropped pictureCopying pictures/videosYou can copy pictures/videos from a card to internal memory or from internal memory to a card.Copy pictures/videos:1Press the Review button.2Press the Menubutton, then to highlight the Review tab. 3Press to highlight Copy, then press OK. Highlight a choice, then press OK.NOTE:Pictures/videos are copied, not moved. To remove pictures/videos from the original location after copying, delete them (see page15).IMPORTANT: Your camera offers a built-in Help system. See page 40.Editing videosYou can do incredible things with your videos!Making a picture from a video You can choose a single frame from a video, then make a picture suitable for a 4 x 6-inch (10 x 15 cm) print.1Press the Reviewbutton, then to find a video.2Press the Menubutton, then to highlight the Edit tab. Highlight Make Picture, then press OK.3Follow the screen prompts.A picture is created. (The original video is saved.)■Press the Shutter button halfway down to return to Capture mode.IMPORTANT: Your camera offers a built-in Help system. See page 40.Video PictureTrimming a videoYou can remove an unwanted start or end from a video, saving only the desired portion.Press the Review button, thento find a video.Press the Menubutton, then to highlight the Edit tab. Highlight Trim, then press OK.3Follow the screen prompts.The video is trimmed. (You can save it as a new videoor replace the original.)■Press the Shutter button halfway down to return to Capture mode.IMPORTANT: Your camera offers a built-in Help system. See page 40.Video Trimmed videoMaking a video action printFrom a video, you can make a 9-up picture, suitable for a 4 x 6-inch (10 x 15 cm) print.1Press the Reviewbutton, then to find a video.2Press the Menu button, then to highlightthe Edit tab. Highlight Action Print, then press OK.3Highlight an option, then press OK.Auto—The camera includes the first and lastframes, then 7 equally spaced frames.Manual—Choose the first and last frames; thecamera chooses 7 frames.A 9-up picture is created.■Press the Shutter button halfway down to return to Capture mode. IMPORTANT: Your camera offers a built-in Help system. See page40.VideoUnderstanding the review iconsAdd text tag View multi-upSelect pictureEmail tagFavorite tagPrint tag/number of printsProtectedPicture/Video number Upload tagVideo durationBattery levelText tag name Play videoFPO4Using the Menu buttonYou can change settings to get the best results from your camera.1Press the Menu button.2Press to highlight a tab:■Capture/Videofor the most common picture/video-taking settings ■Setupfor other camera settings 3Pressto highlight a setting, then press OK.4Highlight an option, then press OK.NOTE: Some modes offer limited settings. Some settings remain until you change them; others, until youchange modes or turn off the camera.Using the Capture tabPress Menu,, then , and OK to access settings Capture OptionsIMPORTANT: Your camera offers a built-in Help system. See page 40.Exposure CompensationMake a picture lighter ordarker. (Available in Programand Panorama modes.) To usea shortcut, see page 10.0.0, +/-0.3, +/-0.7, +/-1.0, +/-1.3, +/-1.7, +/-2.0Picture SizeChoose a picture resolution.See Camera specifications, page 46.BurstTake up to 3 pictures in quicksuccession. (Burst is notavailable in Panorama mode.)Off On —press the Shutter button halfway to focus and set exposure. Press the Shutter button completely down and hold it to take pictures.Using the Menu buttonSelf-timerTake a picture/video after a delay, or take 2 pictures. (Also see page11.)10 seconds 2 seconds 2-shotFocus ModeSelect a large or concentrated area of focus.Auto—for general picture-taking.Macro—for sharpness and detail in pictures at close range. Use available light instead of flash, if possible. The camera automatically sets the focus distance depending on the zoom position.Infinity—for distant subjects; auto-focus framing marks are unavailable.Long Time Exposure Choose how long the shutter stays open.None0.5, 1.0, 2.0, 4.0, 8.0 secondsColor ModeChoose color tones. Unavailable in Video mode.High ColorNatural ColorLow ColorBlack & WhiteSepiaNOTE: EASYSHARE Software also lets you change a color picture to black-and-white or sepia.AF Control (Still) Choose an auto-focus setting.Continuous AF—because the camera is always focusing, there is no need to press the Shutter button halfway down to focus.Single AF—uses TTL-AF (through-the-lens auto focus) when the Shutter button is pressed halfway down.Press Menu,, then , and OK to access settings Capture OptionsIMPORTANT: Your camera offers a built-in Help system.See page40.Using the Menu buttonWhite BalanceChoose your lighting condition. (Available only in Program and Panorama modes.)Auto—automatically corrects white balance. Ideal for general picture taking.Daylight—for pictures in natural lighting. Tungsten—corrects the orange cast of incandescent light bulbs. Ideal for indoor pictures under tungsten or halogen lighting without flash.Fluorescent—corrects the green cast of fluorescent lighting. Ideal for indoor pictures under fluorescent lighting without flash.Open Shade—for pictures in shade in natural lighting.Face Detect Capture Choose if faces get focus priority.On—in SCN modes designed for pictures of people, the camera attempts to focus on faces.OffNOTE: Not available in Smart Capture mode (because face detection is always on).Exposure Metering Evaluate light levels at specific areas of a scene.Multi-Pattern—evaluates lighting conditions throughout the image to give an optimum picture exposure. Ideal for general picture taking.Center-Weight—evaluates the lighting conditions of the subject centered in the lens. Ideal for backlit subjects. Center-Spot—similar to Center-weight, except the metering is concentrated on a smaller area of the subject centered in the LCD.AF ZoneSelect a large or concentrated area of focus.Multi-Zone—evaluates 5 zones to give an even picture focus. Ideal for general picture taking.Center-Zone—evaluates the small area centered in the lens. Ideal when you need precise focus.Press Menu,, then , and OK to access settings Capture OptionsIMPORTANT: Your camera offers a built-in Help system.See page40.Using the Menu buttonVideo settingsISO SpeedControl the sensitivity of thecamera sensor.See Camera specifications, page 46.Sharpness Control picture sharpness.Sharp NormalSoftPress Menu,, , and OK to access settings Video OptionsIMPORTANT: Your camera offers a built-in Help system. See page 40.Video SizeChoose a video resolution.640 x 480 @ 30 fps (VGA) 320 x 240 @ 30 fps (QVGA)Self-timerTake a picture/video after adelay, or take 2 pictures. (Alsosee page 11.)10 seconds 2 seconds 2-shot Focus ModeSelect a large or concentratedarea of focus.Auto—for general video-taking. TBD Macro—for close range. TBDInfinity—for distant subjects. TBDVideo Blur Reduction Reduce blur caused by camera shake or subject motion.OnOff Press Menu,, then , and OK to access settings Capture OptionsIMPORTANT: Your camera offers a built-in Help system. See page 40.Using the Menu buttonUsing the Setup tabPress Menu,to highlight Setup, thenand OK to access settings Setup Options IMPORTANT: Your camera offers a built-inHelp system. See page 40.Share button Choose how pictures/videos are handled when you press the Share button (via EASYSHARE Software for WINDOWS-OS only).NOTE: Some online services limit video file sizes. Use EASYSHARE Software or choose a preferred online service.Favorite and Upload—pictures/videos aretagged as Favorites and uploaded to yourpreferred online service when you connect to yourcomputer or network.Favorite—pictures/videos are tagged asFavorites (5-star in EASYSHARE Software, on yourcomputer).Upload—pictures/videos are uploaded to yourpreferred online service when you connect to yourcomputer or network.LCD Brightness Choose LCD brightness.Power Save—Lower LCD brightness; conservespower.High Power—Higher LCD brightness; uses morepower.Image Storage Choose a storage location for pictures/videos.Auto—the camera uses the card if one is in thecamera. If not, the camera uses internal memory.Internal Memory—the camera always usesinternal memory, even if a card is installed.Set Tag Create tag names and assign them to pictures/videos. See page 36.New Tag—create a tag.Delete Tag—delete a tag.Clear All—cancel selected tags.Red Eye Reduction Choose how you want to reduce red eye.Preflash—red eye preflash fires before the picture is taken.Digital Correction—red eye preflash does notfire; the camera corrects red eye.Using the Menu buttonQuickview Briefly display a picture after it is taken.OnOffDigital Zoom Turn digital zoom on/off.OnOffOrientation Sensor Orient pictures/videos so that they are displayed with the correct side up.On—the camera rotates pictures so that allappear in the same orientation on the camera.Off—pictures are not rotated.Camera Sounds Choose sound effects, volume.Power OnFocus LockShutterErrorSelf-timerSound Volume (High, Medium, Low, Mute)Date & Time Set date and time.Video Out Choose the regional setting that lets you connect the camera to a television or other external device.NTSC—used in North America and Japan; mostcommon format.PAL—used in Europe and China.LanguageChoose your language.Reset CameraReset settings to their default.Press Menu,to highlight Setup, thenand OK to access settings Setup Options IMPORTANT: Your camera offers a built-inHelp system. See page 40.。
SIMATIC CP 341 快速入门指南说明书
Primeros pasosEl presente manual le guía, a través de un ejemplo concreto con cuatro pasos de puesta en servicio, hasta una aplicación de funcionamiento real que le permitirá enviar datos a través de la interfaz serie y conocer y supervisar las funciones básicas del CP 341 por cuanto respecta a hardware y a software. Las referencias al manual pretenden darle una primera visión de conjunto de las informaciones que contiene.Dependiendo de la experiencia de que se disponga, para ejecutar el ejemplo se requieren de 1 a 2 horas.RequisitosDeben cumplirse los siguientes requisitos:S Debe contar con un equipo S7-300, formado por una fuente de alimentación y una CPU.S En la PG debe haber instalado correctamente STEP 7 (≥V5.0).S Debe haber creado un proyecto para el equipo S7-300.S La PG debe estar conectada a la CPU.S Dispone de un módulo CP 341, el software de configuración correspondiente y del cable necesa-rio.S Debe haber preparado al interlocutor para la transmisión serie de datos. Si utiliza el CP 341 con interfaz RS232/V.24, también puede emplear como interlocutor una PG que tenga instalado el pro-grama “Hyper Terminal”. El programa “Hyper Terminal” se encuentra en Windows, bajo Inicio →Programas → Accesorios →Hyper Terminal. Más abajo se describe cómo arrancar el programa. Instalar el paquete de configuración en la PGEl paquete de configuración incluye una herramienta de parametrización para el CP 341, una librería con bloques de función y un ejemplo de programación.Arranque el programa de instalación del CD haciendo doble clic en el archivo SETUP.EXE.Siga las instrucciones del programa de instalación.Montar el CP 341 y conectarlo con el interlocutorEnchufe el elemento de ampliación de bus suministrado con el CP 341 en el conector de bus de la CPU. Enganche el CP 341 en el perfil soporte, abátalo hacia abajo y atorníllelo.Conecte los terminales L+ y M de su fuente de alimentación a las conexiones correspondientes del CP.Con el cable de conexión, establezca la conexión entre el CP 341 y su interlocutor. En el anexo B del manual encontrará la ocupación del conector de interfaz.Prueba:Conecte la tensión en la fuente de alimentación.Después de la fase de inicialización se encenderá el LED SF del CP 341. Parametrizar el CP 341Abra su proyecto en el Administrador SIMATIC.Dentro del proyecto, abra la tabla de configuración de HW Config.En el catálogo de hardware seleccione el CP 341 con la referencia correcta (MLFB) y arrástrelo a la ranura prevista.Haciendo doble clic sobre el CP 341 se abre la pantalla “Propiedades CP 341”.Anote bajo “Adress” (Dirección) la dirección del módulo (en el ejemplo 256 →100 Hex). Necesitaráeste valor para la integración en su programa de usuario.Haga clic en el botón Parámetros y seleccione el protocolo “ASCII”. Haga doble clic en el Sobre. Haciendo clic en el botón Aceptar, acepte las pantallas de parametrización con el siguiente ajuste predeterminado: 9600 bit/s, 8 bits de datos, 1 bit de parada, paridad par.Guarde la parametrización con Archivo → Guardar y salga de la pantalla de parametrización con Archivo → Salir. Dentro de la pantalla “Propiedades CP 341”, haga clic en el botón Aceptar.Guarde en su proyecto la configuración que ha creado pulsando Equipo → Guardar y compilar. Estando la CPU en STOP, transfiera la configuración con los comandos Sistema de destino → Cargar en módulo.Los datos se transfieren directamente a la CPU y al CP 341. Si la carga se efectúa sin errores se apaga el LED SF.Cierre HW Config pulsando Equipo → Salir.Integración en el programa de usuarioAl instalar el paquete de configuración ha instalado el proyecto de ejemplo “CP340_41” en la librería \Siemens\STEP7\Examples.Vaya al Administrador SIMATIC y abra el proyecto de ejemplo con los comandos Archivo → Abrir... →Proyectos y haga doble clic en el subproyecto “CP341Protocol 3964” (sirve también para protocolos ASCII).Abra el programa S7 de la CPU de este subproyecto. Haga doble clic en la carpeta “Blocks”(bloques).Copie en su proyecto, además de los datos del sistema, todos los bloques con Equipo SIMATIC300→ CPU3xx → Programa S7 → Bloques.S FC21FC con SENDS FC22FC con RECEIVES DB21, DB22DBs de instancia para los FBs estándarS DB40, DB41DBs de trabajo para los FBs estándarS DB42DB desde el que se envíaS DB43DB en el que se depositan los datos recibidosS OB1OB cíclicoS OB100Rearranque OB (de rearranque en caliente)S VAT1Tabla de variablesS FB7, FB8FBs estándar para RECEIVE, SENDS SFC 58, 59SFCs para los FBs estándarAbra la FC22 de su proyecto con un doble clic y cambie la dirección del módulo “LADDR” “272” por “256” en la primera línea del segmento 1.Guarde los bloques con los comandos Archivo → Guardar.Salga del editor de la FC con los comandos Archivo → Salir.En el Administrador SIMATIC, seleccione Equipo SIMATIC 300 → CPU3xx → Programa S7 → Blo-ques.Cargue en su CPU todos los bloques S7 existentes mediante Sistema de destino → Cargar (CPU en estado STOP).Cambie la CPU a estado RUN. El CP 341 comienza a enviar datos cíclicamente a través de la interfaz serie (el LED “TxD” parpadea).Si envía datos desde su interlocutor, el CP 341 los recibe en el DB 43. El destino estará registrado en los parámetros “DB_NO”, “DBB_NO” del FB7 (P_RCV_RK) en el FC22.Prueba:Haciendo doble clic en la VAT1 de su proyecto, en el directorio “Bloques”, puede observar la transferencia de datos:Cambie a Online con Sistema de destino → Establecer enlace con →CPU configurada.Cambie a Observar con Variable → Observar.Con ayuda del operando “DB42.DBW0” (contador de envíos) puede determinar el número de transferencias. En el “DB41.DBW18” (contador de recepciones) puede ver si ha recibido datos. Si emplea su PG como interlocutor, puede recibir los datos y enviar datos al CP 341 con el programa “Hyper Terminal”. Haciendo doble clic en el archivo “Getting.ht” (en \Siemens\STEP7\s7fptp\Termi-nal\....), “HyperTerminal” arranca con la configuración correcta. Se indican los datos enviados por el CP 341. Pulsando una tecla cualquiera del teclado se envía el carácter correspondiente al CP 341.DiagnósticoCualquier manejo erróneo, cableado incorrecto de la interfaz serie o parametrización incoherente puede producir errores.En el capítulo 8 del manual puede consultar cómo diagnosticar tales errores y mensajes.。
柯达 M341 说明书
补充用户指南中提供了更多充电选项
/go/m341support
/go/m341support 1
简体中文
使用可选配的 SD 或 SDHC 存储卡
您的相机有内存。您可以购买 SD 或 SDHC 存储卡,以便存储更多照 片和录像。(支持的最大存储容量为 32 GB。)
■ 使用柯达推荐的附件以外的配件,可能会导致火灾、电击或受伤。有关经过批准的配件, 请访问 /go/accessories。
■ 仅使用配备了限流主板的经过 USB 认证的计算机。如果您有任何问题,请联系您的计算 机制造商。
■ 如果在飞机上使用此产品,请遵照航空公司的各种指导。
/go/m341support
7
简体中文
ᕨ 学习有关相机的更多知识!
祝贺您!
您已经学习了:
• 设置相机 • 拍摄照片 • 将照片传输到计算机
继续了解更多信息!
阅读完这本手册之后,您将能够拍摄和分享您的最佳照片!
请访问 /go/m341support: • 补充用户指南 • 互动故障排除与维修 • 互动式教学 • 常见问题解答 • 下载 • 配件 • 打印信息 • 产品注册
每次拍照时,无论光照条件如何,闪光灯都 闪光。当主体在阴影下或“逆光” (主体 背对光线)时使用。
注:(在智能拍摄模式下不可用。)
在拍照前,闪光灯预闪,使瞳孔收缩。
闪光灯不预闪,而是由相机来校正红眼。
不闪光。
请参阅补充用户指南
/go/m341support
12
ZH-CN
/go/easysharecenter
注意 :
存储卡只能按一个方向插入;按错误方向强行插入可能会损坏 存储卡。在相机开机时插入或取出存储卡可能会损坏照片、存 储卡或相机。
柯达相机说明书翻译2007-10-13

安装和取出胶卷安装胶卷装上胶卷以后, 相机会自动把胶卷卷到自己的卷片轴上. 然后每照一张照片, 就有一张胶片回卷到胶卷盒里.1 把拨盘拨到除锁定键以外的任何地方.2 推开相机后盖.3 如图所示,以一定斜度将胶卷装入.4 压着胶卷盒, 拉出胶片头,与相机上的橙色标志对起,然后关上后盖.如果胶片头太长以至超过了橙色标记, 请将多余的退回去.关上相机后盖后,胶片开始缠绕到相机的轴上, 同时胶片记数器开始工作. 然后, 相机发出快门释放的声音, 并显示胶片张数◎如果张数不显示, 就意味着胶卷没有装好. 那么就拿出来重装.第21页本相机不能使用红外线胶卷。
快门帘使用几高精度标准制造。
为了避免损坏,不能触摸。
装胶卷过程中千万小心,保证手指和胶卷不碰它。
取胶卷最后依仗曝光后,相机自动回卷。
当胶卷回卷到头,显示屏上将只显示◎标志。
先检查这个标志是否显示,然后打开相机后盖,取出胶卷。
中途回卷。
最后一张胶卷曝光前回卷胶卷时,请参照以下步骤:1.将命令拨盘转到中途回卷◎《《2.按住◎《《控制按钮不放,至少持续1秒。
胶卷开始回卷。
当回卷到头,相机会发出快门释放的声音。
3打开相机后盖,取出胶卷。
第22页如果你经过回卷就把一格未拍完的胶卷从相机里取出,并装入新胶卷。
这个新胶卷的片头只能回卷到卷盒里。
为了避免这种情形,在装入新胶卷前请关上相机后盖,并完全按下快门一次。
拿稳相机为了排出的照片不模糊,请参考以下的姿势拿相机。
用右手握住相机手柄并抓紧。
将胳膊肘轻轻的靠在自己的身体上。
左手托住镜头。
把相机压在自己的前额上,通过取景器观察图像。
为了更好的稳定,请保持一只脚稍微靠前。
这部分描述命令拨盘基本区域的照相模式。
这些模式能自动设置相机。
需要你做的就三取景和按快门。
而且,这些模式不艘主拨盘和其他控制钮的控制。
从而可以避免意外的错误操作而导致相片效果不好。
相机控制的自动拍摄。
在运用程序影像模式拍摄时,如果闪光灯标志在取景器里闪烁,请用手指抬起内置闪光灯。
柯达相机说明书
ᕡ安装软件ᕣ为 KLIC-7001 电池充电计算机将 USB 电缆连接到计算机的 USB 端口,而不是集线器。
确保计算机电源已打开并且不处于睡眠模式。
/go/easysharecenter语言:确定确定确定4/go/easysharecenterᕦ拍摄照片/录像按 打开/关闭:完全按下快门按钮然后释放。
要停止录制,请再次按下快门按钮。
• 取景窗格• 状态图标 按快门按钮以进行对焦并设置曝光。
就绪指示灯变绿时完全按下。
/go/m893support5ᕧ以查看上一照片按 Review 录像播放。
调节音量。
以 2 倍速或暂停/播放。
确定播放期间:1关闭相机电源。
2连接 A/Vᕨ传输照片/录像闪光灯镜头/go/easysharecenter/go/m893support 9简体中文/ Menu (菜单)按钮Share (分享)按钮5Delete (删除)按钮13电池仓6变焦按钮(广角/远摄)14SD/SDHC 存储卡插槽7模式转盘15底座接口8直流输入(5 伏),适用于可选购的交流变压器16三脚架连接孔1关于相机的其它操作(T) 可放大。
按广角 (W) 可缩小。
始终使用自动对焦取景标记。
如果不使用变焦(1 倍,广角),则您与主体最近可以相距 0.6 米(2 英尺)。
在变焦时,您需要进一步远离主体。
W T D(广角)(远摄)(数码)10/go/easysharecenter(请参阅下面的闪光灯模式)自动闪光补光关于相机的其它操作使用其它拍摄模式使用此模式适用于自动一般拍照 — 既能保证极高的影像品质又易于使用。
特写近距离。
如有可能,请使用现场光,而不要使用闪光灯。
场景即使在特殊条件下拍照,也可获得对准即拍的简单性。
(请参阅第 13 页。
)高感光度使用较高的 ISO 在室内拍摄弱光场景中的人物。
录像拍摄有声录像。
(请参阅第 4 页。
)收藏夹查看收藏的照片。
SCNISO关于相机的其它操作场景模式选择一种场景模式,以使您无论在何种情景下均可拍摄出精美照片。
BMP41可移动打印机说明书
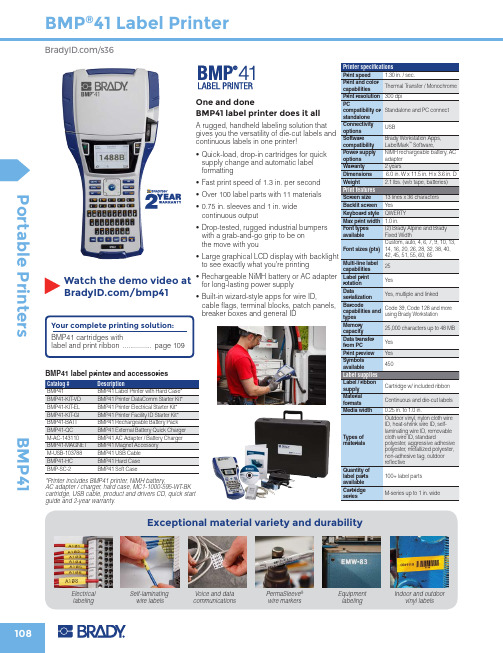
BMP®41 Label Printer
/s36
Printer specifications
Print speed
1.30 in. / sec.
Print and color capabilities
Thermal Transfer / Monochrome
Quantity of label parts available
Cartridge series
100+ label parts M-series up to 1 in. wide
Exceptional material variety and durability
BMP41
108
Electrical labeling
• Large graphical LCD display with backlight
42, 45, 51, 55, 60, 65
to see exactly what you’re printing
Multi-line label capabilities
25
Watch the demo video at
• Quick-load, drop-in cartridges for quick supply change and automatic label formatting
Power supply options Warranty Dimensions
NiMH rechargeable battery, AC adapter 2 years 6.0 in. W x 11.5 in. H x 3.6 in. D
Your complete printing solution:
Hijet CS3412A - 专业影院系列扬声器操作手册说明书
感谢您购买 产品!请仔细阅读本手册,它将帮助你妥善设置并运行您的系统,使其发挥卓越的性能。
并保留这些说明以供日后参照。
警告:为了降低火灾与电击的风险,请不要将产品暴露在雨中或潮湿环境中。
警告:为了降低电击的风险,非专业人士请勿擅自拆卸该系统。
仅供专业人士操作。
等边三角形中的闪电标记,用以警示用户该部件为非绝缘体,系统内部存在着电压危险,电压。
可能足以引起触电。
可能足以引起触电如系统标有带惊叹号的等边三角形,则是为提示用户严格遵守本用户指南中的操作与维护规定。
注意:请勿对系统或附件作擅自的改装。
未经授权擅自改装将造成安全隐患。
警告:燃不得将明火源(如点的蜡烛)放在器材上面。
1. 请先阅读本说明。
2. 保留这些说明以供日后参照。
3. 注意所有警告信息。
4. 遵守各项操作指示。
5. 不要在雨水中或潮湿环境中使用本产品。
6. 不要将产品靠近热源安装,例如暖气管、加热器、火炉或其它能产生热量的装置(包括功放机 )。
7. 不要破坏极性或接地插头的安全性设置。
如果提供的插头不能插入插座,则应当请专业人员更换插座。
8. 保护好电源线和信号线,不要在上面踩踏或拧在一起(尤其是插头插座及穿出机体以外的部分 )。
9. 使用厂商规定及符合当地安全标准的附件。
10.雷电或长时间不使用时请断电以防止损坏产品。
12. 不要让物体或液体落入产品内——它们可能引起火灾或触电。
13. 请注意产品外罩上的相关安全标志。
. 仅与厂商指定或与电器一同售出的推车、架子、三脚架、支架或桌子一起使用。
推动小车/电器时,应谨防翻倒。
11注意事项产品的安装调试须由专业人士操作。
在使用非本厂规定的吊装件时,要保证结构的强度并符合当地的安全规范。
警告:1扬声器及扬声器系统的产品有限保修期为自正式购买日起的3年。
由于用户不合理的应用而导致音圈烧毁或纸盆损坏等故障,不包含于产品保修项目。
产品吊附件(包括音箱装配五金件和吊挂配件)的有限保修期为自正式购买日起的1年。
柯达 EasyShare CD33 变焦数码相机 说明书
柯达 EasyShare CD33变焦数码相机用户指南关于互动式教学,请访问/go/howto关于相机帮助,请访问/go/cd33supportEastman Kodak CompanyRochester, New York 14650© Eastman Kodak Company, 2005所有的屏幕影像都是模拟影像。
柯达 (Kodak)、EasyShare 和 Retinar 是伊士曼柯达 (Eastman Kodak) 公司的商标。
P/N 4J3725_zh-cn产品功能/go/supporti1麦克风7自拍/连拍按钮2腕带孔8闪光灯3自拍器/录像指示灯9取景器4模式拨盘:相机模式/电源设置10镜头5快门按钮11USB 、A/V 输出 6闪光灯按钮12直流输入(3 伏),用于可选购的交流变压器向控制器或 MMC6Review(查看)按钮14Share(分享)按钮7Menu(菜单)按钮15电池仓8液晶显示屏开/关/信息按钮ii /go/support/go/supportiii目录1 设置相机 (1)附接腕带..........................................................................................1装入电池..........................................................................................1打开相机电源...................................................................................2第一次设置日期/时间......................................................................2其它时间设置语言和日期/时间.......................................................3在 SD 或 MMC 存储卡上存储照片...................................................32 拍摄照片和录像 . (4)拍摄照片..........................................................................................4使用光学变焦...................................................................................8使用闪光灯......................................................................................9查看照片和录像...............................................................................9保护照片和录像,防止删除..........................................................123 传输和打印照片 .. (14)安装软件........................................................................................14使用 USB 电缆传输照片.................................................................15打印照片........................................................................................16相机的底座兼容性.........................................................................194 关于相机的其它操作 (20)使用自拍........................................................................................20使用连拍........................................................................................21放映幻灯片....................................................................................21复制照片和录像.............................................................................23更改闪光灯设置.............................................................................24照片拍摄模式.................................................................................25更改拍摄设置.................................................................................27自定义相机 (30)目录查看照片/录像信息 (32)预先标记相册名称 (33)分享您的照片 (35)5 故障排除 (40)相机故障 (40)计算机/接口问题 (42)照片质量问题 (43)相机就绪指示灯状态 (44)直接打印(使用 PictBridge 打印机)问题 (45)6 获得帮助 (46)帮助链接 (46)电话客户支持 (47)7 附录 (49)相机规格 (49)存储容量 (53)节电功能 (54)重要安全事项 (54)电池信息 (56)升级软件和固件 (57)其它维护和保养 (58)保修 (58)监管信息 (60)iv /go/support/go/support11设置相机装入电池1打开电池仓盖。
柯达M381说明书
■ 仅使用配备了限流主板的经过 USB 认证的计算机。如果您有任何问题,请联系您的计算 机制造商。
■ 如果在飞机上使用此产品,请遵照航空公司的各种指导。 ■ 取出电池时,先让它们冷却;电池在使用过程中可能会变热。 ■ 遵照电池制造商附带的所有警告和说明使用电池。 ■ 仅使用此产品准用的电池,以免发生爆炸危险。 ■ 将电池放到小孩拿不到的地方。 ■ 请勿使电池接触金属物体 (包括硬币)。否则,电池可能会短路、放电、发热或渗漏。 ■ 请勿拆解、反向安装或将电池暴露于液体、潮湿、明火或极端温度的环境下。 ■ 如果长时间不使用该产品,请将电池取出。虽然这种情况不多见,但如果发现电池液体
■ 检查闪光灯设置,并根据需要进行更改 (请参阅第 6 页)。
注: 闪光灯并非在所有模式下都闪光。 ■ 将全部 照片传输至计算机 (请参阅第 6 页)。
■ 拍摄另一张照片。
■ 将照片传输至计算机 (请参阅第 6 页)。 ■ 删除存储卡中的照片或插入新的存储卡。 ■ 关闭相机电源,然后重新打开。 ■ 将快门按钮完全按下 (请参阅第 4 页)。 ■ 插入新的或充满电的电池 (请参阅第 1 页)。 ■ 内存已满。传输照片至计算机 (请参阅第 6 页),
/go/m381support
ZH-CN 11
关于相机的其它操作
拍摄录像
1 将模式转盘设置为“录像” 。 2 完全按下快门按钮,然后释放。要停止
录制,请再次按下并释放快门按钮。
要查看录像,请参阅第 5 页。
使用场景 (SCN) 模式
选择一种场景模式,以便您在各种场景中均可拍摄精美的照片。
Kodak GS Compact 数码照片自助打印机使用手册说明书
Picture Kiosk GS CompactThe easy, affordable way to get your share of the growing digital prints market The KODAK GS Compact delivers• U nbeatable Quality. Deliver KODAK lab quality prints in seconds. Kodakproprietary technologies ensure excellent results—time after time.• S o Easy. Kodak’s award-winning kiosk software is designed to be truly intuitive.You get confident, satisfied customers that need less staff assistance.• S mart Investment. If you sell 30-50 prints per day, the GS Compact is theright KODAK Picture Kiosk for you. Priced right for smaller to mid-sized retailphoto printing opportunities.• L onger Up-Time. Designed to keep you open for business, the GS Compactis a reliable and low maintenance solution. Print up to 750 10x15 cm printsbefore you need to refill the printer.• P ayment Made Easy. Process your photo transactions right at the paymentterminal. Fast self-serve printing that consumers appreciate.• Q uickly Verify Transactions. New receipt printing options help speedaccurate checkout.• N ew Creative Borders. Personalized cards and keepsake prints to keepcustomers coming back for more.• O ne Smart Operation. Monitor your kiosk performance thru KODAK RemoteBusiness Manager. Easy content and software updates.• V ersatile & Savvy Design. Our single roll media solution means every availableprint size can be delivered without changing the media. No extra staff timewhen a customer wants something special. Compact design for efficient spaceand flexible placement.Capture YRely on Kodak for lab quality prints that last a lifetime.*consumers who demand the quality used to for their film prints, look to for their preferred printing solution. in on the action with the KODAK Picture Kiosk GS Compact.Amazing KODAK Quality printsOpen for business — in a flashWe’ve designed the KODAK GS Compact for you. In less than 15 minutes, you can unpack your new Kodak kiosk, make your first prints, and be open for business. It offers true plug and play installation.The KODAK GS Compact ships complete with exclusive point-of-sale materials designed and tested by Kodak. Kodak remains one of the most recognized and trusted brands in the world. Put our brand to work in your store.Compact size for flexible placement.Sample point-of-sale materials, supplied by Kodak.Smarter, more efficient operationsConsumers love the quality, simplicity and immediacy of the KODAK GS Compact. We’ve added new options to help reduce your staff time and increase consumer satisfaction with their shopping experience:• N ew payment processing options let you choose from credit card payment processing.• F ast verification at check-out. Receipt printer generates order summary detail with the prints, right at the kiosk.• G et connected and simplify your business with KODAKRemote Business Manager. Keep your equipment running at peak performance with the latest software updates. Remote monitoring helps the Kodak service team quickly diagnose any issues and get you back up and running. Easily download the latest content for fresh, new designs consumers want.Fast, accurate checkout is now even easier with ournew optional receipt printer./go/gscompactkioskOUTPUT OPTIONS Thermal prints:10x15 cm 4x6 in. 13x18 cm 5x7 in. 15x20 cm 6x8 in.Creative borders: P ersonalized cards, keepsake prints and more Mobile phone mini-prints 4 up Photo ID prints KODAK Picture CD INPUT OPTIONS Memory Cards:C OMPACTFLASH ®, COMPACTFLASH ® II, MICRODRIVE, RS-MMC, MMC, SD, MiniSD, SMARTMEDIA, MEMORY STICK, MEMORY STICK Pro, MEMORY STICK Duo, MEMORY STICK Duo Pro, XD Other Devices: • M obile Phones and PDA with BLUETOOTH ® Technology 2.0 • K ODAK Picture CD• C D-ROM/DVD-ROM (JPG, TIFF, BMP) • U SB Memory DevicesOPERATING REQUIREMENTSOperatingtemperature range: 15o to 350o C 59o to 950o F Relative humidity: 20 to 80%Power consumption: S witch selectable to 120 VAC or230 VAC, 750 watts ORDERING INFORMATIONProductCatalog #KODAK Picture Kiosk GS Compact (120V) 120-0351 KODAK Picture Kiosk GS Compact (230V) 138-3165Magnetic Card Reader Kit 819-0746 Receipt Printer Kit 137-3760 Software Upgrade Kit138-5541 TCP/IP Payment Processing Kit 155-5911 KODAK Photo Print Kit 6800/6R 169-6418 Optional Base Cabinet (U.S.)143-8845PRINTER SPECIFICATIONS Thermal dyesublimation process Continuous tone, 300 dpiMax. imageable area: 15x20 cm 6x8 in. borderless Print speed: • Borderless 11 seconds 10x15 cm 4x6 in. • With Borders 19 seconds 13x18 cm5x7 in.MEDIAKODAK Xtralife™: Waterproof, stain resistant prints that willlast a lifetime* Capacity per roll:750 prints 10x15 cm 4x6 in. 375 prints 13x18 cm 5x7 in. 375 prints 15x20 cm 6x8 in.PHYSICAL CHARACTERISTICSGS Compact Unit Dimensions (H x W x D): 49.8 x42.2 x 69.9 cm 19.6 x 16.6 x 27.5 in. Weight: • Console: 22.1 Kg 48.7 lbs. • P rinter without ribbon or paper: 17.9 Kg 39.5 lbs.Receipt Printer 14.3 x 17.6 x 20.8 cm (H x W x D): 5.6 x 6.9 x 8.2 in.Magnetic card reader 16 x 14.6 x 15.9 cm (H x W x D): 6.3 x 5.8 x 6.3 in.KEY FEATURES• Payment processing options• Receipt printer to verify transactions。
- 1、下载文档前请自行甄别文档内容的完整性,平台不提供额外的编辑、内容补充、找答案等附加服务。
- 2、"仅部分预览"的文档,不可在线预览部分如存在完整性等问题,可反馈申请退款(可完整预览的文档不适用该条件!)。
- 3、如文档侵犯您的权益,请联系客服反馈,我们会尽快为您处理(人工客服工作时间:9:00-18:30)。
得 10 x 15 厘米 (4 x 6 英寸)打印照片的限制时,滚动条会暂停
并变红。
请参阅补充用户指南
/go/m341support
/go/m341support
ZH-CN 13
关于相机的其它操作
5 USB/AV 输出
6
OK (确定)按钮
10
/go/easysharecenter
1 关于相机的其它操作
模式转盘
根据您的拍摄主体和环境,将模式转盘转至 最适合的模式。
使用此模式 智能拍摄
编程 减少模糊
运动 全景 场景
录像
适用于 一般拍照 — 既能保证极高的影像品质又易于使用。
简体中文
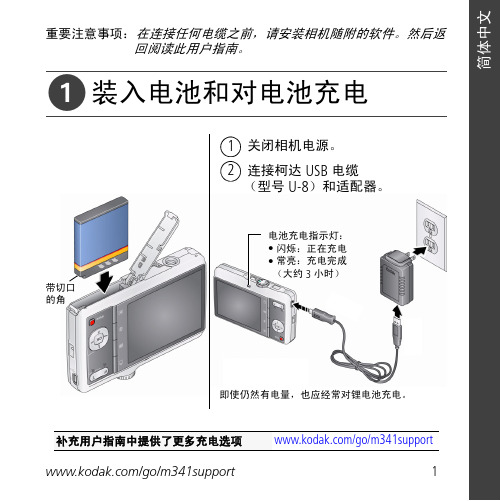
重要注意事项: 在连接任何电缆之前,请安装相机随附的软件。然后返 回阅读此用户指南。
ᕡ 装入电池和对电池充电
1 关闭相机电源。
2 连接柯达 USB 电缆 (型号 U-8)和适配器。
带切口 的角
电池充电指示灯:
• 闪烁:正在充电 • 常亮:充电完成 (大约 3 小时)
即使仍然有电量,也应经常对锂电池充电。
注意 :
存储卡只能按一个方向插入;按错误方向强行插入可能会损坏 存储卡。在相机开机时插入或取出存储卡可能会损坏照片、存 储卡或相机。
1 关闭相机电源。 2 插入或取出选购的存
储卡。
3 打开相机电源。
购买配件
/go/m341accessories
2
/go/easysharecenter
电池电量
/go/m341support
ZH-CN 15
3 分享您的故事!
讲故事的方法有千百种...
每一种方法都是以一张照片开头。
您如何讲述自己的故事?
打印照片
• 4 x 6 照片 • 放大件, 海报 • 拼贴画 • 相簿
照片礼品
• 存储卡 • 日历 • 马克杯 • 领带 • 衬衫
18
ZH-CN
/go/easysharecenter
5 附录
注意 :
请勿拆解此产品;其内部并无用户可维修的零件。请向资质合格的维修人员咨询相关维修事 项。柯达交流变压器和电池充电器仅适合在室内使用。未照此处已经明确说明的规范进行控 制、调节或操作,可能会导致电击和 (或)触电或受到机械伤害。如果液晶显示屏破裂, 请勿触摸玻璃或液体。与柯达客户支持联系。
(请参阅第 12 页)。
注: 闪光灯并非在所有模式下都闪光。
存储卡几乎 已满或全满
■ 将照片传输至计算机 (请参阅第 6 页)。
■ 删除存储卡 (请参阅第 15 页)中的照片或插入新的存 储卡。
电池寿命过短 ■ 确保安装了正确的电池类型。
■ 请在将电池装入相机之前,先用一块洁净的干布擦拭 触点。
■ 插入新的或充满电的电池 (请参阅第 1 页)。
保修服务仅在最初购买产品的国家 (地区)范围内有效。您可能需要自费将产品发送到最初 购买产品的所在国家 (地区)的授权技术服务机构。如果达产品在保修期间因此处所述的任 何情况和/或限制无法正常工作,柯达将提供维修或更换服务。保修服务将包括所有的人工 服务以及任何必要的调和/或零件更换。如果柯达无法维修或更换产品,柯达将自行决定按 购买产品时所支付的价格退款,但前提是用户将产品随同可证明产品价格的购买证退还给柯 达。维修、更换或按售价退款是本保修提供的唯一补救措施。如果在维修过程中使用了更换 零件,那些零件可能是再制造的,也可能包再制造的材料。如有必要更换整个产品,则替代 品可能是再制造的产品。再制造的产品、零件和材料仍然适用原装产品的剩余保修期限,或 者是自维修或更换之日起 90 天,两者中取较长的天数作为保修期。 限制
4
/go/easysharecenter
简体中文
ᕥ 查看照片/录像
按 Review (查看) 按钮 进入/退出查看模式。
查看上一张 (部) /下一张 (部)照片/录像。
确定 播放录像。
查看
请参阅补充用户指南
/go/m341support
/go/m341support
■ 取出电池时,先让它们冷却;电池在使用过程中可能会变热。 ■ 遵照电池制造商附带的所有警告和说明使用电池。
■ 仅使用此产品准用的电池,以免发生爆炸危险。 ■ 将电池放到小孩拿不到的地方。
■ 请勿使电池接触金属物体 (包括硬币)。否则,电池可能会短路、放电、发热或渗漏。
■ 请勿拆解、反向安装或将电池暴露于液体、潮湿、明火或极端温度的环境下。 ■ 如果长时间不使用该产品,请将电池取出。虽然这种情况不多见,但如果发现电池液体
泄漏进该产品内,请与柯达客户支持联系。
■ 虽然这种情况不多见,但如果发现电池液体泄漏到您的皮肤上,请立即用大量清水冲洗 并去医院检查。有关与健康相关的更多信息,请联系当地的柯客户支持。
■ 按照当地和国家 (地区)的规定来处置电池。请访问 /go/kes。 ■ 不要对一次性电池进行充电。有关电池的更多信息,请参阅 /go/batteries。
高级拍摄设置 — 可以使用手动设置。 减少因相机抖动或主体晃动所导致的模糊。
运动照片。 可将最多 3 张照片拼接成一张全景照片。 无论在何种情景下拍照,均可获得对准即拍的简 单性。 拍摄有声录像。
请参阅补充用户指南
/go/m341support
/go/m341support
补充用户指南中提供了更多充电选项
/go/m341support
/go/m341support 1
简体中文
使用可选配的 SD 或 SDHC 存储卡
您的相机有内存。您可以购买 SD 或 SDHC 存储卡,以便存储更多照 片和录像。(支持的最大存储容量为 32 GB。)
5
简体中文
ᕦ 传输照片/录像
1 关闭相机电源。 2 连接柯达 USB 电缆 (型号 U-8)。 3 打开相机电源。
请参阅补充用户指南 购买配件
6
/go/m341support /go/m341accessories
/go/easysharecenter
在查看模式下显 ■ 将全部 照片传输至计算机 (请参阅第 6 页)。
示蓝屏或黑屏, 而不是照片
■
拍摄另一张照片。
拍照后照片 剩余数目未 减少
■ 继续拍摄照片。相机工作正常。
(每拍摄一张照片后,相机将估计剩余照片的数目,这取决于 照片的尺寸和内容。)
闪光灯不闪光 ■ 检查闪光灯设置,并根据需要进行更改
■ 使用柯达推荐的附件以外的配件,可能会导致火灾、电击或受伤。有关经过批准的配件, 请访问 /go/accessories。
■ 仅使用配备了限流主板的经过 USB 认证的计算机。如果您有任何问题,请联系您的计算 机制造商。
■ 如果在飞机上使用此产品,请遵照航空公司的各种指导。
KODAK Picture Kiosk 数码影像速印系统
/go/tips
/go/m341support
ZH-CN 17
4 解决相机问题
状态
解决方法
相机无法开机 ■ 确保电池已充电并且安装正确 (请参阅第 1 页)。 或关机
相机按钮和控件
无法正常工作
简体中文
ᕢ 打开相机电源
按 Power (电源)按钮。
ᕣ 设置语言和日期/时间
语言: 进行更改。
确定 接受设置。
OK (确定) (按下)
日期/时间: 在提示时,按 OK (确定)。
以配置当前字段。
进入上一/下一字段。
确定 接受设置。
请参阅补充用户指南
/go/m341support
以数码方式
• EASYSHARE 数码相框 • HDTV 设备 • 电邮
...还有更多!
16
ZH-CN
/go/easysharecenter
1
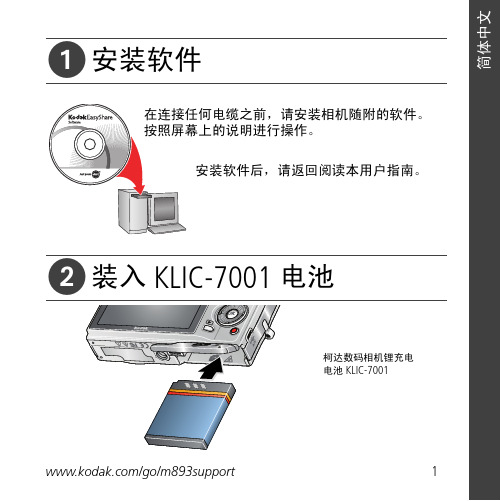
加载软件。 在家
分享您的故事!
照片回忆由此开始!
2
3
拍摄照片。
将照片 传输到 计算机。
让照片讲述故事!
在线
在本地照片零售商处
柯达全能一体机
/go/m341support
7
简体中文
ᕨ 学习有关相机的更多知识!
祝贺您!
您已经学习了:
• 设置相机 • 拍摄照片 • 将照片传输到计算机
继续了解更多信息!
阅读完这本手册之后,您将能够拍摄和分享您的最佳照片!
请访问 /go/m341support: • 补充用户指南 • 互动故障排除与维修 • 互动式教学 • 常见问题解答 • 下载 • 配件 • 打印信息 • 产品注册
9
简体中文
后视图
1
2
34
5
6
11
7
10
8
9
可选购
1 LCD
7 腕带孔
2 就绪/电池充电指示灯
8 Share (分享)按钮
3 Delete (删除)、 Menu (菜单)、 9 电池、 SD/SDHC 存储卡仓
信息、 Review (查看)按钮
10 扬声器
4 变焦 (远摄/广角)按钮
11 三脚架接口
4 突出显示一个选项,然后按 OK (确定)。
重要注意事项: 您的相机具有内置帮助系统。要充分发挥相机性能, 请参阅第 7 页。
了解拍照图标
曝光补偿 闪光灯模式 拍摄模式
自拍定时/连拍 对焦模式
剩余照片数/录像时间
变焦指示灯
标签名称
14
ZH-CN
电池电量
/go/easysharecenter
/go/m341support
3
简体中文
ᕤ 拍摄照片
1 将模式转盘转至“智能拍摄” 。 2 将快门按钮按下一半以锁定并对焦。