配网自动化将快速增长 2020年实现配电自动化90%覆盖率的目标
不再是“愣头青” 2020春风款650nk

OUR TEST 本土测试-------------60APRIL2020《摩托车》杂志长x宽x高:2115mmx830mmx1105mm轴距:1415mm燃油箱容积:17L整备质量:206kg汽缸排量:649.3mL压缩比:11.3:1缸径x行程:83mm x60mm最大功率:45kW(8750r/min)最大扭矩:56N・m(7000r/min)离合器:湿式多片,滑动离合座高:780mm轮胎规格:(前)120/70ZR17(后)160/60ZR17减震规格:(前)KYB正置式,行程120mm(后)KYB单筒减震器,预载可调,行程45mm不再是■"■聽头2020款650NK2011年,春风650NK刚7市,就受到了市场的强烈关注,作为国内第一台大排量运动街车,春风650NK成为了很多车友在经济实力上"够得着"的大排量车款,也让春风跻身国内一线品牌。
9年过去了,这期间650NK经过几次改款,可以说现在呈现在我们眼前的这款车已经成熟多了。
文I张华图I李文韬试车I张多《摩托车》杂志2020APRIL61本土测试OUR TEST•成熟外观2020款春风650NK外观上的变化并不明显,但整体风格却有了新的变化。
从最早的“方头方脑”再到如今的“颜值在线”,650NK无疑是国产大排量跑车中的颜值担当,而这次2020款650NK在高颜值的基础上又增加了一些低调与深沉,磨砂材质的运用追赶上了时代潮流,简洁大方的侧板设计让人看到了KT\啲影子,只不过硕大的Logo还是有些霸气侧漏的感觉。
好看与否这件事有点主观,只是如今的春风也有了打出大Logo的底气毕竟CFMOTO这个品牌在国际已经慢慢被认可。
除了油箱护板造型更新以及减少亮漆材质,在颜色上可以看出厂家还是想极力保持这款车年轻的感觉,纯度较高的蓝色配上银白色有种蓝天白云的感觉,这种颜色搭配初看会让人很舒服。
一些细节上的变化也体现厂家对于车友反馈的重视,202()款排气尾段改为了银色不锈钢材质,相比老款黑色的排气罩好看很多。
20吨至500吨各型汽车式吊车起重性能表

LTM1500型汽车吊基本臂及带超起装置性能表(500t)注:1、同一单元格内标注两组数字的,下方数字为带超起装置的起重吨位。
2、外形尺寸21.6×3×4(m),作业半径10×9.6(m),后回转6.6LTM1500型全路面汽车吊HC810型汽车吊起重性能表(330t)配重:50t 回转:360° 75%60 2.8 2.8HC810型起重机外形尺寸AC615型汽车吊起重性能表(225t)配重:40t 回转:360°44 3.4说明:1、主臂伸缩长度50米、附加臂20米、摆动臂51米;2、最大起升高度101米、作业幅度62米;3、最大起重能力180吨;AC615型汽车吊AC615型汽车吊副臂AC615型汽车吊摆动臂HC340型汽车吊起重性能表(120t)32 2.7 2.7 34 2.1 2.1 36 1.6 1.6 38 1.2 40 0.8HC340型副臂工作半径(m)45米主臂+副臂副臂0°副臂20°12m 20m 12m 20m12 9.114 8.4 5.6 6.216 7.6 5.4 6.018 6.9 5.2 5.7 3.220 6.2 5.0 5.3 3.122 5.6 4.7 4.9 3.024 5.0 4.3 4.5 2.826 4.5 3.9 4.1 2.728 4.0 3.4 3.7 2.630 3.4 3.0 3.4 2.432 2.7 2.7 3.0 2.234 2.1 2.4 2.6 2.136 1.6 2.1 2.0 2.038 1.1 1.8 1.5 1.840 1.4 1.1 1.642 1.1 1.444 1.245 0.9 钢绳道数 2 2 2 1HC340型汽车吊NK—800型汽车起重机性能表基本臂(80t)单位(t)工作半径(m)在左右两侧及后部使用支撑架(主臂)12m 18m 24m 30m 36m 40m 44m3.5 45.0 35.04.0 80.0 45.0 35.0 27.04.5 70.0 45.0 35.0 27.05.0 62.0 40.0 32.0 27.05.5 56.0 37.0 29.2 27.0 22.06.0 50.0 34.3 27.2 25.0 22.06.5 45.0 31.5 25.3 23.2 22.0 18.0NK—800型副臂NK—800型吊钩重量注:1、在吊车安放在牢固坚实平整的土地上,表列额定起重能力是有保证的,额定起重能力包括吊钩及其它起重装置的重量。
Desco Industries SmartLog X3 自动人员地线检测手环和鞋垫测试器说明书

50434/50527SmartLog X3™Automated Personnel Grounding Verification Wrist Strap and Footwear TesterAutomated ESD Record KeepingHardware Setup and Installation3651 Walnut Ave, Chino, CA 91710Phone: (909) 627-8178Fax (909) 627-7449DESCRIPTIONThe Desco EMIT SmartLog X3™ is designed for fast, frequent, and accurate testing of ESD personnel grounding items. By depressing the electrode button once, the SmartLog X3™ tests the resistance path limits of the worn wrist strap and both worn ESD footwear independently within three seconds. Test results are electronically stored in the SmartLog X3™ and can easily be downloaded to a PC for logging records and evaluation. This product can be used as one of the tools to fulfill the ANSI ESD S20.20 paragraph 6.1.3.2 “Compliance Verification Plan. Verification should include routine checks of the Technical Requirements of the Plan.”Paperless data can enhance operator accountability, immediately identifying problems while reducing logging and auditing costs. There is no need to dedicate a computer. The SmartLog X3™ is a complete system including all required components. Operator identification can be accomplished by using the keypad, swiping a barcode card, or waving a proximity card (verify compatibility with the factory).The SmartLog X3™ can test either single or dual-wire wrist straps; the split footplate design allows for individual footwear testing all in one test. If a resistance path is below or exceeds the set limits, failure will be noted via an audio and visual LED alarm. Passing tests can enable a relay for automated door openers. However, if the user desires to test the wrist strap and ESD footwear separately, this can be accomplished. The wrist strap test is activated by inserting wrist strap banana plug into the designated banana jack. Wrist strap only or footwear only testing can also be accomplished. See Software Technical Bulletin TB-6547 for more information.32 SmartLogs can be daisy-chained and connected to one computer, allowing data to be collected to one central computer for all SmartLogs. The SmartLog X3™ can also be networked to a company's Intranet with the optional 50461 Ethernet Adapter. The SmartLog X3™ is calibrated to NIST traceable standards.The SmartLog X3™’s default Wrist Strap test range is 1M – 10M Ohms, and the default Footwear test range is 1M – 35M Ohms. The ranges can be easily adjusted.SmartLog X3™ Team Basic SoftwareUse the powerful versatile SmartLog X3™ Team Basic Software to collect and analyze records.(1) Specify tests and shifts for each employee in database(2) Auto or manual polling of data to computer(3) Auto archive and network data posting(4) Allow data to be saved and stored automatically(5) Data retrieval at selectable time intervals(6) Allow easy data analysisSee Technical Bulletin TB-6547 for more information.ESD Association Information“Compliance verification should be performed prior to each use (daily, shift change, etc.). The accumulation of insulative materials may increase the foot grounder system resistance. If foot grounders are worn outside the ESD protected area testing for functionality before reentry to the ESD protected area should be considered.” ESD SP9.2 APPENDIX B - Foot Grounder Usage Guidance“A log should be maintained which verifies that personnel have tested their personal grounding devices. (ANSI/ESDS20.20 Paragraph 6.2.2.2 Personnel Grounding Guidance)ANSI/ESD S20.20 Table 1 Flooring-Footwear Systems Technical Requirements Recommended Range “less than 35 X 10E6 ohms measured per ESD STM 97.1”."Typical test programs recommend that wrist straps that are used daily should be tested daily. However, if the products that are being produced are of such value that knowledge of a continuous, reliable ground is needed, and then continuous monitoring should be considered or even required."(ESD Handbook TR 20.20 paragraph 5.3.2.4.4)Carefully unpack the Desco EMIT SmartLog X3™. The SmartLog X3™ comes ready to install without any changes to the clock’s configuration.If multiple SmartLogs are to be installed in a daisy-chain configuration, refer to page 9 for instructions.Please see the following technical bulletins for more information on the SmartLog X3™Number DescriptionX3™ Wrist Strap and Footwear TesterTB-6502 SmartLogTB-6546 EthernetAdapterX3™ Team Basic SoftwareTB-6547 SmartLogThe Desco EMIT SmartLog X3™ is available in six models:Item DescriptionX3™ 120V, Software Included50430 SmartLogX3™ 120V, Hardware Only50431 SmartLogX3™ 220V, Software Included50432 SmartLogX3™ 220V, Hardware Only50433 SmartLog50434 SmartLogX3™ 220V CE, Software IncludedX3™ 220V CE, Hardware Only50435 SmartLogNote: SmartLog X3™ is not designed to work in high humidity environments above 70 RH%.Figure 1. 50430 / 50431 / 50432 / 50433 SmartLog X3™ features and components PACKAGINGItems 50430, 50431, 50432, 50433X3™, SmartLog X3™ Wrist Strap / Footwear Tester, and Numeric Key Pad on mounting plate 1 SmartLog1 Dual Foot Plate1 Stereo Cable for Dual Foot Plate1 Team Basic Software Version 4.99 (50430 and 50432 only)1 AC Adapter 12VDC 500mA center pos. (50430 and 50431 only)1 DB9 Serial Adapter1 25’ RS-232 Non-inverted Data Cable4 MountingAnchors4 MountingScrews1 Banana to Ring Terminal Cable1 Shunt / JumperFigure 2. 50434 / 50435 SmartLog X3™ features and componentsPACKAGINGItems 50434 and 50435X3™, SmartLog X3™ Wrist Strap / Footwear Tester, and Laser Barcode Scanner on mounting plate 1 SmartLog1 Dual Foot Plate1 Stereo Cable for Dual Foot Plate1 Team Basic Software Version 4.99 (50434 only)1 DB9 Serial Adapter1 25’ RS-232 Non-inverted Data Cable4 MountingAnchors4 MountingScrews1 Banana to Ring Terminal Cable1 Shunt / JumperBead1 FerriteCONFIGURING THE CLOCK, MOUNTING THE UNIT, AND CABLE CONNECTIONSA. Clock’s Baud Rate, ID, Parity, Daylight Option and Port Expand (See Figure 3 on Page 7)1. Plug the power supply into the unit and then to the appropriate AC source. Refer to Figure 3 to locate thepower input jack. The SmartLog X3™ will cycle through a self diagnostic program. The time and date willappear on the screen when the diagnostics is complete. Do not continue until this step has beencompleted.NOTE: If any of the below settings are not correct, procedure to step 2 and press the Advance button until the correct value appears on the display.Power Requirement: It is highly recommended that these units are installed on power lines separate fromother devices. The clock should not be installed on the same power line with devices containing electric motors.These units have a built-in self-healing fuse and surge, spike, and noise protection. The clock should bepowered on a dedicated electrical circuit. If you are located in an area where there are frequent electricalstorms, power surges, blackouts, or other similar problems, we strongly recommend that the unit be placed ona surge protector.2. After the self diagnosis press the MENU button six times. (If you do not press the Menu button within 20seconds the clock will exit out of the set-up menu and will need to be reset by disconnecting thenreconnecting the power supply.) Refer to Figure 3 for button locations.3. Baud Rate should be set at 9600 (factory default). Press Enter for the next screen.4. Parity should be set for ODD (factory default). Press Enter for next screen.5. The SmartLog X3™ ID is a 2 digit field with valid I.D. numbers 00 through 63. Each SmartLog X3™should have a different I.D. number if they are connected to the same communication line. The SmartLogX3™ should be numbered sequentially starting with 00, so that automatic polling in the software will not beinterrupted.6. The Daylight Option is enables daylight savings in the clock.7. Port Expand should be set to YES (factory default).8. Press Enter button once more to cycle to the next setting before hitting the Menu button to exit.The setting will not change if you do not cycle to the next setting (by hitting the Enter button).NOTE:B. Terminator Jumper, RS-485 Switch, RS-232 Switch and Relay Terminal1. The Terminator Jumper should be applied only when the clocks are in a daisy-chain. It only needs to beapplied to the first and last SmartLog X3™ in the daisy-chain. A stand-alone SmartLog X3™ does notneed the jumper.2. The RS-485 is set default on SLAVE position (right side) and does not need to be switched unless the unitis in a daisy-chain. For units in a daisy-chain, set the RS-485 of the first SmartLog X3™ to MASTER (left position).3. The Relay Terminal connections can be made on the back of the SmartLog X3™ (See Figure 3). Theycan be used to control doors, gates, etc. The relay terminal is limited to a maximum of 5A 250 VAC / 30 VDC and 10A 125 VAC.4. The RS-232 Interface is described by the Electronic Industries Association (EIA) as EIA-232 or RS-232.Special consideration should be used when installing the communications cable. Keep a 3 feet separation distance from any EMF source (power wires, fluorescent lights, etc.) The cable length shall not exceed 50 feet from PC to unit. The Desco EMIT 50461 Ethernet Adapter should be used if distance requirements exceed 50 feet.Figure 3. Back-side of SmartLog X3™ plateC. Connecting the SmartLog X3™NOTE: Both the SmartLog X3™ and computer should be turned off during the following procedures. Connecting One SmartLog X3™ (See Figure 4)1. Connect the Serial Adapter to the desired PC computer.2. Connect one end of the provided RS-232 Non-inverted Data Cable to the Serial Adapter.3. Connect the other end of the RS-232 Non-inverted Data Cable to port labeled “RS-232” on the SmartLogX3™.NOTE: Ensure that the SmartLog X3™ ID is set to 00 and its Terminator Jumper is left open.Figure 4. Connecting one SmartLog X3™Connecting More Than One SmartLog X3™ (See Figure 5)The following procedure provides an example on connecting 3 SmartLogs1. Connect the Serial Adapter to the desired PC computer.2. Connect one end of the provided RS-232 Non-inverted Data Cable to the Serial Adapter.3. Connect the other end of the RS-232 Non-inverted Data Cable to clock port labeled “RS-232” on theSmartLog X3™.4. Apply a shunt across the 2 pin terminator jumper of the first SmartLog and set its ID to 00.5. Connect one end of a RS-485 Inverted Data Cable to the clock port labeled “RS-485” on the first SmartLogX3™.6. Connect the other end of the RS-485 Inverted Data Cable to the clock port labeled “RS-485” on thesecond SmartLog X3™.7. Leave the terminator jumper of the second SmartLog X3™ open and set its ID to 01.8. Connect one end of another RS-485 Inverted Data Cable to the clock port labeled “RS-485” on the secondSmartLog X3™.9. Connect the other end of the same RS-485 Inverted Data Cable to the clock port labeled“RS-485” on the third SmartLog X3™. (See NOTE)10. Apply a shunt across the 2 pin terminator jumper of the third SmartLog X3™ and set its ID to 02.(A jumper is only needed on the first and last units of the daisy-chain)NOTE: An RJ11 splitter will be needed for connecting more than two units to a daisy-chain. The RJ11 splitter attaches to the RS-485 clock port.Figure 5. Connecting more than one SmartLog X3™D. Mounting the SmartLog X3™and Optional 50443 Laser Barcode ScannerUse the provided anchors and screws to mount the entire SmartLog X3™ plate. Be sure to place the SmartLogX3™ at a height where all operators can clearly see the display and perform the necessary tests.Mount the Laser Barcode Scanner to its proper location labeled “BARCODE SCANNER 50443” on the bottom right-hand side of the SmartLog X3™ plate. (50430, 50431, 50432, 50433 only)SMARTLOG X3™ HARDWAREA. The Numeric Key Pad can be used to manually type in ID badge numbers if no card is available. To testusing the Numeric Key Pad, press CLEAR, enter an ID number, and press ENTER. (50430, 50431, 50432, 50433 only)B. The SmartLog X3™ Wrist Strap / Footwear Tester’s default wrist strap test range is 1M – 10M Ohms. Thedefault footwear test range is 1M – 35M Ohms. The default test ranges may be changed to suit personal ground device testing. See Technical Bulletin TB-6502 for instructions.C. The Infrared Barcode Reader (50430, 50431, 50432, 50433 only) and optional Laser Barcode Scanner candecode Code 39 (3 of 9) and Code 128 barcode. The location of the barcode on the employee card must be placed a half inch from the bottom of the card to the center of the barcode (See Figure 5). To use the barcode reader, follow the diagram located to the right of the clock’s vertical slot.D. The Magstripe Reader (50434, 50435 only) reads Track 2 Magstripe.Figure 6. Location of barcode on ID cardE. When the hardware installation has been completed, refer to TB-6129 for TEAM Basic Software installation.TB-6129 will take you through the necessary steps to begin using your new SmartLog X3™.TROUBLESHOOTINGProblem: The host computer is not recognizing the SmartLog X3TM.a. Verify that the cable from the computer to the SmartLog X3™is properly connected. The cable should be flatnon-inverted (See Figure 4).b. Verify that the communication setup on the clock is 9600 baud rate, parity ODD. Refer to the instructions onback of SmartLog X3™ plate to enter configuration mode.c. If there are more than 2 units, verify that their IDs are unique by entering the SmartLog X3™ configurationmode.d. Contact your local IT department to verify that the computer’s comport is working properly.e. Make sure that the SmartLog X3™ LED’s are blinking during data transmission. If they are not blinking orremain on all the time, please contact Desco EMIT technical support at (909) 627-8178 for further support.CONTACT AND WARRANTYUSA EuropeCharleswaterEMITDesco3651 Walnut Ave Unit 17, Millbrook Business Park, Sybron WayChino, CA 91710 Crowborough, East Sussex, TN6 3JZ, U.K.Tel: (909) 627-8178 Tel: 01892 665313Fax: (909) 627-7449 Fax: 01892 668838LIMITED WARRANTYDesco EMIT expressly warrants that for a period of five (5) years from the date of purchase, Desco EMIT SmartLogs will be free of defects in material (parts) and workmanship (labor). Within the warranty period, a credit for purchase of replacement Desco EMIT products, or, at Desco EMIT's option, the product will be repaired or replaced free of charge. If product credit is issued, the amount will be calculated by multiplying the unused portion of the expected five year life times the original unit purchase price. Call our Customer Service Department at 909-627-8178 (Chino, CA) or 781-821-8370 (Canton, MA) for a Return Material Authorization (RMA) and proper shipping instructions and address. Please include a copy of your original packing slip, invoice, or other proof of date of purchase. Any unit under warranty should be shipped prepaid to the Desco EMIT factory. Warranty replacements will take approximately two weeks.If your unit is out of warranty, Desco EMIT will quote repair charges necessary to bring your unit up to Desco EMIT factory standards. Call Customer Service at 909-627-8178 for proper shipping instructions and address. Ship your unit freight prepaid.WARRANTY EXCLUSIONSTHE FOREGOING EXPRESS WARRANTY IS MADE IN LIEU OF ALL OTHER PRODUCT WARRANTIES, EXPRESSED AND IMPLIED, INCLUDING MERCHANTABILITY AND FITNESS FOR A PARTICULAR PURPOSE WHICH ARE SPECIFICALLY DISCLAIMED. The express warranty will not apply to defects or damage due to accidents, neglect, misuse, alterations, operator error, or failure to properly maintain, clean or repair products.LIMIT OF LIABILITYIn no event will Desco EMIT or any seller be responsible or liable for any injury, loss or damage, direct or consequential, arising out of the use of or the inability to use the product. Before using, users shall determine the suitability of the product for their intended use, and users assume all risk and liability whatsoever in connection therewith.50434/50527。
ws3-b-2819-97-2-2020 标准

《ws3-b-2819-97-2-2020 标准》近年来,随着我国汽车行业的快速发展,备受关注的电动汽车市场也日益火热。
为了规范电动汽车及相关产品的生产和销售,提高产品质量和安全性,我国制定并实施了WS3-B-2819-97-2-2020标准。
本文将从几个方面对该标准进行介绍和解读。
一、标准的制定背景1.1 电动汽车的兴起随着环境保护意识的加强和新能源技术的快速发展,电动汽车成为了全球汽车市场的热门产品。
我国作为世界上最大的汽车消费市场,也积极响应国家推动新能源汽车发展的号召,大力发展电动汽车产业。
1.2 标准的必要性电动汽车是一种涉及高科技和新能源的产品,其涉及的安全、性能等方面要求较高,因此标准化是十分必要的。
通过制定标准,可以规范电动汽车产品的设计、生产、测试和销售过程,保证产品的安全、稳定和可靠性,提高产品质量,增强用户的信心。
二、标准的主要内容2.1 产品结构与性能要求该标准对电动汽车的结构和性能作出了详细的要求,包括动力系统、车身结构、传动系统、悬挂系统、制动系统等方面。
要求电动汽车的各个部件和系统都要符合相关的技术标准,确保产品的质量和安全性。
2.2 安全性能要求在安全性能方面,标准对电动汽车的碰撞安全、静态稳定性、侧滑安全性、翻车安全性等方面进行了详细的规定,要求产品必须符合相应的安全标准,确保在使用过程中的安全性。
2.3 EMC电磁兼容性要求电动汽车作为一种电子产品,其在电磁兼容性方面也需要符合相应标准,以保证在工作过程中的电磁兼容性达到要求,不对周围环境和其他设备造成干扰。
2.4 质量控制要求标准对电动汽车的生产过程中的质量控制要求也做出了详细规定,要求企业严格按照相关质量管理体系进行生产,确保产品质量稳定可靠。
三、标准的实施和推广3.1 实施意义WS3-B-2819-97-2-2020标准的实施,将提升我国电动汽车产品的技术水平和竞争力,推动电动汽车产业的健康发展,有利于提高我国电动汽车产品在国际市场上的地位和竞争力。
2013年Honda TRX420和TRX500吊装吊顶装置说明书

INSTALLATION INSTRUCTIONSAccessory Application Issue DateNovember 2013Publication No.MII 14766PLOW MOUNT P/N 08L75-HR3-A20After ‘13 TRX420(All except FA/FPA)After ‘13 TRX500(All except FA/FPA)PARTS LISTNo.DescriptionQty (1)Plow clamp 2(2)Plow plate1(3)Plow mount spacer 4(4)8 x 60 mm carriage bolt 4(5)8 mm flange nut 10(6)Short spacer 2(7)Long spacer2(8)8 x 65 mm carriage bolt 2(9)Plow skid plate 1(10)8 x 20 mm hex bolt 4(11)12 mm lift eye1(12)12 x 40 mm hex socket bolt1The Plow Push Tube Set (P/N 08L77-HR3-A21) and Plow Blade - 54 inch (P/N 08L76-HR3-A21) are required for the installation of this accessory.TOOLS REQUIREDTorque wrench 13 mm socket 13 mm wrench 8 mm hex key Power drillStep drill with 1 inch capacityTORQUE CHARTTighten all screws, bolts, and nuts to their specified torque values. Refer to the Service Manual for the torque values of the removed parts.ItemN·m kgf·m Ibf·ft 8 mm bolt 22 2.21612 mm bolt555.641USE AND CARE INFORMATION• Check the accessory mounts frequently and retighten if necessary.• Replace this accessory with a new one if it is damaged or discolored excessively.NOTICE• Never exceed 5 MPH with the plow attached.• Set the front shock preload to maximum when using the plow.• Always make sure the tire pressure is at 35 kPa (5 psi) when using the plow.INSTALLATION1. Install the plow skid plate on the plow tubes usingfour 8 x 20 mm hex bolts and four 8 mm flange nuts. The nuts will be on the inside.8 mm FLANGE NUTS8 mm HEX BOLTSPlow Push Tube Set & Plow Blade (54 inch)(Sold separately)2. Install the 12 mm lift eye through the hole marked inthe picture below by inserting the 12 x 40 mm bolt through the bottom and screwing the lift eye onto it.3. Refer to the Service Manual and remove the centermudguards and side cover.NOTE:• Skip steps 4, 5 and 7 if using the accessory aluminum skid plate.4. Transfer the center of the inner hole in the frame tothe original skid plate with a mark (both sides).Mark the skid plate through the inner hole.5. Place the upper skid plate clamp on the frame in theproper location and mark the center of all four holeson the original skid plate.Mark center of 4 holes6. Refer to the Service Manual and remove the skidplate.7. Drill 1 inch holes in the skid plate at the positionsmarked in Steps 4 and 5.8. Place the plow clamps into position on the frametubes as shown. Temporarily thread an 8 mm boltthrough the plow clamps to hold them in place.Install lift eyePLOW CLAMP8 mm BOLT9. Refer to the Service Manual and reinstall the skidplate. (Accessory skid plate shown in remainingsteps.)10. Assemble the plow plate as shown using four 8 x 60mm carriage bolts and the plow mount spacers.11. Loosely thread four 8 mm flange nuts onto the8 x 60 mm carriage bolts to hold the plow plate inposition.12. Install the remaining hardware as shown on bothsides.8 mm FLANGE NUTLONG SPACER8 x 65 mmSHORT SPACER13. Tighten all bolts to the specification in the TorqueChart.14. Refer to the Service Manual and reinstall the centermudguards and side covers.FLANGE NUT15. Wrap each push tube with a piece of rubberapproximately 110 mm from the joint between the push tube bracket and the tube. Secure each piece with three zip ties and cut off the ends of the zip ties.RUBBER WRAPPED AROUND TUBES110 m m ap p r o x .16. Proceed to the Plow Push Tube Set InstallationInstructions included with the Plow Push Tube Set package.。
酷炫青春 2020 yamaha mt-03
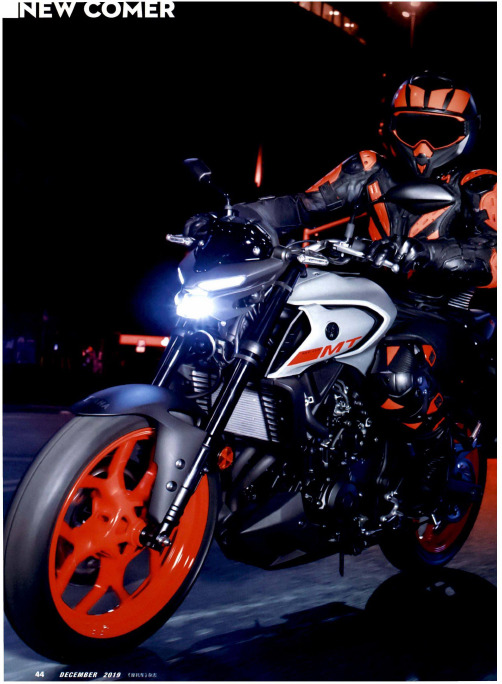
NEV/ C O M E R车海领航2020 Y AM AH A M T-03发动机型式排量液冷,D0HC4气门,并^双缸321 m L缸径X冲程压缩比68.0m m x 44.1mm 112:1最大功率30.9kW(10750r/m in)最大扭矩29.6N-m(9000r/m in)燃離应方式电子燃油喷射系统启动放电启动觸系统6速,常啮合驱动斌链条;闲口誠多片丨车架_拓型车架:长X宽X高2090m m x 745mm x 1035mm轴距最小离地间隙1380mm160mm780mm !后倾角拖曳距25。
94<nm悬縣统(前)37m m§!l立式前叉,行程130mm(后)单筒减震器,行程125mm(前)298m m^盘,双活塞卡钳(后)220m m审盘,单活塞卡钳轮胎规格:(前)110A70~17(后)140/7(M7燃油箱容积:14L整备质量:169kg圆形LED头灯,透射出雪亮的冷光;上方斜长的位置灯,如同两道剑眉辐射出勃勃英气;精简的头部、凸起的油箱,暗示着一颗不肯安分的心;动感造型、绚丽色彩,肆意抒发风与火拥抱的激情;血色喷涂的轮網,飞舞起来一片猩红;高转速的发动机,加密齿轮比的6速曲轴箱,跑车风格的倒立式前叉,无不激荡着追风逐云的梦想!文丨方云飞《摩托车》杂志2019DECEMBER45管这是轻型街车,尽管区区3()0mL 排量还不够超级X k 车型排量的零头,但是这款M 丨'-()3绝对不可小觑!无论是在同级别中出类拔萃的发动机,还是规格媲美轻型跑车的倒立式前叉,无论是轻盈坚固的钢管钻石型车架,还是强劲犀利的制动系统,都致力于一个目标——为激情骑手创造弯道 的兴奋刺激,以及去来如风、收放自如的爽快惬意!焦点首先落在活力十足、运转流畅的动力心脏上。
这台液冷、D O 丨丨(:8气门的并列双缸发动机,直接移植自轻型跑车〉ZK -IH ,拥有火热的追风情怀。
这颗动力心脏采用fi 8.0m m X /|/U mm 的缸径和冲程,排量为32丨m L 。
Q420qC钢板材质简介及执行标准
Q420qC
1、Q420qC钢板简介
Q420qC是一种桥梁用结构钢板
Q420qC钢板牌号分析:
Q代表桥梁用钢屈服强度的〃屈〃字汉语拼音的首位字母;
420代表屈服强度值,单位MPa;
q代表桥梁用钢的〃桥〃字汉语拼音的首位字母;
C代表质量等级的C级。
当要求钢板具有耐候性能或厚度方向性能时,则在上述规定的牌号后分别加上代表耐候的汉
语拼音字母〃NH〃或厚度方向(Z向)性能级别的符号Q420qC-Z15, Q420qC-Z25, Q420qC-Z35。
2、Q420qC钢板执行标准:GB/T714
3、Q420qC钢板交货状态
Q420qC钢板可热轧、控轧、正火或正火轧制、热机械轧制状态交货
4、Q420qC钢板冶炼方式:
Q420qC钢板采用转炉或电炉冶炼,并应进行炉外精炼。
5、Q420qC钢板尺寸,外形,重量及允许偏差
桥梁用结构钢板的尺寸,外形,重量及允许偏差应符合GB/T 709的标准。
8、Q420qC钢板应用范围
Q420qC用于架造铁路、公路桥梁、跨海大桥用钢板。
DDK电动手持扳手FUSION
方头尺寸
3/8" 3/8" 3/8" 3/8"
转速
1 - 1665 1 - 1665 1 - 900 1 - 694
直 筒 式 工 具 扭 矩 范 围 为 10 ~ 40NM。标 准 工 具 带 有 压杆启动和反转开关。 可 选 配 伸 缩 轴、偏 心 齿 轮、开口头。 推荐的工作扭矩范围为最 大扭矩的80%。
FEB-1312-M5
FEB-1312-M10
41610
名称 主电缆,直头型 主电缆,直头型 主电缆,直头型 主电缆,弯角型 主电缆,弯角型 主电缆,弯角型 加长电缆,直头型 加长电缆,直头型 加长电缆,直头型 加长电缆,直头型 加长电缆,直头型 加长电缆,弯角型 加长电缆,弯角型 加长电缆,弯角型 加长电缆,弯角型 加长电缆,弯角型 空调制解调器电缆(9针串口,电脑-控制器)
长/宽 260mm (10.25”) L x 122mm (4.8”) W 279mm (10.9”) L x 217mm (8.56”) W
特殊拧紧头
● DDK可以提供多种特殊用途的拧紧头,包括:偏心头、棘轮头、夹住并拧紧头、开口头、伸缩轴等。
如您有特殊需求,请即与DDK联系!
DDK — 代理商:北京东方泰阳科技有限公司 — 电话:010-51581018
DDK — 代理商:北京东方泰阳科技有限公司 — 电话:010-51581018
6
AFC用户控制软件
AFC用户控制软件 是基于Windows的编程界面,可以: ֜ 简单快捷的读,写,保存和检查拧紧参数。 ֜ 在电子数据表或图形界面上编辑拧紧参数。 ֜ 显示、保存和打印拧紧结果数据和扭矩/角度曲线。 ֜ 对拧紧结果数据进行统计计算。
猫(Cat)120M 120M AWD 摩托吹车说明书
Cat® 120M/120M AWDMotor GradersThe Cat® 120M/120M AWD Motor Grader is designed to help you get more work done in less time. Unprecedented operator comfort and ease of service help to maximize your return on investment.Performance• Programmable Autoshif t option simplifies operation by allowingtransmission to be programmed to shif t at optimal points to matchapplication.• Power Shif t Countershaf t Transmission matches to engine,maximizing power to the ground.• Electronic Throt t le Control helps improve productivit y by providingbest match of horsepower and torque for application demands.Effi ciency• Aggressive blade angle, optimized moldboard cur v ature and largethroat clearance allow material to roll more freely along blade,increasing ef fi ciency.• Hydraulic demand fan automatically adjusts speed according tocooling requirements resulting in more power to the ground andimproved fuel ef fi ciency.• Engine idle shutdown is available to shut down engine af t er a setperiod of time saving fuel and helping reduce emissions.Ease of Operation• Selectable blade lif t modes – Fine, Normal, or Coarse – allow you tochoose the blade lif t modulation mode that best fits your applicationor operating st y le.• Joystick controls with electronically adjustable control pods reducehand and arm movement by 78%, helping reduce operator fatigue.• Lef t joystick controls steering, ar t iculation, return-to-center, wheellean, gear selection, lef t moldboard lif t cylinder and float .• Right joystick controls drawbar, circle and moldboard functions aswell as electronic throt t le control and manual dif f erential lock /unlock .• Ar t iculation Return-to-Center automatically returns machine to astraight frame position from any angle with the touch of a but t on.Safety• Angled cab doors, tapered engine enclosure and sloped rear windowincrease visibility.• Optional rear vision camera enhances sight to rear of machine.Serviceability• Convenient access from the top of the circle to the patented top-adjust wear s t rips and inser t s make them easy to add or replace.• Shimless Moldboard Retention Sys t em uses ver t ical and horizontaladjusting screws to keep moldboard wear strips aligned forreduced blade chat t er and precise blade control.Comfort• Control pods can be adjusted electronically, making it easy toset to ideal operating position.• S t andard Cat Comfor t Series suspension seat is fully adjustable.• High capacit y Heating, Ventilation, and Air Conditioning (H V AC)system dehumidifies and pressurizes cab, sealing out dust, andhelps keep windows clear.Technology• Shut t le Shif t allows smooth, fast direction shif t s without requiringyou to manipulate the throt t le or inching pedal.• Cat Product L i nk™ aids your equipment management with remotemonitoring capabilities.• Optional Stable Blade improves grading precision by decreasingengine speed at 15 percent inter v als when machine bounceis detected then increases engine rpm systematically whengrader stabilizes.• Optional Auto Ar t iculation allows you to ar t iculate automaticallywhile steering in tight spaces or around cur v es, obstacles, andturnarounds.• Optional Cat GR A D E with Cross Slope helps maintain desired crossslope by automatically controlling one side of the blade.• Optional Cat AccuGrade™ uses positioning and guidancetechnologies, machine sensors, and automatic blade control to helpget to grade faster, easier and more ef fi ciently.• Optional Cat Advanced Control Joysticks allow you to controlautomated grading solutions ef fi ciently and safely withoutremoving your hands from the joysticks.Cat® 120M/120M AWD Motor GradersEngine Model Cat C6.6 ACER T™Emissions Brazil MA R-1Base Power (1st gear) – Net 10 3 kW 13 8 hp Base Power (1st gear) – Net (Metric) 14 0 hpV H P Plus Range – Net 10 3-13 6 kW 13 8-18 2 hp V H P Plus Range – Net (Metric) 14 0-185 hp Displacement 6.6 L 4 03 in3 Bore 105 mm 4.13 inS t roke 12 7 mm 5.0 in Torque Rise (VHP Plus) 4 0%Maximum Torque ( V HP Plus-Net) 9 06 N·m 6 68 lbf-f t Maximum Torque (AW D On) 9 63 N·m 710 lbf-f t Speed @ Rated Power 2 ,0 00 rpm Number of Cylinders 6Derating Al t itude 3 505 m 11, 500 f tS t andard Fan Speed – Maximum 1,15 0 rpmS t andard Fan Speed – Minimum 6 00 rpmHigh A m bient Fan Speed – Maximum 1, 650 rpmHigh A m bient Fan Speed – Minimum 6 00 rpmHigh A m bient Capabilit y 5 0° C 12 2° F • Maximum torque ( V HP Plus) measured at 1, 400 rpm.• Net power is tested per ISO 9 24 9, SAE J13 49, and EEC 8 0/12 69 Standards in ef f ect at the time of manufacture.• Net power adver t ised is the power available at rated speed of 2 ,0 00 rpm, measured at the fly w heel when engine is equipped with fan running at minimum speed, air cleaner, muf fl er and alternator.• Power as declared per ISO 14 396Rated Speed = 2 ,0 00 rpmVHP Plus = 175 kW (2 34 hp)• No engine derating required up to 3 048 m (10, 000 f t).Circle – Diameter 15 30 mm 6 0.2 in Drawbar – Height 15 2 mm 6.0 in Drawbar – Width 76.2 mm 3.0 in Front Frame Structure – Height 2 80 mm 11.0 in Front Frame Structure – W i dth 2 55 mm 10.0 in Front A x le – W h eel Lean, Lef t/R ight 18°Front A x le – Total Oscillation per Side 3 2°Gross Vehicle Weight – BaseTotal 16 2 31 kg 3 5,78 3 lb Front A x le 42 20 kg 9, 303 lb Rear A x le 12 011 kg 2 6, 479 lb Gross Vehicle Weight – MaximumTotal 2 2 0 45 kg 4 8,6 01 lb Front A x le 6 839 kg 15,077 lb Rear A x le 15 20 6 kg 3 3, 523 lb Gross Vehicle Weight – Typically EquippedTotal 18 4 00 kg 4 0, 565 lb Front A x le 5090 kg 11,221 lb Rear A x le 13 310 kg 2 9, 343 lbMoldboard – Height 610 mm 24.0 in Arc Radius 413 mm 16.3 in Throat Clearance 13 4 mm 5.2 in Moldboard – Width 3.7 m 12 f t Circle Centershif t – RightCircle Centershif t – Lef t65 6 mm65 6 mm2 5.8 in2 5.8 in Moldboard Sideshif t – RightMoldboard Sideshif t – Lef t6 60 mm510 mm26.0 in20.1 in Blade Tip Range – For w ardBlade Tip Range – Back w ardMaximum Shoulder Reach Outsideof Tires – RightMaximum Shoulder Reach Outsideof Tires – Lef t19 05 mm1742 mm4 0°5°75.0 in6 8.6 in Maximum L i f t Above Ground 427 mm 16.8 in Maximum Depth of Cut 720 mm 2 8. 3 inF o r more complete infor m ation on Cat product s, dealer ser v ices, and indus t r y solutions, v i sit us on the web at © 2 017 CaterpillarAll rights reser v edMaterials and speci fi cations are subject to change wi t hou t not i ce. Feat u red machines in photos may include addi t ional equipment .See your Cat dealer for available opt i ons .C A T, C A T E R PIL L A R, S A F E T , their respective logos, “Caterpillar Yellow ” and t h e “Power Edge” trade dress, as well ascorporate and product iden t i t y used herein, are trademarks of Caterpillar and may not be used wi t hout permission.AE X Q 218 7 (0 7-2017)。
风机安装技术交底
(1)施工现场设置醒目的施工标志牌,标明工程名称、范围、时间、工地负责人。
(2)施工便道经常洒水养护、为文明施工创造必要条件。
(3)遵守当地政府的各种规定,尊重当地居民的风俗,与当地政府和居民友好相处,建立良好的社会关系。
(4)应所施工场地为牧民区域,牛、羊比较分散,在车辆行驶必须按线路所征用地界行驶为8米,灌注桩施工地界为30米、并将每家所封闭区域,车辆行驶后及时封闭,避免牛、羊的丢失、如有施工封闭不及时造成牛、羊丢失应自行及时处理。
2、现场堆放时,应对气相防锈剂进行定期检查。准备吊装前对变压器内气相防锈剂进行拆除。
3、登记变压器编号,收集变压器发货清单和各类质量、实验文件并记录保存在设备台账中。
环水保、文明意丢弃,应按要求运至指定废料存放点及垃圾场。
(2)在桩基础施工完毕后,应及时清理现场所产生的,生活垃圾及建筑垃圾,并将施工场地的平整及草原植被恢复。
叶轮总成完好,轮毂底座螺栓孔和变桨轴承螺栓孔完好,无锈蚀、无杂物。
跟随叶轮总成发货的组件齐备,根据项目机械配置清单和机组随机零部件清单进行检查。
1.3.3 塔筒现场卸货
1.3.3.1货物检查:
塔筒及内饰件完好,塔筒法兰螺栓孔完好,无锈蚀、无杂物。跟随塔筒发货的组件齐备,根据项目出厂机械配置清单和机组随机零部件清单进行检查。塔筒本体尺寸的检测。
1.4.2轮毂密封
1、用防水布覆盖轮缘外侧轮廓;
2、将轮毂底部覆盖防水布密封来防止地面的灰尘;
3、在轮毂中放入干燥剂,在存贮期经常检查并保持干燥剂有效、良好,在启动前请核实将干燥剂移除干燥剂和干燥剂指示器;
1.4.3机舱密封
1、存储期间经常检查前端的覆盖是否有裂纹或脱落,如果有请修复或者更换;
- 1、下载文档前请自行甄别文档内容的完整性,平台不提供额外的编辑、内容补充、找答案等附加服务。
- 2、"仅部分预览"的文档,不可在线预览部分如存在完整性等问题,可反馈申请退款(可完整预览的文档不适用该条件!)。
- 3、如文档侵犯您的权益,请联系客服反馈,我们会尽快为您处理(人工客服工作时间:9:00-18:30)。
电网自动化及工业控制类产品主要包括配电网业务、节能设备、工业控制及其他业务,预计2018-2020 年增速为15%-20% 。
电力信息化投资持续增长,安全问题不容小觑。
导致电网发生故障因素很复杂,而且是十分迅速,判断或者处理不当,就会导致大的损失和人生安全,未来避免带来更少损失更需要电网自动化。
预计到2019 年,电力信息化投资规模将达到507.7 亿元,保持持续稳定增长态势。
“震网病毒”+乌克兰大停电要求重视信息安全,市场规模预计将保持20%以上的增长。
在电力安全增速在25%,市占70%,预计增速略高于行业。
电力信息安全将打开近300 亿空间图
数据来源:公开资料整理
配电网业务主要受益于近期的配网投资冲刺和充电桩的大力建设,我们预计将保持40%以上的增速;节能设备在2018H1回购金额达到5.59亿元,预计未来3年每年回购金额分别为10/15/15亿元;工业控制在国内收益上工业复苏态势,预计保持未来3年增速为20%;其他业务:主要包括新能源汽车充换电、轨道交通等业务,保守估计未来3年增速为10%。
配电自动化是实现配电网高效管理的重要手段。
2020 年实现配网自动化覆盖率图
数据来源:公开资料整理
从国网对配网设备招标趋势看,投资趋势确定,2017年配网设备共进行两个批次招标,根据数据调查显示,2017年配网设备合计招标约270亿元,其中二次设备招标约32亿元,占比为11.54%,预计未来二次设备的招标量持续景气,未来三年将打开200亿市场空间。
技术壁垒较高,竞争格局稳定。
国电南瑞在主站系统中市占率在30%以上,全市场第一。
配电终端方面,FTU市占率为12%,DTU市占率为12%,领跑全市场。
国内电力自动化龙头企业,受益于配网自动化刺激,同时完成资产重组成功切入电力通信、柔性输电等业务。
2016和2017年国电南瑞在主站系统市占率图
数据来源:公开资料整理
2018-2020年在配网自动化业务上的营收分别为12.99/19.11/28.41亿元,三年累计贡献超60亿营收。
未来三年配网自动化业务的业绩弹性,营业收入弹性将从2017年的2.48%提升至2020年的6.91%,而毛利弹性将在2017年的3.75%提升至2020年的10.23%。
配网自动化业绩弹性图
数据来源:公开资料整理
节能设备回购陆续进行,创造增长新动力,2018H1 节能设备经营情况,新增在建工程1.4亿元,转固3.2亿元,电网公司回购5.59亿元,2018H1期末用于租赁的节能设备为7.71亿元。
南瑞继保是国内继电保护龙头,未来增速在20%。
配网自动化投资不足预期,我国配电网建设长期处于落后状态,接线方式标准化率不足,自动化改造难度相对较大,有可能会抑制地方电网的投资积极性。
新业务产业化进度不足,前IGBT市场大部分份额均被国外厂商把持,国内厂商市占率不足5%。
技术积累和人才资源,国内与国际上仍存在不小的差距。
在政策的支持下和研发实力上来看,未来还是有一定的空间的。
电网自动化:未来电力投资增量有限,保守估计10%增速。
受益“一带一路”,海外市场空间广阔。
受电网投资结构性调整的影响,配电网自动化投资将成为未来三年投资重心。
调度自动化业务、变电自动化和用电自动化业务将保持平稳增长,2017-2020年增速为15%。
配网自动化业务受配网投资刺激,将保持40%以上的增速快速增长。