Acme Packet展示会话管理器产品系列
Acme Packet 4500 Storage Expansion Module 安装指南说明书

Acme Packet 4500Storage Expansion Module Installation Guide Formerly Net-Net 4500April 2015Copyright © 2015, 2009 Oracle and/or its affiliates. All rights reserved.This software and related documentation are provided under a license agreement containing restrictions on use and disclosure and are protected by intellectual property laws. Except as expressly permitted in your license agreement or allowed by law, you may not use, copy, reproduce, translate, broadcast, modify, license, transmit, distribute, exhibit, perform, publish, or display any part, in any form, or by any means. Reverse engineering, disassembly, or decompilation of this software, unless required by law for interoperability, is prohibited.The information contained herein is subject to change without notice and is not warranted to be error-free. If you find any errors, please report them to us in writing.If this is software or related documentation that is delivered to the U.S. Government or anyone licensing it on behalf of the U.S. Government, then the following notice is applicable:U.S. GOVERNMENT END USERS: Oracle programs, including any operating system, integrated software, any programs installed on the hardware, and/or documentation, delivered to U.S. Government end users are "commercial computer software" pursuant to the applicable Federal Acquisition Regulation and agency-specific supplemental regulations. As such, use, duplication, disclosure, modification, and adaptation of the programs, including any operating system, integrated software, any programs installed on the hardware, and/or documentation, shall be subject to license terms and license restrictions applicable to the programs. No other rights are granted to the U.S. Government. This software or hardware is developed for general use in a variety of information management applications. It is not developed or intended for use in any inherently dangerous applications, including applications that may create a risk of personal injury. If you use this software or hardware in dangerous applications, then you shall be responsible to take all appropriate fail-safe, backup, redundancy, and other measures to ensure its safe use. Oracle Corporation and its affiliates disclaim any liability for any damages caused by use of this software or hardware in dangerous applications. Oracle and Java are registered trademarks of Oracle and/or its affiliates. Other names may be trademarks of their respective owners.Intel and Intel Xeon are trademarks or registered trademarks of Intel Corporation. All SPARC trademarks are used under license and are trademarks or registered trademarks of SPARC International, Inc. AMD, Opteron, the AMD logo, and the AMD Opteron logo are trademarks or registered trademarks of Advanced Micro Devices. UNIX is a registered trademark of The Open Group.This software or hardware and documentation may provide access to or information about content, products, and services from third parties. Oracle Corporation and its affiliates are not responsible for and expressly disclaim all warranties of any kind with respect to third-party content, products, and services unless otherwise set forth in an applicable agreement between you and Oracle. Oracle Corporation and its affiliates will not be responsible for any loss, costs, or damages incurred due to your access to or use of third-party content, products, or services, except as set forth in an applicable agreement between you and Oracle.About This GuideOverviewThe Acme Packet 3820 or Acme Packet 4500 Storage Expansion Module InstallationGuide describes how to install an Storage Expansion Module in your Acme Packet3820 or Acme Packet 4500 .Audience This guide is written for network administrators, and telecommunicationsequipment installers and technicians. It provides information related to hardwarecomponent installation. Only experienced and authorized personnel should performinstallation, configuration, and maintenance tasks.For information about Acme Packet 3820 or Acme Packet 4500 training, contact**********************************************************************This section contains a revision history for this document.Date DescriptionApril 2009•Initial ReleaseOctober 2013•Applied standard formatting and generalediting.April 2015 •Changed the copyright page to Oraclestandards for 2015.•Deleted a paragraph in the introduction to theStorage Expansion Module (SEM) Installationchapter suggesting that there may be revisionlevels to the motherboard that may notsupport the SEM.•Entered a note at the end of the installationchapter pointing out that after you install orreplace an SEM, you must format it.Acme Packet 4500 Storage Expansion Module Installation Guide iiiABOUT THIS GUIDEiv Acme Packet 4500 Storage Expansion Module Installation GuideAcme Packet 4500 Storage Expansion Module Installation Guide 5Storage Expansion Module Installation IntroductionThis document explains how to install the Storage Expansion Module in your Acme Packet 3820 or Acme Packet 4500.Shipped PartsThe following lists the contents of one Storage Expansion Module upgrade order.•Storage Expansion Module module•2 x mounting brackets•4 x pan head screws (M3 x 5mm)STORAGE EXPANSION MODULE INSTALLATION•4 x SEM screws (with washer) (4-40 x 1/4”)Installation Tools and Parts The following tools and parts are required to install an Storage Expansion Module in your Acme Packet 3820 or Acme Packet 4500.•#1 Phillips-head screwdriver•#2 Phillips-head screwdriver•ESD wrist strap•Cable labelsPreinstallationPerform the following logical and physical preparations before you install theStorage Expansion Module in your Acme Packet 3820 or Acme Packet 4500.Logical System Removal Be mindful of all systems and network entities that may be affected by removing a Acme Packet 3820 or Acme Packet 4500 from your network. In addition to routing calls around the Acme Packet 3820 or Acme Packet 4500, you must also prepare network monitoring and health systems to accommodate the loss of a network element.Specific procedures for removing the Acme Packet 3820 or Acme Packet 4500 from your network are beyond the scope of this document.Physical System Removal After logically removing the Acme Packet 3820 or Acme Packet 4500 from your network, the following procedures must be completed before you can install the Storage Expansion Module. These are:•Disconnection of all media network, management network, alarm and console cabling from the Acme Packet 3820 or Acme Packet 4500•Disconnection of all power and ground system cabling•Removal of the Acme Packet 3820 or Acme Packet 4500 from the equipment rackData Cabling Removal Labeling all existing data cables will ease reconnecting the Acme Packet 3820 orAcme Packet 4500 to the network.bel each cable noting which port on the Acme Packet 3820 or Acme Packet4500 it connects to.2.Attach the appropriate label to each cable.Remember to label all media network cables , maintenance cabling, and consoleand alarm cables.3.Disconnect all data cables from the Acme Packet 3820 or Acme Packet 4500.6 Acme Packet 4500 Storage Expansion Module Installation GuideSTORAGE EXPANSION MODULE INSTALLATION Acme Packet 4500 Storage Expansion Module Installation Guide 7Power and Ground Cabling Removal Take care in removing power from the Acme Packet 3820 or Acme Packet 4500.Refer to the Safety chapter in the Acme Packet 3820 or Acme Packet 4500 HardwareInstallation Guide for complete safety guidelines.The following is an overview of the power and ground cabling removal process.Please refer to the Acme Packet 3820 or Acme Packet 4500 Hardware InstallationGuide for detailed instructions.1.Shut off power to the Acme Packet 3820 or Acme Packet 4500 at the circuit breaker or power source.2.Remove the power cable(s) from the Acme Packet 3820 or Acme Packet 4500’s power supplies.3.Unscrew the two kep nuts that secure the grounding cable lug to the Acme Packet 4500 (this step is not valid for the Acme Packet 3820). 4.Remove the ground cable. Put the kep nuts in a safe place (this step is not valid for the Acme Packet 3820.Chassis Removal The Acme Packet 3820 or Acme Packet 4500 is heavy, and personal injury can resultwhile removing and installing the chassis in an equipment rack. To prevent injury or damage to the Acme Packet system, follow these guidelines:Caution To prevent personal injury, we recommend that two people lift and install the chassis into the equipment rack.•Follow your organization’s best practices for lifting and installing heavy components into an equipment rack.•Ensure that the Acme Packet 3820 or Acme Packet 4500 remains supported asyou remove it from the equipment rack.The following is an overview of the chassis removal process. Please refer to the AcmePacket 4500 Hardware Installation Guide for detailed instructions.e a workbench or other supportive surface, and place it nearby to set the Acme Packet 3820 or Acme Packet 4500 on after it is removed from the equipment rack.Support the chassis before and while removing it from the equipment rack.2.Remove the Acme Packet 3820 or Acme Packet 4500 from the rack. The number of points to unscrew depends upon whether the Acme Packetsystem is installed in a front- or center- mount configuration.3.Place the chassis on a workbench.Hardware Removal for Center-Mount Configurations The rack ears must be removed before you can open the chassis.STORAGE EXPANSION MODULE INSTALLATIONTo remove center-mount equipment rack hardware:1.Remove the left rack ear by unscrewing the three screws.2.Remove the right rack ear by unscrewing the three screws.3.Set the rack ears and screws aside.Hardware Removal for Front-Mount Configurations The chassis slides and rack ears must be removed before you can open the chassis. To remove front-mount equipment rack hardware:1.Remove the left chassis slide by unscrewing the three screws.2.Remove the left rack ear by unscrewing the three screws.3.Repeat steps 1 and 2 on the right side of the Acme Packet 3820 or Acme Packet4500.4.Set the rack ears and screws asideOpening the Chassis The chassis lid is secured to the chassis by 15 screws. Remove the screws and lift thechassis lid off the chassis.8 Acme Packet 4500 Storage Expansion Module Installation GuideSTORAGE EXPANSION MODULE INSTALLATION Acme Packet 4500 Storage Expansion Module Installation Guide 9Caution Before opening the Acme Packet 3820 or Acme Packet 4500, ground yourself using an ESD wrist strap or other comparable grounding system. Failure to do so could damage the Storage Expansion Module the Acme Packet 3820 or Acme Packet 4500.Note: Use a #2 Phillips-head screwdriver for all chassis cover and side screws.1.Unscrew the four countersunk screws on each side of the Acme Packet 4500 thathold the chassis cover to the chassis.LEFT SIDE RIGHT SIDE2.Set these screws aside.STORAGE EXPANSION MODULE INSTALLATION3.Unscrew the seven countersunk screws on the top of the Acme Packet 4500 thathold the chassis cover to the chassis. The following is an image of the top of thechassis.REAR FRONT4.Set the lid and screws aside.5.Lift the chassis lid off of the chassis and set aside.Storage Expansion Module InstallationOnce the Acme Packet 3820 or Acme Packet 4500 is open, the Storage ExpansionModule installation is straightforward. The Storage Expansion Module attacheselectrically to the Acme Packet 3820 or Acme Packet 4500 motherboard by astandard 2.5” SATA connector. In addition, it is secured to the motherboard by fourscrews.Caution Before handling the Storage Expansion Module, groundyourself using an ESD wrist strap or other comparablegrounding system. Failure to do so could damage the StorageExpansion Module or the Acme Packet 3820 or Acme Packet4500.Storage Expansion Module Preparation Before you can install the Storage Expansion Module, you must attach one mounting bracket to each side of the module. The mounting brackets are identical and can be attached to either side of the storage expansion module.10 Acme Packet 4500 Storage Expansion Module Installation Guide1.Screw one mounting bracket to one side of the storage expansion module with2 pan head screws. Ensure that the mounting bracket’s flange are on the top sideof the storage module, the side with the label.2.Repeat Step 1 for the other side of the storage expansion module.3.The storage expansion module with the mounting brackets attached resemblesthe following image:Storage Expansion Module Installation 1.Note the region on the Acme Packet 3820 or Acme Packet 4500 motherboardwhere the Storage Expansion Module attaches. In the photograph below, the Storage Expansion Module’s SATA connector is circled. The Storage ExpansionModule plugs into place here. Note the four standoffs where you will screw the storage expansion module to the chassis in step 5.2.Note the Storage Expansion Module’s SATA connector, circled in the followingphotograph.3.Place the Storage Expansion Module on the Acme Packet 3820 or Acme Packet4500 motherboard as shown in the photograph below. The Storage Expansion Module’s mounting flanges should initially be placed to the left of the fourstandoffs.4.Slide the Storage Expansion module to the right until the SATA connector seatscompletely into its mate. The holes in the mounting flanges should line up with the standoffs.5.Screw the Storage Expansion Module to the standoffs with 4 SEM screws (withwashers) as shown in the following image using a #1 Phillips screwdriver.PostinstallationAfter the Storage Expansion Module has been installed in the Acme Packet 3820 orAcme Packet 4500, you can close the chassis and reinstall it in the equipment rack. Attaching the Lid Use a #2 Phillips-head screwdriver for all chassis cover and side screws.1.Set the lid on top of the Acme Packet 3820 or Acme Packet 4500 chassis. Thestickers are positioned at the chassis rear.2.Screw the eight countersunk screws into the top of the Acme Packet 4500 to secure the chassis cover to the chassis. The following is an image of the top of the chassis without any screws.REAR FRONT3.Continue securing the chassis lid with four screws on each side.LEFT SIDE RIGHT SIDEInstalling the Chassis in the Rack Perform the reverse of the operations in the Physical System Removal section of this document:Please refer to the Acme Packet 3820 or 4500 Hardware Installation Guide for full rack installation procedures.Storage Expansion Module Validation We recommend that you validate the Storage Expansion Module (SEM) installation by running Acme Packet 3820 or Acme Packet 4500 diagnostics. All versions from nnCX_diags110.gz and later include the appropriate tests for validating the SEM. Please refer to the diagnostic’s documentation for more information.In the following procedure, after booting into diagnostics, the circled text represents a preliminary check that the system recognizes the Storage Expansion Module.Password: ******-> dc/boot/ - Volume is OK243 MB/code/ - Volume is OK245 MB/sata/ - Drive Present476940 MBStarting Diagnostic Executive...Comm Express MCH 945 Present.AHCI Support is Enabled.Acme Packet Net-Net 4500Diagnostic Executive Version 1.10Creation date: Nov 16 2009 11:08:02Board Level DiagnosticsDate & Time: TUE NOV 17 14:56:01 2009[diag_proc] ->Formatting the Storage Expansion Module After replacing the SEM, you must format it. Details on file system designs and the formatting procedure may be found in Chapter 9, File System Maintenance of the Maintenance and Troubleshooting Guide for your software release.。
AudioCodes MediaPack 5xx 数字语音网关系列说明书
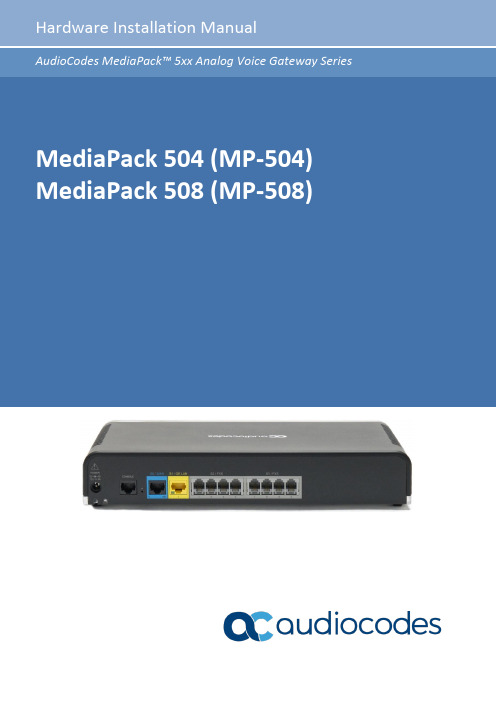
Contents MP-504/8Table of ContentsMediaPack 504-508 (MP-5xx) Hardware Installation Manual (1)Notice ............................................................................................................................... i ii WEEE EU Directive ........................................................................................................................... i ii Customer Support............................................................................................................................ i ii Stay in the Loop with AudioCodes ................................................................................................... i ii Abbreviations and Terminology ...................................................................................................... i ii General Notes and Warnings ........................................................................................................... i ii Safety Precautions ........................................................................................................................... i v Related Documentation ................................................................................................................... i v Documentation Feedback ................................................................................................................ i v 1Introduction . (5)2Unpacking the Device (6)3Physical Description (7)3.1Physical Dimensions and Operating Environment (7)3.2Front Panel Description (7)3.3Rear Panel Description (8)4Mounting the Device (9)4.1Desktop mounting (9)4.219-Inch Rack Mounting (9)4.3Wall Mounting (12)5Cabling the Device (14)5.1Cabling WAN Interface (14)5.2Cabling FXS Analog Interfaces (15)5.3Connecting to Power (17)WEEE EU DirectivePursuant to the WEEE EU Directive, electronic and electrical waste must not be disposed of withunsorted waste. Please contact your local recycling authority for disposal of this product.Customer SupportCustomer technical support and services are provided by AudioCodes or by an authorizedAudioCodes Service Partner. For more information on how to buy technical support for AudioCodesproducts and for contact information, please visit our website athttps:///services-support/maintenance-and-support.Stay in the Loop with AudioCodesAbbreviations and TerminologyEach abbreviation, unless widely used, is spelled out in full when first used.Throughout this manual, unless otherwise specified, the term device refers to the MediaPack 504 /508 (MP-504/MP-508) analog voice gateway.General Notes and WarningsWarning: The device must be installed only indoors.Open-source software may have been added and/or amended. For further information, contact your AudioCodes sales representative.Safety Precautions◼It's recommended that Ethernet and phone (FXS) cabling be routed only indoors and not exit the building.◼Do not open or dismantle the device.◼Do not expose the device to water or moisture.◼Make sure the device is installed in a well-ventilated location to avoid overheating of internal components and subsequent damage.◼Do not place any object on top of the device and make sure that sufficient clearance from the top and sides are maintained to ensure proper airflow to avoid over heating of internalcomponents.◼Operate the device in an ambient temperature (Tma) that does not exceed 40°C (104°F).◼Use only the supplied AC/DC power adapter for connection to the power source.Warning: In case of a malfunction, do not attempt to fix the power adapter and do not useany other type of power adapter.Related DocumentationDocumentation FeedbackAudioCodes continually strives to produce high quality documentation. If you have any comments(suggestions or errors) regarding this document, please fill out the Documentation Feedback form onour website at https:///documentation-feedback.1. Introduction MP-504/81IntroductionThis document provides a hardware description of the device and step-by-step procedures formounting and cabling the device.The device supports the following interfaces:◼WAN interface - single Gigabit Ethernet copper (10/100/1000Base-T)◼LAN interface - single Gigabit Ethernet (1000Base-T) LAN port (RJ-45)◼Telephony interfaces:•MP-504 model: One slot of four FXS port interfaces•MP-508 model: Two slots, each providing four FXS port interfaces (i.e., total eightinterfaces)◼Serial console port (RJ-45) for device management2. Unpacking the Device MP-504/82Unpacking the DeviceFollow the procedure below for unpacking the carton in which the device was shipped.To unpack the device:1.Open the carton and carefully remove packing materials.2.Remove the chassis from the carton.3.Check that there is no equipment damage.4.Ensure that in addition to the chassis, the package contains the following items:•Four anti-slide bumpers for desktop installation•AC/DC power adapter3Physical DescriptionThis section provides a physical description of the device.3.1Physical Dimensions and Operating EnvironmentThe device's physical dimensions and operating environment are listed in the table below:Table 1: Physical Dimensions and Operating EnvironmentSpecificationValueDimensions (H x W x D) 51 x 296 x 165 mm (2 x 11.65 x 6.5 in.) Weight670 g (1.5 lbs.)Operating Environment◼Operational: 5 to 40°C (41 to 104°F) ◼ Storage: -25 to 85°C (-13 to 185°F)◼ Relative Humidity: 10 to 90% non-condensing3.2 Front Panel DescriptionThe front panel provides LEDs for indicating the status of various functionalities. The LEDs are shown in the figure below and described in the subsequent tables.Figure 1: Front Panel1PowerLED indicating power status: Green On Power received by device. OffNo power.2 Status LED indicating operating status: Green On Device is operational.Green Flashing Initial rebooting stage or software upgrade in process. Red OnBoot failure.3 WAN GE LED indicating Gigabit Ethernet WAN link status: Green On WAN GE link established. Green Flashing Data received or transmitted.OffNo WAN GE link or power not received by the device.1233.3 Rear Panel DescriptionThe device's rear panel is shown in the figure below and described in the subsequent table.Figure 2: Rear Panel1 POWER DC power plug entry for external AC/DC power adapter.2//Reset pinhole button for resetting the device or restoring it to factory defaults. To restore to factory defaults: with a paper clip or any other similar pointed object, press and hold down the button for at least 12 seconds (but no more than 25 seconds). Please note that the device will lose all its configuration!3 S0 / WANWAN interface port Giga Ethernet (10/100/1000Base-T) Green On Ethernet link established. Green Flashing Data is received or transmitted. OffNo Ethernet link.4S2 / FXS S3 / FXSS2: FXS ports 1-4S3: FXS ports 5-8 (applicable only to MP-508)1 2344Mounting the DeviceYou can mount the device using one of the following methods:◼Desktop mounting◼19-inch Rack mounting◼Wall mounting4.1Desktop mountingPlace the device on a desktop using the four anti-slide bumpers (supplied), which you need to stickon the grooves located on the underside of the device. The bumpers avoid involuntary movementof the unit on the desktop as well as enable better air flow for cooling the device.4.219-Inch Rack MountingYou can mount the device in a standard 19-inch rack, using AudioCodes 1U 19-inch rack mount shelf(not supplied).The AudioCodes 1U 19-inch rack mount shelf is not supplied with your product and can beordered separately from an AudioCodes sales distributor.Warning:◼Elevated Operating Ambient: If installed in a closed or multi-unit rack assembly, consideration should be given to installing the equipment in an environmentcompatible with the maximum ambient temperature (Tmax) of 40°C (104°F).◼Reduced Air Flow: Installation should be such that the amount of air flow required for safe operation on the equipment is not compromised. Do not stack equipment one on top of the other and keep the ventilation openings free from cables or any objects to allow free air circulation. The device must be mounted correctly on the rack mount shelf to avoid air blockage to the three vents located on the bottom of the device.Mounting the device on a shelf other than AudioCodes' rack mount shelf may cause the device to overheat, resulting in permanent damage to it.◼Only one device can be mounted per rack mount shelf.◼The minimum vertical rack space for mounting the device in a 19-inch rack must be 2Us (3.5 in. or 88.9 mm). See figure below.Figure 3: Minimum Vertical Space for 19-inch Rack MountingTo mount the device in a 19-inch rack:1.Position the rack mount shelf (ordered separately from AudioCodes) in the 19-inch rack,aligning the holes of the shelf's side brackets with the holes of the rack's front posts, as shown in the figure below.Figure 4: Positioning Shelf in RackMake sure that you attach the shelf's side brackets (left and right) at the same height levelin the rack so that the shelf is in a horizontal position.2.Attach the shelf to the rack posts using four standard 19-inch rack bolts (not supplied).3.Place the device on the shelf so that the device's front panel faces the front of the rack andthe device's four anti-slide rubber legs (located on the bottom of the device) fit into the four square openings on the shelf, as shown in the figure below (viewed from underneath):Figure 5: Positioning the Device's Anti-Slide Rubber Legs into Shelf's Openings4.Make sure the device is firmly mounted on the shelf so it does not horizontally slide in anydirection:Figure 6: Device Mounted on Shelf in 19-inch Rack4.3 Wall MountingYou can mount the device on a wall using the keyholes on the bottom of the device. To mount the device on a wall: 1.Drill three holes in the wall where you want to mount the device, using the distances between the holes as shown in the figure below: • Horizontal distance between the top two parallel holes: 89 mm (5.51 in.)• Vertical distance between the top two parallel holes and bottom hole: 204 mm (8.03 in.) •Horizontal distance between a top hole and the bottom hole: 44.5 (1.75 in.)Figure 7: Dimensions for Drilled Holes◼When choosing the area on the wall to mount the device, make sure that sufficient space is available for attaching cables on the rear panel.◼ Make sure that you drill the holes in the same orientation as shown in the above figure (i.e., two parallel holes on the top and the single hole on the bottom).2. Insert wall anchors of the appropriate size into each hole.3.Thread screws (not supplied) into each of the wall anchors. The recommended screw type is DIN 7982 3.5x25 Phillips flat head. Make sure that the heads extend sufficiently (about 4 mm or 0.157 in.) from the wall for the device's keyholes to hang on:Figure 8: Protruded Screw Distance from Wall Surface4.Hold the device so that it is orientated with the bottom panel with the keyholes facing thewall and the rear panel with the ports facing your right.5.Mount the device on the wall by hanging the device's keyholes on the screw heads:Figure 9: Hanging Device on Screw Heads5Cabling the DeviceThis chapter describes device cabling.Figure 10: Cabling Overview5.1Cabling WAN InterfaceThe device provides a copper Gigabit Ethernet (GbE) port interface for connecting to the WAN.Cable specification:◼Cable: straight-through Cat 5 cable◼Connector: RJ-45◼Connector Pinouts:Table 2: RJ-45 Connector Pinouts for Copper GbE WANTo connect the copper GbE WAN port:1.Connect one end of a straight-through RJ-45 Ethernet cable to the Blue RJ-45 port labeled S0 /WAN GE (located on the rear panel).Figure 11: Cabling the WAN Copper GbE Port2.Connect the other end of the cable to the WAN network (e.g., ADSL or Cable modem).5.2Cabling FXS Analog InterfacesThe procedure below describes how to cable the device's FXS interfaces. FXS is the interface replacingPrivate Branch Exchange (PBX)—and connects to analog telephones, dial-up modems, and faxmachines. The FXS is designed to supply line voltage and ringing current to these telephone devices.Warnings:◼The device must be installed and located only indoors.◼Connect the FXS ports only to certified phone devices; otherwise, damage to the device may occur.◼Keep phone (FXS) cabling routed only within the building away from any power cabling.◼Routing FXS wiring outside the building may damage the port due to surge phenomena.◼The FXS ports are considered ES2 (TNV-2); avoid contact with any exposed wiring.Cable specification:◼Cable: Standard straight-through RJ-11 telephony cable◼Connector: RJ-11◼Connector Pinouts:Figure 12: RJ-11 Connector Pinouts for FXS InterfacesTo connect an FXS interface:1.Connect one end of an RJ-11 cable to an FXS port, located on the rear panel and labeled FXS.Figure 13: Cabling FXS Interfaces2.Connect the other end of the cable to the required telephone interface (e.g., fax machine,dial-up modem, or analog POTS telephone).5.3Connecting to PowerThe device is powered by an external 12V AC/DC power adapter (supplied), connected to a standardalternating current (AC) electrical wall outlet.Table 3: Power SpecificationsWarning: Use only the AC/DC power adapter supplied with the device.Warning: Do not open or service the AC/DC power adapter. If it's broken, do not use it anddo not plug it into the electrical wall socket; contact AudioCodes for a Return MaterialAuthorization (RMA).Notice: for PLUGGABLE EQUIPMENT, the socket-outlet shall be installed near theequipment and shall be easily accessibleThe device is shipped with the 3A AC/DC power adapter shown in the figure below. The power adapter also supports interchangeable plugs to suit the electrical wall outlet type requirement of the country in which the device is being installed.Figure 14: 3A AC/DC Power AdapterTable 4: Power Adapter with Interchangeable PlugsTo connect the device to the power supply using the 3-Amp power adapter:1.Insert the relevant AC plug into the housing power adapter:a.Insert the top part of the plug into the upper part of the housing slot (1).b.Press down on the bottom part of the plug until a "click" sound is heard, indicating thatthe plug is securely inserted in the housing slot. To remove the plug, push and slide downthe OPEN plug release lever (3).Figure 15: Inserting Plug into Power Adapter2.Insert the DC plug (5) located at the end of the power cord (4) of the power adapter into thedevice's power socket located on the rear panel.Figure 16: Cabling to Power with 3A AC/DC Power Adapter3.Plug the power adapter directly into a standard electrical wall outlet.4.the plug at the other end of the AC power cord to a standard electrical outlet.International Headquarters1 Hayarden Street,Airport CityLod 7019900, IsraelTel: +972-3-976-4000Fax: +972-3-976-4040AudioCodes Inc.80 Kingsbridge RdPiscataway, NJ 08854, USATel: +1-732-469-0880Fax: +1-732-469-2298Contact us: https:///corporate/offices-worldwideWebsite: https://Documentation feedback: https:///documentation-feedback©2023 AudioCodes Ltd. All rights reserved. AudioCodes, AC, HD VoIP, HD VoIP Sounds Better, IPmedia, Mediant, MediaPack, What’s Inside Matters, OSN, SmartTAP, User Management Pack, VMAS, VoIPerfect, VoIPerfectHD, Your Gateway To VoIP, 3GX, VocaNom, AudioCodes One Voice, AudioCodes Meeting Insights, and AudioCodes Room Experience are trademarks or registered trademarks of AudioCodes Limited. All other products or trademarks are property of their respective owners. Product specifications are subject to change without notice.Document #: LTRT-10613。
NAM 4.4 B2C 演示门户配置指南说明书

B2C Demo Portal Configuration Guide1.DeploymentThe deployment of the various components that integrate to provide the Business to consumer capabilities:2.Pre-requisitesInstall SSPR. Optionally install Advanced Authentication if you want to demonstrate enhanced authentication capabilities.If using Access Manager 4.4.1 or later, configure B2C using the Business to Consumer UI on the Admin Console.If you are using non-public DNS names, ensure that:o AG and IDP have the host entries so they can communicate with one anothero Client should have host entries for IDP and AG as well.o Note that should point to AG’s IP.Use Firefox. Chrome seems to have an issue with Delete options.3.Portal SetupExtract the portal package on to your local system. This package contains:-portal directory – the B2C demo portal web application-nidp_jars_4.4.0 and nidp_jars_4.4.1 – updated JARs to include REST APIs needed by the portal -sspr –CSS for SSPR server to have uniform look and feel across the portals.Installation Steps:1.The B2C demo portal must be deployed on a tomcat server. Setup a tomcat server or simply use thetomcat in any IDP server.2.NAM Appliance:-Backup the default singlebox portal at /opt/novell/nam/adminconsole/webapps/portal.-Copy the portal directory in the demo portal zip to /opt/novell/nam/adminconsole/webapps Distributed NAM:-Copy the portal directory to <TOMCAT_HOME>/webapps directory.3.Edit <TOMCAT_HOME>/webapps/portal/index.html.Replace all instances of “:8443” with your IDP domain and port.4.Copy the JARs for your version of Access Manager to /opt/novell/nam/idp/webapps/nidp/WEB-INF/lib on every IDP server in the cluster.5.Restart all the IDP servers.6.If you are using non-public DNS names, add the host entry in your client system for the IDP DNS.7.Access the IDP URL – https://<idp-domain>:<port>/nidp. Accept the self-signed certificate warningshown on your browser. This step is important for the embedded login page to show up correctly on the portal.8.Go to https://<portal server IP>:<port>/portal. Ensure that the portal’s landing page and the loginfields show up fine.4.Access Manager Configuration4.1Protecting the B2C Demo Portal webapp1.Create a proxy service for this demo portal.NAM Appliance:Skip this step. You can use the default “NAM-RP > namportal” proxy service.Distributed NAM:a.Create a proxy service for the domain b.Configure the Web server. In this case, I have deployed the portal on an Admin Consolewebserver running on port 2443.c.Set up a Protected resource for the Public pagescontract that supports username and password.3.Configure an Identity injection policy to share the user details with the portalFYI, in the demo portal:portal/pages/user_details.jsp retrieves these injected headers from the request.portal/js/portalApp.js makes these user details available to the Portal html pages.4.Enable this policy for portal_protected PR4.2Protecting the IDP REST APIsThe Demo portal accesses the REST APIs exposed by the IDP. To make this possible, we need two things: -Handle CORS since portal is on and IDP is (for Non-Appliance)-Support SSO. User session for login is different from the session he has with the IDP. The portal does not have access to the IDP session ID. Hence the APIs are accessed with OAuth tokens. This applies to both NAM Appliance and traditional NAM.1.Configure OAuth2.Create Identity Injection policy3.Protect the nidp URLs.NAM Appliance:Skip this step, as the “namportal” proxy service already protects the /nidp URLs.Distributed NAM:a.Create a Path based proxy service for the IDP APIs. Add these additional paths.b.Add all the IDP servers to the webserver listproxy service).5.Enable and set the order of this profile6.Create a Protected resource for these API URLs. You can choose “Any Contract” here.7.Assign the OAuth Identity injection policy to this PR4.3SSPR Integration (skip these if B2C was configured using the Business to Consumer UI)Pre-requisite: SSPR Server must be installed and setup for B2C as documented here.1.Configure SSPR under IDP > Shared Settings.2.Create a user store pointing to the SSPR user store (as SSPR requires schema extensions). Assign it tothe default contract.SSPR user store configuration:3.Create a path based proxy service for /sspr4.Set the webserver details of the SSPR server5.Create a protected resource for the public pages of SSPR6.Create a protected resource for the protected pages of SSPR7.Create an identity injection policy and assign it to this PR.4.4Final ConfigurationThis is how the AG configuration will look after the above steps. The AA service can be configured (as shown here) following the documentation. This is optional.Update the AG and IDP servers.Access https:///portal and login (using a user in the SSPR user store)5.SSPR ConfigurationsSSPR must be configured to redirect the portal URL.Set the Home URL and Cancel URL to be https:///portal/pages/home.htmlSet the logout URL to be https:///AGLogout6.BrandingChange the logo and banner in all the following places to maintain a uniform look and feel:1.Demo Portal:a.Edit the setting for ‘masthead’ in <TOMCAT_HOME>/webapps/portal/css/portal.cssb.Change the logo.png in <TOMCAT_HOME>/webapps/portal/images2.Access Managera.Login to Admin console and go to Branding UI. Upload the logo and set the banner colors.3.SSPRa.Edit the SSPR css in <TOMCAT_HOME>/webapps/portal/css/sspr/themes/portal/style.cssb.Copy the new logo.png to the same dir as the CSSc. Create a zip of the themes directory.d. Upload the themes.zip to SSPR as demonstrated in https:///watch?v=bqX-ymk_8ZU7.Configuring Demo use casesSocial Contracts1.Create Social Auth class. Set the Identify Use locally. SSPR should also look for the sameattributes in its “Social Profile”.2.Create Password Fetch class. This is required for SSO between the portal and the SSPR in case ofsocial login.3.Create Social auth method and Password Fetch methodChoose Identifies User for both methods.For PasswordFetch, choose the SSPR userstore as the method’s userstore4.Create social auth contract.a.Select Satisfiable by a contract of equal or higher valueb.Select Facebook Auth method first, then add PasswordFetch auth method. Managed Applications TabThis displays two types of applications:Federated applications that user has consented to.Oauth clients that user has consented to.Configure these and access with the user account and provide consent.Risk evaluation with Device Fingerprinting1.Set the History DB to point to a SQL installation.2.Create a device fingerprint rule.3.Create a step up class (like TOTP Auth class)4.Create a risk policy, assign the Device fingerprint rule and the TOTP class as step up)5.Create risk auth method.6.Create risk contract. Set the risk method as the 2nd factor.8.Demo Portal CodeThe demo portal is an AngularJS based portal. It can be completely redone to customer’s requirement by simply using the available REST APIs.8.1Index Page with Login optionsThe entire index.html is static HTML page. Hence it can be rewritten as needed. The item of interest is the embedded login fields. This is dynamically built and served by the IDP. To include this on your index page, simply add the following container in the location you want the login fields to display:<div id="login-container"></div>The <script> tags in the index.html of the demo portal must be retained. They take care of loading the login fields dynamically into the container.6.2 Getting User AttributesThe /portal/app/user_details.jsp is used to read the user attributes from the request and return a JSON. These attribute headers are not accessible from javascript, hence the need for a JSP.Check the userService in portalApps.js to see how this JSP is invoked, parameters are read and made available to the pages.。
Acme Packet Net-Net 9000 EMS 配置指南说明书
Net-Net® 9000 EMSConfiguration GuideRelease Version 6.0 Acme Packet, Inc.71 Third AvenueBurlington, MA 01803 USAt 781-328-4400f 781-425-5077Last Updated: July 16, 2008Document Number: 400-0084-60 Rev. 1.0.0Notices©2002—2008 Acme Packet, Inc., Burlington, Massachusetts. All rights reserved. Acme Packet®, Session Aware Networking®, Net-Net®, and related marks are registered trademarks of Acme Packet, Inc. All other brand names are trademarks, registered trademarks, or service marks of their respective companies or organizations. Patents Pending, Acme Packet, Inc.The Acme Packet Documentation Set and the Net-Net systems described therein are the property of Acme Packet, Inc. This documentation is provided for informational use only, and the information contained within the documentation is subject to change without notice.Acme Packet, Inc. shall not be liable for any loss of profits, loss of use, loss of data, interruption of business, nor for indirect, special, incidental, consequential, or exemplary damages of any kind, arising in any way in connection with the Acme Packet software or hardware, third party software or hardware, or the documentation. Some jurisdictions do not allow the exclusion or limitation of incidental or consequential damages, so the above exclusions may not apply. These limitations are independent from all other provisions and shall apply notwithstanding the failure of any remedy provided herein.Copying or reproducing the information contained within this documentation without the express written permission of Acme Packet, Inc., 71 Third Avenue, Burlington, MA 01803, USA is prohibited. No part may be reproduced or retransmitted.Acme Packet Net-Net products are protected by one or more of the following patents: United States: 7072303, 7028092, 7002973, 7133923, 7031311, 7142532, 7151781. France: 1342348, 1289225, 1280297, 1341345, 1347621. Germany: 1342348, 1289225, 1280297, 1341345, 1347621. United Kingdom: 1342348, 1289225, 1280297, 1341345, 1347621. Other patents are pending.ContentsAbout this Guide . . . . . . . . . . . . . . . . . . . . . . . . . . . . . . . . . . . . . . . . . . . . . . . . . 19Overview . . . . . . . . . . . . . . . . . . . . . . . . . . . . . . . . . . . . . . . . . . . . . . . . . . . . . . . . . . . . . . . . . . . . . . .19 Configuring Different Versions of Net-Net SBCs . . . . . . . . . . . . . . . . . . . . . . . . . . . . . . . . . . . .19Configuration Timestamp . . . . . . . . . . . . . . . . . . . . . . . . . . . . . . . . . . . . . . . . . . . . . . . . . . . . . . .19Who is Acme Packet?. . . . . . . . . . . . . . . . . . . . . . . . . . . . . . . . . . . . . . . . . . . . . . . . . . . . . . . . . . .20 Associated Documentation . . . . . . . . . . . . . . . . . . . . . . . . . . . . . . . . . . . . . . . . . . . . . . . . . . . . . . .20 Customer Questions, Comments, or Suggestions. . . . . . . . . . . . . . . . . . . . . . . . . . . . . . . . . . . .21Contact Us. . . . . . . . . . . . . . . . . . . . . . . . . . . . . . . . . . . . . . . . . . . . . . . . . . . . . . . . . . . . . . . . . . . .21 3Getting Started. . . . . . . . . . . . . . . . . . . . . . . . . . . . . . . . . . . . . . . . . . . . . . . . . . . 21Introduction. . . . . . . . . . . . . . . . . . . . . . . . . . . . . . . . . . . . . . . . . . . . . . . . . . . . . . . . . . . . . . . . . . . . .21 Using the Net-Net EMS to Configure the Net-Net SBC . . . . . . . . . . . . . . . . . . . . . . . . . . . . . .21Configuration Timestamp . . . . . . . . . . . . . . . . . . . . . . . . . . . . . . . . . . . . . . . . . . . . . . . . . . . . . . .21Filtering Configuration Tables. . . . . . . . . . . . . . . . . . . . . . . . . . . . . . . . . . . . . . . . . . . . . . . . . . . .22 Installation and Start-Up . . . . . . . . . . . . . . . . . . . . . . . . . . . . . . . . . . . . . . . . . . . . . . . . . . . . . . . . .24 Hardware Installation Summary. . . . . . . . . . . . . . . . . . . . . . . . . . . . . . . . . . . . . . . . . . . . . . . . . .24Connecting to Your Net-Net SBC System . . . . . . . . . . . . . . . . . . . . . . . . . . . . . . . . . . . . . . . . . .24 Local Connections and Time-outs . . . . . . . . . . . . . . . . . . . . . . . . . . . . . . . . . . . . . . . . . . . . .24Telnet Remote Connections and Time-outs. . . . . . . . . . . . . . . . . . . . . . . . . . . . . . . . . . . . . .25Connecting Using Telnet through Net-Net EMS . . . . . . . . . . . . . . . . . . . . . . . . . . . . . . . . .26SSH Remote Connections . . . . . . . . . . . . . . . . . . . . . . . . . . . . . . . . . . . . . . . . . . . . . . . . . . . .27SSH Through Net-Net EMS . . . . . . . . . . . . . . . . . . . . . . . . . . . . . . . . . . . . . . . . . . . . . . . . . .27 System Boot. . . . . . . . . . . . . . . . . . . . . . . . . . . . . . . . . . . . . . . . . . . . . . . . . . . . . . . . . . . . . . . . . . .29 Net-Net SBC Boot Parameters. . . . . . . . . . . . . . . . . . . . . . . . . . . . . . . . . . . . . . . . . . . . . . . . . . . . .30 Displaying Boot Parameters. . . . . . . . . . . . . . . . . . . . . . . . . . . . . . . . . . . . . . . . . . . . . . . . . . . . . .30Changing Boot Parameters . . . . . . . . . . . . . . . . . . . . . . . . . . . . . . . . . . . . . . . . . . . . . . . . . . . . . .32 Using the ACLI. . . . . . . . . . . . . . . . . . . . . . . . . . . . . . . . . . . . . . . . . . . . . . . . . . . . . . . . . . . . .32Interrupting Boot in Progress. . . . . . . . . . . . . . . . . . . . . . . . . . . . . . . . . . . . . . . . . . . . . . . . . .33Virtual IP Address for Management . . . . . . . . . . . . . . . . . . . . . . . . . . . . . . . . . . . . . . . . . . . .34 Setting Up System Basics . . . . . . . . . . . . . . . . . . . . . . . . . . . . . . . . . . . . . . . . . . . . . . . . . . . . . . . . .35Version 6.0 Net-Net 9200 EMS Configuration Guide 3NTP Synchronization. . . . . . . . . . . . . . . . . . . . . . . . . . . . . . . . . . . . . . . . . . . . . . . . . . . . . . . . . . .35 Configuring the Time Zone . . . . . . . . . . . . . . . . . . . . . . . . . . . . . . . . . . . . . . . . . . . . . . . . . . .36 About Your Net-Net SBC Image. . . . . . . . . . . . . . . . . . . . . . . . . . . . . . . . . . . . . . . . . . . . . . . . . . .38 Obtaining a New Image. . . . . . . . . . . . . . . . . . . . . . . . . . . . . . . . . . . . . . . . . . . . . . . . . . . . . . . . .38Using FTP to Copy an Image on Your Net-Net SBC. . . . . . . . . . . . . . . . . . . . . . . . . . . . . . . . . .38 System Image Filename . . . . . . . . . . . . . . . . . . . . . . . . . . . . . . . . . . . . . . . . . . . . . . . . . . . . . .39 Booting an Image on Your Net-Net SBC. . . . . . . . . . . . . . . . . . . . . . . . . . . . . . . . . . . . . . . . . . . .40 Booting from Flash Memory . . . . . . . . . . . . . . . . . . . . . . . . . . . . . . . . . . . . . . . . . . . . . . . . . . . . .40Booting from an External Device. . . . . . . . . . . . . . . . . . . . . . . . . . . . . . . . . . . . . . . . . . . . . . . . . .41 Software Licensing. . . . . . . . . . . . . . . . . . . . . . . . . . . . . . . . . . . . . . . . . . . . . . . . . . . . . . . . . . . . . . .42 Unlicensed Net-Net SBCs . . . . . . . . . . . . . . . . . . . . . . . . . . . . . . . . . . . . . . . . . . . . . . . . . . . . . . .43Obtaining a License . . . . . . . . . . . . . . . . . . . . . . . . . . . . . . . . . . . . . . . . . . . . . . . . . . . . . . . . . . . .43 Trial Licenses. . . . . . . . . . . . . . . . . . . . . . . . . . . . . . . . . . . . . . . . . . . . . . . . . . . . . . . . . . . . . . .43 Adding Licenses . . . . . . . . . . . . . . . . . . . . . . . . . . . . . . . . . . . . . . . . . . . . . . . . . . . . . . . . . . . . . . .43Deleting Licenses . . . . . . . . . . . . . . . . . . . . . . . . . . . . . . . . . . . . . . . . . . . . . . . . . . . . . . . . . . . . . .44Expiration. . . . . . . . . . . . . . . . . . . . . . . . . . . . . . . . . . . . . . . . . . . . . . . . . . . . . . . . . . . . . . . . . . . . .45Viewing Licenses . . . . . . . . . . . . . . . . . . . . . . . . . . . . . . . . . . . . . . . . . . . . . . . . . . . . . . . . . . . . . .45 RADIUS Authentication. . . . . . . . . . . . . . . . . . . . . . . . . . . . . . . . . . . . . . . . . . . . . . . . . . . . . . . . . .46 How It Works . . . . . . . . . . . . . . . . . . . . . . . . . . . . . . . . . . . . . . . . . . . . . . . . . . . . . . . . . . . . . . . . .46PAP Handshake . . . . . . . . . . . . . . . . . . . . . . . . . . . . . . . . . . . . . . . . . . . . . . . . . . . . . . . . . . . . . . .47 PAP Client Request Example. . . . . . . . . . . . . . . . . . . . . . . . . . . . . . . . . . . . . . . . . . . . . . . . . .47PAP RADIUS Response. . . . . . . . . . . . . . . . . . . . . . . . . . . . . . . . . . . . . . . . . . . . . . . . . . . . . .48 CHAP Handshake . . . . . . . . . . . . . . . . . . . . . . . . . . . . . . . . . . . . . . . . . . . . . . . . . . . . . . . . . . . . .48 CHAP Client Request Example . . . . . . . . . . . . . . . . . . . . . . . . . . . . . . . . . . . . . . . . . . . . . . . .48CHAP RADIUS Response . . . . . . . . . . . . . . . . . . . . . . . . . . . . . . . . . . . . . . . . . . . . . . . . . . . .48 MS-CHAP-v2 Handshake. . . . . . . . . . . . . . . . . . . . . . . . . . . . . . . . . . . . . . . . . . . . . . . . . . . . . . .48 MS-CHAP-v2 Client Request Example . . . . . . . . . . . . . . . . . . . . . . . . . . . . . . . . . . . . . . . . .49MS-CHAP-v2 RADIUS Response. . . . . . . . . . . . . . . . . . . . . . . . . . . . . . . . . . . . . . . . . . . . . .49 Management Protocol Behavior . . . . . . . . . . . . . . . . . . . . . . . . . . . . . . . . . . . . . . . . . . . . . . . . . .49 Configuring RADIUS Authentication . . . . . . . . . . . . . . . . . . . . . . . . . . . . . . . . . . . . . . . . . . . . . .50 RADIUS Server Settings. . . . . . . . . . . . . . . . . . . . . . . . . . . . . . . . . . . . . . . . . . . . . . . . . . . . . .514System Configuration. . . . . . . . . . . . . . . . . . . . . . . . . . . . . . . . . . . . . . . . . . . . . 49 Introduction. . . . . . . . . . . . . . . . . . . . . . . . . . . . . . . . . . . . . . . . . . . . . . . . . . . . . . . . . . . . . . . . . . . . .49General System Information . . . . . . . . . . . . . . . . . . . . . . . . . . . . . . . . . . . . . . . . . . . . . . . . . . . . . .49 Configuring General System Information . . . . . . . . . . . . . . . . . . . . . . . . . . . . . . . . . . . . . . . . . .49 System Description and Location . . . . . . . . . . . . . . . . . . . . . . . . . . . . . . . . . . . . . . . . . . . . . .50 Physical Interfaces . . . . . . . . . . . . . . . . . . . . . . . . . . . . . . . . . . . . . . . . . . . . . . . . . . . . . . . . . . . . . . .50 Overview. . . . . . . . . . . . . . . . . . . . . . . . . . . . . . . . . . . . . . . . . . . . . . . . . . . . . . . . . . . . . . . . . . . . .50Types of Physical Interfaces. . . . . . . . . . . . . . . . . . . . . . . . . . . . . . . . . . . . . . . . . . . . . . . . . . . . . .50 4 Net-Net 9200 EMS Configuration Guide Version 6.0Slot and Card Location. . . . . . . . . . . . . . . . . . . . . . . . . . . . . . . . . . . . . . . . . . . . . . . . . . . . . . . . . .51 Management Interfaces . . . . . . . . . . . . . . . . . . . . . . . . . . . . . . . . . . . . . . . . . . . . . . . . . . . . . .51 Before You Configure. . . . . . . . . . . . . . . . . . . . . . . . . . . . . . . . . . . . . . . . . . . . . . . . . . . . . . . . . . .52 Configuring Physical Interfaces . . . . . . . . . . . . . . . . . . . . . . . . . . . . . . . . . . . . . . . . . . . . . . . . . . .52 Configuring Physical Interfaces. . . . . . . . . . . . . . . . . . . . . . . . . . . . . . . . . . . . . . . . . . . . . . . . . . .52 Configuring the Physical Interface . . . . . . . . . . . . . . . . . . . . . . . . . . . . . . . . . . . . . . . . . . . . .53 Network Interfaces. . . . . . . . . . . . . . . . . . . . . . . . . . . . . . . . . . . . . . . . . . . . . . . . . . . . . . . . . . . . . . .54 Overview. . . . . . . . . . . . . . . . . . . . . . . . . . . . . . . . . . . . . . . . . . . . . . . . . . . . . . . . . . . . . . . . . . . . .54IP Configuration . . . . . . . . . . . . . . . . . . . . . . . . . . . . . . . . . . . . . . . . . . . . . . . . . . . . . . . . . . . . . . .54 VLANs . . . . . . . . . . . . . . . . . . . . . . . . . . . . . . . . . . . . . . . . . . . . . . . . . . . . . . . . . . . . . . . . . . . .54VLAN Network Layer Segmentation . . . . . . . . . . . . . . . . . . . . . . . . . . . . . . . . . . . . . . . . . . .55Overlapping Networks. . . . . . . . . . . . . . . . . . . . . . . . . . . . . . . . . . . . . . . . . . . . . . . . . . . . . . .55HIP. . . . . . . . . . . . . . . . . . . . . . . . . . . . . . . . . . . . . . . . . . . . . . . . . . . . . . . . . . . . . . . . . . . . . . .55 Configuring Network Interfaces . . . . . . . . . . . . . . . . . . . . . . . . . . . . . . . . . . . . . . . . . . . . . . . . . .55 Special Considerations. . . . . . . . . . . . . . . . . . . . . . . . . . . . . . . . . . . . . . . . . . . . . . . . . . . . . . .55Configuring the Network Interface. . . . . . . . . . . . . . . . . . . . . . . . . . . . . . . . . . . . . . . . . . . . .56Configuring a HIP Interface. . . . . . . . . . . . . . . . . . . . . . . . . . . . . . . . . . . . . . . . . . . . . . . . . . .57Enabling Management Traffic . . . . . . . . . . . . . . . . . . . . . . . . . . . . . . . . . . . . . . . . . . . . . . . . .58 SNMP . . . . . . . . . . . . . . . . . . . . . . . . . . . . . . . . . . . . . . . . . . . . . . . . . . . . . . . . . . . . . . . . . . . . . . . . . .58 Overview. . . . . . . . . . . . . . . . . . . . . . . . . . . . . . . . . . . . . . . . . . . . . . . . . . . . . . . . . . . . . . . . . . . . .58 Basic SNMP Parameters. . . . . . . . . . . . . . . . . . . . . . . . . . . . . . . . . . . . . . . . . . . . . . . . . . . . . .58SNMP Community. . . . . . . . . . . . . . . . . . . . . . . . . . . . . . . . . . . . . . . . . . . . . . . . . . . . . . . . . .59Trap Receivers. . . . . . . . . . . . . . . . . . . . . . . . . . . . . . . . . . . . . . . . . . . . . . . . . . . . . . . . . . . . . .59 Configuring SNMP . . . . . . . . . . . . . . . . . . . . . . . . . . . . . . . . . . . . . . . . . . . . . . . . . . . . . . . . . . . . . .59 SNMP Configuration Overview . . . . . . . . . . . . . . . . . . . . . . . . . . . . . . . . . . . . . . . . . . . . . . . . . .59SNMP Configuration . . . . . . . . . . . . . . . . . . . . . . . . . . . . . . . . . . . . . . . . . . . . . . . . . . . . . . . . . . .59 SNMP Community Configuration. . . . . . . . . . . . . . . . . . . . . . . . . . . . . . . . . . . . . . . . . . . . . .61 Alarm Thresholds. . . . . . . . . . . . . . . . . . . . . . . . . . . . . . . . . . . . . . . . . . . . . . . . . . . . . . . . . . . . . . . .64 Configuring Alarm Thresholds . . . . . . . . . . . . . . . . . . . . . . . . . . . . . . . . . . . . . . . . . . . . . . . . . . .64 HDR Trap for Data Push Success . . . . . . . . . . . . . . . . . . . . . . . . . . . . . . . . . . . . . . . . . . . . . . . . . .65 Configuring HDR Data Push Success Trap . . . . . . . . . . . . . . . . . . . . . . . . . . . . . . . . . . . . . . . . .65 Persistent Protocol Tracing. . . . . . . . . . . . . . . . . . . . . . . . . . . . . . . . . . . . . . . . . . . . . . . . . . . . . . . .66 About Persistent Protocol Tracing. . . . . . . . . . . . . . . . . . . . . . . . . . . . . . . . . . . . . . . . . . . . . . . . .66About the Logs . . . . . . . . . . . . . . . . . . . . . . . . . . . . . . . . . . . . . . . . . . . . . . . . . . . . . . . . . . . . . . . .66 Process Logs . . . . . . . . . . . . . . . . . . . . . . . . . . . . . . . . . . . . . . . . . . . . . . . . . . . . . . . . . . . . . . .66Communication Logs. . . . . . . . . . . . . . . . . . . . . . . . . . . . . . . . . . . . . . . . . . . . . . . . . . . . . . . .67Protocol Trace Logs. . . . . . . . . . . . . . . . . . . . . . . . . . . . . . . . . . . . . . . . . . . . . . . . . . . . . . . . . .67 Configuring Persistent Protocol Tracing. . . . . . . . . . . . . . . . . . . . . . . . . . . . . . . . . . . . . . . . . . . .67 Syslog and Process Logs. . . . . . . . . . . . . . . . . . . . . . . . . . . . . . . . . . . . . . . . . . . . . . . . . . . . . . . . . .69 Overview of Log Files. . . . . . . . . . . . . . . . . . . . . . . . . . . . . . . . . . . . . . . . . . . . . . . . . . . . . . . . . . .69Version 6.0 Net-Net 9200 EMS Configuration Guide 5Process Log Messages . . . . . . . . . . . . . . . . . . . . . . . . . . . . . . . . . . . . . . . . . . . . . . . . . . . . . . .69Syslog. . . . . . . . . . . . . . . . . . . . . . . . . . . . . . . . . . . . . . . . . . . . . . . . . . . . . . . . . . . . . . . . . . . . .69. . . . . . . . . . . . . . . . . . . . . . . . . . . . . . . . . . . . . . . . . . . . . . . . . . . . . . . . . . . . . . . . . . . . . . . . . .70Global Log Level. . . . . . . . . . . . . . . . . . . . . . . . . . . . . . . . . . . . . . . . . . . . . . . . . . . . . . . . . . . .71Configuring a Process Log Server. . . . . . . . . . . . . . . . . . . . . . . . . . . . . . . . . . . . . . . . . . . . . .71Task-Specific Logging . . . . . . . . . . . . . . . . . . . . . . . . . . . . . . . . . . . . . . . . . . . . . . . . . . . . . . .71Facility Logging for Specific Tasks. . . . . . . . . . . . . . . . . . . . . . . . . . . . . . . . . . . . . . . . . . . . . .72General Management Support . . . . . . . . . . . . . . . . . . . . . . . . . . . . . . . . . . . . . . . . . . . . . . . .73 Host Routes. . . . . . . . . . . . . . . . . . . . . . . . . . . . . . . . . . . . . . . . . . . . . . . . . . . . . . . . . . . . . . . . . . . . .74 Overview. . . . . . . . . . . . . . . . . . . . . . . . . . . . . . . . . . . . . . . . . . . . . . . . . . . . . . . . . . . . . . . . . . . . .74Configuring Host Routes. . . . . . . . . . . . . . . . . . . . . . . . . . . . . . . . . . . . . . . . . . . . . . . . . . . . . . . .74 Accounting. . . . . . . . . . . . . . . . . . . . . . . . . . . . . . . . . . . . . . . . . . . . . . . . . . . . . . . . . . . . . . . . . . . . . .75 SIP Session Accounting . . . . . . . . . . . . . . . . . . . . . . . . . . . . . . . . . . . . . . . . . . . . . . . . . . . . . . . . .75Accounting Configuration . . . . . . . . . . . . . . . . . . . . . . . . . . . . . . . . . . . . . . . . . . . . . . . . . . . . . . .76 Accounting Server. . . . . . . . . . . . . . . . . . . . . . . . . . . . . . . . . . . . . . . . . . . . . . . . . . . . . . . . . . .78 Packet Trace. . . . . . . . . . . . . . . . . . . . . . . . . . . . . . . . . . . . . . . . . . . . . . . . . . . . . . . . . . . . . . . . . . . . .81 How It Works . . . . . . . . . . . . . . . . . . . . . . . . . . . . . . . . . . . . . . . . . . . . . . . . . . . . . . . . . . . . . . . . .81Packet Trace Scenarios. . . . . . . . . . . . . . . . . . . . . . . . . . . . . . . . . . . . . . . . . . . . . . . . . . . . . . . . . .82 Packet Trace for One Endpoint . . . . . . . . . . . . . . . . . . . . . . . . . . . . . . . . . . . . . . . . . . . . . . . .82Packet Trace for Both Call Legs. . . . . . . . . . . . . . . . . . . . . . . . . . . . . . . . . . . . . . . . . . . . . . . .83Packet Trace for a Net-Net SBC Signaling Address . . . . . . . . . . . . . . . . . . . . . . . . . . . . . . .83 Configuring Packet Tracing. . . . . . . . . . . . . . . . . . . . . . . . . . . . . . . . . . . . . . . . . . . . . . . . . . . . . . .84System ACLs. . . . . . . . . . . . . . . . . . . . . . . . . . . . . . . . . . . . . . . . . . . . . . . . . . . . . . . . . . . . . . . . . . . .86 Configuring System ACLs. . . . . . . . . . . . . . . . . . . . . . . . . . . . . . . . . . . . . . . . . . . . . . . . . . . . . . .86 Adding an ACL for the Management Interface . . . . . . . . . . . . . . . . . . . . . . . . . . . . . . . . . . .865Realms and Nested Realms . . . . . . . . . . . . . . . . . . . . . . . . . . . . . . . . . . . . . . . . 77 Introduction. . . . . . . . . . . . . . . . . . . . . . . . . . . . . . . . . . . . . . . . . . . . . . . . . . . . . . . . . . . . . . . . . . . . .77Overview. . . . . . . . . . . . . . . . . . . . . . . . . . . . . . . . . . . . . . . . . . . . . . . . . . . . . . . . . . . . . . . . . . . . .77 About Realms and Network Interfaces. . . . . . . . . . . . . . . . . . . . . . . . . . . . . . . . . . . . . . . . . .78About the SIP Home Realm. . . . . . . . . . . . . . . . . . . . . . . . . . . . . . . . . . . . . . . . . . . . . . . . . . .78About Realms and Other Net-Net SBC Functions . . . . . . . . . . . . . . . . . . . . . . . . . . . . . . . .78 Configuration Overview. . . . . . . . . . . . . . . . . . . . . . . . . . . . . . . . . . . . . . . . . . . . . . . . . . . . . . . . . .79 Before You Configure. . . . . . . . . . . . . . . . . . . . . . . . . . . . . . . . . . . . . . . . . . . . . . . . . . . . . . . . . . .79Configuration Overview. . . . . . . . . . . . . . . . . . . . . . . . . . . . . . . . . . . . . . . . . . . . . . . . . . . . . . . . .79Configuration Timestamp . . . . . . . . . . . . . . . . . . . . . . . . . . . . . . . . . . . . . . . . . . . . . . . . . . . . . . .81 Configuring Realms. . . . . . . . . . . . . . . . . . . . . . . . . . . . . . . . . . . . . . . . . . . . . . . . . . . . . . . . . . . . . .81 Creating the Realm. . . . . . . . . . . . . . . . . . . . . . . . . . . . . . . . . . . . . . . . . . . . . . . . . . . . . . . . . . . . .81Configuring the Realm. . . . . . . . . . . . . . . . . . . . . . . . . . . . . . . . . . . . . . . . . . . . . . . . . . . . . . . . . .83 6 Net-Net 9200 EMS Configuration Guide Version 6.0Nested Realms . . . . . . . . . . . . . . . . . . . . . . . . . . . . . . . . . . . . . . . . . . . . . . . . . . . . . . . . . . . . . . . . . .84 Configuring Nested Realms. . . . . . . . . . . . . . . . . . . . . . . . . . . . . . . . . . . . . . . . . . . . . . . . . . . . . .86Configuring Nested Realms. . . . . . . . . . . . . . . . . . . . . . . . . . . . . . . . . . . . . . . . . . . . . . . . . . . . . .86 Choosing the Parent Realm. . . . . . . . . . . . . . . . . . . . . . . . . . . . . . . . . . . . . . . . . . . . . . . . . . .87 Realm-Based Packet Marking . . . . . . . . . . . . . . . . . . . . . . . . . . . . . . . . . . . . . . . . . . . . . . . . . . . . .87 About TOS/DiffServ. . . . . . . . . . . . . . . . . . . . . . . . . . . . . . . . . . . . . . . . . . . . . . . . . . . . . . . . . . . .87 ToS Byte. . . . . . . . . . . . . . . . . . . . . . . . . . . . . . . . . . . . . . . . . . . . . . . . . . . . . . . . . . . . . . . . . . .88DiffServ Byte . . . . . . . . . . . . . . . . . . . . . . . . . . . . . . . . . . . . . . . . . . . . . . . . . . . . . . . . . . . . . . .88 Packet Marking for Media . . . . . . . . . . . . . . . . . . . . . . . . . . . . . . . . . . . . . . . . . . . . . . . . . . . . . . .88Configuring Packet Marking by Media Type . . . . . . . . . . . . . . . . . . . . . . . . . . . . . . . . . . . . . . . .88 Creating the QoS Marking Profile. . . . . . . . . . . . . . . . . . . . . . . . . . . . . . . . . . . . . . . . . . . . . .89Applying the QoS Marking Profile . . . . . . . . . . . . . . . . . . . . . . . . . . . . . . . . . . . . . . . . . . . . .90 Configuring Packet Marking for Signaling. . . . . . . . . . . . . . . . . . . . . . . . . . . . . . . . . . . . . . . . . .90 Creating a Class Policy. . . . . . . . . . . . . . . . . . . . . . . . . . . . . . . . . . . . . . . . . . . . . . . . . . . . . . .91Applying a Class Policy to a Realm. . . . . . . . . . . . . . . . . . . . . . . . . . . . . . . . . . . . . . . . . . . . .92 Steering Pools. . . . . . . . . . . . . . . . . . . . . . . . . . . . . . . . . . . . . . . . . . . . . . . . . . . . . . . . . . . . . . . . . . .92 Configuration Overview. . . . . . . . . . . . . . . . . . . . . . . . . . . . . . . . . . . . . . . . . . . . . . . . . . . . . . . . .93Configuring Steering Pools . . . . . . . . . . . . . . . . . . . . . . . . . . . . . . . . . . . . . . . . . . . . . . . . . . . . . .93 Multiple Interface Realms . . . . . . . . . . . . . . . . . . . . . . . . . . . . . . . . . . . . . . . . . . . . . . . . . . . . . . . .94 How It Works . . . . . . . . . . . . . . . . . . . . . . . . . . . . . . . . . . . . . . . . . . . . . . . . . . . . . . . . . . . . . . . . .95Steering Pool Port Allocation . . . . . . . . . . . . . . . . . . . . . . . . . . . . . . . . . . . . . . . . . . . . . . . . . . . .97Configuring Multiple Interface Realms. . . . . . . . . . . . . . . . . . . . . . . . . . . . . . . . . . . . . . . . . . . . .97 Media over TCP . . . . . . . . . . . . . . . . . . . . . . . . . . . . . . . . . . . . . . . . . . . . . . . . . . . . . . . . . . . . . . . . .99 TCP Bearer Conditions. . . . . . . . . . . . . . . . . . . . . . . . . . . . . . . . . . . . . . . . . . . . . . . . . . . . . . . . . .99TCP Port Selection . . . . . . . . . . . . . . . . . . . . . . . . . . . . . . . . . . . . . . . . . . . . . . . . . . . . . . . . . . . . .99 SDP Offer Example. . . . . . . . . . . . . . . . . . . . . . . . . . . . . . . . . . . . . . . . . . . . . . . . . . . . . . . . .102Timers. . . . . . . . . . . . . . . . . . . . . . . . . . . . . . . . . . . . . . . . . . . . . . . . . . . . . . . . . . . . . . . . . . . .103 Configuring Media Over TCP . . . . . . . . . . . . . . . . . . . . . . . . . . . . . . . . . . . . . . . . . . . . . . . . . . .103 Media Management Behind the Same IP . . . . . . . . . . . . . . . . . . . . . . . . . . . . . . . . . . . . . . . . . .104 Additional Media Management Options . . . . . . . . . . . . . . . . . . . . . . . . . . . . . . . . . . . . . . . . . .104Configuring Media Management Behind the Same IP. . . . . . . . . . . . . . . . . . . . . . . . . . . . . . .104 6SIP Signaling Services. . . . . . . . . . . . . . . . . . . . . . . . . . . . . . . . . . . . . . . . . . . . 105Introduction. . . . . . . . . . . . . . . . . . . . . . . . . . . . . . . . . . . . . . . . . . . . . . . . . . . . . . . . . . . . . . . . . . . .105About the Net-Net SBC and SIP. . . . . . . . . . . . . . . . . . . . . . . . . . . . . . . . . . . . . . . . . . . . . . . . . .105 Types of SIP Devices. . . . . . . . . . . . . . . . . . . . . . . . . . . . . . . . . . . . . . . . . . . . . . . . . . . . . . . . . . .105Basic Service Models. . . . . . . . . . . . . . . . . . . . . . . . . . . . . . . . . . . . . . . . . . . . . . . . . . . . . . . . . . .106 About B2BUA . . . . . . . . . . . . . . . . . . . . . . . . . . . . . . . . . . . . . . . . . . . . . . . . . . . . . . . . . . . . .106SIP B2BUA Peering. . . . . . . . . . . . . . . . . . . . . . . . . . . . . . . . . . . . . . . . . . . . . . . . . . . . . . . . .106B2BUA Hosted IP Services. . . . . . . . . . . . . . . . . . . . . . . . . . . . . . . . . . . . . . . . . . . . . . . . . . .107 Version 6.0 Net-Net 9200 EMS Configuration Guide 7SIP B2BUA and L3/L5 NAT. . . . . . . . . . . . . . . . . . . . . . . . . . . . . . . . . . . . . . . . . . . . . . . . . .107 About SIP Interfaces. . . . . . . . . . . . . . . . . . . . . . . . . . . . . . . . . . . . . . . . . . . . . . . . . . . . . . . . . . .107 SIP Network Models and Types . . . . . . . . . . . . . . . . . . . . . . . . . . . . . . . . . . . . . . . . . . . . . . . . . .107 Network Model. . . . . . . . . . . . . . . . . . . . . . . . . . . . . . . . . . . . . . . . . . . . . . . . . . . . . . . . . . . . . . .108Network Type . . . . . . . . . . . . . . . . . . . . . . . . . . . . . . . . . . . . . . . . . . . . . . . . . . . . . . . . . . . . . . . .108Default Network Model and Type. . . . . . . . . . . . . . . . . . . . . . . . . . . . . . . . . . . . . . . . . . . . . . . .108Upgrade Considerations . . . . . . . . . . . . . . . . . . . . . . . . . . . . . . . . . . . . . . . . . . . . . . . . . . . . . . .108Configuring the Network Type and Network Model . . . . . . . . . . . . . . . . . . . . . . . . . . . . . . . .108 Configuring the Network Model. . . . . . . . . . . . . . . . . . . . . . . . . . . . . . . . . . . . . . . . . . . . . .109Configuring the Network Type . . . . . . . . . . . . . . . . . . . . . . . . . . . . . . . . . . . . . . . . . . . . . . .109 Configuring the Net-Net SBC for SIP Signaling . . . . . . . . . . . . . . . . . . . . . . . . . . . . . . . . . . . .110 Using the Net-Net EMS to Configure the Net-Net SBC . . . . . . . . . . . . . . . . . . . . . . . . . . . . .111Configuration Timestamp . . . . . . . . . . . . . . . . . . . . . . . . . . . . . . . . . . . . . . . . . . . . . . . . . . . . . .111 Configuring the Home Realm . . . . . . . . . . . . . . . . . . . . . . . . . . . . . . . . . . . . . . . . . . . . . . . . . . . .111 Overview. . . . . . . . . . . . . . . . . . . . . . . . . . . . . . . . . . . . . . . . . . . . . . . . . . . . . . . . . . . . . . . . . . . .111 SIP NAT Function. . . . . . . . . . . . . . . . . . . . . . . . . . . . . . . . . . . . . . . . . . . . . . . . . . . . . . . . . .112Home Realm’s Purpose . . . . . . . . . . . . . . . . . . . . . . . . . . . . . . . . . . . . . . . . . . . . . . . . . . . . .112 Configuring the Home Realm. . . . . . . . . . . . . . . . . . . . . . . . . . . . . . . . . . . . . . . . . . . . . . . . . . .112 Configuring a SIP Interface . . . . . . . . . . . . . . . . . . . . . . . . . . . . . . . . . . . . . . . . . . . . . . . . . . . . . .114 Overview. . . . . . . . . . . . . . . . . . . . . . . . . . . . . . . . . . . . . . . . . . . . . . . . . . . . . . . . . . . . . . . . . . . .114About SIP Ports. . . . . . . . . . . . . . . . . . . . . . . . . . . . . . . . . . . . . . . . . . . . . . . . . . . . . . . . . . . . . . .114 Preferred SIP Port. . . . . . . . . . . . . . . . . . . . . . . . . . . . . . . . . . . . . . . . . . . . . . . . . . . . . . . . . .114 Proxy Mode. . . . . . . . . . . . . . . . . . . . . . . . . . . . . . . . . . . . . . . . . . . . . . . . . . . . . . . . . . . . . . . . . .114Redirect Action . . . . . . . . . . . . . . . . . . . . . . . . . . . . . . . . . . . . . . . . . . . . . . . . . . . . . . . . . . . . . . .115Trust Mode . . . . . . . . . . . . . . . . . . . . . . . . . . . . . . . . . . . . . . . . . . . . . . . . . . . . . . . . . . . . . . . . . .115 About the Process. . . . . . . . . . . . . . . . . . . . . . . . . . . . . . . . . . . . . . . . . . . . . . . . . . . . . . . . . .115 Configuring a SIP interface . . . . . . . . . . . . . . . . . . . . . . . . . . . . . . . . . . . . . . . . . . . . . . . . . . . . .116 Configuring SIP Ports. . . . . . . . . . . . . . . . . . . . . . . . . . . . . . . . . . . . . . . . . . . . . . . . . . . . . . .122Configuring Carriers. . . . . . . . . . . . . . . . . . . . . . . . . . . . . . . . . . . . . . . . . . . . . . . . . . . . . . . .123 Configuring SIP Timers . . . . . . . . . . . . . . . . . . . . . . . . . . . . . . . . . . . . . . . . . . . . . . . . . . . . . . . . .124 Overview. . . . . . . . . . . . . . . . . . . . . . . . . . . . . . . . . . . . . . . . . . . . . . . . . . . . . . . . . . . . . . . . . . . .124Configuring SIP Timers . . . . . . . . . . . . . . . . . . . . . . . . . . . . . . . . . . . . . . . . . . . . . . . . . . . . . . . .124 Configuring SIP Options Tag Handling . . . . . . . . . . . . . . . . . . . . . . . . . . . . . . . . . . . . . . . . . . .126 Overview. . . . . . . . . . . . . . . . . . . . . . . . . . . . . . . . . . . . . . . . . . . . . . . . . . . . . . . . . . . . . . . . . . . .126Configuration Overview. . . . . . . . . . . . . . . . . . . . . . . . . . . . . . . . . . . . . . . . . . . . . . . . . . . . . . . .126Configuring SIP Options Tag Handling. . . . . . . . . . . . . . . . . . . . . . . . . . . . . . . . . . . . . . . . . . .127 ENUM: Large UDP Datagram Support for DNS NAPTR Responses . . . . . . . . . . . . . . . . . .129 How It Works . . . . . . . . . . . . . . . . . . . . . . . . . . . . . . . . . . . . . . . . . . . . . . . . . . . . . . . . . . . . . . . .129Configuring Large UDP Datagram Support. . . . . . . . . . . . . . . . . . . . . . . . . . . . . . . . . . . . . . . .129 Configuring SIP Options . . . . . . . . . . . . . . . . . . . . . . . . . . . . . . . . . . . . . . . . . . . . . . . . . . . . . . . .1308 Net-Net 9200 EMS Configuration Guide Version 6.0。
Polycom 产品说明书

Why Polycom VoIP?• Polycom is the leading independent supplier of standards-based IP telephones.• To offer you a choice of end-to-end, integrated VoIP solutions , Polycom ensures that your Polycom phones are fully interoperable with leading standards-based IP PBX and Softswitch platforms 1.• Polycom’s comprehensive product portfolio encompasses the SoundPoint ®IP family of desktop phones, the attendant console based on the SoundPoint IP 601/650 and Expansion Module, and the SoundStation ®IP 4000 conference phone.Features and Benefits Outstanding Voice Quality• Polycom’s revolutionary HD Voice ™technology delivers voice communications of life-like interactivity, richness, and clarity*:- Exceptional sound quality, echo cancellation, and noise reduction - Support of G.722 wideband codec- Interactive two-way conversations that are as natural as being there- Polycom full-duplex 2speakerphones are compliant with IEEE 1329 standards • Network-related provisioning for superb voice quality:- Quality of Service – IEEE 802.1 p/Q, Layer 3 TOS, and DSCP 3- Dynamic jitter buffer- Sophisticated packet loss concealment algorithms Enhanced Call Handling, Security, and • Support of up to 24 simultaneous calls on up to 12 lines Advanced Applications 4, 5• Shared call / bridged line appearance • Busy Lamp Field (BLF)• Multiple call- and flexible line appearances• TLS security 3, encrypted configuration files 3, HTTPS secure provisioning 7, support of “signed” software executables 7, URL syntax for boot server address, and digest authentication•Microsoft ®LCS 2005 interoperability for telephony and presence 3- Compatibility with Microsoft Office Communicator and Windows ®Messenger 5.1 clients•XHTML micro-browser for productivity-enhancing Web-based applications 8Ease of Use• Polycom IP phones provide an easy transition from legacy PBX and Key Systems to the world of IP communications:- Intuitive user interface- Easy-to-read, high-quality LCD displays with up to 320x160 pixel resolution - A combination of up to 26 dedicated hard keys and up to 4 context-sensitive soft keys for one-touch access to essential featuresEfficient Installation, Provisioning, and Ugrades • Polycom IP phones are designed to make installation, configuration, and upgradesas simple and efficient as possible:- Centralized provisioning and upgrades from an FTP , TFTP , HTTP 7, or HTTPS server - Support of provisioning 3 and call server redundancy - Manual or DHCP set-up. Web configuration- Lower cabling expenses: dual-port 10/100 Mbps Ethernet switch for LAN and PC connection 9- Choice of powering options: AC adapter or Power over Ethernet Investment Protection• Polycom IP phones can be upgraded to new firmware in the field so as to consistently meet your business communication needs as protocols develop and standards evolve • Polycom IP phones are standards-based, so there is no need to replace them when upgrading or replacing your standards-based call server* Currently available on SoundPoint IP 650 and 550. In some calling scenarios, such as IP to PSTN, Polycom HD Voice will not be available and the call will progress in narrowband instead.1Please visit /techpartners.htm for a full list of supported IP PBX and Softswitch solutions.2The SoundPoint IP 301 has a monitor-only speakerphone.3Requires SIP version 2.0.x or higher.4Most features must be supported by the call server. Please contact your IP PBX / Softswitch vendor or service provider for a list of supported features.5Not all Polycom VoIP phones support all features. Please refer to the product documentation for details.7Requires BootROM 3.0.x or higher.8Not available on the SoundPoint IP 301.9The SoundPoint IP 320 and SoundStation IP 4000 have a single 10/100 Ethernet port.Polycom ®IP TelephonesQuick Reference GuideThe Power of a Network. The Simplicity of a Phone.7SoundPoint IP 550:Cutting-edge SIP feature set meets Polycom HD Voice■Application targets: manager's / professional's office ■4 lines■Integrated PoE support (IEEE 802.3af)■Polycom HD Voice for all audio paths■320 x 160 pixel backlit grayscale graphical LCD■26 dedicated hard keys, 4 context-sensitive soft keys ■SIPWW MSRP*: $369PERFORMANCEAt-a-GlanceRev. 03/07Polycom Headquarters:4750 Willow Road, Pleasanton, CA 94588 (T) 1.800.POLYCOM (765.9266) for North America only. For North America, Latin America and Caribbean (T) +1.925.924.6000, (F) +1.925.924.6100 Polycom EMEA:270 Bath Road, Slough, Berkshire SL1 4DX, (T) +44 (0)1753 723000, (F) +44 (0)1753 723010Polycom Asia Pacific:8 Shenton Way, #11-01 Temasek Tower, Singapore 068811 (T) +65.6389.9200, (F) +65.6323.3022© 2007 Polycom,Inc. All rights reserved.Polycom, the Polycom logo, SoundPoint and SoundStation are registered trademarks and HD Voice is a trademark of Polycom, Inc. in the U.S. and various countries. All other trademarks are the property of their respective companies. Specifications are subject to change without notice.* Subject to change without noticeSoundPoint IP 301:Entry-level two-linedesktop IP phone that delivers remarkable value■Application targets: common areas, warehouse ■2 lines■PoE support with optional cable ■Monitor-only speakerphone ■4 line x 20 character-based LCD■12 dedicated hard keys, 3 context-sensitive soft keys ■SIP , MGCPUS MSRP*: $180SoundPoint IP 501:Three-line desktop IP phone that delivers exceptional voice quality■Application targets: office, SOHO, hotel room ■3 lines■PoE support with optional cable■Full-duplex speakerphone with Acoustic Clarity Technology■160 x 80 pixel grayscale graphical LCD■24 dedicated hard keys, 4 context-sensitive soft keys ■SIP , MGCPUS MSRP*: $270SoundPoint IP 330 and 320:Entry-level IP phones with enterprise-grade features and outstanding voice quality■Application targets:- Cubicle, call center (SoundPoint IP 330)- Common areas, dorm rooms, wall-mounted deployments (SoundPoint IP 320)■2 lines■Integrated PoE support (IEEE 802.3af)■Full-duplex speakerphone with Acoustic Clarity Technology ■102 x 33 pixel graphical LCD■15 dedicated hard keys, 3 context-sensitive soft keys ■Two-port 10/100 Ethernet switch (SoundPoint IP 330)■Single 10/100 Ethernet port (SoundPoint IP 320)■SIPWW MSRP*: $179 (SoundPoint IP 330)$139 (SoundPoint IP 320)SoundPoint IP 430:Full-duplex speakerphone, built-in PoE, and a graphical LCD■Application target: cubicle ■2 lines■Full-duplex speakerphone with Acoustic Clarity Technology■Integrated PoE support (IEEE 802.3af)■132 x 46 pixel graphical LCD■16 dedicated hard keys, 4 context-sensitive soft keys ■SIPWW MSRP*: $239SoundPoint IP 601:Six-lines, advanced functionality, and Expansion Module support■Application targets: manager’s office, telephone attendant's desk■6 lines (standalone) / 12 lines (with Expansion Module)■Integrated PoE support (IEEE 802.3af and Cisco Inline Power)■Full-duplex speakerphone with Acoustic Clarity Technology ■320 x 160 pixel grayscale graphical LCD■26 dedicated hard keys, 4 context-sensitive soft keys ■Support of up to three Expansion Modules (SIP only)■SIP , MGCPUS MSRP*: $399SoundStation IP 4000:The clear IP conferencing solution■Full-duplex conference phone featuring Acoustic Clarity Technology■10-ft. microphone coverage expandable to 20-ft.x 30-ft. with optional extension microphones ■PoE support with optional PoE Interface Module ■248 x 68 pixel backlit graphical LCD ■SIPUS MSRP*: $1,099SoundPoint IP Expansion Module:Turn the SoundPoint IP 601/650 into a high-performance attendant console■Application target: telephone attendant's desk ■14 illuminated keys configurable as a line key, or a speed dial with BLF■160 x 320 pixel grayscale graphical LCD ■Plug-and-play, hot-swappable■Cord-free, no AC adapter required – power and signaling are provided by the host phoneWW MSRP*: $299SoundPoint IP 650:High-performance IP phone with Polycom HD Voice ™■Application targets: executive office■6 lines (standalone) / 12 lines (with Expansion Module)■Integrated PoE support (IEEE 802.3af)■Polycom HD Voice for all audio paths■320 x 160 pixel backlit grayscale graphical LCD ■26 dedicated hard keys, 4 context-sensitive soft keys ■Support of up to three Expansion Modules ■USB port for future applications ■SIPWW MSRP*: $449ENTRY-LEVELMAINSTREAMATTENDANTCONFERENCE。
TEF4-OFF前端电子计时器产品说明书

Package Level 1 Units Package Level 1 Width Package Level 1 Height Package Level 1 Depth / Length Package Level 1 Gross Weight Package Level 1 EAN Package Level 2 Units Package Level 2 Width Package Level 2 Height Package Level 2 Depth / Length Package Level 2 Gross Weight
Tightening Torque UL/CSA
Additional Information
Climatic Withstand Conventional Free-air Thermal Current (Ith) Degree of Protection Maximum Electrical Switching Frequency Maximum Mechanical Switching Frequency Medium Description
2
85389091
43 mm 41.6 mm 67.7 mm 0.065 kg
box 1 piece 82 mm 51 mm 56 mm
0.065 kg 3471523130654
box 80 piece 254 mm 200 mm 319 mm 5.2 kg
Close to Contactor for Storage -40 ... +80 °C Near Contactor for Operation in Free Air -25 ... +70 °C
Acme Panel-Tran Zone Power Center产品介绍说明书
Acme offers the world’s largest variety of Panel-Tran Power Centers, the ideal way to save time, space and money when you need a reliable zone power solution. Instead of buying, assembling and installing separate components, you can rely on one pre-tested, pre-wired combination of a primary breaker disconnect, dry-type shielded transformer, secondary breaker disconnect and a secondary power panel that is pre-assembled in a Type 3R enclosure. All our Panel-TranPower Centers are UL listed and have a 10 year warranty. Panel assembly will accom-modate one-inch, 1, 2 or 3-pole, common trip, duplex secondary branch circuit breakers and ground fault circuit breakers. New Bolt-in designs offer bolt-in breakers for more robust applications.The cost, versatility and ease of installation makes our product the best cost zone powersolution available.P A N E L -T R A N ®Z O N E P O W E R C E N T E R SPT061150005LSPTBA3150015LSSnap-in or bolt-in circuit breakersUL listed systemSecondary main circuit breakers providedPrimary circuit breakers providedEncapsulated constructionPT061150005SSPTBA3150015SST en-year limited warrantyT amper-Proof Pad-lockable Captive HardwareAbundant knockouts providedStainless Steel construction availableLifting ears for easy installationShielded for cleaner powerPetroleumMining5.0PT0B1150005LS 16838.00 (96.5)15.88 (40.3)11.00 (27.9)165 (74.8)7.5PT0B1150007LS 16838.00 (96.5)15.88 (40.3)11.00 (27.9)165 (74.8)10.0PT0B1150010LS 16838.00 (96.5)17.13 (43.5)12.38 (31.4)240 (108.8)15.0PT0B1150015LS 16838.00 (96.5)17.13 (43.5)12.38 (31.4)240 (109.0)25.0PT0B1150025LS281445.20 (114.8)17.88 (45.4)13.50 (34.3)330 (150.0)① The number of secondary circuits shown is only a representation of circuits. Please contact the factory for exact number of secondary circuits available.304 STAINLESS STEEL/ BOLT-IN BREAKERS 480 PRIMARY VOLTS –– 240/120 SECONDARY VOLTS –– 1Ø, 60 Hz Single Phase5.0PT0B1150005SS 16838.00 (96.5)15.88 (40.3)11.00 (27.9)165 (74.8) 7.5PT0B1150007SS 16838.00 (96.5)15.88 (40.3)11.00 (27.9)165 (74.8)10.0PT0B1150010SS 16834.38 (87.3)17.13 (43.5)12.38 (31.4)240 (108.8)15.0PT0B1150015SS 16834.38 (87.3)17.13 (43.5)12.38 (31.4)240 (109.0)25.0PT0B1150025SS281441.88 (106.4)17.88 (45.4)13.50 (34.3)330 (150.0)① The number of secondary circuits shown is only a representation of circuits. Please contact the factory for exact number of secondary circuits available.SINGLE PHASE BOLT-IN BREAKERS480 VOLTS to 240/120 VOLTS Circuit Breaker DatakVA 480 Volts primary breakers240/120 Volts secondary mainMaximum Rating of Secondary Breakers5.0ED42B025L (25A)B230H (30A)20 amps 7.5ED42B025L (25A)B240H (40A)30 amps 10.0ED42B035L (35A)B250H (50A)40 amps 15.0ED42B050L (50A)B270H (70A)60 amps 25.0ED42B090L (90A)B2125 (125A)100 ampsBOLT-IN BREAKERS480 DELTA PRIMARY VOLTS –– 208Y/120 SECONDARY VOLTS –– 3Ø, 60 Hz Three Phase10 309.0PTBB3150009LS 15733.75 (85.7)22.13 (56.2)7.63 (19.4)255 (116.0)①The number of secondary circuits shown is only a representation of circuits. Please contact the factory for exact number of secondary circuits available.304 STAINLESS STEEL/ BOLT-IN BREAKERS 480 DELTA PRIMARY VOLTS –– 208Y/120 SECONDARY VOLTS –– 3Ø, 60 Hz Three PhasekVA Catalog NumberSecondary MaximumCurrent Output ①120 V 208 V (1-pole) (3-pole)Height(Inches)(Cm.)Width(Inches)(Cm.)Depth(Inches)(Cm.)Weight(Lbs.)(Kg.)9.0PTBB3150009SS 15733.75 (85.7)22.13 (56.2)7.63 (19.4)255 (116.0)①The number of secondary circuits shown is only a representation of circuits. Please contact the factory for exact number of secondary circuits available.THREE PHASE BOLT-IN BREAKERS480 VOLTS DELTA to 208Y/120 VOLTS Circuit Breaker DatakVA480 Volts primary breakers208Y/120 Volts secondary mainMaximum Rating of Secondary Breakers9.0ED43B025L (25A)B330H (30A)25 ampsACM_BRO_017_0116N85 W12545 Westbrook Crossing • Menomonee Falls, WI 53051 • 800.334.5214 • Hubbell Canada Inc. • 905-839-1138 • Hubbell de Mexico, S.A. de C.V . • 52-55-9151-9999 5.0PT061150005LS 8432.13 (81.6)13.25 (33.7)7.63 (19.4)120 (54.4)7.5PT061150007LS 8432.13 (81.6)15.88 (40.3)11.00 (27.9)160 (72.6)10.0PT061150010LS 8434.38 (87.3)15.88 (40.3)11.00 (27.9)185 (83.9)15.0PT061150015LS 12634.38 (87.3)17.13 (43.5)12.38 (31.4)240 (109.0)25.0PT061150025LS201041.88 (106.4)17.88 (45.4)13.50 (34.3)330 (150.0)① The number of secondary circuits shown is only a representation of circuits. Please contact the factory for exact number of secondary circuits available.304 STAINLESS STEEL/ SNAP-IN BREAKERS 480 PRIMARY VOLTS –– 240/120 SECONDARY VOLTS –– 1Ø, 60 Hz Single Phase5.0PT061150005SS 8432.13 (81.6)13.25 (33.7)7.63 (19.4)120 (54.4) 7.5PT061150007SS 8432.13 (81.6)15.88 (40.3)11.00 (27.9)160 (72.6)10.0PT061150010SS 8434.38 (87.3)15.88 (40.3)11.00 (27.9)185 (83.9)15.0PT061150015SS 12634.38 (87.3)17.13 (43.5)12.38 (31.4)240 (109.0)25.0PT061150025SS201041.88 (106.4)17.88 (45.4)13.50 (34.3)330 (150.0)① The number of secondary circuits shown is only a representation of circuits. Please contact the factory for exact number of secondary circuits available.SINGLE PHASE SNAP-IN BREAKERS480 VOLTS to 240/120 VOLTS Circuit Breaker DatakVA 480 Volts primary breakers240/120 Volts secondary mainMaximum Rating of Secondary Breakers5.0ED42B025L (25A)Q225 (25A)20 amps 7.5ED42B025L (25A)Q240 (40A)30 amps 10.0ED42B035L (35A)Q250 (50A)40 amps 15.0ED42B050L (50A)Q270 (70A)60 amps 25.0ED42B090L (90A)Q2125 (125A)100 ampsSNAP-IN BREAKERS480 DELTA PRIMARY VOLTS –– 208Y/120 SECONDARY VOLTS –– 3Ø, 60 Hz Three Phase10 309.0PTBA3150009LS 12433.75 (85.7)22.13 (56.2)7.63 (19.4)255 (116.0)①The number of secondary circuits shown is only a representation of circuits. Please contact the factory for exact number of secondary circuits available.304 STAINLESS STEEL/ SNAP-IN BREAKERS 480 DELTA PRIMARY VOLTS –– 208Y/120 SECONDARY VOLTS –– 3Ø, 60 Hz Three PhasekVA Catalog NumberSecondary MaximumCurrent Output ①120 V 208 V (1-pole) (3-pole)Height(Inches)(Cm.)Width(Inches)(Cm.)Depth(Inches)(Cm.)Weight(Lbs.)(Kg.)9.0PTBA3150009SS 12433.75 (85.7)22.13 (56.2)7.63 (19.4)255 (116.0)①The number of secondary circuits shown is only a representation of circuits. Please contact the factory for exact number of secondary circuits available.THREE PHASE SNAP-IN BREAKERS480 VOLTS DELTA to 208Y/120 VOLTS Circuit Breaker DatakVA480 Volts primary breakers208Y/120 Volts secondary mainMaximum Rating of Secondary Breakers9.0ED43B025L (25A)Q330 (30A)25 amps。
AXIS C1210-E网络天花板扬声器说明书
AXIS C1210-E Network Ceiling SpeakerDiscrete in-ceiling installation—largeAXIS C1210-E is an all-in-one speaker system that makes voice announcements and background music smart and easy. It connects to standard network using one cable for both power(PoE)and connectivity.AXIS C1210-E offers flexible, discrete recessed ceiling installation,ideal for indoor environments but can also be used for protected outdoor areas like under the eaves.Additionally,it features a backbox that meets plenum requirements.It offers easy integration with your video management software(VMS),VoIP telephony,analytics,and more.Including a preconfigured digital signal processer(DSP)it produces clear voice every time.It also features a built-in microphone enabling remote health testing and2-way audio talk-back.Furthermore,the embedded audio management software supports user,content,zone,and scheduling management.>All-in-one speaker system>Connects to standard network>Easy installation with just one network cable(PoE)>Scalable and easy to integrate>Remote healthtesting DatasheetAXIS C1210-E Network Ceiling Speaker Audio hardwareEnclosure One way enclosure with6,5inches broadband dynamic conespeakerMax soundpressure level96dBFrequencyresponse40Hz-20kHzCoverage pattern130°coaxialAudio input/output Built-in microphone(can be disabled) External microphone,Line inBuilt-inmicrophonespecification50Hz-20kHzAmplifierdescriptionBuilt-in7W Class D amplifierDigital signalprocessingBuilt-in and pre-configured Audio managementAXIS Audio Manager Edge Built in:–Content management for music and live/pre-recorded announcements.–Scheduling to decide when and where to play specific content.–Content prioritization to ensure urgent messages interrupt the schedule.–Zone management allowing you to divide up to200speakers into20zones.–Health monitoring for remote discovery of system errors.–User management to control who has access to what features. See separate datasheet for more details.AXIS Audio Manager Pro For larger and more advanced systems.Sold separately.See separate datasheet for specifications.Audio softwareAudio streaming One-way/two-way with optional half-duplex echo cancellation.Mono.Audio encoding AAC LC8/16/32/48kHz,G.711PCM8kHz,G.726ADPCM8kHz, Axisµ-law16kHz,WAV,MP3in mono/stereo from64kbps to320kbps.Constant and variable bit rate.Sampling rate from8kHz up to48kHz.System on chip(SoC)Model i.MX6SoloXMemory512MB RAM,512MB FlashNetworkSecurity IP address filtering,HTTPS a encryption,IEEE802.1X a networkaccess control,user access log,Centralized CertificateManagementNetwork protocols IPv4/v6b,HTTP,HTTPS a,SSL/TLS a,QoS Layer3DiffServ,FTP,SFTP, CIFS/SMB,SMTP,Bonjour,UPnP TM,SNMP v1/v2c/v3(MIB-II), DNS,DynDNS,NTP,RTSP,RTP,TCP,UDP,IGMPv1/v2/v3,RTCP, ICMP,DHCP,ARP,SOCKS,SSH,NTCIP,SIP(Cisco,Avaya,Asterisk)System integrationApplication Programming Interface Open API for software integration,including VAPIX®,One-click cloud connection,AXIS Camera Application Platform(ACAP).VoIP Support for Session Initiation Protocol(SIP)for integration with Voice over IP(VoIP)systems.Peer to peer or integrated withSIP/PBX.Tested with:SIP client such as Cisco,Bria and Grandstream andPBX suppliers such as Cisco and Asterisk.Supported SIP features:secondary SIP server,IPv6,SRTP/RTSPS,SIPS,SIP TLS,DTMF(RFC2976and RFC2833),NAT(ICE,STUN,TURN)Supported codecs:PCMU,PCMA,opus,L16/16000,L16/8000,speex/8000,speex/16000,G.726-32Intelligent audio Auto Speaker Test(verification via built-in microphone) Event triggers Call,virtual inputs,external input,AXIS Camera ApplicationPlatform(ACAP)Event actions Play audio clip,send SNMP trap,send Auto Speaker Test,status LED,File upload via HTTP,network share and email,Notification via email,HTTP,HTTPS and TCP,external output activationBuilt-ininstallation aidsTest tone verification and identificationCybersecurityEdge security Software:Signed firmware,brute force delay protection,digest authentication,password protection,AES-XTS-Plain64256bitSD card encryptionHardware:Secure boot,Axis Edge Vault with Axis device ID,signed video,secure keystore(CC EAL4+certified hardwareprotection of cryptographic operations and keys)Network security IEEE802.1X(EAP-TLS)a,IEEE802.1AR,HTTPS/HSTS a,TLSv1.2/v1.3a,Network Time Security(NTS),X.509Certificate PKI,IP address filteringDocumentation AXIS OS Hardening GuideAxis Vulnerability Management PolicyAxis Security Development ModelTo download documents,go to /support/cybersecu-rity/resourcesTo read more about Axis cybersecurity support,go to/cybersecurityGeneralCasing IP44(IP40above ceiling)Baffle:PlasticTop cover:PlasticMesh:Surface-treated steel plateMesh color:Off-white(RAL9010or equivalent)Repaintable.For repainting instructions and impact on warranty,contact your Axis partner.Speaker mounting method:Plastic clampPower Power over Ethernet(PoE),IEEE802.3af Type1Class3(max12.95W)Connectors RJ4510BASE-T/100BASE-TX PoEI/O:4-pin2.5mm terminal block for2x supervised configurableI/OsStorage Support for microSD/microSDHC/microSDXC cardMax.size64GBFor SD card recommendations see Reliability Designed for24/7operation.LED indicators Status LED,front-facing LEDOperatingconditions-30°C to50°C(-22°F to122°F)Humidity10–100%RH(condensing)Storageconditions-40°C to65°C(-40°F to149°F)Humidity5–95%RH(non-condensing)Approvals EMCCISPR24,CISPR35,CISPR32Class A,EN55024,EN55035,EN55032Class A,EN61000-6-1,EN61000-6-2,EN61000-6-3,EN61000-6-4,FCC Part15Subpart B Class A,ICES-3(A)/NMB-3(A),KC KN35,KC KN32Class A,RCM AS/NZS CISPR32Class A,VCCI Class ASafetyCAN/CSA C22.2No.62368-1,CAN/CSA-C22.2No.60950-22,IEC/EN62368-1,KC-Mark,UL62368-1,UL60950-22EnvironmentIEC60068-2-1,IEC60068-2-2,IEC60068-2-6,IEC60068-2-14,IEC60068-2-27,IEC60068-2-78,IEC/EN60529IP44 Dimensions Height:150mm(5.9in),Front-meshØ285mm(11.2in)Ceiling thickness:for mounting:0–60mm(0–2.4in)Dimensions for fixing hole:Ø261mm±2mm(10.3in±0.08in) Weight3100gOptionalaccessoriesAXIS TC1603Tile Bridge(for installation in soft ceiling),AXIS TC1602Conduit Adapter,AXIS TC1702Back Cover,AXIS Safety Wire3MFor more accessories,see VideomanagementsoftwareAXIS Companion,AXIS Camera Station,video managementsoftware from Axis’Application Development Partners availableon /techsup/softwareLanguages English,German,French,Spanish,ItalianWarranty5-year warranty,see /warrantya.This product includes software developed by the OpenSSL Project for use in the OpenSSL Toolkit.(),and cryptographic software written by Eric Young(*****************).b.Audio synchronization with IPv4only.Environmental responsibility:/environmental-responsibility©2022-2023Axis Communications AB.AXIS COMMUNICATIONS,AXIS,ARTPEC and VAPIX are registered trademarks ofAxis AB in various jurisdictions.All other trademarks are the property of their respective owners.We reserve the right tointroduce modifications without notice.T10177745/EN/M6.8/2301。
Rockwell Automation FactoryTalk Logix Echo 产品说明书
注意:标识可能导致人员伤亡、财物损害或经济损失的做法或环境的相关信息。注意事项可帮助您识别危险,避开 危险,以及意识到后果。
重要 标识对成功应用和了解产品至关重要的信息。 还会在设备上或内部使用标签来提供具体预防措施。
FactoryTalk Logix Echo SDKFra bibliotek附录 A
SDK 文档套件和 NuGet 软件包 .......................................................... 35 API 功能 .................................................................................................... 35
FactoryTalk Logix Echo 获 取结果指南
获取结果指南
Rockwell Automation 出版号 9310-GR001B-ZH-P - 2022 年 11 月 取代出版号 9310-GR001A-ZH-P - 2021 年 8 月
原始说明
FactoryTalk Logix Echo 获取结果指南
章节 3
使用控制器快照 ........................................................................................ 25 添加快照............................................................................................... 25 编辑快照.............................................................................................. 26 恢复快照.............................................................................................. 26 导出快照.............................................................................................. 27 导入快照.............................................................................................. 27
Beacon Global Technology EtherNet IP 产品应用手册说明书
BEACON GLOBAL TECHNOLOGYEtherNet/IP产品应用手册本手册将主要介绍利用BT-EN-MT-P网关,实现DCS和罗克韦尔自动化马达保护器E300之间的通讯。
本手册为补充手册,具体配置网关EtherNet/IP做server和Client方法,配置网关Modbus TCP做server和Client方法请参考《BT-EN-MT-B/P快速启动手册》先将BT-EN-MT-P和E300两个设备挂在同一个网段上,使用RSlinx扫描。
打开E300手册,查看关于EtherNet/IP Information,用户手册里面关于通讯的介绍主要有三个部分需要对应:CLASS CODEInstanceAttributeBT-EN网关里面也有这三个部分的对应通讯原理,网关的这三项与E300用户手册对应上即可。
登录网关,右上角有Login 登录选项用户名和密码都是admin,对EtherNet/IP协议操作,选择EtherNet/IP Client表示EtherNet/IP主站,高级版的有15个Client表示可以作为15个主站,每个主站可以连接多个E300, 变频器等,建议每个Client连接1-2个罗克韦尔设备。
注意:连接的设备增多会降低网络通讯的速度。
选择通讯命令的种类,选择Generic.点击Add可以增加一条指令Enable: YES/NOFunction Type:命令的类型有三种:Read Attribute All,读取全部的Attribute(只有所连接设备说明书提供Read Attribute All功能才可使用)Read Attribute Single,读取单独的Attribute(只有所连接设备说明书提供Read Attribute Single功能才可使用)Write Attribute Single,写入单独的Attribute(只有所连接设备说明书提供Write Attribute Single功能才可使用)举例E300说明书IP Address:所连接设备的IP地址Slot:是指PLC CPU在AB机架上的槽位,如果连接的是非CPU设备,需要填写-1Quantity:读或者写的数量,当Function Type是读或者写单个Attribute时,此数量的设置才会起作用。