智能语音软件emTTS说明文档
TEMS使用手册
TEMS使用手册软件简介TEMS Investigation GSM测试软件除了进行语音测试外还可以进行GPRS测试,现在我们主要介绍语音测试.语音测试时我们主要用的功能有:拨打、锁频、强制切换等。
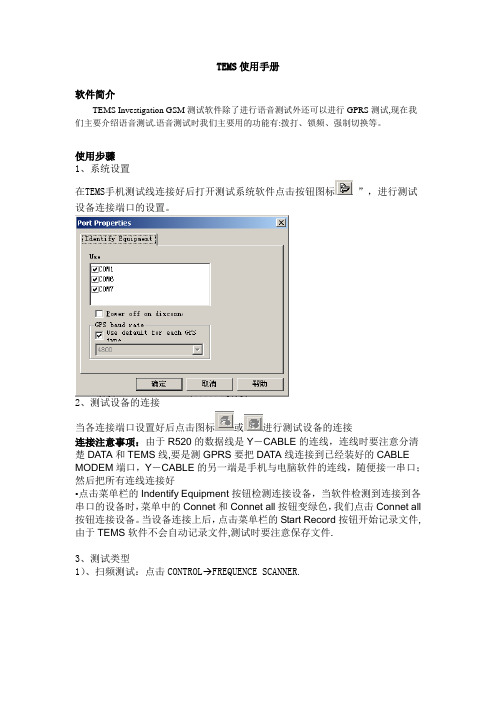
使用步骤1、系统设置在TEMS手机测试线连接好后打开测试系统软件点击按钮图标”,进行测试设备连接端口的设置。
2、测试设备的连接当各连接端口设置好后点击图标或进行测试设备的连接连接注意事项:由于R520的数据线是Y-CABLE的连线,连线时要注意分清楚DATA和TEMS线,要是测GPRS要把DATA线连接到已经装好的CABLE MODEM端口,Y-CABLE的另一端是手机与电脑软件的连线,随便接一串口;然后把所有连线连接好•点击菜单栏的Indentify Equipment按钮检测连接设备,当软件检测到连接到各串口的设备时,菜单中的Connet和Connet all按钮变绿色,我们点击Connet all 按钮连接设备。
当设备连接上后,点击菜单栏的Start Record按钮开始记录文件,由于TEMS软件不会自动记录文件,测试时要注意保存文件.3、测试类型1)、扫频测试:点击CONTROL FREQUENCE SCANNER.2)、锁频测试锁BCCH测试:点击快捷图标设置好后测试。
也可以点击主菜单下的Lock on channel按钮,选取所需的BCCH即可。
锁频段测试:进行锁频段测试时也可以先点击主菜单下的Equipment Properties 按钮,在属性里面有个SET BAND的选项,选取所需的频段.3)、强制切换测试回放:1、运行 TEMS INVESTIGATION,点击LOGFILE→OPEN LOGFILE,选择要回放的LOG文件。
2、选择Presentation→GSM选所要观察的项目3、选Configuration→Cell Definition,打开小区数据文件,格式如下图,为.cel文件,具体可以先用Cell Definition的ADD CELL来定义一个CELL,然后保存文件,再用EXCL打开该文件并照格式把其他基站数据补齐。
智能语音助手开发与应用技术手册
智能语音开发与应用技术手册第一章概述 (3)1.1 智能语音发展历程 (3)1.1.1 早期语音识别技术 (3)1.1.2 智能语音的诞生 (4)1.1.3 我国智能语音的发展 (4)1.2 智能语音技术架构 (4)1.2.1 语音识别模块 (4)1.2.2 自然语言处理模块 (4)1.2.3 语音合成模块 (4)1.2.4 对话管理模块 (4)1.2.5 知识库与推理模块 (4)第二章语音识别技术 (5)2.1 语音信号处理 (5)2.1.1 引言 (5)2.1.2 语音信号预处理 (5)2.1.3 特征提取 (5)2.2 声学模型 (5)2.2.1 引言 (6)2.2.2 常用声学模型 (6)2.3 (6)2.3.1 引言 (6)2.3.2 常用 (6)2.4 识别算法优化 (6)2.4.1 引言 (6)2.4.2 识别算法优化方法 (6)第三章语音合成技术 (6)3.1 文本预处理 (7)3.1.1 文本规范化 (7)3.1.2 分词 (7)3.1.3 词性标注 (7)3.1.4 语法分析 (7)3.2 基于拼接的语音合成 (7)3.2.1 语音库构建 (7)3.2.2 语音拼接 (7)3.2.3 语音后处理 (7)3.3 基于深度学习的语音合成 (7)3.3.1 模型训练 (8)3.3.2 文本编码 (8)3.3.3 语音 (8)3.4 语音合成效果评估 (8)3.4.1 自然度 (8)3.4.3 语音质量 (8)3.4.4 功能 (8)第四章语音理解与对话管理 (8)4.1 语义解析 (8)4.2 意图识别 (9)4.3 对话管理策略 (9)4.4 多轮对话优化 (10)第五章语音交互设计 (10)5.1 交互界面设计 (10)5.2 交互流程设计 (10)5.3 交互反馈机制 (11)5.4 用户体验优化 (11)第六章人工智能技术在智能语音中的应用 (12)6.1 自然语言处理 (12)6.1.1 (12)6.1.2 语音识别 (12)6.1.3 语义理解 (12)6.1.4 对话 (12)6.2 机器学习 (12)6.2.1 特征提取 (12)6.2.2 模型训练 (12)6.2.3 模型优化 (12)6.3 深度学习 (13)6.3.1 声学模型 (13)6.3.2 (13)6.3.3 语音合成 (13)6.4 强化学习 (13)6.4.1 对话策略学习 (13)6.4.2 用户意图识别 (13)6.4.3 个性化推荐 (13)第七章智能语音硬件平台 (13)7.1 麦克风阵列 (13)7.2 语音处理器 (14)7.3 输出设备 (14)7.4 硬件集成与调试 (14)第八章智能语音软件平台 (15)8.1 操作系统 (15)8.1.1 Android操作系统 (15)8.1.2 iOS操作系统 (15)8.1.3 Windows操作系统 (15)8.2 应用开发框架 (16)8.2.1 Android开发框架 (16)8.2.2 iOS开发框架 (16)8.3 数据库管理 (16)8.3.1 关系型数据库 (16)8.3.2 NoSQL数据库 (17)8.4 软件集成与调试 (17)8.4.1 集成测试 (17)8.4.2 调试工具 (17)8.4.3 持续集成与持续部署 (17)第九章智能语音测试与评估 (17)9.1 语音识别测试 (18)9.1.1 测试目的与原则 (18)9.1.2 测试内容与方法 (18)9.1.3 测试工具与平台 (18)9.2 语音合成测试 (18)9.2.1 测试目的与原则 (18)9.2.2 测试内容与方法 (18)9.2.3 测试工具与平台 (18)9.3 对话系统测试 (19)9.3.1 测试目的与原则 (19)9.3.2 测试内容与方法 (19)9.3.3 测试工具与平台 (19)9.4 功能评估与优化 (19)9.4.1 功能评估指标 (19)9.4.2 功能优化方法 (19)第十章智能语音市场与产业发展 (19)10.1 市场规模与趋势 (19)10.2 产业链分析 (20)10.3 应用场景拓展 (20)10.4 未来发展展望 (21)第一章概述智能语音作为一种新兴的人机交互方式,正逐渐改变着我们的生活。
支持Symbian UIQ作業系統的Voice Translator v2.0.2 说明书

支持Symbian UIQ作業系統的Voice Translator v2.0.2使用說明書引言安裝軟體與註冊軟體使用辭彙集辭彙集設定指南天氣自Speereo網站下載指南目前的天氣狀況(線上)怎樣註冊引言您想用外語與人交流溝通嗎? 沒什麼比這個更簡單的了!Speereo Translator是一語音翻譯軟體,能幫助您突破一切語言和地域的障礙!藉助Speereo Translator,您可選擇念出七種語言中的一個辭彙(西班牙語、德語、法語、義大利語、俄語、中國話、日語),Speereo Translator就會將辭彙翻譯成另一語言並讀出該辭彙譯語的語音。
本軟體收錄了約4000個常用辭彙,囊括商務、技術、醫學和法律術語以及成語和部份俚語。
按主題共區分成16大項和87個子項。
例如:「旅行」、「有用的」、「城市」、「食物」、「購物」、「健康」和「娛樂」。
歡迎您到國外旅行時,安裝這套軟體在您的智慧型手機中,作為您最佳的國際指南。
Speereo Translator包含各國和許多城市的Columbus旅遊指南,專供在Speereo Translator上使用。
Columbus旅遊指南提供無價、廣泛且詳盡的全球各國各城市資訊。
與Speereo Translator 配套的Columbus旅遊指南提供您無論去到何處旅遊都可取得各種有用的資訊,包括當地風光名勝、旅店餐廳等。
另外您可使用GPRS聯機取得指南中免費的天氣實況與最近幾天的天氣預報。
安裝軟體與註冊支持Symbian UIQ版本的Voice Translator 可安裝在機型中。
您可安裝包含英語與另一語言的雙語版本或者是包含八種語言的多語言版本及一個免費的指南。
若您下載並安裝試用版Voice Translator,您可於15天試用期間使用免費指南與「旅行」專案中您選定的兩種語言的雙向語音翻譯。
超過試用期後,若您仍想使用本軟體,就需註冊一種或多種語言版本的Voice Translator.安裝及註冊其他語言您可從/download 下載其他語言的(*.sis文件)。
计算机语音识别模块的使用说明书
计算机语音识别模块的使用说明书
使用说明:
一.运行本程序需要安装Microsoft Speech SDK语音开发工具。
其安装方法如下:
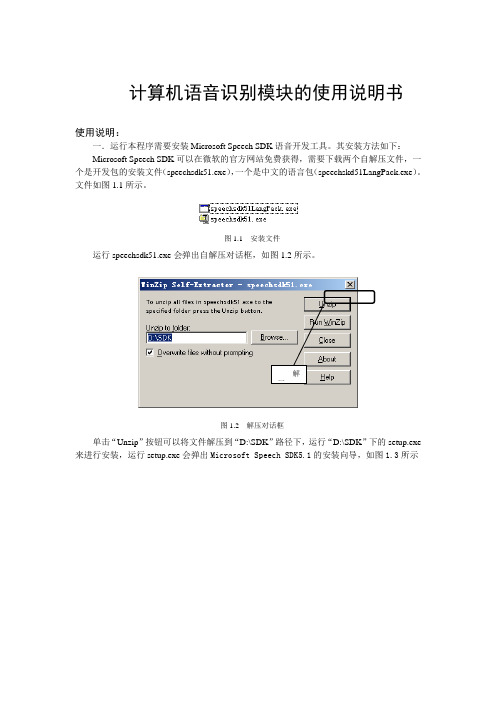
Microsoft Speech SDK可以在微软的官方网站免费获得,需要下载两个自解压文件,一个是开发包的安装文件(speechsdk51.exe),一个是中文的语言包(speechskd51LangPack.exe)。
文件如图1.1所示。
图1.1 安装文件
运行speechsdk51.exe会弹出自解压对话框,如图1.2所示。
图1.2 解压对话框
单击“Unzip”按钮可以将文件解压到“D:\SDK”路径下,运行“D:\SDK”下的setup.exe
来进行安装,运行setup.exe会弹出Microsoft Speech SDK5.1的安装向导,如图1.3所示
图1.3 安装向导
在向导中,通过单击“Next”按钮一步一步根据提示进行安装。
安装完成后计算机就具有了语音识别能力,输入法中会增加语音输入法。
但此时只能识别英语,要想使计算机能够识别汉语,还需要安装语言包,运行speechskd51LangPack.exe将文件解压,同开发包一样使用setup.exe进行安装。
二.如果不能正常朗读,先运行调节朗读模块,进行默认的初始化
带口型的朗读,朗读英文选Microsoft Mike。
EMTP使用说明书

智能语音软件emTTS说明文档
4.2.2 标记[m*] –发音人选择
示例文本 [m3]我是晓玲[m3] [m51]我是尹小坚[m3] [m52]我是易小强[m3] [m53]我是田蓓蓓[m3] [m54]我是唐老鸭[m3] [m55]我是小燕子[m3]
合成解释 用发音人“晓玲”的声音合成: “我是晓玲” 用发音人“尹小坚”的声音合成:“我是尹小坚” 用发音人“易小强”的声音合成:“我是易小强” 用发音人“田蓓蓓”的声音合成:“我是田蓓蓓” 用发音人“唐老鸭”的声音合成:“我是唐老鸭” 用发音人“小燕子”的声音合成:“我是小燕子”
合成系统
的嵌入式”,静音2秒,再播放“语音合成系统”
4.2.5 标记[r*] –姓氏读音策略
示例文本 [r0]解放涛的妹妹来了,单位的单小虎也来了[d] [r1]解放涛的妹妹来了,单位的单小虎也来了[d] [r2]解放涛的妹妹来了,单位的单小虎也来了[d]
合成解释 自动判断姓名读音 读 作 : 解 (jie3) 放 涛 的 妹 妹 来 了 , 单 (dan1) 位 的 单 (shan4)小虎也来了 强制每句开头字按姓氏读音 读作:解(xie4)放涛的妹妹来了,单(shan4)位的单 (shan4)小虎也来了 仅紧跟的汉字强制姓氏读音 读 作 : 解 (xie4) 放 涛 的 妹 妹 来 了 , 单 (dan1) 位 的 单 (shan4)小虎也来了
3.2 发音效果指标
中文
自然度
4.15
可懂度
4.60
清晰度
4.50
总体感觉
4.35
注:上表中评分参考“中国 863 计划中文信息处理与智能人机接口技术评测组”标准执行得出的,按照 5 分 制给出,5 分为最高分,4 分为普通说话人水平,0 分为最低分。
FactoryTalk EnergyMetrix软件版本2.0用户说明书
Release NotesFactoryTalk EnergyMetrix Software Version 2.0Catalog Number 9703About This Publication These release notes describe software enhancements and anomalies for theFactoryTalk® EnergyMetrix software version 2.0.Package Contents FactoryTalk EnergyMetrix software is an upgrade and re-branding ofRSEnergyMetrix software.The contents of the software product packaging have changed in several ways:•Only FactoryTalk EnergyMetrix Manager software products include aninstallation DVD. Options such as Real Time (RT), ReportsPlus,ChartsPlus, and FTEMOPC (third-party OPC client) are furnished witha FactoryTalk Activation only. T o install these options, install theiractivations by using FactoryTalk Activation Manager.•The User Manual replaces the Getting Results Guide and is provided onthe installation DVD as an Adobe Acrobat PDF file.•Manager products bundled with Microsoft SQL server are supplied withMicrosoft SQL Server 2008 R2.Upgrading from RSEnergyMetrix Software You may upgrade to FactoryTalk EnergyMetrix from RSEnergyMetrix software. For customers who have purchased software support agreements, these updates are available at no charge. Y ou may download an upgrade from the Rockwell Software updates page or request a DVD from Rockwell Software support. Topic PageAbout This Publication1Package Contents1Upgrading from RSEnergyMetrix Software1Enhancements with Version 2.03Corrected Anomalies with Version 2.03Known Anomalies with Version 2.03Additional Resources4IMPORTANT FactoryTalk EnergyMetrix software supports only FactoryTalk Activations. If you are upgrading from RSEnergyMetrix™ software activated with EvRSI (master disk)activation, please contact your local Rockwell Automation Sales office or TechnicalSupport for information to migrate your activations to FactoryTalk activations.2 FactoryTalk EnergyMetrix Software Version 2.0IMPORTANT If you are upgrading from RSEnergyMetrix software activated with EvRSI (master disk)activation, please contact your local Rockwell Automation Sales office or TechnicalSupport for information to migrate your activations to FactoryTalk activations.An upgrade may be installed from a DVD or a downloaded upgrade file. Thedownloaded file is a full image of the installation DVD and is approximately 1GB in size.During an upgrade, FactoryTalk EnergyMetrix software reads configurationparameters from the existing web.config file and stores them in the database.ATTENTION: If your installation of RSEnergyMetrix software has been customized by asolution provider (Rockwell Automation or a system integrator), contact the solutionprovider before attempting any software update. Updating a customized installationwithout the necessary precautions may disable custom additions to the basic software.Follow these steps to upgrade your RSEnergyMetrix installation toFactoryTalk EnergyMetrix software.Installation from DVD or Downloaded DVD ImageFollow these steps to install the software.1.Back-up the RSEnergyMetrix ‘EMMA’ database.2.Obtain the login username and password of the SQL system administratoraccount used for the initial installation of RSEnergyMetrix software.3.Download the upgrade file from the Rockwell Automation softwareupdates page.•Locate the downloaded file, default is:C:\Documents and Settings\All Users\ApplicationData\RA\FactoryTalk EnergyMetrix\2.00.00-FactoryTalkEnergyMetrix-DVD.•Or, insert the installation DVD into the server's DVD drive.4.Browse to the FactoryTalk EnergyMetrix folder.5.Run the file setup.exe.6.On the dialog box that appears, choose ‘Remove all installed components’.TIP If an error message appears related to the installation script version, exit theinstallation program. Use the Windows Control Panel Add/Remove Programsapplication to remove FactoryTalk EnergyMetrix software. Then re-start the FactoryTalkEnergyMetrix software installer and install the new version.The existing installation of RSEnergyMetrix software is removed. Thedatabase is not removed.7.When the un-installer completes, run setup.exe again.FactoryTalk EnergyMetrix Software Version 2.0 38.When prompted, enter the SQL system administrator account logincredentials.You will see a message that the existing FactoryTalk EnergyMetrix databasehas been found and updated if needed. The installer will copy programoptions from the previous web.config file into the database9.When prompted, click ‘Y es’ to restart the server.Enhancements with Version 2.0The following product enhancements are part of FactorTalk EnergyMetrixsoftware version 2.0.Corrected Anomalies withVersion 2.0The following product changes were included when the product shipped to you.Known Anomalies with Version 2.0The following are the known anomalies for FactoryTalk EnergyMetrix software version 2.0.IMPORTANT The URL for the web site that FactoryTalk EnergyMetrix software runs under is different from that which RSEnergyMetrix software used. The web site name will beFTEnergyMetrix instead of RSEnergyMetrix. Users that had bookmarkedRSEnergyMetrix in their browser will need to change that bookmark.Enhancement DescriptionNew product support FactoryTalk EnergyMetrix software supports the Allen-Bradley PowerMonitor™ 5000 unit. FactoryTalk Live Data FactoryTalk EnergyMetrix software supports data logging from the Factory Talk Live Dataserver.Excel MPR Template A Microsoft Excel template has been added to the Multi-purpose Report in the ReportsPlusoption.Automatic PowerQuality DownloadingFactoryTalk EnergyMetrix software automatically downloads and saves power qualitycaptures like waveforms and transient records into the database and then clears the powermonitor buffers.Corrected Anomalies DescriptionPowerMonitor 1000 RT CORRECTED: PowerMonitor 1000 Load Factor Log column labels were incorrect. PowerMonitor 3000 RT CORRECTED: Removed ‘k’ from PowerMonitor 3000 setpoint type power/energy unitdescriptions.E3 Plus EC5 logging issue CORRECTED: E3 Plus EC5 device was not logging data.Known Anomaly DescriptionRT Device configuration for the PowerMonitor 3000 unit RT Device configuration dialog box for the PowerMonitor 3000 unit may need to be closed and re-openedfollowing an initial upload to enable all the model-related features in the dialog box.Communication loss to PowerMonitor W250 unit FactoryTalk EnergyMetrix software version 2.0 will not detect communication loss to wireless PowerMonitor W250units. In case of communication loss, energy and demand data will not be logged, and voltage and current datawill remain fixed.Manually adding IP addresses of Ethernet network devices You must manually add the IP address of each Ethernet network device to the RSLinx Classic software EthernetDevices driver on the server.Allen-Bradley, Rockwell Software, Rockwell Automation, PowerMonitor, RSLinx, and FactoryTalk are trademarks ofRockwell Automation, Inc.Trademarks not belonging to Rockwell Automation are property of their respective companies.Publication FTALK-RN001A-EN-P - July 2012Copyright © 2012 Rockwell Automation, Inc. All rights reserved. Printed in the U.S.A.Roc kw ell Otomasyon Ticaret A .Ş., K ar Plaza İş Mer k ezi E B lo k K at:6 34752 İçeren köy, İstanbul, T el: +90 (216) 5698400Additional Resources These documents contain additional information concerning related productsfrom Rockwell Automation.You can view or download publications at /literature/. T o order paper copies oftechnical documentation, contact your local Allen-Bradley distributor orRockwell Automation® sales representative.RSLinx® Classic software user interfaceWhen RSLinx Classic software runs as a Windows service on Windows 2008 Server, its user interface is not available. The RSLinx Classic user interface is available only when RSLinx Classic software runs as an application.Configuring EtherNet/IP devices in RSLinx software and connecting to those devices in FactoryTalk EnergyMetrix softwareAfter configuring EtherNet/IP network devices in RSLinx software, it may be necessary to open RSWho and then browse to and select each device, including Logix processor modules, to enable FactoryTalk EnergyMetrix software to connect to the devices.RT and ChartsPlus options on 64-bit operating systemsThe RT (Real Time) and ChartsPlus options will not run as rich-client applications on a 64-bit operating system. They will run as ClickOnce Framework installationThe .NET Framework must be installed after IIS is installed and running. If IIS is installed after these components, then you must reinstall those components.Creating PowerMonitor unit with unknown rack/group addressIf a PowerMonitor unit on a remote I/O device is created with a rack/group address that does not exist, the RT device viewer may display bogus data.DeviceNet communication to a PowerMonitor II meterFactoryTalk EnergyMetrix RT software does not support DeviceNet communication to the PowerMonitor II meter.SQL server installed on another machineIf FactoryTalk EnergyMetrix software is installed with a connection to an SQL server on another machine, SQL Server 2005 or 2008 Express Edition must be installed on the FactoryTalk EnergyMetrix server.Scheduling auto-run reportsScheduling many auto-run reports to run at the same time may cause excessive server resource demand and cause reports to time out.Viewing reports in web browserReports run automatically in Excel format may not be viewed in the web browser if the client has the Microsoft Office 97 operating system or later installed. The report may still be saved and opened by using Microsoft Excel software.New OPC meter set upWhen setting up a new OPC meter, the first time the OPC Browser is used it may return an error. To work around this, save the meter with a blank access path, edit, and click OPC Browser again.Validate button in MPR script editor page With IIS 7, clicking the Validate button throws a page error and doesn't validate the script. A script with syntax errors may be saved. To correct this, open IIS Manager from Administrative Tools. Drill into Application Pools and change the Managed Pipeline Mode in the default application pool to Classic from Integrated.Known AnomalyDescription ResourceDescription FactoryTalk EnergyMetrix Software Version 2.0 User Manual, publication FTALK-UM001Provides information for using FactoryTalk EnergyMetrix software.Industrial Automation Wiring and Grounding Guidelines, publication 1770-4.1Provides general guidelines for installing a Rockwell Automation industrial system.Product Certifications website, Provides declarations of conformity, certificates, and other certification details.。
VoLTE培训
CDS培训-VOLTEVolte T EST(含MOS)北京惠捷朗科技有限公司VoLTE测试简介•VoLTE是基于IMS的语音业务。
IMS由于支持多种接入和丰富的多媒体业务,成为全IP时代的核心网标准架构。
经历了过去几年的发展成熟后,如今IMS已经跨越裂谷,成为固定话音领域VoBB、PSTN网改的主流选择,而且也被3GPP、GSMA确定为移动语音的标准架构。
•由于VoLTE支持高清的语音编码标准,因此在MOS测试时业务一般采用POLQA算法进行VoLTE的语音质量评估。
•VoLTE的测试内容主要包括正常的VoLTE呼叫测试、ESRVCC测试、MOS测试、IMS注册等各种测试内容CDS VOLTE 解决方案•CDS 目前版本为7.1 •CDS 采用前后台合一的模式 •CDS 支持目前国内运营商使用的2/3/4G 网络制式 •CDS 支持室内室外测试 •CDS 支持多种语音及数据业务测试 •CDS 拥有最灵活便捷的操作方式•CDS 运行高效,具备良好数据处理能力•CDS 在中国移动第一批VoLTE 实验网就开始参与VoLTE 测试,是目前业内最成熟的VoLTE 测试工具之一 USB 线 USB 线USB 线 音频线 前台测试 后台处理 MOS 打分MOS 介绍•支持各种标清、高清、VGA 等VOICE call ,以及OTT 、eSRVCC 、多用户等场景测试 •自定义选择对应语料文件、播音衰减值等,可以进行手动MOS 语料录播及打分 •支持48K (POLQA )、16K 、8K 等不同采样速率的MOS 打分、双向MOS 打分,实时显示录音波形及录制通话录音,完整显示MOS 相关指标(抖动、时延、PLR 等) •优势:✓硬件集成度高、拥有独家mos 盒语音播音失真的工艺控制技术,业界话音损失最小✓正版POLQA 算法,MOS 打分稳定,端到端时延统计准确 ✓无需外置电源✓小巧、易携带✓适配各类终端 重量 0.26 kg 供电方式 USB 供电 接口类型 1 x USB Mini-B , 2 x 音频 功耗 2.4 W 外观尺寸 14.3 cm x 6.4 cm x 2.4 cmGPS同步•为了获得准确的RTP端到端时延,因此主被叫两部手机需要保持时间同步,在CDS的测试方案中要求在终端上安装软件使得手机保持在同步的状态。
英特韦特软件使用说明书概述
二、如何实现软件安装
第一步:打开安装盘。所显 示文件为安装程式对应文 件
2018/8/14
如何实现软件安装(续)
第二步:寻找 setup.exe安装文件,双击此 文件(或按回车键)即执行软件的安装
2018/8/14
如何实现软件安装 (续)
第三步:按提示执行安装(1)
2018/8/14
如何实现软件安装 (续)
2018/8/14
如何设置设备的基本參数(续)
第二步:按要求设置设备强行闯入的基本参数(3),强行闯入项: “警报有效“打” ∨“表示门非法打开时,产生警报,”时区控制 功能“打” ∨“表示强行闯入警报信号的产生受时区的限制,”自 动重置功能“表警报状态的自动取消功能,其右边的数值表警报自 动重置的时间范围,最大取值为”5959“;控制箱打开项:“警报 有效”打“∨”表控制箱非法打开时产生控制箱被非法打开警报
2018/8/14
如何登陆软件(续)
第三步:系统登陆,在“User ID”中输入系统用户 名,在“Password”中输入系统密码,按 进 行登陆,按 取消登陆
2018/8/14
如何登陆软件(续)
第三步:数据库压缩、加密设置,在“Database compaction setup”中选 择数据库压缩的条件,在“Backup Data setting”中选择数据库压缩的路 径,在“Compact database”进行人工压缩数据库,在“Change database password”中进行数据库操作密码的更改。
2018/8/14
如何重整设备(续)
第二步:选择要复位的设备进行复 位,在设备复位前,要将界面右边 相应的项目选择好,按 将选 择项进行复位,复位成功后, “∨”符号应消失
SingNet BroadBand 与 mio Voice 服务安装指南说明书
ContentsSTEP 1:Equipment CheckSTEP 2: Setting Up Your BroadBand ConnectionSTEP 3: BroadBand Connection Settings for Fibre (Optional) STEP 4: Logging in to Your SingNet BroadBandSTEP 5: Connecting Wirelessly to SingNet BroadBand (Optional) STEP 6: Setting Up Your mio VoiceTechnical Support Contact Numbers1STEP 1: Equipment CheckDear Customer, this guide has been prepared to help you to install SingNet BroadBand service and mio Voice services.The following items are pre-packaged in your Residential Gateway.Note: Existing Singnet BroadBand, mio Plan or mio Home subscribers should already have these items connected to their Residential Gateway.STEP 2: Setting Up Your BroadBand ConnectionUsing the Telephone Cable (RJ11), connect the Residential Gateway’s “DSL ” Port to the DSL Microfilter’s “DSL ” port.Insert the head of the DSLMicrofilter into your Telephone the wall socket.Note: You can connect your telephone into the DSL Microfilter’s “Phone” port to use your fixed Phoneline.Connect Power Adapter to your Residential Gateway “POWER” port and the mearest electrical outlet. Turn “On” the power at the electrical outlet and theResidential GatewayPlease wait for approximately 5 minutes. The “POWER” and the “BROADBAND” LEDs should now be stable GREEN (not blinking ), except the “ETHERNET” LED, it should be GREEN and blinking. If not, please check connections 2.1 to 2.3. Do NOT proceed to the next section until you have done so.LED Check:2.12.22.33Using an Ethernet Cable (RJ45), connect to any of the available Residential Gateway’s “LOCAL ETHERNET” ports to your PC’s “ETHERNET” port.Verify that the “ETHERNET” and “BROADBAND” LEDs found in front of the Residential Gateway are light up in GREEN .Note: If the LEDs mentioned in 2.5 are not light up, please check your connections again based on 2.1 to 2.4. You may now proceed to Step 3 once the LEDs are light up.Optional: If you have subscribed to mio TV service, please connect the Set Top Box to the Residential Gateway using the blue ethernet cable (RJ45) provided.2.42.5 2.6STEP 3: Connect the Residential Gateway’s “BROADBAND” Port to the ONT “LAN 1” Port highlighted in Yellow using the Ethernet Cable (RJ45).Note: Switch off the ONT power before you do the set up.For mio TV Set Top Box, personal computer or laptop, please connect it to the “LOCAL ETHERNET” Port highlighted in Yellow.For mio Voice service, please connect your phone using a Phone Cable (RJ11) to the Residential Gateway’s “VOICE 1&2” Port.3.13.23.3Once Power Adapter is connected, follow the power up sequence as below.Power up the Optical Network Terminal (ONT). Wait for “POWER” and “PON” LEDs to turn to stable green light.Power on the R esidential Gateway . Wait for the “POWER”, “ETHERNET”, “BROADBAND”, “INTERNET” and “IPTV” (if applicable) to turn to stable green light.Power up you mio TV Set Top Box and your computer.Note: For exStream service, there is no need to key in user ID and password. All service credential will be auto push down to your Residential Gateway.3.4BroadBand Connection Settings for Fibre (Optional)1. 2. 3.5STEP 4: Logging in to Your Singnet BroadBand Please confirm that you have the following item on hand before attempting this step.>> SingNet BroadBand Service Letter - This contains your Username and Password which will be used for setting up the SingNet BroadBand.Open your web-browser (e.g. Internet Explorer). You should now see the following screen on the left. Click on “SET UP NOW”.4.1Type your User ID and Password as stated in your Service Letter in the “Username” and “Password” fields and click the “Connect” button.Note: If you are unable to view the page type the URL http://192.168.1.254Note: The text behind @ maybe different. Please ensure that you have entered the correct one as stated in your service letter before proceeding.Please wait while SingNet verifies your account. If you have entered your “Username” and “Password” correctly, you will be redirected to the “Setup Successful” page.4.24.3LED Check: Array The “POWER”, “BROADBAND”,“ETHERNET” and “INTERNET”LEDs should now be stableGREEN(not blinking), exceptthe “ETHERNET” LED, it shouldbe GREEN and blinking. If not,please re-do STEP 4 and ensurethat you enter your USER ID andPassword correctly.Congratulations! You can now use SingNet BroadBand!Please take note of two numerical codes which are your Network name and Key with this diagram as a guide.You may fill in these details on the box below for future references. Section A: Your Network Name and KeyIMPORTANT!You will need a wireless adapter (wireless PC card or wireless USB adapter) or a wireless-enabled Notebook before you can proceed to the next section. Please refer to your operating system’s instructions: Section B . if you are using Window’s XP Section C . if you are using Windows Vista Section D . if you are using Windows Section E . if you are using another wireless manager other than WindowsNetwork Name (SSID): SINGTEL - ___________Network Key:____________________STEP 5: Note: The default wireless encryption option is Mixed WPA2/WPA-PSK.Write the last 4 numbers of your Network Name here.Write the 10 digit of your Wireless Key here.Connecting Wirelessly to SingNet BroadBand (Optional)Section B: If you are using Windows XPDouble click on the wireless icon on your task bar .You should see the available wireless networks, if you are prompted to use another wireless manager , please refer to section E.Double click the Network Name of your wireless network (e.g. SINGTEL-0110) and wait for the network to be detected. Note: 1. Please refer to section A if you are unsure of your Network Name and try refreshing your Network List if you do not see it.Type the 10-Digit Network Key into the “Network Key” and “Confirm Network Key” fields. Click on the “Connect” button to complete the setup and wait for the network address to be acquired.Note: 1. Please refer to section A if you are unsure of your Network Key.43215You will see the screen on the left if the setup is successful.Section C: If you are using Windows VistaIn Windows Vista, Click on the Start button .1Click on Connect To .2You will see the screen on theleft.3Under Show , select “Wireless”.411Find the Network Name of your wireless network (e.g. SINGTEL-0110).5Note: 1. Please refer to section A ifyou are unsure of your Network Name or try refreshing your Network list if you do not see it.Click on the Connect button.6Please wait while your computer tries to connect to the Residential Gateway.You will now be prompted to enter your Network Key .8Note: You will see this when 1. You are connecting to the Residential Gateway for the first time 2.You have unselected the option to save the Network Key.Type in your Network Key in the “Security keyor passphrase” field.Click on the Connect button.1011Please wait while your computerauthenticate your wirelessnetwork.12Your wireless connection issuccesfully configured when yousee the screen on the left.13Make sure that “Save this network”is selected.Note:This option will save your Network Key.If you do not enable this option, you willalways be prompted to enter the key. 14Ensure that you have “Startthis connection automatically”selected.Note:This option will connect your computerto the Residential Gateway automatically.If you do not enable this option, you willbe required to connect to the wirelessnetwork manually.15You have successfully configuredyour wireless connection onWindows Vista.16Click on “Close” to exit thewindow.13Section D: If you are using WindowsOn the right hand side of the task bar, click on the wireless network icon like the one on the left.You will see a window of the available networks, locate and select your own wireless network e.g. SINGTEL-0110.Input your wireless network key on the “Security Key” field.123Note: Please refer to Section A if you are unsure of your Network Name or try refreshing your network list if you do not see it.Note: Please refer to Section A if you are unsure of your Network Key. You will see this when: (i) You are connecting to the Residential Gateway for the first time (ii) You had unselected the option to save the Network Key4On the Select Network Location click on “Home Network”.Click on the“Close” button to complete the setup and close the window.You will see the wireless icon on the taskbar , like the one on the left, once the wireless is successfullyconnected.5615Section E: For Other Wireless ManagersOpen your default or preferred Wireless Manager.1Configuration of most Wireless Managers requires your Network Name and Key . Follow the steps below or refer to the user manual of your wireless adapter for advanced instructions.Look for your Network Name and double click on it.2Note: Please refer to section A if you are unsure about your Network Name or try refereshing your Network list if you do not see it.Enter your Network Key when prompted.3Note: Please refer to section A if you are unsure about your Network Key.Section F: Welcome to your FREE exPRESS Portal Stay close to the people and memories that matter most to you.Visit and log in with your SingNet email and password. First time users will see a guided tour.Your home screen - Play and discover new possibilitiesOnce logged in, non-Fibre customers will see the screen below. If you are a Fibre customer, you will see a slightly different interface (refer to the “Quick Guide to exStream” leaflet).To start a service, double-click on the services’ icon to open up the widget. Let’s check out Store and Share.1Using WidgetsYou can start using the widget once it’s opened. Store and Share allows you to store, share and retrieve files online, anywhere you are. You can also back up your phone contacts and computer files. If you’ve signed up for the service, you can start using it immediately.When you’re done, click on the “x” button to close the widget. You’ll return to the home screen where you can continue to check out other exciting servicesMore fun servicesCheck out these other interesting widgets to help keep your friends close!Universal InboxPull together your social networks and emails all in one page. Check out your friend’s latest updates and pictures. Update your status or upload your photos to multiple social networks at once. Save pictures you like directly into Store and Share.Video ChatEnjoy high quality video chats, with up to 6 parties for Fibre customers.1STEP 6: Setting Up Your mio VoiceNew subscribers for mio Voice will automatically be configured with the service. The “VOICE“ LED on the Residential Gateway will turn on after 10 minutes upon successful configuration of your BroadBand service. Thereafter, customers may proceed to connect their supported telephones following the steps below.ImportantPlease ensure that ALL analogue devices e.g. telephones and fax machines are disconnected from wall sockets to optimize the performance. If the Voice 1 and Voice 2 LED does not light up after 10 minutes, please power off the Residential Gateway momentarily and turn it back on. It will take approximately 5 to 10 minutes for a successful configuration.Connect your supported telephoneto the telephone port on theResidential Gateway using a PhoneCable Cable (RJ11).6.1Continue with step 6.2 and 6.3 only ifyou have 2 mio Voice subscriptionsPlease insert a FXS Phone Splitterto the Phone Cable (RJ11) beforeinserting the telephone of theResidential Gateway.6.2Congratulations! You have successfully installed mio Voice. 6.3Connect your supportedtelephones to P1 and P2 portsrespectively for both mio voicelines21Important Tips:Ensure that all active telephone extensions are fixed with DSL microfilters for stable and reliable internet experience. The DSL microfilter can be seen in Step 1 - Equipment Check.Remember the Network Name (SSID) and Network Key of the wireless setup. For more information, please refer to Step 5 - Section A - You Network Name and Key. Please note that your Network Name (SSID) and Network Key may not be the same if you have changed your wireless settings.Please place the Residential Gateway on a flat surface and ensure the following: Simple Troubleshooting Steps for SingNet Residential Gateway If you encounter any internet connectivity issue, please try the following:Note that the wireless coverage may vary or fail due to any of the above-mentioned factors which are not within SingNet’s control. SingNet shall not be liable for any loss or damage arising from such interference or failure. Customer shall be solely reponsible for providing all equipments necessary such as repeaters, at his/her own expense to extend the wireless coverage should the need arise.It is not near blockades such as building structure and natural or artificial barriers. It is not kept in an enclosed area that will affect the signal coverage. It is not near any electronic devices such as microwave ovens, bluetooth devices and/or cordless phones so as to reduce interference of the same frequency. It is not near water containing equipment filled with water to optimize wireless signal.*1234Reboot your SingTel Residential Gateway.Wait 5-10 mins until the Internet/ Service LED indicator turns green.Open your web browser to try connecting to the Internet by surfing a web site.If the issue remains unresolved, *******Check if your telephone has dial e a new DSL Microfilter and/or telephone line (RJ11).Connect your SingTel Residential Gateway to another wall socket.✓✓✓5Technical Support Contact Numbers Customer CareCustomer Care Hotline: 1688 Monday to Sunday and Public Holidays: 8:00 AM to 12:00MNFor Business ADSL Customers:1606 then select option 2 (Available at all times)Service Center Address:31 Ubi Road 1 Aztech Building Lobby A Ground FloorSingapore 4086 4Hotline: 65 4 22Email:******************Operating HoursMonday to Friday: :00 AM to 6:15 PM Saturday: :00 AM to 1:00 PM (Except Public Holidays)2325。
- 1、下载文档前请自行甄别文档内容的完整性,平台不提供额外的编辑、内容补充、找答案等附加服务。
- 2、"仅部分预览"的文档,不可在线预览部分如存在完整性等问题,可反馈申请退款(可完整预览的文档不适用该条件!)。
- 3、如文档侵犯您的权益,请联系客服反馈,我们会尽快为您处理(人工客服工作时间:9:00-18:30)。
注意:音效控制仅对 16K 模型有效,且需多增加 20K 内存
设置音效模型
[e*]
[e0]
(*=0/1/2/3/4/5/6) 0 – 关闭 1 – 忽近忽远 2 – 回声 3 – 机器人 4 – 合唱 5 – 水下 6 – 混响
第 5 页 / 共 15 页
备注: 所有的控制标识均为半角字符。 控制标记作为文本进行合成。 不符合以上可识别的“控制标识”的或者格式不对的,一律按普通的字符和数字处理 控制标识为全局控制标识的,也就是只要用了一次,在不对软件进行重启、或使用[d]恢复默认设置的条
件下,其后发送给软件的所有文本都会处于它的控制之下。注意:选择发音人[m*]不受[d]控制,要恢复 默认发音人,必须用[m3]恢复。 当软件重启后,原来的设置过的标识会失去作用,软件将恢复到所有的默认值。 控制标记中的数字超过范围的,均按默认值处理 [r001]是有效控制命令,等价于[r1];其他的类似。
合成系统
的嵌入式”,静音2秒,再播放“语音合成系统”
4.2.5 标记[r*] –姓氏读音策略
示例文本 [r0]解放涛的妹妹来了,单位的单小虎也来了[d] [r1]解放涛的妹妹来了,单位的单小虎也来了[d] [r2]解放涛的妹妹来了,单位的单小虎也来了[d]
合成解释 自动判断姓名读音 读 作 : 解 (jie3) 放 涛 的 妹 妹 来 了 , 单 (dan1) 位 的 单 (shan4)小虎也来了 强制每句开头字按姓氏读音 读作:解(xie4)放涛的妹妹来了,单(shan4)位的单 (shan4)小虎也来了 仅紧跟的汉字强制姓氏读音 读 作 : 解 (xie4) 放 涛 的 妹 妹 来 了 , 单 (dan1) 位 的 单 (shan4)小虎也来了
资源占用低
考虑到嵌入式环境下宝贵的资源空间,emTTS在系统架构、代码实现、资源结构等方面进行了大量的优化 工作,在运算资源和存储资源的需求方面,都较传统的合成系统有了极大的降低,即便是一些低端的平台, emTTS也能从容运行。
播音设备兼容
emTTS提供8K、16KHz两种输出采样率,供用户灵活选择,满足各种播音设备,适应不同平台和广大客户 需求。
4.2 文本控制标记使用示例
4.2.1 标记[i*] –识别汉语拼音
示例文本 [i0]欢迎 shi3yong4 我 gong1si1de5 系统[d] [i1]欢迎 shi3yong4 我 gong1si1de5 系统[d]
合成解释 不识别汉语拼音,按汉字和字母和数字逐个发音 读作:欢迎shi三yong四我gong一si一de五系统 识别汉语拼音,读作:欢迎使用我公司的系统
合成解释 自动判断。 读作:拨打六二九八六六零零。有一百二十三公斤重 强制按照号码的方式合成数字串。 读作:拨打六二九八六六零零。有一二三公斤重 强制按照数值的方式合成数字串。 读作:拨打六千二百九十八万六千六百。有一百二十 三公斤重
4.2.4 标记[p*] –静音一段时间
示例文本
合成解释
欢迎使用宇音天下[p1000]研发的嵌入式[p2000]语音 播放“欢迎使用宇音天下”,静音1秒,再播放“研发
注:标记[d]不会将发音人恢复成默认,要恢复默认发音人,必须用[m3]恢复。
第 6 页 / 共 15 页
4.2.3 标记[n*] –数字处理策略
示例文本 [n0]拨打62986600。有123公斤重。[d] [n1]拨打62986600。有123公斤重。[d]
[n2]拨打62986600。有123公斤重。[d]
支持10级音量调整和10级语速调整和10级语调调整
软件可实现10级数字音量控制,音量更大,更广。支持语速语调的调节,满足各种不同的应用需求。
提示音
软件内集成了 77 首声音提示音,可用于不同行业不同场合的信息提醒、报警等功能。 软件内集成了 14 首和弦音乐,可用作和弦短信提示音或者和弦铃声。
1)拼音模式为:1至6位字母 + 1位数字
2) 声调用1位数字表示(1:阴平 2:阳平 3:上声 4:去声 5:轻声) 3)连续出现时以第一个为准。 (*=0/1)
0 - 一字一顿
1 - 平铺直叙
(*=0/1) 0 – 不读标点符号 1 – 读标点符号
恢复默认的合成参数
[d]
所有设置(除发音人设置外)恢复为默认值
控制 标识 [i*]
[m*]
[n*] [p*] [r*] [s*] [t*]
默认 设置 [i0]
[m3]
[n0]
[r0] [s5] [t5]
详细说明
(*=0/1) 0 - 不识别汉语拼音 1 - 识别汉语拼音 说明: 1)拼音模式为:1至6位字母 + 1位数字 2) 声调用1位数字表示(1:阴平 2:阳平 3:上声 4:去声 5:轻声) (*= 3, 51, 52, 53, 54, 55) 3 - 晓玲 (女声) 51 - 尹小坚 (男声) 52 - 易小强 (男声) 53 - 田蓓蓓 (女声) 54 - 唐老鸭 (效果器) 55 - 小燕子 (女童声) (*=0/1/2) 0 - 自动判断 1 - 数字作号码处理 2 - 数字作数值处理 (*=无符号整数) * - 插入静音的时间长度,单位:毫秒(ms) (*=0/1/2) 0 - 自动判断姓名读音 1 - 强制以后的每句开头字均按姓氏读音 2 - 强制紧跟句的开头字按姓氏读音 (*=0~10) * - 语速值(0至10) 说明:语速值越小,语速越慢
成系统[d]
天下研发的”,按2级音量播放“嵌入式语音合成系统”
4.2.6 标记[s*] –语速调节
示例文本
合成解释
[s5]欢迎使用[s8]宇音天下研发的[s2]嵌入式语音合 按5级语速播放“欢迎使用”,按8级语速播放“宇音
第 7 页 / 共 15 页
成系统[d]
天下研发的”,按2级语速播放“嵌入式语音合成系统”
4.2.7 标记[t*] –语调调节
示例文本
合成解释
ቤተ መጻሕፍቲ ባይዱ 支持多种文本控制标记
软件支持多种文本控制标记。可通过发送“合成命令”发送文本控制标记,调节语速、语调、音量。 还可以使用控制标记提升文本处理的正确率,如:设置句子的韵律、设置数字读法、设置姓氏读音策略、 设置号码中“1”的读法等。
完全与平台无关
emTTS有着优良的兼容性,内核完全与平台无关。任何平台只需配置、编译,即可完成移植。emTTS能适 用绝大部分平台,例如 Windows CE、Linux、MTK系列、Android、Windows Mobile、Windows Mobile 2003 等。
(*=0~10)
第 4 页 / 共 15 页
设置音量 设置提示音处理策略 设置号码中"1"的读法 设置韵律标注处理策略
为单个汉字强制拼音
设置发音风格 设置标点符号朗读
[v*] [x*] [y*] [z*]
[=*]
[f*] [b*]
[v5] [x1] [y0] [z0]
[f1] [b0]
* - 语调值(0至10)
主频 栈内存 堆内存 资源空间
最小配置 (模型采用率为 8K) 80MHz 4.5K 44K
(效果稍差点)
中文+字母
最好配置要求
(模型采用率为 16K) 160MHz 4K
64K
(效果最好)
2.1M 2.8M
第 3 页 / 共 15 页
4 附录
4.1 文本控制标记
作用 设置识别汉语拼音
选择发音人
设置数字处理策略 静音一段时间 设置姓名读音策略 设置语速 设置语调
第 1 页 / 共 15 页
软件还支持客户增加自己的提示音,满足客户对特定文本合成或特定提示音的需求。客户可根据需要删 除和增加提示音。
支持多个发音人
提供两男、两女、一个效果器和一个女童声共6个中文发音人,可以通过使用特殊标记[m?]来切换软件的 发音人。[m3] :女声“晓玲”; [m51]:男声“尹小坚”; [m52]:男声“易小强”; [m53]:女声“田蓓 蓓”; [m54]:效果器“唐老鸭”;[m55]:女童声“小燕子”。
4.2.2 标记[m*] –发音人选择
示例文本 [m3]我是晓玲[m3] [m51]我是尹小坚[m3] [m52]我是易小强[m3] [m53]我是田蓓蓓[m3] [m54]我是唐老鸭[m3] [m55]我是小燕子[m3]
合成解释 用发音人“晓玲”的声音合成: “我是晓玲” 用发音人“尹小坚”的声音合成:“我是尹小坚” 用发音人“易小强”的声音合成:“我是易小强” 用发音人“田蓓蓓”的声音合成:“我是田蓓蓓” 用发音人“唐老鸭”的声音合成:“我是唐老鸭” 用发音人“小燕子”的声音合成:“我是小燕子”
说明: 语调值越小,基频值越低 (*=0~10) * - 音量值(0至10) 说明: 音量的调节范围为静音到音频设备支持的最大值 (*=0/1) 0 - 不使用提示音 1 - 自动使用提示音 (*=0/1) 0 - 合成号码时"1"读成"幺" 1 - 合成号码时"1"读成"一" (*=0/1) 0 - 不处理韵律标注 1 - 处理韵律标注 说明:韵律标注中 使用“#”标出韵律短语划分位置。 使用“*”标出韵律词划分位置。 (*=拼音) * - 为前一个汉字强制设定的拼音 说明:
中文多发音人 (女生:晓玲,田蓓蓓;男生:尹小坚,易小强;其它:唐老鸭,小燕子) PCM signed 16bit 8K/16K 可选 支持 支持 支持 支持 支持 支持阿拉伯数字、英文字母、常用符号的全/半角形式 默认根据上下文智能判断;可指定按号码或数值处理; 根据上下文智能判断; 支持普通多音字和姓名多音字的智能处理 支持 不小于 72 小时
[t5]欢迎使用[t8]宇音天下研发的[t2]嵌入式语音合 按5级语调播放“欢迎使用”,按8级语调播放“宇音