Leica DISTO S910 中文操作手册
Leica 3D Disto 用户手册说明书
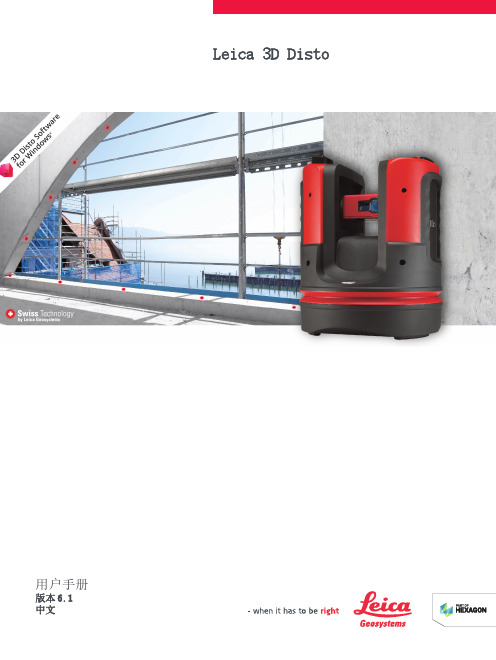
Leica 3D Disto用户手册版本6.1中文简介感谢您购买 Leica 3D Disto。
本手册包括了重要的安全指南,可指导您安全地安装并使用仪器。
详情请参见1 安全指南。
请您在使用本产品之前仔细阅读用户手册。
铭牌上注有产品型号和序列号。
当您联系代理商或 Leica Geosystems 授权维修中心时,请引用该信息。
•Windows ®是微软公司(Microsoft Corporation)在美国和其他国家的注册商标。
其他商标所有权归各自拥有者。
3D Disto 快速启动作为首次安装快速参考指南。
3D Disto 用户手册本用户手册包含仪器基本操作的所有说明。
同时提供仪器外观图以及技术数据和安全指示。
-ü安全手册提供如何使用 3D Disto 的重要安全说明。
üü关于 3D Disto 全部文档/软件,请参阅以下资源:•Leica USB 存储卡•https://在本手册的最后一页,您可找到 Leica Geosystems 总部的地址。
获取区域联系信息列表,请访问/contact-us/sales_support 。
myWorld@Leica Geosystems (https:// ) 提供广泛的服务、信息、培训资料。
通过直接访问myWorld,您能够在您方便的时候访问所有相关的服务。
我的产品添加您和您公司所拥有的所有产品并探索为您打造的Leica Geosystems 世界:查看您的产品的详细信息,升级您的产品到最新的固件以及浏览最前沿的文档。
我的维修在Leica Geosystems 维修中心查看当前的维修状态,和您的产品的所有的维修历史记录。
查看已经完成维修步骤的具体信息,以及下载您的检验证书和维修报告。
我的支持为您的产品创建新的支持请求,您当地的 Leica Geo‐systems 的支持团队将会为您解答。
查看您的支持历史,如果您需要参考以前的支持请求,可以查看其详细信息。
徕卡测距仪使用说明书

徕卡测距仪使用说明书徕卡测距仪使用说明书:一、使用前的准备,一,电池的装入/更换打开仪器尾部的固定挡板。
向前推卡钮~向下将底座取下。
按住红色的卡钮推开电池盒盖。
安装或更换电池。
关闭电池盒盖~安装底座和卡扣。
当电池的电压过低时~显示屏上将持续闪烁显示电池的标志{B~21}。
此时应及时更换电池。
1、按照极性正确装入电池。
2、使用碱性电池,建议不要使用充电电池,。
3、当长时间不使用仪器时~请取出电池~以避免电池的腐蚀。
更换电池后~设置和储存的值都保持不变。
,二,多功能底底座固定挡板可以在下面的测量情况下使用:边缘测量~将固定挡板拉出~直到听到卡入的声音。
1、从2、从角落测量~将固定挡板拉出~直到听到卡入的声音~轻轻将固定挡板向右推~此时固定挡板完全展开。
仪器自带的传感器将辨认出固定挡板的位置~并将自动设置测量其准点。
,三,内置的望远镜瞄准器在仪器的右部有一个内置的望远镜瞄准器。
此望远镜瞄准器为远距离测量起到辅助的作用。
通过瞄准器上的十字丝可以精确地观察到测量目标。
在30米以上的测量距离~激光点会显示在十字线的正中。
而在30米以下的测量距离~激光点不在十字线中间。
,四,气泡一体化的水泡使仪器更容易调平。
,五,键盘1、开/测量键2、第二级菜单功能3、加+键4、计时,延迟测量,键5、等于[=]键6、面积/体积键7、储存键8、测量基准边键9、清除/关键10、菜单键11、照明键12、间接测量,勾股定律,键13、减-键14、BLUETOOTH ,六,显示屏1、关于错误测量的信息2、激光启动3、周长4、最大跟踪测量值5、最小跟踪测量值6、测量基准边7、调出储存值8、储存常数9、主显示10、单位~包括乘方立方,2/3,11、顶的面积12、墙面积13、3个额外显示,如:测量中间值,14、BLUETOOTH蓝牙开/关15、第二级菜单功能开16、硬件故障17、间接测量-利用勾股定律18、间接测量-利用勾股定律-部分高度19、面积/体积20、带常数的测量21、电池充电量显示二、菜单功能,一,设置在菜单中可以改变设置~并将其长久保存~并在关机和更换电池后不改变。
LeicaDISTOD510详细操作手册

界面元素说明: 各图标含义及
功能详解
主界面操作流 程:快速上手, 轻松掌握基本
操作
功能键位说明
开机键:用于开启或关闭Leica DISTO D510
功能键:用于选择不同的测量 模式和功能
测量键:用于触发测量操作
菜单键:用于进入设置菜单, 进行各项参数的调整和设置
快捷键操作
常用快捷键:如回车、空格、方向 键等
确保操作环境 安全,避免在 不稳定或易滑 的表面上使用 Leica DISTO
D510。
在操作前确保 电池和内存卡 正确安装,避 免因未正确安 装而导致的设 备故障或数据
丢失。
在使用Leica DISTO D510 时,应避免水 或其他液体进 入设备内部, 以防造成损坏。
在操作过程中, 应避免过度弯 曲或扭曲Leica DISTO D510 的电缆,以防 止电缆损坏或
在Leica DISTO D510的菜单中 找到“设置”选 项,然后选择 “系统设置”。
在“系统设置” 中,选择“时间 和日期”选项, 按照提示进行设 置。
同样在“系统设 置”中,选择 “语言”选项, 根据需要选择相 应的语言。
操作界面与功能键
主界面介绍
主界面布局: 简洁直观,易
于操作
功能键介绍: 常用功能一键 直达,提高工
设备保养与维护
清洁与保养建议
清洁镜头:使用干燥的软布轻轻擦拭镜头,避免使用含有化学物质的清洁剂 清洁机身:使用干燥的软布擦拭机身,注意不要使用含有酒精或化学溶剂的清洁剂 保养电池:定期充电并存放在干燥的地方,避免电池过度充电或放电 保养充电器:定期清洁充电器的插口,确保充电正常
常见故障排除
角度测量
选择“测距与测量”功能
Leica M10 Monochrom 快速使用指南说明书

LEICA M10 MONOCHROMQUICK START GUIDEDownload the full scope instruction manual here:https:///Service-Support/Support/DownloadsPlease register via the following link if you would like to receive a printed copy of the full scope instruction manual:1235132021222324252627DISPLAYS IN THE VIEWFINDERThe bright-line rangefi nder in this camera is more than just a very bright viewfi nder – it also is a lens-coupled rangefi nder. All Leica M lenses with focal lengths between 16 and 135 mm are coupled automatically.28 mm/90 mmABright-line frame 50 mm/75 mmB CMetering fi eld for focusing Digital display FOCUSINGSUPERIMPOSED IMAGE METHOD (DOUBLE IMAGE)SPLIT IMAGE METHODout of focusin focusDISPLAYS ON THE LCD PANEL1452612891011714151331Battery capacity 2Light balance3Remaining memory card capacity 4ISO Sensitivity5Exposure compensation scale 6Shutter speed7File format/compression level/resolution 8Exposure metering method 9Shutter button/Drive Mode 10WLAN status 11GPS status 12User profi le 13Exposure mode14Light intensity/focal length or lens type 15Remaining number of pictures22:45 P M 22.02.2012999-90008234/9999 12MP2.8F1/800012500ISO EVAll other operations are accessible by invoking the relevant function from the menu list.1 This menu item is only available if the Leica Visoflex viewfinder is attached (available as an accessory).You will find the manufacturing date of your camera on the stickers in the Warranty Card and/or on the packaging. The date format is year/month/day. Subject to changes in design and production.94 122 XII/19/DTECHNICAL DATACAMERA DesignationLeica M10 Monochrom Camera typeDigital camera with rangefinder system Type no.6376 Order No.20 050 Buffer memory DNG™: 10 recordings Storage mediumSD cards 1-2 GB / SDHC cards up to 32 GB / SDXC cards up to 2 TB MaterialTop cover and bottom cover: brass, black chrome-plated finishFront and rear housing panels: magnesium Lens mount Leica M bayonet Compatible lensesLeica M lenses, Leica R lenses via adapter Operating conditions 0/+40°C Dimensions (WxHxD)139 x 38.5 x 80 mm Weightapprox. 675 g (with battery)SENSORSensor sizeMonochrome CMOS chip, active surface approx. 24x 36 mm Picture resolutionDNG™: 7864 x 5200 pixels (40,89 MP),JPEG: 7840 x 5184 pixels (40,64 MP), 5472 x 3648 pixels (20 MP), 2976 x 1984 pixels (6MP)VIEWFINDER/LCD PANEL ViewfinderLarge, bright-line rangefinder with automatic parallax compensation LCD panel3” TFT LCD, 1,036,800 dots, touch control available EQUIPMENT WLANThe Leica FOTOS app is required to use of the WLAN function. The Leica app is available from the Apple App Store™ or the Google Play Store™. Complies with IEEE 802.11b/g/n standard(standard WLAN protocol), channel 1-11, encryption method: WLAN-compatible WPA™/WPA2™, access method: infrastructure mode Menu languagesEnglish, German, French, Italian, Spanish, Russian, Japanese, Simplified Chinese, Traditional Chinese, Korean, Portuguese POWER SUPPLY Rechargeable battery (Leica BP-SCL5)1 lithium-ion rechargeable battery, rated voltage 7.4 V; capacity 1100 mAh, max. charging voltage/current: 1000 mADC, 7.4 V; operating conditions (in the camera): +0 to +40°C; manufacturer: PT. VARTA Microbattery, Made in Indonesia Charger (Leica BC-SCL5)Inputs: 100-240 VAC, 50/60 Hz, 300 mA with automatic switch-over or 12 VDC, 1.3 A; output: DC, rated voltage 7.4 V, 1000 mA / max. 8.25 V, 1100 mA; operating conditions: +10 to +35°C;manufacturer: Guangdong PISEN Electronics Co.Ltd., Made in ChinaSAFETY REMARKSGENERAL INFORMATION• Do not use your camera in the immediate vicinity of devices that generate powerful magnetic, electrostatic or electromagnetic fields (e.g. induction ovens, microwave ovens, television sets or computer screens, video game consoles, cell phones, broadcasting equipment). Their electromagnetic fields can interfere with recordings.• Strong magnetic fields, e.g. from speakers or large electric motors can damage the stored picture data or disrupt recording.• Switch off the camera, remove the battery briefly, replace it and switch the camera back on in case of a camera malfunction due to the effects of electromagnetic fields.• Do not use the camera in the immediate vicinity of radio transmitters or high-voltage power lines. Their electromagnetic fields may interfere with recordings.• Always store small parts e.g. the accessory shoe cover as follows:–out of the reach of children–in a safe location, where they will not get lost or stolen• State-of-the-art electronic components are sensitive to static discharge. Since people can easily pick up charges of several 10,000 volts by walking on synthetic carpets, a discharge can occur when you touch the camera, and especially it is placed on a conductive surface. A static discharge on the camera housing poses no risk for the electronics. Despite built-in safety circuits, you should avoid direct contact with external camera contacts like those in the flash shoe.• Take care not to soil or scratch the sensor for lens detection in the bayonet. You must similarly prevent direct contact of the bayonet with grains of sand or similar particles, as these could cause irreparable damage. This component must only be cleaned with a dry cloth (in system cameras).• Use a cotton or linen cloth instead of a microfiber cloth from an optician's (synthetic) when cleaning the contacts. Make sure to discharge any electrostatic charge by deliberately touching a heating or water pipe (conductive, grounded material). Dirt deposits and oxidation on the contacts can be avoided by storing your camera in a dry location with the lens cap and the flash shoe/viewfinder cap (in system cameras) attached.• Only use accessories specified for this model to prevent faults, short circuits or electric shock.• Do not attempt to remove parts of the housing (covers) yourself. Repairs must be done at authorized service centers only.• Protect the camera against contact with insect sprays and other aggressive chemicals. Petroleum spirit, thinner and alcohol must not be used for cleaning. Some chemicals and liquids can damage the camera housing or the surface finish.• Rubber and plastics are known to expel aggressive chemicals and should therefore not be kept in contact with the camera for extended periods of time.• Prevent any sand or dust or water penetration into the camera, e.g. during snowfall or rain or on the beach. Be extra careful when changing the lens (in system cameras) and when inserting or removing the memory card and rechargeable battery. Sand and dust can damage the camera, the lens, the memory card and the battery. Moisture can cause malfunctions and irreparable damage to the camera and memory card.LENS• A camera lens can have the effect of a magnifying glass when exposed to direct frontal sunlight. The camera must therefore be protected against extended exposure to direct sunlight.• Attaching the lens cap and keeping the camera in the shade or ideally in its camera case, will help prevent damage to the interior of the camera.RECHARGEABLE BATTERY• Improper use of the batteries or the use of unapproved battery types may result in an explosion!• Do not expose the rechargeable battery to sunlight, heat, humidity or moisture for prolonged periods of time. Likewise, the batteries must not be placed in a microwave oven or a high-pressure container as this would pose a fire or explosion hazard.• Do not under any circumstances charge or insert a damp or wet battery into the camera!• A safety valve in the battery ensures that any excess pressure caused by improper handling is discharged safely. It is nevertheless important to dispose of a bloated battery immediately. It may pose an explosion hazard!• Keep the battery contacts clean and easily accessible. Although lithium-ion batteries are secured against short circuits, they should still be protected against contact with metal objects like paper clips or jewelry. A short-circuited battery can get very hot and cause severe burns.• When a battery is accidentally dropped, make sure to check the housing and the contacts immediately for any damage.A damaged battery can damage the camera.• The battery must be removed from the camera or charger and must be replaced immediately in case of a strange smell, discoloration, deformation, overheating or leakage. Continued use of the battery may result in overheating, which can cause fire and/or explosion!• Never throw batteries into a fire as they may explode.• Keep the battery away from sources of heat in case of leakage or if you smell burning. Leaked fluid can catch fire!• The use of other chargers not approved by Leica Camera AG can cause damage to the batteries – and in extreme cases – cause serious or life-threatening injuries.• Make sure that the power socket is freely accessible at all times.• The in-car charging cable must never be connected while the charger is connected to mains electricity.• Do not attempt to open the battery or the charger. Repairs must only be carried out by authorized service centers.• Keep batteries out of the reach of children. Batteries can cause suffocation when swallowed.CHARGER• Using the charger in the vicinity of broadcasting receivers may interfere with reception. Ensure a distance of at least 1 m (3 ft) between the charger and the receiver.• When the charger is in use, it may emit a buzzing sound – this is normal and not a malfunction.• Disconnect the charger from the mains when it is not in use, as it consumes electricity (a very small amount), even if no battery is inserted.• Always keep the charger contacts clean, and never short circuit them.• The in-car charging cable must only be operated in 12V in-car grids and must never be connected while the charger is connected to mains electricity.MEMORY CARD• Never remove the memory card during a datasave or card reading process. The camera must not be switched off or be subjected to impact or vibrations while working.• Do not open the cover/remove the memory card or the battery while the status LED is lit, which indicates memory access. Data on the card may otherwise be destroyed and camera malfunctions may occur.• Do not drop or bend memory cards as this will cause damage and result in the loss of stored data.• Do not touch the connections on the reverse of the memory card and keep them clean and dry.• Keep memory cards out of the reach of children. Swallowing a memory card may cause suffocation.SENSORCosmic radiation (e.g. during flights) may cause pixel defects.CARRY STRAP• Once you have attached the carry strap, please make sure that the clips are mounted correctly to prevent the camera from falling.• Carry straps are usually made of very robust material. You should therefore keep it out of the reach of children. A carry strap is not a toy and poses a strangulation risk.• Use the carry strap only for its intended purpose on a camera or on binoculars. Any other use poses the risk of injury and may possibly result in damage to the carry strap and is therefore not permitted.• Carry straps should also not be used for cameras/binoculars during sports activities that pose a risk of entanglement (e.g. when mountain climbing and similar outdoor activities).TRIPOD• When using a tripod, make sure it is standing securely and turn the camera only by turning the tripod, not the actual camera.• Ensure that the tripod screw is hand-tightened only.• Avoid transporting the camera while the tripod is attached. You might injure yourself or others and the camera could get damaged.FLASHThe use of incompatible flash units with your Leica M10 Monochrom may result in irreparable damage to the camera and/ or the flash unit.REGULATORY INFORMATIONSpecific regional approvals for this device can be found in the camera menu.▸Select Camera Information in the main menu(Applies within the EU and for other European countries with active waste separation policies)This device contains electric and/or electronic components which must not be disposed of in general household waste. Instead, it should be disposed of at a recycling collection point provided by your local authority. This service is free of charge. Any standard or rechargeable batteries used in this device must be removed and disposed of separately in accordance with local regulations.Please contact your local authorities, waste disposal collection point or the retailer, from whom you purchased the device for more information on correct waste disposal.WARRANTY In addition to your statutory warranty rights regarding your dealer, you will receive an additional Leica Camera AG product warranty valid from the date of purchase at an authorized Leica retailer. Previously, the product warranty was included with the product in the packaging. From now on, the product warranty will only be available online as a new service. You will be able to review the warranty conditions for your product at any time, without having to search fr the document. Please note that this new policy applies only for products that are no longer delivered with a hardcopy product warranty included in the packaging. Any products delivered with the warranty document in the packaging are still subject to that particular document. For more information regarding the warranty scope, services and limitations, please visit: FOR EU ONLY:English Declaration of Conformity (DoC)Hereby, “Leica Camera AG” declares that this product is in compliance with the essential requirements and other relevant provisions of Directive 2014/53/EU.Customers can download a copy of the original DoC to our Radio Equipment products from our DoC server: In case of further questions, please contact:Leica Camera AG, Am Leitz-Park 5, 35578 Wetzlar, GermanyProduct dependent (see technical data)Type Frequency band (central frequency)Maximum power (dBm E.I.R.P.)WLAN 2412–2462/5180–5240 MHz/5260–5320/5500–5700 MHz 20Bluetooth Wireless Technology 2402–2480 MHz 20The CE mark on our products documents compliance with the fundamental require-ments of applicable EU directives.FOR HOME OR OFFICE USEThis device complies with Part 15 of the FCC Rules. Operation is subject to the following two conditions: (1) This device may not cause harmful interference, and (2) this device must accept any interference received, including interference that may causeuncontrolled environment. This device complies with FCC/IC SAR limit of 1.6 W/kg. For body worn operation, this equipment has been tested and meets the FCC/IC RF exposure guidelines when used with the Leica Camera AG accessories supplied or desig-nated for this product that have no metallic component in the assembly. Use of other accessories may not ensure compliance with FCC/IC RF exposure guidelines.FOR CANADA ONLY:CAN ICES-3 (B)/NMB-3(B)This device complies with RSS-210 of the IC Rules. Operation is subject to the following two conditions:(1) This device may not cause harmful interference,(2) This device must accept any interference received,including interference that may cause undesired operation of the device. This equipment complies with IC radiation exposure limits set forth for an uncontrolled environment and meets RSS-102 of the IC radio frequency (RF) Exposure rules. This equipment is tested for specific absorption ratio (SAR) and complies with FCC/IC radiation exposure limits set forth for an uncontrolled environ-ment. This device complies with FCC/IC SAR limit of 1.6 W/kg. For body worn operation, this equipment has been tested and meets the FCC/IC RF exposure guidelines when used with the Leica Camera AG accessories supplied or designated for this product that have no metallic component in the assembly. Use of other accessories may not ensure compliance with FCC/IC RF exposure guidelines.。
Leica DISTO D2 说明书
进入面积功能,如:室内高度。
DE
一次短暂按键:调出储存值,寻找所需的数值。
GB
一次较长时间按键:选定数值,此功能的计算结果
(如:面积)将会显示在显示屏内。
F
I
延迟测量
E
一次较长时间按键: 图标将显示在显示屏内。
P
延迟测量的默认时间是 5 秒。
增大数值。
NL
减小数值。
DK
按住此键可快速调整数值。
S
倒计时开始 (激光开启)直到测量。
在主显示内显示出一个值 (默认值为 1m)。此值可以根
功能
6
Leica DISTO™ D2 1.0.0 cn
据放样需要进行设置。 增大数值。
减小数值。
利用较长时间按键可以快速调整数值。 一次短暂按键:开启持续测量。
在第一辅助显示行内显示出设置值,也适用于重复操作 中。 在主显示中显示出距离放样的距离。 在接近放样点时 (小于 0,10 m),仪器开始蜂鸣。当到 达放样点时,蜂鸣声有所改变,第一辅助显示开始闪烁 显示。
N
关闭蜂鸣
同时按键 5 秒钟: 蜂鸣关闭。 再次同时按键 5 秒钟可重新开启蜂鸣。
FIN J
CN ROK
PL
H
RUS
CZ
Leica DISTO™ D2 1.0.0 cn
7
功能
DE GB F
I E P NL DK S N FIN J CN ROK PL H RUS CZ
备注
显示信息
所有的信息都以 或 "Error" 显示出来。下面所显示 的信息为可以更正的:
一次短暂按键:结束放样测量,仪器返回单次测量 模式。
历史储存
Leica IP S 载玻片打印机 使用说明书
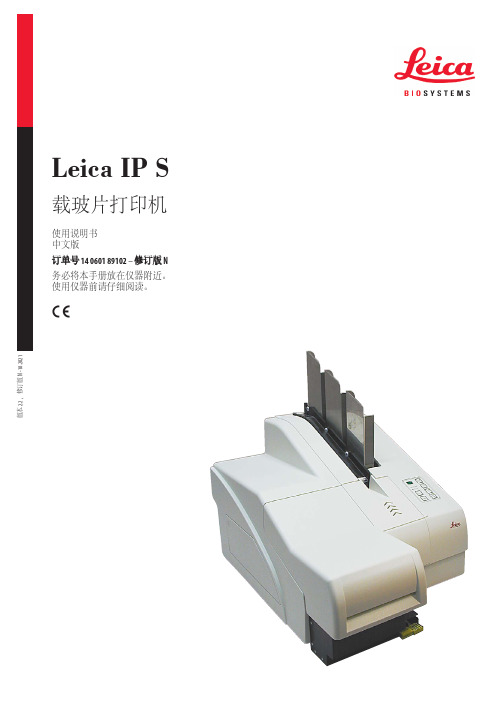
Leica IP S
载玻片打印机
使用说明书 中文版 订单号 14 0601 89102 – 修订版 N 务必将本手册放在仪器附近。 使用仪器前请仔细阅读。
版本 2.2,修订版 N - 10.2021
注意
本使用说明书中所包含的信息、数据资料、注意事项和价值评判,只代表我们目前通过全面研 究该领域所掌握的科学知识和先进技术。
Leica IP S
3
目录
1. 重要信息 ............................................................................................................................................... 6
3. 仪器组件和规格 ................................................................................................................................14
3.1 概述 — 仪器 ...................................................................................................................................................................14 3.2 技术参数 ...............................................................................................................................................................................17 3.3 打印规格 ...............................................................................................................................................................................19 3.3.1 样品载玻片的要求...........................................................................................................................................................19 3.3.2 打印规格 ...............................................................................................................................................................................20 3.3.3 打印条形码..........................................................................................................................................................................21
徕卡全站仪使用方法讲解
一、编码(biān mǎ)度盘测角原理
扇区型码盘
条码型码盘
26
精品资料
二、编码度盘与光栅度盘测角特点 (tèdiǎn)比较
比较项目
编码度盘 光栅度盘
测角方式
绝对式
增量式
关机后角度信息
保留
不保留
误差与躁声
不积累
积累
制造工艺
复杂
简单
27
精品资料
新型液态双轴自三动、(zì电dò子ng()d补ià偿nzǐ)测角中的轴系补偿
…… X-SECT记录断面测量
RAW 编辑观测值
POINTS 编辑坐标数据
PTLIB 编辑控制点
CODE 编码编辑
……
精品资料
XFER 文件传输
SEND 下载文件
RECEIVE 上装文件
PRINT 打印文件 至串行口 至并行口 至数据卡
PORT 设置通讯参数
PROG 应用程序
测量程序 放样程序 对边测量 悬高测量 面积计算 自由设站 交会定点 导线测量 坐标反算 导线平差
TCM1105 TCM1103 TCM1102 TCM1101
TCR1105 TCR1103 TCR1102 TCR1101
TC1105 TC1103 TC1102 TC1101
TCR705 TCR703 TCR702
TC705
TC703
TC702
TCR305 TCR303
TC305
TC303
T105 T/TM1100
〈3〉、适应性强:全站仪是为适应恶劣环境操作所制造的仪器。它们经受过全面 的测试以便适应各种作业条件,例如,雨天、潮湿、冲撞、尘土和高温等,因此, 它们能在最苛刻的环境下完成作业任务。 <4>、全站仪设有双向倾斜补偿器,可以自动对水平和竖直方向进行修正,以消除竖轴 倾斜误差的影响。还可进行地球曲率改正、折光误差以及温度、气压改正。
莱卡使用说明
Leica FlexLine plus快速操作指南版本 2.0中文2 FlexLine plus, 仪器重要信息1仪器重要信息请在使用仪器或附件前,先阅读USB存储器中的用户手册,并按照手册说明进行操作。
妥善保管,供日后参考!使用范围•测量水平角和垂直角。
•测量距离。
•可见的方向和竖轴照准。
FlexLine plus , 仪器重要信息3激光产品仪器包含以下激光产品:*可选激光产品•EDM 和激光对点器的分类符合IEC 60825-1(2007-03)。
•EGL 分类符合IEC 62471 (2006-07).ƽ小心从安全角度看,3R 预防:1)避免眼睛直视激光束。
2)不要用激光束照射他人。
激光产品激光类别EDM (电子距离测量)模块•使用棱镜测量1类•无棱镜测量3R 类EGL (电子导向光)*无害激光对中器2类4 FlexLine plus, 仪器重要信息ƽ小心从安全角度,2类激光产品对眼睛是有危害。
预防:1)避免凝视激光束。
2)避免将激光束打向他人。
激光孔径位置a)LED激光红色(EGL)b)LED激光黄色(EGL)c)激光光束(EDM)d)激光光束(激光对点)e)激光光束出口(激光对点)符合国家规定符合国家规定在此,Leica Geosystems AG,申明仪器符合欧洲执行标准中所要求的要点及其他相关的规定。
对规范遵守的声明可在网站/ce中查询。
•FCC 第15部分 (仅适用于美国)•在此,Leica Geosystems AG,申明产品符合1999/5/EC 执行标准中的要点及其它相关规定。
对规范遵守的声明可在网站 /ce中查询。
依照欧洲执行标准 1999/5/EC (R&TTE) 1 级设备可以无限制地在任何欧洲经济区成员国的市场中销售及维修。
15部分或欧洲执行标准 1999/5/EC 没有包含某些国家的规定,则在这些国家使用时应首先取得批准。
FlexLine plus, 仪器重要信息56 FlexLine plus, 仪器构成2仪器构成仪器部件(1/2)a)粗瞄器b)装有螺钉的可分离式提把c)集成电子测距模块(EDM)的物镜 EDM激光束发射口d)竖直微动螺旋e)开关键f)触发键g)水平微动螺旋h)显示屏幕i)第二面键盘*;与第一面键盘相同*对于TS02 plus可选仪器组件(2/2)j)望远镜调焦环k)目镜;调节十字丝l)电池盖m)RS232串口n)脚螺旋o)显示屏幕p)键盘FlexLine plus, 仪器构成78 FlexLine plus, 仪器构成仪器部件(1/2)a)USB存储器和USB电缆接口b)蓝牙天线c)粗瞄器d)装有螺钉的可分离式提把e)电子导向光(EGL)*f)集成电子测距模块(EDM)的物镜。
莱卡电子水准仪操作规程
莱卡电子水准仪操作规程第一篇:莱卡电子水准仪操作规程电子水准仪操作规程1.仪器的安置1.根据身高和观测姿势的舒适性,调节三脚架到合适的高度。
将脚架置于地面控制点上方,尽可能地将脚架面中心对准该点。
2.拧紧中心连接螺旋,将基座及仪器固定到脚架上。
3.移动脚架腿,并转动基座脚螺旋。
4.伸缩脚架腿整平水准器。
5.通过水准器的指示,转动基座脚螺旋以精确整平仪器。
6.通过移动三脚架头上的基座,将仪器精确对准地面点,然后旋紧中心连接螺旋。
7.前后视距尺寸不超过五十米,标尺的方法是,应让水准气泡的面朝上。
2.使用Leica Geo Office上载程序。
1.1在仪器窗口中选择DNA,并选择通讯端口DNA03新机载线路测量程序操作说明书John Shao 1.2完成后点Upload,进入下面界面1.3选择上载程序,然后点击“下一步”,程序开始上载,等待其完成。
线路测量1应用程序选择在仪器上按PROG 进入[应用程序界面],用上下键选择线路测量 2新建作业在[线路测量]中,选择[作业]按回车,进入如下界面:Job:作业名称;Oper:操作人员;Comt1:作业描述1;Comt2:作业描述2;:返回上一级,不创建作业。
:确认创建作业,进入下一步,线路测量设置。
Name:输入将要测量的线路名称;Meth:作业方法选择,本程序中有BF,aBF,BFFB,aBFFB四中方法可以选择;PtID:线路起始点点号;H0:线路起始点高程值;Staf1:标尺1描述; Staf2:标尺 3.描述;2.1线路测量方法选择线路测量方法中有BF双转点模式;BF常规模式;aBF往测(奇数站后前,偶数站前后);aBF返测(奇数站前后,偶数站后前);aBFFB往测(奇数站后前前后,偶数站前后后前);aBFFB返测(奇数站前后后前,偶数站后前前后);使用方向键选择返测或双转点测量模式。
1.选择BF双转点测量模式:2、选择BF常规测量模式: 3.选择BFFB双转点测量模式:4、选择BFFB常规测量模式:5、选择aBF返测模式:6、选择aBF常规测量模式:7、选择aBFFB返测模式:8、选择aBFFB返测模式:选择方法后直接用进入下一步,进入常规或往测测量模式。
Leica激光扫描共聚焦显微镜快速操作手册
2
7
1 6
3 4
5
1 研究级显微镜 2 扫描头
8
10
9
11
3 防震台 4 EL6000荧光激发光源 5 显微镜控制器
6 遥控手轮
12 13
7 显示器 8 控制面板 9 键盘
10 电脑鼠标
14
11 电脑桌
12 CSU 13 电源控制 14 电脑主机
Leica TCS SP8正置,配备紧凑型光源组件(CSU)
物镜选择按钮 预览按钮 Live 拍摄按钮 叠加图像显示按钮,在使用两个或以上数量通道拍摄多色图像时,用于显示 所有通道叠加后的图像
7
2.3 在显微镜下观察样品
2.3.1 选择物镜:可通过显微镜主机右侧的物镜转换按钮,或软件中的“Objectives” 键进行选择。(如下图)(注意:有时,显微镜主机上的物镜转换按钮不能在干镜 和油镜或水镜之间切换,软件中都可以切换)
2
Leica TCS SP8基本系统组成
1 2
3 4
7 6
5
Leica TCS SP8倒置,配备灵活型光源组件(FSU)
8
9
10 11
13 12
14
1 研究级显微镜 2 扫描头 3 防震台 4 EL6000荧光激发光源 5 显微镜控制器 6 遥控手轮 7 显示器 8 控制面板 9 键盘 10 电脑鼠标 11 电脑桌 12 FSU 12.1 开机顺序 (硬件标号请参考前面的系统组成图)
(1)因为 FSU 和 CSU 硬件的电源控制 )不同,请分别按照如下步骤开机:
FSU 系统
CSU 系统
依次打开“PC Microscope”、“Scanner Power”、 先按电脑主机上的电源按钮启动电脑,再打
- 1、下载文档前请自行甄别文档内容的完整性,平台不提供额外的编辑、内容补充、找答案等附加服务。
- 2、"仅部分预览"的文档,不可在线预览部分如存在完整性等问题,可反馈申请退款(可完整预览的文档不适用该条件!)。
- 3、如文档侵犯您的权益,请联系客服反馈,我们会尽快为您处理(人工客服工作时间:9:00-18:30)。
Leica DISTOTM S910
The original laser distance meter
Hale Waihona Puke 目录仪器设置 - - - - - - - - - - - - - - - - - - - - - - - - - - - - - - - - - - - - - - - 2 简介- - - - - - - - - - - - - - - - - - - - - - - - - - - - - - - - - - - - - - - - - 2 概述- - - - - - - - - - - - - - - - - - - - - - - - - - - - - - - - - - - - - - - - - 2 基本测量屏幕 - - - - - - - - - - - - - - - - - - - - - - - - - - - - - - - - - - 3 选择屏幕 - - - - - - - - - - - - - - - - - - - - - - - - - - - - - - - - - - - - - 3 数码瞄准器- - - - - - - - - - - - - - - - - - - - - - - - - - - - - - - - - - - - 4 状态栏上的图标 - - - - - - - - - - - - - - - - - - - - - - - - - - - - - - - - 4 通过 USB 为锂离子电池充电 - - - - - - - - - - - - - - - - - - - - - - - 5 使用智能底座 - - - - - - - - - - - - - - - - - - - - - - - - - - - - - - - - - - 6 使用智能底座延长装置 - - - - - - - - - - - - - - - - - - - - - - - - - - - 6
Leica DISTOTM S910 808167
ZH
罗盘 - - - - - - - - - - - - - - - - - - - - - - - - - - - - - - - - - - - - - - - - 26 测量单一距离- - - - - - - - - - - - - - - - - - - - - - - - - - - - - - - - - - 27 点对点功能 / 距离 - - - - - - - - - - - - - - - - - - - - - - - - - - - - - - 28 水平 - - - - - - - - - - - - - - - - - - - - - - - - - - - - - - - - - - - - - - - - 29 面积 - - - - - - - - - - - - - - - - - - - - - - - - - - - - - - - - - - - - - - - - 29 智能面积测量- - - - - - - - - - - - - - - - - - - - - - - - - - - - - - - - - - 30 照片 - - - - - - - - - - - - - - - - - - - - - - - - - - - - - - - - - - - - - - - - 31 数据获取到 DXF 文件 - - - - - - - - - - - - - - - - - - - - - - - - - - - - 32 调整测量基准- - - - - - - - - - - - - - - - - - - - - - - - - - - - - - - - - - 33 三角形面积 - - - - - - - - - - - - - - - - - - - - - - - - - - - - - - - - - - - 34 高度跟踪 - - - - - - - - - - - - - - - - - - - - - - - - - - - - - - - - - - - - - 35 智能水平模式- - - - - - - - - - - - - - - - - - - - - - - - - - - - - - - - - - 36 对边测量 - - - - - - - - - - - - - - - - - - - - - - - - - - - - - - - - - - - - - 37 勾股定理测量 (2 点)- - - - - - - - - - - - - - - - - - - - - - - - - - - 38 体积 - - - - - - - - - - - - - - - - - - - - - - - - - - - - - - - - - - - - - - - - 39 放样功能 - - - - - - - - - - - - - - - - - - - - - - - - - - - - - - - - - - - - - 40 计算器 - - - - - - - - - - - - - - - - - - - - - - - - - - - - - - - - - - - - - - 41 图库 - - - - - - - - - - - - - - - - - - - - - - - - - - - - - - - - - - - - - - - - 41 图像距离测量- - - - - - - - - - - - - - - - - - - - - - - - - - - - - - - - - - 42 图像直径测量- - - - - - - - - - - - - - - - - - - - - - - - - - - - - - - - - - 43 断面测量 - - - - - - - - - - - - - - - - - - - - - - - - - - - - - - - - - - - - - 44 梯形测量 - - - - - - - - - - - - - - - - - - - - - - - - - - - - - - - - - - - - - 45 勾股定理测量 (3 点)- - - - - - - - - - - - - - - - - - - - - - - - - - - 46 图像面积测量- - - - - - - - - - - - - - - - - - - - - - - - - - - - - - - - - - 47 技术参数 - - - - - - - - - - - - - - - - - - - - - - - - - - - - - - - - - - - - - - - 48 消息代码 - - - - - - - - - - - - - - - - - - - - - - - - - - - - - - - - - - - - - - - 49 保养 - - - - - - - - - - - - - - - - - - - - - - - - - - - - - - - - - - - - - - - - - - 49 保修 - - - - - - - - - - - - - - - - - - - - - - - - - - - - - - - - - - - - - - - - - - 50 安全说明 - - - - - - - - - - - - - - - - - - - - - - - - - - - - - - - - - - - - - - - 50 责任范围 - - - - - - - - - - - - - - - - - - - - - - - - - - - - - - - - - - - - - 50 允许使用 - - - - - - - - - - - - - - - - - - - - - - - - - - - - - - - - - - - - - 50 禁止使用 - - - - - - - - - - - - - - - - - - - - - - - - - - - - - - - - - - - - - 50 使用限制 - - - - - - - - - - - - - - - - - - - - - - - - - - - - - - - - - - - - - 51 废物处置 - - - - - - - - - - - - - - - - - - - - - - - - - - - - - - - - - - - - - 51 电磁兼容性 (EMC) - - - - - - - - - - - - - - - - - - - - - - - - - - - - - - 51 通过 Bluetooth® 使用产品 - - - - - - - - - - - - - - - - - - - - - - - 51 激光分类 - - - - - - - - - - - - - - - - - - - - - - - - - - - - - - - - - - - - - 52 标签 - - - - - - - - - - - - - - - - - - - - - - - - - - - - - - - - - - - - - - - - 52