6.XLS1000LCD操作介绍
LCD导乘图简易操作说明ppt课件

当所有线路的图片都做好后,需要导入到LCD屏内存空间, 方法如下:
1
通过U盘去更新、发布节目——
通过平台将节目发布,然后点
,点击
,将节目下载至电脑。用U
盘拷贝至根目录下,然后插入要更新、发布的终端,自动更新。
2
通过平台直接更新、发布节目——
通过平台将节目发布,如下图:
第15页
15
第四部分
节目发布、更新
简介——
车载长条LCD屏,主要用于各大城市公交车、长途客运车、出租车后 屏等。内部含安卓系统系统电路集成,集多功能于一体,比如:广告投放 (视频、文字、图片)、公交导乘显示等,主要服务于大众,为广大群众 带来更直接的视觉便利,同样为需要投放广告商户带来便捷,效果更佳!
4
第二部分
功能简介
主要功能——
第1页
车载LCD屏多功能简易操作说明
深圳市德威实业发展有限公司 2016年3月
1
目录
第一部分:系统组成 第二部分:功能简介 第三部分:文件编辑.效果 第四部分:节目发布、更新 第五部分:产品规格
第2页
2
第3页
第一部分
系统组成
定制型LCD显示屏
BS平台广告发布系统
BUS报站器
3
第4页
第二部分
功能简介
广告节目区域
第7页
公交导乘区域
7
第三部分
文件编辑
更新公交导乘文件 ——通过平台更新
1.电脑本地建 立公交素材
(1)公交导乘
文件编辑
2. 平台建立公交 线路路径
线路文件夹
线路表格及 导乘底图
素材管理
建立公交线路 路径
内容编辑完成后 压缩文件夹为zip格式
LCD原理及显示程序
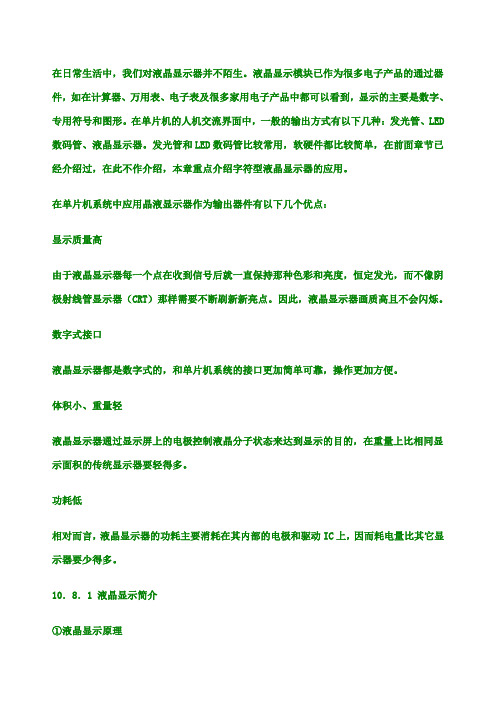
在日常生活中,我们对液晶显示器并不陌生。
液晶显示模块已作为很多电子产品的通过器件,如在计算器、万用表、电子表及很多家用电子产品中都可以看到,显示的主要是数字、专用符号和图形。
在单片机的人机交流界面中,一般的输出方式有以下几种:发光管、LED 数码管、液晶显示器。
发光管和LED数码管比较常用,软硬件都比较简单,在前面章节已经介绍过,在此不作介绍,本章重点介绍字符型液晶显示器的应用。
在单片机系统中应用晶液显示器作为输出器件有以下几个优点:显示质量高由于液晶显示器每一个点在收到信号后就一直保持那种色彩和亮度,恒定发光,而不像阴极射线管显示器(CRT)那样需要不断刷新新亮点。
因此,液晶显示器画质高且不会闪烁。
数字式接口液晶显示器都是数字式的,和单片机系统的接口更加简单可靠,操作更加方便。
体积小、重量轻液晶显示器通过显示屏上的电极控制液晶分子状态来达到显示的目的,在重量上比相同显示面积的传统显示器要轻得多。
功耗低相对而言,液晶显示器的功耗主要消耗在其内部的电极和驱动IC上,因而耗电量比其它显示器要少得多。
10.8.1 液晶显示简介①液晶显示原理液晶显示的原理是利用液晶的物理特性,通过电压对其显示区域进行控制,有电就有显示,这样即可以显示出图形。
液晶显示器具有厚度薄、适用于大规模集成电路直接驱动、易于实现全彩色显示的特点,目前已经被广泛应用在便携式电脑、数字摄像机、PDA移动通信工具等众多领域。
②液晶显示器的分类液晶显示的分类方法有很多种,通常可按其显示方式分为段式、字符式、点阵式等。
除了黑白显示外,液晶显示器还有多灰度有彩色显示等。
如果根据驱动方式来分,可以分为静态驱动(Static)、单纯矩阵驱动(Simple Matrix)和主动矩阵驱动(Active Matrix)三种。
③液晶显示器各种图形的显示原理:线段的显示点阵图形式液晶由M×N个显示单元组成,假设LCD显示屏有64行,每行有128列,每8列对应1字节的8位,即每行由16字节,共16×8=128个点组成,屏上64×16个显示单元与显示RAM区1024字节相对应,每一字节的内容和显示屏上相应位置的亮暗对应。
LCD模块使用手册

LCD 模块使用手册1.使用范围----------------------------------------------------22.质量保证----------------------------------------------------23.性能特点----------------------------------------------------24.外形图-------------------------------------------------------55.I/O接口特性-----------------------------------------------76.质量等级---------------------------------------------------107.可靠性---------------------------------------------------128.生产注意事项---------------------------------------------139.使用注意事项---------------------------------------------141.使用范围该检验标准适用于大连佳显电子有限公司设计提供的标准液晶显示模块。
如果在使用中出现了异常问题或没有列明的项目,建议同最近的供应商或本公司联系。
2.质量保证如在此手册列明的正常条件下使用、储存该产品,公司将提供12个月的质量保证。
3.性能特点3-1.性能:显示方式 : 半透、正显灰白色TN LCD显示颜色 : 显示点: 黑色背景: 灰白色显示形式: 3×6位笔段式显示(带小数点)输入数据 : 来自MPU的1位串行数据接口驱动方式 : 静态视角: 6 点背光 : LED3-2.机械性能:项目规格单位外形尺寸 170.0(W)×178.8(H) ×15.0 Max.(T) mm显示位数3×6位(带小数点) —视域3×130.6(W)×31.5(H) mm显示图形域3×127.6(W)×25.4(H) mm字符间距 22.0 mm 字符尺寸 12.7(W)×25.4(H) mm 重量 Approx.380 g3-3.极限参数:项 目 符 号 最小值最大值 单位 注 释逻辑 Vdd 0 6.0 V电源电压LCD 驱动 V LCD0 6.0 V 输入电压 Vi 0 Vdd V 操作温度 Top -30 70 ℃ 储存温度 Tstg -40 80 ℃ 湿度 — — 90 %RH3-4. 电气特性: 3-4-1. 电气参数项 目 符 号 条 件 最小值典型值 最大值 单 位逻辑 Vdd 4. 5 5.0 5. 5电源电压LCD 驱动 V LCD4. 5 —5. 5 高电平 Vih Vdd=5V ±10% 0.8Vdd — Vdd输入电压 低电平 Vil 0 — 0.2 Vdd 高电平 V oh Vdd=5V ±10% Vdd-0.3— —输出电压低电平 V ol — — 0.3V频 率 Fflm Vdd=5V 31 33 35 Hz 逻辑 Idd— 0.5 1.0功 耗LCD 驱动 I LCDVdd=5V Fflm=33Hz — 0.22 0.25 mATa= -30℃ φ=0°,θ=0° — 5.5 5.8 Ta= 25℃ φ=0°,θ=0° — 5.0 — LCD 驱动电压(推荐电压)V LCDTa= 70℃ φ=0°,θ=0°4.2 4.5 —V3-4-2. LED 背光规格 标 准 值项目单位最小值典型值 最大值条 件电源电压 V 10.5 11 12 If=40mA 亮 度 cd/m 2 — 17 — If=40mA(单片玻璃) 电 流 mA — — 380 单片玻璃 寿 命 Hrs 5000 — 发光颜色 — 黄绿色 — 操作温度 ℃ -30 ~ 70 — 储存温度 ℃ -40 ~ 80 —3-5. 电光特性项 目 符号温度 条件 最小值典型值最大值 单位 注释 -30℃ — 5.5 5.825℃ — 5.0 —LCD 驱动电压(推荐电压)V op 70℃ φ=0°,θ=0° 4.2 4.5 — V 1,2,5 0℃ — 1500 2000 上升时间 tr 25℃ — 150 2000℃ — 3000 3500响应 时间 衰退时间 td 25℃ φ=0°,θ=0°— 200 250mS 1,3,5垂直 -35 — 35视 角 Δφ 25℃ 水平 -30 — 30deg. 1,4,5对比度 K 25℃ φ=0°,θ=0° 2.0 5.0 — — 1,5,6注意:<1> φ和θ的定义<2> 在此电压范围内能获得对比度大于2(k ≥2)注意:<3> 响应时间波形定义(ΔΦ) ΔΦ=|Φ1-Φ2|非选择点的亮度(B2)4.外形图(见下页)PIN# 1 2 3 4 5 6 7 SYM LED -LED +Vss Vdd CLK DIN CL15.I/O接口特性5-1. I/O 接口表:管脚号符号功能- 背光电源(地)1 LED2 LED+ 背光电源(+12V)3 Vss 电源(地)4 Vdd 电源 (+5V)5 CLK 时钟信号输入6 DIN 串行数据输入7 CL1 串行数据锁存信号5-2. 时序及时序图:项目 符号 条件最小值最大值 单位 时钟频率 Fcl — 400 kHz 时钟上升/下降时间 Tct— 200 高电平 Tcwh800—时钟宽度低电平 Tcwl 800 — 数据建立时间 Tsu 300 —数据保持时间 TdhVdd=5V ±10%Ta=25℃ 300 —ns时序图5-3. 显示数据格式及顺序:左Æ右 位1 位2位3位4位5 位6行 1 18 17 16 15 14 13 行 2 12 11 10 9 8 7 行 3 6 5 4 3 2 1注释:每次刷新屏幕需重新送入18个数。
LCD指令集
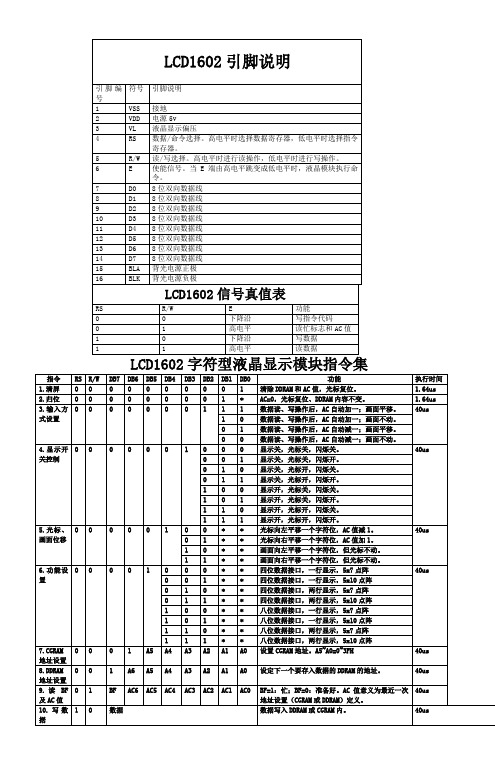
11.读数据
1
1
数据
读取DDRAM或CGRAM钟的内容。
40us
8
D1
8位双向数据线
9
D2
8位双向数据线
10
D3
8位双向数据线
11
D4
8位双向数据线
12
D5
8位双向数据线
13
D6
8位双向数据线
14
D7
8位双向数据线
15
BLA
背光电源正极
16
BLK
背光电源负极
LCD1602信号真值表
RS
R/W
E
功能
0
0
下降沿
写指令代码
0
1
高电平
读忙标志和AC值
1
0
下降沿
写数据
1
1
高电平
读数据
LCD1602字符型液晶显示模块指令集
指令
RS
R/W
DB7
DB6
DB5
DB4
DB3
DB2
DB1
DB0
功能
执行时间
1.清屏
0
0
0
0
0
0
0
0
0
1
清除DDRAM和AC值,光标复位。
1.64us
2.归位
0
0
0
0
0
0
0
0
1
*
AC=0,光标复位、DDRAM内容不变。
1.64us
3.输入方式设置
0
0
0
0
1
0
显示关,光标开,闪烁关。
0
1
1
显示关,光标开,闪烁开。
液晶显示设备使用说明书

液晶显示设备使用说明书一、前言液晶显示设备(以下简称显示设备)是一种通过液晶技术实现图像显示的高科技产品。
本使用说明书旨在为用户提供正确、安全和有效地使用显示设备的指导。
在使用前,请仔细阅读本说明书,并按照说明进行操作。
二、产品概述显示设备是一种视觉输出设备,主要通过液晶屏幕将数字图像或视频信号转化为可视化图像,并向用户展示。
本产品采用高清液晶屏,具有色彩饱满、高清晰度和广视角等特点。
同时,本显示设备还配备了易操作的控制面板,方便用户进行设置和调整。
三、安全注意事项1. 请勿将水或其他液体溅到显示设备上,以免损坏产品或引起电路短路等安全隐患。
2. 请勿将重物放置在显示设备上,以免造成屏幕压力过大,导致屏幕损坏或碎裂。
3. 请勿在潮湿或者有大量灰尘的环境中使用显示设备,以免影响产品的正常使用寿命。
4. 如果您需要清洁屏幕,请先关闭显示设备,并使用柔软的纤维布轻轻擦拭,切勿用力过大或使用化学溶液。
四、产品功能1. 颜色调节:本显示设备支持对图像的亮度、对比度以及色彩进行调节,以满足不同用户对图像效果的要求。
2. 屏幕分辨率:本显示设备拥有高分辨率的屏幕,可以呈现更加清晰、细腻的图像画面。
3. 视角范围:本产品具有广视角特点,用户可以在较大的角度范围内观看到清晰的图像。
4. 接口连接:显示设备配备了多种接口(如HDMI、VGA等),以便用户连接各类设备(如电脑、游戏机等)进行图像传输。
五、使用步骤1. 将显示设备与电源连线,并插入电源插座。
2. 打开电源开关,待显示设备亮起后,按需将其他设备(如电脑、游戏机)与显示设备连接。
3. 使用控制面板上的按键进行亮度、对比度和色彩的调节,以达到最佳的图像效果。
4. 确保所需图像源设备正常工作并输出信号,通过操作显示设备的输入源选择功能,选择正确的输入信号源。
5. 使用遥控器或者控制面板上的菜单键,调节并设置显示设备的其他功能和选项。
六、故障排除1. 如果显示设备无法正常开机,请检查电源插头是否插入稳固,电源开关是否处于开启状态。
L1000用户说明书(TH2010控制器)
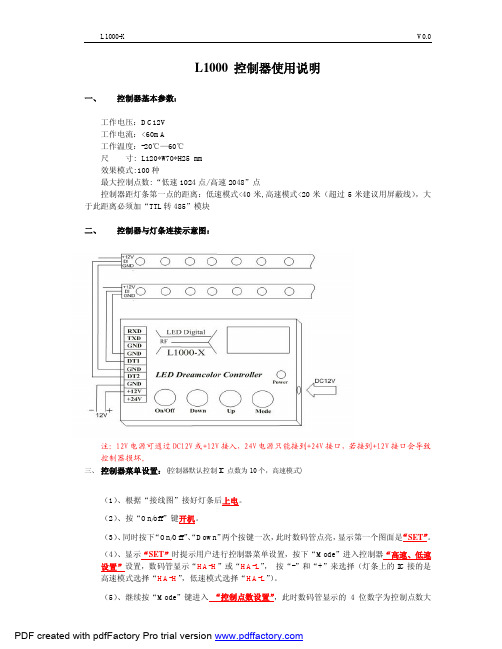
L1000 控制器使用说明一、控制器基本参数:工作电压:DC12V工作电流:<60mA工作温度:-20℃—60℃尺寸: L120*W70*H25 mm效果模式:100种最大控制点数:“低速1024点/高速2048”点控制器距灯条第一点的距离:低速模式<40米,高速模式<20米(超过5米建议用屏蔽线),大于此距离必须加“TTL转485”模块二、控制器与灯条连接示意图:注:12V电源可通过DC12V或+12V接入,24V电源只能接到+24V接口,若接到+12V接口会导致控制器损坏。
三、控制器菜单设置:(控制器默认控制IC点数为10个,高速模式)(1)、根据“接线图”接好灯条后上电。
(2)、按“On/off”键开机。
(3)、同时按下“On/Off”、“Down”两个按键一次,此时数码管点亮,显示第一个图面是“SET”。
(4)、显示“SET”时提示用户进行控制器菜单设置,按下“Mode”进入控制器“高速、低速设置”设置,数码管显示“HA-H”或“HA-L”,按“-”和“+”来选择(灯条上的IC接的是高速模式选择“HA-H”,低速模式选择“HA-L”)。
(5)、继续按“Mode”键进入“控制点数设置”,此时数码管显示的4位数字为控制点数大小,通过“Down”和“Up”来加减控制点数(长按可以快速调节)。
(6)、继续按“Mode”进入键进入“花样选择设置”,数码管显示“001-H”或“001-L”,“001-H”表示“001”花样选择播放,“001-L”表示“001”花样选择不播放。
可通过按“Mode”键选择花样播放或不播放,按“Down”,“Up”切换到其他花样。
(7)、同时按下“Up”,“Mode”返回到控制器“高速、低速设置”设置。
(8)、设置完后,按“On/off”键“保存”并退出。
四、控制器播放状态下按键功能说明:(1)、On/Off:开机/关机(2)、Down :模式-/速度-(3)、Up :模式+/速度+(4)、Mode :模式调节/速度调节功能切换(数码管第一位显示C为模式调节,显示S为速度调节)注:控制器上电后,红色指示灯将点亮。
LCD模块使用手册
LCD 模块使用手册1.使用范围----------------------------------------------------22.质量保证----------------------------------------------------23.性能特点----------------------------------------------------24.外形图-------------------------------------------------------55.I/O接口特性-----------------------------------------------66.质量等级---------------------------------------------------217.可靠性---------------------------------------------------248.生产注意事项---------------------------------------------259.使用注意事项---------------------------------------------261.使用范围该检验标准适用于大连佳显电子有限公司设计提供的标准液晶显示模块。
如果在使用中出现了异常问题或没有列明的项目,建议同最近的供应商或本公司联系。
2.质量保证如在此手册列明的正常条件下使用、储存该产品,公司将提供12个月的质量保证。
3.性能特点3-1.性能:显示方式 : 半透、正显 / 全透、负显黄绿模式 / 蓝白模式 / 黑白模式 /显示颜色 : 显示点: 深蓝色/白色/ 黄绿色背景: 黄绿色/蓝色/黑色显示形式: 240(w)×128(h) 全点阵输入数据 : 来自MPU的8位并行数据接口驱动路数: 1/128Duty视角: 6 点背光 : LED背光RAM 显示容量: 8k byte S-RAM(built-in)控制器: 东芝 T6963C(Built-in)CGROM/RAM容量: Built-in 128 words character generator (CG) ROM.3-2.机械性能:项目规格单位外形尺寸 144.0(W)×104.0(H) ×16.0 Max.(T) mm显示点阵数 240(W) ×128(H) Dots —字符结构40C×16L(640) in case of 6×8 Fonts30C×16L(480) in case of 8×8 Fonts—视域 114.0(W)×64.0(H) mm显示图形域 107.95(W)×57.55(H) mm 点间距 0.45(W)×0.45(H) mm点尺寸 0.40(W)×0.40(H) mm重量 Approx.180 g 3-3.极限参数:项目符号最小值最大值单位注释逻辑 Vdd-0.37.0VVss=0V时电源电压LCD 驱动 Vdd–Vee0 20 V输入电压 Vi-0.3Vdd+0.3VVss=0V时操作温度 Top-1060℃储存温度 Tstg-2070℃湿度 ——90%RH3-4. 电气特性:3-4-1. 电气参数 注释: <1> 驱动路数=1/128 <2> 所有点在静态条件下项 目 符 号 条 件 最小值典型值最大值 单 位 逻辑 Vdd 4. 5 5.0 5. 5电源电压LCD 驱动 Vdd–Vee — 19.7 25.0 高电平 Vih Vdd=5V ±5% Vdd-2.2— Vdd输入电压 低电平 Vil 0 — 0.8 高电平 V oh Vdd=5V ±5% Vdd-0.3— Vdd输出电压低电平 V ol 0 — 0.3V频 率 Fflm Vdd=5V 70 75 80 Hz逻辑 Idd — 5.7 10.0功 耗 LCD 驱动 Iee Vdd=5V Vdd–Vee=15.0VFflm=75Hz— 5.4 9.8 mA Ta= -10℃φ=0°,θ=0°— — —Ta= 25℃φ=0°,θ=0°— 19.7 — LCD 驱动电压 (推荐电压) Vdd–Vee Ta= 60℃φ=0°,θ=0°— — —V3-4-2.LED 背光规格 注释<1>: 在20℃、60%RH 时初始亮度值的一半标 准 值项目单位最小值 典型值最大值条 件电源电压 V — 3.2 — — 频 率 Hz — 400 400 —亮 度 cd/m 2(nit) 150 200 — 电 流 mA/cm 2 — 450 - A 寿 命 Hrs 10000 注释 <1> 发光颜色 — 白色 操作温度 ℃ -20 ~70 — 储存温度 ℃ -30 ~ 80 —3-5. 电光特性项 目 符号温度 条件 最小值典型值最大值单位 注释 -10℃ — 19.7 20.025℃ — 20.0 — LCD 驱动电压(推荐电压)V op 60℃ φ=0°,θ=0°22.0 22.2 — V 1,2,50℃ — 500 700 上升时间 tr 25℃ — 200 2500℃ — 540 810响应 时间 衰退时间 td 25℃ φ=0°,θ=0°— 250 300mS 1,3,5垂直 -35 — 35视 角 Δφ 25℃ 水平 -30 — 30deg. 1,4,5对比度 K 25℃ φ=0°,θ=0° 2.0 5.0 — — 1,5,6 注意:<1> φ和θ的定义<2> 在此电压范围内能获得对比度大于2(k ≥2)注意:<3> 响应时间波形定义4.外形图(见下页)5.I/O接口特性注释:本模块有内建负压发生器和无内建负压发生器两种,以下所有说明均是针对无内建负压发生器的模块,用户如选用的是有内建负压发生器的模块,只需将接口Vee脚悬空,单电源+5V(VDD)供电即可,忽略以下有关负压的说明。
LCD监视器用户手册说明书
LCD MonitorUser ManualLegal InformationUser Manual©2018 Hangzhou Hikvision Digital Technology Co., Ltd.About this ManualThis Manual is subject to domestic and international copyright protection. Hangzhou Hikvision Digital Technology Co., Ltd. ("Hikvision") reserves all rights to this manual. This manual cannot be reproduced, changed, translated, or distributed, partially or wholly, by any means, without the prior written permission of Hikvision.Please use this user manual under the guidance of professionals.Trademarksand other Hikvision marks are the property of Hikvision and are registered trademarks or the subject of applications for the same by Hikvision and/or its affiliates. Other trademarks mentioned in this manual are the properties of their respective owners. No right of license is given to use such trademarks without express permission.DisclaimerTO THE MAXIMUM EXTENT PERMITTED BY APPLICABLE LAW, HIKVISION MAKES NO WARRANTIES, EXPRESS OR IMPLIED, INCLUDING WITHOUT LIMITATION THE IMPLIED WARRANTIES OF MERCHANTABILITY AND FITNESS FOR A PARTICULAR PURPOSE, REGARDING THIS MANUAL. HIKVISION DOES NOT WARRANT, GUARANTEE, OR MAKE ANY REPRESENTATIONS REGARDING THE USE OF THE MANUAL, OR THE CORRECTNESS, ACCURACY, OR RELIABILITY OF INFORMATION CONTAINED HEREIN. YOUR USE OF THIS MANUAL AND ANY RELIANCE ON THIS MANUAL SHALL BE WHOLLY AT YOUR OWN RISK AND RESPONSIBILITY.REGARDING TO THE PRODUCT WITH INTERNET ACCESS, THE USE OF PRODUCT SHALL BE WHOLLY AT YOUR OWN RISKS. HIKVISION SHALL NOT TAKE ANY RESPONSIBILITIES FOR ABNORMAL OPERATION, PRIVACY LEAKAGE OR OTHER DAMAGES RESULTING FROM CYBER ATTACK, HACKER ATTACK, VIRUS INSPECTION, OR OTHER INTERNET SECURITY RISKS; HOWEVER, HIKVISION WILL PROVIDE TIMELY TECHNICAL SUPPORT IF REQUIRED.SURVEILLANCE LAWS VARY BY JURISDICTION. PLEASE CHECK ALL RELEVANT LAWS IN YOUR JURISDICTION BEFORE USING THIS PRODUCT IN ORDER TO ENSURE THAT YOUR USE CONFORMS THE APPLICABLE LAW. HIKVISION SHALL NOT BE LIABLE IN THE EVENT THAT THIS PRODUCT IS USED WITH ILLEGITIMATE PURPOSES.IN THE EVENT OF ANY CONFLICTS BETWEEN THIS MANUAL AND THE APPLICABLE LAW, THE LATER PREVAILS.PerfaceSymbol ConventionsThe symbols that may be found in this document are defined as follows.Applicable ModelsThis manual is applicable to monitors of the following sizes: 22 inch, 32 inch, 43 inch, and 55 inch.ContentsChapter 1 Introduction (1)1.1 Overview (1)1.2 Key Features (1)1.3 Panel Buttons (1)1.4 Interfaces (2)1.5 Power Supply Connections (3)1.6 Remote Control (3)Chapter 2 Terminal Operations (5)2.1 Switch Input Source (5)2.2 Menu Descriptions (5)2.3 Configure Image Parameters (7)2.4 Configure Audio Settings (10)2.5 Enable/Disable keypad lock (11)2.6 System Maintenance (12)2.6.1 Upgrade the Device (12)2.6.2 Restore the Defaults (12)2.6.3 Configure Temperature Monitoring (13)2.6.4 View System Information (14)2.6.5 Enable/Disable Auto Sleep (15)2.6.6 Enable/Disable Power Saving Mode (15)2.6.7 Configure Screen Saver (15)2.6.8 Check Energy Diagram (15)Chapter 3 Client Operation (17)3.1 Log in to Client (17)3.2 Configure Serial Port (17)3.3 Startup/Shutdown (17)3.4 Switch Input Source (18)Chapter 1 Introduction1.1 OverviewThe LCD monitor is a reliable surveillance display with excellent color reduction, image processing, and true display of video details. Multiple interfaces can meet various surveillance environments, and build-in speaker is convenient for audio play. The monitor is an ideal choice for security and surveillance application.1.2 Key Features•8-bit 2-ch LVDS (1920 × 1080) HD display.•3D digital comb filter.•True color OSD and user-friendly operating menu.•Mstar ACE-5 auto color and image enhancement engine, improving the image contrast, details, color of skin and edges, etc.•Programmable 12-bit RGB gamma correction.•1-ch HDMI 1.3 input interface, supporting HDCP 1.2.•Software spread-spectrum technology to reduce EMI radiation.•3D noise reduction.•HD JPEG decoding.•Multimedia playing of text, image, audio, video, etc.1.3 Panel ButtonsTouch buttons place on the left side of the monitor. See details in the following figure and table.Table 1-1 Buttons Description1.4 InterfacesTable 1-2 Description of Rear Panel1.5 Power Supply ConnectionsInsert the 3-pin power plug (100 to 240 VAC, 2A) into well-grounded power socket.NoteDisconnect the power of the monitor if it will not be used for a long time.1.6 Remote ControlRefer to the following table for the remote controller descriptions.Figure 1-3 Remote ControlNoteThe following keys are only used under the USB signal source: , , , , , .Table 1-3 Description of Remote Control Buttons /Chapter 2 Terminal Operations2.1 Switch Input SourceThe monitor supports 5 signal sources: HDMI, DVI, VGA, CVBS , USB.Steps1.Press SOURCE to enter Input Source page.Figure 2-1 Input Source2.Press ▼ or ▲ to select the input source.3.Press OK to accomplish the input source selection.2.2 Menu DescriptionsMenu OperationsNoteConfiguration steps vary depending on the menu you choose.Table 2-1 Description of Menu Operations1Press MENU and the main menu appears on the screen, such as image mode, audio settings, VGA parameters, etc.2Press ▲/▼/◄/► to select a submenu.3Press OK to confirm the submenu.4Press ▲/▼ to select parameters.5Press ◄/► to set the parameters.6Press MENU to complete the settings and back to the main menu interface. OSD SettingsYou can set the language and OSD duration on the menu.Enter Menu Settings page: Menu→ Menu Settings , and then set language, OSD duration, and OSD blending.Figure 2-2 OSD SettingsLanguageSupports Chinese & English menu switch.OSD DurationRefers to the display time of the menu after it is not used. Press ◄ or ► to adjust the OSD duration to: Always On/5 Sec/15 Sec/30 Sec.OSD BlendingRefers to the OSD transparency. You can adjust the blending value to: High/Middle/Low/Off.2.3 Configure Image ParametersImage ModeYou can switch image modes and adjust image parameters including contrast, brightness, color, sharpness, and hue.Enter Image Mode page: MENU→ Image Mode , and then press ▲or▼to select Image Mode.Figure 2-3 Image ModeStandardSuitable for a normal environment.GentleSuitable for a dark room.DynamicSuitable for a bright room.UserWhen you select the User mode, press ◄ or ► to set the brightness, contrast, color, or sharpness to adjust display effect.NoteAdjustable parameters vary depending on the input source you choose. If the parameter bar is gray, it indicates that the parameter is unadjustable under the current input source.Backlight SettingsYou can adjust the screen brightness. The higher the backlight value, the brighter the screen.Enter Backlight Settings page: MENU→ Backlight Settings , and then press ▲ or ▼to select Backlight.Figure 2-4 Backlight SettingsVGA ParameterWhen you select VGA as the input source, you can adjust VGA parameters to make the picture show in the correct position.Enter VGA Parameter page: MENU→ VGA Parameter , and then press ▲ or ▼to adjust VGA parameters according to your needs.Figure 2-5 VGA ParameterOverscan SettingsWhen there is black border, you can shield the borders for better image quality.Enter Overscan Settings page: MENU→ Overscan Settings , and then press◄ or ► to disable Overscan. You can set Left Edge, Right Edge, Top Edge and Bottom Edge from 0 to 100.Figure 2-6 Oversan SettingsNoteThe value of overscan is the pixel value of certain edge.AspectYou can set the aspect ratio as 16:9, 4:3, and P-to-P to zoom pictures.Enter Aspect page: MENU→ Aspect , and then press ◄ or ► to set the aspect ratio.Figure 2-7 AspectImage FreezeImage freeze refers to freezing the current image on the monitor.Enter Image Freeze page: MENU→ Other Settings→ Image Freeze , and then press ◄ or ►to setImage Freeze as Yes or No to enable or disable the image freeze.After switching the input source, the image freeze is automatically disabled by default. LightingYou can set the lighting parameters to adopt different surrounding lighting conditions.Enter Lighting page: MENU→ Other Settings→ Lighting , and then press ◄ or ► to switch lighting modes.Normal ModeSuitable for normal light conditions.Daylight ModeSuitable for daylight conditions.Night ModeSuitable for night light conditions.2.4 Configure Audio SettingsYou can switch the mute on/off, and adjust the volume/balance.Enter Audio Mode page: Menu→ Audio Mode , and then press ◄ or ► to set the mute, volume, and balance.Figure 2-8 Audio Settings2.5 Enable/Disable keypad lockYou can disable keypad lock to avoid the misoperation of control panel buttons.Enter Lock Keypad page: MENU→ Lock Keypad , and then press ◄ or ► to turn on/off Lock Keypad.Figure 2-9 Lock KeypadNoteWhen the lock keypad keypad lock is enabled, the control panel buttons are invalid.2.6 System MaintenanceThe device supports functions such as viewing system information, upgrading software, high temperature protection, no signal screensaver.2.6.1 Upgrade the DevicePlease use the latest update package to get all the possible updates.Before You StartInsert the USB flash drive with the update package to the device.Steps1.Enter Upgrade(USB) page: MENU→ Maintenance→ Upgrade(USB) .2.Press ►to to start upgrading.3.Press ◄ to continue the upgrading process or ► to cancel the operation and back to the menu.2.6.2 Restore the DefaultsAll parameters of the device can be restored to default settings.Steps1.Enter Restore Defaults page: MENU→ Restore Defaults .Figure 2-10 Restore Defaults2.Press ►to start restoration.A dialog box pops up.3.Press ◄ to continue restoring the defaults or ► to cancel the operation and back to the menu.2.6.3 Configure Temperature MonitoringYou can enable Overheat Alarm and once the board temperature is too high, an alarm prompt appears on the screen.Steps1.Enter Alarm Settings page: MENU→ Alarm Settings .2.Press ◄or ► to enable/disable Overheat Alarm.Figure 2-11 Alarm Settings3.Select Alarm Temp (°C) and press ◄ or ► to adjust the alarm temperature.4.Press MENU again to complete the settings and back to the main menu interface.2.6.4 View System InformationView the system information for maintenance.Enter System Info page: MENU→ System Info , and check current software version, working hours,current temperature, device ID.Figure 2-12 System Information2.6.5 Enable/Disable Auto SleepWhen the monitor does not have signal input in a preset interval, it goes to sleep automatically. Steps1.Enter Auto Sleep page: MENU→ Backlight Settings→ Auto Sleep .2.Press ◄ or ► to set Auto Sleep value or turn off Auto Sleep.3.Press MENU again to complete the settings and back to the main menu interface.2.6.6 Enable/Disable Power Saving ModeThe Power Saving Mode can reduce screen brightness and power consumption.Steps1.Enter Power Saving Mode page: MENU→ Other Settings→ Power Saving Mode .2.Press◄ or ►to enable/disable Power Saving Mode.3.Press MENU again to complete the settings and back to the main menu interface.2.6.7 Configure Screen SaverThe screen saver allows you to set the screen mode when the monitor has no signal input. Steps1.Enter No Signal Screensaver page: MENU→ Other Settings→ No Signal Screensaver .2.Press ◄ or ► to set Blue or Black or LOGO when there is no signal input.3.Press MENU again to complete the settings and back to the main menu interface.2.6.8 Check Energy DiagramYou can confirm the working condition of power saving mode and check current power, the power ratio, the sum power of the monitor.Steps1.Enter Energy Diagram page: MENU→ Other Settings→ Energy Diagram .2.Press ► to enable Energy Diagram.3.Press MENU again to complete the settings and back to the main menu interface.Figure 2-13 Energy DiagramThe Energy Diagram appears on the top left of the screen.Current PowerThe current power of the device.Power RatioThe ratio of the current power to the maximum power.Sum PowerThe total power accumulated from the factory to the present.4.Optional:Turn off Energy Diagram.1)Repeat step 1, and press ► to disable Energy Diagram.2)Press MENU again to complete the settings and back to the main menu interface.Chapter 3 Client OperationYou can turn on/off the monitor, switch the input signal through the ScreenControl client.3.1 Log in to ClientIf you use the client software for the first time, set Control Mode and Screen Type. Before You StartObtain the ScreenControl software from the CD-ROM and install it.Steps1.Double-click the client software shortcut to open the client.2.Select Control Mode to serial port.3.Select Screen Type to LCD-D50.4.Select User Name to guest.5.Click Login to log in to the client software.3.2 Configure Serial PortThe client controls the screen by connecting the serial port.Steps1.Click System Configuration→ Serial Port Configuration .2.Select Serial Port.3.Set Buad Rate to 9600.4.Click Open to connect the serial port.5.Optional:Click Close to disconnect the serial port.3.3 Startup/ShutdownYou can turn on/off the monitors via the client.Before You StartConfigure the serial port, and see Configure Serial Port for details.Steps1.Open the Screen Control page.2.Hold the mouse to draw a rectangle to select one or multiple virtual screens.3.Turn on/off the monitors.-Right click to select Startup/Shutdown.-Click to turn off the monitors. Or click to turn on the monitors.3.4 Switch Input SourceYou can switch the input source via the client.Before You StartConfigure the serial port, and see Configure Serial Port for details.Steps1.Open the Screen Control page.2.Hold the mouse to draw a rectangle to select one or multiple virtual screens.3.Right click and select Switch Signal.4.Select the source according to your needs.。
gds1000示波器面板介绍
面板介绍前面板GDS-1042LCD DisplayFunction keysVARIABLE knob MenukeysTriggerLEVEL knob Trigger keys Ground TerminalCH1terminal SD Card portCH2terminalProbe compensation output EXT TRIG terminal Power switch Horizontal POSITIONknob Horizontal MENU key TIME/DIV knob CH1/CH2/MATH keysVertical POSITION knob VOLTS/DIV knobLCD 显示器 TFT 彩色, 320 x 234 分辨率,广角检视LCD 显示器。
功能键开启LCD 左边的功能键。
Variable 旋钮VARIABLE增加/减少数值或移到下一个参数。
Acquire 键 Acquire设定撷取模式 (50 页)。
Display 键 Display显示器设定(53 页)。
Utility 键Utility安装Hardcopy (78页), 系统数据 92页),目录语言(72), 校正 (92 页),和测棒补偿 (93 页)Help 键 Help在LCD 显示器上显示 Help 内容 (93 页)。
Autoset 键 Autoset寻找信号并设定适当的水平/垂直/ 触发设定 (30 页)。
Cursor 键 Cursor执行光标量测 (20)。
Measure 键 Measure安装并执行自动量测 (24页)。
Save/Recall 键 Save/Recall储存并读取影像,波形,面板设定 (25页)。
Hardcopy 键 Hardcopy传递数据到 SD 卡 (78页)。
Run/Stop 键 Run/Stop冻结信号 (38 页)。
Trigger level knobL EVELTRIGGER设定触发电平(29页)。
MC1000使用手册
安装主电池 . . . . . . . . . . . . . . . . . . . . . . . . . . . . . . . . . . . . . . . . . . . . . . . . . . . . . . . . . . . . . . . . . . . . . . . .1-6 安装锂电池 . . . . . . . . . . . . . . . . . . . . . . . . . . . . . . . . . . . . . . . . . . . . . . . . . . . . . . . . . . . . . . . . . . . . . . . .1-6 安装 AAA 电池 . . . . . . . . . . . . . . . . . . . . . . . . . . . . . . . . . . . . . . . . . . . . . . . . . . . . . . . . . . . . . . . . . . . . . 1-7 电池充电 . . . . . . . . . . . . . . . . . . . . . . . . . . . . . . . . . . . . . . . . . . . . . . . . . . . . . . . . . . . . . . . . . . . . . . . . . . . . . . 1-8 启动移动数据采集终端. . . . . . . . . . . . . . . . . . . . . . . . . . . . . . . . . . . . . . . . . . . . . . . . . . . . . . . . . . . . . . . . . 1-9 唤醒移动数据采集终端. . . . . . . . . . . . . . . . . . . . . . . . . . . . . . . . . . . . . . . . . . . . . . . . . . . . . . . . . . . . . . . . . 1-9 取出锂电池 . . . . . . . . . . . . . . . . . . . . . . . . . . . . . . . . . . . . . . . . . . . . . . . . . . . . . . . . . . . . . . . . . . . . . . . . . . . 1-10 取出 AAA 电池 . . . . . . . . . . . . . . . . . . . . . . . . . . . . . . . . . . . . . . . . . . . . . . . . . . . . . . . . . . . . . . . . . . . . . . . . 1-10下面列出了对Fra bibliotek册初稿所作的更改: