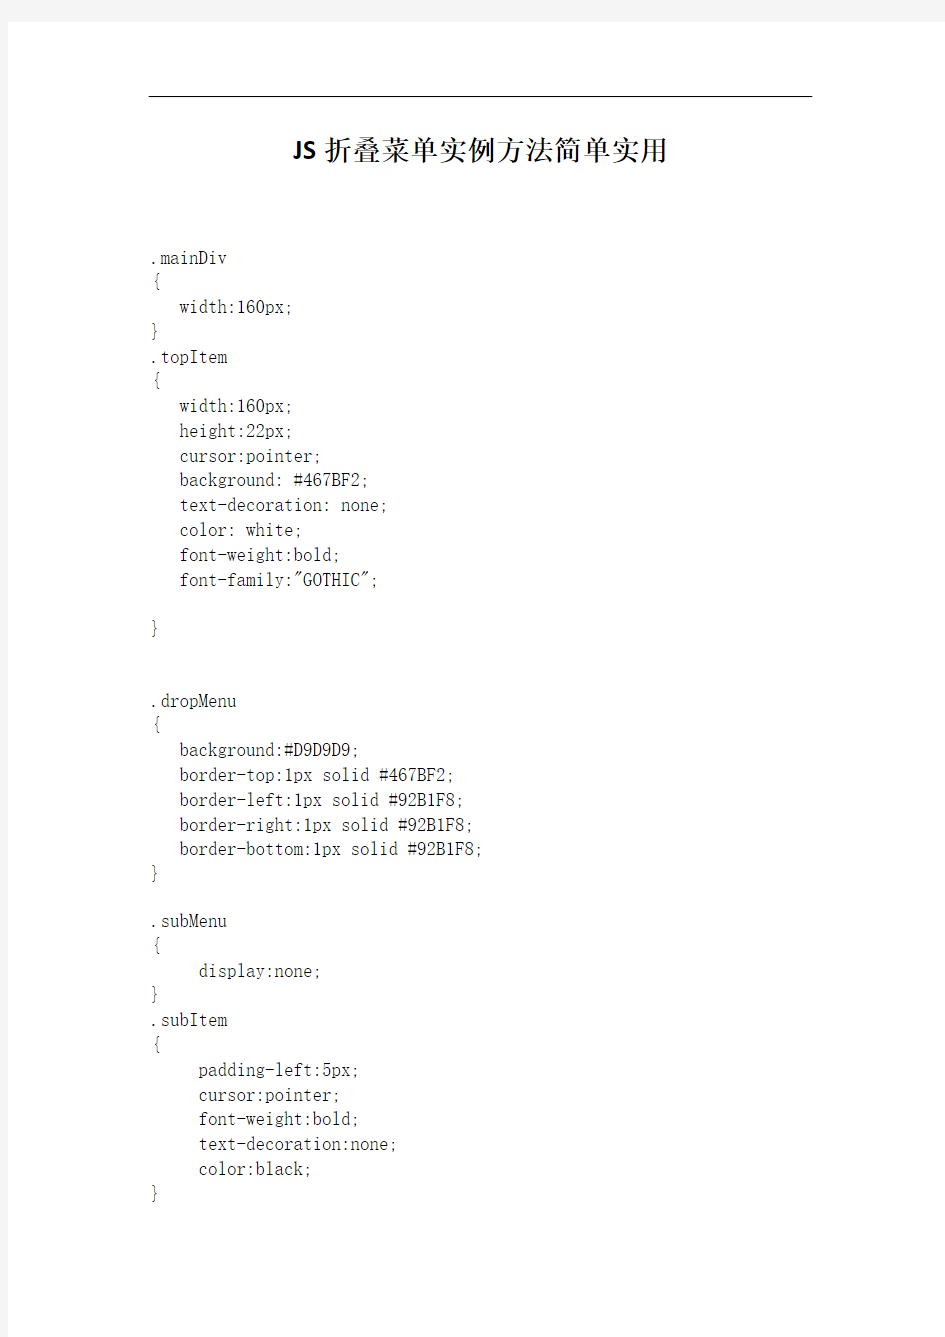
JS折叠菜单实例方法简单实用
JS折叠菜单实例方法简单实用
.mainDiv
{
width:160px;
}
.topItem
{
width:160px;
height:22px;
cursor:pointer;
background: #467BF2;
text-decoration: none;
color: white;
font-weight:bold;
font-family:"GOTHIC";
}
.dropMenu
{
background:#D9D9D9;
border-top:1px solid #467BF2;
border-left:1px solid #92B1F8;
border-right:1px solid #92B1F8;
border-bottom:1px solid #92B1F8;
}
.subMenu
{
display:none;
}
.subItem
{
padding-left:5px;
cursor:pointer;
font-weight:bold;
text-decoration:none;
color:black;
}
.subItem a
{
text-decoration:none;
color:black;
}
.subItemOver
{
cursor:pointer;
color:blue;
text-decoration:underline;
font-weight:bold;
padding-left:5px;
}
.subItemOver a
{
color:blue;
}
.drop
{
border-left:1px solid black;
border-right:1px solid black;
}
var TIMER_SLIDE = null;
var OBJ_SLIDE;
var OBJ_VIEW;
var PIX_SLIDE = 10; //this is the amount of slide/DELAY_SLIDE
var NEW_PIX_VAL;
var DELAY_SLIDE = 30; //this is the time between each call to slide var DIV_HEIGHT = 22; //value irrelevant
var SUB_MENU_NUM =0;
var RE_INIT_OBJ = null;
var bMenu = document.getElementById("curMenu");
var MainDiv,SubDiv
//DD added code
document.write('
style="visibility: hidden; position: absolute">
function Init(objDiv)
{
if (TIMER_SLIDE == null)
{
SUB_MENU_NUM = 0;
MainDiv = objDiv.parentNode;
SubDiv = MainDiv.getElementsByTagName("DIV").item(0);
SubDiv.onclick = SetSlide;
OBJ_SLIDE = MainDiv.getElementsByTagName("DIV").item(1)
OBJ_VIEW =
OBJ_SLIDE.getElementsByTagName("DIV").item(0);
document.getElementById("tempcontainer").innerHTML=MainDiv.get ElementsByTagName("DIV").item(2).innerHTML //DD added code
DIV_HEIGHT=document.getElementById("tempcontainer").offsetHeig
ht //DD added code
for (i=0;i { if (OBJ_VIEW.childNodes.item(i).tagName == "SPAN") { SUB_MENU_NUM ++; OBJ_VIEW.childNodes.item(i).onmouseove r= ChangeStyle; OBJ_VIEW.childNodes.item(i).onmouseout = ChangeStyle; } } NEW_PIX_VAL = parseInt(MainDiv.getAttribute("state")); } } function SetSlide() { if (window.TIMER_SLIDE) clearInterval(TIMER_SLIDE) //DD added code if (TIMER_SLIDE == null && this.parentNode == MainDiv) TIMER_SLIDE = setInterval('RunSlide()', DELAY_SLIDE); else { RE_INIT_OBJ = this; setTimeout('ReInit()', 200); } } function ReInit(obj) { Init(RE_INIT_OBJ); TIMER_SLIDE = setInterval('RunSlide()', DELAY_SLIDE); RE_INIT_OBJ = null; } function RunSlide() { if (OBJ_VIEW.getAttribute("state") == 0) { NEW_PIX_VAL += PIX_SLIDE; OBJ_SLIDE.style.height = NEW_PIX_VAL; if (NEW_PIX_VAL >= DIV_HEIGHT) //DD modified code { clearInterval(TIMER_SLIDE); TIMER_SLIDE = null; OBJ_VIEW.style.display = 'inline'; OBJ_VIEW.setAttribute("state","1") MainDiv.setAttribute("state",NEW_PIX_VAL); } } else { OBJ_VIEW.style.display = 'none'; NEW_PIX_VAL -= PIX_SLIDE; if(NEW_PIX_VAL > 0)OBJ_SLIDE.style.height = NEW_PIX_VAL; if (NEW_PIX_VAL <= 0) { NEW_PIX_VAL = 0; OBJ_SLIDE.style.height = NEW_PIX_VAL clearInterval(TIMER_SLIDE); TIMER_SLIDE = null; OBJ_VIEW.setAttribute("state","0") MainDiv.setAttribute("state",NEW_PIX_VAL); } } } function ChangeStyle() { if (this.className == this.getAttribute("classOut")) this.className = this.getAttribute("classOver"); else this.className = this.getAttribute("classOut"); }
excel应用场景:多级联动下拉列表实现选择一级部门下的二级部门
excel应用场景:多级联动下拉列表实现选择一级部门下的二 级部门 很多小伙伴们都知道,利用数据有效性功能做一个下拉列表,可以让用户从列表中选择选项,避免手工输入造成的错误。但是你们知道如何做一个多级联动下拉列表吗?先让我介绍一下,什么叫多级联动下拉列表。例如,公司里面的部门,分为一级部门,二级部门等。要求用户在选择了一个一级部门后,在二级部门中,只能选择一级部门对应的那些二级部门。最终效果我们就以上面这个例子开始,向小伙伴们,演示一下如何做这样一个多级联动下拉列表。动画演示解析:首先,分别定义了[市场部]和[信息研发部]名称,来管理各自对应的二级部门。然后,在数据有效性中,指定一级部门的数据序列来源于{B1:C1}最后,在数据有效性中,指定二级部门的数据序列来源于Indirect(D8),快速适用公式到其他二级部门单元格中。这里只有一点要说明一下,那就是Indirect(D8)的作用。Indirect(D8)的执行细节,如下图:Indirect函数解析附:Indirect(ref)函数的定义:返回文本字符串ref所指定的引用扩展:如果是三级联动,例如下图中的例子,怎么做呢?最终效果请看动画演示效果:动画效果三级部门联动原理和二级部门联动的例子是一样的。最后总结一下,这一期的主要内容是联动下拉列表的实现,包括二级
联动以及三级联动。用到的主要功能点是:在名称管理器中创建名称来管理对应的单元格区域,以及通过Indirect函数去查找地址对应的实际引用(相当于二次查找)。欢迎大家观看,转发,并留下宝贵意见,谢谢。本文是[谈谈生活谈谈职场]的原创,如要转载,请联系作者。关键词:Excel 联动下拉列表,Excel 联动下拉框,Indirect。
竖型导航栏的制作
竖型导航栏的制作 1、新建html文件index.html,使用文本编辑器进行编辑。如下图: 2、在
内开始编写导航栏的html代码。使用ul标签建立一个无序列表 效果如下图: 此时的列表还不能点击进行导航,我们使用标签进行超链接:效果如下图: 3、为了使得导航栏更加美观我用CSS进行样式设计,此时应在
标签里进 行引用。 4、新建CSS文件使用文本编辑器进行编辑 A.应为html页面默认有内、外边距。为方便我们进行样式设计,把所有标 签默认的内、外边距设为0px。 *{ margin:0px; padding:0px; } B.为了使导航栏在页面中间我们通过设置列表所在的js联动菜单下拉菜单日历方法
下拉式日历
以上是页面代码部分PHP+MySQL实现二级联动下拉列表
PHP+MySQL实现二级联动下拉列表 1.Javascript在下拉列表的各个对象 2.案例代码 Liandong.php