三代中九卡机安装
C3 智能卡 工时系统安装说明

系统安装操作说明书
一 C3系统安装
1.打开C3setup文件夹
2.双击此文件夹下的“setup”,(如下图)
3.根据安装提示,点击下一步,至安装完成(如下图)
4.安装完毕后,找到并打开”pb9配置文件”文件夹,全选并复制文件夹下的文件
5.在桌面找到安装完成后的图标”C3企业版3.0”,鼠标右键图标选择”属性-查找目标”
把复制的”pb9配置文件”粘贴到目标文件夹下(全部替换)
6.替换完成后,在安装目录下找到并双击运行c3conn注册表文件。
7.最后双击运行setup070910,安装报表组件,按照提示点击下一步直至安装完成
二智能卡管理系统安装
1.找到并运行ZNK_Setup文件夹下的ZNK_Setup文件
2.按照提示点击下一步直至安装完成
其中用户名,公司名及序列号按下图输入即可
三工时安装系统
1.找到并运行”工时安装系统”文件夹下的Gsgl_Setup文件,按照提示点击下一步期间输入用户名,公司名,序列号如下图,点击下一步直至安装完成。
中星九号接收机各常用芯片升级46台工具和bin文件使用教程

接收机各常用芯片升级46台工具和bin文件使用教程全集, 工具借这儿再声明一下:本人不算高手,本文也旨在抛砖引玉,真切希望那些高手多施舍点技艺。
引子:本人从事家电维修行业,近期接大量中9接收机升级,已成功“升级”大量上寨接收机,为了方便同行,故将成功经验整理发布,附全4类芯片:海尔(Hi2023,Hi2023E),华亚HTV903(F),国芯(GX3001,GX6121 等),阿里(ALi M3330E)的刷机软件和各类芯片46台的成功数据,数据均为本版块收集亲测,首先感谢原作者!为了避免刷成砖头,请认真参考以下内容!硬件准备:万用电表。
串口刷机板(TTL转接板。
可以自制,现成的也需要自制各种联机插线),标准串口延长线(用于使用标准9芯串口的接收机)万用电表:世人皆知。
用于判断各类接收机升级数据接口各引脚功能。
与电脑连接硬件:如果是标准9芯串口插头,直接使用标准串口延长线。
如果是4线或5线插排,请使用TTL转接板接入电脑的串口。
串口刷机板:本人是自制的(成本6元左右,一个串口插头,max232集成电路,电解等),淘宝也有卖(大约12元钱+运费),自制电路图纸网上随便就可以找到,就是一个max232芯片以及一些辅助原件。
刷机板自身工作电源无法像图纸上那样从串口获得,可以从5线数据线的4脚得到14V然后经过78L05稳压供给。
但4线的数据接口标称3.3V(有些好像标5V的,未测),故本人从USB端口供电,直供5V,未使用耦合电路也是成功的,建议大家从USB端口直接供电。
只要找到一个退休的USB鼠标或摄像头剪下插头即可,非常实用。
该板连接接收机最终是3根线:公用地线,读数据,写数据。
用万用表判断4线或5线的数据接口:地线:不用说了吧?就是和高频头外壳直通的那根!呵呵!电源线:无论是多高的电压,电源相对于任何数据引脚都有相对较小的对地电阻,对地反向二极管导通性更明显。
数据读写线:两个引脚靠在一起,万用表实测电压为3.3V,而且紧靠接地脚。
三茗还原卡的安装和卸载

三茗还原卡的安装和卸载三茗还原卡安装和卸载安装:第一步:安装驱动程序如果您使用的是Windows 95/98/ME操作系统,请进入操作系统后,运行drvist.exe,根据提示完成驱动程序的安装。
如果您使用的是Windows NT/2000p,则以管理员身份登录Windows NT/2000,直接运行drvist.exe,根据提示完成驱动程序的安装。
如果您使用是Windows2000/2022server,则以管理员身份登录,从控制面板—>添加/删除程序—>添加新程序里运行drvist.exe,根据提示完成驱动程序的安装。
三茗电脑卫士之“中国芯”保护卡SAMINGSOFT如果您使用的是Windows XP,则以管理员身份登陆,直接运行drvist.exe,根据提示完成驱动程序的安装。
第二步:安装“中国芯”保护卡关闭计算机,打开机箱盖板,将“中国芯”保护卡插入主板上可用的任意一个PCI 插槽内,开启计算机,进入CMOS,将引导选项设置为“Network”或“LAN”优先引导,保存CMOS设置,重新启动计算机,待CMOS检测完毕会自动出现如图1 所示安装画面:(图1)开始安装:进行“中国芯”保护卡底层程序的安装。
放弃安装:退出“中国芯”保护卡的安装,进入操作系统。
默认选择“开始安装”,按回车键,出现如图2所示画面,选择保护对象:(图2)C盘保护:只对主分区C盘进行保护。
全盘保护:对整个硬盘的所有分区进行保护。
三茗电脑卫士之“中国芯”保护卡SAMINGSOFT分区选择:对硬盘的各分区有选择性的进行保护,详见图5。
选择“C 盘保护”或“全盘保护”按回车键后出现图3 所示画面:(图3)按F9 恢复:指用户开机或重新启动计算机时,当CMOS自检结束后即将进入系统时,快速按下键盘的F9 键进行数据恢复;按F9 输入密码恢复:指上述操作的同时需要输入管理员密码,计算机验证密码无误后方可执行恢复数据任务;自动恢复有提示:开启计算机或重新启动系统时,《电脑卫士》自动恢复数据并在屏幕上显示提示界面;自动恢复无提示:在上述状态下恢复数据时,屏幕不显示提示界面迅速恢复数据并直接进入系统。
三系统安装教程

三系统安装教程三系统指的是Windows、macOS和Linux三种操作系统。
安装这三个系统有不同的方法,下面是它们的安装教程:Windows系统安装教程:第一步,打开计算机,将Windows系统安装盘插入光驱或将U盘插入USB接口。
第二步,重启电脑,按照屏幕上的提示进入BIOS设置。
第三步,将启动顺序设置为光驱或U盘优先,并保存设置后重启。
第四步,选择语言和区域设置,点击“下一步”按钮。
第五步,点击“安装”按钮开始安装Windows系统。
第六步,按照屏幕上的提示进行系统设置,如选择安装分区、输入许可证密钥等。
第七步,等待系统自动安装,过程中电脑会多次重启,耐心等待。
第八步,完成安装后,按照屏幕上的提示进行最后的设置,如创建用户账户、设置密码等。
第九步,安装完成后,系统即可正常使用。
macOS系统安装教程:第一步,打开计算机,连接到互联网,进入App Store下载macOS系统安装程序。
第二步,下载完成后,打开安装程序,按照屏幕上的提示进行安装。
第三步,选择安装目标磁盘,点击“安装”按钮开始安装。
第四步,安装过程中需要输入Apple ID和密码进行验证。
第五步,等待系统自动安装完成,过程中电脑会多次重启,耐心等待。
第六步,安装完成后,按照屏幕上的提示进行最后的设置,如创建用户账户、设置密码等。
第七步,安装完成后,系统即可正常使用。
Linux系统安装教程:第一步,选择适合自己的Linux发行版,如Ubuntu、CentOS 等,下载相应的ISO镜像文件。
第二步,打开计算机,将ISO镜像文件写入光盘或制作成启动U盘。
第三步,重启电脑,按照屏幕上的提示进入BIOS设置。
第四步,将启动顺序设置为光盘或U盘优先,并保存设置后重启。
第五步,选择适合自己的语言和安装方式,点击“安装”按钮开始安装。
第六步,在安装过程中,根据提示选择分区、设置用户名和密码等。
第七步,等待系统自动安装,过程中电脑会多次重启,耐心等待。
卡皇安装说明、BT3破解说明及虚拟机安装说明书
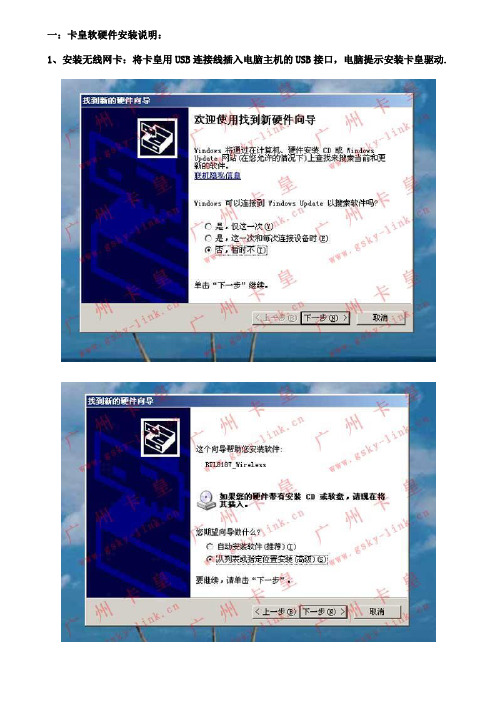
一:卡皇软硬件安装说明:1、安装无线网卡:将卡皇用USB连接线插入电脑主机的USB接口,电脑提示安装卡皇驱动.2:将小光盘放到光驱内安装卡皇的驱动程序。
3:安装好驱动后在桌面右下角,在无线网卡处点右键,查看可用的无线网络。
二:BT3破解详细安装说明(针对上面WEP加密方式,就要用到BT3破解光盘和破解说明书破解密码)1.首先要设置电脑光驱引导启动。
由于每台电脑的主板BIOS设置都是不一样的,所以请各位客户到百度搜索一下如何设置,在这里就没有图解了。
2.将BT3破解光盘放入DVD光驱(注意:一定要是DVD光驱才行,由于数据容量在2G以上,CD光驱是读不出的)3.重启电脑后,系统会由DVD光驱自动引导到以下的画面:4.点击左下角第二个黑色窗口样的图标,(只点击一下)在弹出的对话框中输入spoonwep 后按回车5.过20秒后,在弹出的对话框中接图上的显示选择一模一样选择项后按下一步6.这里直接点击右上角LAUNCH按纽7.在这里选择数值最大的选择项进行破解,DATA为零时一般是无法破解的,要换个时间等有流量时再破解。
三:利用虚拟机破解详细说明如果您的笔记本或上网本不支持DVD引导进入LINUX系统,这时就要用虚拟机进行破解操作;本公司独家提供,虚拟机文件在本公司提供的光盘中。
A 在VMware6.0目录下找到以下图标,双击安装:出现以下对话框按Y后回车选择2,先安装USB服务再按9退出B.在VMware6.0目录下再找到虚拟机图标,双击安装安装虚拟机:C,在BT3 中测试有无无线网卡:点击左下角第二个黑色窗口样的图标,(只点击一下)在弹出的对话框中输入ifconfig -a 后按回车D、破解过程:点击左下角第二个黑色窗口样的图标,(只点击一下)在弹出的对话框中输入spoonwep后按回车广州卡皇网络科技有限公司QQ:389790941(此QQ已经满了,但任何人可以加其为好友)QQ:285422323 (此QQ已经满了,但任何人可以加其为好友)QQ:1043740118E-mail:gskylink@ MSN: gskylink@官方网址: 。
九州户户通机顶盒安装指导要求规范

实用标准四川九州电子科技股份有限公司直播星户户通机顶盒安装指导规范技术开发中心·DVB测试所版本修订记录直播星户户通机顶盒安装指导规范一.户户通机顶盒安装步骤 (3)二.安装注意事项 (6)三.安装过程中软件的提示及处理方法 (7)四.中星9号节目编号 (10)五.位置锁定系统典型工作流程及场景 (12)一、位置锁定系统框图 (12)二、工作流程图 (14)一.户户通机顶盒安装步骤1、安装前需事先在地方安装维护中心对待安装的盒子进行开卡,开卡网址:/。
在机顶盒未通电的状态下,对机顶盒安装SIM卡和智能卡;2、安装好机顶盒的天线,用AV线连接机顶盒与电视机,将机顶盒与卫星接收器连接好;3、打开电视机和机顶盒,通过遥控器设置机顶盒。
点击遥控器【菜单】按钮,选择【系统设置】,输入密码“9999”进入设置;进入【网络连接设置】项,将网络IP设置为“114.251.156.067”,网络端口设置为“4567”,确认后保存设置;(DVS-698TL盒子需要做第3步,DVS-798TL的IP及端口参数已经预置在软件中了,不需做第3步)。
4、退出菜单,会在监视器上看到“E06对不起,智能卡未授权”的提示,如下图1-1所示;图1-1 智能卡未授权提示5、开机大约20s左右,电视机屏幕上会出现搜索到的基站信息(最多5行)的提示页面,如下图1-2所示。
根据屏幕提示,此时点击遥控器上对应颜色(红色或橙色)按钮进行保存;图1-2 搜索到的基站信息提示页面6、等待约8s后,屏幕上会出现显示“智能卡未授权,若安装请按确认键,取消请按返回键”的提示信息,如图1-3所示。
此时请按遥控器上【确认】按钮;图1-3确认是否安装的提示图7、再次等待约15S后,屏幕上出现“发送成功”的提示,如下图1-4所示。
若显示“发送失败”则需将机顶盒断电,拔掉电源线,重新安装SIM卡,完成3-7的安装操作。
图1-4 定位信息发送成功的提示图8、在收到“发送成功”的提示信息后,屏幕右上角会显示“安装过程中,请稍后...”的字样,如图1-5所示,约10S后屏幕上出现电视节目视频画面;图1-5 安装过程的提示9、右上角“安装过程中,请稍后...”在持续一段时间后会自动消失,而后屏幕中间出现黄色提示页面显示“安装成功”随即消失,用户正常接受电视节目,安装过程全部完成;图1-6 安装成功的提示图备注:该安装步骤是根据我到做开卡安装测试时总结而来,若有不对的地方请指正。
九代雅阁恒晨车机换原厂车机教程
九代雅阁恒晨车机换原厂车机教程
1. 准备工作:购买原厂车机、拆卸车内原有的车机、工具。
2. 拆卸原有车机:首先需要关闭车辆点火和电源,然后拆除原有车机的面板和外壳,拆卸固定螺丝,并拔出原有车机的插头连接线。
3. 安装原厂车机:将原厂车机的插头线接入原有的插头连接线中,将车机固定在原有车机的位置,安装好面板和外壳,然后再次点火测试。
4. 配置车机:根据原车机的配置,进行车机功能的设置和调试,包括音响、收音机、导航等功能。
5. 测试车机:在调试完成后,进行车机的测试,检查车机的各项功能是否正常运行,如有问题需要及时调整。
注意事项:
1. 在更换车机前,需要确认新车机与车辆的兼容性,避免出现不匹配的情况。
2. 更换车机时需要注意车辆的电源安全,避免出现短路和电路故障。
3. 更换车机后,需要进行车机的调试和测试,确保车机的各项功能正常运行。
中九升级教程
中九升级教程中九升级教程一、摆正升级心态近来中九升级加我QQ的人不下几百人,本人真是应接不暇,有的说麻烦;有的说没有升级设备,有的说升级工具及升级文件难以查找。
其实升级这个东东说容易也容易,说难也可以说是难上了天;说容易吧,不就是在电脑上连几根线,然后将升级文件拷贝到机器里就OK了吗。
说实在的我对中九升级完全是出于个人爱好,没有别的目的。
光刷机线我就买了好几条(在网上购你还得耐心等)便宜的几块钱,贵一点的几十元上百元的都有,几块钱的数据线,光邮政快递费就要二十多元,(真是划不来的)还有升级工具及升级文件什么的,在网上查找,不是要注册,就是要"点点"、"星星",麻烦死了,有时你花了莫大的力气注了册,也找不到合适的升级工具及文件,如果有兼麻烦的,也就不要搞了,中九机带锅子不也就是百十来块钱吗;还说不定那一天"广电"要将"山寨机"赶尽杀绝,也就再用不着了。
中九升级要的是"个人爱好",说挣钱吧,你帮别人升级,最多能收三来二十块钱,而且还要冒着机子被刷成砖的危险,何必呢?如果说你是经常买"六合彩"的,而且光输钱,那你就不妨试试这个东东,也许能将你从"赌"中解脱出来,享受升级成功的喜悦!二、升级前期准备1、你必须拥有一台属于你自已的电脑;(台式、笔记本的均可)2、准备带有232转换模块的刷机线;(串口、并口均可,有一种诺基亚带232转换模块的的手机数据线也可以)3、准备好刷机工具及升级文件,目前我搜集的升级工具就有:A、海尔工具;B、国芯工具;C、华亚工具;D、卓异工具;E、阿里、高斯贝尔工具;各种升级工具相配的升级文件也不尽相同。
我这些工具文件都是通刷的,不需要再更改,找准对应的直接升级就行,而且支持以后再次升级,只要输入六位数的超级密码就行。
如果你却得网上难以查找,想方便快捷。
中九接收盒国芯GX刷机教程
国芯GX3001:升级工具软件:GxDownloaderIII V1.008 GxDownloaderIII V2.120(1)连接数据线(2)打开GxDownloaderIII,选择端口(serial port),点端口后面的“>>”打开详细设置栏,芯片型号:选择“GX3001”。
晶振频率选择“4M”(有必要吗?3001还能以其他频率工作吗?为何厂家不内置?)。
flash类型:“PPI-flash”为并口,“SPI-flash”为串口,一般板子上都是8脚的串行数据接口的flash,那就选择“SPI-flash”,flash型号就有点头疼了,我的是25L800还有其他什么的忘记了。
下拉框里面没有啊?选个差不多的吧:“W25X80”,内存类型和容量默认“SDRAM”“64M”(那一块内存有64M吗?SDR内存条8芯片最大的我只见过256M的,除以8还有多少?不管他了,好用就行了)Mode:工作模式“Download”为刷写数据,“Erase”为擦除数据(我没用过,怕变砖),“Dump”为备份数据。
Section:选择需要编辑的数据内容。
“All”为全部,“Bootload”为启动加载项(估计这个刷错就会变砖),“Main code”为主代码(估计这个错了要瘫痪),“Logo”顾名思义是开机画面,“Common Data”通用数据(估计是操作程序),“Default UserDB”默认用户数据,“UserDB”用户数据,“SysDB”系统数据,“Key”搞的就是他了!!File:选择备份的保存位置和文件全名(包括扩展名)或者准备好的升级文件位置。
按下面的大按钮,备份为“Dump”,刷写为“Download”(3)打开接收机电源,接收机无视频输出,有些接收机面板会显示数字或字符,显示内容根据工作模式和编辑的数据内容而不同(仅了解一下,可不必管他),等待进度条完成,并有声音提示。
关闭接收机,拔出数据线,---试机---OK了!备份说明:Mode选择“Dump”,Section选择“All”(也可以将各单元数据分别备份)升级说明:Mode选择“Download”,Section:至于Section选择就根据你的需要了,如果你找到的是一个完整的升级文件(1M或2M)那就选择“All”(全部),至少我目前升级的几台机没能找到可用的完整bin文件,而且高频型号不一样的结果就是没有信号(或只没有信号质量),我100%成功的刷法是仅升级“Key”,这个Key也是坛子里面找到的,那么Section就选择最下面一项“Key”。
苹果 Mac OS 9 安装手册说明书
Installing Mac OS 9K Apple Computer, Inc.©1999 Apple Computer, Inc. All rights reserved.Under the copyright laws, this manual may not be copied, in whole or in part, without the written consent of Apple. Your rights to the software are governed by the accompanying software license agreement.The Apple logo is a trademark of Apple Computer, Inc., registered in the U.S. and other countries. Use of the “keyboard” Apple logo (Option-Shift-K) for commercial purposes without the prior written consent of Apple may constitute trademark infringement and unfair competition in violation of federal and state laws.Every effort has been made to ensure that the information in this manual is accurate. Apple is not responsible for printing or clerical errors.Apple Computer, Inc.1 Infinite LoopCupertino, CA 95014-2084408-996-1010Apple, the Apple logo, AppleShare, Mac, Macintosh, and PowerBook are trademarks of Apple Computer, Inc., registered in the U.S. and other countries.Disk First Aid, Extensions Manager, and Finder are trademarks of Apple Computer, Inc.Other company and product names mentioned herein are trademarks of their respective companies. Mention of third-party products is for informational purposes only and constitutes neither an endorsement nor a recommendation. Apple assumes no responsibility with regard to the performance or use of these products. Simultaneously published in the United States and Canada.Click, then follow the onscreen instructions.What’s newRead “What’s new” to find out about the changes and features in Mac te-breaking news Get the latest news about compatibility and other important information.Troubleshooting InformationBefore or During InstallationYour computer doesn’t have a CD-ROM drive.You can install the Mac OS using a CD-ROM drive attached to another Macintosh. Connect both computers to a network, then use file sharing to access the CD from across the network. See the onscreen Help for information about using file sharing with your computer.To ensure a smooth installation, turn off any disk security or virus-protection software you have installed. Then use the Extensions Manager control panel to turn off non-Apple extensions and control panels. Make sure you have AppleShare extension 3.6.4 or later. (A copy is available on the Mac OS CD; install it if necessary.) See the onscreen Help for information about using the Extensions Manager control panel.After you’ve turned off the extensions, restart your computer, then open the Installer and install the Mac OS. Following this process will help ensure that incompatible extensions don’t interfere with the installation process.After the installation is finished, you can turn on your extensions and virus-protection software. If you encounter problems after doing so, see “Resolving Software Conflicts” on page 11.You can’t start up the computer using the Mac OS CD.With the CD inserted, open the Startup Disk control panel and click the CD icon in the Startup Disk window. Then restart the computer and install the Mac OS. After installation, use the Startup Disk control panel to reselect your hard disk, then restart your computer.The Installer cannot repair your hard disk.m If you see a message that the disk can’t be fixed because a file is open, quit all programs. If file sharing is on, turn it off. Then try installing again.m If you still get the message, use Disk First Aid, provided on the Mac OS CD, to see if it can repair the disk.m If Disk First Aid is unable to repair the disk, try a third-party disk repair utility, if you have one. Make sure you’re using the latest version of the utility.m If you don’t have a third-party utility, or if that utility can’t repair the disk either, you may need to reinitialize the hard disk. First, back up your hard disk because reintializing erases all the files on the disk. Then use the Drive Setup utility program, provided on the Mac OS CD, to reinitialize the disk. For help with Drive Setup, open the program, then look in the Help menu. After you’ve reinitialized the disk, use the Mac OS Installer to reinstall system software, then reinstall your application programs and your documents from the backup copies you made before you reinitialized the disk.9You see a message about updating the firmware.Some computers require a firmware update before installing the Mac OS. Firmware is controlsoftware that’s built into your computer. Follow the instructions for updating firmware in theCD Extras folder on the Mac OS CD before proceeding with the installation.The Installer cannot update the hard disk driver.The Installer cannot update non-Apple hard disks. Use the disk utility recommended by themanufacturer of your hard disk to update your drivers before installing the Mac OS. Make sureto get a version of the utility that is compatible with the software you are installing. An oldutility will not be able to update your disk with the most current driver.You see a message that there’s not enough memory to use the Installer.Make sure you’ve started up your computer from the Mac OS CD. If you can’t start up from theCD, quit all open applications and make sure you’ve followed the steps described in “You can’tstart up the computer using the Mac OS CD.” on page 9.You see a message that there’s not enough disk space.Make more space available on your hard disk by removing some files from the disk. Copy thefiles you want to keep to another disk, then drag them to the Trash and choose Empty Trashfrom the Special menu to delete the files. You don’t need to quit the Installer before youremove files from the disk.You see a message that the System file cannot be modified.Make sure that you’ve started up your computer using the Mac OS CD. If you can’t start upfrom the CD, make sure any security and virus-protection software is turned off. See page 9 forother steps to follow when you can’t start up from the CD.You see a message that an item cannot be replaced.The Installer is attempting to replace a file, but there is a folder on the disk that has the samename as the file being replaced. (Files cannot replace folders.) Find the folder on your disk andrename it, then try the installation again.You see a message that the installation was not successful.Make sure that you’ve started up your computer using the Mac OS CD. If you can’t start upfrom the CD, make sure any security and virus-protection software is turned off. See page 9 forother steps to follow when you can’t start up from the CD.10After InstallationYou can’t start up or restart the computer, or when you do you see a bombmessage.You probably have an incompatible item in the System Folder. Follow the instructions in“Resolving Software Conflicts,” next. If you still can’t resolve the problem, you may need to reinstall the system software by following the instructions in “Performing a Clean Installation”on page 12.Application programs freeze, or require you to restart the computer.You may have an incompatible item in the System Folder. Follow the instructions in “Resolving Software Conflicts,” next. You may also need to contact the program’s manufacturer todetermine if it is compatible with this version of the Mac OS.Resolving Software ConflictsIf your computer does not start up properly or behaves erratically, you probably have anincompatible extension, control panel, or application.Step 1: Verify the ProblemTo verify that you have a compatibility problem, follow these steps:1Start up your computer while holding down the Space bar.When the Extensions Manager control panel appears, release the Space bar.2Open the Selected Set menu and choose the item with the words “Mac OS Base.”This turns off all extensions and control panels except those installed with the Mac OS.3Close the Extensions Manager to continue startup.4When the computer is finished starting up, try the same actions that caused the problem.If the problem no longer occurs, you probably have an extension or control panel that doesn’t work with this version of the Mac OS. Continue with the steps in “Test Individual Extensions and Control Panels,” next, to identify the item that is causing the problem.If the problem still occurs, try checking your hard disk for problems using the Disk First Aid utility, provided on the Mac OS CD. If the problem occurs only when using a certain program, that program is probably not compatible or may need to be reinstalled. Check with theprogram’s manufacturer for information.Step 2: Test Individual Extensions and Control PanelsTo test an individual extension or control panel for compatibility, follow these steps:1Restart your computer while holding down the Space bar.The Extensions Manager appears again.11122Turn on the item you want to test by clicking its checkbox.3Close the Extensions Manager to continue startup.4Try the same actions that caused the problem.If the problem does not occur again, then the item you turned on is probably compatible with this version of the Mac OS.If the problem occurs again, the item you turned on is probably incompatible. Open the Extensions Manager control panel and click the item’s checkbox to deselect it.5Repeat steps 1 through 4 for each item you want to test.If you find that a piece of software is incompatible, turn it off or remove it from your computer, then contact the manufacturer of the software to see if an updated version is available.Performing a Clean Installation This section provides instructions for what is commonly called a clean installation of system software. A normal system software installation replaces changed system files and adds new ones, but leaves other files alone. A clean installation creates a completely new System Folder on your hard disk. Performing a clean installation can be a lengthy procedure, but if you have tried other troubleshooting methods and are still experiencing problems, it may help.1Start up your computer from the Mac OS CD.2Open the Mac OS Installer application.3In the Select Destination window of the Installer, click the Options button.4Click the Perform Clean Installation checkbox to select it, then click OK.5Follow the onscreen instructions to begin the installation.When the installation is finished, you can reinstall extensions, fonts, control panels, applications, and other items not installed with the Mac OS from their original disks. If you don’t have the original disks, you can drag the items one at a time from the Previous System Folder to the new System Folder. To make sure the software is compatible with this version of the Mac OS, you should restart your computer after you reinstall each item.Important A clean installation creates a completely new System Folder. This means you must reinstall any non-Apple extensions, fonts, and control panels after you do the installation. Before you begin, write down your Internet settings (from the Modem, TCP/IP, and Remote Access control panels). Some of your application programs might also need to be reinstalled after you perform a clean installation, particularly if they rely on files that used to be in the System Folder.After you’re sure you’ve copied all the items you want to save into your new System Folder, delete the Previous System Folder from your hard disk.Setting Up Internet AccessYour modem doesn’t appear in the list of modem types in the Modem Settings window of the Internet Setup Assistant.Copy the modem script file (CCL) supplied with your modem into the Modem Scripts folder in the Extensions folder. Additional modem scripts are available in the CD Extras folder on the Mac OS CD. If you can’t find a script for your modem, contact the manufacturer of the modem to get this file. Once the file is copied into the Modem Scripts folder, your modem will appear as a choice the next time you open the Internet Setup Assistant.You have an internal modem, but the Port menu in the Modem Settings window of the Internet Setup Assistant does not include Internal Modem as a choice.m On computers with an internal comm slot, the internal modem shows in the software as if it were attached to the modem port. If your computer has an internal modem, but it does not appear as a choice, then Modem Port is the correct selection.m Some modems require special extensions to allow the computer to recognize them. Use the Extensions Manager control panel to turn on any modem extensions. You may need to reinstall the software that came with your modem if you cannot identify the requiredextension.Your modem appears in the list of modem types in the Modem Settings window, but your modem does not seem to be working.m Check to see that your modem is turned on and connected to your computer and to your phone line correctly.m You may need to contact the modem vendor to get an updated modem script. Once you get this script, copy it into the Modem Scripts folder in the Extensions folder (inside the System Folder).While you are attempting to create a new account, the line seems to have dropped or you get no response.When you create an account, the Setup Assistant places a call to an Internet registration server. Sometimes the server is busy temporarily and you can try to create the account again almost immediately.You used the Internet Setup Assistant to select your previous configuration, but now you can’t connect to the Internet.Make sure the settings in the TCP/IP control panel are correct. Or, use the Internet Setup Assistant to create a new configuration with the correct settings. Contact your Internet service provider or network administrator to find out what your settings should be.13Other ProblemsThe onscreen Mac Help has answers to thousands of questions. Open the Help menu, thenchoose Mac Help. Type some words that relate to your question, then click Search.14。
- 1、下载文档前请自行甄别文档内容的完整性,平台不提供额外的编辑、内容补充、找答案等附加服务。
- 2、"仅部分预览"的文档,不可在线预览部分如存在完整性等问题,可反馈申请退款(可完整预览的文档不适用该条件!)。
- 3、如文档侵犯您的权益,请联系客服反馈,我们会尽快为您处理(人工客服工作时间:9:00-18:30)。
三代中九卡机安装
需要视频的朋友请到下面的地址下载视频教程
:http://www.126disk.com/fileview_192130.html
必须到报装地址所在乡镇激活智能卡
:首先把天线调好方向对准卫星、把机器里的GPRS天线装到机器后面。
在不通电的状态下把手机卡(必须是移动并且已经开通GPRS功能)装到机器里面的卡槽里
用户卡也插好
AV线和天线也连接好
然后开机,出现自动搜索画面
搜到节目,但是不出影像
在出现下面的对话框,不用管它、等待。
待一会出现基站信息,按红键存储。
接着按菜单键到系统设置再按确认键(OK键)
出现密码提示框输入9 9 9 9 密码后确认
光标移到网络连接设置再按确认
网络IP设置更改成:114 251 156 067 网络端口改成04567
改好后按确认键,接着退出菜单
关掉机器,重新开机
出现下面的画面,不用动、等待
接着出现基站信息还是按红键存储
等一会会出现下面的画面,然后按确认键
出现下面的画面不用管,等待
出现发送成功画面,不用动
出现安装过程中请稍候。。。继续等待
出现画面,不用管它等待
出现安装成功
出现正常画面,安装完毕