celestron天文望远镜说明书
Celestron SkyQ Link SkyQ Link 2 使用说明书

Celestron SkyQ Link/SkyQ Link 2 but the selected pages only. paper. Summaries Below you will find previews of the content of the user manuals presented on the following pages to Celestron SkyQ Link/SkyQ Link 2. If you want to quickly view the content of pages found on the following pages of the manual, you can use them. Contact information
Link/SkyQ Link 2 user manual directly on this website is not convenient for you, there are two possible solutions: Full Screen Viewing - to easily view the user manual (without downloading it to your computer), you can use full-screen viewing mode. To start viewing the user manual Celestron SkyQ Link/SkyQ Link 2 on full screen, use the button
Explore the detailed user manual for Celestron remarkable creation, Model SkyQ Link/SkyQ Link 2. Gain valuable insights and instructions to maximize your device's capabilities and optimize your user experience. Uncover the full potential of your Celestron SkyQ Link/SkyQ Link 2 device through this comprehensive user manual, offering step-by-step
星特朗NEXSTARSLT天文望远镜使用说明书
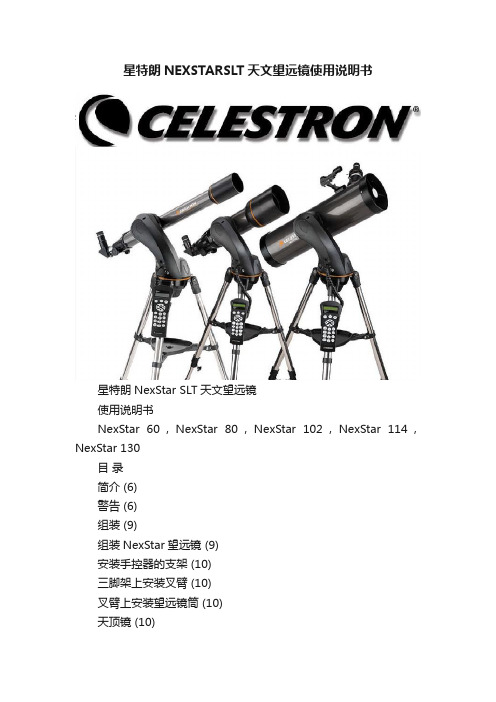
星特朗NEXSTARSLT天文望远镜使用说明书星特朗NexStar SLT天文望远镜使用说明书NexStar 60,NexStar 80,NexStar 102,NexStar 114,NexStar 130目录简介 (6)警告 (6)组装 (9)组装NexStar望远镜 (9)安装手控器的支架 (10)三脚架上安装叉臂 (10)叉臂上安装望远镜筒 (10)天顶镜 (10)目镜 (11)调焦 (12)星点寻星镜 (12)安装星点寻星镜 (12)操作星点寻星镜 (13)安装手控器 (13)NexStar供电 (14)手控器 (15)手控器介绍 (15)手控器操作 (16)校准程序 (17)星空校准 (17)两星校准 (19)一星校准 (20)太阳系校准 (20)NexStar重新校准 (21)天体分类 (22)选择天体 (22)回转指向天体 (22)寻找行星 (23)漫游模式 (23)星群漫游 (23)方向键 (24)速率键 (24)设置步骤 (25)跟踪模式 (25)跟踪速率(Tracking Rate) (25)观察时间-地点(View Time-Site) (25)用户定义目标(User Defined Objects) (25) Get RA/DEC (26)Goto R.A/Dec (26)辨认 (26)望远镜设置功能 (27)设定时间-位置 (27)消齿隙 (27)回转极限 (27)选星范围 (28)方向键 (28)实用功能(Utility Features) (28) GPS开/关 (28)出厂设置 (29)版本 (29)Get Alt-Az (29)Go Alt-Az (29)休眠(Hibernate) (29)太阳菜单 (29)滚动菜单 (30)调焦 (31)图像取向 (31)望远镜基础知识 (31)计算放大倍率 (32)测量视场 (32)一般观测提示 (32)天文观测 (33)观测月球 (33)观测行星 (33)行星观测提示 (33)观测太阳 (34)太阳观测提示 (34)观测深空天体 (34)观看条件 (34)透明度 (34)宁静度 (35)望远镜维护 (36)光学器件护理和清洁 (36)准直 (36)可选配件 (37)附录A: 技术指标 (40)附录B: 时区图 (41)附录C: 全年星图 (43)简介恭喜您购买了星特朗NexStar望远镜。
星特朗70lcm教程

星特朗70lcm教程
1、把星特朗天文望远镜的零件,散放在平面上。
便于拿取。
2、先拿起镜筒。
把支架插在镜筒上。
并拧上螺丝。
3、在支架上插上寻星镜。
夹的位置大约在寻星镜的三分之一处。
这样美观。
并扣紧夹紧螺丝。
4、把镜筒放在平面上。
把正像天顶镜插进镜筒口。
之所以不拿起来,就是怕摔坏了。
因为镜筒很重。
拧紧螺丝。
5、支起三脚架。
其接口接到镜筒底座的螺丝孔。
随便哪一个都行。
6、同样拧紧旋转钮。
7、三脚架上有一个观察平衡的小气泡。
这个平视很有用。
8、这时可以把三脚架连同镜筒拿起来,立在平面上。
再装目镜到正像天顶镜上。
现在稳当了。
9、摇动三脚架的把手,调节可视角度。
10、旋转镜筒的伸缩旋钮,调节距离。
11、组装完成。
12、在观看星空前,你要先对准寻星镜。
再把低倍目镜换成高倍目镜,重复上述程序。
如果在最高倍率目镜下观察到的像中心,同时也在寻星镜的十字线中心,您的寻星镜就
调准了。
现在可以快速寻找您想观察的天体了。
在极特殊的情况下,寻星镜可能还需要调节。
天文望远镜说明书

天文望远镜说明书天文望远镜说明书本说明书旨在帮助您了解天文望远镜的使用方法及注意事项,使您能够正确、安全地操作望远镜,获得更好的观测体验。
1. 组装指南:- 首先,将望远镜的三脚架打开并调整到合适的高度,确保稳定性。
- 将望远镜的光学管装配到三脚架的中央接口上,并通过扳手固定好。
- 将望远镜的目镜装配到光学管上,并轻轻旋转使其对准目标。
- 检查所有连接处是否牢固,确保安全使用。
2. 校准过程:- 首先,将目镜对准地平线上的一个稳定、容易辨认的目标,例如建筑物或远处的树木。
- 使用垂直调节旋钮或杠杆,将视场中心的交叉线对准所选择的目标。
- 然后,使用水平调节旋钮或杠杆,将视场中心的交叉线与所选择目标的水平线对齐。
- 再次检查校准是否准确。
3. 观测技巧:- 在选择观测目标之前,确保望远镜已校准并调整好焦距。
- 使用较低的放大倍数开始观测,以获得更广阔的视野和更清晰的图像。
- 寻找一个稳定的观测位置,远离环境干扰和光污染,并尽可能避免大气湍流。
- 当调整望远镜方向时,使用缓慢而平稳的动作,以避免影响观测。
4. 注意事项:- 在使用望远镜时,避免触摸光学镜片,因为指纹或划痕会影响观测效果。
- 当您不使用望远镜时,可以使用防尘罩或盖子保护光学部件。
- 请避免将望远镜暴露在潮湿、尘土或极端温度的环境中,以免损坏设备。
- 在观测太阳、月亮或其他明亮的天体时,务必使用适当的滤镜,以避免眼睛受伤。
本说明书仅提供了天文望远镜的基本操作和安全事项的概览。
具体的使用指导和注意事项请参阅您所购买的望远镜的用户手册。
了解和遵守所有使用规则和安全指南,将有助于您充分利用望远镜并保持安全。
天狼星102SLT便携式天文望远镜快速安装指南说明书

Extend tripod legs 6 to 8 inches by loosening the tripod leg locking knob and pulling the leg to desired length and re-tightening knob.Assemble tripod by spreading the legs out until the center leg brace is fully extended.Item #31132Quick Set-up Guide123All three legs should be the same length to provide a level platform for the telescope. A bubble level is included (inset) to assist in leveling.47Hold the telescope fork arm and place the bottom of the base inside the tripod mounting platform as shown.Place accessory tray on top of center leg brace by lining up the grooves on the tray to the post on the brace.5Once grooves are aligned, turn accessory tray until it snaps into clips on each leg brace.6Thread the coupling screw intothe hole at the bottom of the fork arm base. Tighten screw to secure the fork arm.8Slide the optical tube dovetail into the fork arm as shown above.9NexStar 102SLTYour NexStar 102SL T includes: optical tube;fork arm; pre-assembled tripod;computerized hand control; hand control holder; star diagonal; two eyepieces;finderscope; accessory tray; documentation including an owner’s manual, The Sky® CD and NSOL Telescope Control Software.Item #22096Coupling screwQuick Set-up Guide [cont]Secure optical tube to fork arm by tightening the screw located on the inside of the fork arm assembly.11T o attach the finderscope, loosen the silver screw and slide finderscope into mounting platform .12Secure finderscope to mounting platform by tightening the silver screw. The glass window of the finderscope should be facing towards the front of the telescope.13Insert the chrome barrel of the stardiagonal into the focuser and tighten the two silver screws to secure in place.14Select the low power (25mm) eyepiece and insert it as shown above. Tighten silver screw to secure.15Attach plastic hand control holder to the tripod leg.16Slide Computerized Hand Control into the hand control holder as shown above.1718Before you begin viewing, please remember to remove tube lens cap.19While observing, tube should be positioned as shown above.10Plug Computerized Hand Control into the “Hand Control”port on the fork arm.Before you can begin observing,you must setup your hand control,align your finderscope and align your telescope.Step by step instructions are included in the following Hand Control Setup section.20Before you can use your telescope, you must insert 8 AA batteries.21Place AA batteries inside the battery compartment located at the base of the fork arm.Hand Control Guide1Turn power switch (located on the side of the fork arm) to “on”position. The light will come on and the hand control will display “NexStar SLT”.2You will notice that there are directional arrows in the center of the hand control.These only move the telescope. They cannot be used to scroll through menu features.3Now you will need to align the finderscope.Turn on the red LED light by turning the knob shown above. When used for the first time, remove the clear plastic disk that is located between the battery clip and the battery. See inset.4Use the hand control direction arrow buttons to point telescope at a distant land object, like a telephone pole or at night you can use the moon. Center and focus the object in the 25mm eyepiece of the telescope.5In order to accurately center an object in the eyepiece it may be necessary to change the slew speed of the motors. To change the slew speed, press the RATE button then select a number from 1 (slowest) to 9 (fastest).Before you can begin using your NexStar 102SLT, you must setup your computerized hand control and go through the SkyAlign alignment procedure. In order for the NexStar to accurately point to the objects in the sky, it must first be aligned with known positions (stars) in the sky. With this information, the telescope can create a model of the sky, which it uses to locate any object in its database Once you have aligned your finderscope,make sure to turn off the LED light to conserve the battery. Now you are ready to align the telescope. This will have to be done at night.79Use the UP and DOWN scroll buttons (located on #6 and #9) to select“SkyAlign”then press ENTER. Now you will need to enter your site/time information.With the object centered in the eyepiece,use the azimuth (right/left) and altitude (up/down) adjustment knobs on the finderscope to place the red alignment dot directly over the centered object.10The hand control will display the last entered time and site information. Since this is your first time using the NexStar,press UNDO to enter your site and time information.1112Using the numeric key pad enter your time information. Press ENTER to continue. Press UNDO to backspace.Press ENTER to select City Database. Use the Up and Down scroll buttons (located on #6 and #9)and choose the closest city to your present location. Press ENTER after selecting the country, state and city.8When the display reads NexStar SLT,press ENTER to begin the alignment procedure.6Hand Control Guide [cont]If you have questions or problems with set-up,please contactCelestron Technical Support:310.803.595516If the finderscope has been properly aligned, the alignment star should now be visible in the field of view of the eyepiece.17The hand control will prompt you to center the bright alignment star in the center of the eyepiece. Once centered,press ALIGN. This will accept the star as your first alignment position.1819Repeat the process for the thirdalignment star. When the telescope has been aligned to the final star, the display will read “Match Confirmed”. Press UNDO to display the names of the three bright objects you aligned to, or press ENTER to accept these three objects for alignment.20Now that your telescope is properly aligned, you are ready to find your first object. Press the TOUR button on the hand control. The hand control willdisplay a list of objects that are visible for the date and location entered.For the second alignment object, choose a bright star or planet as far from the first alignment object as possible. Once again use the directional arrow buttons to center the object in the finderscope and press ENTER. Once object is centered in the eyepiece, press ALIGN.15Use the directional arrow keys on the hand control to slew (move) the telescope towards any bright celestial object in the sky. Center the object in the finderscope and press ENTER.13Now, using the Up and Down scrollbuttons (located on #6 and #9), verify the time zone you are in and press ENTER.14Using the numeric key pad enter the date. Press ENTER to continue. Press UNDO to backspace.21Press INFO to read information about the object displayed. Press the DOWN scroll key to display the next object. Press ENTER to slew (move) to the displayed object.For general usage information,please consult your user’s manual.TOURINFO。
天文望远镜使用手册演示教学

学用户手册很多天文爱好者在购买天文望远镜的时候都是很惘然,到底哪一款天文望远镜最适合自己,能否看到星星,能看清楚到什么程度,等等疑问,而且对于一些天文望远镜的型号,参数,光学系统也不了解。
在购买天文望远镜之前,让我们大家一起来了解一下。
首先来说说天文望远镜的光学系统吧。
天文望远镜有折射式天文望远镜、反射式天文望远镜和折反射式天文望远镜1以透镜作为物镜的,称为折射望远镜.使用起来比较方便,视野较大,星像明亮,但是有色差,从而降低了分辨率。
优质折射镜的物镜是两片双分离消色差物镜或3片复消色差物镜。
不过,消色差或复消色差并不能完全消除色差。
折射望远镜用透镜系统聚光。
小的时候大部分人有这样的经验,在晴天我们用放大镜点燃一片树叶或纸。
这个实验的原理就是放大镜把表面的光聚焦成一点,使这一点的温度特别高,即光度特别大。
一架折射望远镜用透镜组完成同样的事情。
在折射望远镜大的一端有两片大小相等但不同类型的镜片。
当光通过它们,它们共同工作把光聚焦在望远镜筒另一端。
在这一点,不管望远镜指向哪里都会成像。
2用反射镜作为物镜的,称为反射望远镜.反射镜天文望远镜的优点是没有色差,但是,反射镜的彗差和像散较大,使得视野边缘像质变差。
常用的反射镜有牛顿式和卡塞格林式两种。
前者光学系统简单、价格便宜,球面反射镜在后端,目镜在前端侧面;后者光学系统的主、副镜为非球面,主镜和目镜都在后面,成像质量较好,价格也较贵。
一般说来,对天文普及工作,特别是对观测经验不足的爱好者来说,牛顿式反射望远镜使用起来不太方便,其物镜又需经常镀膜,维护起来也麻烦3既包含透镜,又有反射镜的称为折反射望远镜。
折反射天文望远镜镜兼顾了折射镜天文望远镜和反射镜天文望远镜的优点:视野大、像质好、镜筒短、携带方便。
与等焦距和同等口径的折射望远镜相比,价格还不及三分之一。
折反射镜有施密特—卡塞格林式我们一般简称施卡和马克苏托夫—卡塞格林式,我们一般简称马卡。
大家看过这些是不是又会有新的疑问,比如什么是色差,什么是彗差等等问题,下面我通俗的讲一下。
Celestron MicroSpin 数字显微镜说明书

INSTRUCTION MANUAL MODEL # 441141. INTRODUCTIONThank you for purchasing the Celestron MicroSpin™ Digital Microscope. Please read this instruction manual carefully before using this product and retain it for future reference. With proper care and maintenance, your microscope will provide you years of service.The MicroSpin Digital Microscope differs from a traditional optical microscope. Instead of an eyepiece, MicroSpin’s internal camera sensor acts as a 10x eyepiece. The microscope connects to your computer via the USB 2.0 cable and the magnified image of your specimen is displayed on your monitor. The integrated objective wheel has 6 objective lenses with powers from 10x to 60x, resulting in 100x to 600x final magnification.*Y ou can capture and save still images and video to your computer using the included MicroSpin Digital Capture software.*NOTE: The final magnification you can achieve depends on the size of your monitor—the larger the monitor, the higher the magnification.Windows OS• W indows 8 (32 bit or 64 bit)/Windows 7 (32 bit or 64 bit)/Windows XP SP2, SP3 systems/Windows Vista (32 bit or 64 bit)• CD-ROM drive• CPU speed P4-1.8 GHz or above• Minimum 512 MB RAM• Minimum 8OO MB available hard disk space• Available USB 2.0 port Mac OS• M ac OS X 10.4.8-Mac OS X systems 10.10.x • C PU speed Power PC G3/G4/G5 or Intel-based • C D-ROM drive• M inimum 128 MB RAM• M inimum 800 MB available hard disk space • A vailable USB 2.0 portSPECIFICATIONSMagnification Powers100x, 200x, 300x, 400x, 500x, 600xSensor 2 MP CMOSImage File Format JPEGVideo Capturing Resolution320 x 240, 640 x 480Effective observation area Objective lens 100x = 3.6 x 2.70 mmObjective lens 200x = 1.8 x 1.40 mmObjective lens 300x = 1.2 x 0.90 mmObjective lens 400x = 0.9 x 0.70 mmObjective lens 500x = 0.7 x 0.50 mmObjective lens 600x = 0.6 x 0.45 mmOS systems supported Windows 8/7/XP/VistaMac OSX 10.4.8 and upConnection T ype USBPower5V, 140mAh (through USB cable connected to computer) Illuminators Upper and lower LEDSize8.19in. x 5.12in. x 6.02in. / 208mm x 130mm x 153mm Weight0.77 lbs / 350 gPARTS1.Shutter trigger button2. Objective wheel3. Objective lenses (6)4. Stage and lower illuminator LED5. Illuminator selector switch6. Upper iIluminator LED7. Stage clips8. Focus knob9. USB cableIN THE BOX58967MicroSpin DigitalMicroscope (1)(3) B lank specimen slides(1) MicroSpin Digital Capture software(3) B lank specimen slide cover slips (1) Tweezers(1) Eye dropper (1) Q uick Set-up Guide(1) P repared slide with cotton swatchCONNECTING THE DEVICE• C onnect the device to the computer by plugging the USB 2.0 cable into an open USB port on your PC.STARTING THE DIGITAL CAPTURE SOFTWAREWindows OSLaunch the MicroSpin Digital Capture software by double clicking the desktop icon from the desktop, or from the start menu {Start > All Programs > MicroSpin Digital Capture > MicroSpin Digital Capture}.Mac OS1. I nsert the supplied MicroSpin Digital Capture CD to the computer’s CD-ROM drive.2. D ouble click the “MicroSpin Digital Capture.dmg” icon within the CD.3. D rag the MicroSpin Digital Capture Viewer icon into the Mac OSLaunch the MicroSpin Digital Capture software by double clicking the icon in the Applications menu.Windows OS1. I nsert the supplied MicroSpin Digital Capture CD to the computer’s CD-ROM drive.2. D ouble click the “MicroSpin Digital Capture.exe” icon within the CD.3. F ollow the MicroSpin Digital Capture software wizard to 2. GETTING STARTEDSOFTWARE INSTALLATIONMicroSpin Digital CaptureMicroSpin Digital CaptureSELECTING A LIGHT SOURCE• T his digital microscope contains an upper (6) and lower (4) LED illuminator. Once connected to your computer, one of the lights will turn on. Press the illuminator selector switch (5) to toggle between the illuminators.SYSTEM SETTINGS MENUThe first time the MicroSpin Digital Capture software is started, the default settings will be loaded, and you may change these settings manually in the system settings menu.Device - Choose your video streaming device (in this case the MicroSpin Digital Microscope).Resolution - Change the capture resolution settings here. Timed shot setup - Setup automatic image capture here.Movie setup - Choose your video resolution here (640x480 or 320x240).Save setting - Choose the destination folder on your computer where all images and video will be nguage setting - The language of the MicroSpin Digital Capture software can be changed using this setting.Advanced settings - C licking the “More…” button on the right of the system settings menu will allow you to manually adjust all ofthe image settings.These may include:- Brightness - Contrast - Hue - Saturation - SharpnessNOTE: These settings available may vary depending on your operating system.Saved files - W ith the MicroSpin Digital Capture software open, you can locate the saved files folder by clicking the “More… “ buttonlocated on the left of the main window.Full screen - T o activate full screen mode, click the full screen button located in the bottom right hand comer of the MicroSpin DigitalCapture software window. - T o exit full screen mode, either double click on the screen, or press the “Esc” button on the keyboard.Video Record/StopInformationPower offSettings iconShutter trigger Timer 3. USING THE DIGITAL CAPTURE SOFTWAREMAIN WINDOW ICONS- Gamma - White Balance - Backlight comp- GainCARE AND MAINTENANCE• Keep the device dry and protect it from water or vapor.• Do not leave your device in a place with an extreme high or low temperature.• Do not touch the device with wet hands. Doing so may damage the device or cause an electric shock to the user.• Do not use or store the device in dusty, dirty areas as its moving parts may be damaged.• D o not use harsh chemicals, cleaning solvents or strong detergents to clean the device. Instead, wipe it with a soft cloth slightly dampened in a mild soap-and-water solution.WARNING• Do not look into the digital microscope’s illuminators. Doing so may cause permanent eye damage.• Do not attempt to open or dismantle the digital microscope.LEGAL INFORMATIONThis document is published without any warranty. While the information provided is believed to be accurate, it may include errors or inaccuracies. In no event shall the manufacturer or its distributors be liable for incidental or consequential damages of any nature, including but not limited to loss of profits or commercial loss, arising out of the use of the information in this document. Intel is a trademark of Intel Corp. In the U.S. and other countries. Mac, Mac OS and OS X are trademarks of Apple Inc., registered In the U.S. and other countries.WARRANTYY our MicroSpin Digital Microscope has a two year limited warranty. Please visit the Celestron website for detailedinformation on all Celestron microscopes:© 2015 Celestron • All rights reserved. • 2835 Columbia Street • Torrance, CA 90503 U.S.A.Telephone: 1(800) 421-9649 • Printed in China 2013FCC Note: This equipment has been tested and found to comply with the limits for a Class B digital device, pursuant to part 15 of the FCC Rules. These limits are designed to provide reasonable protection againstharmful interference in a residential installation. This equipment generates, uses, and can radiate radio frequency energy and, if not installed and used in accordance with the instructions, may cause harmfulinterference to radio communications. However, there is no guarantee that interference will not occur in a particular installation. If this equipment does cause harmful interference to radio or television reception,which can be determined by turning the equipment off and on, the user is encouraged to try to correct the interference by one or more of the following measures:+ Reorient or relocate the receiving antenna.+ Increase the separation between the equipment and receiver.+C onnect the equipment into an outlet on a circuit different from that to which the receiver is connected.+ Consult the dealer or an experienced radio/TV technician for help.This product is designed and intended for use by those 14 years of age and older. Product design and specifications are subject to change without prior notification.。
星特朗3.5寸液晶触摸屏数码显微镜说明书(中文)
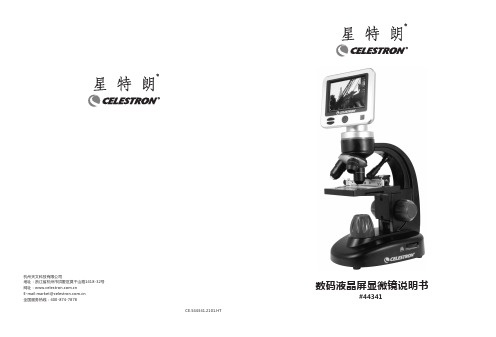
杭州天文科技有限公司地址:浙江省杭州市拱墅区莫干山路1418-32号网址:E-mail:********************.cn全国服务热线:400-874-7878数码液晶屏显微镜说明书#44341杭州天文科技有限公司地址:浙江省杭州市拱墅区莫干山路1418-32号网址:E-mail:********************.cn全国服务热线:400-874-7878数码液晶屏显微镜说明书#44341感谢您购买星特朗3.5寸液晶触摸屏数码显微镜。
这款数码显微镜使用了500万像素的感光芯片和3.5寸彩色液晶显示屏。
此显微镜属于精密光学仪器,使用高级材料精心制造,确保长期可靠的使用,只需要很少的维护就可以长久而愉快的使用。
在使用本款显微镜之前,请仔细阅读本说明书,熟悉产品的功能和操作,以便让您更顺心和更方便地使用本产品。
本手册中所涉及的各部件请参见显微镜图示。
本款显微镜支持40倍至400倍(数码变焦可高达1600倍)的高放大率。
非常适合霉菌、酵母菌、微生物、动植物组织、纤维以及细菌等标本载片的观察。
通过LCD显示屏,你可以轻松观测目标,也可以多人同时观测。
你还可以用内置的数码相机拍摄图片或视频。
12345678915图114131211101AV OUT 视频输出9上照明亮度调节钮2SD卡槽10下照明3MINI USB接口11机械载物台4支撑臂12物镜5上照明13物镜转换器6载物台控制钮14控制面板7调焦旋钮15LCD显示屏8基座内置500万像素数码相机内置6孔位滤镜轮3.5寸彩色LCD 液晶显示屏标配电源适配器4倍物镜标配USB 线10倍物镜附送5个成品切片40倍物镜防尘罩亮度可调上/下照明光源便携箱1G SD 卡物镜4x 10x 40x 数码成像—标准模式40x 100x 400x 最大4倍数码变焦160x400x1600x载物台机械式载物台3.5” x 3.5” (88 mm x 88 mm)数码相机500万像素CMOS,10倍放大率(代替目镜)液晶显示器 3.5" 4倍数码变焦—高清数码TFT 显示屏,分辨率--320 x 240像素调焦器单速调焦存储器SD 卡插槽,最大支持32G SD 卡。
- 1、下载文档前请自行甄别文档内容的完整性,平台不提供额外的编辑、内容补充、找答案等附加服务。
- 2、"仅部分预览"的文档,不可在线预览部分如存在完整性等问题,可反馈申请退款(可完整预览的文档不适用该条件!)。
- 3、如文档侵犯您的权益,请联系客服反馈,我们会尽快为您处理(人工客服工作时间:9:00-18:30)。
celestron天文望远镜说明书
Celestron天文望远镜说明书
Celestron是美国一个著名的天文望远镜品牌,其产品经久耐用,适用于天文爱好者和业余天文学家。
一款好的天文望远镜不仅需要良好的性能和质量,在使用过程中也需要注意一些细节。
因此,以下是Celestron天文望远镜说明书。
一、初步设置
在使用天文望远镜前,需要进行一些初步设置。
首先,需要使用望远镜三脚架的水平仪,确保望远镜在水平状态下。
然后,将望远镜固定到三脚架上。
接下来,需要调整望远镜的高度和方向,以便清楚地观察目标。
最后,需要调整望远镜镜片焦距。
二、使用前的准备工作
在使用天文望远镜前,需要进行一些准备工作。
首先,需要查找天文台和观测站的位置,并了解所要观测的目标。
其次,需要准确地设置经度和纬度,并根据当地时间来调整观测仪器。
最后,需要准备好一支高质量的望远镜镜头,用于观察目标。
三、如何使用望远镜
在使用望远镜时,需要注意以下几点。
首先,需要轻轻转动调焦,使
得镜头对准目标。
其次,需要调整望远镜的视野,以便观察到目标。
最后,需要使用望远镜的放大倍数,将目标放大到合适的大小。
四、如何维护望远镜
在使用完天文望远镜后,需要进行维护和保养。
首先,需要将望远镜
存放在防潮和避光的地方,不要让望远镜受到阳光、潮气和灰尘的侵袭。
其次,需要使用柔软的布擦拭望远镜的各个部分,保持镜头清洁。
最后,需要定期检查望远镜的各个部分,以确保望远镜的正常运行。
五、注意事项
在使用天文望远镜时,需要注意以下事项。
首先,需要在不干扰观察
的前提下,避免使用手机和电脑等电子设备。
其次,需要避免在灯火
通明的地方观测天空,以免产生光污染。
最后,需要尊重他人的隐私,不要将天文望远镜指向他人的住宅等私人空间。
以上是Celestron天文望远镜说明书。
使用天文望远镜需要一定的技
巧和经验,在使用前需要做好充分的准备工作。
希望这份说明书可以帮助您更好地使用天文望远镜,享受星空观测的乐趣。