TPM-train-standard-外出完整版 (格式版)2 [兼容模式]
ECE-R10-R3
CONTENTS
REGULATION
Page
1. Scope ..................................................................................................................................5
Annex 10: Method(s) of testing for immunity to and emission of transients of electrical/electronic sub-assemblies
E/ECE/324 E/ECE/TRANS/505 Regulation No. 10 page 5
12. Transitional provisions ......................................................................................................22
13. Names and addresses of Technical Services conducting approval tests, and of Administrative Departments ..............................................................................................22
E/ECE/324 E/ECE/TRANS/505 Regulation No. 10 page 4
} Add.9/Rev.3
ANNEXES
Annex 1: Examples of approval marks
4 Tune
Entrance Lens, AMU gain, offset Mass axis gain, offset offse t 分析器电压
HP5973 70 eV electrons @ 300 uA emission 0 - 42.7 volts Ground potential 0 - 242.0 volts 0 - 128 mV/amu 0 - 127.5 volts 0 - 4095 0 - 255 HED 0 - 3000 volts 2047 499 影响 电子束能量 产生电子数量 将离子推出离子源 穿过小孔进入透镜 相对丰度 相对丰度 相对丰度 峰宽 峰宽 提高 EMV 灵敏度的特殊装置 灵敏度 质量分配 质量分配
Slide #3
Author:Tianyou Yue
离子源结构
离子源结构与离子轨道
FILAMENT DRAWOUT LENS INSULATOR
REPELLER ION FOCUS
ENTRANCE LENS
15
Slide #4
Author:Tianyou Yue
离子源结构
• 电离室 • 透镜
Slide #5
调谐标样PFTBA
全氟三丁胺(PFTBA)
S c a n : 1 0 . 0 0 6 5 0 . 0 0 S a m p l e s : 1 6 T h r e s h : 5 0 0 1 1 7 p e a k s B a s e : 6 9 . 0 0 A b u n d a n c e : 1 9 7 4 7 8 4
Element Filament Repeller DrawOut Ion Focus Entrance Lens Entrance Lens Offset AMU Gain AMU Offset X-Ray Electron Multiplier Mass Axis Gain Mass Axis Offset
250TGp_global_dark

LOGOPowerPoint TemplateContents1Click to add Title2Click to add Title3Click to add Title4Click to add TitleHot Tip•How do I incorporate my logo to aslide that will apply to all the otherslides?–On the [View]menu, point to [Master],and thenclick [Slide Master]or [Notes Master].Changeimages to the one you like, then it will apply to allthe other slides.[Image information in product]●Image –CD : Digital globe (ImageState)●Note to customers: This image has been licensed to be used within this PowerPoint template only.You may not extract the image for any other use.DiagramThemeGallery is a Design Digital Content & Contents mall developed by Guild Design Inc.TitleAdd your textThemeGalleryis a Design DigitalContent & Contentsmall developed byGuild Design Inc.Cycle DiagramAdd Your TextTextTextCycle nameTextTextTitle ThemeGallery is a Design Digital Content & Contents mall developed by Guild Design Inc.Title ThemeGallery is a Design Digital Content & Contents mall developed by Guild Design Inc.Title ThemeGallery is a Design Digital Content & Contents mall developed by Guild Design Inc.Add Your TextAdd Your TextAdd Your TextAdd Your TextAdd your textAdd your text Add your text Add your text Add your textYour Slogan hereTitle Add your textTitle Add your textTitleAdd your text TitleAdd your textDiagramConceptAdd Your TextText Text TextTextText TextAdd Your TextAdd Your TextAdd Your TextAdd Your TextAdd Your TextAdd Your TextAdd Your TextAdd Your TextAdd Your TextAdd Your Title Add Your TextAdd Your TextDiagram –PowerPoint2002Text Text Text Add Your Text Add Your Text Add Your TextAdd Your TitleTextTextTextTextTitle Add Your TextAdd Your Text Add Your TextAdd Your TextAdd Your Text Add Your Text1 ThemeGallery is a Design Digital Content & Contents mall developed by Guild Design Inc.3ThemeGallery is aDesign DigitalContent & Contentsmall developed byGuild Design Inc.2ThemeGallery is aDesign DigitalContent & Contentsmall developed byGuild Design Inc.2001200220032004Progress DiagramPhase 1Phase 2Phase 33-D Pie ChartText1Text2Text3Text4 Text5Text6LOGO。
Mintab-excel版_MSA_GR&R
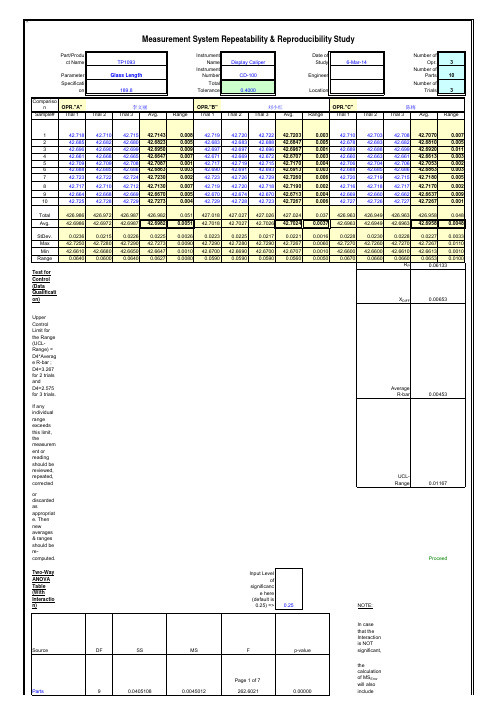
Specification189.8Total Tolerance0.4000LocationNumber of Trials3Measurement System Analysis : By Xbar/R method1) base on parts ToleranceRepeatability2) %Contribution & %Process RepeatabilityEV=0.002678293SourceStDev.% Contribution%ToleranceRepeatability - Equipment Variation (EV)Variance Total Gauge R&R0.0043140.02588621.82% 6.47%(Machine, etc.)EV ^2=0.000007173Repeatability0.0026780.01607013.55% 4.02%MachineReproducibility0.0033820.02029517.11% 5.07%ReproducibilityPart-to-Part 0.0192950.11577397.59%28.94%ReproducibilityXDIFF*K20.00341759Total Variation0.0197720.118632100.00%29.66%For Xbar/R method, there is no interaction.VarianceReproducibility - Appraiser Variation (AV);AV^2=0.000011443) Number of Distinct Categories =6AV=0.003382424OperatorsRepeatability and Reproducibility Explanation of Total Variation(G R&R.) 0.004314400% of Total Measurement Error due to;% of Total Variation % of Spec Repeatability Machine 38.54%0.00%Parts Variation(PV)ReproducibilityOperators 61.46%0.00%PV=0.019295467Total 100.00%0.00%Total Variation (TV)Explanation of Repeatability Repeatability StDev.% of Spec (Gauge S.D. * 6)0.025886Machine Repeat on Operators 李文丽0.0030120.00%TV=0.0197719265Machine Repeat on Operators 刘小红0.0021850.00%MachineRepeat on Operators陈梅0.0028350.00%Average0.0026780.00%Summary (by Xbar/R)Criteria- P/T Ratio or %Tolerance= 6.47%AcceptableAcc. <10%10%< Conditional Acc. <30%- %Contribution of Total Gage R&R =21.82%Condition Acceptable Acc. <10%10%< Conditional Acc. <30%- Number of Distinct Categories (NDC)=6AcceptableAcc. >44> Conditional Acc. >2StudyVar(6*SD).Machine39%Operators 61%% of Total VariationSpecification189.8Total Tolerance0.4000LocationNumber of Trials3Measurement System Analysis : By ANOVA methodFor an adequate measurement system, at least 50% of averages should fall outside control limits.Charts Analysis:1. R Chart by Opr This chart illustrates the "Repeatability" of each operator. If there are too many points out of control, it might be implied as inadequate gage repeatability.2. Xbar Chart by Opr For this chart, the variation between parts is expected.And all operators should obtain similar values for each part.This chart is also used to determine if enough part-to-part variation has beenobserved to estimate Part Variation (SigmaParts & VarianceParts).If too few of the averages fall outside the control limits, maybe the selectedparts here are too similar. It is recommended to rerun analysis with different,more heterogeneous, parts.3. By PartNo.To use this chart in conjunction with chart #2. 4. By OprThis chart illustrates the "Reproducibility" of the operators. 5. Opr*PartNo. Interaction A significant Interaction means that operators tend to have difficulty to have similar measurements from identical parts42.6242.6442.6642.6842.742.7242.74A1A2A3A4A5A6A7A8A9A10B1B2B3B4B5B6B7B8B9B10C1C2C3C4C5C6C7C8C9C10Xbar Chart by OPR.Xbar Chart :For an adequate measurement system, at least 50% of averages should fall outside control limits.AB C0.0020.0040.0060.0080.010.0120.014A1A2A3A4A5A6A7A8A9A10B1B2B3B4B5B6B7B8B9B10C1C2C3C4C5C6C7C8C9C10R Chart by OPR.AB C42.6342.6442.6542.6642.6742.6842.6942.742.7142.7242.7342.7412345678910Response By PartNo.42.6242.6442.6642.6842.742.7242.74OprAOprBOprCResponse By Opr.42.6242.6442.6642.6842.742.7242.7412345678910Opr *PartNo. InteractionOprAOprBOprC4.06% 1.43%2.62%95.94%20.14%11.96%16.20%97.95%7%4%6%33%0%10%20%30%40%50%60%70%80%90%100%Total Gage R&R Repeatability Reproducibility Part-To-Part Components of variation %Contribution %Study Var %Tolerance。
Programme
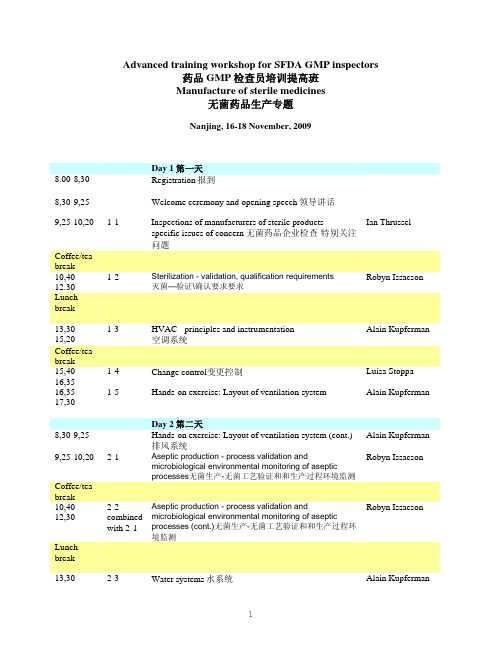
Advanced training workshop for SFDA GMP inspectors药品GMP检查员培训提高班Manufacture of sterile medicines无菌药品生产专题Nanjing, 16-18 November, 2009Day 1第一天8.00-8,30 Registration报到8,30-9,25 Welcome ceremony and opening speech领导讲话9,25-10,20 1-1 Inspections of manufacturers of sterile products -specific issues of concern无菌药品企业检查-特别关注问题Ian ThrusselCoffee/teabreak10,40-12.30 1-2 Sterilization - validation, qualification requirements灭菌—验证\确认要求要求Robyn IssacsonLunch break13,30-15,20 1-3 HVAC - principles and instrumentation空调系统-Alain KupfermanCoffee/teabreak15,40-16,351-4 Change control变更控制Luisa Stoppa 16,35-17,301-5 Hands-on exercise: Layout of ventilation system Alain KupfermanDay 2第二天8,30-9,25 Hands-on exercise: Layout of ventilation system (cont.)排风系统Alain Kupferman9,25-10,20 2-1 Aseptic production - process validation andmicrobiological environmental monitoring of asepticprocesses无菌生产-无菌工艺验证和和生产过程环境监测Robyn IssacsonCoffee/teabreak10,40-12,30 2-2combinedwith 2-1Aseptic production - process validation andmicrobiological environmental monitoring of asepticprocesses (cont.)无菌生产-无菌工艺验证和和生产过程环境监测Robyn IssacsonLunchbreak13,30-2-3 Water systems水系统Alain Kupferman15,20Coffee/teabreak15,40-16,352-4 Injectables - technology utilised in sterile production Alain Kupferman16,35-17,30 2-5a2-5b2-5c2-5dHands-on exercise: Media fill test protocol preparation无菌培养基灌装试验方案准备Luisa Stoppa Day 3第三天8,30-9,25 Hands-on exercise: Media fill test protocol preparation(cont.)无菌培养基灌装试验方案准备Luisa Stoppa9,25-10,20 3-1 Most frequent GMP deficiencies observed in sterileproduction facilities无菌生产厂房检查常见缺陷Ian ThrusselCoffee/teabreak10,40-12,303-2 Microbiological quality control tests微生物检验Robyn Issacson Lunchbreak13,30-15,203-3 Risk management风险评估Ian Thrussel Coffee/teabreak15,40-16,35Panel discussion 讨论All16,35-17,00Closing ceremony闭幕式3 个专题尚未收到。
KHS

PrintRoom 2000
Future
The path to your
KHS EMPLOYMENT
Make the ink profile according to the image Plate mounting
Inker
Keep min. dampening
Ink key preset Ink feed preset
PrintRoom 2000
Future
The path to your
1
PrintRoom 2000
Future
The path to your
Intelligent Pre-Inking System
KOMORI SYSTEM
2
PrintRoom 2000
Future
The path to your
khs printroom2000 yourfuture printroom 2000 yourfuture printroom2000 yourfuture printroom 2000 yourfuture komorisystem intelligent pre-inking system printroom 2000 yourfuture printroom 2000 yourfuture presentationplan khsconcept (target) testuser's report khsprinting procedure installingconditions printroom 2000 yourfuture printroom 2000 yourfuture developmentkhs pqc amr apc remotecontrol inkkeys remotecontrol plateregistration papersize preset automaticplate changer pdc- pdc-s densitycontrol spectralcolor matching control printroom 2000 yourfuture printroom 2000 yourfuture pressroom standardizeprinting procedure digitalizeprint quality control reducewaste sheets improveprinting time ratio printroom 2000 yourfuture printroom 2000 yourfuture khsconcept target standardize(digitalize) color matching operation wastesheet used colormatching reducespare sheets from 200-300 sheets 50sheets obtainstandard density just20 30sheets densityvariation within 0.15d firstsheet 300sheets) printroom 2000 yourfuture printroom 2
CANape_Training
© 2007. HiRain Technologies. All rights reserved. Slide: 23
配置图形窗口(Graphic Window)
增加一个图形窗口 Display| Measurement Windows| Graphic window CANape程序窗口的空白处单击鼠标右键,在弹出菜单中选择对应项
增加一个数值窗口 Display| Measurement Windows| Digital window CANape程序窗口的空白处单击鼠标右键,在弹出菜单中选择对应项
添加关联信号 窗口中右键单击,在弹出菜单中选择Insert measurement signal 命令 F8快捷键
日程
CANape介绍 > CANape Project
创建和配置CCP设备 测量ECU内部参数 ECU标定 标定参数管理 Model Based Development Diagnostics Flash Programming
© 2007. HiRain Technologies. All rights reserved. Slide: 9
CANalyzer
CANoe
Distributed CAN Network System
Network Node 1 e.g. ABS ECU
Network Node 2 e.g. ESP ECU
CAN / LIN / FlexRay Bus
CAN / LIN / FlexRay Network
Network Node 3 e.g. Engine ECU
CANape使用Device来定义被测量、标定或诊断的设备 Device类型
checklist
BASIC TRAININGPrerequisitesMake sure you have the jobs.zip; sys.zip and lib.zip files on each stations used during the Basic Training. Unzip these files in order to set up all stations for the training.DA Y ONEWelcome❑Agenda❑TourDo not forget to show the rest room; kitchen and response center location. [Genesis installation] for system administrators only and not regular operators ❑Installation of software, manuals, KIT❑LicensesIntroduction❑[Explain the Gerber language]❑ODB++Genesis structure❑$GENESI S_DIR/share (license; users; etc…)❑$GENESIS_DIR/sys (hooks; scripts; etc…)❑$GENESIS_DIR/E xx(all; misc; gnd; etc…)❑$GENESIS_DIR/logsGenesis database❑$GENESIS_DIR/share/joblist❑$GENESIS_DIR/sys/dblist❑$GENESIS_DIR/fw❑Engineering ToolkitThe File Menu❑File / Create…❑File / Copy…❑File / Duplicate❑File / Delete…❑File / Save❑File / Export Job…❑File / Import Job…❑File / Close Job❑File / Locks / Check Out❑File / Locks / Check In❑File / Locks / Locks Status❑File / Version❑File / QuitThe Actions Menu❑Actions / Select / Select All❑Actions / Select / Unselect All❑Actions / Open❑Actions / Update window❑Actions / Entity attributes❑Actions / Message❑Actions / View Log…The Options Menu❑Options / Users…❑Options / Groups…❑Options / Configuration…♦Edt_max_undo♦Edt_resize_oct_corners♦Edt_resize_rect_rc♦Get_inp_exclude♦Gns_editor_icon♦Gns_editor_text♦Gui_color_no_mix♦Iol_274x_ill_polygon♦Iol_min_f_comp❑Options / Licenses / Usage…❑Options / Licenses / Installed…❑Clean unused symbolsThe Window Menu❑Main Clipboard❑Input❑OutputDATA Input❑Open the Input Screen and select the Gerber job: </jobs/day1_1> Explain All Input Screen ParametersIDENTIFYM3 on the file name❑View Graphic (explain zoom & pan options)❑View ASCII❑Text Editor❑Parameters❑Select All / Clear / FilterOpen the Wheel template Editor❑File / Create❑File / Open❑Params / Global❑Edit / Add Record❑Field type (Dcode; Int; Float; Fixed_Str)❑Tag/No-Tag❑Actions / Translate Wheel❑Edit / Delete Record❑File / Save (Save As…)❑File / CloseTRANSLATECopy / Move / Report…❑Open the Input Screen and select the Gerber job: </jobs/day1_2> IDENTIFYOpen the Wheel template EditorTRANSLATE❑Open the Input Screen and select the Gerber job: </jobs/day1_3> IDENTIFYThe lyr_rule hookOpen the Wheel template EditorTRANSLATE❑Open the Input Screen and select the RS274X job: </jobs/day1_4> IDENTIFYOpen the Wheel template Editor❑Open the Input Screen and select the RS274X job: </jobs/day1_5> IDENTIFYOpen the Wheel template Editor❑Open the Input Screen and select the RS274X job: </jobs/day1_6> IDENTIFYOpen the Wheel template EditorEXERCISE1.Simulate an ODB++ file transfer to/from customer∙Select a JOB∙Make an export file.∙Clean the job from the database.∙Import the job back on Genesis.DA Y TWOPractice❑Open the Input Screen and select the Gerber job: </jobs/day2_1> IDENTIFYOpen the Wheel template EditorTRANSLATEMATRIX (open from the Input screen)❑Set layer name, layer type, layer context and layer polarity❑Edit / Delete, Move, Copy, Insert, Duplicate❑Edit / Add / Add row and column❑Actions / Refresh❑Actions / Entity attributes❑Options / Layer attributesBasic Graphic Functions❑Layer Display and Activation❑Work Layer / Snap Layer / Affect Layer❑M3 on Layer / Display Colors❑Options / ColorsICONS❑Pan Up/Down/Left/Right/Automatic❑Zoom In/Out/Home/Back/Factor❑Control popup❑Snap/Grid/Origin❑Zoom Area / Popview / Measure / Highlight❑Add / Delete / Move / Copy features❑Change Line Angle / Stretch Line / Rotate feature / Mirror feature❑Invert feature / Break Line❑Pull Line / Move Junction / Move tripletSELECTION❑Feature selection icon❑Rectangle selection❑Polygon selection❑Select By Net❑Feature Selection Filter❑Options / Selection❑Actions / Clear Select & Highlight❑Actions / Reverse Selection❑[Actions / Reference Selection]❑M3 in graphic windowEXERCISE1.Create a SymbolPractice❑Open the Input Screen and select the Gerber job: </jobs/day2_2> IDENTIFYOpen the Wheel template EditorTRANSLATEThe Edit MenuUndoDeleteMove❑Same layer❑Other layer❑Move tripletsCopy❑Same layer❑Other layer❑[step and repeat]Resize❑Global❑Thermals & Donuts❑By FactorTransform…Buffer❑Copy❑Paste❑View…Reshape❑Change Symbol❑Break❑Arc to Lines❑Design to Rout❑Line to Pad❑Pad to LinePolarity❑Positive❑Negative❑InvertCreate❑Symbol❑ProfileChange❑Change Text❑Pads to Slots❑Space Tracks EvenlyAttributes❑Change❑DeleteDA Y THREEPracticeOperator task:❑Input the Gerber job: </jobs/day3_1>IDENTIFYOpen the Wheel template Editor∙DO NOT USE THE WHEEL TEMPLATE DAY1_1! The EOF is dofferent.∙Define the Matrix using customer naming convention∙Copy the step with name Original∙Play with the selection options∙Copy / Move and delete elementsSurfacesThe Edit / Reshape menu❑Contourize❑Drawn to Surfaces❑Fill❑Clean Holes❑Clean Surfaces❑Break to Island and Holes❑Contour to Pad❑Replace Surface(s)The Edit / Resize menu❑Surfaces❑Contourize & ResizeThe Surface Editor Icon❑Add – Remove & Move vertex❑Toggle straight and curve lines❑Move & Delete hole❑Display surface infoLayer Operations❑Display❑Features histogram❑Copy❑Merge❑Unmerge❑Optimise Level❑Fill Profile❑Register: Layer registration (incl. auto register)❑Matrix❑Copper / Exposed area❑Clip area❑Re-read❑Truncate❑CompareDrill Layers Operations❑Hole sizes❑Drill Tools Manager❑Drill Map CreationEXERCISE1.Operator must perform the following working flow:∙Input job </jobs/day3>∙Save∙Matrix (name layers using their own naming convention)∙Registration∙Copy Step to Original∙Profile + Clip∙Drill Tool Manager∙Contourize the drawn areas∙Change the square holes on first inner layer to round using the following commands: 1-Drawn to surface 2-Separate to island and holes 3-Contour to pad on holes layer 4-Change symbol 6-Contourize the holes layer 7-Replace surface(s)∙Save∙Create the 2pad and the cross symbol used for filling.∙Perform the manual copper balancing on one of the inner signal layers using the following commands: 1-create new layer 2–fill profile with a square symbol 3-Resizeoriginal layer by +40mils 4-Ref selection on filled layer 5-delete selected features 6-copy the original layer into the filled layer using the resize by –40mils.DA Y FOURPracticeOperator task:∙Input the Gerber job </jobs/day4_1>∙Define the Matrix using customer naming convention∙Copy the step with name Original∙Drill Tool Manager∙Play with the layer options such as copy, m erge etc…∙Copy / Move and delete elementsERF principlesExplain the principle of erf files using the legend detection to start with. A more advanced explanation will be given using the signal.erf file.Clean UpLegend Detection❑Explain & Run the Action Screen❑Edit the result (show the results viewer & results histogram)❑Show how to manually set the .nomenclature attributeConstruct Pads Auto❑Explain & Run the Action Screen❑Edit the result (show the results viewer & results histogram)❑Substitute drawn padsConstruct Pads Auto - All Angles❑Explain & Run the Action Screen❑Edit the result (show the results viewer & results histogram)❑Substitute drawn padsConstruct Pads Ref.❑Explain & Run the Action ScreenSet SMD Attribute❑Explain & Run the Action Screen❑Edit the result (show the results viewer & results histogram)❑Show how to manually set the .smd attributeAnalysisSignal Layer check❑Edit the signal.erf file (explain link between the file and the action screen)❑Explain & Run the Action Screen❑Edit the result (show the results viewer & results histogram)Drill check❑Explain & Run the Action Screen❑Edit the result (show the results viewer & results histogram)Power/Ground check❑Explain & Run the Action Screen❑Edit the result (show the results viewer & results histogram)Solder Mask check❑Explain & Run the Action Screen❑Edit the result (show the results viewer & results histogram) Silk Screen check❑Explain & Run the Action Screen❑Edit the result (show the results viewer & results histogram) DFMRedundant Line removal❑Explain & Run the Action Screen❑Edit the result (show the results viewer & results histogram) NFP removal❑Explain & Run the Action Screen❑Edit the result (show the results viewer & results histogram) Pad snapping❑Explain & Run the Action Screen❑Edit the result (show the results viewer & results histogram) Pinhole Elimination❑Explain & Run the Action Screen❑Edit the result (show the results viewer & results histogram) Sliver & Acute angles❑Explain & Run the Action Screen❑Edit the result (show the results viewer & results histogram) Sliver & Peelable repair❑Explain & Run the Action Screen❑Edit the result (show the results viewer & results histogram) Legend Sliver Fill❑Explain & Run the Action Screen❑Edit the result (show the results viewer & results histogram) Etch Compensation❑Explain & Run the Action Screen❑Edit the result (show the results viewer & results histogram) Advanced Teardrops creation❑Explain & Run the Action Screen❑Edit the result (show the results viewer & results histogram) ChecklistCreate new checklistRename ChecklistCopy checklist to libraryOpen a new job and copy checklist from libraryOpen copied checklistDA Y FIVEPracticeOperator task:∙Input the Gerber job </jobs/day5_1>∙Define the Matrix using customer naming convention∙Copy the step with name Original∙Drill Tool Manager∙Create a checklist called cleanup that performs the following actions: -Legend Detection–Construct Pads Auto–Set Smd Attributes∙Create a checklist called analysis that performs the following actions: -Signal Layer check –Drill check–Power & Ground check –Solder Mask check –Silk Screencheck.∙Create a checklist called dfm that performs the following actions: -Redundant Line removal –NFP removal–Pad snapping –Sliver & Acute angles –Teardropscreation.Step OperationsProfile❑Rectangle / Polygon & Step limitsDatum pointPanelization❑Panel Size❑Active Area❑Step & Repeat / Table …❑Step & Repeat / Automatic …❑S & R Edit …❑Pattern FillDynamic Text❑Rectangle / Polygon & Step limitsSub-Panel OptimisationData OutputOutput ScreenData FormatsOutput Layers❑Gerber output❑Drill outputRevision TestFeedback。