智能调光开关使用说明书
全智能强光手电使用说明
全智能强光手电使用说明1-7档自定义电路通过对开关的操作即可自由删档,恢复档位,自定义档位亮度!1>.发货时的默认档位排列为:微1%--低7%--中35%--高100%--警闪100%—信标100%--爆闪100%2>.记忆/换档:任意档开机超过1秒后记忆当前档位,下次开机档位不变,如要换档,需要连续半按(轻触)开关2次!开机后1秒内,再半按(轻触)一次开关也能换档.3>.自定义各档亮度(无极调光):(A).任意档开机1秒后会轻微闪烁1次,见到此闪烁时立即快速半按开关3次(即连续断电3次),当前档位就进入无极调光模式(注意>使用模式下:闪烁档开机后1秒内处于熄灭状态,当此档开始闪烁时正好就是1秒的参考点,所以闪烁档在开机1秒后开始闪烁时就立即快速轻按3次开关,即可进入无极模式):a>.此时手电亮度从当前亮度开始由低到高变化,每0.5秒增加一次电流比例,当电流比例低于20%时每次加1%(1-20%需要10秒完成),比例达到20%后每次加5%(21-100%需要8秒完成).b>.比例到达100%时手电会微闪一下,并保持100%高亮状态2秒.c.随后比例降低为0并保持2秒,此时手电处于熄灭状态.d.随后程序自动跳转到(a)由低到高变化,如此循环.(B).在无极调光模式中,任意时刻断电都将保存当前比例或状态并退回到常规使用模式.4>.删档:在无极调光模式中,当比例降低为0后,此时手电有2秒的熄灭状态,在此期间断电,此档位将被删除,使用模式中不再出现(除非对手电进行复位操作,误删所有档位后手电自动复位.)5>.复位:任意档开机1秒后会轻微闪烁1次,见到此闪烁时立即快速轻按开关5次(即连续断电5次),手电立即恢复被删除档和各档默认比例,并处于低档工作状态.(操作方式和无极调光相同,只是多操作2次开关而已)技术咨询,老郭q。
q 2583388488。
70100003 无线彩光调光开关说明书

ZigBee Wireless CCT Remote70100003Function introductionImportant: Read All Instructions Prior to Installation Front sideBack sideClick to turn off the paired lighting devicesPress and hold down to search and pair to ZigBee network CCT color button, press and hold down to adjust color temperatureNote: This switch supports 1 group for binding max. 30 lighting devices.• This device contains a button lithium battery that shall be stored and disposed properly.• DO NOT expose the device to moisture.Safety & WarningsProtocol Operation VoltageTransmission Frequency Transmission Range (free field)Protection Type Dimming Range DimensionsZigBee 3.03VDC (CR2450)2.4GHz 30m IP200.1%-100%71.2x71.2x13.6mmProduct Data• ZigBee CCT remote based on ZigBee 3.0• Enables to pair ZigBee lighting devices via touchlink commissioning without coordinator• Supports find and bind mode to pair with ZigBee lighting devices• Supports 1 group for binding max. 30 lighting devices • 2.4 GHz global operation• Long battery life mesh technology• Transmission range up to 30m• Compatible with universal ZigBee Gateway products • Compatible with universal CCT ZigBee lighting devices16.ZigBee Clusters Supported by This Remote Are As Follows:Input clusters:• Basic • Power Configuration • Identify • DiagnosticsOutput clusters:• Identify • On/off • Level control • Ota • Color control55.57 mm71.20 mm11 mmBattery: CR2450Before the first use, please open the batterycover and remove the protective film55.57 m m71.20 mmNetwork pairing mode: click both buttons 3 times to set the remote into network pairing mode (the remote should not belong to any gateway network).Quick Start (Simplified operation compared to standard operations in the part “Operation”)4. TouchLink to a Zigbee Lighting Device5. Removed from a Zigbee Network through Coordinator or Hub Interface6. Factory Reset Manually7. Remove a Touchlink Paired ZigBee Lighting DeviceNote: 1) After pairing successfully, the remote information will appear on the controller or hub interface.2) No remote information will appear on the hub interface if pairing to Philips Hue Bridge.Step 1commissioning,manual to learn how.From your ZigBee controller or hubinterface, choose to delete or resetthe remote as instructed, indicatorflashes 3 times quickly to indicatesuccessful removing.Step 3LED indicator turns on.the device will blink twice.Step 1: Press and hold down untilLED indicator turns on.: Immediately short press 5Step 1manual to learn how.Step 3LED indicator turns on.to indicate successful removing. Note: 1) Directly TouchLink (both not added to a ZigBee network), each remote can link with 30 devices.2) TouchLink after both added to a ZigBee network, each remote can link with max. 30 devices.3) For Hue Bridge & Amazon Echo Plus, add remote and device to network first then TouchLink.4) After TouchLink, the remote can control the linked lighting devices.Immediately short press toIndicator will then blink 5 timesquickly for successful pairing.Operation1.This ZigBee CCT remote is a wireless transmitter that communicates with a variety of ZigBeecompatible systems. This transmitter sends wireless radio signals that are used to remotely control acompatible system.2.This ZigBee remote supports 1 group for binding max. 30 lighting devices and enables to control CCTZigBee lighting devices.3. Zigbee Network Pairing through Coordinator or Hub (Added to a Zigbee Network)Step 1:part "Factory Reset Manually".From your zigbeeStep 3:LED indicator turns on.10. Find and Unbind a Zigbee Lighting Device11. Clear All Find and Bind Mode Paired Lighting Devices12. Setup a Network & Add Devices to the Network (No Coordinator or Hub Required)Step 6: Add more remotes to the network as you would like .Step 7: Factory reset the lighting devices that you would like then add them to the network, refer to their manuals.Step 8: Touchlink to pair the added remotes and lighting devices, refer to their manuals. Each remote can link with max. 30 lighting devices. Each lighting device can be linked by max. 30 remotes .14. How to Check Whether the Remote Belongs to a Network or notShort press any button, indicator blinking means the remote has already been added to a network. No blinking of indicator means the remote does not belong to any network.Step 1target, refer to its manual .ZigBee Lighting DeviceStep 2LED indicator turns on .Step 3: Short press twice to enable the remote (target node) to find and unbind initiator. LED indicator flashes 4 times for successfulunbinding or twice if unbinding fails.Step 1LED indicator turns on .Step 2: Short press 5 times continuously to clear all bound lighting devices . LED indicator flashes 4 times for successful unbinding.Step 1and the lighting device , their manuals .Step 4repeat the operation .13. OTAThe remote supports firmware updating through OTA, and will acquire new firmware from zigbee controller or hub every 10 minutes automatically.15. Battery Power Monitor FunctionThe remote will report battery power value to the coordinator under following situations:• When powered on.• When short pressing both and buttons simultaneously.• When operating the switch to send data packets (over 4 hours since last operation).• When added to the network by a coordinator .Note: Each remote can bind max. 30 lighting devices.8. Factory Reset a Lighting Device (Touch Reset)Note : the device shall be added to a network, the remote added to the same one or not added to any network .Note: Make sure the device and remote already added to the same zigbee network.Step 1refer to its manual .Step 3LED indicator turns on.indicate successful reset.Step 1target, refer to its manual .ZigBee Lighting DeviceStep 2LED indicator turns on.Step 3: Short press to enable the remote (target node) to find and bind initiator.LED indicator flashes 4 times for successful binding or twice if binding fails.9. Find and Bind a Zigbee Lighting DeviceStep 3LED indicator turns on .MountingThe key part of this controller is an universal one, especially rotary standard switch element that can be integrated in numerous frames by different manufactures as below list:BEKER S1, B1, B3, B7 glass GIRA Standard55, E2, Event, EspritJUNG A500, Aplus MERTENM-smart, M-Arc, M-Plan① silicone gel battery coverUse tool to open the 1.Remove battery insulatorMethod 1:Stick 3M glue on the back of the bracket and then stick the bracket to the wallMethod 2:Screw the bracket to the wallInstallation。
北京星光莱特电子 智能调光控制器LT-0410P 说明书
LT-0410P智能调光控制器用户手册北京星光莱特电子有限公司BEIJING STARLIGHT ELECTRONICS CO.,LTD 北京市大兴区西红门镇星光巷7号 100076 交货-拆包安全知识操作电缆注意事项主要功能产品特性产品安装和要求控制器的安装和环境控制器安装尺寸要求控制器的固定和安装电源线的连接主供电网络形式供电电缆接线要求接线端口供电系统输出连接控制信号的连接方式及走线要求协议简介:DMX512/1990协议简介:LT-NET控制电缆连接标准工作状态及方式的选择各类检测、保护及恢复方法交货-拆包当您收到LIGHTSPACE®的产品时,请确认包装尚未拆卸,并仔细检查设备是否完好;所有设备经严格检验,并确认完好才允许出厂的;如果发现设备有任何损坏,请及时联系相关人员,并记录在案。
核对您收到的产品和系列产品规格和清单上的是否一致;检查您收到的设备型号、数量与交付单上的是否一致的;一旦发现出错,立即与发货方联系,说明情况直到收到满意答复。
确认无误后,把产品放回包装,安放在符合存储条件的位置,等候最后的安装。
安全知识LT-0410P是专业型的全数字调光器符合欧洲安全标准EN60439,EN60950,它属于Ⅰ类设备,按EN 60439设计生产,按当地规格强制安全接地。
为防止任何触电事故,请不要打开外壳和防护措施,正常操作无需了解设备内部情况。
如设备有损坏必须由专业人员检查和维修,在检查和维修之前请确认电源已切断。
警告!!!内有致命电压!注意您的安全!安装调试和维修服务应由专业人员操作!任何人员使用前务必仔细阅读此手册,并按照要求使用。
操作电缆注意事项供电电缆和连接器是设备安全的重要组成部分。
z电缆供电端必须有主断路器、保险器等,用于切断电源,并且不能触碰到电缆;z确保电缆和连接器无任何损坏,安装和平时检查都要确认电缆无损坏;z电缆和信号线不能合于一处。
主要功能z4个调光通道输出,每个通道10Az每个通道有一个10A小型断路器和一个旁路直通开关z应用于分布式智能灯光控制系统z可接收LT-NET信号,DALI信号及DMX-512信号z系统输出一组12V直流电压,供给控制系统使用z电源LED指示及通讯指示LED各一个z可预置场景128个z可分区域128个z渐变时间:1~100秒z采用大功率可控硅及快速电磁开关,降低因短路事故烧毁可控硅的概率z每个通道有一个专业滤波器上升斜率为120uS,减少灯丝噪音z自动限压功能使输出电压限制在230V以内,延长灯泡的使用寿命z可以控制白炽灯泡、卤钨灯泡、经变压器的低电压灯泡产品特性电子控制:全数字、微处理器控制额定功率:调光器连续工作额定负荷:4 x 2 kWLT-0410P 最大整机负荷为8 kW工作温度范围:0℃到 40℃,25℃时相对湿度不大于90%,大气压力小于106kP供电系统:NPE 230V 50Hz (TN-S 系统, 中性线直接连接到地,相和中性线间230V) 不允许减少N线线径供电电压范围:198 V 到264 V (230 V±14 %)额定供电电流:N~ with PE 供给:,230V 时电流40 A调光器保护:MCB 微型断路器(最大分断能力6000A)输入控制:双接口输入,DMX 和 LT-NET(DALI) 信号可同时工作,遵从大者优先原则DMX控制信号:正确的 DMX 信息是连续闪动LT-NET或DALI控制信号:正确的 LT-NET 信息是红绿交替变化控制端输出电压:12V /0.2A地址:调光器的首地址可通过手持编程器设定(设定时应将机内拨码开关拨下)前面板指示:每个通道电源连接是否正常(MCB是否跳开)DMX512 或 LT-NET(DALI) 控制信号是否正常(通讯指示 LED 显示)电源故障信息(电源指示 LED 显示)调光器测试功能:当紧急直通按钮按下时,可使用机内的微调电位器0~100%调整6路通道的输出亮度旁路直通开关:当功能模块出现故障,可按下对应回路的旁路直通开关响应时间:DMX≤30ms调光器精度:1024 级功率半导体器件:反并联可控硅每路调光器最小负荷:≥60W输出电压的DC成份:在额定负载范围内低于1V负载类型:白炽灯泡、卤钨灯泡、经变压器的低电压灯泡供电电缆颜色:相线棕色或黑色中性线N蓝色地线PE黄绿色电磁兼容标准:EN55103-1:1996EN55103-2:1996安全标准:EN60439,EN60950保护:⑴由 MCB (6k A 分断能力)提供每路保护,在规定条件下系统安全运行;⑵电源端子进线线径:刚性最大25 mm2、柔性最大16 mm2;⑶负载端子出线线径:刚性最大6mm2、柔性最大4 mm2;⑷从机框的顶部敲落孔或后面板中的进线方孔进电缆;⑸控制信号的接线端在底部敲落孔进线。
WG-ZCSWLPT-D1111-01 单火线单路调光开关说明书

系统指示灯 2
9
联网 4、退网设置 长按【多功能按键】10秒后,退出ZigBee网络,【系统指示 灯】闪烁4次后熄灭,同时本产品恢复为出厂设置。
长按10秒 1 闪烁4次后熄灭 2
10
下载
方法一:二维码下载
Android版下载
iOS版下载
软件使用手册下载
11
下载
方法二:电子市场下载 1、 iOS用户可在“APP Store”搜索“wulian”或“智能家居”,
选择“
”软件下载;
2、 Android用户可在“Play商店”(或其它电子市场)搜索 “wulian”或“智能家居”,
选择“
”软件下载;
12
下载 方法三:官网下载 /service.shtml 注:初次使用,请仔细阅读软件说明文档 软件版本升级,请及时下载最新版本
7
联网
2、加网设置 快击【多功能按键】4次,申请加入网络。成功加入网络后, 【系统指示灯】长亮2秒后熄灭
快击4次,单次快击
时间不超过1 秒
1
搜索网络时,闪烁; 2 成功加网后,长亮2秒后熄灭
8
联网
3、绑定设置 长按【多功能按键】不动,同时快击一下需要绑定的【UP键】, 后松开【多功能按键】,【系统指示灯】闪烁1次,表示发出绑定 请求,20秒内操作另一端的输出端绑定设备(输出端绑定请参阅该 产品说明书),绑定成功后【系统指示灯】闪烁3次,不成功闪烁6 次。(本产品可以和场景开关等遥控器类设备绑定,一般需要绑定 两次,分别对应设备的调亮和调灭)。
15
南京市雨花台区凤集大道15号创业创新城-北柚11栋 邮编:210039 服务热线:400-928-9228
14
智能灯光控制系统操作说明

智能灯光控制系统操作说明1.系统简介智能灯光控制系统是一种基于智能技术的灯光自动化系统,能够根据用户需求实现定时开关、调节亮度、变换颜色等功能。
系统采用可编程控制器与灯光设备进行通信,用户可以通过手机APP或者物理控制器对系统进行操作。
2.系统基本要求在操作智能灯光控制系统之前,需要满足以下基本要求:-确保灯光设备与系统的连接正常,通信稳定;-手机APP已经正确安装,并且已经登录系统账号;-物理控制器已经连接到系统,并且具备电源供应。
3.系统操作步骤3.1手机APP操作步骤-打开手机APP,在登录界面输入账号和密码,点击登录按钮进入系统主界面;-在系统主界面,点击灯光控制选项,进入灯光控制页面;-在灯光控制页面,选择需要控制的灯光设备,点击设备名称进入设备控制页面;-在设备控制页面,可以进行如下操作:-点击开关按钮,控制灯光的开关状态;-滑动亮度调节条,调节灯光的亮度;-点击颜色调节按钮,选择合适的颜色;-设置定时开关功能,选择具体的时间和执行动作;-修改设备名称、位置等信息;-操作完成后,可以点击返回按钮返回上一级页面。
3.2物理控制器操作步骤-确保物理控制器已经连接到电源,并且与系统正常通信;-在物理控制器上,有开关按钮、亮度旋钮等操作元件;-通过按下开关按钮,可以实现灯光的开关操作;-通过旋转亮度旋钮,可以调节灯光的亮度;-物理控制器上可能还包括其他功能按钮,根据具体功能需要进行操作。
4.系统常见问题与解决方法4.1灯光设备无法连接系统-检查灯光设备的电源和通信线路是否正常连接;-确认灯光设备的网络设置是否正确,并且与系统处于同一局域网中;-重启灯光设备和系统,尝试重新连接。
4.2系统账号登录失败-确认账号和密码输入是否正确;-确认手机APP和系统的网络连接是否正常;-尝试重启手机APP和系统,再次尝试登录。
4.3系统操作界面无法正常显示-检查手机APP的版本是否过低,需要更新到最新版本;-确认手机APP的存储空间是否充足,尽量清理无用的文件;-尝试重启手机APP和系统。
「0326 LCS60智能灯光控制器说明书」

智能灯光控制器□使用说明书[LCS6008]北京嘉复欣科技有限公司Beijing GareflwlTechnology Co.,Ltd说明LCS6008型灯光控制器是我公司专门针对远程城市景观照明集中监控市场而设计开发的一款具有嵌入GPRS/CDMA 1X 通信功能的一体化微型远程设备。
城市景观照明存在如下特点:分布点多、分布面广,市政府如要统一管理与控制城市景观照明,提高城市智能化与信息化建设,那么远程控制点设备一定要有接入互联网的手段,以实现远程数据采集与控制,目前主流的接入方式是通过GPRS/CDMA 1X网络接入Inte rnet或专网。
每个控制点有着多条交流线路需要远程控制,并能够检测多种设备数字信号的报警,这样可避免白天亮灯、晚上熄灯等异常情况。
城市景观照明的实时性不强但时效性很强,有些景观照明设施并不是每天都要开启,而只是在特定或特殊日期才开启,例如五一、十一、元旦、春节或重要会议等情况,这样就要求设备具有可设置多组时间表的功能,通过时间表的设定,设备即可在设定的时间范围内去控制照明设施,而其他时间并不起效。
城市景观照明的控制不能依赖于远程控制中心,在脱机情况下设备仍能按照预先设置的参数去工作,真正做到无人值守的工作模式,同时又不缺失远程接管的功能,当设备接入GPRS网络后即可与预设的监控中心取得联系,这样远程控制中心即可接管设备,实现远程控制与数据采集功能。
终 端 结 构 框 图图1-1 结构图基 本 工 作 原 理 及 功 能LCS6008型灯光控制器由GPRS 通信模块、主机板及显示板等部件组成,同时可外接PDA 掌上电脑,由此实现电量数据和控制信号的采集、计算、显示、传送,并通过无线组网,接收中心控制的指令,完成遥测、遥信、遥控等功能。
终端接通电源后,自动进入复位和程序初始化运行,若首次运行则需由主台控制中心发送一系列的运行参数给终端,之后,终端会严格按此参数有条不紊地进行工作。
迪尔(DIELL) EUD12D-UC 数字可调多功能通用调光开关说明书
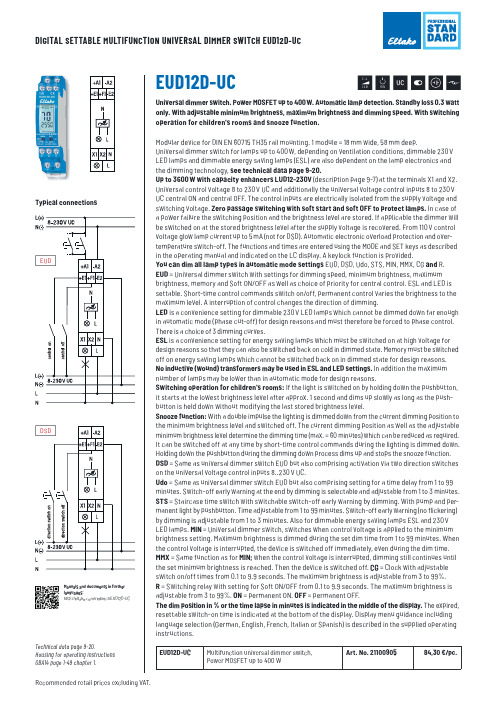
Modular device for DIN EN 60715 TH35 rail mounting. 1 module = 18 mm wide, 58 mm deep. Universal dimmer switch for lamps up to 400 W, depending on ventilation conditions, dimmable 230 V LED lamps and dimmable energy saving lamps (ESL) are also dependent on the lamp electronics and the dimming technology, see technical data page 9-20. Up to 3600 W with capacity enhancers LUD12-230V (description page 9-7) at the terminals X1 and X2. Universal control voltage 8 to 230 V UC and additionally the universal voltage control inputs 8 to 230 V UC central ON and central OFF. The control inputs are electrically isolated from the supply voltage and switching voltage. Zero passage switching with soft start and soft OFF to protect lamps. In case of a power failure the switching position and the brightness level are stored. If applicable the dimmer will be switched on at the stored brightness level after the supply voltage is recovered. From 110 V control voltage glow lamp current up to 5 mA (not for DSD). Automatic electronic overload protection and overtemperature switch-off. The functions and times are entered using the MODE and SET keys as described in the operating manual and indicated on the LC display. A keylock function is provided. You can dim all lamp types in automatic mode settings EUD, DSD, Udo, STS, MIN, MMX, CG and R. EUD = Universal dimmer switch with settings for dimming speed, minimum brightness, maximum brightness, memory and Soft ON/OFF as well as choice of priority for central control. ESL and LED is settable. Short-time control commands switch on/off, permanent control varies the brightness to the maximum level. A interruption of control changes the direction of dimming. LED is a convenience setting for dimmable 230 V LED lamps which cannot be dimmed down far enough in automatic mode (phase cut-off) for design reasons and must therefore be forced to phase control. There is a choice of 3 dimming curves. ESL is a convenience setting for energy saving lamps which must be switched on at high voltage for design reasons so that they can also be switched back on cold in dimmed state. Memory must be switched off on energy saving lamps which cannot be switched back on in dimmed state for design reasons. No inductive (wound) transformers may be used in ESL and LED settings. In addition the maximum number of lamps may be lower than in automatic mode for design reasons. Switching operation for children's rooms: If the light is switched on by holding down the pushbutton, it starts at the lowest brightness level after approx. 1 second and dims up slowly as long as the pushbutton is held down without modifying the last stored brightness level. Snooze function: With a double impulse the lighting is dimmed down from the current dimming position to the minimum brightness level and switched off. The current dimming position as well as the adjustable minimum brightness level determine the dimming time (max. = 60 minutes) which can be reduced as required. It can be switched off at any time by short-time control commands during the lighting is dimmed down. Holding down the pushbutton during the dimming down process dims up and stops the snooze function. DSD = Same as universal dimmer switch EUD but also comprising activation via two direction switches on the universal voltage control inputs 8..230 V UC. Udo = Same as universal dimmer switch EUD but also comprising setting for a time delay from 1 to 99 minutes. Switch-off early warning at the end by dimming is selectable and adjustable from 1 to 3 minutes. STS = Staircase time switch with switchable switch-off early warning by dimming. With pump and permanent light by pushbutton. Time adjustable from 1 to 99 minutes. Switch-off early warning (no flickering) by dimming is adjustable from 1 to 3 minutes. Also for dimmable energy saving lamps ESL and 230 V LED lamps. MIN = Universal dimmer switch, switches when control voltage is applied to the minimum brightness setting. Maximum brightness is dimmed during the set dim time from 1 to 99 minutes. When the control voltage is interrupted, the device is switched off immediately, even during the dim time. MMX = Same function as for MIN; when the control voltage is interrupted, dimming still continues until the set minimum brightness is reached. Then the device is switched off. CG = Clock with adjustable switch on/off times from 0.1 to 9.9 seconds. The maximum brightness is adjustable from 3 to 99%. R = Switching relay with setting for Soft ON/OFF from 0.1 to 9.9 seconds. The maximum brightness is adjustable from 3 to 99%. ON = permanent ON. OFF = permanent OFF. The dim position in % or the time lapse in minutes is indicated in the middle of the display. The expired, resettable switch-on time is indicated at the bottom of the display. Display menu guidance including language selection (German, English, French, Italian or Spanish) is described in the supplied operating instructions.
LED智能调光系统手册
目录
LED智能调光系统 (3)
软件运行的硬件要求 (4)
软件运行的系统环境 (6)
如何安装本软件 (7)
如何卸载本软件 (12)
控制台管理 (14)
添加和删除控制台 (15)
连接和断开控制台 (18)
获取控制台信息 (20)
基础功能 (21)
调光模式切换 (22)
人工调光 (23)
自动调光 (24)
控制台时间更新 (25)
高级功能 (27)
初始化控制台 (28)
初始化灯板 (31)
初始化灯具数 (32)
线路巡检 (33)
定时查询设置 (35)
一般的操作流程如下:
1:获取用于初始化控制台的Excel表格
3:填写完毕后在初始化控制台界面上单击“从Excel表导入数据”,以便系统将Excel表的数据导入到软件中:
4:单击“开始初始化”按钮,系统会根据Excel表的信息对控制台进行初始化
操作流程如下:
1:在线路巡检界面上先在左边选择需要巡检的控制台
2:单击“开始巡检”按钮对此控制台进行线路巡检操作,系统会对每路通道的每盏灯进行查询
3:在巡检期间可单击“暂停”按钮暂停线路的巡检,但当单击“停止”按钮后,本次巡检的数据会被清除
4:在暂停的时候可单击“保存记录”按钮将当前的巡检数据导出为Excel文件,方便维护人员做记录。
- 1、下载文档前请自行甄别文档内容的完整性,平台不提供额外的编辑、内容补充、找答案等附加服务。
- 2、"仅部分预览"的文档,不可在线预览部分如存在完整性等问题,可反馈申请退款(可完整预览的文档不适用该条件!)。
- 3、如文档侵犯您的权益,请联系客服反馈,我们会尽快为您处理(人工客服工作时间:9:00-18:30)。
零火智能调光开关使用说明书
适用范围:索科特零火智能调光开关
产品优势:
1,外观精美,工艺细致,颜色和图案可根据用户喜好而定制。
2,背光效果为你在黑夜中指明前进的方向,实用贴心。
3,开关上的每个开关按键完全满足5-500瓦对应光源。
4,超大容量的每个开关按键可以保存20个遥控器按键值。
5,控制方式多样化,可以实现触摸控制、现场遥控、远程控制。
安全警告:
1,安装和拆卸前请务必切断总电源。
2,安装前确保线路没有短路,接错。
3,安装和使用本产品时须注意防水、防蒸汽、防敲击。
4,勿用尖锐的物体刮擦触摸面板。
5,开关在开灯或关灯时请勿用力过猛,以免按碎触摸面板。
6,清洁时请使用干布进行擦拭,禁用潮湿或含有腐蚀性物质的东西擦拭。
否则触电危险及产品器件腐蚀损坏。
7,严禁超负荷使用,否则易引起发热,导致烧毁或引起火灾等。
一,产品图示说明
二,安装方法(与零火智能开相同)
将灯具的接线与零火智能开关的接线连接好,再将220V的市交流电接线接入零火智能开关中,确定无误后,给零火智能开关供电。
N:接220V零线L:接220V火线
L1灯光的火线供电,负载最大500W。
三,使用方法
1,灯光开启与关闭
1.1,开启:触摸ON/OFF键,灯光渐渐变亮,直到上次关闭前的亮度。
1.2,关闭:触摸ON/OFF键,灯光渐渐变暗,直到关闭。
2,亮度调节
2.1,调亮:触摸△键,灯光渐渐变亮,直到亮度达到要求时松手。
2.2,调暗:触摸▽键,灯光渐渐变暗,直到亮度达到要求时松手。
提示:本说明书所提到的“触摸”操作,均为快速触摸,一般不超过0.5秒,如动作过轻或过慢均影响操作。
3,遥控对码
3.1,开灯后长按开关ON/OFF键触摸区约4秒,蜂鸣1声并伴有蓝色背光闪烁,进入对码状态。
3.2,进入遥控器灯光控制界面中,按下欲配对的数字键发出信号,当开关接收到无线信号后,背光会出现快速闪烁。
3.3,再次长按开关ON/OFF键,蜂鸣器快速连响5声后并保存并退出。
提示:每路开关可储存20个无线编码,当编码存满后再对码时,此开关会发出红色背光快速闪烁12次提示容量已满,须删除对码才能继续对码。
4,删除对码
开灯后长按开关触摸区约13秒蜂鸣器连响4声后松手,再长按蜂鸣器快速连响5声后表明已删除对码。
5,场景设置(对码后才能进行此设置)
1,开灯后长按ON/OFF键约7秒,蜂鸣2声并伴有蓝色背光闪烁,进入场景设置状态。
2,使用上下键调节灯光亮度(或者最亮开灯/最暗关灯)。
3,点按开关触摸区设置场景号,蜂鸣声等于场景号。
(如:想设置成遥控器3号键控制,则在这里按3下)
4,再长按ON/OFF保存此场景号,背光出现快速闪烁松手表明保存成功(保存后还可以接着设置下一个场景。
)
5,再次长按开关触摸区保存场景设置,蜂鸣器快速连响5声后并保存并退出。
注:每路可设场景14个。
6,删除场景
开灯后长按ON/OFF约10秒蜂鸣器连响3声后松手,再长按蜂鸣器快速连响5声后表明已删除场景。
7,删除对码:
开灯后长按ON/OFF约15秒蜂鸣器连响4声后松手,再长按蜂鸣器快速连响5声后表明已删除场景。
四、遥控测试:
遥控器室外有效控制距离为150 米(无阻碍距离)。
遥控器室内有效控制距离为30 米(有墙体阻隔)。
五、注意事项:
问:为什么开关对码不成功。
答:A:开关按键没进入对码状态或开关按键已经保存满20个遥控器按键值。
B:开关等待已经超过30秒,已经退出了对码状态。
问:为什么遥控器无法控制开关?
答:A:遥控器与开关没对码或对码不成功
B:两者距离太远或两者之间的障碍物太厚或太封闭(如上下楼之间的楼板)。
C:遥控器电池电压太低。
问:开关怎样恢复出厂状态?
答:删除对码即恢复出厂设置。
六、开关技术参数
工作电压:220V±20% 工作温度: -10℃—60℃工作湿度: ≤90%RH 启动时间:≤1s 接收灵敏度: ≤-100dbm
频率:FSK433.92MHz 单路负载类型:5W~500W(白织灯,射灯)。