华硕p4p800主板说明书
华硕使用说明书
5-1 變壓器 .................................................................. 58 5-2 電池系統 .............................................................. 59 5-3 效能設定 .............................................................. 62 5-4 保持良好的省電習慣 ............................................ 63
清潔電腦前請先關機,並移 開變壓器及內部電池。
液晶顯示螢幕表面會因靜電 而吸附灰塵,如ቤተ መጻሕፍቲ ባይዱ現有灰塵 時請使用柔軟乾布擦拭,並 請勿過度用力擦拭,也請 勿用手直接拍除,以免在 液晶顯示螢幕表面留下些 許指紋。
攜帶電腦所使用的揹袋必須 具備防碰撞的緩衝襯墊,並 請勿放置過多物件,以避免 壓壞液晶顯示器。
請依照筆記型電腦底部的電 源功率貼紙說明使用正確的 電源變壓器,如果使用錯誤 功率的電源變壓器有可能造 成內部零件的損壞。
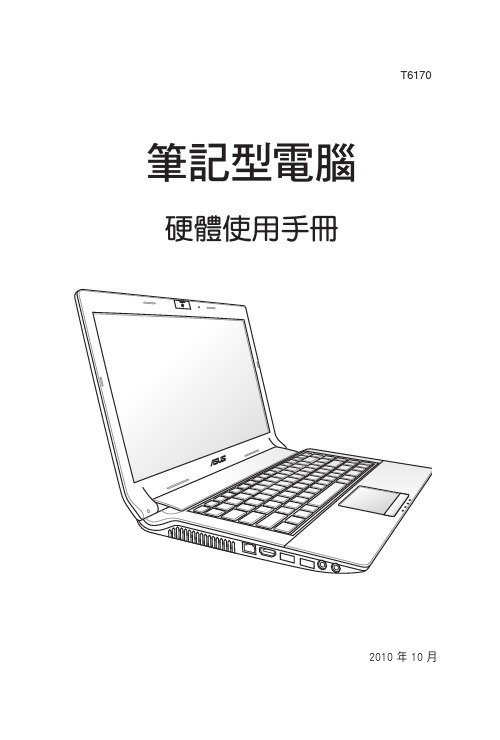
T6170
筆記型電腦
硬體使用手冊
2010 年 10 月
版權說明
版權所有.不得翻印 ©2010 華碩電腦 本使用手冊包括但不限於其所包含的所有資訊受到著作權法之保護,未經 華碩電腦股份有限公司(以下簡稱「華碩」)許可,不得任意地仿製、拷貝、 謄抄、轉譯或為其他使用或處分。
免責聲明
本使用手冊沒有任何型式的擔保、立場表達或其它暗示。若有任何因本使 用手冊或其所提到之產品的所有資訊,所引起直接或間接的資料流失、利益 損失或事業終止,華碩及其所屬員工恕不為其擔負任何責任。除此之外,本 使用手冊所提到的產品規格及資訊僅供參考,內容亦會隨時更新,恕不另行 通知。華碩不負責本使用手冊的任何錯誤或疏失。
ASUS 平板电脑用户手册说明书
Turning your device offPutting on sleep modeTo put your device on sleep mode:Press the Power button once.Forcing your device to shut downTo force shutdown your device:•If your device is unresponsive, press and hold the power button for at least eight (8) seconds.Shutting down your deviceTo shut down your device:1. Launch the Charm bar and tap .2. Tap > Shut down to turn off your device.ASUS Tablet ManualASUS Tablet ManualDeclarations and Safety Statements Federal Communications Commission Statement This device complies with part 15 of the FCC Rules. Operation is subject to the following two conditions: (1) This device may not cause harmful interference, and (2) this device must accept any interference received, including interference that may cause undesired operation.This device has been tested and found to comply with the limits for a Class B digital device, pursuant to Part 15 of the FCC Rules. These limits are designed to provide reasonable protection against harmful interference in a residential installation. This equipment generates, uses and can radiated radio frequency energy and, if not installed and used in accordance with the instructions, may cause harmful interference to radio communications. However, there is no guarantee that interference will not occur in a particular installation If this equipment does cause harmful interference to radio or television reception, which can be determined by turning the equipment off and on, the user is encouraged to try to correct the interference by one or more of the following measures:Reorient or relocate the receiving antenna.Increase the separation between the equipment and receiver.Connect the equipment into an outlet on a circuit different from that to which the receiver is connected.Consult the dealer or an experienced radio/TV technician for help.Changes or modifications not expressly approved by the party responsible for compliance could void the user‘s authority to operate the equipment.The antenna(s) used for this transmitter must not be co-located or operating in conjunction with any other antenna or transmitter.RF Exposure Information (SAR)This device meets the government’s requirements for exposure to radio waves. This device is designed and manufactured not to exceed the emission limits for exposure to radio frequency (RF) energy set by the Federal Communications Commission of the U.S. Government.The exposure standard employs a unit of measurement known as the Specific Absorption Rate, or SAR. The SAR limit set by the FCC is 1.6 W/kg. Tests for SAR are conducted using standard operating positions accepted by the FCC with the EUT transmitting at the specified power level in different channels.The highest SAR value for the device as reported to the FCC is 0.558 W/kg when placed next to the body.••••The FCC has granted an Equipment Authorization for this device with all reported SAR levels evaluated as in compliance with the FCC RF exposure guidelines. SAR information on this device is on file with the FCC and can be found under the Display Grant section of /oet/ea/fccid after searching on FCC ID: MSQTF600T.This device is compliance with SAR for general population /uncontrolled exposure limits in ANSI/IEEE C95.1-1999 and had been tested in accordance with the measurement methods and procedures specified in OET Bulletin 65 Supplement C. Canada, Industry Canada (IC) NoticesThis Class B digital apparatus complies with Canadian ICES-003 and RSS-210. Operation is subject to the following two conditions: (1) this device may not cause interference, and (2) this device must accept any interference, including interference that may cause undesired operation of the device.Radio Frequency (RF) Exposure InformationThe radiated output power of the Wireless Device is below the Industry Canada (IC) radio frequency exposure limits. The Wireless Device should be used in such a manner such that the potential for human contact during normal operation is minimized.This device has been evaluated for and shown compliant with the IC Specific Absorption Rate (“SAR”) limits when installed in specific host products operated in portable exposure conditions.Canada’s REL (Radio Equipment List) can be found at the following web address: http://www.ic.gc.ca/app/sitt.reltel/srch/nwRdSrch.do?lang=engAdditional Canadian information on RF exposure also can be found at the following web address: http://www.ic.gc.ca/eic/site/smt-gst.nsf/eng/sf08792.html Canada, avis d’Industry Canada (IC)Cet appareil numérique de classe B est conforme aux normes canadiennes ICES-003 et RSS-210.Son fonctionnement est soumis aux deux conditions suivantes : (1) cet appareil ne doit pas causer d'interférence et (2) cet appareil doit accepter toute interférence, notamment les interférences qui peuvent affecter son fonctionnement.10ASUS Tablet ManualCopyright Information No part of this manual, including the products and software described in it, may be reproduced, transmitted, transcribed, stored in a retrieval system, or tranPadd into any language in any form or by any means, except documentation kept by the purchaser for backup purposes, without the express written permission of ASUSTeK COMPUTER INC. (“ASUS”).ASUS and ASUS Tablet logo are trademarks of ASUSTek Computer Inc. Information in this document is subject to change without notice.Copyright © 2012 ASUSTeK COMPUTER INC. All Rights Reserved.Limitation of Liability Circumstances may arise where because of a default on ASUS’ part or other liability, you are entitled to recover damages from ASUS. In each such instance, regardless of the basis on which you are entitled to claim damages from ASUS, ASUS is liable for no more than damages for bodily injury (including death) and damage to real property and tangible personal property; or any other actual and direct damages resulted from omission or failure of performing legal duties under this Warranty Statement, up to the listed contract price of each product.ASUS will only be responsible for or indemnify you for loss, damages or claims based in contract, tort or infringement under this Warranty Statement.This limit also applies to ASUS’ suppliers and its reseller. It is the maximum for which ASUS, its suppliers, and your reseller are collectively responsible.UNDER NO CIRCUMSTANCES IS ASUS LIABLE FOR ANY OF THE FOLLOWING: (1) THIRD-PARTY CLAIMS AGAINST YOU FOR DAMAGES; (2) LOSS OF, OR DAMAGE TO, YOUR RECORDS OR DATA; OR (3) SPECIAL, INCIDENTAL, OR INDIRECT DAMAGES OR FOR ANY ECONOMIC CONSEQUENTIAL DAMAGES (INCLUDING LOST PROFITS OR SAVINGS), EVEN IF ASUS, ITS SUPPLIERS OR YOUR RESELLER IS INFORMED OF THEIR POSSIBILITY.Manufacturer ASUSTek COMPUTER INC.Address, City No. 150, LI-TE RD., PEITOU, TAIPEI 112, TAIWAN R.O.C Country TAIWAN Authorized Representative in Europe ASUS COMPUTER GmbH Address, City HARKORT STR. 21-23, 40880 RATINGEN Country GERMANY。
ASUS客户自助维修和服务指南说明书

Customer Self Repair (CSR)Maintenance and Service GuideFirst Edition /November 2021COPYRIGHT INFORMATIONNo part of this manual, including the products and software described in it, may be reproduced,transmitted, transcribed, stored in a retrieval system, or translated into any language in any form or by any means, except documentation kept by the purchaser for backup purposes, without the express written permission of ASUSTeK COMPUTER INC.(“ASUS”).ASUS PROVIDES THIS MANUAL “AS IS” WITHOUT WARRANTY OF ANY KIND, EITHER EXPRESS OR IMPLIED,INCLUDING BUT NOT LIMITED TO THE IMPLIED WARRANTIES OR CONDITIONS OF MERCHANTABILITY OR FITNESS FOR A PARTICULAR PURPOSE. IN NO EVENT SHALL ASUS, ITS DIRECTORS, OFFICERS, EMPLOYEES OR AGENTS BE LIABLE FOR ANY INDIRECT, SPECIAL, INCIDENTAL, OR CONSEQUENTIAL DAMAGES(INCLUDING DAMAGES FOR LOSS OF PROFITS, LOSS OF BUSINESS, LOSS OF USE OR DATA, INTERRUPTION OF BUSINESS AND THE LIKE), EVEN IF ASUS HAS BEEN ADVISED OF THE POSSIBILITY OF SUCH DAMAGES ARISING FROM ANY DEFECT OR ERROR IN THIS MANUAL OR PRODUCT.Products and corporate names appearing in this manual may or may not be registered trademarks or copyrights of their respective companies, and are used only for identification or explanation and to the owners’ benefit, without intent to infringe.SPECIFICATIONS AND INFORMATION CONTAINED IN THIS MANUAL ARE FURNISHED FOR INFORMATIONAL USE ONLY, AND ARE SUBJECT TO CHANGE AT ANY TIME WITHOUT NOTICE, AND SHOULD NOT BE CONSTRUED AS A COMMITMENT BY ASUS. ASUS ASSUMES NO RESPONSIBILITY OR LIABILITY FOR ANY ERRORS OR INACCURACIES THAT MAY APPEAR IN THIS MANUAL, INCLUDING THE PRODUCTS AND SOFTWARE DESCRIBED IN IT.Copyright © 2020 ASUSTeK COMPUTER INC. All Rights Reserved.LIMITATION OF LIABILITYCircumstances may arise where because of a default on ASUS’ part or other liability, you are entitled to recover damages from ASUS. In each such instance, regardless of the basis on which you are entitled to claim damages from ASUS, ASUS is liable for no more than damages for bodily injury (including death) and damage to real property and tangible personal property; or any other actual and direct damages resulted from omission or failure of performing legal duties under this Warranty Statement, up to the listed contract price of each product.ASUS will only be responsible for or indemnify you for loss, damages or claims based in contract, tort or infringement under this Warranty Statement.This limit also applies to ASUS’ suppliers and its reseller. It is the maximum for which ASUS, its suppliers, and your reseller are collectively responsible.UNDER NO CIRCUMSTANCES IS ASUS LIABLE FOR ANY OF THE FOLLOWING: (1) THIRD-PARTY CLAIMS AGAINST YOU FOR DAMAGES; (2) LOSS OF, OR DAMAGE TO, YOUR RECORDS OR DATA; OR (3) SPECIAL, INCIDENTAL, OR INDIRECT DAMAGES OR FOR ANY ECONOMIC CONSEQUENTIAL DAMAGES (INCLUDING LOST PROFITS OR SAVINGS), EVEN IF ASUS, ITS SUPPLIERS OR YOUR RESELLER IS INFORMED OF THEIR POSSIBILITY.SERVICE AND SUPPORTVisit our multi-language website at:https:///support/Table of Contents Disclaimer (4)Safety precautions (4)Installation tools (5)Before disassembly (5)Removing the base cover (6)Installing an M.2card(SSD) (9)DisclaimerASUS is not responsible for direct, indirect, intentional or unintentional damages resulting from improper installation and operation.Safety precautions•Keep liquids or moisture away from your Notebook PC before installing or removing any components.•Place your Notebook PC on a stable surface before installing or removing any components. •Detach the clip or flap before removing the signal cables to prevent damage.•Disconnect the power plug by pulling the plug evenly to avoid damage. Ensure to connect the signal cables in the correct orientation.•Disconnect all power cables and remove the battery pack (if applicable) before cleaning your Notebook PC with liquid detergent to avoid risk of electric shock.•Disconnect all power cables and remove the battery pack (if applicable) before installing or removing any components. Be sure to thoroughly to read and follow the instructions in the manual.•To avoid Electrostatic Discharge (ESD) damage the electric components inside your computer, before handling components, use a grounded wrist strap or touch a safely grounded object to prevent electric products damaged by the electrostatic discharge.Please refer to Electrostatic Discharge (ESD) Protection Notes.•Keep liquids or moisture away from your Notebook PC to avoid short circuiting.•Hold components by the edges to avoid touching the Integrated Circuits (ICs).•Before re-connecting the AC power, ensure all components are properly installed.•Reduce the risk of fire or explosion by avoiding incompatible power adapters or batteries. Use only certified power adapters or batteries supplied by ASUS or authorized retailers.•Ensure the correct screw models are re-installed to your Notebook PC to prevent damage. Protection of Stored DataFor Your important data, please make periodic back-up copies of all the data stored on the hard disk or other storage devices as a precaution against possible failures, alteration, or loss of the data. ASUS AND ITS AFFILIATES WILL NOT BE HELD LIABLE FOR ANY OF YOUR CONFIDENTIAL, PROPRIETARY OR PERSONAL DATA NOR ANY LOST OR CORRUPTED DATA, PROGRAMS OR SOFTWARE. IF YOUR DATA IS ALTERED OR LOST DUE TO ANY TROUBLE, FAILURE OR MALFUNCTION OF THE PRODUCT AND THE DATA CANNOT BE RECOVERED, WE SHALL NOT BE LIABLE FOR ANY DAMAGE OR LOSS TO DATA, SYSTEM, NETWORK, OR ANY OTHER DAMAGE RESULTING THEREFROM. WHEN COPYING OR TRANSFERRING YOUR DATA, PLEASE BE SURE TO CONFIRM WHETHER THE DATA HAS BEEN SUCCESSFULLY COPIED OR TRANSFERRED PRIOR TO PROVISIONING OF SERVICES BY US. WE DISCLAIM ANY LIABILITY FOR THE FAILURE TO COPY OR TRANSFER THE DATA CORRECTLY AND WILL HAVE NO LIABILITY FOR ANY ACTS OR OMISSIONS, INCLUDING NEGLIGENCE, BY ASUS OR A THIRD-PARTY SERVICE PROVIDER.Installation tools#1Before disassemblyA.Before your disassembly, we strongly recommend that youprepare a smartphone or other handheld camera. Duringdisassembly, use your camera to take photos to help youremember the order of assembly and location of parts.B.When lifting the base cover off, slowly and carefully open so theangle is as small as possible. To avoid damaging the cables,please confirm they are disconnected before opening the basecover completely.C.After you open the base cover, be sure to disconnect the batterycable first.D.When replacing components, if any materials, cables, tapes andothers were touched or moved, please return it to its originallocation before proceeding.E.Avoid using too much force when fastening screws to preventhardware damage.CDEBA Screwdriver Non-conductive pry tool Tweezers Anti-static glovesRemoving the base coverNOTE : The appearance of your Notebook PC ’s bottom view mayvary per model.A.Remove the screw(s) from the Notebook PC ’s base cover.Lefty -Loosey Righty -Tighty #1#1#1e the non-conductive pry tool to lift open the indicated area of the basecover as shown in the illustration.Disassembly steps:IMPORTANT! Avoid sliding the non-conductive pry tool along the side of your Notebook PC to prevent damage.Start StartC.Pull out the base cover and remove it completely from your Notebook PC.Installing an M.2 card (SSD)Refer to the following steps when installing a compatible M.2 card (SSD) in your Notebook PC:IMPORTANT! Purchase your M.2 card from authorized retailers ofthis Notebook PC to ensure maximum compatibility and reliability.WARNING! Disconnect all the connected peripherals, any telephoneor telecommunication lines and power connector (such as externalpower supply, battery pack, etc.) before removing the base cover.NOTE:•The appearance of your Notebook PC’s bottom view and M.2 cardmay vary per model but the module installation remains the same.•It is recommended that you install the M.2 card underprofessional supervision. You may also visit an authorized servicecenter for further assistance.A.Before handling components, wear anti-static gloves to avoid damaging them due to static electricity.B.Remove the base cover.C.Disconnect the cable from the battery connector.NOTE : For more details, refer to the removing the base coversection in this manual.Disassembly steps:e the non-conductive pry tool to push iron sheet.e thenon-conductive pry tool to disconnect battery connector.Disassembly steps:1.Remove the screw*1pc and M.2 card (SSD).NOTE :If there is material pasted on the M.2 card (SSD), when you replace M.2 card (SSD), please paste the material on the new M.2 card (SSD).(Notincluded specification label.)Assembly steps:1. Align and insert the new M.2 card into the module slot.2. Secure the M.2 card in place by fastening the screw.12F.Please follow the below steps to attach the battery connector.I. Secure the base cover in place using the screws.15~30G. Install the base cover at a slight tilt at upper side first, and then pressthe upper side of base cover to fix from right to left.H.Put the base cover down slowly, and then press left and right side of basecover to fix, and press lower side of base cover to fix.Lefty -LooseyRighty -Tighty #1#1#1。
press f1 to resume

我的电脑一直设为上午7:30自动开机,晚上22:30自动关机。
当然自动开机是在主板的BIOS里设置的,关机是第三方程序设定。
前不久发现早上不能开机了,但见主机是通电的。
后来才发现出现了如下提示:Pri Slave Hard Disk S.M.A.R.T. Status BAD,Backup and Replace,Press F1 To Resume.按F1后才可以正常进入系统。
每次开机重新启动都出现这个提示,系统当然就不能自动开机了。
以往出现Press F1 to continue时基本是因为没有搜索到鼠标、键盘或者没有在BIOS里把软驱设为none而软驱损坏了才会出现这种提示。
但出现Press F1 To Resume我却第一次遇见。
这块主板是华硕P4P800SE,自使用后一直正常启动。
首先怀疑是主板电池没有电了,但开机后时间日期都对。
我把电池放电后重新装上,还是没有解决问题。
把软驱设为none也不行。
在网上查找答案,有的说是分区表坏了,我用diskgen恢复分区表后系统反而无法启动,恢复备份也不行。
最后只得重新安装系统。
最后在网上看到类似问题是华硕或仿华硕主板的常见问题,我进入BIOS里看了,发现BOOT里的Boot settings configuration中确有一项wait for 'F1' if' error,原设定为enable,我改为disable后重新启动电脑,直接进入系统了。
开机按F1键,这是因为你的BIOS设置不当但也能正常引导系统,属非致命性故障,按F1是在问你是否继续。
你没有安装软盘驱动器,但是在CMOS中设置了,开启软驱的选项.方法是:一:开机按Del键,进入BIOS设置,选择第一个"基本设置",把floopy一项设置没"Disabel"无效就可以了.二:刚开始开机时按DEL进入BIOS,按回车键进入第一项,看看里面的“Drive A”项是不是“None”,不是的话按“Pgup”或“PgDn”进行修改,修改后按“ESC”退出,选“Save & Exit Setup”项按回车退出BIOS,重启,再不行的话就换了电池再按上面的步骤重新设置既可。
华硕主板Bios详细图解
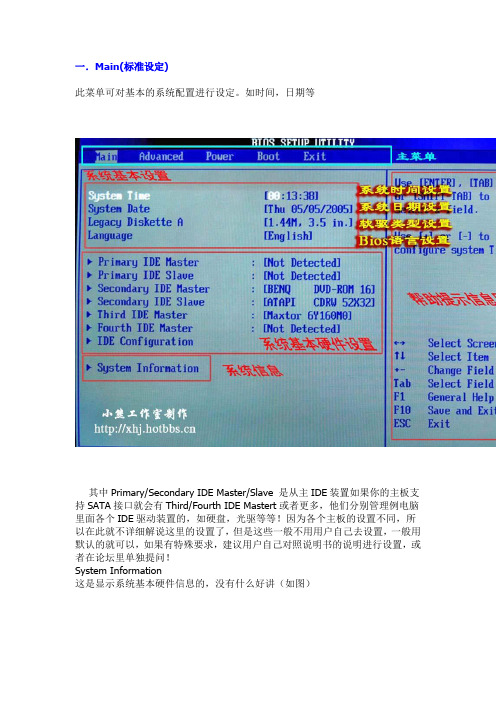
一.Main(标准设定)此菜单可对基本的系统配置进行设定。
如时间,日期等其中Primary/Secondary IDE Master/Slave 是从主IDE装置如果你的主板支持SATA接口就会有Third/Fourth IDE Mastert或者更多,他们分别管理例电脑里面各个IDE驱动装置的,如硬盘,光驱等等!因为各个主板的设置不同,所以在此就不详细解说这里的设置了,但是这些一般不用用户自己去设置,一般用默认的就可以,如果有特殊要求,建议用户自己对照说明书的说明进行设置,或者在论坛里单独提问!System Information这是显示系统基本硬件信息的,没有什么好讲(如图)二.Advanced(进阶设置)如图:这里就是Bios的核心设置了,新手一定要小心的设置,因为其直接关系系统的稳定和硬件的安全,千万不可以盲目乱设!1.大家先看到的是“JumperFree Configuration”(不同品牌的主板有可能不同,也可能没有)再这里可以设置CPU的一些参数,对于喜欢超频的朋友来说这里就是主攻地!(如图)其中又以“Manual”为关键,选择后会看到如下图:对于CPU超频爱好者这些东西应该了如指掌,CPU的外频设置(CPU External Frequency)是超频的关键之一,CPU的主频(即我们平时所说的P4 3.0G等等之内的频率)是由外频和倍频相乘所得的值,比如一颗3.0G的CPU在外频为200的时候他的倍频就是15,(200MHz*15=3000MHz)。
外频一般可以设定的范围为100MHz到400MHz,但是能真正上300的CPU都不多,所以不要盲目的设置高外频,一般设定的范围约为100-250左右,用户在设定中要有耐心的一点点加高,最好是以1MHz为步进,一点点加,以防一次性加到过高而导致系统无法正常使用甚至CPU损坏!内存频率设定(DRAM Frequency)使用此项设定所安装内存的时钟,设定选项为:200MHz, 266MHz,333MHz, 400MHz, Auto。
3第三次课第三章 微型计算机的主板

主板的分类
市场上流行的主板,根据不同的标准,有不 同的分类方式。主要可以按照外形、 CPU插 座及其支持的芯片组几种方式分类。 按外形分类,可分为AT主板、 ATX主板、 NLX主板和最新的BTX主板四类。 按外形分类主要基于主板的物理结构、大小 形状和电源要求的规范。
AT主板
AT主板因其首先应用在IBM PC/AT机上而得 名,并发展成为一种工业标准。 主板尺寸为13英寸×12英寸(1英吋=25.4毫 米)即33厘米× 30.5厘米,在主板上集成有 控制芯片和扩充插槽,目前已被淘汰。
Intel(英特尔)芯片组
Intel i810E 芯片组
Intel i815 芯片组
Intel(英特尔)芯片组
Intel i845 芯片组
Intel 芯片组
Intel(英特尔)芯片组
Intel i865G 芯片组
Intel i875P 芯片组
VIA(威盛)芯片组
VIA KX133 芯片组 VIA KT400 芯片组
几款常见主板欣赏
几款常见主板欣赏
几款常见主板欣赏
几款常见主板欣赏
几款常见主板欣赏
几款常见主板欣赏
按CPU插座和支持的芯片组分类
可以分为支持Inter CPU的主板和支持AMD CPU 的主板。 支持Inter CPU 的主板芯片组有Inter 、VIA 、 SiS。性能最强、最稳定的是Inter芯片组, VIA芯片组的性价比较高,综合性能在Inter之 下, SiS主要做集成芯片,零售市场很少看 到。 支持AMD的主板插座分为Slot A 、Socket A 等。
比较接近于CPU并且加装有散热设备的是北 桥芯片。相对来说比较小的离CPU比较远的 是南桥芯片。南桥芯片在PCI插槽旁边,北桥 芯片在CPU旁边。 北桥芯片提供对CPU类型、主频、内存的类 型、内存的最大容量、AGP插槽的支持。 南桥芯片提供对键盘控制器、ISA/PCI、USB、 时钟控制器、数据传送方式和高级电源管理 的支持。
ASUS 主板规格说明书
HP Desktop PCs - Motherboard SpecificationsMotherboard Supplier ASUSSystem BIOS Core Brand Asus/AMIBoard Form Factor uATXProcessor Brand AMDProcessor Socket Type Socket-A (PGA462)Processor Families AthlonXP (Thoroughbred,Barton),Maximum Processor Core Frequency <=2.16Ghz (2700+) Thoroughbred <=2.2GHz Barton (3200+)Processor Front Side Bus Frequency 266/333/400MHzHyper Threading Support naProcessor VRM SpecificationChipset Name Crush18D (nForce2 400) Chipset "North Bridge" & RevisionChipset "South Bridge" & Revision MCP2Super I/O ITE IT8712F-AFlash BIOS Device Type & Density 4Mb Flash EEPROM Memory Type DDR SDRAMMemory Speed PC2700/PC2100 Memory Sockets 2 DIMMSingle or Dual Channel System Memory Single channel Maximum Memory Up to 2.0GBAGP Graphics Support YesAGP Graphics Maximum Mode naIntegrated Graphics (UMA) Supplier Up onlyIntegrated Graphics Shared Memory naTV-Out Device noneTV-Out Configuration noneIntegrated AC'97 Audio Support none5.1 channel Audio Support AC'97 DownAC'97 Codec Device Realtek ALC650 Passive Speaker Output (amplified) M,LI,LO,SOAudio SP-DIF Output noneAudio SP-DIF Input noneRear Audio Jacks (Mic,Line-In,Line-Out) Mic, Line-In, Line-Out Internal CD-Audio In Connector 2Front Audio Line-In/Headphone/Mic LI/HP/MICEthernet MAC/PHY Device Realtek 8201BL Integrated IEEE-1394 Support YesIntegrated IEEE-1394 MAC/PHY Device Agere FW802C-PHYOnboard 1394 Maximum Transfer Rate (Mbps)400MbpsIEEE-1394 Ports (Total) 2IEEE-1394 Front Ports (on pin header) 1IDE/ATAPI UDMA Modes ATA-100/66/33Expansion Slots (AGP/PCI) 1 AGP, 3 PCIUSB Interface Specification (2.0/1.1) USB 2.0USB Ports (Total) 6USB Front Ports (on pin headers) 2USB Rear Ports (at rear I/O area) 4Serial, Parallel, Floppy, PS2 Kbd &Mouse Ports1S, 1P, 1F, PS2 K+MFan Headers (CPU, System, Chipset) CPU, System1CPU Fan Speed Control (for active fansink) YesSystem Fan Speed Control YesSuffix (Legend Below) -UL6EUGraphics card (up, not on motherboard) LLAN on motherboard (ethernet)E1394 on motherboardCopyright Hewlett-Packard Co. 1994-2003This information is subject to change without notice andis provided "as is" with no warranty.Hewlett-Packard shall not be liable for any direct,indirect, special, incidental or consequential damagesin connection with the use of this material.。
SATA硬盘BIOS设置部分
P-ATA+S-ATA:并行和串行硬盘并存模式,此时SATA和PATA通道都相互独立互不干扰,理论上4个P-ATA和2个S-ATA可同时接6个设备,实际上得根据不同主板而定,有的南桥芯片就只支持4个ATA设备。此时SATA1口硬盘对应Third
IDE Master(第三IDE通道主盘),SATA2口硬盘对应Fourth IDE Master(第四IDE通道主盘)。
Mode和Enhanced Mode)。其中兼容模式Compatible
Mode,可以理解为把SATA硬盘端口映射到并口IDE通道的相应端口,当你选择这种模式时在下面的IDE Port
Settings中会有三个选项:
Primary P-ATA+S-ATA:并行IDE硬盘占据IDE0+1的主通道(Primary IDE
另外,在使用SATA硬盘时,如果你的机器中没有安装软驱,我们还要将软驱这一项给关闭。方法是首先选择Aduanced BIOS Features项进入基本的BIOS设置选项,选择BOOT UP Floppy Seek回车,选择[Disabled]即可。
?SATA硬盘的分区与系统安装:
二、SATA硬盘的分区
使用GHOST做系统的备份我想这里的许多朋友都会做,但也有很多朋友,特别是用SATA硬盘的朋友,在使用GHOST给系统做备份时,可能都碰到过这样的情况,用软盘或光盘启动进入系统后,当使用GHOST.EXE命令后系统黑屏,死机了。是GHOST不支持SATA设备吗?难道使用SATA硬盘后,我们就不能为系统做一个备份吗?答案是否,SATA硬盘同样可以用来克隆,但在操作上需要一点小技巧了。
P-ATA Ports Only:屏蔽了串行SATA硬盘接口,只能使用并行接口设备。
华硕P4P800S-X电脑主板使用说明书
Infineon
DS HYB25D256807BT-5B
77.10636.56G
Mosel
SS V58C2256804SAT5
77.10736.56G
Mosel
DS V58C2256804SAT5B
TS32MLD64V4F3
SAMSUNG
SS K4H560838D-TCCC
1-10
512MB 1GB 256MB 512MB 256MB 256MB 256MB 256MB 256MB 256MB 256MB 512MB 512MB 256MB 512MB 256MB 512MB 256MB 512MB 256MB 512MB 1GB 256MB 512MB 256MB 512MB 256MB 512MB 256MB 512MB 256MB 512MB 256MB 512MB 256MB 512MB 256MB 512MB 256MB 512MB
Transcend Transcend Transcend Transcend A DATA A DATA A DATA A DATA A DATA A DATA Winbond Winbond PSC PSC PSC KINGMAX KINGMAX ATP ATP ATP ATP ATP NANYA NANYA BRAIN POWER BRAIN POWER CENTURY CENTURY CENTURY CENTURY CENTURY CENTURY elixir elixir Kreton Kreton Veritech Veritech Pmi Pmi
P4P800S-X
Motherboard
C1627 © 2004
2
3
4
• • • • • •
教程华硕主板Bios详细图解
一.Main(标准设定)此菜单可对基本的系统配置进行设定。
如时间,日期等其中Primary/Secondary IDE Master/Slave 是从主IDE装置如果你的主板支持SATA接口就会有Third/Fourth IDE Mastert或者更多,他们分别管理例电脑里面各个IDE驱动装置的,如硬盘,光驱等等!因为各个主板的设置不同,所以在此就不详细解说这里的设置了,但是这些一般不用用户自己去设置,一般用默认的就可以,如果有特殊要求,建议用户自己对照说明书的说明进行设置,或者在论坛里单独提问!System Information这是显示系统基本硬件信息的,没有什么好讲(如图)基本设置了解后就进入高级设置了!二.Advanced(进阶设置)如图:这里就是Bios的核心设置了,新手一定要小心的设置,因为其直接关系系统的稳定和硬件的安全,千万不可以盲目乱设!1.大家先看到的是“JumperFree Configuration”(不同品牌的主板有可能不同,也可能没有)再这里可以设置CPU的一些参数,对于喜欢超频的朋友来说这里就是主攻地!(如图)大家可以看到有一个“AI Overclock Tumer”的选项,其中有一些选项,如上图,其中又以“Manual”为关键,选择后会看到如下图:对于CPU超频爱好者这些东西应该了如指掌,CPU的外频设置(CPU External Frequency)是超频的关键之一,CPU的主频(即我们平时所说的P4 3.0G等等之内的频率)是由外频和倍频相乘所得的值,比如一颗3.0G的CPU在外频为200的时候他的倍频就是15,(200MHz*15=3000MHz)。
外频一般可以设定的范围为100MHz到400MHz,但是能真正上300的CPU都不多,所以不要盲目的设置高外频,一般设定的范围约为100-250左右,用户在设定中要有耐心的一点点加高,最好是以1MHz为步进,一点点加,以防一次性加到过高而导致系统无法正常使用甚至CPU损坏!内存频率设定(DRAM Frequency)使用此项设定所安装内存的时钟,设定选项为:200MHz, 266MHz,333MHz, 400MHz, Auto。
- 1、下载文档前请自行甄别文档内容的完整性,平台不提供额外的编辑、内容补充、找答案等附加服务。
- 2、"仅部分预览"的文档,不可在线预览部分如存在完整性等问题,可反馈申请退款(可完整预览的文档不适用该条件!)。
- 3、如文档侵犯您的权益,请联系客服反馈,我们会尽快为您处理(人工客服工作时间:9:00-18:30)。
华硕服务器主板P5MT 主板芯片
集成芯片显卡/网卡
主芯片组Intel E7230
芯片厂商Intel
芯片组描述采用Intel E7230/ICH7R/6702 PXH芯片组音频芯片无
图形芯片ATI RageXL/8M
网络芯片板载千兆网卡
华硕服务器主板P5MT CPU规格
适用平台Intel平台
CPU_种类奔腾 4
CPU_描述支持P4处理器
CPU_插槽Socket 775
支持CPU数1
总线频率
FSB 1066MHz
(MHz)
华硕服务器主板P5MT 内存规格
内存类型DDRII
内存描述支持双通道DDR2 533/667内存
华硕服务器主板P5MT 扩展插槽
显卡插槽PCI-E 16X
PCI 插槽1条32位PCI 插槽,2条PCI-E 64位
IDE 插槽一个IDE插槽
FDD 插槽一个FDD,接软驱
SATA接口4个SATAII接口,支持RAID 0,RAID 1 ,Raid0+1华硕服务器主板P5MT I/O接口
PS/2接口PS/2鼠标,PS/2键盘接口
华硕服务器主板P5MT 板型
主板板型ATX
外形尺寸12" x 9.8"
华硕服务器主板P5MT 其他参数
超线程技术支持
电源插口一个八针,一个24针电源接口
华硕服务器主板P5MT 附件
随机附件说明书、驱动光盘、FDD/IDE数据线、挡板。